CHRYSLER VOYAGER 2004 Service Manual
Manufacturer: CHRYSLER, Model Year: 2004, Model line: VOYAGER, Model: CHRYSLER VOYAGER 2004Pages: 2585, PDF Size: 62.54 MB
Page 2041 of 2585
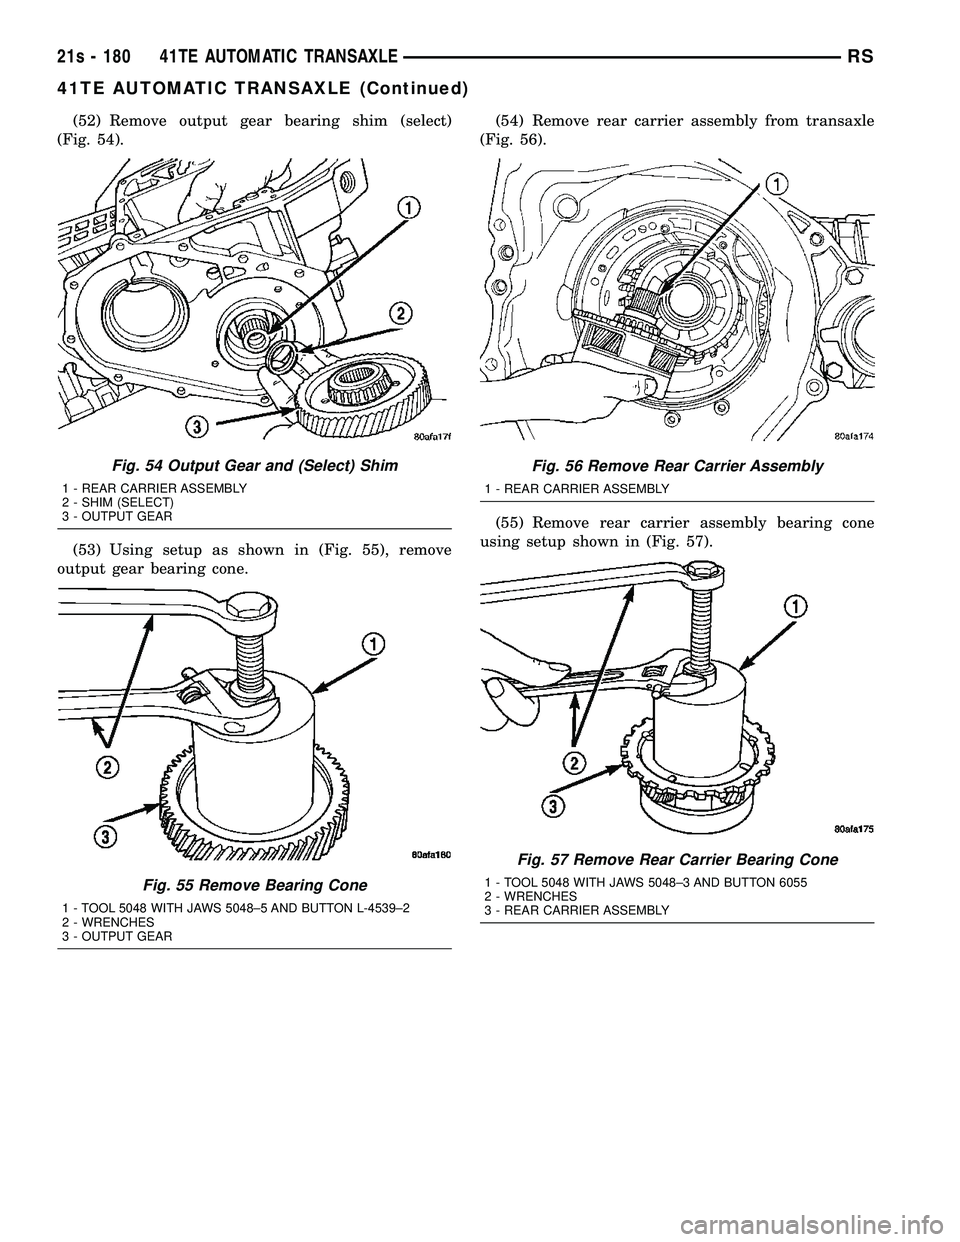
(52) Remove output gear bearing shim (select)
(Fig. 54).
(53) Using setup as shown in (Fig. 55), remove
output gear bearing cone. (54) Remove rear carrier assembly from transaxle
(Fig. 56).
(55) Remove rear carrier assembly bearing cone
using setup shown in (Fig. 57).
Fig. 54 Output Gear and (Select) Shim
1 - REAR CARRIER ASSEMBLY
2 - SHIM (SELECT)
3 - OUTPUT GEAR
Fig. 55 Remove Bearing Cone
1 - TOOL 5048 WITH JAWS 5048±5 AND BUTTON L-4539±2
2 - WRENCHES
3 - OUTPUT GEAR
Fig. 56 Remove Rear Carrier Assembly
1 - REAR CARRIER ASSEMBLY
Fig. 57 Remove Rear Carrier Bearing Cone
1 - TOOL 5048 WITH JAWS 5048±3 AND BUTTON 6055
2 - WRENCHES
3 - REAR CARRIER ASSEMBLY
21s - 180 41TE AUTOMATIC TRANSAXLERS
41TE AUTOMATIC TRANSAXLE (Continued)
Page 2042 of 2585
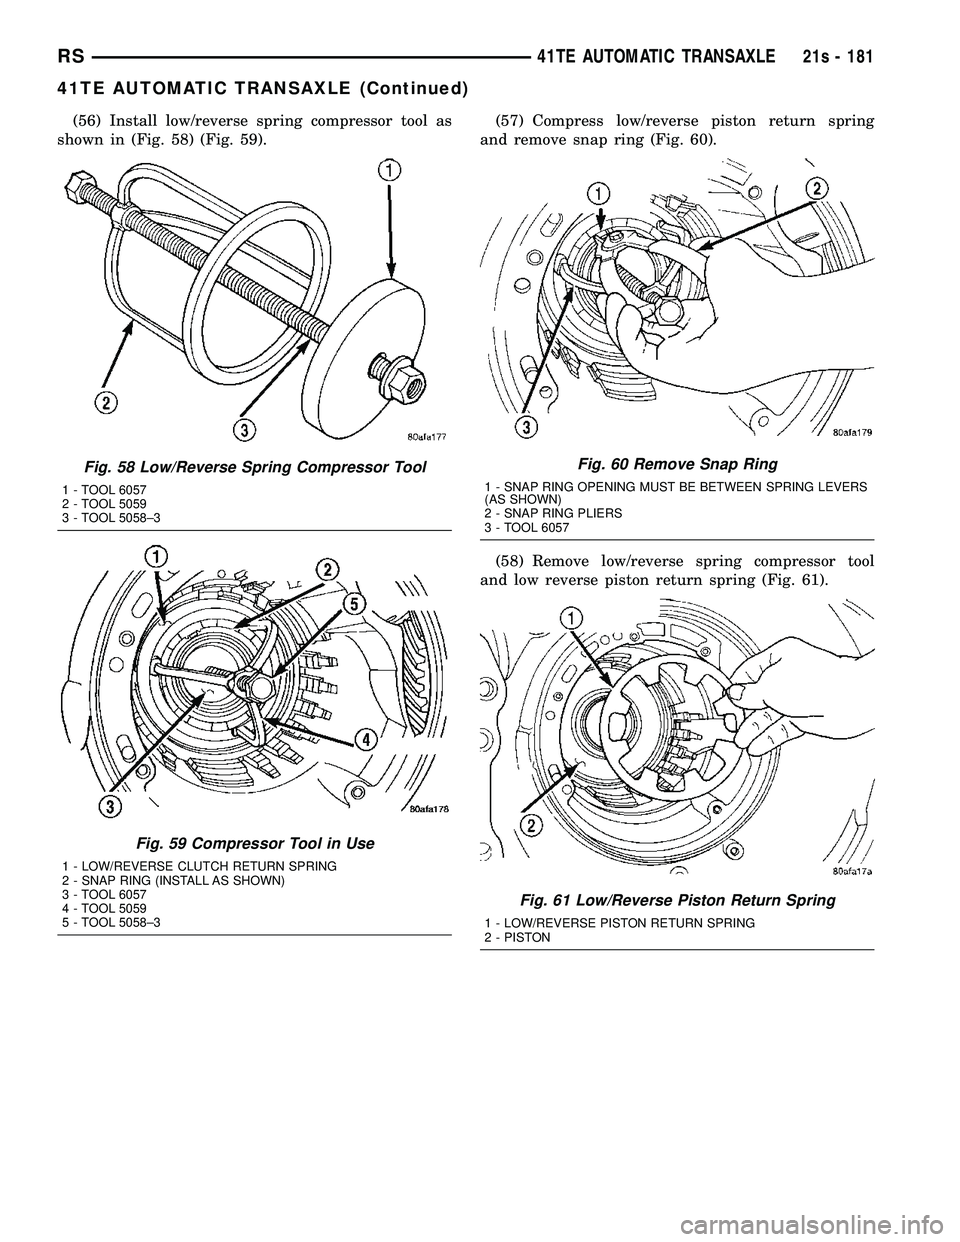
(56) Install low/reverse spring compressor tool as
shown in (Fig. 58) (Fig. 59). (57) Compress low/reverse piston return spring
and remove snap ring (Fig. 60).
(58) Remove low/reverse spring compressor tool
and low reverse piston return spring (Fig. 61).
Fig. 58 Low/Reverse Spring Compressor Tool
1 - TOOL 6057
2 - TOOL 5059
3 - TOOL 5058±3
Fig. 59 Compressor Tool in Use
1 - LOW/REVERSE CLUTCH RETURN SPRING
2 - SNAP RING (INSTALL AS SHOWN)
3 - TOOL 6057
4 - TOOL 5059
5 - TOOL 5058±3
Fig. 60 Remove Snap Ring
1 - SNAP RING OPENING MUST BE BETWEEN SPRING LEVERS
(AS SHOWN)
2 - SNAP RING PLIERS
3 - TOOL 6057
Fig. 61 Low/Reverse Piston Return Spring
1 - LOW/REVERSE PISTON RETURN SPRING
2 - PISTON
RS 41TE AUTOMATIC TRANSAXLE21s - 181
41TE AUTOMATIC TRANSAXLE (Continued)
Page 2043 of 2585
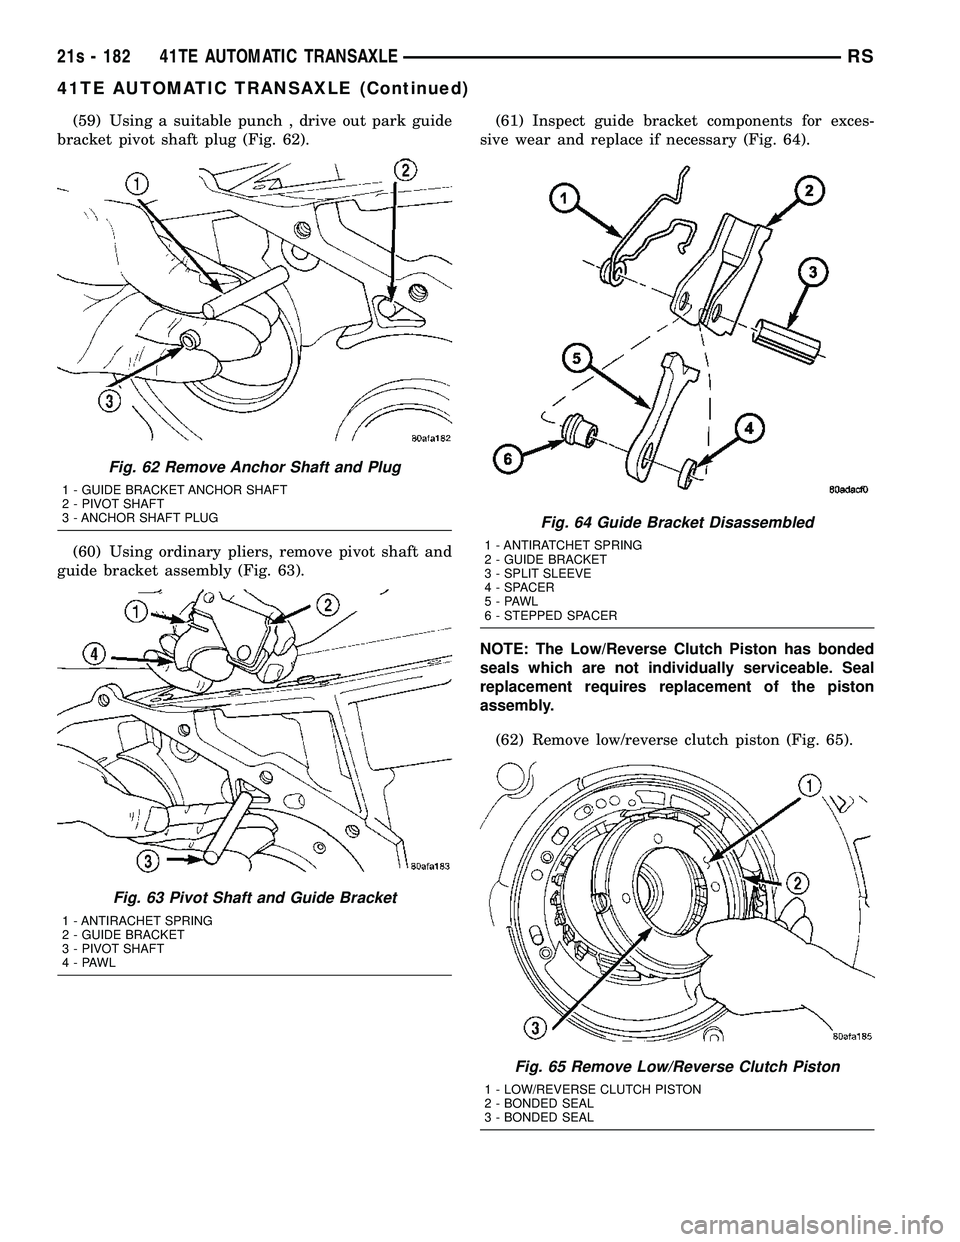
(59) Using a suitable punch , drive out park guide
bracket pivot shaft plug (Fig. 62).
(60) Using ordinary pliers, remove pivot shaft and
guide bracket assembly (Fig. 63). (61) Inspect guide bracket components for exces-
sive wear and replace if necessary (Fig. 64).
NOTE: The Low/Reverse Clutch Piston has bonded
seals which are not individually serviceable. Seal
replacement requires replacement of the piston
assembly.
(62) Remove low/reverse clutch piston (Fig. 65).
Fig. 62 Remove Anchor Shaft and Plug
1 - GUIDE BRACKET ANCHOR SHAFT
2 - PIVOT SHAFT
3 - ANCHOR SHAFT PLUG
Fig. 63 Pivot Shaft and Guide Bracket
1 - ANTIRACHET SPRING
2 - GUIDE BRACKET
3 - PIVOT SHAFT
4-PAWL
Fig. 64 Guide Bracket Disassembled
1 - ANTIRATCHET SPRING
2 - GUIDE BRACKET
3 - SPLIT SLEEVE
4 - SPACER
5-PAWL
6 - STEPPED SPACER
Fig. 65 Remove Low/Reverse Clutch Piston
1 - LOW/REVERSE CLUTCH PISTON
2 - BONDED SEAL
3 - BONDED SEAL
21s - 182 41TE AUTOMATIC TRANSAXLERS
41TE AUTOMATIC TRANSAXLE (Continued)
Page 2044 of 2585
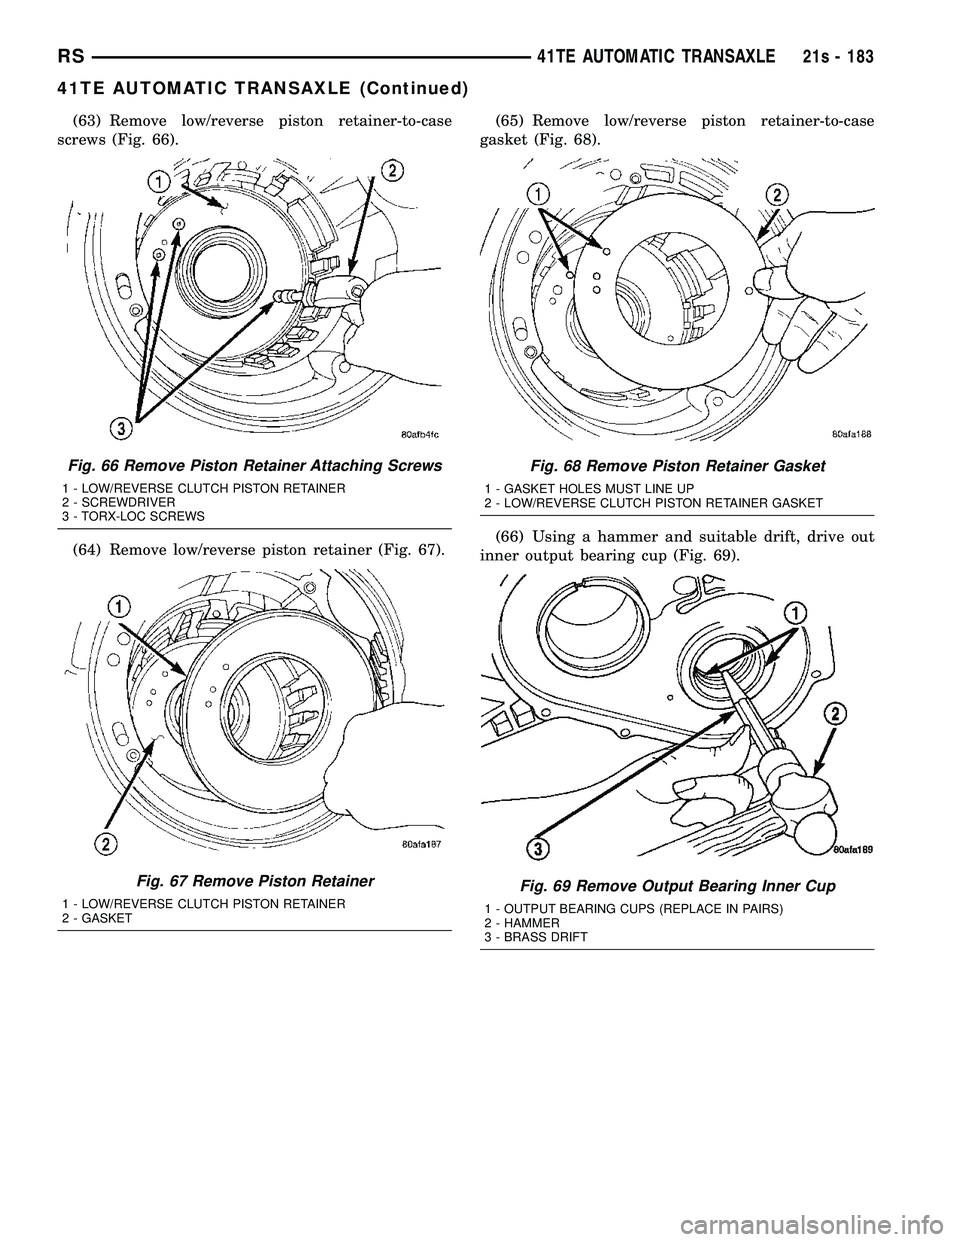
(63) Remove low/reverse piston retainer-to-case
screws (Fig. 66).
(64) Remove low/reverse piston retainer (Fig. 67). (65) Remove low/reverse piston retainer-to-case
gasket (Fig. 68).
(66) Using a hammer and suitable drift, drive out
inner output bearing cup (Fig. 69).
Fig. 66 Remove Piston Retainer Attaching Screws
1 - LOW/REVERSE CLUTCH PISTON RETAINER
2 - SCREWDRIVER
3 - TORX-LOC SCREWS
Fig. 67 Remove Piston Retainer
1 - LOW/REVERSE CLUTCH PISTON RETAINER
2 - GASKET
Fig. 68 Remove Piston Retainer Gasket
1 - GASKET HOLES MUST LINE UP
2 - LOW/REVERSE CLUTCH PISTON RETAINER GASKET
Fig. 69 Remove Output Bearing Inner Cup
1 - OUTPUT BEARING CUPS (REPLACE IN PAIRS)
2 - HAMMER
3 - BRASS DRIFT
RS 41TE AUTOMATIC TRANSAXLE21s - 183
41TE AUTOMATIC TRANSAXLE (Continued)
Page 2045 of 2585
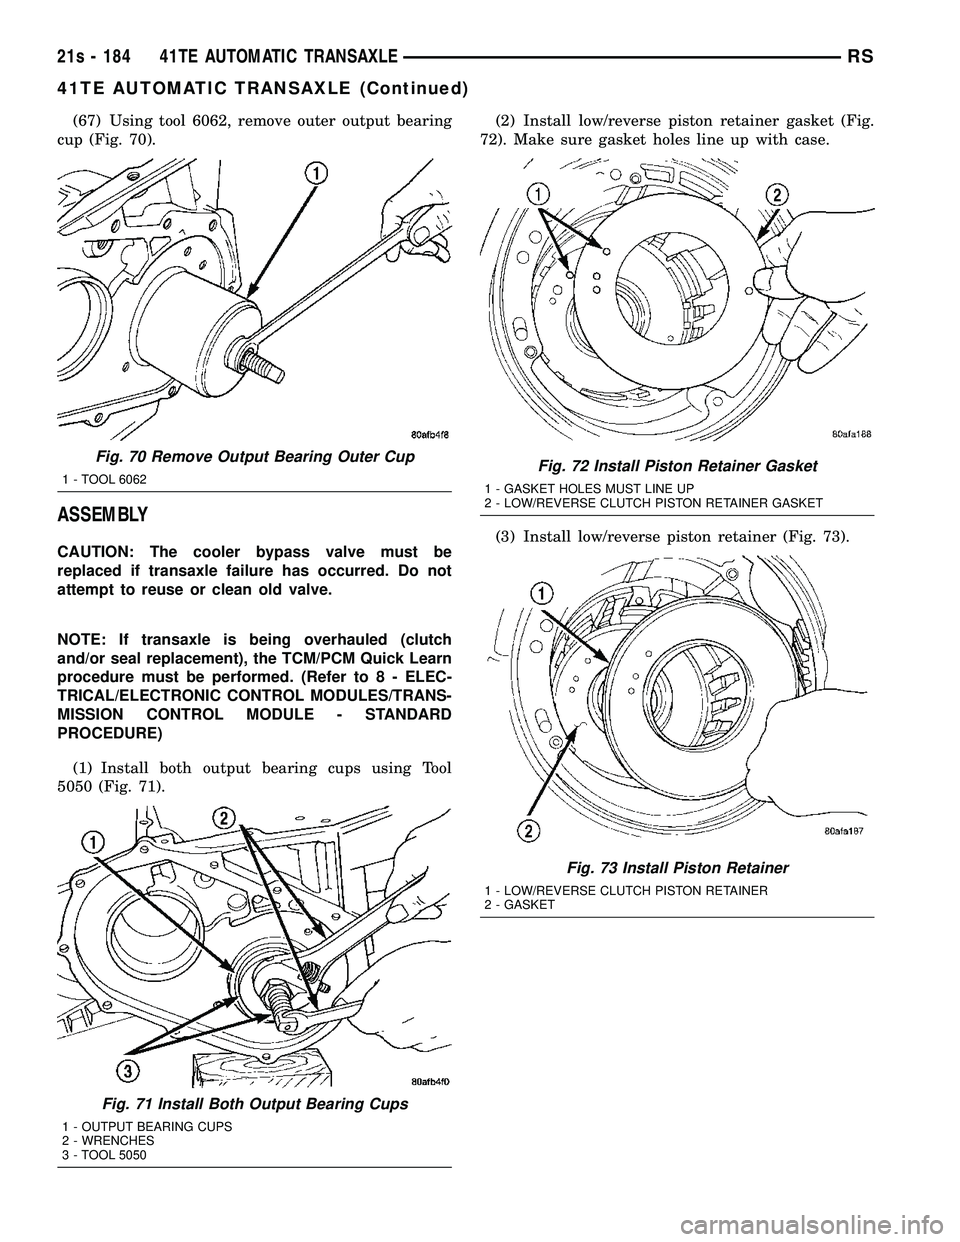
(67) Using tool 6062, remove outer output bearing
cup (Fig. 70).
ASSEMBLY
CAUTION: The cooler bypass valve must be
replaced if transaxle failure has occurred. Do not
attempt to reuse or clean old valve.
NOTE: If transaxle is being overhauled (clutch
and/or seal replacement), the TCM/PCM Quick Learn
procedure must be performed. (Refer t o 8 - ELEC-
TRICAL/ELECTRONIC CONTROL MODULES/TRANS-
MISSION CONTROL MODULE - STANDARD
PROCEDURE)
(1) Install both output bearing cups using Tool
5050 (Fig. 71). (2) Install low/reverse piston retainer gasket (Fig.
72). Make sure gasket holes line up with case.
(3) Install low/reverse piston retainer (Fig. 73).
Fig. 70 Remove Output Bearing Outer Cup
1 - TOOL 6062
Fig. 71 Install Both Output Bearing Cups
1 - OUTPUT BEARING CUPS
2 - WRENCHES
3 - TOOL 5050
Fig. 72 Install Piston Retainer Gasket
1 - GASKET HOLES MUST LINE UP
2 - LOW/REVERSE CLUTCH PISTON RETAINER GASKET
Fig. 73 Install Piston Retainer
1 - LOW/REVERSE CLUTCH PISTON RETAINER
2 - GASKET
21s - 184 41TE AUTOMATIC TRANSAXLERS
41TE AUTOMATIC TRANSAXLE (Continued)
Page 2046 of 2585
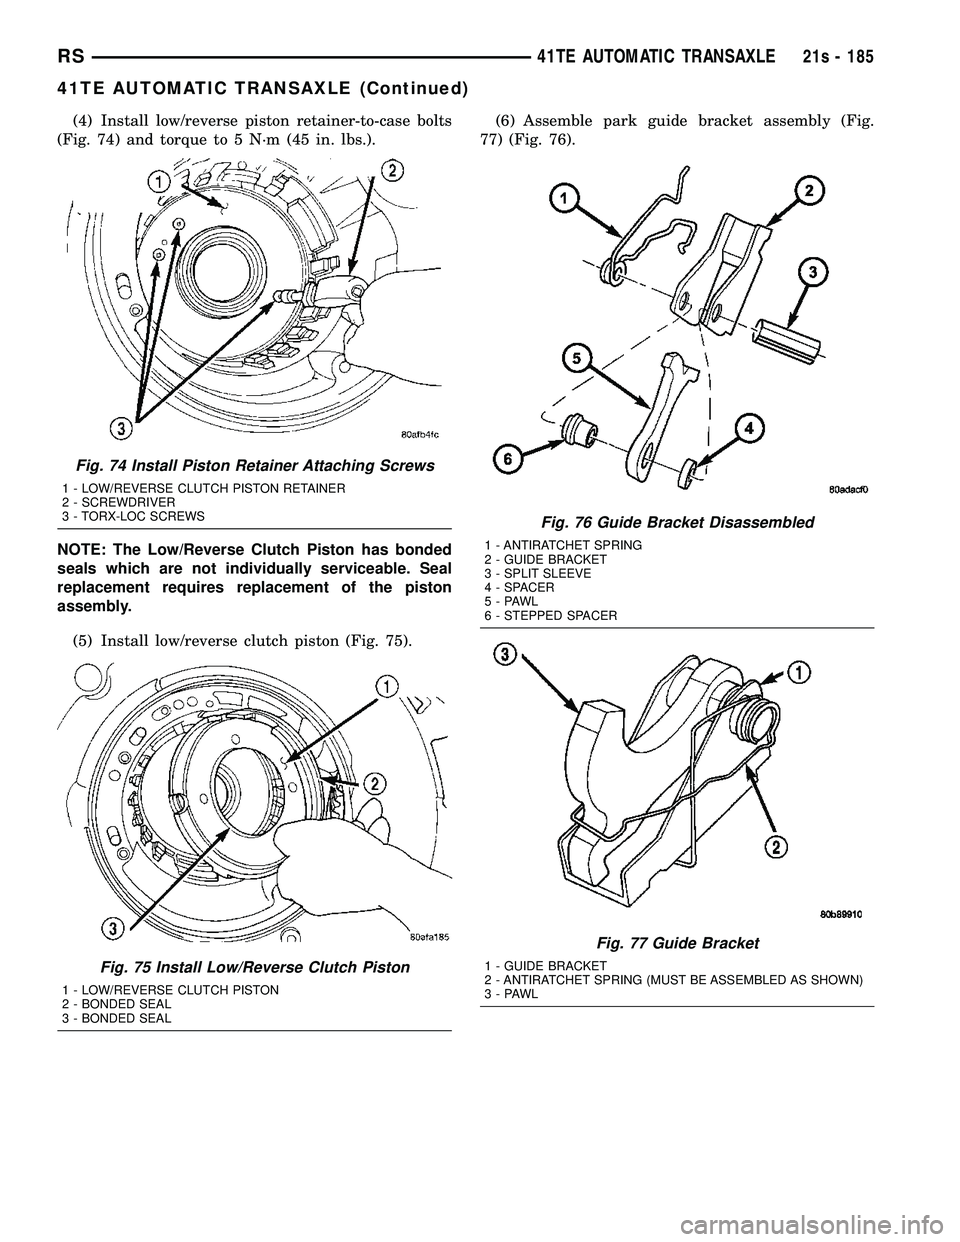
(4) Install low/reverse piston retainer-to-case bolts
(Fig. 74) and torque to 5 N´m (45 in. lbs.).
NOTE: The Low/Reverse Clutch Piston has bonded
seals which are not individually serviceable. Seal
replacement requires replacement of the piston
assembly.
(5) Install low/reverse clutch piston (Fig. 75). (6) Assemble park guide bracket assembly (Fig.
77) (Fig. 76).
Fig. 74 Install Piston Retainer Attaching Screws
1 - LOW/REVERSE CLUTCH PISTON RETAINER
2 - SCREWDRIVER
3 - TORX-LOC SCREWS
Fig. 75 Install Low/Reverse Clutch Piston
1 - LOW/REVERSE CLUTCH PISTON
2 - BONDED SEAL
3 - BONDED SEAL
Fig. 76 Guide Bracket Disassembled
1 - ANTIRATCHET SPRING
2 - GUIDE BRACKET
3 - SPLIT SLEEVE
4 - SPACER
5-PAWL
6 - STEPPED SPACER
Fig. 77 Guide Bracket
1 - GUIDE BRACKET
2 - ANTIRATCHET SPRING (MUST BE ASSEMBLED AS SHOWN)
3-PAWL
RS 41TE AUTOMATIC TRANSAXLE21s - 185
41TE AUTOMATIC TRANSAXLE (Continued)
Page 2047 of 2585
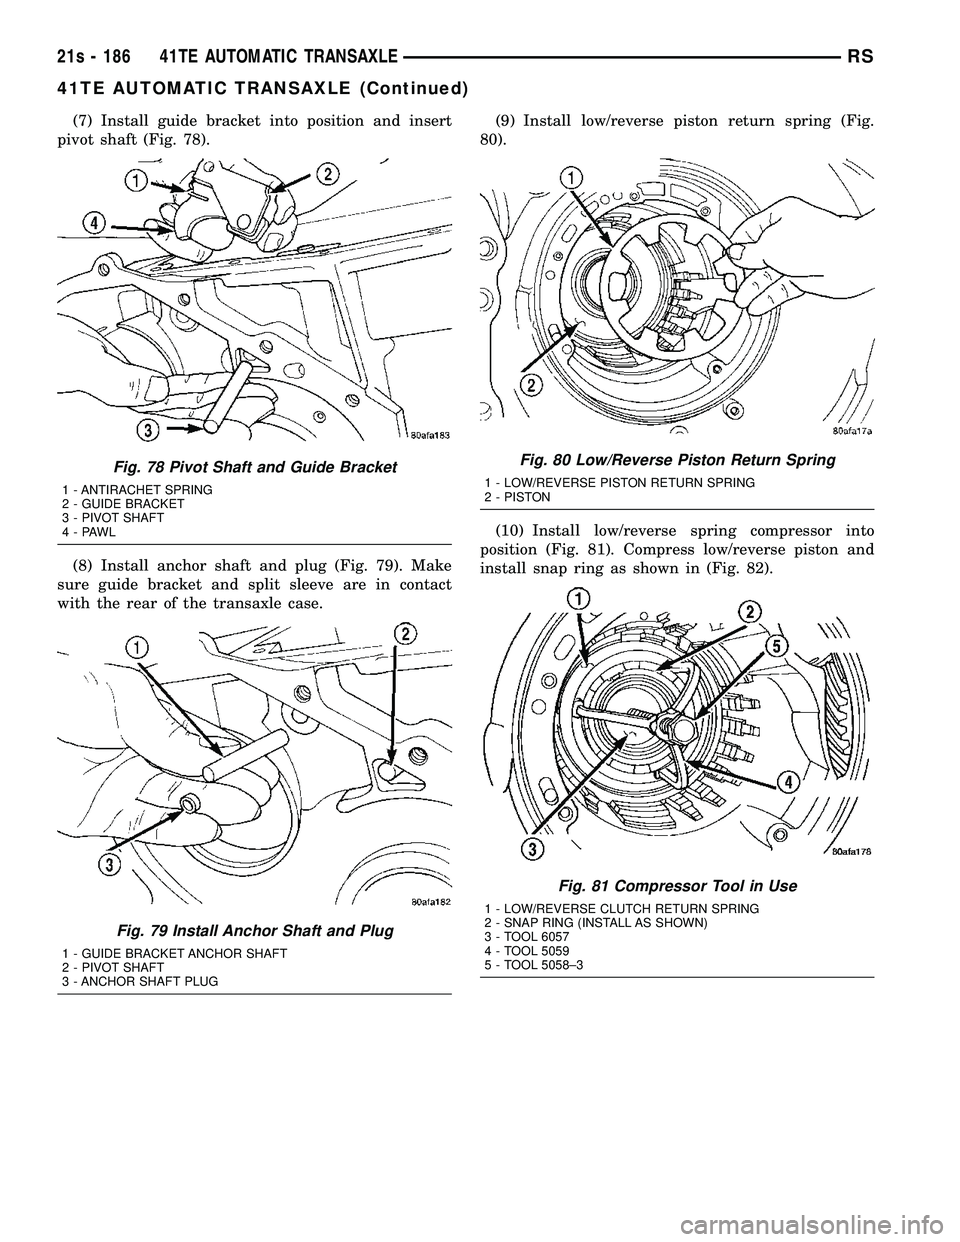
(7) Install guide bracket into position and insert
pivot shaft (Fig. 78).
(8) Install anchor shaft and plug (Fig. 79). Make
sure guide bracket and split sleeve are in contact
with the rear of the transaxle case. (9) Install low/reverse piston return spring (Fig.
80).
(10) Install low/reverse spring compressor into
position (Fig. 81). Compress low/reverse piston and
install snap ring as shown in (Fig. 82).
Fig. 78 Pivot Shaft and Guide Bracket
1 - ANTIRACHET SPRING
2 - GUIDE BRACKET
3 - PIVOT SHAFT
4-PAWL
Fig. 79 Install Anchor Shaft and Plug
1 - GUIDE BRACKET ANCHOR SHAFT
2 - PIVOT SHAFT
3 - ANCHOR SHAFT PLUG
Fig. 80 Low/Reverse Piston Return Spring
1 - LOW/REVERSE PISTON RETURN SPRING
2 - PISTON
Fig. 81 Compressor Tool in Use
1 - LOW/REVERSE CLUTCH RETURN SPRING
2 - SNAP RING (INSTALL AS SHOWN)
3 - TOOL 6057
4 - TOOL 5059
5 - TOOL 5058±3
21s - 186 41TE AUTOMATIC TRANSAXLERS
41TE AUTOMATIC TRANSAXLE (Continued)
Page 2048 of 2585
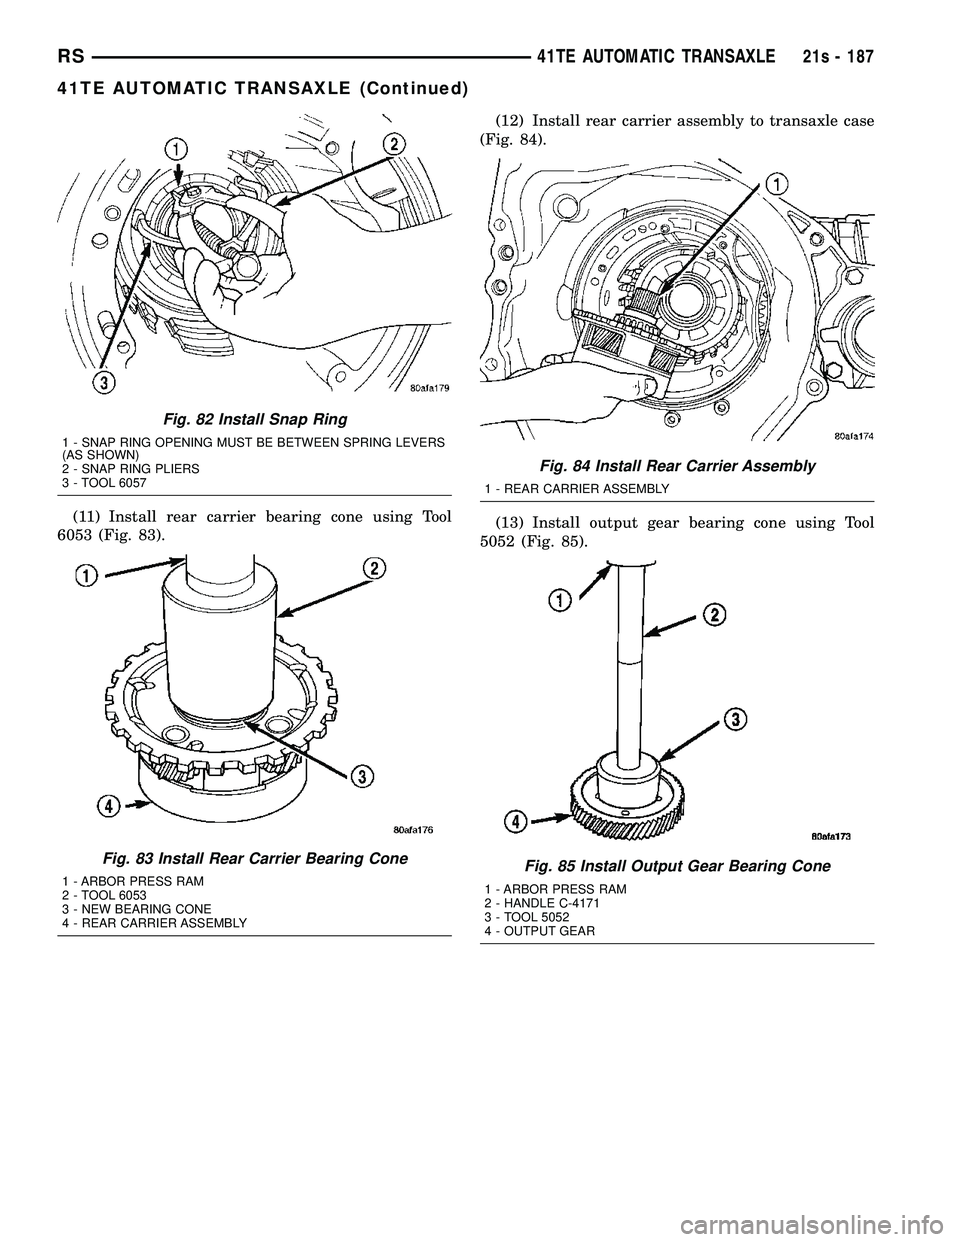
(11) Install rear carrier bearing cone using Tool
6053 (Fig. 83). (12) Install rear carrier assembly to transaxle case
(Fig. 84).
(13) Install output gear bearing cone using Tool
5052 (Fig. 85).
Fig. 82 Install Snap Ring
1 - SNAP RING OPENING MUST BE BETWEEN SPRING LEVERS
(AS SHOWN)
2 - SNAP RING PLIERS
3 - TOOL 6057
Fig. 83 Install Rear Carrier Bearing Cone
1 - ARBOR PRESS RAM
2 - TOOL 6053
3 - NEW BEARING CONE
4 - REAR CARRIER ASSEMBLY
Fig. 84 Install Rear Carrier Assembly
1 - REAR CARRIER ASSEMBLY
Fig. 85 Install Output Gear Bearing Cone
1 - ARBOR PRESS RAM
2 - HANDLE C-4171
3 - TOOL 5052
4 - OUTPUT GEAR
RS 41TE AUTOMATIC TRANSAXLE21s - 187
41TE AUTOMATIC TRANSAXLE (Continued)
Page 2049 of 2585
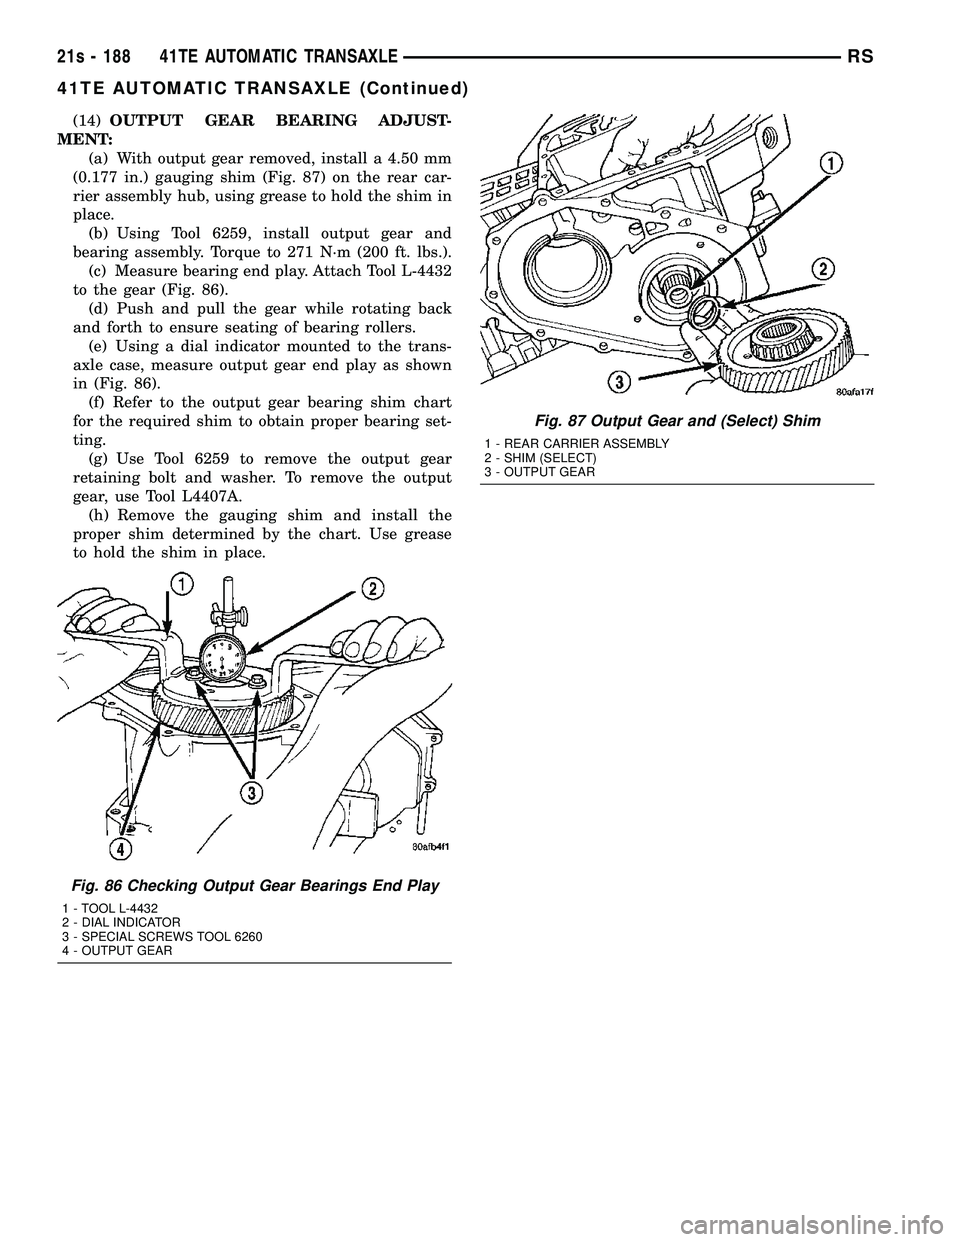
(14)OUTPUT GEAR BEARING ADJUST-
MENT: (a) With output gear removed, install a 4.50 mm
(0.177 in.) gauging shim (Fig. 87) on the rear car-
rier assembly hub, using grease to hold the shim in
place. (b) Using Tool 6259, install output gear and
bearing assembly. Torque to 271 N´m (200 ft. lbs.). (c) Measure bearing end play. Attach Tool L-4432
to the gear (Fig. 86). (d) Push and pull the gear while rotating back
and forth to ensure seating of bearing rollers. (e) Using a dial indicator mounted to the trans-
axle case, measure output gear end play as shown
in (Fig. 86). (f) Refer to the output gear bearing shim chart
for the required shim to obtain proper bearing set-
ting. (g) Use Tool 6259 to remove the output gear
retaining bolt and washer. To remove the output
gear, use Tool L4407A. (h) Remove the gauging shim and install the
proper shim determined by the chart. Use grease
to hold the shim in place.
Fig. 86 Checking Output Gear Bearings End Play
1 - TOOL L-4432
2 - DIAL INDICATOR
3 - SPECIAL SCREWS TOOL 6260
4 - OUTPUT GEAR
Fig. 87 Output Gear and (Select) Shim
1 - REAR CARRIER ASSEMBLY
2 - SHIM (SELECT)
3 - OUTPUT GEAR
21s - 188 41TE AUTOMATIC TRANSAXLERS
41TE AUTOMATIC TRANSAXLE (Continued)
Page 2050 of 2585
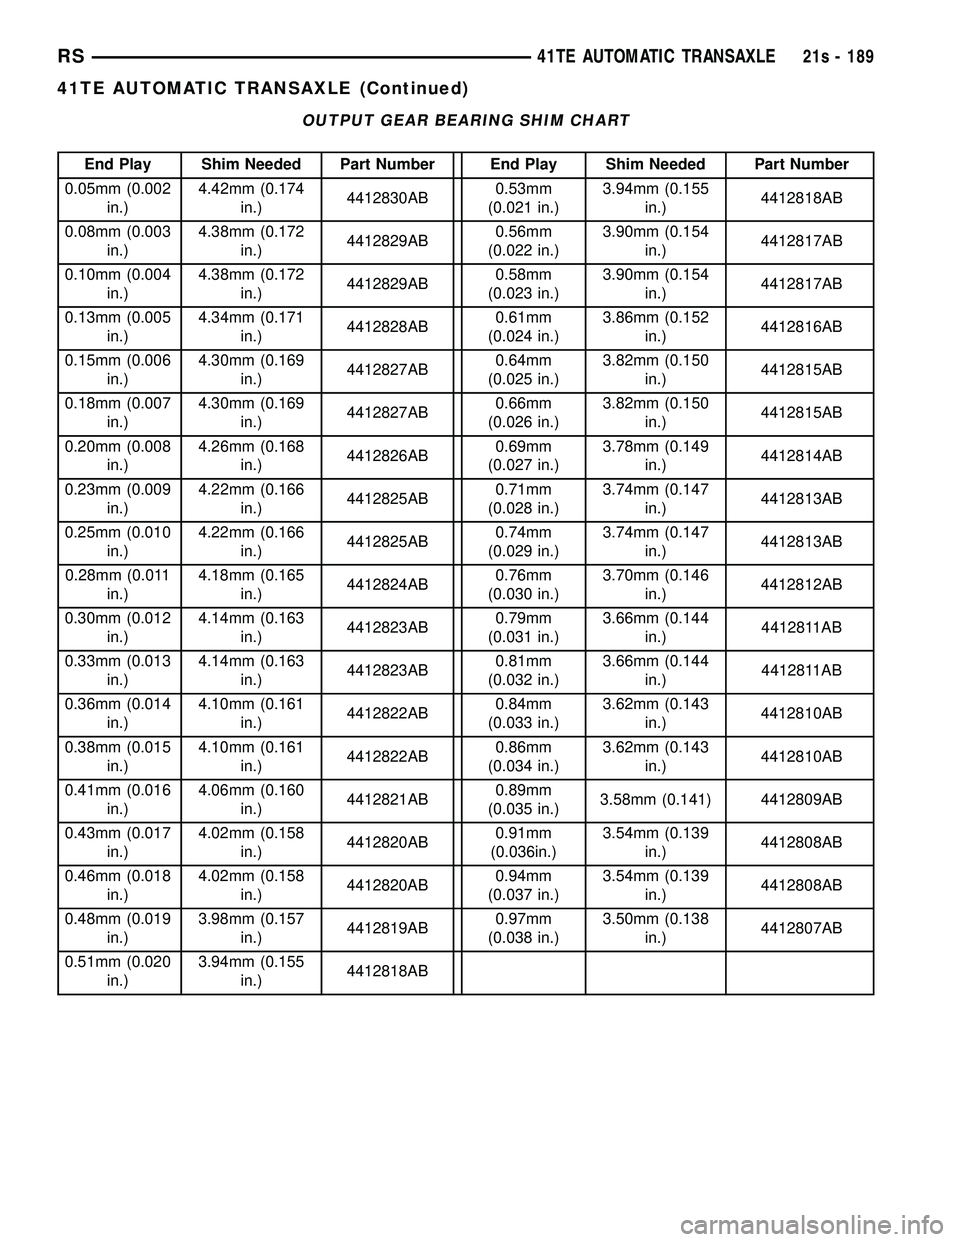
OUTPUT GEAR BEARING SHIM CHART
End Play Shim Needed Part Number End Play Shim Needed Part Number
0.05mm (0.002 in.) 4.42mm (0.174
in.) 4412830AB 0.53mm
(0.021 in.) 3.94mm (0.155
in.) 4412818AB
0.08mm (0.003 in.) 4.38mm (0.172
in.) 4412829AB 0.56mm
(0.022 in.) 3.90mm (0.154
in.) 4412817AB
0.10mm (0.004 in.) 4.38mm (0.172
in.) 4412829AB 0.58mm
(0.023 in.) 3.90mm (0.154
in.) 4412817AB
0.13mm (0.005 in.) 4.34mm (0.171
in.) 4412828AB 0.61mm
(0.024 in.) 3.86mm (0.152
in.) 4412816AB
0.15mm (0.006 in.) 4.30mm (0.169
in.) 4412827AB 0.64mm
(0.025 in.) 3.82mm (0.150
in.) 4412815AB
0.18mm (0.007 in.) 4.30mm (0.169
in.) 4412827AB 0.66mm
(0.026 in.) 3.82mm (0.150
in.) 4412815AB
0.20mm (0.008 in.) 4.26mm (0.168
in.) 4412826AB 0.69mm
(0.027 in.) 3.78mm (0.149
in.) 4412814AB
0.23mm (0.009 in.) 4.22mm (0.166
in.) 4412825AB 0.71mm
(0.028 in.) 3.74mm (0.147
in.) 4412813AB
0.25mm (0.010 in.) 4.22mm (0.166
in.) 4412825AB 0.74mm
(0.029 in.) 3.74mm (0.147
in.) 4412813AB
0.28mm (0.011 in.) 4.18mm (0.165
in.) 4412824AB 0.76mm
(0.030 in.) 3.70mm (0.146
in.) 4412812AB
0.30mm (0.012 in.) 4.14mm (0.163
in.) 4412823AB 0.79mm
(0.031 in.) 3.66mm (0.144
in.) 4412811AB
0.33mm (0.013 in.) 4.14mm (0.163
in.) 4412823AB 0.81mm
(0.032 in.) 3.66mm (0.144
in.) 4412811AB
0.36mm (0.014 in.) 4.10mm (0.161
in.) 4412822AB 0.84mm
(0.033 in.) 3.62mm (0.143
in.) 4412810AB
0.38mm (0.015 in.) 4.10mm (0.161
in.) 4412822AB 0.86mm
(0.034 in.) 3.62mm (0.143
in.) 4412810AB
0.41mm (0.016 in.) 4.06mm (0.160
in.) 4412821AB 0.89mm
(0.035 in.) 3.58mm (0.141) 4412809AB
0.43mm (0.017 in.) 4.02mm (0.158
in.) 4412820AB 0.91mm
(0.036in.) 3.54mm (0.139
in.) 4412808AB
0.46mm (0.018 in.) 4.02mm (0.158
in.) 4412820AB 0.94mm
(0.037 in.) 3.54mm (0.139
in.) 4412808AB
0.48mm (0.019 in.) 3.98mm (0.157
in.) 4412819AB 0.97mm
(0.038 in.) 3.50mm (0.138
in.) 4412807AB
0.51mm (0.020 in.) 3.94mm (0.155
in.) 4412818AB
RS
41TE AUTOMATIC TRANSAXLE21s - 189
41TE AUTOMATIC TRANSAXLE (Continued)