seat belt retract CHRYSLER VOYAGER 2005 Service Manual
[x] Cancel search | Manufacturer: CHRYSLER, Model Year: 2005, Model line: VOYAGER, Model: CHRYSLER VOYAGER 2005Pages: 2339, PDF Size: 59.69 MB
Page 488 of 2339
RESTRAINTS
TABLE OF CONTENTS
page page
RESTRAINTS
DESCRIPTION..........................2
OPERATION............................4
WARNING
WARNINGS...........................5
DIAGNOSIS AND TESTING - AIRBAG SYSTEM . 6
STANDARD PROCEDURE
STANDARD PROCEDURE - HANDLING
AIRBAGS.............................6
STANDARD PROCEDURE - SERVICE
AFTER AN AIRBAG DEPLOYMENT.........7
BELT TENSION SENSOR
DESCRIPTION..........................8
OPERATION............................9
CHILD RESTRAINT ANCHOR
DESCRIPTION..........................9
OPERATION...........................10
CLOCKSPRING
DESCRIPTION.........................10
OPERATION...........................11
STANDARD PROCEDURE - CLOCKSPRING
CENTERING.........................11
REMOVAL.............................12
INSTALLATION.........................12
CURTAIN AIRBAG
DESCRIPTION.........................12
OPERATION...........................13
REMOVAL.............................14
INSTALLATION.........................16
DRIVER AIRBAG
DESCRIPTION.........................16
OPERATION...........................16
REMOVAL.............................17
INSTALLATION.........................18
IMPACT SENSOR
DESCRIPTION.........................18
REMOVAL.............................19
INSTALLATION.........................21
KNEE BLOCKER AIRBAG
DESCRIPTION.........................22
OPERATION...........................22
REMOVAL.............................23
INSTALLATION.........................23
OCCUPANT CLASSIFICATION MODULE
DESCRIPTION.........................25
OPERATION...........................25
REMOVAL.............................26
INSTALLATION.........................26OCCUPANT RESTRAINT CONTROLLER
DESCRIPTION.........................27
OPERATION...........................28
REMOVAL.............................29
INSTALLATION.........................29
PASSENGER AIRBAG
DESCRIPTION.........................30
OPERATION...........................30
REMOVAL.............................30
INSTALLATION.........................32
PASSENGER AIRBAG DISABLED INDICATOR
DESCRIPTION.........................33
OPERATION...........................33
REMOVAL.............................34
INSTALLATION.........................34
SEAT BELT BUCKLE - FRONT INBOARD
REMOVAL.............................35
INSTALLATION.........................35
SEAT BELT BUCKLE - FIRST ROW INBOARD -
QUAD BUCKET
REMOVAL.............................35
INSTALLATION.........................36
SEAT BELT BUCKLE - FIRST ROW - BENCH
REMOVAL.............................36
INSTALLATION.........................37
SEAT BELT BUCKLE - SECOND ROW
INBOARD - 50/50 BENCH
REMOVAL.............................37
INSTALLATION.........................38
SEAT BELT HEIGHT ADJUSTER-BOR
C-PILLAR
REMOVAL.............................38
INSTALLATION.........................38
SEAT BELT HEIGHT ADJUSTER KNOB
REMOVAL.............................38
INSTALLATION.........................38
SEAT BELT & RETRACTOR - OUTBOARD -
FRONT
REMOVAL.............................38
INSTALLATION.........................39
SEAT BELT & RETRACTOR - FIRST ROW -
OUTBOARD
REMOVAL.............................39
INSTALLATION.........................40
SEAT BELT BUCKLE - SECOND ROW - THREE
PASSENGER BENCH
REMOVAL.............................40
INSTALLATION.........................40
RSRESTRAINTS8O-1
Page 489 of 2339
SEAT BELT & RETRACTOR - SECOND ROW -
RIGHT OUTBOARD
REMOVAL.............................40
INSTALLATION.........................40
SEAT BELT & RETRACTOR - SECOND ROW -
RIGHT OUTBOARD WITH REAR HVAC - LWB
REMOVAL.............................41
INSTALLATION.........................41
SEAT BELT & RETRACTOR - SECOND ROW -
LEFT OUTBOARD
REMOVAL.............................42INSTALLATION.........................42
SEAT BELT TENSIONER
DESCRIPTION.........................43
OPERATION...........................43
SEAT WEIGHT BLADDER & PRESSURE
SENSOR
DESCRIPTION.........................43
OPERATION...........................44
RESTRAINTS
DESCRIPTION
This vehicle is equipped with a Frontal Impact Air-
bag System, which utilizes the driver/passenger air-
bags, two front impact sensors, and seat belt
tensioners located in the front seat belt buckles. This
system is designed to protect occupants in the event
of a front impact collision. These airbags are all ser-
viceable parts. The tensioners are integral to the
front seat belt buckles. If these pyrotechnics are
deployed or defective, they must be replaced.
Vehicles equipped with the Side Impact Airbag
System utilize a curtain airbag, three side impact
sensors, and the Occupant Restraint Controller
(ORC) to determine if the airbag should be deployed.
Following a side impact event where the side airbag
was deployed, the headliner as well as the curtain
airbag must be replaced.
The occupant restraints include both active and
passive types. Active restraints are those which
require the vehicle occupants to take some action to
employ, such as fastening a seat belt; while passive
restraints require no action by the vehicle occupants
to be employed.
ACTIVE RESTRAINTS
The active restraints include:
²Front Seat Belts- Both front seating positions
are equipped with three-point seat belt systems
employing a lower B-pillar mounted inertia latch-
type retractor, height-adjustable upper B-pillar
mounted turning loops, a fixed lower seat belt anchor
secured to the lower B-pillar, and a traveling end-re-
lease buckle secured to the inboard side of the seat
cushion frame. The driver side front seat belt buckle
includes an integral Hall-effect seat belt switch that
detects whether the driver side front seat belt has
been fastened.²Rear Seat Belts- Both outboard rear second
and third seating positions are equipped with three-
point seat belt systems. The outboard seating posi-
tion belts employ a lower C or D-pillar mounted
inertia latch-type retractor, a fixed position upper C
or D-pillar mounted turning loop, and a fixed lower
seat belt anchor secured to the inboard side of the
seat cushion frame.
²Child Restraint Anchors- Also equipped in
this vehicle are two, fixed-position, child seat upper
tether anchors located on the lower seat cushion, in
the rear of the lower seat cushion. There is one
anchor integral to the back of the third row seat back
panel, one on each seat back panel. Two lower second
row anchors are also provided for each rear outboard
seating position. The lower anchors are integral to
the seat cushion frame and are accessed from the
front of the second row seat where the seat back
meets the seat cushion.
PASSIVE RESTRAINTS
The passive restraints available for this model
include the following:
²Dual Front Airbags- Multistage driver. front
passenger, and driver knee blocker airbags are avail-
able for this model. This airbag system is a passive,
inflatable, Supplemental Restraint System (SRS) and
vehicles with this equipment can be readily identified
by the ªSRS - AIRBAGº logo molded into the driver
airbag trim cover in the center of the steering wheel
and also into the passenger airbag door on the
instrument panel above the glove box. Vehicles with
the airbag system can also be identified by the airbag
indicator, which will illuminate in the instrument
cluster for about seven seconds as a bulb test each
time the ignition switch is turned to the ON position.
A pyrotechnic-type seat belt tensioner is integral to
the driver and passenger front seat belt buckle of all
models equipped with dual front airbags.
8O - 2 RESTRAINTSRS
Page 491 of 2339
²Occupant Classification Module- Vehicles
equipped with the Occupant Classification System
(OCS) include an Occupant Classification Module
(OCM) which is secured to a stamped steel mounting
bracket on the underside of the passenger side front
seat cushion frame.
²Occupant Restraint Controller- The Occu-
pant Restraint Controller (ORC) is also sometimes
referred to as the Airbag Control Module (ACM). The
ORC is located on a mount on the floor transmission
tunnel just underneath the instrument panel center
stack (Fig. 3).
²Passenger Airbag- The passenger airbag is
located on the instrument panel, beneath the instru-
ment panel top pad and above the glove box on the
passenger side of the vehicle (Fig. 3).
²Passenger Airbag Disabled (PAD) Indicator
- Vehicles equipped with the Occupant Classification
System (OCS) include a passenger airbag disabled
(PAD) indicator which is located in the instrument
panel center stack (Fig. 3).
²Passenger Knee Blocker- The passenger knee
blocker is a structural reinforcement that is integral
to and concealed within the glove box door (Fig. 3).
²Seat Belt Tensioner- A seat belt tensioner is
integral to both front seat belt buckles. The seat belt
buckles are secured to the inner seat frame sides,
beneath a cushion trim panel.
²Seat Weight Bladder and Pressure Sensor
Assembly- Vehicles equipped with the Occupant
Classification System (OCS) include a seat weight
bladder that is sandwiched between an insulator pad
on the top of the passenger side front seat pan and
the seat cushion foam padding. A short hose connects
the bladder to a pressure sensor which is secured to
the Occupant Classification Module (OCM) mounting
bracket on the underside of the passenger side front
seat cushion frame.
²Side Impact Sensors- Six side impact sensors
are used on vehicles equipped with the curtain air-
bags, three left side and three right side. The first
row side impact sensor is located in the B-pillar, just
above the front seat belt retractor. The second row
side impact sensor is located in the sliding side door
track opening, just in front of the C-pillar. The third
row side impact sensor is located behind the quarter
trim panel, above the rear tire wheel well, between
the C and D-pillars.
The ORC, the OCM, and the cluster each contain a
microprocessor and programming that allow them to
communicate with each other using the Programma-
ble Communications Interface (PCI) data bus net-
work. This method of communication is used by the
ORC for control of the airbag indicators.OPERATION
ACTIVE RESTRAINTS
The primary passenger restraints in this or any
other vehicle are the seat belts and child restraint
anchors. Seat belts and child restraint anchors are
referred to as an active restraint because the vehicle
occupants are required to physically fasten and prop-
erly adjust these restraints in order to benefit from
them. See the owner's manual in the vehicle glove
box for more information on the features, use and
operation of all of the active restraints.
PASSIVE RESTRAINTS
The passive restraints are referred to as a supple-
mental restraint system because they were designed
and are intended to enhance the protection for the
occupants of the vehicleONLYwhen used in con-
junction with the seat belts. They are referred to as
passive restraints because the vehicle occupants are
not required to do anything to make them operate;
however, the vehicle occupants must be wearing their
seat belts in order to obtain the maximum safety
benefit from the supplemental restraint system.
The supplemental restraint system electrical cir-
cuits are continuously monitored and controlled by a
microprocessor and software contained within the
Occupant Restraint Controller (ORC). An airbag indi-
cator in the ElectroMechanical Instrument Cluster
(EMIC) illuminates for about seven seconds as a bulb
test each time the ignition switch is turned to the
ON or START positions. Following the bulb test, the
airbag indicator is turned ON or OFF by the ORC to
indicate the status of the supplemental restraint sys-
tem. If the airbag indicator comes ON at any time
other than during the bulb test, it indicates that
there is a problem in the supplemental restraint sys-
tem electrical circuits. Such a problem may cause air-
bags not to deploy when required, or to deploy when
not required.
Deployment of the supplemental restraints
depends upon the angle and severity of an impact.
Deployment is not based upon vehicle speed; rather,
deployment is based upon the rate of deceleration as
measured by the forces of gravity (G force) upon the
impact sensors. When an impact is severe enough,
the microprocessor in the ORC signals the inflator of
the appropriate airbag units to deploy their airbag
cushions. The front seat belt tensioners are provided
with a deployment signal by the ORC in conjunction
with the front airbags. During a frontal vehicle
impact, the knee blockers work in concert with prop-
erly fastened and adjusted seat belts to restrain both
the driver and the front seat passenger in the proper
position for an airbag deployment. The knee blockers
also absorb and distribute the crash energy from the
8O - 4 RESTRAINTSRS
RESTRAINTS (Continued)
Page 496 of 2339
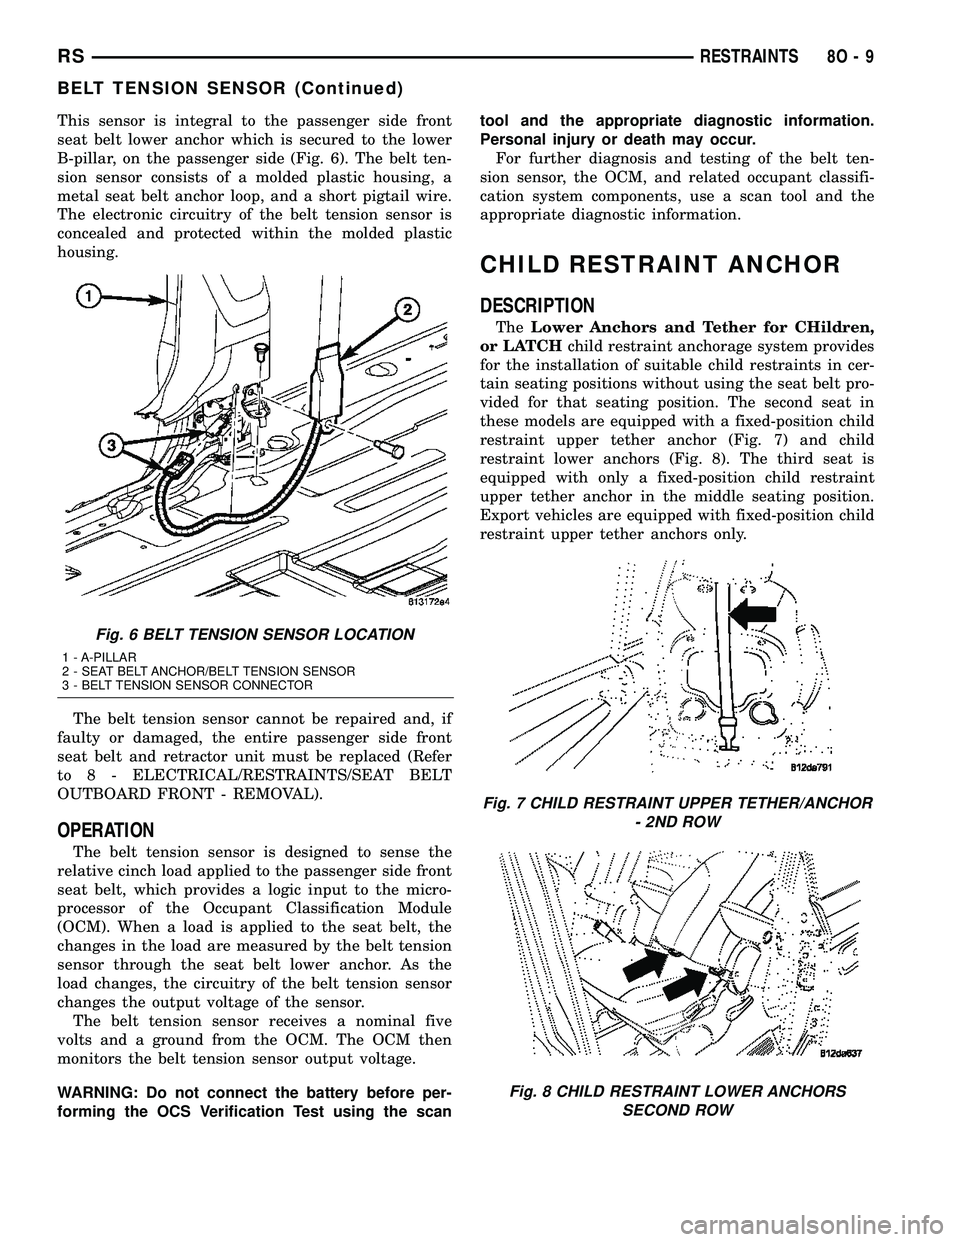
This sensor is integral to the passenger side front
seat belt lower anchor which is secured to the lower
B-pillar, on the passenger side (Fig. 6). The belt ten-
sion sensor consists of a molded plastic housing, a
metal seat belt anchor loop, and a short pigtail wire.
The electronic circuitry of the belt tension sensor is
concealed and protected within the molded plastic
housing.
The belt tension sensor cannot be repaired and, if
faulty or damaged, the entire passenger side front
seat belt and retractor unit must be replaced (Refer
to 8 - ELECTRICAL/RESTRAINTS/SEAT BELT
OUTBOARD FRONT - REMOVAL).
OPERATION
The belt tension sensor is designed to sense the
relative cinch load applied to the passenger side front
seat belt, which provides a logic input to the micro-
processor of the Occupant Classification Module
(OCM). When a load is applied to the seat belt, the
changes in the load are measured by the belt tension
sensor through the seat belt lower anchor. As the
load changes, the circuitry of the belt tension sensor
changes the output voltage of the sensor.
The belt tension sensor receives a nominal five
volts and a ground from the OCM. The OCM then
monitors the belt tension sensor output voltage.
WARNING: Do not connect the battery before per-
forming the OCS Verification Test using the scantool and the appropriate diagnostic information.
Personal injury or death may occur.
For further diagnosis and testing of the belt ten-
sion sensor, the OCM, and related occupant classifi-
cation system components, use a scan tool and the
appropriate diagnostic information.
CHILD RESTRAINT ANCHOR
DESCRIPTION
TheLower Anchors and Tether for CHildren,
or LATCHchild restraint anchorage system provides
for the installation of suitable child restraints in cer-
tain seating positions without using the seat belt pro-
vided for that seating position. The second seat in
these models are equipped with a fixed-position child
restraint upper tether anchor (Fig. 7) and child
restraint lower anchors (Fig. 8). The third seat is
equipped with only a fixed-position child restraint
upper tether anchor in the middle seating position.
Export vehicles are equipped with fixed-position child
restraint upper tether anchors only.
Fig. 6 BELT TENSION SENSOR LOCATION
1 - A-PILLAR
2 - SEAT BELT ANCHOR/BELT TENSION SENSOR
3 - BELT TENSION SENSOR CONNECTOR
Fig. 7 CHILD RESTRAINT UPPER TETHER/ANCHOR
- 2ND ROW
Fig. 8 CHILD RESTRAINT LOWER ANCHORS
SECOND ROW
RSRESTRAINTS8O-9
BELT TENSION SENSOR (Continued)
Page 506 of 2339

SIDE IMPACT SENSORS
Three side impact sensors (Fig. 22) are used on
each side of the vehicle. These sensors are mounted
remotely from the bi-directional safing sensor that is
internal to the Occupant Restraint Controller (ORC).
The side and front impact sensors are identical in
construction and calibration and each impact sensor
is secured with two screws. Each side impact sensor
is secured with two screws. The first row side impact
sensor is located in the B-pillar, just above the front
seat belt retractor (Fig. 23). The second row side
impact sensor is located in the sliding door opening,in the lower door track area (Fig. 23). The third row
side impact sensor is located behind the quarter trim
panel, above the rear tire wheel well, between the C
and D-pillars (Fig. 23).
The impact sensor housing has an integral connec-
tor. A cavity in the center of the molded black plastic
impact sensor housing contains the electronic cir-
cuitry of the sensor which includes an electronic com-
munication chip and an electronic impact sensor.
Potting material fills the cavity to seal and protect
the internal electronic circuitry and components. The
side impact sensors are each connected to the vehicle
electrical system through a connector of the body
harness.
The side impact sensors cannot be repaired or
adjusted. If damaged or faulty, they must be
replaced. Refer to the proper body diagnostic infor-
mation for diagnosis and testing.
REMOVAL
FRONT IMPACT SENSOR
The right and left front impact sensors are
mounted identically on the front rail tips.
(1) Open hood, disconnect and isolate the battery
negative cable.
(2)
WARNING: Wait two minutes for the airbag system
reserve capacitor to discharge before beginning
any airbag system or component service. Failure to
do so may result in accidental airbag deployment,
personal injury or death.
Fig. 23 SIDE IMPACT SENSOR LOCATION
1 - FRONT ROW SIDE IMPACT SENSOR 3 - THIRD ROW SIDE IMPACT SENSOR
2 - SECOND ROW SIDE IMPACT SENSOR
Fig. 22 SIDE IMPACT SENSOR
RSRESTRAINTS8O-19
IMPACT SENSOR (Continued)
Page 525 of 2339

INSTALLATION
(1) Push belt through seat cushion.
(2) While looking at the bottom of the seat, locate
retaining bolt hole on the left side of the seat riser.
Install retaining bolt into seat riser (Fig. 45). Torque
anchor bolt to 39 N´m (29 ft. lbs.).
(3) Place seat into track and on front anchors.
(4) Pull #3 strap and install seat onto latching
area.
(5) Pull seat assembly down firmly and snap into
track.
(6) Pull handle #1 and fold seat back rearward.
(7) Close rear liftgate.
SEAT BELT HEIGHT
ADJUSTER-BORC-PILLAR
REMOVAL
(1) Remove turning loop retaining bolt.
(2) Remove B or C-pillar trim cover.
(3) Remove two screws attaching shoulder belt
height adjuster to pillar.
(4) Remove height adjuster from vehicle.
INSTALLATION
(1) Place height adjuster into position.
(2) Install screws attaching shoulder belt height
adjuster to pillar.
(3) Install B or C-pillar trim cover.
(4) Install turning loop to height adjuster. Torque
anchor bolt to 39 N´m (29 ft. lbs.).
SEAT BELT HEIGHT
ADJUSTER KNOB
REMOVAL
(1) Disengage clips attaching clam shell cover to
seat belt turning loop and open cover.
(2) Using a trim tool (special tool #C-4755), gently
pry knob from seat belt height adjuster.
INSTALLATION
(1) Place seat belt height adjuster knob in position
on height adjuster.
(2) Firmly push knob on until retainers engage.
(3) Reinstall turning loop clam shell cover.
(4) Verify seat belt operation. Make sure it moves
through loop without binding.
SEAT BELT & RETRACTOR -
OUTBOARD - FRONT
REMOVAL
(1) Open door.
(2) Move seat all the way forward.
(3) Open hood.
(4) Disconnect and isolate the battery negative
cable.
(5)
WARNING: Wait two minutes for the airbag system
reserve capacitor to discharge before beginning
any airbag system or component service. Failure to
do so may result in accidental airbag deployment,
personal injury or death.
(6) Remove shoulder harness height adjuster knob
by pulling it straight away from adjuster (Fig. 48).
(7) Remove cover from seat belt turning loop (Fig.
48).
(8) Remove bolt attaching turning loop to shoulder
belt height adjuster (Fig. 48).
(9) Remove upper B-pillar trim cover (Fig. 48).
NOTE: If equipped with the Occupant Classification
System (OCS), there is a Belt Tension Sensor
located on the lower seat belt anchor on the pas-
senger front seat belt.
Fig. 48 SEAT BELT - OUTBOARD FRONT
1 - B-PILLAR TRIM LOWER
2 - BELT
3 - B-PILLAR TRIM UPPER
4 - HEIGHT ADJUSTER
5 - KNOB
6 - B-PILLAR TRIM LOWER
7 - FLOOR ANCHOR
8 - FLOOR ANCHOR
9 - 30É OUTBOARD
10 - RETRACTOR
8O - 38 RESTRAINTSRS
SEAT BELT BUCKLE - SECOND ROW INBOARD - 50/50 BENCH (Continued)
Page 526 of 2339

(10) Remove the lower seat belt anchor bolt (Fig.
49).
(11) Disconnect the electrical connector if equipped
with OCS (Fig. 49).
(12) Remove front door sill plate (Fig. 48).
(13) Remove sliding door sill plate (Fig. 48).
(14) Remove lower B-pillar trim cover (Fig. 48).
(15) Disconnect the seat belt retractor electrical
connector (Fig. 48).
(16) Remove seat belt retractor attaching bolt (Fig.
48).
(17) Remove the seat belt and retractor from vehi-
cle.
INSTALLATION
WARNING: Inspect the condition of the shoulder
belt and lap belt. Replace any belt that is cut,
frayed, torn, or damaged in any way. Also, replace
the shoulder belt if the retractor is either damaged
or inoperative.
(1) Place seat belt and retractor into position (Fig.
48).
(2) Install bolt attaching seat belt retractor to
B-pillar (Fig. 48). Torque bolt to 39 N´m (29 ft. lbs.).
(3) Connect the seat belt retractor electrical con-
nector (Fig. 48).
(4) Install the lower B-pillar trim cover (Fig. 48).
(5) Install the sliding door sill plate (Fig. 48).
(6) Install the front door sill plate (Fig. 48).(7) Install the lower seat belt anchor bolt (Fig. 49).
Torque bolt to 39 N´m (29 ft. lbs.).
NOTE: If equipped with the Occupant Classification
System (OCS), there is a Belt Tension Sensor
located on the lower seat belt anchor on the pas-
senger front seat belt.
(8) Connect the belt tension sensor connector (if
equipped with OCS) (Fig. 49).
(9) Install the upper B-pillar trim cover (Fig. 48).
(10) Install the bolt attaching turning loop to
shoulder belt height adjuster (Fig. 48). Torque bolt to
39 N´m (29 ft. lbs.).
(11) Install the cover to the seat belt turning loop
(Fig. 48).
(12) Install the shoulder harness height adjuster
knob by pushing it straight onto the adjuster (Fig.
48).
(13) Move seat back to approximate customer posi-
tion.
WARNING: If equipped with the OCS, do not con-
nect the battery negative cable (Refer to 8 - ELEC-
TRICAL/RESTRAINTS - DIAGNOSIS AND TESTING -
AIRBAG SYSTEM). Personal injury or death may
result if the system test is not performed first.
WARNING: If equipped with the OCS, following suc-
cessful completion of the Airbag System test proce-
dure, the Occupant Classification System
Verification Test must be done using a scan tool
and the appropriate diagnostic information.
(14) Verify vehicle and system operation.
(15) Close hood.
SEAT BELT & RETRACTOR -
FIRST ROW - OUTBOARD
REMOVAL
(1) Remove first and second row seats.
(2) Remove first row seat belt lower anchor bolt.
(3) Remove first row seat belt upper turning loop
anchor bolt.
(4) Remove liftgate sill plate.
(5) Remove upper liftgate trim.
(6) Remove second seat lower anchor bolt.
(7) Remove second seat upper turning loop anchor
bolt.
(8) Remove D-pillar trim cover.
(9) Disconnect speaker connector. The left side has
the speaker mounted in the D-pillar trim cover and
the right side will have the speaker mounted in the
rear of the quarter trim panel, but the connector is
Fig. 49 BELT TENSION SENSOR/LOWER SEAT
BELT ANCHOR
1 - A-PILLAR
2 - SEAT BELT ANCHOR/BELT TENSION SENSOR
3 - BELT TENSION SENSOR CONNECTOR
RSRESTRAINTS8O-39
SEAT BELT & RETRACTOR - OUTBOARD - FRONT (Continued)
Page 527 of 2339

accessible from the rear after the D-pillar trim is
removed.
(10) Remove quarter trim bolster.
(11) Remove quarter trim panel screws.
(12) Remove quarter trim panel.
(13) Remove first row seat belt and retractor
retaining bolt.
(14) Remove first row seat belt and retractor from
vehicle.
INSTALLATION
(1) Install first row seat belt and retractor. Torque
bolt to 39 N´m (29 ft. lbs.).
(2) Install quarter trim panel.
(3) Install quarter trim panel screws.
(4) Install quarter trim bolster.
(5) Connect speaker connector. The left side has
the speaker mounted in the D-pillar trim cover and
the right side will have the speaker mounted in the
rear of the quarter trim panel, but the connector is
accessible from the rear after the D-pillar trim is
removed.
(6) Install D-pillar trim cover.
(7) Install second seat belt lower anchor bolt.
Torque bolt to 39 N´m (29 ft. lbs.).
(8) Install second seat belt upper turning loop
anchor bolt. Torque bolt to 39 N´m (29 ft. lbs.).
(9) Install upper liftgate trim.
(10) Install liftgate sill plate.
(11) Install first row seat belt upper turning loop
anchor bolt. Torque bolt to 39 N´m (29 ft. lbs.).
(12) Install first row seat belt lower anchor bolt.
Torque bolt to 39 N´m (29 ft. lbs.).
(13) Install first and second row seats.
SEAT BELT BUCKLE - SECOND
ROW - THREE PASSENGER
BENCH
REMOVAL
(1) Remove bolt attaching seat belt buckle to seat
rear frame rail (Fig. 50).
(2) Remove seat belt buckle from seat.
INSTALLATION
(1) Place seat belt buckle in position on seat.
(2) Install bolt to attach seat belt buckle to seat
rear frame rail. Tighten all seat belt bolts to 39 N´m
(29 ft. lbs.) torque.
SEAT BELT & RETRACTOR -
SECOND ROW - RIGHT
OUTBOARD
REMOVAL
(1) Remove first and second row seats.
(2) Remove first row seat belt lower anchor bolt.
(3) Remove first row seat belt upper anchor bolt.
(4) Remove liftgate sill plate.
(5) Remove upper liftgate trim.
(6) Remove second seat belt lower anchor bolt.
(7) Remove second seat belt upper anchor bolt.
(8) Remove D-pillar trim cover.
(9) Disconnect speaker connector. The left side has
the speaker mounted in the D-pillar trim cover and
the right side will have the speaker mounted in the
rear of the quarter trim panel, but the connector is
accessible from the rear after the D-pillar trim is
removed.
(10) Remove quarter trim bolster.
(11) Remove quarter trim panel screws.
(12) Remove quarter trim panel.
(13) Remove retractor retaining bolt.
(14) Remove second row seat belt and retractor.
INSTALLATION
(1) Install second row seat belt and retractor.
Torque bolt to 39 N´m (29 ft. lbs.).
(2) Install quarter trim panel.
(3) Install quarter trim panel screws.
(4) Install quarter trim bolster.
(5) Connect speaker connector. The left side has
the speaker mounted in the D-pillar trim cover and
Fig. 50 SEAT BELT BUCKLE - SECOND ROW -
THREE PASSENGER BENCH
1 - ANCHOR BOLT
2 - SEAT BELTS
3 - ANCHOR
4 - RISER
8O - 40 RESTRAINTSRS
SEAT BELT & RETRACTOR - FIRST ROW - OUTBOARD (Continued)
Page 528 of 2339

the right side will have the speaker mounted in the
rear of the quarter trim panel, but the connector is
accessible from the rear after the D-pillar trim is
removed.
(6) Install D-pillar trim cover.
(7) Install second seat belt lower anchor bolt.
Torque bolt to 39 N´m (29 ft. lbs.).
(8) Install second seat belt upper turning loop
anchor bolt. Torque bolt to 39 N´m (29 ft. lbs.).
(9) Install upper liftgate trim.
(10) Install liftgate sill plate.
(11) Install first row seat belt upper turning loop
anchor bolt. Torque bolt to 39 N´m (29 ft. lbs.).
(12) Install first row seat belt lower anchor bolt.
Torque bolt to 39 N´m (29 ft. lbs.).
(13) Install first and second row seats.
SEAT BELT & RETRACTOR -
SECOND ROW - RIGHT
OUTBOARD WITH REAR HVAC
-LWB
REMOVAL
(1) Remove first and second row seats.
(2) Remove first row seat belt lower anchor bolt.
(3) Remove first row seat belt upper anchor bolt.
(4) Remove liftgate sill plate.
(5) Remove upper liftgate trim.
(6) Remove second seat belt lower anchor bolt.
(7) Remove second seat belt upper anchor bolt.
(8) Remove D-pillar trim cover.
(9) Disconnect speaker connector. The left side has
the speaker mounted in the D-pillar trim cover and
the right side will have the speaker mounted in the
rear of the quarter trim panel, but the connector is
accessible from the rear after the D-pillar trim is
removed.
(10) Remove quarter trim bolster.
(11) Remove quarter trim panel screws.
(12) Remove quarter trim panel.
(13) Loosen HVAC unit enough to gain access to
seat belt retractor fasteners.
(a) Remove bracket around HVAC unit (Fig. 51).
(b) Remove air duct (Fig. 52).
(c) Remove fasteners attaching HVAC unit to
inner quarter panel (Fig. 53).
(d) Gently pry out on rear HVAC unit to gain
access to the seat belt and retractor.
(14) Remove bolts attaching seat belt guide loop to
inner quarter panel.
(15) Pull outward on HVAC unit and remove bolt
attaching retractor to inner quarter panel.
(16) Remove second row seat belt and retractor
from vehicle.
INSTALLATION
(1) Position second row seat belt and retractor to
vehicle.
(2) Pull outward on HVAC unit and install bolt
attaching retractor to inner quarter panel. Torque
bolt to 39 N´m (29 ft. lbs.).
(3) Install bolts attaching seat belt guide loop to
inner quarter panel.
(4) Install fasteners attaching HVAC unit to inner
quarter panel.
(5) Install air duct.
(6) Install trim panel retaining bracket around
HVAC unit.
(7) Install quarter trim panel.
(8) Install quarter trim panel screws.
(9) Install quarter trim bolster.
(10) Connect speaker connector. The left side has
the speaker mounted in the D-pillar trim cover and
Fig. 51 TRIM PANEL MOUNTING BRACKET
1 - TRIM PANEL MOUNTING BRACKET
Fig. 52 LOWER HEATER DUCT
1 - LOWER HEAT DUCT MOUNTING
RSRESTRAINTS8O-41
SEAT BELT & RETRACTOR - SECOND ROW - RIGHT OUTBOARD (Continued)
Page 529 of 2339

the right side will have the speaker mounted in the
rear of the quarter trim panel, but the connector is
accessible from the rear after the D-pillar trim is
removed.
(11) Install D-pillar trim cover.
(12) Install second seat belt lower anchor bolt.
Torque bolt to 39 N´m (29 ft. lbs.).
(13) Install second seat belt upper turning loop
anchor bolt. Torque bolt to 39 N´m (29 ft. lbs.).
(14) Install upper liftgate trim.
(15) Install liftgate sill plate.
(16) Install first row seat belt upper turning loop
anchor bolt. Torque bolt to 39 N´m (29 ft. lbs.).
(17) Install first row seat belt lower anchor bolt.
Torque bolt to 39 N´m (29 ft. lbs.).
(18) Install first and second row seats.
SEAT BELT & RETRACTOR -
SECOND ROW - LEFT
OUTBOARD
REMOVAL
(1) Remove first and second row seats.
(2) Remove first row seat belt lower anchor bolt.
(3) Remove first row seat belt upper anchor bolt.
(4) Remove liftgate sill plate.
(5) Remove upper liftgate trim.
(6) Remove second seat belt lower anchor bolt.
(7) Remove second seat belt upper anchor bolt.
(8) Remove D-pillar trim cover.
(9) Disconnect speaker connector. The left side has
the speaker mounted in the D-pillar trim cover and
the right side will have the speaker mounted in the
rear of the quarter trim panel, but the connector is
accessible from the rear after the D-pillar trim is
removed.
(10) Remove quarter trim bolster.
(11) Remove quarter trim panel screws.
(12) Remove quarter trim panel.
(13) Remove retractor retaining bolt.
(14) Remove second row seat belt and retractor
from vehicle.
INSTALLATION
(1) Install second row seat belt and retractor.
Torque bolt to 39 N´m (29 ft. lbs.).
(2) Install quarter trim panel.
(3) Install quarter trim panel screws.
(4) Install quarter trim bolster.
(5) Connect speaker connector. The left side has
the speaker mounted in the D-pillar trim cover and
the right side will have the speaker mounted in the
rear of the quarter trim panel, but the connector is
accessible from the rear after the D-pillar trim is
removed.
(6) Install D-pillar trim cover.
(7) Install second seat belt lower anchor bolt.
Torque bolt to 39 N´m (29 ft. lbs.).
(8) Install second seat belt upper turning loop
anchor bolt. Torque bolt to 39 N´m (29 ft. lbs.).
(9) Install upper liftgate trim.
(10) Install liftgate sill plate.
(11) Install first row seat belt upper turning loop
anchor bolt. Torque bolt to 39 N´m (29 ft. lbs.).
(12) Install first row seat belt lower anchor bolt.
Torque bolt to 39 N´m (29 ft. lbs.).
(13) Install first and second row seats.
Fig. 53 REAR HVAC MOUNTING
1 - REAR HVAC MODULE MOUNTING
2 - REAR EVAPORATOR LOWER HOUSING
3 - REAR EVAPORATOR UPPER HOUSING
8O - 42 RESTRAINTSRS
SEAT BELT & RETRACTOR - SECOND ROW - RIGHT OUTBOARD WITH REAR HVAC - LWB (Continued)