Latch CHRYSLER VOYAGER 2021 Owner's Guide
[x] Cancel search | Manufacturer: CHRYSLER, Model Year: 2021, Model line: VOYAGER, Model: CHRYSLER VOYAGER 2021Pages: 348, PDF Size: 18.73 MB
Page 234 of 348
232SAFETY
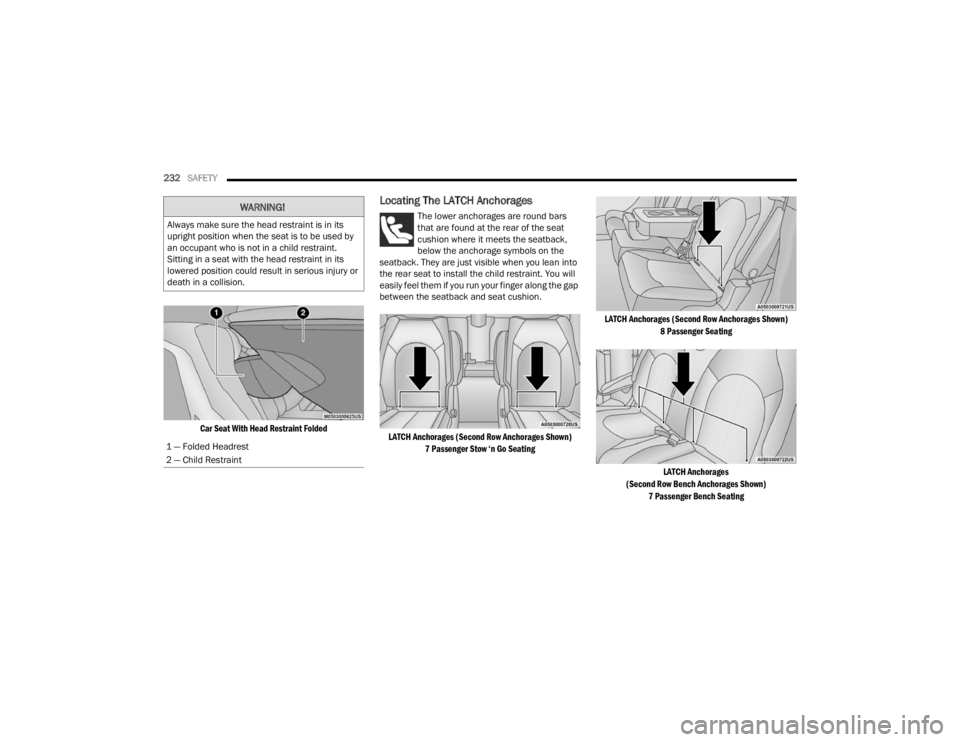
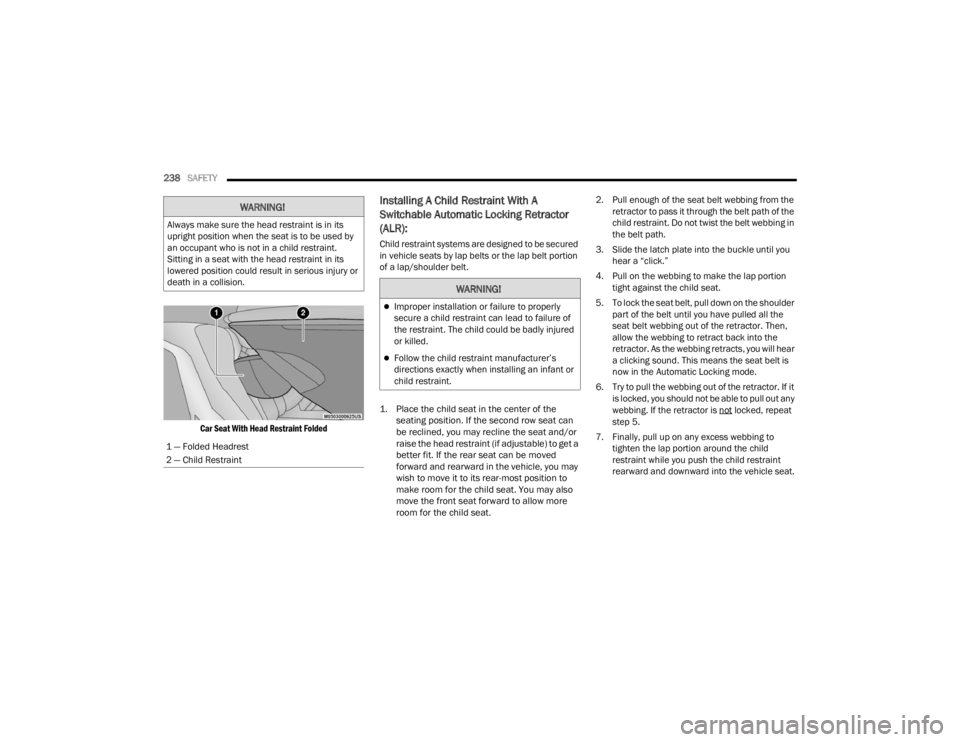
Car Seat With Head Restraint Folded
Locating The LATCH Anchorages
The lower anchorages are round bars
that are found at the rear of the seat
cushion where it meets the seatback,
below the anchorage symbols on the
seatback. They are just visible when you lean into
the rear seat to install the child restraint. You will
easily feel them if you run your finger along the gap
between the seatback and seat cushion.
LATCH Anchorages (Second Row Anchorages Shown) 7 Passenger Stow ‘n Go Seating LATCH Anchorages (Second Row Anchorages Shown)
8 Passenger Seating
LATCH Anchorages
(Second Row Bench Anchorages Shown) 7 Passenger Bench Seating
WARNING!
Always make sure the head restraint is in its
upright position when the seat is to be used by
an occupant who is not in a child restraint.
Sitting in a seat with the head restraint in its
lowered position could result in serious injury or
death in a collision.
1 — Folded Headrest
2 — Child Restraint
21_RUV_OM_EN_USC_t.book Page 232
Page 235 of 348
SAFETY233
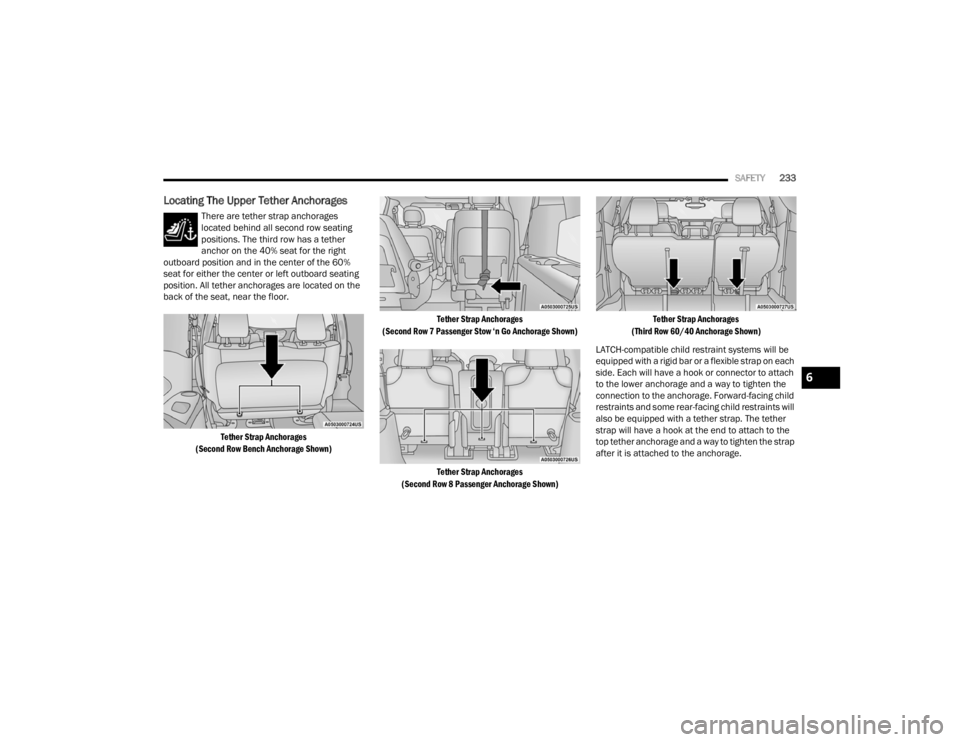
Locating The Upper Tether Anchorages
There are tether strap anchorages
located behind all second row seating
positions. The third row has a tether
anchor on the 40% seat for the right
outboard position and in the center of the 60%
seat for either the center or left outboard seating
position. All tether anchorages are located on the
back of the seat, near the floor.
Tether Strap Anchorages
(Second Row Bench Anchorage Shown) Tether Strap Anchorages
(Second Row 7 Passenger Stow ‘n Go Anchorage Shown)
Tether Strap Anchorages
(Second Row 8 Passenger Anchorage Shown) Tether Strap Anchorages
(Third Row 60/40 Anchorage Shown)
LATCH-compatible child restraint systems will be
equipped with a rigid bar or a flexible strap on each
side. Each will have a hook or connector to attach
to the lower anchorage and a way to tighten the
connection to the anchorage. Forward-facing child
restraints and some rear-facing child restraints will
also be equipped with a tether strap. The tether
strap will have a hook at the end to attach to the
top tether anchorage and a way to tighten the strap
after it is attached to the anchorage.
6
21_RUV_OM_EN_USC_t.book Page 233
Page 236 of 348
234SAFETY
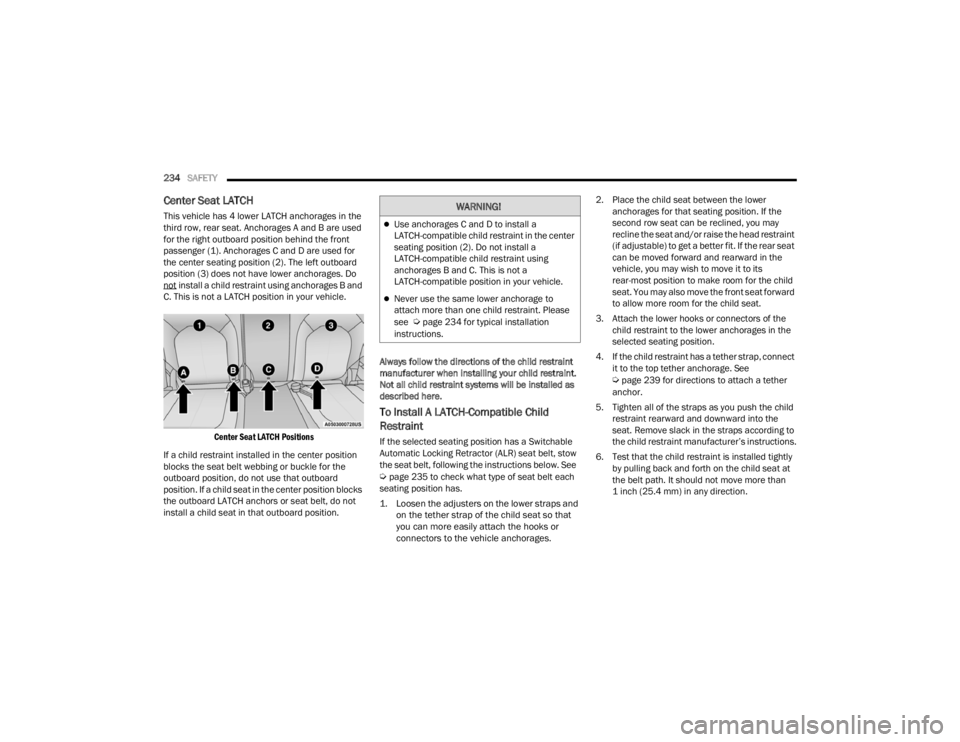
Center Seat LATCH
This vehicle has 4 lower LATCH anchorages in the
third row, rear seat. Anchorages A and B are used
for the right outboard position behind the front
passenger (1). Anchorages C and D are used for
the center seating position (2). The left outboard
position (3) does not have lower anchorages. Do
not
install a child restraint using anchorages B and
C. This is not a LATCH position in your vehicle.
Center Seat LATCH Positions
If a child restraint installed in the center position
blocks the seat belt webbing or buckle for the
outboard position, do not use that outboard
position. If a child seat in the center position blocks
the outboard LATCH anchors or seat belt, do not
install a child seat in that outboard position. Always follow the directions of the child restraint
manufacturer when installing your child restraint.
Not all child restraint systems will be installed as
described here.
To Install A LATCH-Compatible Child
Restraint
If the selected seating position has a Switchable
Automatic Locking Retractor (ALR) seat belt, stow
the seat belt, following the instructions below. See
Úpage 235 to check what type of seat belt each
seating position has.
1. Loosen the adjusters on the lower straps and on the tether strap of the child seat so that
you can more easily attach the hooks or
connectors to the vehicle anchorages.
2. Place the child seat between the lower
anchorages for that seating position. If the
second row seat can be reclined, you may
recline the seat and/or raise the head restraint
(if adjustable) to get a better fit. If the rear seat
can be moved forward and rearward in the
vehicle, you may wish to move it to its
rear-most position to make room for the child
seat. You may also move the front seat forward
to allow more room for the child seat.
3. Attach the lower hooks or connectors of the child restraint to the lower anchorages in the
selected seating position.
4. If the child restraint has a tether strap, connect it to the top tether anchorage. See
Úpage 239 for directions to attach a tether
anchor.
5. Tighten all of the straps as you push the child restraint rearward and downward into the
seat. Remove slack in the straps according to
the child restraint manufacturer’s instructions.
6. Test that the child restraint is installed tightly by pulling back and forth on the child seat at
the belt path. It should not move more than
1 inch (25.4 mm) in any direction.
WARNING!
Use anchorages C and D to install a
LATCH-compatible child restraint in the center
seating position (2). Do not install a
LATCH-compatible child restraint using
anchorages B and C. This is not a
LATCH-compatible position in your vehicle.
Never use the same lower anchorage to
attach more than one child restraint. Please
see
Úpage 234 for typical installation
instructions.
21_RUV_OM_EN_USC_t.book Page 234
Page 237 of 348
SAFETY235
How To Stow An Unused Switchable-ALR
(ALR) Seat Belt:
When using the LATCH attaching system to install
a child restraint, stow all ALR seat belts that are not
being used by other occupants or being used to
secure child restraints. An unused belt could injure
a child if they play with it and accidentally lock the
seat belt retractor. Before installing a child
restraint using the LATCH system, buckle the seat
belt behind the child restraint and out of the child’s
reach. If the buckled seat belt interferes with the
child restraint installation, instead of buckling it
behind the child restraint, route the seat belt
through the child restraint belt path and then
buckle it. Do not lock the seat belt. Remind all
children in the vehicle that the seat belts are not
toys and that they should not play with them.
Installing Child Restraints Using The
Vehicle Seat Belt
Child restraint systems are designed to be secured
in vehicle seats by lap belts or the lap belt portion
of a lap/shoulder belt. The seat belts in the passenger seating positions
are equipped with a Switchable Automatic Locking
Retractor (ALR) that is designed to keep the lap
portion of the seat belt tight around the child
restraint so that it is not necessary to use a locking
clip. The ALR retractor can be “switched” into a
locked mode by pulling all of the webbing out of the
retractor and then letting the webbing retract back
into the retractor. If it is locked, the ALR will make
a clicking noise while the webbing is pulled back
into the retractor.
See the “Automatic Locking Mode” description
Úpage 210 for additional information on ALR.
WARNING!
Improper installation of a child restraint to the
LATCH anchorages can lead to failure of the
restraint. The child could be badly injured or
killed. Follow the child restraint manufac
-
turer’s directions exactly when installing an
infant or child restraint.
Child restraint anchorages are designed to
withstand only those loads imposed by
correctly-fitted child restraints. Under no
circumstances are they to be used for adult
seat belts, harnesses, or for attaching other
items or equipment to the vehicle.
WARNING!
Improper installation or failure to properly
secure a child restraint can lead to failure of
the restraint. The child could be badly injured
or killed.
Follow the child restraint manufacturer’s
directions exactly when installing an infant or
child restraint.
6
21_RUV_OM_EN_USC_t.book Page 235
Page 240 of 348
238SAFETY
Car Seat With Head Restraint Folded
Installing A Child Restraint With A
Switchable Automatic Locking Retractor
(ALR):
Child restraint systems are designed to be secured
in vehicle seats by lap belts or the lap belt portion
of a lap/shoulder belt.
1. Place the child seat in the center of the seating position. If the second row seat can
be reclined, you may recline the seat and/or
raise the head restraint (if adjustable) to get a
better fit. If the rear seat can be moved
forward and rearward in the vehicle, you may
wish to move it to its rear-most position to
make room for the child seat. You may also
move the front seat forward to allow more
room for the child seat.
2. Pull enough of the seat belt webbing from the
retractor to pass it through the belt path of the
child restraint. Do not twist the belt webbing in
the belt path.
3. Slide the latch plate into the buckle until you hear a “click.”
4. Pull on the webbing to make the lap portion tight against the child seat.
5. To lock the seat belt, pull down on the shoulder part of the belt until you have pulled all the
seat belt webbing out of the retractor. Then,
allow the webbing to retract back into the
retractor. As the webbing retracts, you will hear
a clicking sound. This means the seat belt is
now in the Automatic Locking mode.
6. Try to pull the webbing out of the retractor. If it is locked, you should not be able to pull out any
webbing. If the retractor is not
locked, repeat
step 5.
7. Finally, pull up on any excess webbing to tighten the lap portion around the child
restraint while you push the child restraint
rearward and downward into the vehicle seat.
WARNING!
Always make sure the head restraint is in its
upright position when the seat is to be used by
an occupant who is not in a child restraint.
Sitting in a seat with the head restraint in its
lowered position could result in serious injury or
death in a collision.
1 — Folded Headrest
2 — Child Restraint
WARNING!
Improper installation or failure to properly
secure a child restraint can lead to failure of
the restraint. The child could be badly injured
or killed.
Follow the child restraint manufacturer’s
directions exactly when installing an infant or
child restraint.
21_RUV_OM_EN_USC_t.book Page 238
Page 241 of 348
SAFETY239
8. If the child restraint has a top tether strap and the seating position has a top tether
anchorage, connect the tether strap to the
anchorage and tighten the tether strap. See
Úpage 239 for directions to attach a tether
anchor.
9. Test that the child restraint is installed tightly by pulling back and forth on the child seat at
the belt path. It should not move more than
1 inch (25.4 mm) in any direction.
Any seat belt system will loosen with time, so check
the belt occasionally, and pull it tight if necessary.
Seat Belt Park Stitch — If Equipped
The rear outboard seat belts may be equipped with
a park stitch to raise the latch plate for easier
access to occupants. If the park stitch interferes
with the tight installation of a child restraint, slide
the latch plate over the stitching to shorten the lap
portion of the belt and install the car seat following
the steps above. When the car seat is removed
from the vehicle, slide the latch plate above the
park stitch to enable occupants to latch the
seatbelt securely.
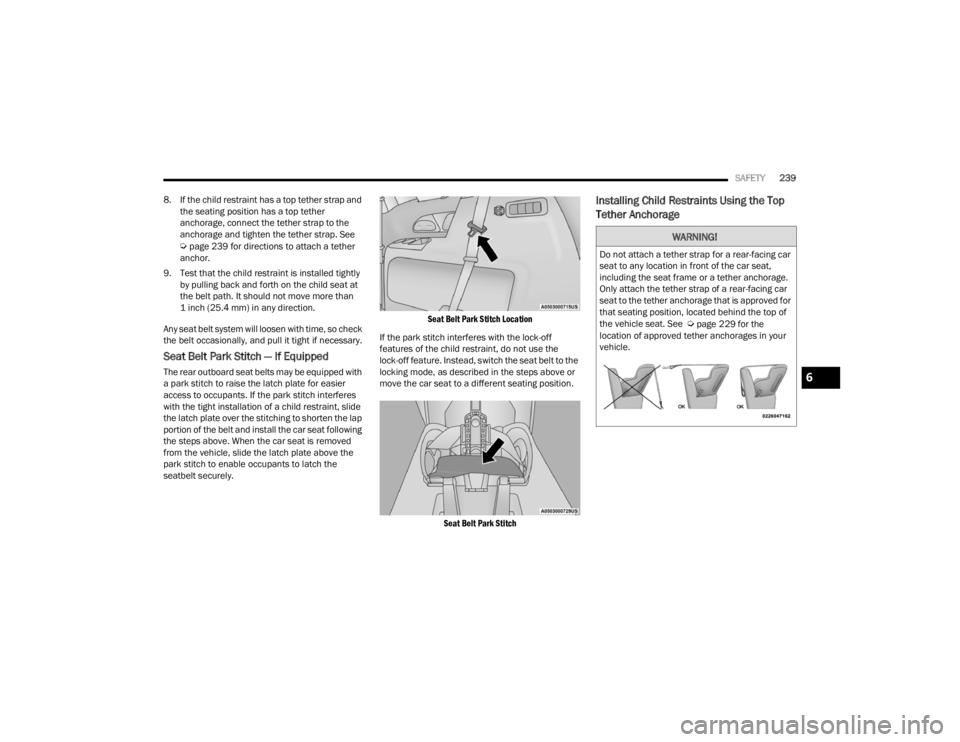
Seat Belt Park Stitch Location
If the park stitch interferes with the lock-off
features of the child restraint, do not use the
lock-off feature. Instead, switch the seat belt to the
locking mode, as described in the steps above or
move the car seat to a different seating position.
Seat Belt Park Stitch
Installing Child Restraints Using the Top
Tether Anchorage
WARNING!
Do not attach a tether strap for a rear-facing car
seat to any location in front of the car seat,
including the seat frame or a tether anchorage.
Only attach the tether strap of a rear-facing car
seat to the tether anchorage that is approved for
that seating position, located behind the top of
the vehicle seat. See
Úpage 229 for the
location of approved tether anchorages in your
vehicle.
6
21_RUV_OM_EN_USC_t.book Page 239
Page 245 of 348
SAFETY243
(Continued)
PERIODIC SAFETY CHECKS YOU SHOULD
M
AKE OUTSIDE THE VEHICLE
Tires
Examine tires for excessive tread wear and uneven
wear patterns. Check for stones, nails, glass, or
other objects lodged in the tread or sidewall.
Inspect the tread for cuts and cracks. Inspect
sidewalls for cuts, cracks, and bulges. Check the
lug nut/bolt torque for tightness. Check the tires
(including spare) for proper cold inflation pressure.
Lights
Have someone observe the operation of brake
lights and exterior lights while you work the
controls. Check turn signal and high beam
indicator lights on the instrument panel.
Door Latches
Check for proper closing, latching, and locking.
Fluid Leaks
Check area under the vehicle after overnight
parking for fuel, coolant, oil, or other fluid leaks.
Also, if gasoline fumes are detected or if fuel or
brake fluid leaks are suspected, the cause should
be located and corrected immediately.
ALWAYS REMOVE THE EXISTING FLOOR MAT
FROM THE VEHICLE before installing any
other floor mat. NEVER install or stack an
additional floor mat on top of an existing floor
mat.
ONLY install floor mats designed to fit your
vehicle. NEVER install a floor mat that cannot
be properly attached and secured to your
vehicle. If a floor mat needs to be replaced,
only use a FCA approved floor mat for the
specific make, model, and year of your
vehicle.
ONLY use the driver’s side floor mat on the
driver’s side floor area. To check for interfer -
ence, with the vehicle properly parked with the
engine off, fully depress the accelerator, the
brake, and the clutch pedal (if present) to
check for interference. If your floor mat inter -
feres with the operation of any pedal, or is not
secure to the floor, remove the floor mat from
the vehicle and place the floor mat in your
trunk.
ONLY use the passenger’s side floor mat on
the passenger’s side floor area.
WARNING!
ALWAYS make sure objects cannot fall or slide
into the driver’s side floor area when the
vehicle is moving. Objects can become
trapped under accelerator, brake, or clutch
pedals and could cause a loss of vehicle
control.
NEVER place any objects under the floor mat
(e.g., towels, keys, etc.). These objects could
change the position of the floor mat and may
cause interference with the accelerator,
brake, or clutch pedals.
If the vehicle carpet has been removed and
re-installed, always properly attach carpet to
the floor and check the floor mat fasteners are
secure to the vehicle carpet. Fully depress
each pedal to check for interference with the
accelerator, brake, or clutch pedals then
re-install the floor mats.
It is recommended to only use mild soap and
water to clean your floor mats. After cleaning,
always check your floor mat has been properly
installed and is secured to your vehicle using
the floor mat fasteners by lightly pulling mat.
WARNING!
6
21_RUV_OM_EN_USC_t.book Page 243
Page 252 of 348
250IN CASE OF EMERGENCY
JACK AND SPARE TIRE LOCATION
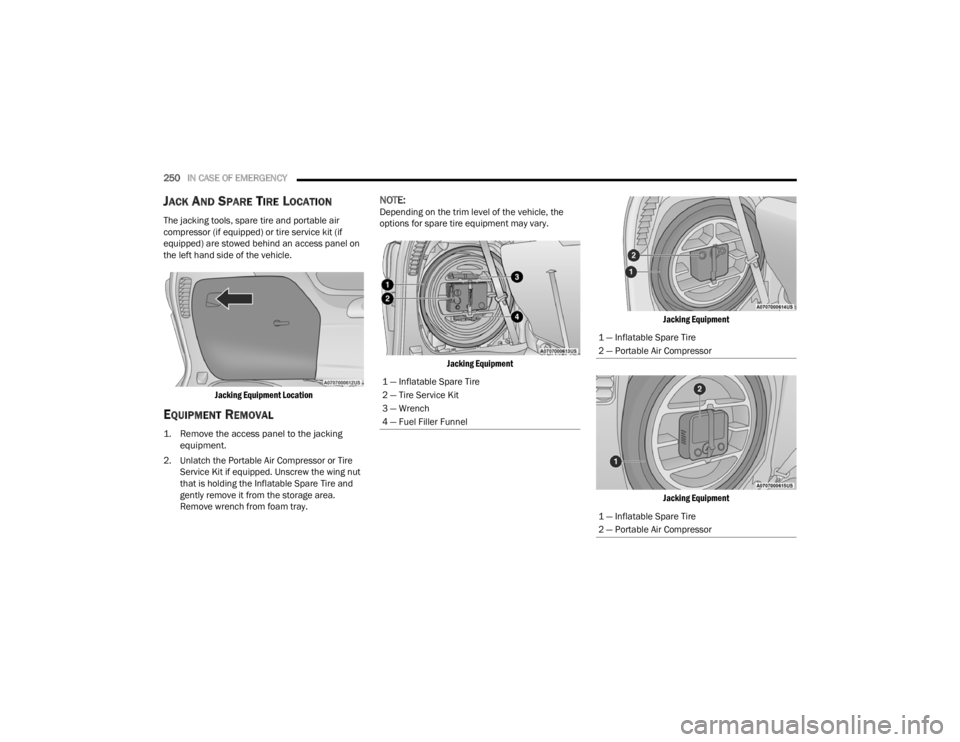
The jacking tools, spare tire and portable air
compressor (if equipped) or tire service kit (if
equipped) are stowed behind an access panel on
the left hand side of the vehicle.
Jacking Equipment Location
EQUIPMENT REMOVAL
1. Remove the access panel to the jacking equipment.
2. Unlatch the Portable Air Compressor or Tire Service Kit if equipped. Unscrew the wing nut
that is holding the Inflatable Spare Tire and
gently remove it from the storage area.
Remove wrench from foam tray.
NOTE:Depending on the trim level of the vehicle, the
options for spare tire equipment may vary.
Jacking Equipment Jacking Equipment
Jacking Equipment
1 — Inflatable Spare Tire
2 — Tire Service Kit
3 — Wrench
4 — Fuel Filler Funnel
1 — Inflatable Spare Tire
2 — Portable Air Compressor
1 — Inflatable Spare Tire
2 — Portable Air Compressor
21_RUV_OM_EN_USC_t.book Page 250
Page 284 of 348
282SERVICING AND MAINTENANCE
BODY LUBRICATION
Locks and all body pivot points, including such
items as seat tracks, door hinge pivot points and
rollers, liftgate, tailgate, decklid, sliding doors and
hood hinges, should be lubricated periodically. Use
a lithium-based grease, such as Mopar® Spray
White Lube to ensure quiet, easy operation and to
protect against rust and wear. Prior to the
application of any lubricant, the parts concerned
should be wiped clean to remove dust and grit;
after lubricating, excess oil and grease should be
removed. Particular attention should also be given
to hood latching components to ensure proper
function. When performing other underhood
services, the hood latch release mechanism, and
safety catch should be cleaned and lubricated.
The external lock cylinders should be lubricated
twice a year, preferably in the Autumn and Spring.
Apply a small amount of a high quality lubricant,
such as Mopar® Lock Cylinder Lubricant directly
into the lock cylinder.
WINDSHIELD WIPER BLADES
Clean the rubber edges of the wiper blades and the
windshield periodically with a sponge or soft cloth
and a mild nonabrasive cleaner. This will remove
accumulations of salt or road film. Operation of the wipers on dry glass for long
periods may cause deterioration of the wiper
blades. Always use washer fluid when using the
wipers to remove salt or dirt from a dry windshield.
Avoid using the wiper blades to remove frost or ice
from the windshield. Keep the blade rubber out of
contact with petroleum products such as engine
oil, gasoline, etc.
NOTE:Life expectancy of wiper blades varies depending
on geographical area and frequency of use. If chat
-
tering, marks, water lines or wet spots are present,
clean the wiper blades or replace as necessary.
The wiper blades and wiper arms should be
inspected periodically, not just when wiper
performance problems are experienced. This
inspection should include the following points:
Wear or uneven edges
Foreign material
Hardening or cracking
Deformation or fatigue
If a wiper blade or wiper arm is damaged, replace
the affected wiper arm or blade with a new unit. Do
not attempt to repair a wiper arm or blade that is
damaged.
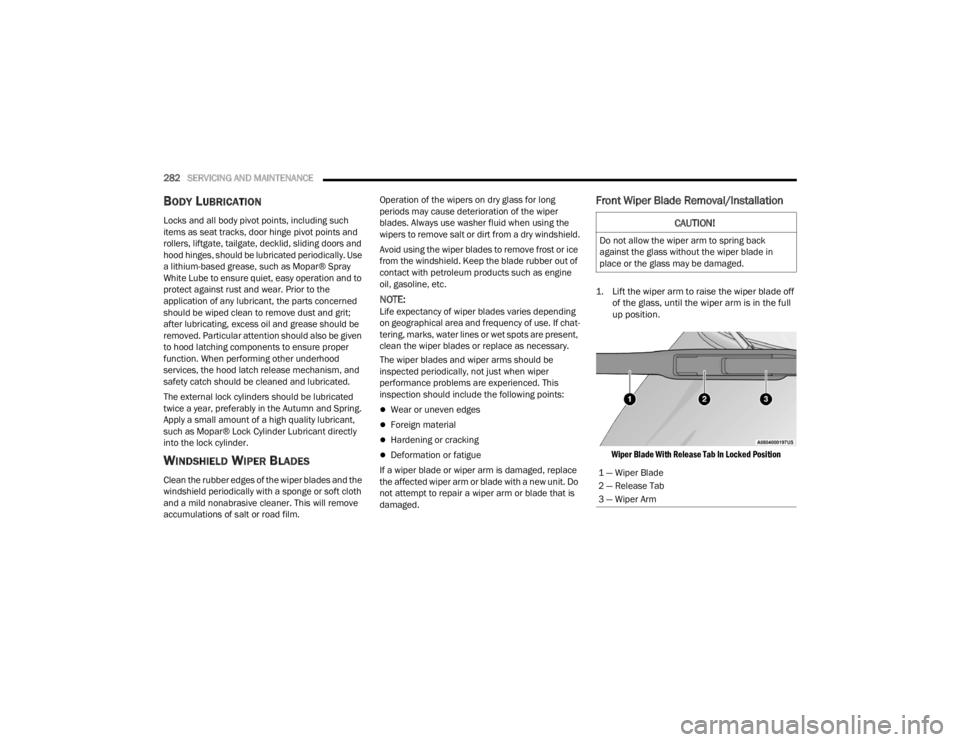
Front Wiper Blade Removal/Installation
1. Lift the wiper arm to raise the wiper blade off of the glass, until the wiper arm is in the full
up position.
Wiper Blade With Release Tab In Locked Position
CAUTION!
Do not allow the wiper arm to spring back
against the glass without the wiper blade in
place or the glass may be damaged.
1 — Wiper Blade
2 — Release Tab
3 — Wiper Arm
21_RUV_OM_EN_USC_t.book Page 282
Page 285 of 348
SERVICING AND MAINTENANCE283
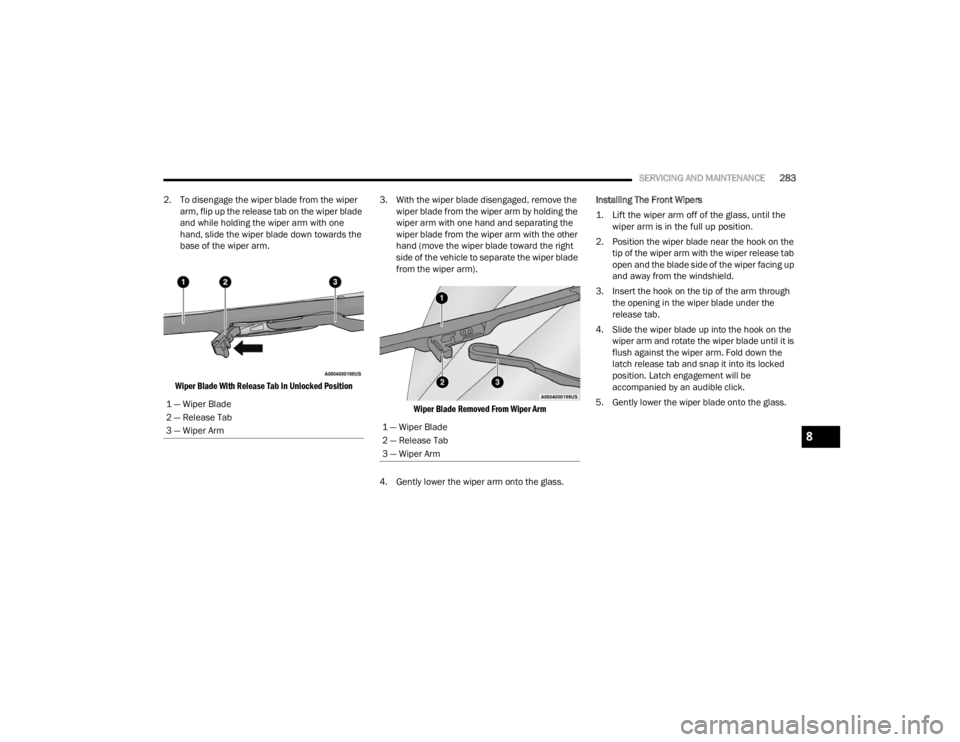
2. To disengage the wiper blade from the wiper arm, flip up the release tab on the wiper blade
and while holding the wiper arm with one
hand, slide the wiper blade down towards the
base of the wiper arm.
Wiper Blade With Release Tab In Unlocked Position
3. With the wiper blade disengaged, remove the
wiper blade from the wiper arm by holding the
wiper arm with one hand and separating the
wiper blade from the wiper arm with the other
hand (move the wiper blade toward the right
side of the vehicle to separate the wiper blade
from the wiper arm).
Wiper Blade Removed From Wiper Arm
4. Gently lower the wiper arm onto the glass. Installing The Front Wipers
1. Lift the wiper arm off of the glass, until the
wiper arm is in the full up position.
2. Position the wiper blade near the hook on the tip of the wiper arm with the wiper release tab
open and the blade side of the wiper facing up
and away from the windshield.
3. Insert the hook on the tip of the arm through the opening in the wiper blade under the
release tab.
4. Slide the wiper blade up into the hook on the wiper arm and rotate the wiper blade until it is
flush against the wiper arm. Fold down the
latch release tab and snap it into its locked
position. Latch engagement will be
accompanied by an audible click.
5. Gently lower the wiper blade onto the glass.
1 — Wiper Blade
2 — Release Tab
3 — Wiper Arm
1 — Wiper Blade
2 — Release Tab
3 — Wiper Arm8
21_RUV_OM_EN_USC_t.book Page 283