stop start CHRYSLER VOYAGER 2021 Owners Manual
[x] Cancel search | Manufacturer: CHRYSLER, Model Year: 2021, Model line: VOYAGER, Model: CHRYSLER VOYAGER 2021Pages: 348, PDF Size: 18.73 MB
Page 6 of 348

4
STARTING AND OPERATING
STARTING THE ENGINE ...................................... 106
Normal Starting ........................................... 106AutoPark ........................................................ 107Cold Weather Operation
(Below –22°F Or −30°C) ............................ 109
After Starting — Warming Up
The Engine ..................................................... 109
If Engine Fails To Start ................................. 109To Turn Off The Engine Using
ENGINE START/STOP Button ........................ 110
ENGINE BLOCK HEATER — IF EQUIPPED ......... 110
ENGINE BREAK-IN RECOMMENDATIONS ........ 110
PARKING BRAKE ................................................. 111
Electric Park Brake (EPB) ............................. 111
AUTOMATIC TRANSMISSION.............................. 113
Ignition Park Interlock ................................... 114Brake/Transmission Shift Interlock (BTSI)
System ........................................................... 1159-Speed Automatic Transmission ............... 115
Gear Ranges .................................................. 115
ACTIVE NOISE CANCELLATION .......................... 118
POWER STEERING ............................................... 118 STOP/START SYSTEM — IF EQUIPPED ............. 119
Autostop Mode .............................................. 119
Possible Reasons The Engine Does Not
Autostop......................................................... 119
To Start The Engine While In Auto
Stop/Start ...................................................... 120
To Manually Turn Off The
Stop/Start System......................................... 120
To Manually Turn On The
Stop/Start System......................................... 120
System Malfunction ...................................... 120
CRUISE CONTROL SYSTEMS —
IF EQUIPPED ........................................................ 120
Cruise Control ................................................ 120
PARKSENSE REAR PARK ASSIST —
IF EQUIPPED ....................................................... 122
ParkSense Sensors ....................................... 123
ParkSense Warning Display ......................... 123
ParkSense Display ........................................ 123Enabling And Disabling ParkSense .............. 126Service The ParkSense Rear Park
Assist System ................................................ 126Cleaning The ParkSense System ................. 126
ParkSense System Usage Precautions........ 126
PARKVIEW REAR BACK UP CAMERA .............. 127
REFUELING THE VEHICLE ................................... 129
VEHICLE LOADING ............................................ 129
Certification Label ......................................... 129 TRAILER TOWING ............................................... 130
Common Towing Definitions......................... 130
Trailer Hitch Classification............................ 132
Trailer Towing Weights
(Maximum Trailer Weight Ratings) .............. 132
Vehicle Loading Chart ................................... 133
Trailer And Tongue Weight .......................... 134
Towing Requirements .................................. 135Towing Tips ................................................... 137
RECREATIONAL TOWING
(BEHIND MOTORHOME) ..................................... 138
Towing This Vehicle Behind Another
Vehicle ........................................................... 138
DRIVING TIPS ....................................................... 139
Driving On Slippery Surfaces ........................ 139Driving Through Water ................................. 140
MULTIMEDIA
UCONNECT SYSTEMS ......................................... 141
CYBERSECURITY ................................................. 141
UCONNECT SETTINGS ......................................... 142 Customer Programmable Features ............ 142
UCONNECT INTRODUCTION................................ 156
System Overview .......................................... 156Drag & Drop Menu Bar ................................ 158Safety And General Information .................. 158
21_RUV_OM_EN_USC_t.book Page 4
Page 12 of 348
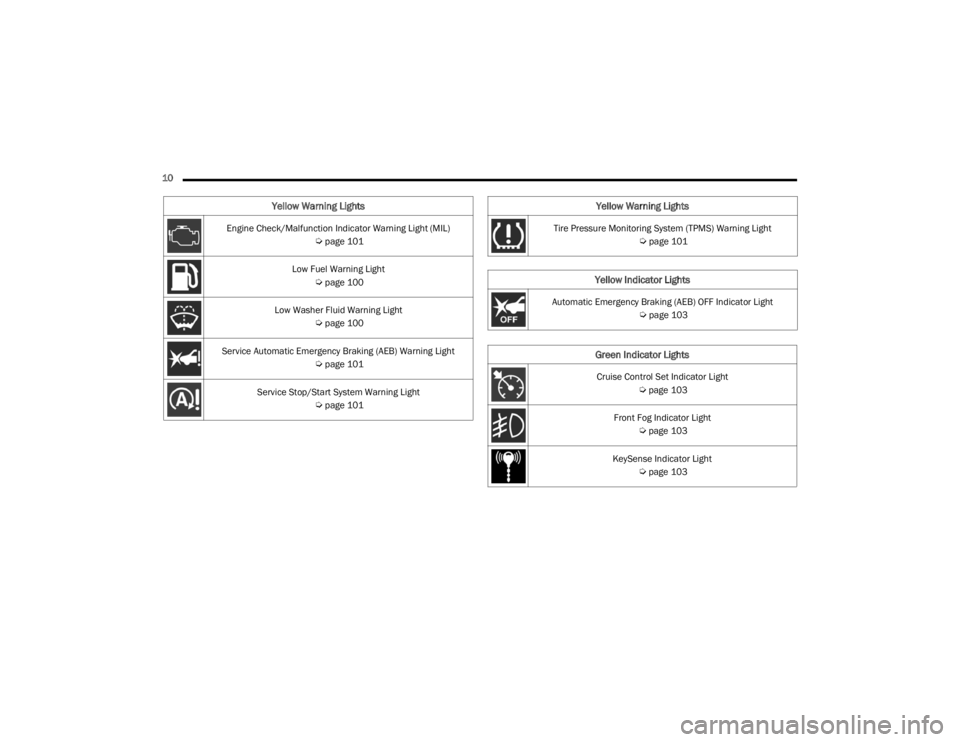
10 Engine Check/Malfunction Indicator Warning Light (MIL)
Úpage 101
Low Fuel Warning Light
Úpage 100
Low Washer Fluid Warning Light
Úpage 100
Service Automatic Emergency Braking (AEB) Warning Light
Úpage 101
Service Stop/Start System Warning Light
Úpage 101
Yellow Warning Lights
Tire Pressure Monitoring System (TPMS) Warning Light
Úpage 101
Yellow Indicator Lights
Automatic Emergency Braking (AEB) OFF Indicator Light
Úpage 103
Green Indicator Lights
Cruise Control Set Indicator Light
Úpage 103
Front Fog Indicator Light
Úpage 103
KeySense Indicator Light
Úpage 103
Yellow Warning Lights
21_RUV_OM_EN_USC_t.book Page 10
Page 13 of 348
11
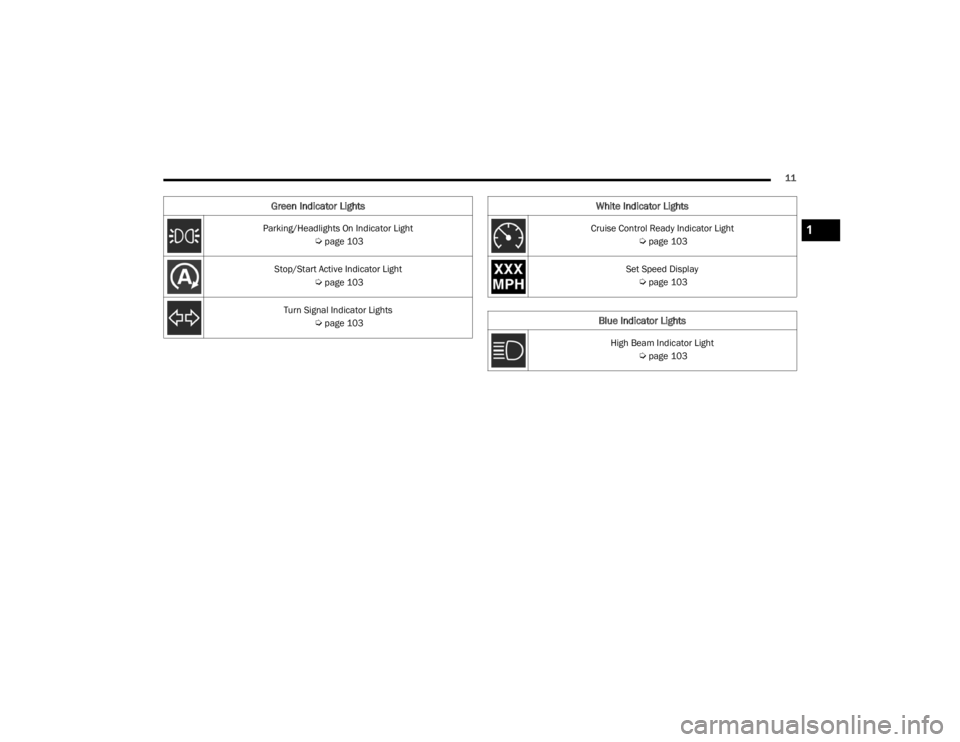
Parking/Headlights On Indicator Light
Úpage 103
Stop/Start Active Indicator Light
Úpage 103
Turn Signal Indicator Lights
Úpage 103
Green Indicator LightsWhite Indicator Lights
Cruise Control Ready Indicator Light
Úpage 103
Set Speed Display
Úpage 103
Blue Indicator Lights
High Beam Indicator Light
Úpage 103
1
21_RUV_OM_EN_USC_t.book Page 11
Page 16 of 348
14GETTING TO KNOW YOUR VEHICLE
Programming And Requesting Additional
Key Fobs
Programming the key fob may be performed by an
authorized dealer.
NOTE:
Once a key fob is programmed to a vehicle, it
cannot be repurposed and reprogrammed to
another vehicle.
Only key fobs that are programmed to the
vehicle electronics can be used to start and
operate the vehicle. Duplication of key fobs may be performed at an
authorized dealer. This procedure consists of
programming a blank key fob to the vehicle
electronics.
NOTE:When having the Sentry Key Immobilizer System
serviced, bring all vehicle keys with you to an
authorized dealer.
KeySense Features — If Equipped
This feature provides the vehicle owner with the
ability to customize vehicle settings that can be
applied to determine the driving experience for
other drivers of the vehicle. The vehicle settings
are protected by a unique 4-digit PIN, which the
vehicle owner creates when accessing the specific
settings for the first time. KeySense also has additional features that are
always enabled when the specific key is in use that
cannot be set by the vehicle owner. While this
specific key fob is in use, the vehicle will respond
accordingly to the customized vehicle settings and
mandatory features. This includes enhanced
driving assistance features, increased driver
alerts, and the locking of certain optional features.
Settings can be customized within the Uconnect
system
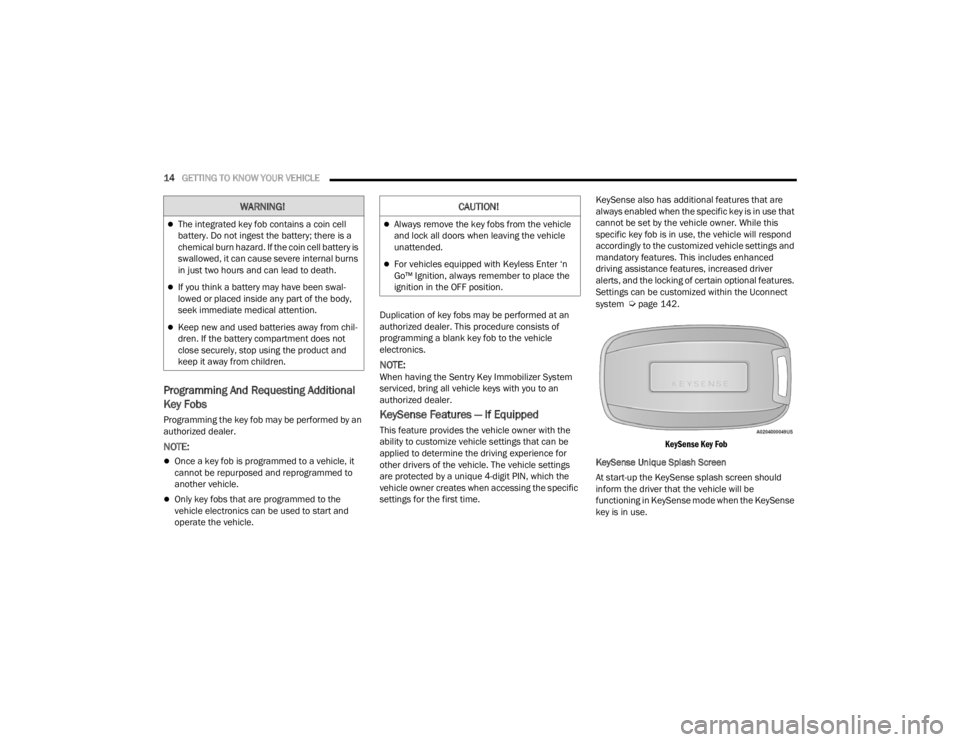
Úpage 142.
KeySense Key Fob
KeySense Unique Splash Screen
At start-up the KeySense splash screen should
inform the driver that the vehicle will be
functioning in KeySense mode when the KeySense
key is in use.
WARNING!
The integrated key fob contains a coin cell
battery. Do not ingest the battery; there is a
chemical burn hazard. If the coin cell battery is
swallowed, it can cause severe internal burns
in just two hours and can lead to death.
If you think a battery may have been swal-
lowed or placed inside any part of the body,
seek immediate medical attention.
Keep new and used batteries away from chil -
dren. If the battery compartment does not
close securely, stop using the product and
keep it away from children.
CAUTION!
Always remove the key fobs from the vehicle
and lock all doors when leaving the vehicle
unattended.
For vehicles equipped with Keyless Enter ‘n
Go™ Ignition, always remember to place the
ignition in the OFF position.
21_RUV_OM_EN_USC_t.book Page 14
Page 17 of 348
GETTING TO KNOW YOUR VEHICLE15
Start Up Display Features
Unique splash screen graphic
Telltale illuminated
After unique splash screen, and after stored
messages are cycled, then start-up KeySense
messages (Range & Max Speed) are displayed
The following features are always enabled when
this key is in use:
Entertainment audio muted if front row occu-
pied seat belts are not fastened
Consistent seat belt unfastened chime
Maximum radio volume limited to 15 out of 39
Daytime Running Lights
SENTRY KEY
The Sentry Key Immobilizer system prevents
unauthorized vehicle operation by disabling the
engine. The system does not need to be armed or
activated. Operation is automatic, regardless of
whether the vehicle is locked or unlocked.
The system uses a key fob, keyless push button
ignition and a Radio Frequency (RF) receiver to
prevent unauthorized vehicle operation. Therefore,
only key fobs that are programmed to the vehicle
can be used to start and operate the vehicle. The
system cannot reprogram a key fob obtained from
another vehicle. After placing the ignition switch in the ON/RUN
position, the Vehicle Security Light will turn on for
three seconds for a bulb check. If the light remains
on after the bulb check, it indicates that there is a
problem with the electronics. In addition, if the light
begins to flash after the bulb check, it indicates
that someone attempted to start the engine with
an invalid key fob. In the event that a valid key fob
is used to start the engine but there is an issue
with the vehicle electronics, the engine will start
and shut off after two seconds.
If the Vehicle Security Light turns on during normal
vehicle operation (vehicle running for longer than
10 seconds), it indicates that there is a fault in the
electronics. Should this occur, have the vehicle
serviced as soon as possible by an authorized
dealer.
All of the key fobs provided with your new vehicle
have been programmed to the vehicle electronics
Úpage 331.
IGNITION SWITCH
KEYLESS ENTER ‘N GO™ IGNITION
This feature allows the driver to operate the
ignition switch with the push of a button as long as
the key fob is in the passenger compartment.
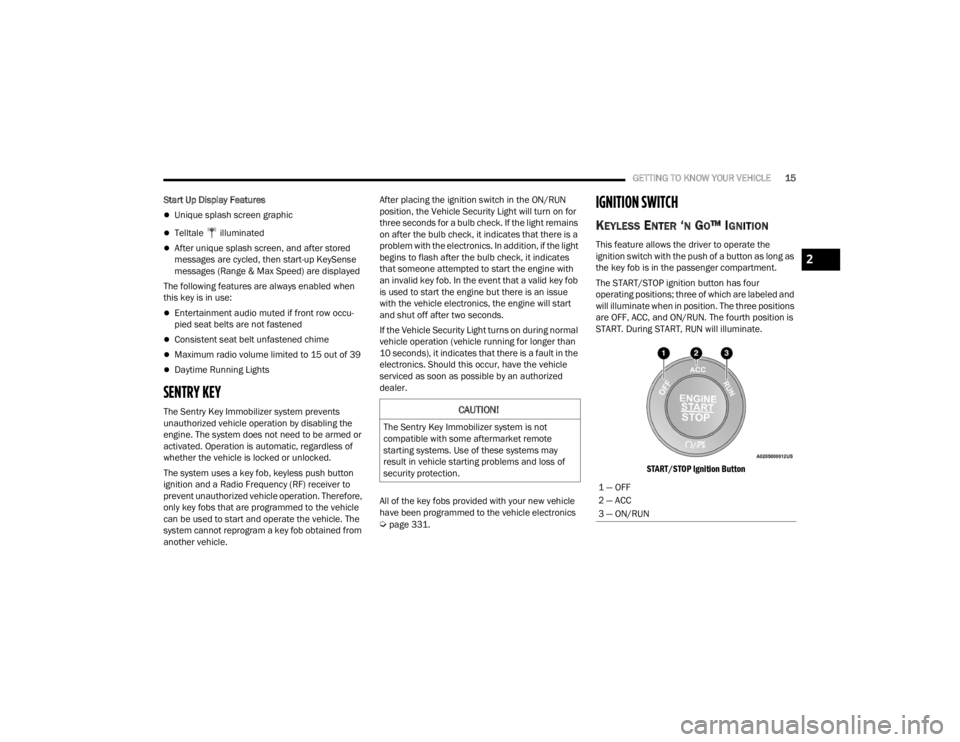
The START/STOP ignition button has four
operating positions; three of which are labeled and
will illuminate when in position. The three positions
are OFF, ACC, and ON/RUN. The fourth position is
START. During START, RUN will illuminate.
START/STOP Ignition Button
CAUTION!
The Sentry Key Immobilizer system is not
compatible with some aftermarket remote
starting systems. Use of these systems may
result in vehicle starting problems and loss of
security protection.
1 — OFF
2 — ACC
3 — ON/RUN
2
21_RUV_OM_EN_USC_t.book Page 15
Page 18 of 348
16GETTING TO KNOW YOUR VEHICLE
(Continued)
The push button ignition can be placed in the
following modes:
OFF
The engine is stopped
Some electrical devices (e.g. power locks,
alarm, etc.) are still available
ACC
The engine is stopped
Some electrical devices are available (e.g.
power windows)
ON/RUN
Driving position
All the electrical devices are available (e.g.
climate controls, etc.)
START
The engine will start (when foot is on the brake
pedal)
The engine only runs in the ON/RUN ignition
position or from a Remote Start request.
In case the ignition switch does not change with
the push of a button, the key fob may have a low or
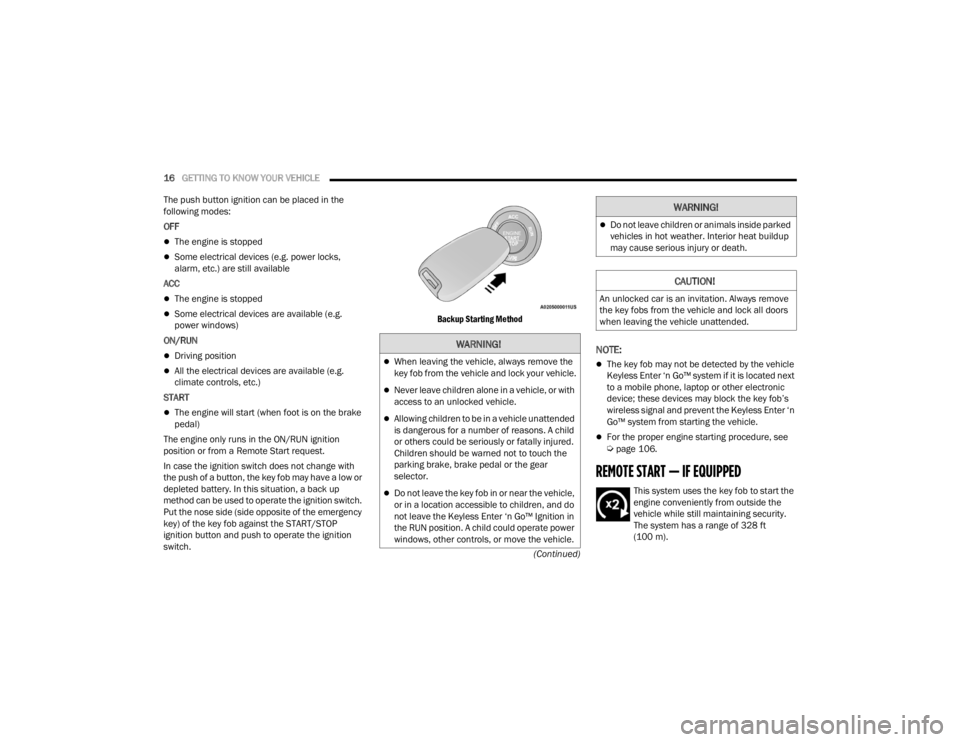
depleted battery. In this situation, a back up
method can be used to operate the ignition switch.
Put the nose side (side opposite of the emergency
key) of the key fob against the START/STOP
ignition button and push to operate the ignition
switch.
Backup Starting Method
NOTE:
The key fob may not be detected by the vehicle
Keyless Enter ‘n Go™ system if it is located next
to a mobile phone, laptop or other electronic
device; these devices may block the key fob’s
wireless signal and prevent the Keyless Enter ‘n
Go™ system from starting the vehicle.
For the proper engine starting procedure, see Úpage 106.
REMOTE START — IF EQUIPPED
This system uses the key fob to start the
engine conveniently from outside the
vehicle while still maintaining security.
The system has a range of 328 ft
(100 m).
WARNING!
When leaving the vehicle, always remove the
key fob from the vehicle and lock your vehicle.
Never leave children alone in a vehicle, or with
access to an unlocked vehicle.
Allowing children to be in a vehicle unattended
is dangerous for a number of reasons. A child
or others could be seriously or fatally injured.
Children should be warned not to touch the
parking brake, brake pedal or the gear
selector.
Do not leave the key fob in or near the vehicle,
or in a location accessible to children, and do
not leave the Keyless Enter ‘n Go™ Ignition in
the RUN position. A child could operate power
windows, other controls, or move the vehicle.
Do not leave children or animals inside parked
vehicles in hot weather. Interior heat buildup
may cause serious injury or death.
CAUTION!
An unlocked car is an invitation. Always remove
the key fobs from the vehicle and lock all doors
when leaving the vehicle unattended.
WARNING!
21_RUV_OM_EN_USC_t.book Page 16
Page 20 of 348

18GETTING TO KNOW YOUR VEHICLE
TO EXIT REMOTE START MODE
To drive the vehicle after starting the Remote Start
system, either push and release the unlock button
on the key fob to unlock the doors, or unlock the
vehicle using Keyless Enter ‘n Go™ — Passive Entry
via the door handles, and disarm the Vehicle
Security system (if equipped). Then, prior to the
end of the 15 minute cycle, push and release the
START/STOP ignition button.
The Remote Start system will turn the engine off
with another push and release of the Remote Start
button on the key fob, or if the engine is allowed to
run for the entire 15 minute cycle. Once the
ignition is placed in the ON/RUN position, the
climate controls will resume the previously set
operations (temperature, blower control, etc.).
NOTE:
For vehicles equipped with the Keyless Enter ‘n
Go™ — Passive Entry feature, the message
“Remote Start Active — Push Start Button” will
show in the instrument cluster display until you
push the START/STOP ignition button.
To avoid unintentional shutdowns, the system
will disable for two seconds after receiving a
valid Remote Start request.
REMOTE START FRONT DEFROST
A
CTIVATION — IF EQUIPPED
When Remote Start is active, and the outside
ambient temperature is 40°F (4.5°C) or below, the
system will automatically activate front defrost for
15 minutes or less. The time is dependent on the
ambient temperature. Once the timer expires, the
system will automatically adjust the settings
depending on ambient conditions. See “Remote
Start Comfort Systems — If Equipped” in the next
section for detailed operation.
REMOTE START COMFORT SYSTEMS —
I
F EQUIPPED
When Remote Start is activated, the front and rear
defrost will automatically turn on in cold weather.
The heated steering wheel and driver heated seat
feature will also turn on if programmed in the
comfort menu screen within Uconnect Settings
Úpage 142. In warm weather, the driver vented
seat feature will automatically turn on when the
Remote Start is activated, if programmed via the
comfort menu screen. The vehicle will adjust the
climate control settings depending on the outside
ambient temperature. Automatic Temperature Control (ATC) —
If Equipped
The climate controls automatically adjust to an
optimal temperature and mode, dependent upon
the outside ambient temperature. When the
ignition is placed in the ON/RUN position, the
climate controls will resume their previous
settings.
Manual Temperature Control (MTC) — If Equipped
In ambient temperatures of 40°F (4.5°C) or
below, the climate settings will default to
maximum heat, with fresh air entering the
cabin. If the front defrost timer expires, the
vehicle will enter Mix Mode.
In ambient temperatures from 40°F (4.5°C) to
78°F (26°C), the climate settings will be based
on the last settings selected by the driver.
In ambient temperatures of 78°F (26°C)
or above, the climate settings will default to
MAX A/C, Bi-Level mode, and Recirculation on.
For more information on ATC, MTC, and climate
control settings, see
Úpage 58.
21_RUV_OM_EN_USC_t.book Page 18
Page 21 of 348

GETTING TO KNOW YOUR VEHICLE19
NOTE:These features will stay on through the duration of
Remote Start until the ignition is placed in the
ON/RUN position. The climate control settings
will change, and exit automatic operation, if
manually adjusted by the driver while the vehicle is
in Remote Start mode. This includes the OFF
button on the climate controls, which will turn the
system off.
REMOTE START WINDSHIELD WIPER
D
E–ICER ACTIVATION — IF EQUIPPED
When the Remote Start system is active and the
outside ambient temperature is less than 33°F
(0.6°C), the Windshield Wiper De-Icer will activate.
Exiting Remote Start will resume its previous
operation. If the Windshield Wiper De-Icer was
active, the timer and operation will continue.
REMOTE START CANCEL MESSAGE
The following messages will display in the
instrument cluster if the vehicle fails to remote
start or exits Remote Start prematurely:
Remote Start Cancelled — Door Open
Remote Start Cancelled — Hood Open
Remote Start Cancelled — Fuel Low
Remote Start Cancelled — Liftgate Open
Remote Start Cancelled — Time Expired
Remote Start Disabled — Start Vehicle To Reset
The message will stay active until the ignition is
placed in the ON/RUN position.
VEHICLE SECURITY SYSTEM — IF EQUIPPED
The Vehicle Security system monitors the vehicle
doors for unauthorized entry and the ignition
switch for unauthorized operation. When the alarm
is activated, the interior switches for door locks,
power sliding doors and power liftgate are
disabled. The Vehicle Security system provides
both audible and visible signals. If something
triggers the alarm, the Vehicle Security system will
provide the following audible and visible signals:
the horn will pulse, the park lamps and/or turn
signals will flash, and the Vehicle Security Light in
the instrument cluster will flash.
TO ARM THE SYSTEM
Follow these steps to arm the Vehicle Security
system:
1. Make sure the vehicle’s ignition is placed in the OFF position.
For vehicles equipped with Keyless
Enter ‘n Go™ — Passive Entry, make sure
the vehicle ignition system is OFF. 2. Perform one of the following methods to lock
the vehicle:
Push lock on the interior power door lock
switch with the driver and/or passenger
door open.
Push the lock button on the exterior Passive
Entry door handle with a valid key fob avail -
able in the same exterior zone
Úpage 22.
Push the lock button on the key fob.
3. If any doors are open, close them.
TO DISARM THE SYSTEM
The Vehicle Security system can be disarmed using
any of the following methods:
Push the unlock button on the key fob.
Grab the Passive Entry door handle (if equipped) Úpage 22.
Cycle the vehicle ignition system out of the OFF
position.
For vehicles equipped with Keyless
Enter ‘n Go™ — Passive Entry, push the
keyless ignition START/STOP ignition button
(requires at least one valid key fob in the
vehicle).
2
21_RUV_OM_EN_USC_t.book Page 19
Page 49 of 348
GETTING TO KNOW YOUR VEHICLE47
UCONNECT VOICE RECOGNITION
INTRODUCING VOICE RECOGNITION
Start using Uconnect Voice Recognition with these
helpful quick tips. It provides the key Voice
Commands and tips you need to know to control
your vehicle’s Voice Recognition (VR) system.
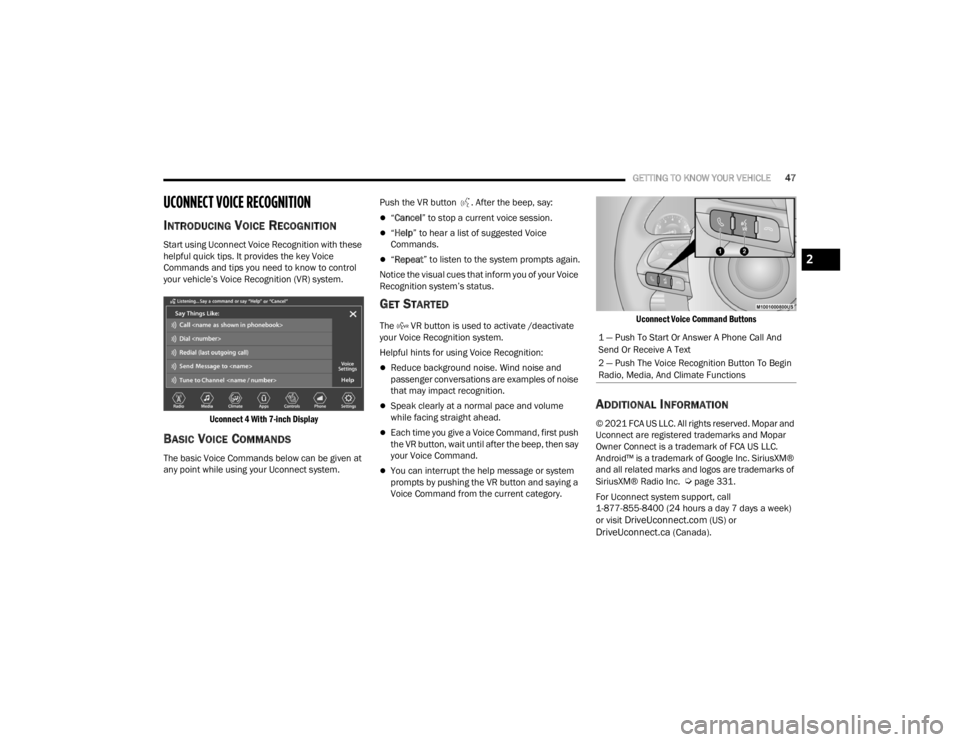
Uconnect 4 With 7-inch Display
BASIC VOICE COMMANDS
The basic Voice Commands below can be given at
any point while using your Uconnect system. Push the VR button . After the beep, say:
“
Cancel ” to stop a current voice session.
“Help ” to hear a list of suggested Voice
Commands.
“ Repeat ” to listen to the system prompts again.
Notice the visual cues that inform you of your Voice
Recognition system’s status.
GET STARTED
The VR button is used to activate /deactivate
your Voice Recognition system.
Helpful hints for using Voice Recognition:
Reduce background noise. Wind noise and
passenger conversations are examples of noise
that may impact recognition.
Speak clearly at a normal pace and volume
while facing straight ahead.
Each time you give a Voice Command, first push
the VR button, wait until after the beep, then say
your Voice Command.
You can interrupt the help message or system
prompts by pushing the VR button and saying a
Voice Command from the current category.
Uconnect Voice Command Buttons
ADDITIONAL INFORMATION
© 2021 FCA US LLC. All rights reserved. Mopar and
Uconnect are registered trademarks and Mopar
Owner Connect is a trademark of FCA US LLC.
Android™ is a trademark of Google Inc. SiriusXM®
and all related marks and logos are trademarks of
SiriusXM® Radio Inc.
Úpage 331.
For Uconnect system support, call
1-877-855-8400 (24 hours a day 7 days a week)
or visit
DriveUconnect.com (US) or DriveUconnect.ca (Canada).
1 — Push To Start Or Answer A Phone Call And
Send Or Receive A Text
2 — Push The Voice Recognition Button To Begin
Radio, Media, And Climate Functions
2
21_RUV_OM_EN_USC_t.book Page 47
Page 92 of 348
90GETTING TO KNOW YOUR INSTRUMENT PANEL
The instrument cluster display (base/premium
cluster) features a driver interactive display that is
located in the center of the instrument cluster, and
may include the following menu/submenu items:
Speedometer
Vehicle Info
Driver Assist — If Equipped
Fuel Economy
Trip (Trip A / Trip B)
Stop / Start — If Equipped
Audio
Messages
Screen Setup
Speed Warning — If Equipped
OIL LIFE RESET
Your vehicle is equipped with an engine oil
change indicator system. The “Oil Change
Required” message will display for approxi -
mately five seconds after a single chime has
sounded, to indicate it is time to change the
engine oil. The engine oil change indicator
system is duty cycle based, which means the
engine oil change interval may fluctuate, depen -
dent upon your personal driving style.
Unless reset, this message will continue to
display each time the ignition is cycled to the
ON/RUN position.
To reset the oil change indicator after
performing the scheduled maintenance, refer to
the following procedure.
NOTE:This procedure should only be performed after
scheduled maintenance is completed. Resetting
oil life other than when associated with a
scheduled maintenance may result in damage due
to not properly maintaining the engine oil.
Oil Life Reset
1. Without pressing the brake pedal, push the ENGINE START/STOP button and place the
ignition in the ON/RUN position (do not start
the vehicle.)
2. Push the OK button to enter the instrument
cluster display menu screen.
3. Push and release the down arrow button to
access the ”Vehicle Info” menu screen.
4. Push the left arrow button or right arrow
button to access the “Oil Life” submenu.
5. Hold the OK button to reset the “Oil Life” to
100%.
6. Push the up arrow button to exit the
instrument cluster display menu screen. Secondary Method For Oil Life Reset Procedure
1. Without pushing the brake pedal, place the
ignition in the ON/RUN position (do not start
the engine).
2. Fully press the accelerator pedal, slowly, three times within 10 seconds.
3. Without pushing the brake pedal, place the ignition in the OFF position.
NOTE:If the indicator message illuminates when you start
the vehicle, the oil change indicator system did not
reset. If necessary, repeat this procedure.
KEYSENSE CLUSTER MESSAGES —
I
F EQUIPPED
When the KeySense key is in use there will be:
Continuous, dedicated telltale
Unique Display Splash Screen
21_RUV_OM_EN_USC_t.book Page 90