transmission CHRYSLER VOYAGER 2023 Owners Manual
[x] Cancel search | Manufacturer: CHRYSLER, Model Year: 2023, Model line: VOYAGER, Model: CHRYSLER VOYAGER 2023Pages: 256, PDF Size: 13.97 MB
Page 5 of 256
3
GETTING TO KNOW YOUR
INSTRUMENT PANEL
BASE INSTRUMENT CLUSTER ...........................................59Base Instrument Cluster Descriptions....................... 60
PREMIUM INSTRUMENT CLUSTER ...................................61 Premium Instrument Cluster Descriptions ................ 62
INSTRUMENT CLUSTER DISPLAY ....................................62 Instrument Cluster Display Location And Controls ... 62
Oil Life Reset ............................................................... 63
KeySense Cluster Messages —
If Equipped .................................................................. 64
Instrument Cluster Display Menu Items ................... 64
Battery Saver On/Battery Saver Mode Message —
Electrical Load Reduction Actions — If Equipped ..... 66
WARNING LIGHTS AND MESSAGES.................................67 Red Warning Lights ..................................................... 67
Yellow Warning Lights ................................................. 70
Yellow Indicator Lights ................................................ 72
Green Indicator Lights ................................................ 72
White Indicator Lights ................................................. 72
Blue Indicator Lights ................................................... 73
ONBOARD DIAGNOSTIC SYSTEM — OBD II .....................73 Onboard Diagnostic System
(OBD II) Cybersecurity ................................................. 73
EMISSIONS INSPECTION AND MAINTENANCE
PROGRAMS ........................................................................74
STARTING AND OPERATING
STARTING THE ENGINE ...................................................... 75 Normal Starting ........................................................... 75
AutoPark .......................................................................75
Cold Weather Operation
(Below –22°F Or −30°C) ........................................... 77
After Starting — Warming Up The Engine ................... 77
If Engine Fails To Start ............................................... 77
To Turn Off The Engine Using ENGINE START/STOP
Button ........................................................................... 78
ENGINE BLOCK HEATER — IF EQUIPPED ........................ 78
ENGINE BREAK-IN RECOMMENDATIONS ....................... 78
PARKING BRAKE ................................................................ 79 Electric Park Brake (EPB) ........................................... 79
AUTOMATIC TRANSMISSION ............................................ 81 Ignition Park Interlock ................................................. 81
Brake/Transmission Shift Interlock (BTSI) System ... 82
9-Speed Automatic Transmission ..............................82
Gear Ranges ................................................................ 82
ACTIVE NOISE CANCELLATION ......................................... 84
POWER STEERING .............................................................. 84
STOP/START SYSTEM — IF EQUIPPED ............................ 85 Autostop Mode............................................................. 85
Possible Reasons The Engine Does Not Autostop .... 85
To Start The Engine While In Auto Stop/Start ........... 85
To Manually Turn Off The Stop/Start System ............ 86
To Manually Turn On The Stop/Start System ............ 86
System Malfunction..................................................... 86
CRUISE CONTROL SYSTEMS — IF EQUIPPED ................. 86 Cruise Control .............................................................. 86 PARKSENSE REAR PARK ASSIST —
IF EQUIPPED ...................................................................... 87
ParkSense Sensors ..................................................... 88
ParkSense Warning Display........................................ 88
ParkSense Display ...................................................... 88
Enabling And Disabling ParkSense ............................ 91
Service The ParkSense Rear Park Assist System ..... 91
Cleaning The ParkSense System ............................... 91
ParkSense System Usage Precautions ...................... 91
PARKVIEW REAR BACK UP CAMERA ............................. 92
REFUELING THE VEHICLE .................................................. 93
VEHICLE LOADING ............................................................. 93 Certification Label ....................................................... 93
TRAILER TOWING ............................................................... 94 Common Towing Definitions....................................... 94
Trailer Hitch Classification .......................................... 96
Trailer Towing Weights (Maximum Trailer Weight
Ratings) ....................................................................... 97
Vehicle Loading Chart ................................................. 97
Trailer And Tongue Weight ......................................... 99
Towing Requirements ................................................ 99
Towing Tips ............................................................... 101
RECREATIONAL TOWING (BEHIND MOTORHOME) ..... 101 Towing This Vehicle Behind Another Vehicle ........... 101
DRIVING TIPS ....................................................................102 Driving On Slippery Surfaces .................................... 102
Driving Through Water ............................................. 103
23_RUV_OM_EN_US_t.book Page 3
Page 7 of 256
5
Exhaust System ........................................................ 203
Cooling System.......................................................... 204
Brake System ........................................................... 206
Automatic Transmission .......................................... 207
Fuses ......................................................................... 208
Bulb Replacement .................................................... 215
TIRES ................................................................................ 217 Tire Safety Information ............................................ 217
Tires — General Information .................................... 224
Tire Types................................................................... 227
Spare Tires — If Equipped ........................................ 228Wheel And Wheel Trim Care .................................... 229
Snow Traction Devices ............................................ 230
Tire Rotation Recommendations ............................. 230
DEPARTMENT OF TRANSPORTATION UNIFORM TIRE
QUALITY GRADES ........................................................... 231 Treadwear .................................................................. 231
Traction Grades ......................................................... 231
Temperature Grades................................................. 231
STORING THE VEHICLE.................................................... 232
BODYWORK ...................................................................... 232 Protection From Atmospheric Agents ...................... 232
Body And Underbody Maintenance ......................... 232Preserving The Bodywork ......................................... 233 INTERIORS ....................................................................... 233
Seats And Fabric Parts ............................................. 233
Plastic And Coated Parts .......................................... 234Leather Surfaces ...................................................... 234
Glass Surfaces ......................................................... 234
TECHNICAL SPECIFICATIONS
VEHICLE IDENTIFICATION NUMBER (VIN)..................... 235
BRAKE SYSTEM .............................................................. 235
WHEEL AND TIRE TORQUE SPECIFICATIONS .............. 235 Torque Specifications ............................................... 235
FUEL REQUIREMENTS .................................................... 236 3.6L Engine .............................................................. 236
Reformulated Gasoline ........................................... 236Gasoline/Oxygenate Blends .................................... 236Do Not Use E-85 In Non-Flex Fuel Vehicles ............ 237
CNG And LP Fuel System Modifications.................. 237
Methylcyclopentadienyl Manganese
Tricarbonyl (MMT) In Gasoline ................................. 237
Materials Added To Fuel .......................................... 237Fuel System Cautions ............................................... 237
FLUID CAPACITIES .......................................................... 238
ENGINE FLUIDS AND LUBRICANTS .............................. 238
CHASSIS FLUIDS AND LUBRICANTS ............................ 239
CUSTOMER ASSISTANCE
SUGGESTIONS FOR OBTAINING SERVICE FOR YOUR
VEHICLE ............................................................................240 Prepare For The Appointment .................................. 240
Prepare A List ............................................................ 240Be Reasonable With Requests ................................. 240
IF YOU NEED ASSISTANCE ..............................................240 Roadside Assistance ................................................. 240
FCA US LLC Customer Center ................................... 241
FCA Canada Inc. Customer Center........................... 241
Mexico ........................................................................ 241
Puerto Rico And US Virgin Islands............................ 242
Customer Assistance For The Hearing Or Speech
Impaired (TDD/TTY)................................................... 242
Service Contract ....................................................... 242
WARRANTY INFORMATION.............................................242
MOPAR® PARTS ..............................................................242
REPORTING SAFETY DEFECTS ......................................243 In The 50 United States And Washington, D.C........ 243
In Canada................................................................... 243
PUBLICATION ORDER FORMS .......................................243
CHANGE OF OWNERSHIP OR ADDRESS.......................244
GENERAL INFORMATION................................................. 244
23_RUV_OM_EN_US_t.book Page 5
Page 10 of 256
8
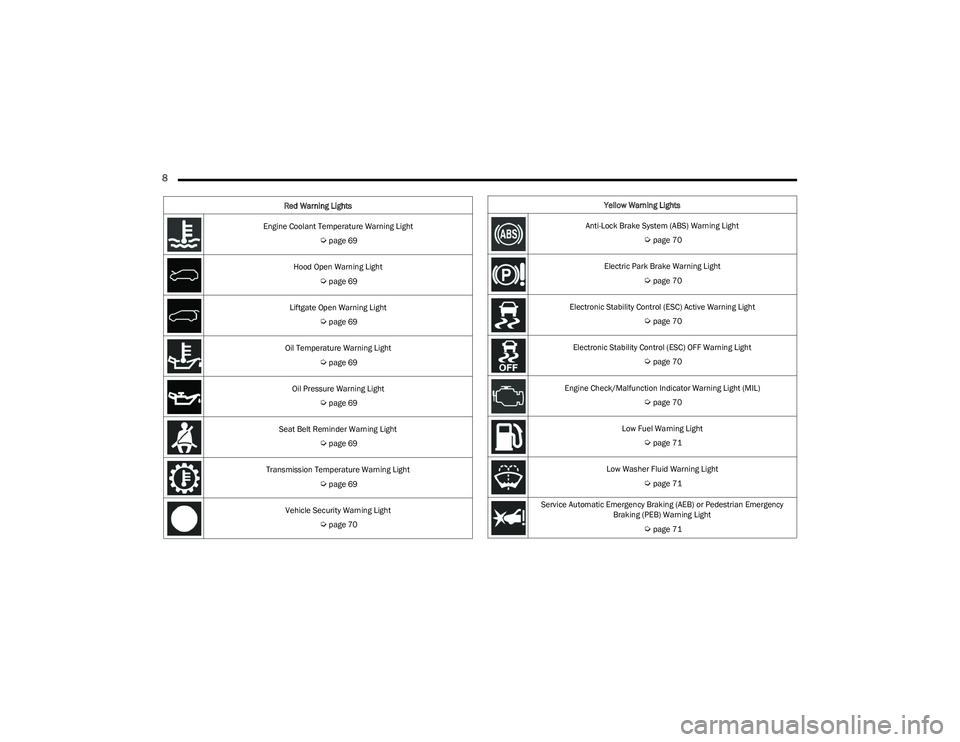
Engine Coolant Temperature Warning Light
Úpage 69
Hood Open Warning Light
Úpage 69
Liftgate Open Warning Light
Úpage 69
Oil Temperature Warning Light
Úpage 69
Oil Pressure Warning Light
Úpage 69
Seat Belt Reminder Warning Light
Úpage 69
Transmission Temperature Warning Light
Úpage 69
Vehicle Security Warning Light
Úpage 70
Red Warning Lights
Yellow Warning Lights
Anti-Lock Brake System (ABS) Warning Light
Úpage 70
Electric Park Brake Warning Light
Úpage 70
Electronic Stability Control (ESC) Active Warning Light
Úpage 70
Electronic Stability Control (ESC) OFF Warning Light
Úpage 70
Engine Check/Malfunction Indicator Warning Light (MIL)
Úpage 70
Low Fuel Warning Light
Úpage 71
Low Washer Fluid Warning Light
Úpage 71
Service Automatic Emergency Braking (AEB) or Pedestrian Emergency Braking (PEB) Warning Light
Úpage 71
23_RUV_OM_EN_US_t.book Page 8
Page 46 of 256

44GETTING TO KNOW YOUR VEHICLE
Neutral Wipe Inhibit
— The Rain Sensing feature will not
operate when the ignition is ON, when the transmission gear
selector is in the NEUTRAL position and the vehicle speed is
less than 3 mph (5 km/h), unless the wiper control on the
windshield wiper lever is moved, the vehicle speed is
greater than 3 mph (5 km/h) or the gear selector is moved
out of the NEUTRAL position.
Remote Start Mode Inhibit — On vehicles equipped with
the Remote Start system, Rain Sensing wipers are not
operational when the vehicle is in the Remote Start
mode. Once the operator is in the vehicle and has
placed the ignition switch in the ON/RUN position, rain
sensing wiper operation can resume, if it has been
selected, and no other inhibit conditions (mentioned
previously) exist.
REAR WIPER AND WASHER
The rear wiper/washer is operated by rotating a switch,
located at the middle of the lever.
Rotate the center portion of the lever upward to
the first detent for intermittent operation and to
the second detent for continuous rear wiper
operation.
Rear Window Washer Operation Pushing the windshield wiper lever forward
activates the rear window washer. If the lever is
pushed while on the intermittent setting, the
wiper will turn on and operate for several wipe
cycles after the lever is released, and then resume the
intermittent interval previously selected. If the lever is
pushed while the wiper is in the off position, the wiper will
operate several wipe cycles, then turn off.
CLIMATE CONTROLS
MANUAL CLIMATE CONTROL
D
ESCRIPTIONS AND FUNCTIONS
Uconnect 5 With 7-inch Display Manual Temperature Controls
Uconnect 5/5 NAV With 10.1-inch Display Manual Temperature Controls
MAX A/C Button
Press and release the MAX A/C button to
change the current setting. The indicator
illuminates when MAX A/C is on. Performing
this function again will cause the MAX A/C
operation to switch into manual mode and the MAX A/C
indicator will turn off.
NOTE:The MAX A/C setting is only available on the touchscreen.
A/C Button
Press and release the A/C button to change the
current setting. The indicator illuminates when
A/C is on.
NOTE:
For Manual Climate Controls, if the system is in Mix,
Floor or Defrost Mode, the A/C can be turned off, but
the A/C system shall remain active to prevent fogging
of the windows.
If fog or mist appears on the windshield or side glass,
select Defrost mode, and increase blower speed if
needed.
If your air conditioning performance seems lower than
expected, check the front of the A/C condenser
(located in front of the radiator), for an accumulation of
dirt or insects. Clean with a gentle water spray from the
front of the radiator and through the condenser.
23_RUV_OM_EN_US_t.book Page 44
Page 58 of 256
56GETTING TO KNOW YOUR VEHICLE
HOOD
OPENING
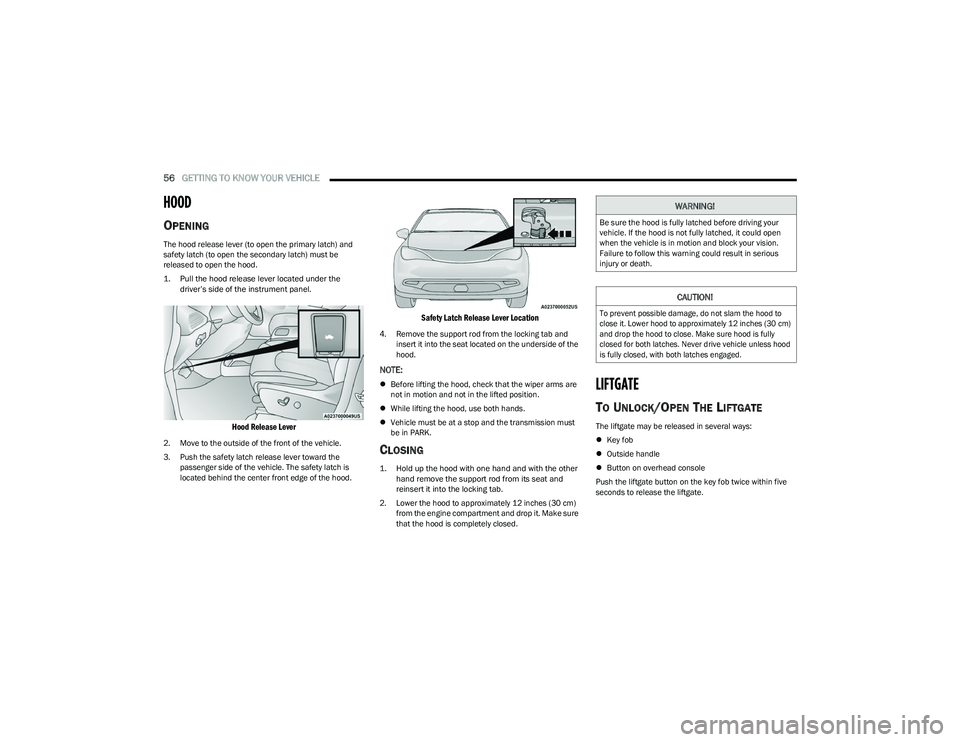
The hood release lever (to open the primary latch) and
safety latch (to open the secondary latch) must be
released to open the hood.
1. Pull the hood release lever located under the
driver’s side of the instrument panel.
Hood Release Lever
2. Move to the outside of the front of the vehicle.
3. Push the safety latch release lever toward the passenger side of the vehicle. The safety latch is
located behind the center front edge of the hood.
Safety Latch Release Lever Location
4. Remove the support rod from the locking tab and insert it into the seat located on the underside of the
hood.
NOTE:
Before lifting the hood, check that the wiper arms are
not in motion and not in the lifted position.
While lifting the hood, use both hands.
Vehicle must be at a stop and the transmission must
be in PARK.
CLOSING
1. Hold up the hood with one hand and with the other
hand remove the support rod from its seat and
reinsert it into the locking tab.
2. Lower the hood to approximately 12 inches (30 cm) from the engine compartment and drop it. Make sure
that the hood is completely closed.
LIFTGATE
TO UNLOCK/OPEN THE LIFTGATE
The liftgate may be released in several ways:
Key fob
Outside handle
Button on overhead console
Push the liftgate button on the key fob twice within five
seconds to release the liftgate.
WARNING!
Be sure the hood is fully latched before driving your
vehicle. If the hood is not fully latched, it could open
when the vehicle is in motion and block your vision.
Failure to follow this warning could result in serious
injury or death.
CAUTION!
To prevent possible damage, do not slam the hood to
close it. Lower hood to approximately 12 inches (30 cm)
and drop the hood to close. Make sure hood is fully
closed for both latches. Never drive vehicle unless hood
is fully closed, with both latches engaged.
23_RUV_OM_EN_US_t.book Page 56
Page 66 of 256
64GETTING TO KNOW YOUR INSTRUMENT PANEL
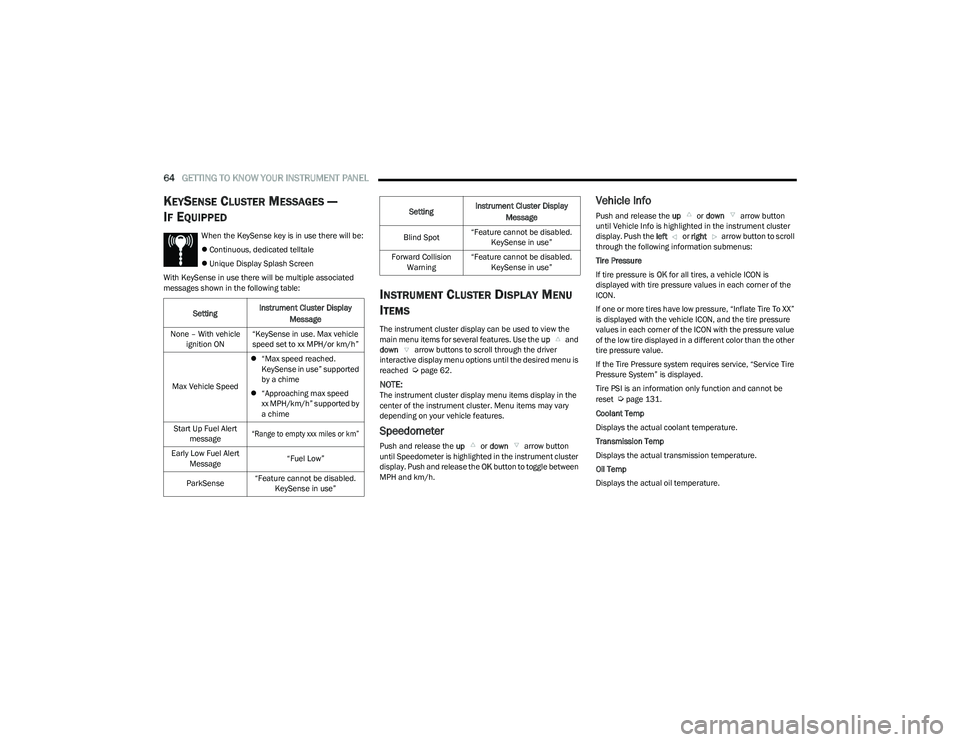
KEYSENSE CLUSTER MESSAGES —
I
F EQUIPPED
When the KeySense key is in use there will be:
Continuous, dedicated telltale
Unique Display Splash Screen
With KeySense in use there will be multiple associated
messages shown in the following table:
INSTRUMENT CLUSTER DISPLAY MENU
I
TEMS
The instrument cluster display can be used to view the
main menu items for several features. Use the up and
down arrow buttons to scroll through the driver
interactive display menu options until the desired menu is
reached
Úpage 62.
NOTE:The instrument cluster display menu items display in the
center of the instrument cluster. Menu items may vary
depending on your vehicle features.
Speedometer
Push and release the up or down arrow button
until Speedometer is highlighted in the instrument cluster
display. Push and release the OK button to toggle between
MPH and km/h.
Vehicle Info
Push and release the up or down arrow button
until Vehicle Info is highlighted in the instrument cluster
display. Push the left or right arrow button to scroll
through the following information submenus:
Tire Pressure
If tire pressure is OK for all tires, a vehicle ICON is
displayed with tire pressure values in each corner of the
ICON.
If one or more tires have low pressure, “Inflate Tire To XX”
is displayed with the vehicle ICON, and the tire pressure
values in each corner of the ICON with the pressure value
of the low tire displayed in a different color than the other
tire pressure value.
If the Tire Pressure system requires service, “Service Tire
Pressure System” is displayed.
Tire PSI is an information only function and cannot be
reset
Úpage 131.
Coolant Temp
Displays the actual coolant temperature.
Transmission Temp
Displays the actual transmission temperature.
Oil Temp
Displays the actual oil temperature.
Setting
Instrument Cluster Display
Message
None – With vehicle ignition ON “KeySense in use. Max vehicle
speed set to xx MPH/or km/h”
Max Vehicle Speed
“Max speed reached.
KeySense in use” supported
by a chime
“Approaching max speed
xx MPH/km/h” supported by
a chime
Start Up Fuel Alert message
“Range to empty xxx miles or km”
Early Low Fuel Alert Message “Fuel Low”
ParkSense “Feature cannot be disabled.
KeySense in use”
Blind Spot “Feature cannot be disabled.
KeySense in use”
Forward Collision Warning “Feature cannot be disabled.
KeySense in use”
Setting
Instrument Cluster Display
Message
23_RUV_OM_EN_US_t.book Page 64
Page 70 of 256
68GETTING TO KNOW YOUR INSTRUMENT PANEL
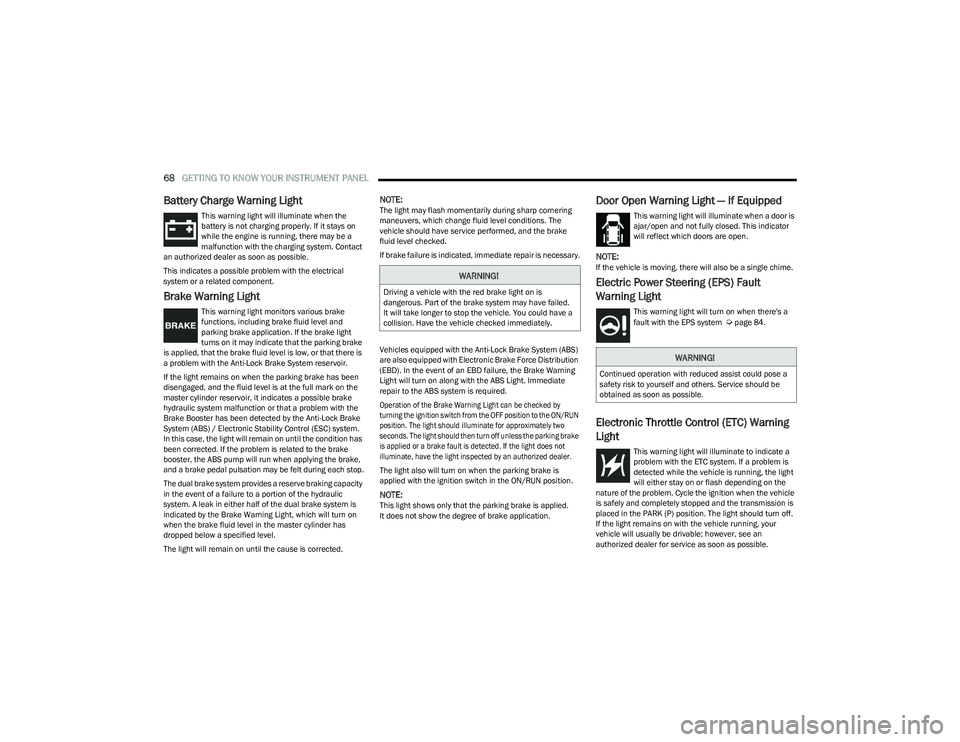
Battery Charge Warning Light
This warning light will illuminate when the
battery is not charging properly. If it stays on
while the engine is running, there may be a
malfunction with the charging system. Contact
an authorized dealer as soon as possible.
This indicates a possible problem with the electrical
system or a related component.
Brake Warning Light
This warning light monitors various brake
functions, including brake fluid level and
parking brake application. If the brake light
turns on it may indicate that the parking brake
is applied, that the brake fluid level is low, or that there is
a problem with the Anti-Lock Brake System reservoir.
If the light remains on when the parking brake has been
disengaged, and the fluid level is at the full mark on the
master cylinder reservoir, it indicates a possible brake
hydraulic system malfunction or that a problem with the
Brake Booster has been detected by the Anti-Lock Brake
System (ABS) / Electronic Stability Control (ESC) system.
In this case, the light will remain on until the condition has
been corrected. If the problem is related to the brake
booster, the ABS pump will run when applying the brake,
and a brake pedal pulsation may be felt during each stop.
The dual brake system provides a reserve braking capacity
in the event of a failure to a portion of the hydraulic
system. A leak in either half of the dual brake system is
indicated by the Brake Warning Light, which will turn on
when the brake fluid level in the master cylinder has
dropped below a specified level.
The light will remain on until the cause is corrected.
NOTE:The light may flash momentarily during sharp cornering
maneuvers, which change fluid level conditions. The
vehicle should have service performed, and the brake
fluid level checked.
If brake failure is indicated, immediate repair is necessary.
Vehicles equipped with the Anti-Lock Brake System (ABS)
are also equipped with Electronic Brake Force Distribution
(EBD). In the event of an EBD failure, the Brake Warning
Light will turn on along with the ABS Light. Immediate
repair to the ABS system is required.
Operation of the Brake Warning Light can be checked by
turning the ignition switch from the OFF position to the ON/RUN
position. The light should illuminate for approximately two
seconds. The light should then turn off unless the parking brake
is applied or a brake fault is detected. If the light does not
illuminate, have the light inspected by an authorized dealer.
The light also will turn on when the parking brake is
applied with the ignition switch in the ON/RUN position.
NOTE:This light shows only that the parking brake is applied.
It does not show the degree of brake application.
Door Open Warning Light — If Equipped
This warning light will illuminate when a door is
ajar/open and not fully closed. This indicator
will reflect which doors are open.
NOTE:If the vehicle is moving, there will also be a single chime.
Electric Power Steering (EPS) Fault
Warning Light
This warning light will turn on when there's a
fault with the EPS system Úpage 84.
Electronic Throttle Control (ETC) Warning
Light
This warning light will illuminate to indicate a
problem with the ETC system. If a problem is
detected while the vehicle is running, the light
will either stay on or flash depending on the
nature of the problem. Cycle the ignition when the vehicle
is safely and completely stopped and the transmission is
placed in the PARK (P) position. The light should turn off.
If the light remains on with the vehicle running, your
vehicle will usually be drivable; however, see an
authorized dealer for service as soon as possible.
WARNING!
Driving a vehicle with the red brake light on is
dangerous. Part of the brake system may have failed.
It will take longer to stop the vehicle. You could have a
collision. Have the vehicle checked immediately.
WARNING!
Continued operation with reduced assist could pose a
safety risk to yourself and others. Service should be
obtained as soon as possible.
23_RUV_OM_EN_US_t.book Page 68
Page 71 of 256
GETTING TO KNOW YOUR INSTRUMENT PANEL69
NOTE:This light may turn on if the accelerator and brake pedals
are pressed at the same time.
If the light continues to flash when the vehicle is running,
immediate service is required and you may experience
reduced performance, an elevated/rough idle, or engine
stall and your vehicle may require towing. The light will
come on when the ignition is placed in the ON/RUN or
ACC/ON/RUN position and remain on briefly as a bulb
check. If the light does not come on during starting, have
the system checked by an authorized dealer.
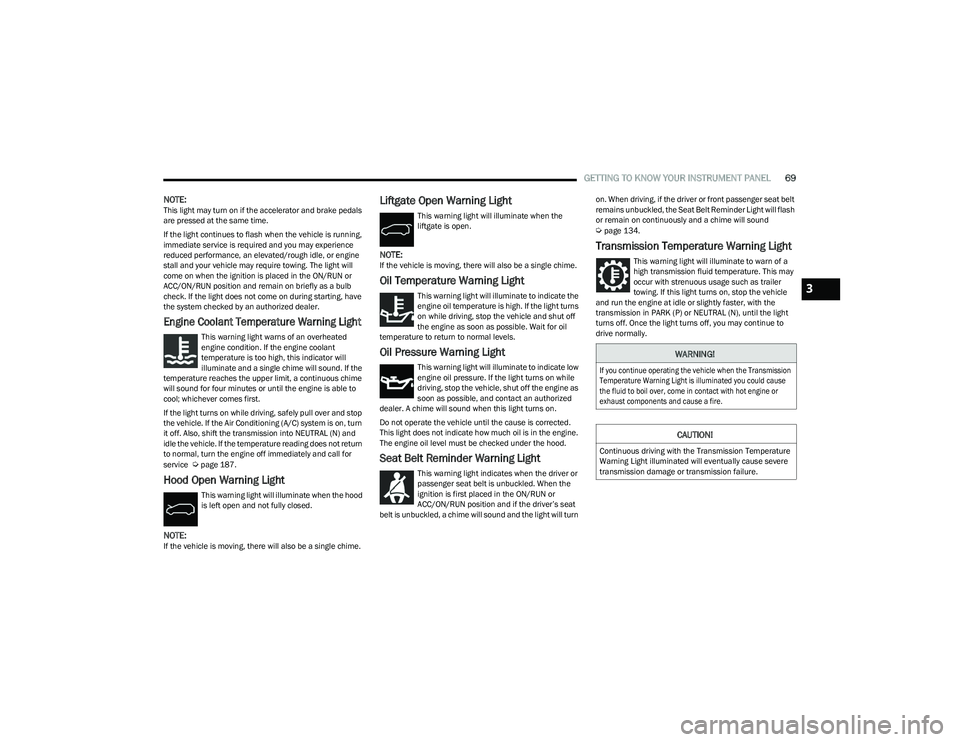
Engine Coolant Temperature Warning Light
This warning light warns of an overheated
engine condition. If the engine coolant
temperature is too high, this indicator will
illuminate and a single chime will sound. If the
temperature reaches the upper limit, a continuous chime
will sound for four minutes or until the engine is able to
cool; whichever comes first.
If the light turns on while driving, safely pull over and stop
the vehicle. If the Air Conditioning (A/C) system is on, turn
it off. Also, shift the transmission into NEUTRAL (N) and
idle the vehicle. If the temperature reading does not return
to normal, turn the engine off immediately and call for
service
Úpage 187.
Hood Open Warning Light
This warning light will illuminate when the hood
is left open and not fully closed.
NOTE:If the vehicle is moving, there will also be a single chime.
Liftgate Open Warning Light
This warning light will illuminate when the
liftgate is open.
NOTE:If the vehicle is moving, there will also be a single chime.
Oil Temperature Warning Light
This warning light will illuminate to indicate the
engine oil temperature is high. If the light turns
on while driving, stop the vehicle and shut off
the engine as soon as possible. Wait for oil
temperature to return to normal levels.
Oil Pressure Warning Light
This warning light will illuminate to indicate low
engine oil pressure. If the light turns on while
driving, stop the vehicle, shut off the engine as
soon as possible, and contact an authorized
dealer. A chime will sound when this light turns on.
Do not operate the vehicle until the cause is corrected.
This light does not indicate how much oil is in the engine.
The engine oil level must be checked under the hood.
Seat Belt Reminder Warning Light
This warning light indicates when the driver or
passenger seat belt is unbuckled. When the
ignition is first placed in the ON/RUN or
ACC/ON/RUN position and if the driver’s seat
belt is unbuckled, a chime will sound and the light will turn on. When driving, if the driver or front passenger seat belt
remains unbuckled, the Seat Belt Reminder Light will flash
or remain on continuously and a chime will sound
Úpage 134.
Transmission Temperature Warning Light
This warning light will illuminate to warn of a
high transmission fluid temperature. This may
occur with strenuous usage such as trailer
towing. If this light turns on, stop the vehicle
and run the engine at idle or slightly faster, with the
transmission in PARK (P) or NEUTRAL (N), until the light
turns off. Once the light turns off, you may continue to
drive normally.
WARNING!
If you continue operating the vehicle when the Transmission
Temperature Warning Light is illuminated you could cause
the fluid to boil over, come in contact with hot engine or
exhaust components and cause a fire.
CAUTION!
Continuous driving with the Transmission Temperature
Warning Light illuminated will eventually cause severe
transmission damage or transmission failure.
3
23_RUV_OM_EN_US_t.book Page 69
Page 72 of 256
70GETTING TO KNOW YOUR INSTRUMENT PANEL
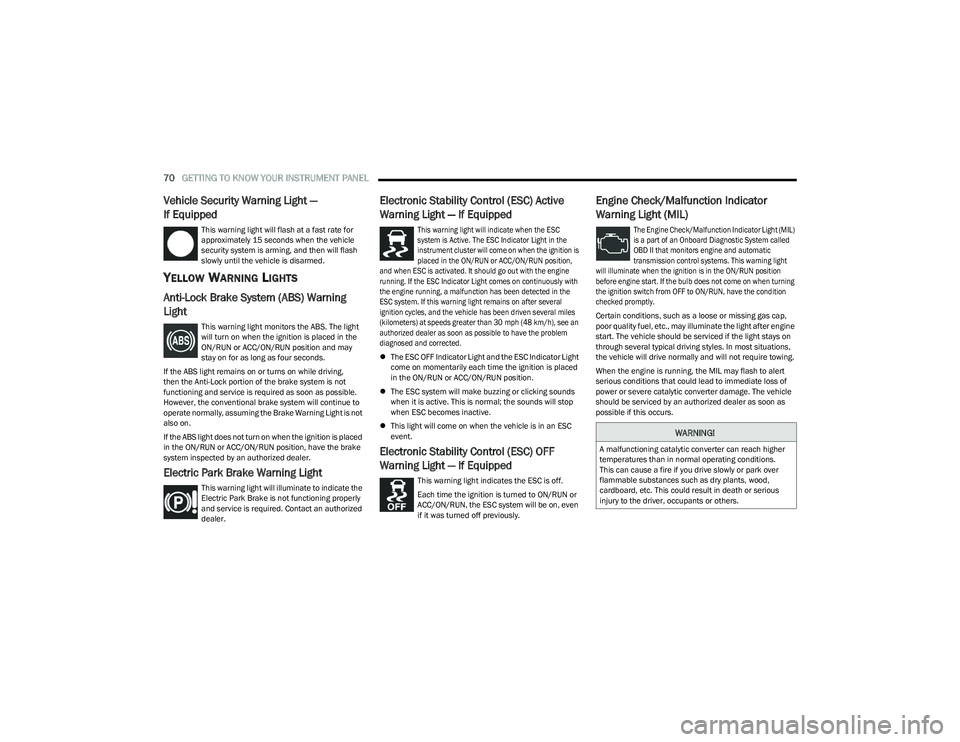
Vehicle Security Warning Light —
If Equipped
This warning light will flash at a fast rate for
approximately 15 seconds when the vehicle
security system is arming, and then will flash
slowly until the vehicle is disarmed.
YELLOW WARNING LIGHTS
Anti-Lock Brake System (ABS) Warning
Light
This warning light monitors the ABS. The light
will turn on when the ignition is placed in the
ON/RUN or ACC/ON/RUN position and may
stay on for as long as four seconds.
If the ABS light remains on or turns on while driving,
then the Anti-Lock portion of the brake system is not
functioning and service is required as soon as possible.
However, the conventional brake system will continue to
operate normally, assuming the Brake Warning Light is not
also on.
If the ABS light does not turn on when the ignition is placed
in the ON/RUN or ACC/ON/RUN position, have the brake
system inspected by an authorized dealer.
Electric Park Brake Warning Light
This warning light will illuminate to indicate the
Electric Park Brake is not functioning properly
and service is required. Contact an authorized
dealer.
Electronic Stability Control (ESC) Active
Warning Light — If Equipped
This warning light will indicate when the ESC
system is Active. The ESC Indicator Light in the
instrument cluster will come on when the ignition is
placed in the ON/RUN or ACC/ON/RUN position,
and when ESC is activated. It should go out with the engine
running. If the ESC Indicator Light comes on continuously with
the engine running, a malfunction has been detected in the
ESC system. If this warning light remains on after several
ignition cycles, and the vehicle has been driven several miles
(kilometers) at speeds greater than 30 mph (48 km/h), see an
authorized dealer as soon as possible to have the problem
diagnosed and corrected.
The ESC OFF Indicator Light and the ESC Indicator Light
come on momentarily each time the ignition is placed
in the ON/RUN or ACC/ON/RUN position.
The ESC system will make buzzing or clicking sounds
when it is active. This is normal; the sounds will stop
when ESC becomes inactive.
This light will come on when the vehicle is in an ESC
event.
Electronic Stability Control (ESC) OFF
Warning Light — If Equipped
This warning light indicates the ESC is off.
Each time the ignition is turned to ON/RUN or
ACC/ON/RUN, the ESC system will be on, even
if it was turned off previously.
Engine Check/Malfunction Indicator
Warning Light (MIL)
The Engine Check/Malfunction Indicator Light (MIL)
is a part of an Onboard Diagnostic System called
OBD II that monitors engine and automatic
transmission control systems. This warning light
will illuminate when the ignition is in the ON/RUN position
before engine start. If the bulb does not come on when turning
the ignition switch from OFF to ON/RUN, have the condition
checked promptly.
Certain conditions, such as a loose or missing gas cap,
poor quality fuel, etc., may illuminate the light after engine
start. The vehicle should be serviced if the light stays on
through several typical driving styles. In most situations,
the vehicle will drive normally and will not require towing.
When the engine is running, the MIL may flash to alert
serious conditions that could lead to immediate loss of
power or severe catalytic converter damage. The vehicle
should be serviced by an authorized dealer as soon as
possible if this occurs.
WARNING!
A malfunctioning catalytic converter can reach higher
temperatures than in normal operating conditions.
This can cause a fire if you drive slowly or park over
flammable substances such as dry plants, wood,
cardboard, etc. This could result in death or serious
injury to the driver, occupants or others.
23_RUV_OM_EN_US_t.book Page 70
Page 75 of 256
GETTING TO KNOW YOUR INSTRUMENT PANEL73
BLUE INDICATOR LIGHTS
High Beam Indicator Light
This indicator light will illuminate to indicate
that the high beam headlights are on. With the
low beams activated, push the multifunction
lever forward (toward the front of the vehicle) to
turn on the high beams. Pull the multifunction lever
rearward (toward the rear of the vehicle) to turn off the
high beams. If the high beams are off, pull the lever toward
you for a temporary high beam on, “flash to pass”
scenario.
ONBOARD DIAGNOSTIC SYSTEM — OBD II
Your vehicle is equipped with a sophisticated Onboard
Diagnostic system called OBD II. This system monitors the
performance of the emissions, engine, and automatic
transmission control systems. When these systems are
operating properly, your vehicle will provide excellent
performance and fuel economy, as well as emissions well
within current government regulations. If any of these systems require service, the OBD II system
will turn on the Malfunction Indicator Light (MIL). It will
also store diagnostic codes and other information to
assist your service technician in making repairs. Although
your vehicle will usually be drivable and not need towing,
see an authorized dealer for service as soon as possible.
ONBOARD DIAGNOSTIC SYSTEM
(OBD II) CYBERSECURITY
Your vehicle is required to have OBD II and a connection
port to allow access to information related to the
performance of your emissions controls. Authorized
service technicians may need to access this information to
assist with the diagnosis and service of your vehicle and
emissions system
Úpage 104.
CAUTION!
Prolonged driving with the MIL on could cause further
damage to the emission control system. It could also
affect fuel economy and driveability. The vehicle
must be serviced before any emissions tests can be
performed.
If the MIL is flashing while the vehicle is running,
severe catalytic converter damage and power loss
will soon occur. Immediate service is required.
WARNING!
ONLY an authorized service technician should
connect equipment to the OBD II connection port in
order to read the VIN, diagnose, or service your
vehicle.
If unauthorized equipment is connected to the OBD II
connection port, such as a driver-behavior tracking
device, it may:
Be possible that vehicle systems, including
safety related systems, could be impaired or a
loss of vehicle control could occur that may
result in an accident involving serious injury or
death.
Access, or allow others to access, information
stored in your vehicle systems, including
personal information.
3
23_RUV_OM_EN_US_t.book Page 73