torque Citroen BERLINGO 2005 1.G Workshop Manual
[x] Cancel search | Manufacturer: CITROEN, Model Year: 2005, Model line: BERLINGO, Model: Citroen BERLINGO 2005 1.GPages: 462, PDF Size: 10.48 MB
Page 169 of 462
Downloaded from www.Manualslib.com manuals search engine 163
ENGINE
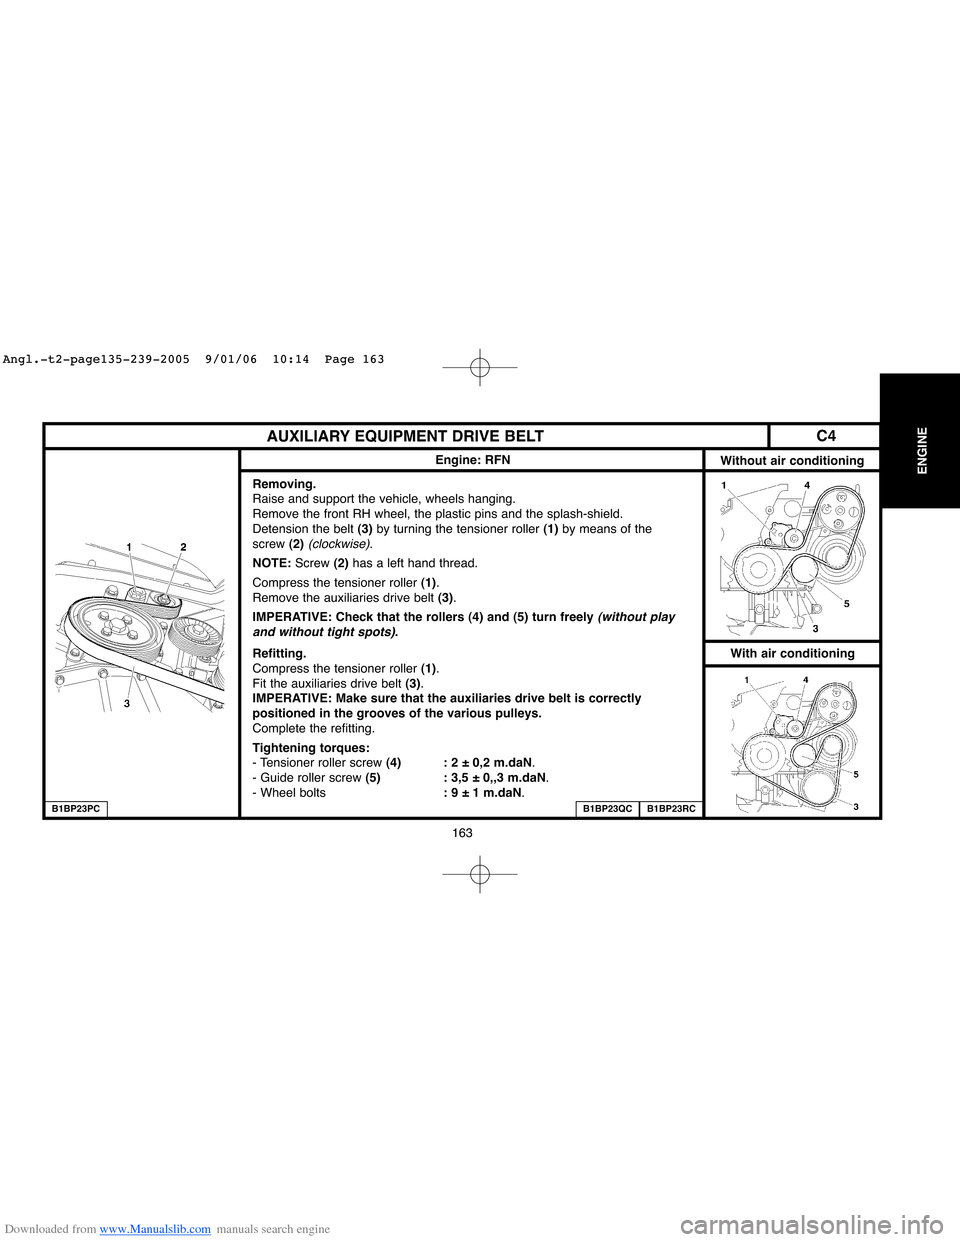
AUXILIARY EQUIPMENT DRIVE BELT
Engine: RFN
Without air conditioning
Removing.
Raise and support the vehicle, wheels hanging.
Remove the front RH wheel, the plastic pins and the splash-shield.
Detension the belt (3)by turning the tensioner roller (1)by means of the
screw (2)
(clockwise).
NOTE:Screw (2)has a left hand thread.
Compress the tensioner roller (1).
Remove the auxiliaries drive belt (3).
IMPERATIVE: Check that the rollers (4) and (5) turn freely
(without play
and without tight spots).
Refitting.
Compress the tensioner roller (1).
Fit the auxiliaries drive belt (3).
IMPERATIVE: Make sure that the auxiliaries drive belt is correctly
positioned in the grooves of the various pulleys.
Complete the refitting.
Tightening torques:
- Tensioner roller screw (4) : 2 ± 0,2 m.daN.
- Guide roller screw (5) : 3,5 ± 0,,3 m.daN.
- Wheel bolts: 9 ± 1 m.daN.
B1BP23PCB1BP23QCB1BP23RC
With air conditioning
C4
Angl.-t2-page135-239-2005 9/01/06 10:14 Page 163
Page 170 of 462
![Citroen BERLINGO 2005 1.G Workshop Manual Downloaded from www.Manualslib.com manuals search engine 164
ENGINE
B1BP39AC
B1BP23RC
AUXILIARY EQUIPMENT DRIVE BELT
Engine: RFK
Tools.
[1]Detensioning lever for auxiliaries drive belt tensioner rolle Citroen BERLINGO 2005 1.G Workshop Manual Downloaded from www.Manualslib.com manuals search engine 164
ENGINE
B1BP39AC
B1BP23RC
AUXILIARY EQUIPMENT DRIVE BELT
Engine: RFK
Tools.
[1]Detensioning lever for auxiliaries drive belt tensioner rolle](/img/9/4138/w960_4138-169.png)
Downloaded from www.Manualslib.com manuals search engine 164
ENGINE
B1BP39AC
B1BP23RC
AUXILIARY EQUIPMENT DRIVE BELT
Engine: RFK
Tools.
[1]Detensioning lever for auxiliaries drive belt tensioner roller:
Dynamic spanner extension: FACOM SJ.214
Adaptor for socket 9x12 : FACOM J.274
Polygon socket 9x12 : 016
Removing.
Raise and support the vehicle, wheels hanging.
Remove the front RH wheel, the plastic pins and the splash-shield.
Turn the tensioner roller(1)by the screw (2)
(anti-clockwise), using tool [1]to detension the belt (3).
NOTE: Screw (2)has a left hand thread.
Remove the auxiliaries drive belt (3).
Refitting.
IMPERATIVE: Check that the rollers (4) and (5) turn freely
(without play and without tight spots).
Refitting.
Compress the tensioner roller (1), using tool [1].
Fit the auxiliaries drive belt (3).
IMPERATIVE: Make sure that the auxiliaries drive belt is correctly positioned in the grooves of
the various pulleys.
Complete the refitting.
Tightening torques:
- Tensioner roller screw (4)tighten to: 2 ± 0,2 m.daN.
- Guide roller screw (5)tighten to: 3,5 ± 0,3 m.daN.
C4
Angl.-t2-page135-239-2005 9/01/06 10:14 Page 164
Page 258 of 462
![Citroen BERLINGO 2005 1.G Workshop Manual Downloaded from www.Manualslib.com manuals search engine 252
ENGINECHECKING AND SETTING THE VALVE TIMING
Engines: 9HZ - 9HY
Refitting.
Refit tool [1]at «b».
Remove the screw (10).
Refit:
- The uppe Citroen BERLINGO 2005 1.G Workshop Manual Downloaded from www.Manualslib.com manuals search engine 252
ENGINECHECKING AND SETTING THE VALVE TIMING
Engines: 9HZ - 9HY
Refitting.
Refit tool [1]at «b».
Remove the screw (10).
Refit:
- The uppe](/img/9/4138/w960_4138-257.png)
Downloaded from www.Manualslib.com manuals search engine 252
ENGINECHECKING AND SETTING THE VALVE TIMING
Engines: 9HZ - 9HY
Refitting.
Refit tool [1]at «b».
Remove the screw (10).
Refit:
- The upper timing cover (12).
- The lower timing cover (11).
- The accessories drive pulley (9).
- The screw (10).
Tightening torque
Screw (10)Pre-tighten to : 3 ± 0,3 m.daN.
Angular tighten : 180° ± 5°.
Remove tool [1].
Refit:
- The engine support (8), tighten to 5,5 ± 0,4 m.daN.
- The engine support (4), tighten to 6,1 ± 0,6 m.daN.
- The engine support (5), tighten to 2,5 ± 0,2 m.daN.
- The electrical harness (7).
- The power steering fluid reservoir (6).
XSARA PICASSO
Couple:
- The tube (2).
- The exhaust line, tighten the clip to 2,5 ± 0,3 m.daN.
- The fuel unions (1).
- The air/air heat exchanger inlet and outlet pipes (3).
Connect the connector at «a».
Refit:
- The accessories drive belt
(see corresponding operation).
- The front RH splash-shield (see corresponding operation).
- The front RH wheel, tighten to 9 ± 1 m.daN.
- Reconnect the positive and negative terminals of the battery.
IMPERATIVE: Perform the operations that are necessary following
a reconnection of the battery
(see corresponding operation).
Angl.-t2-page240-282-2005 9/01/06 10:16 Page 252
Page 264 of 462
![Citroen BERLINGO 2005 1.G Workshop Manual Downloaded from www.Manualslib.com manuals search engine 258
ENGINECHECKING AND SETTING THE VALVE TIMING
Engines: 9HZ - 9HY
Refitting (continued).
Refit tool [1]at «b».
Remove the screw (10).
Refit: Citroen BERLINGO 2005 1.G Workshop Manual Downloaded from www.Manualslib.com manuals search engine 258
ENGINECHECKING AND SETTING THE VALVE TIMING
Engines: 9HZ - 9HY
Refitting (continued).
Refit tool [1]at «b».
Remove the screw (10).
Refit:](/img/9/4138/w960_4138-263.png)
Downloaded from www.Manualslib.com manuals search engine 258
ENGINECHECKING AND SETTING THE VALVE TIMING
Engines: 9HZ - 9HY
Refitting (continued).
Refit tool [1]at «b».
Remove the screw (10).
Refit:
- The upper timing cover (12).
- The lower timing cover (11).
- The accessories drive pulley (9).
- The screw (10).
Tightening torque
- Screw (10)Pre-tighten to: 3 ± 0,3 m.daN.
Angular tighten: 180° ± 5°.
Remove tool [1].
Refit:
- The engine support (8), tighten to 5,5 ± 0,4 m.daN.
- The engine support (4), tighten to 6,1 ± 0,6 m.daN.
- The engine support (5), tighten to 2,5 ± 0,2 m.daN.
- The electrical harness (7).
- The power steering fluid reservoir (6).
XSARA PICASSO
Disengage the jack from under the engine.
Couple:
- The tube (2).
- The exhaust line, tighten the clip to 2,5 ± 0,3 m.daN.
- The fuel unions (1).
- The air/air heat exchanger inlet and outlet pipes (3).
Connect the connector at «a».
Refit:
- The accessories drive belt
(see corresponding operation).
- The front RH splash-shield (see corresponding operation).
- The front RH wheel, tighten to 9 ± 1 m.daN.
Reconnect the positive and negative terminals of the battery.
IMPERATIVE: Perform the operations that are necessary following
a reconnection of the battery
(see corresponding operation).
Angl.-t2-page240-282-2005 9/01/06 10:16 Page 258
Page 272 of 462
Downloaded from www.Manualslib.com manuals search engine 266
ENGINECHECKING AND SETTING THE VALVE TIMING
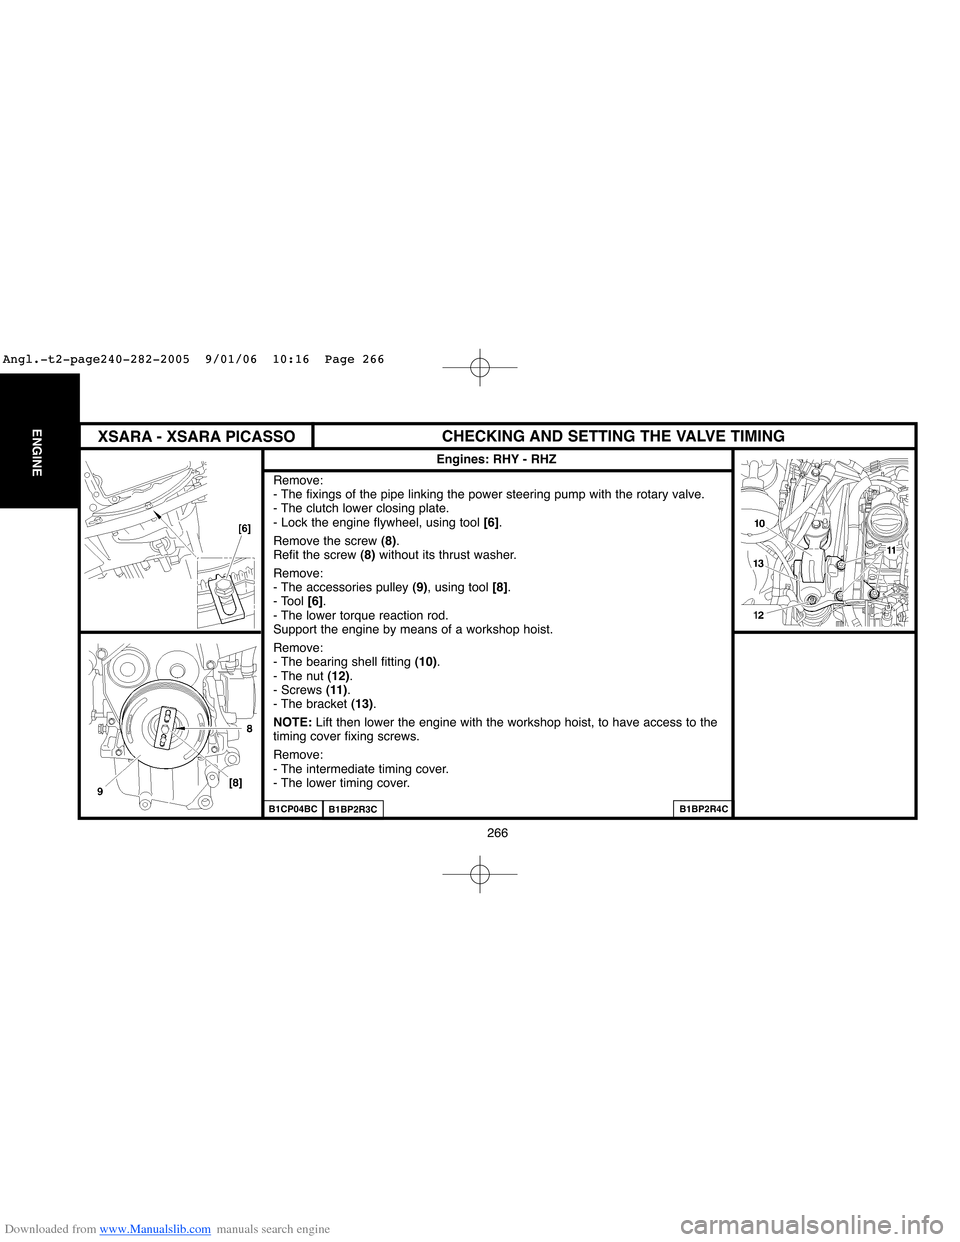
Engines: RHY - RHZ
Remove:
- The fixings of the pipe linking the power steering pump with the rotary valve.
- The clutch lower closing plate.
- Lock the engine flywheel, using tool [6].
Remove the screw (8).
Refit the screw (8)without its thrust washer.
Remove:
- The accessories pulley (9), using tool [8].
- Tool [6].
- The lower torque reaction rod.
Support the engine by means of a workshop hoist.
Remove:
- The bearing shell fitting (10).
- The nut (12).
- Screws (11).
- The bracket (13).
NOTE:Lift then lower the engine with the workshop hoist, to have access to the
timing cover fixing screws.
Remove:
- The intermediate timing cover.
- The lower timing cover.
B1CP04BCB1BP2R3CB1BP2R4C
XSARA - XSARA PICASSO
Angl.-t2-page240-282-2005 9/01/06 10:16 Page 266
Page 276 of 462
![Citroen BERLINGO 2005 1.G Workshop Manual Downloaded from www.Manualslib.com manuals search engine 270
ENGINECHECKING AND SETTING THE VALVE TIMING
Engines: RHY - RHZ
Remove:
- Tools [3]and [5], Screw (7)and the spacer.
Refit:
- The lower, i Citroen BERLINGO 2005 1.G Workshop Manual Downloaded from www.Manualslib.com manuals search engine 270
ENGINECHECKING AND SETTING THE VALVE TIMING
Engines: RHY - RHZ
Remove:
- Tools [3]and [5], Screw (7)and the spacer.
Refit:
- The lower, i](/img/9/4138/w960_4138-275.png)
Downloaded from www.Manualslib.com manuals search engine 270
ENGINECHECKING AND SETTING THE VALVE TIMING
Engines: RHY - RHZ
Remove:
- Tools [3]and [5], Screw (7)and the spacer.
Refit:
- The lower, intermediate and upper covers (5).
- Screw (7), tighten to 1,5 ± 0,1 m.daN.
- Screws (3), (4)and (6).
- The bracket (13).
Screws (11), tighten to 6,1 ± 0,5 m.daN.
The nut (12), tighten to 4,5 ± 0,5 m.daN.
Fit the bearing shell (10).
Take away the workshop hoist.
Clip the fuel delivery and return pipes.
Remove the tool [7].
Couple:
- The fuel delivery pipe (12).
- The fuel return pipe (1).
- Coat the screw (8)with loctite FRENETANCH.
Refit the tool [6]and the screw (8)with the washer (22), tighten to 7 ± 0,2 m.daN
and angular tighten to A= 60°±5°.
Refit the torque reaction rod on the lower engine support.
Remove the tool [6].
Reposition and reclip the cooling hose.
Complete the refitting of components in reverse order to removal.
B1EP1A7CB1BP2R4CB1EP1ADC
XSARA - XSARA PICASSO
Angl.-t2-page240-282-2005 9/01/06 10:16 Page 270
Page 281 of 462
Downloaded from www.Manualslib.com manuals search engine 275
ENGINE
CHECKING AND SETTING THE VALVE TIMING
Engine: RHR
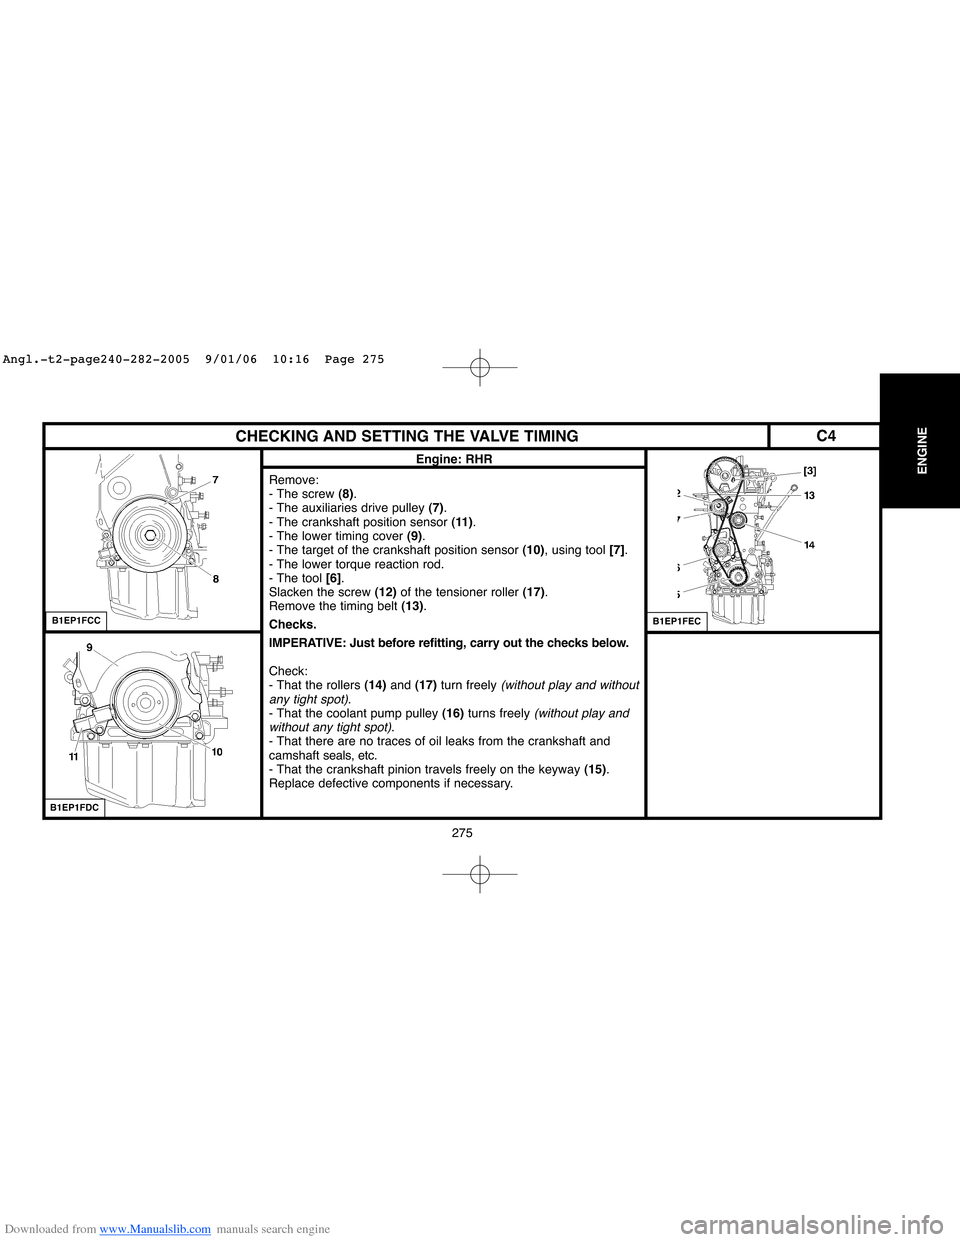
Remove:
- The screw (8).
- The auxiliaries drive pulley (7).
- The crankshaft position sensor (11).
- The lower timing cover (9).
- The target of the crankshaft position sensor (10), using tool [7].
- The lower torque reaction rod.
- The tool [6].
Slacken the screw (12)of the tensioner roller (17).
Remove the timing belt (13).
Checks.
IMPERATIVE: Just before refitting, carry out the checks below.
Check:
- That the rollers (14)and (17)turn freely
(without play and without
any tight spot).
- That the coolant pump pulley (16)turns freely (without play and
without any tight spot).
- That there are no traces of oil leaks from the crankshaft and
camshaftseals, etc.
- That the crankshaft pinion travels freely on the keyway (15).
Replace defective components if necessary.
B1EP1FCC
B1EP1FDC
B1EP1FEC
C4
Angl.-t2-page240-282-2005 9/01/06 10:16 Page 275
Page 284 of 462
Downloaded from www.Manualslib.com manuals search engine 278 278
ENGINECHECKING AND SETTING THE VALVE TIMING
Engine: RHR
Refitting.
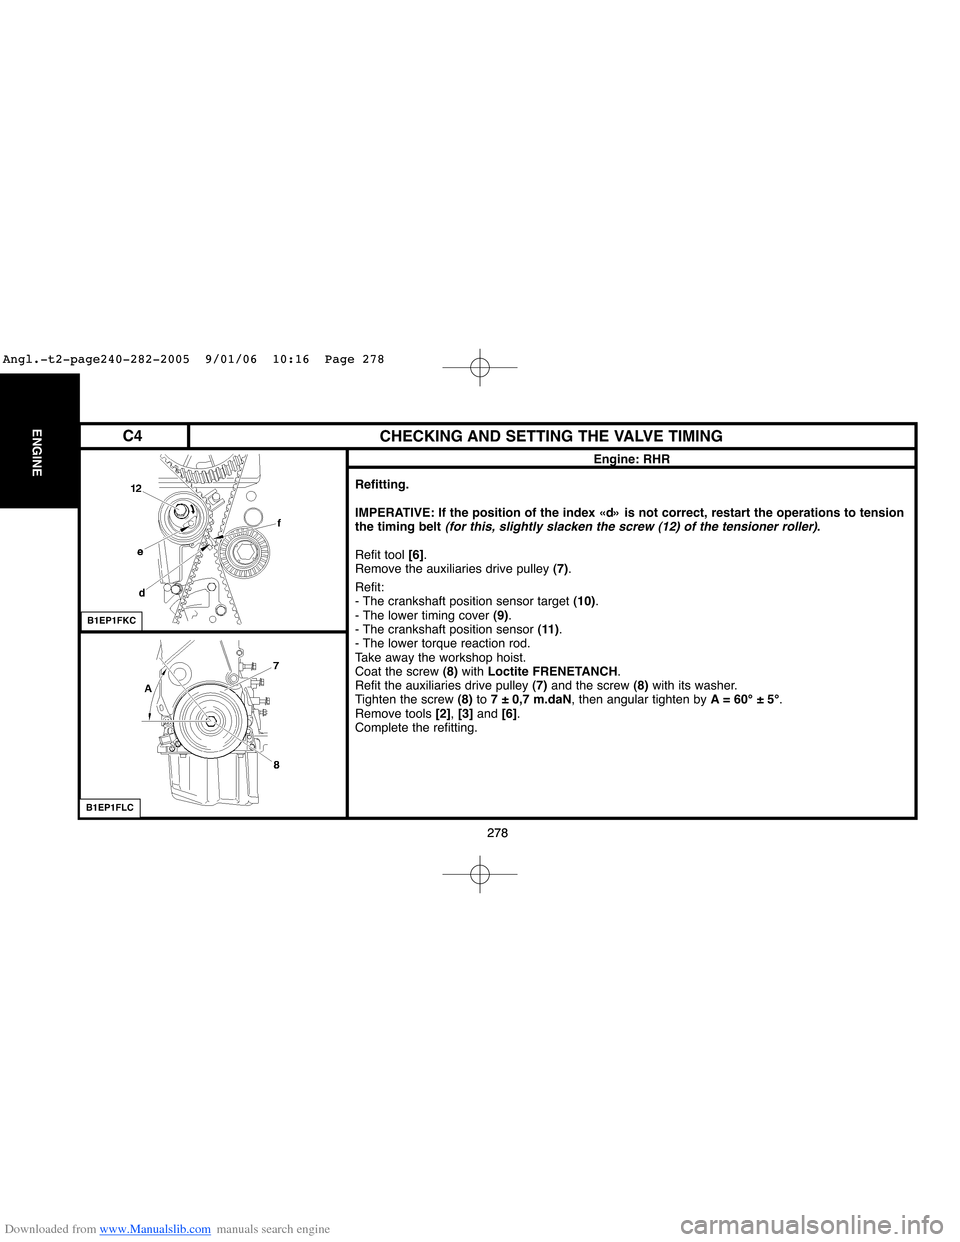
IMPERATIVE: If the position of the index «d» is not correct, restart the operations to tension
the timing belt
(for this, slightly slacken the screw (12) of the tensioner roller).
Refit tool [6].
Remove the auxiliaries drive pulley (7).
Refit:
- The crankshaft position sensor target (10).
- The lower timing cover (9).
- The crankshaft position sensor (11).
- The lower torque reaction rod.
Take away the workshop hoist.
Coat the screw (8)with Loctite FRENETANCH.
Refit the auxiliaries drive pulley (7) and the screw (8)with its washer.
Tighten the screw (8)to 7 ± 0,7 m.daN, then angular tighten by A= 60°±5°.
Remove tools [2], [3] and [6].
Complete the refitting.
B1EP1FKC
B1EP1FLC
C4
Angl.-t2-page240-282-2005 9/01/06 10:16 Page 278
Page 311 of 462
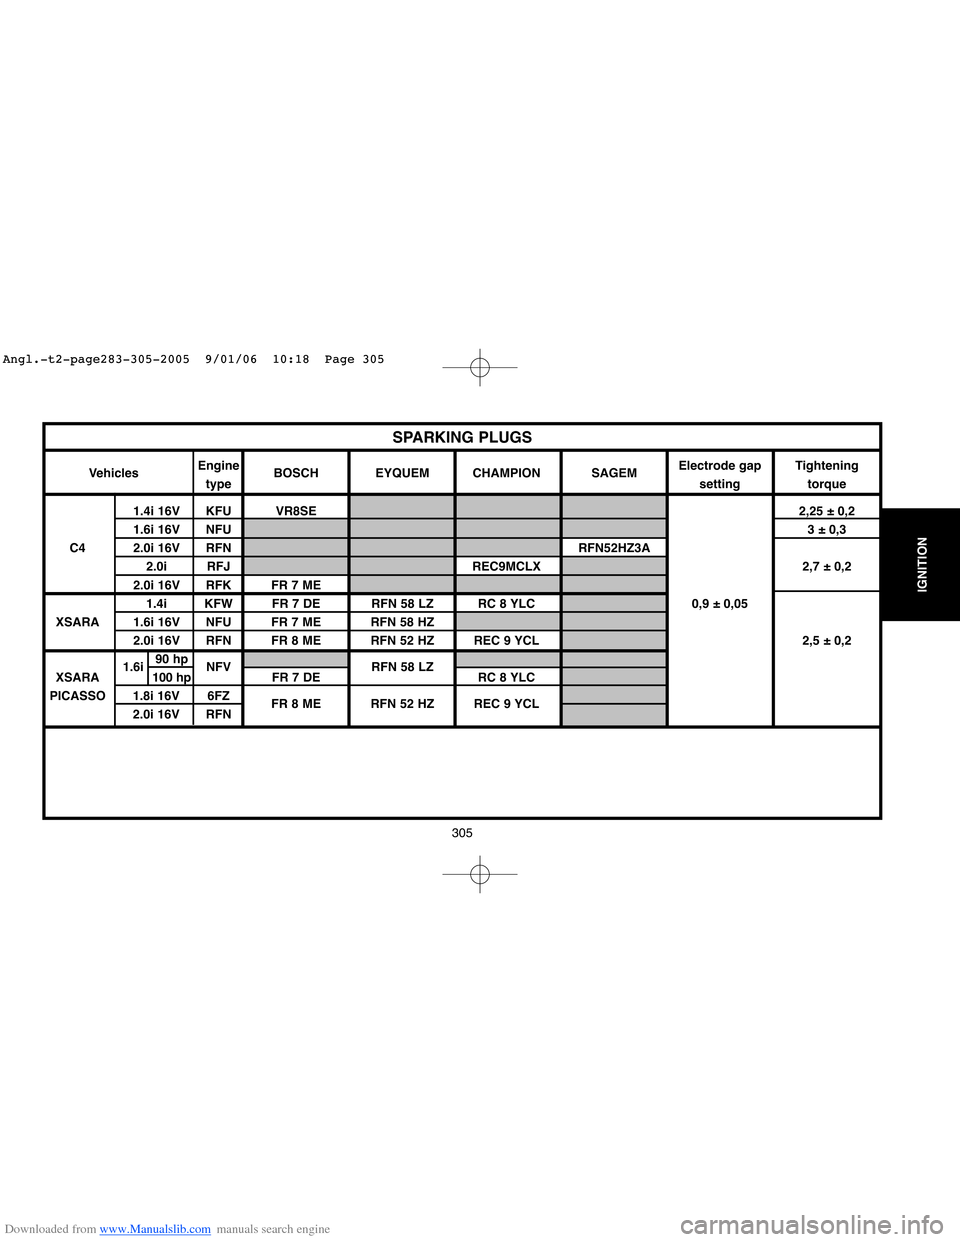
Downloaded from www.Manualslib.com manuals search engine 305
IGNITION
VehiclesEngine
BOSCH EYQUEM CHAMPION SAGEMElectrode gap Tightening
typesetting torque
1.4i 16V KFU VR8SE2,25 ± 0,2
1.6i 16V NFU3 ± 0,3
C4 2.0i 16V RFN RFN52HZ3A
2.0i RFJ REC9MCLX 2,7 ± 0,2
2.0i 16V RFK FR 7 ME
1.4i KFW FR 7 DE RFN 58 LZ RC 8 YLC 0,9 ± 0,05
XSARA 1.6i 16V NFU FR 7 ME RFN 58 HZ
2.0i 16V RFN FR 8 ME RFN 52 HZ REC 9 YCL 2,5 ± 0,2
1.6i90 hp
NFV RFN 58 LZ
XSARA100 hp FR 7 DE RC 8 YLC
PICASSO 1.8i 16V 6FZ
FR 8 ME RFN 52 HZ REC 9 YCL
2.0i 16V RFN
SPARKING PLUGS
Angl.-t2-page283-305-2005 9/01/06 10:18 Page 305
Page 318 of 462
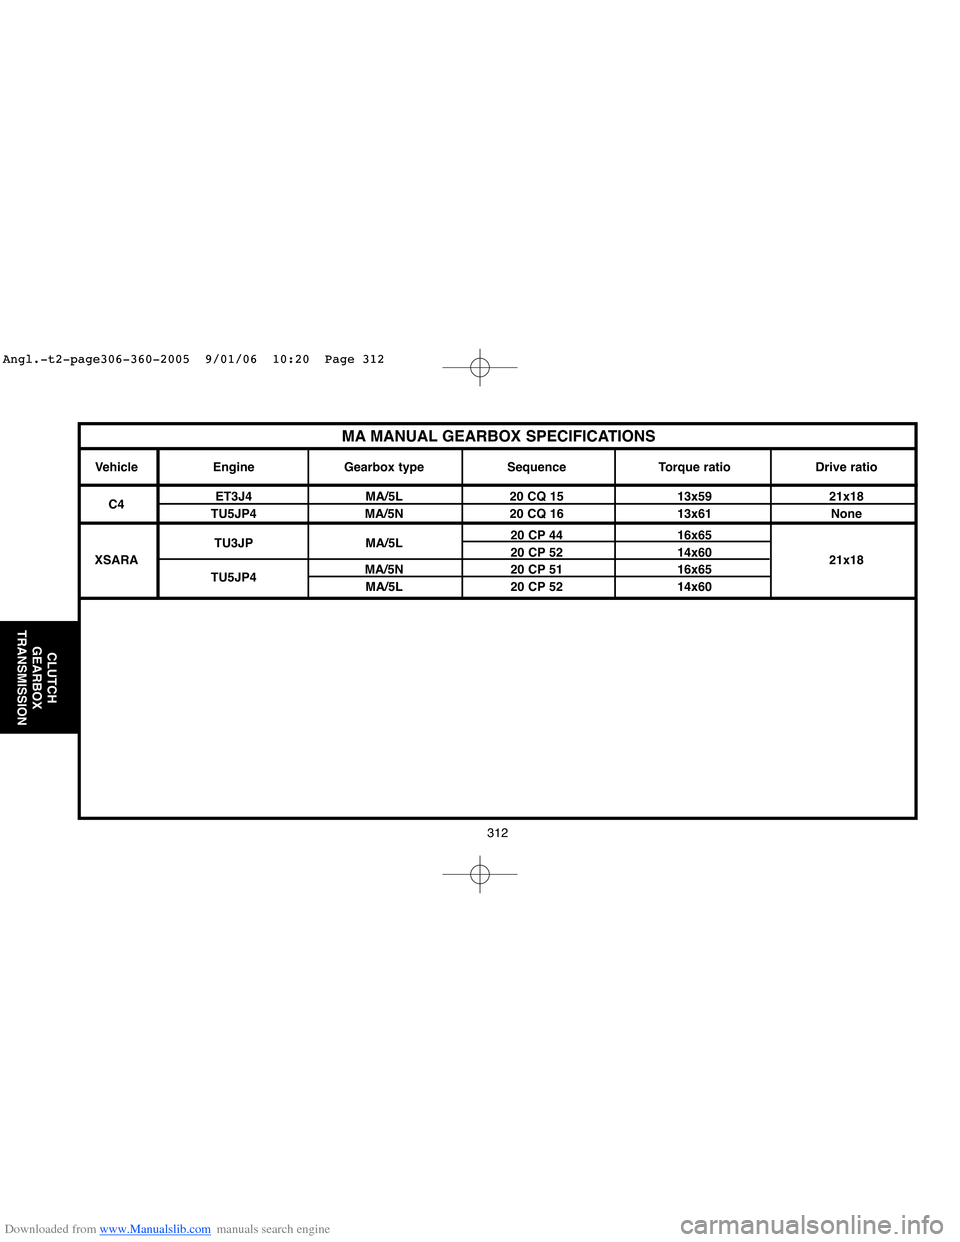
Downloaded from www.Manualslib.com manuals search engine 312
CLUTCH
GEARBOX
TRANSMISSION
MA MANUAL GEARBOX SPECIFICATIONS
Vehicle Engine Gearbox type Sequence Torque ratio Drive ratio
C4ET3J4 MA/5L 20 CQ 15 13x59 21x18
TU5JP4 MA/5N 20 CQ 16 13x61 None
TU3JP MA/5L20 CP 44 16x65
XSARA20 CP 52 14x60
21x18
TU5JP4MA/5N 20 CP 51 16x65
MA/5L 20 CP 52 14x60
Angl.-t2-page306-360-2005 9/01/06 10:20 Page 312