check engine Citroen BERLINGO 2005 1.G Workshop Manual
[x] Cancel search | Manufacturer: CITROEN, Model Year: 2005, Model line: BERLINGO, Model: Citroen BERLINGO 2005 1.GPages: 462, PDF Size: 10.48 MB
Page 304 of 462
![Citroen BERLINGO 2005 1.G Workshop Manual Downloaded from www.Manualslib.com manuals search engine 298
INJECTION
CHECKING THE AIR SUPPLY CIRCUIT
Tool.
[1]Manual pressure-vacuum pump: FACOM DA 16
Checks.
Vacuum pump.
Connect the tool [1]into t Citroen BERLINGO 2005 1.G Workshop Manual Downloaded from www.Manualslib.com manuals search engine 298
INJECTION
CHECKING THE AIR SUPPLY CIRCUIT
Tool.
[1]Manual pressure-vacuum pump: FACOM DA 16
Checks.
Vacuum pump.
Connect the tool [1]into t](/img/9/4138/w960_4138-303.png)
Downloaded from www.Manualslib.com manuals search engine 298
INJECTION
CHECKING THE AIR SUPPLY CIRCUIT
Tool.
[1]Manual pressure-vacuum pump: FACOM DA 16
Checks.
Vacuum pump.
Connect the tool [1]into the vacuum pump (1).
Start the engine.
Wait 30 seconds.
The vacuum value should be 0.9 ± 0.1 barat idle.
NOTE:The exhaust gas recycling valve is not linked to the air supply circuit.
The exhaust gas recycling electrovalve is controlled by the engine ECU.
Turbocharging pressure regulation valve.
Connect the tool [1]on the valve (2)
(tube identified by the colour grey).
Apply a vacuum of approx. 0.8 bar.
Rod "a"should move 12 ± 2 mm.
B1HP1UGC
B1HP1UHC
Engines: 9HY - 9HZ
C4
Angl.-t2-page283-305-2005 9/01/06 10:18 Page 298
Page 305 of 462
![Citroen BERLINGO 2005 1.G Workshop Manual Downloaded from www.Manualslib.com manuals search engine 299
INJECTION
CHECKING THE AIR SUPPLY CIRCUIT
B1BP33ZC
B1BP340C
Engine: RHR
B1BP341C
B1BP342C
Tool.
[1]Manual pressure-vacuum pump: FACOM DA 16 Citroen BERLINGO 2005 1.G Workshop Manual Downloaded from www.Manualslib.com manuals search engine 299
INJECTION
CHECKING THE AIR SUPPLY CIRCUIT
B1BP33ZC
B1BP340C
Engine: RHR
B1BP341C
B1BP342C
Tool.
[1]Manual pressure-vacuum pump: FACOM DA 16](/img/9/4138/w960_4138-304.png)
Downloaded from www.Manualslib.com manuals search engine 299
INJECTION
CHECKING THE AIR SUPPLY CIRCUIT
B1BP33ZC
B1BP340C
Engine: RHR
B1BP341C
B1BP342C
Tool.
[1]Manual pressure-vacuum pump: FACOM DA 16
IMPERATIVE: Respect the safety and cleanliness specific to high pressure diesel
injection engines.
WARNING: After switching off the ignition, wait 15 minutes before disconnecting
the battery
(to guarantee memorisation of the initialisations of the different ECUS).
Checking the vacuum source
(vacuum pump).
Connect the tool [1] on the take-off «a».
Start the engine.
The value should be: 1 ± 0,2.
Turbocharging pressure electrovalve.
Connect the tool [1]on the vacuum supply «b»of the electrovalve (1).
Start the engine.
The value should be: 1 ± 0,2.
Cold air circuit electrovalve.
Connect the tool [1]on the vacuum supply «c»of the electrovalve (2).
Start the engine.
The value should be: 1 ± 0,2.
Warm air circuit electrovalve.
Connect the tool [1]on the vacuum supply «d»of the electrovalve (3).
Start the engine.
The value should be: 1 ± 0,2.
C4
Angl.-t2-page283-305-2005 9/01/06 10:18 Page 299
Page 306 of 462
Downloaded from www.Manualslib.com manuals search engine 300
INJECTION
CHECKING THE AIR SUPPLY CIRCUIT
B1BP343C
B1BP344C
Engine: RHR
B1BP345C
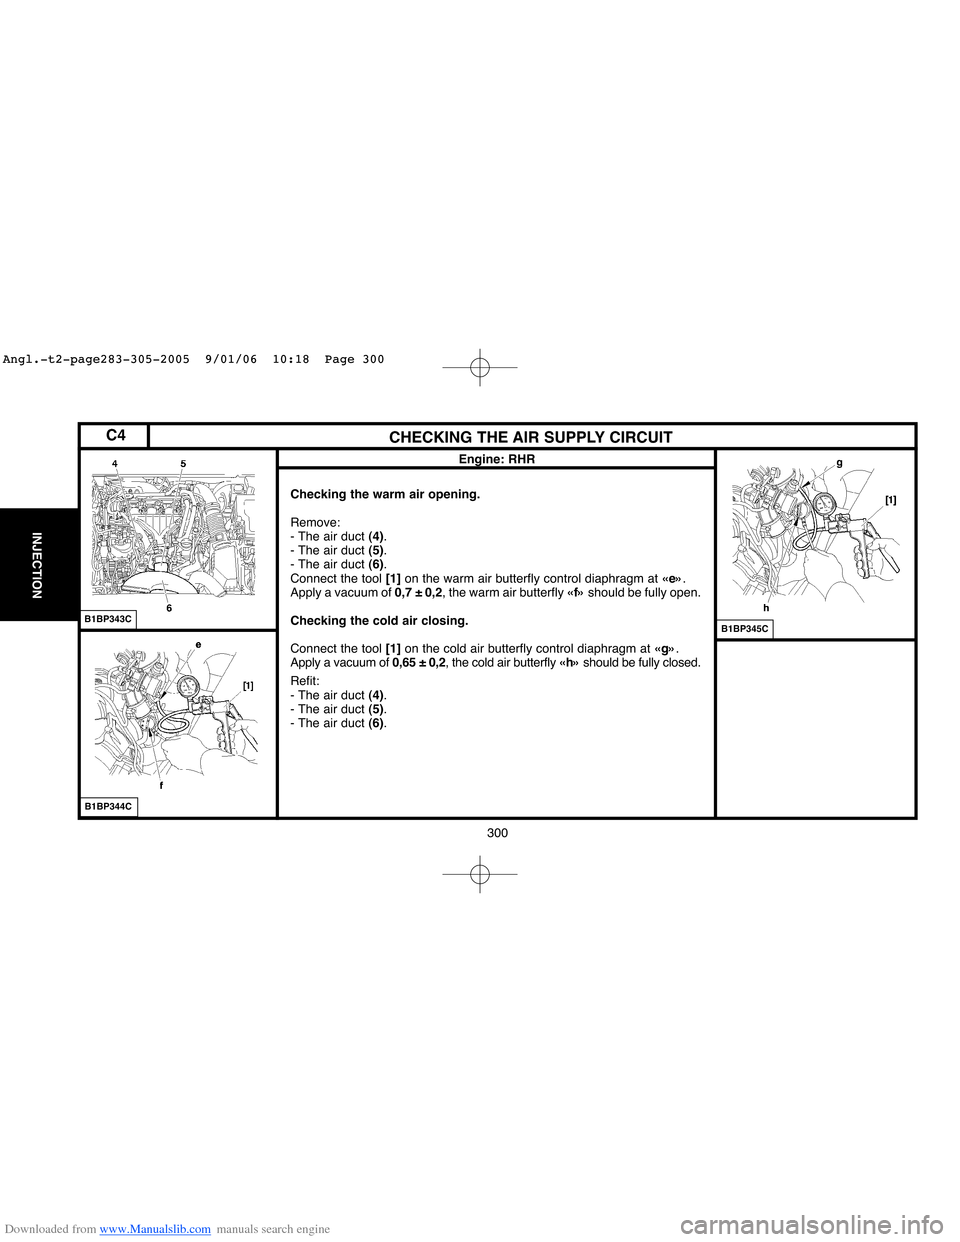
Checking the warm air opening.
Remove:
- The air duct (4).
- The air duct (5).
- The air duct (6).
Connect the tool [1]on the warm air butterfly control diaphragm at «e».
Apply a vacuum of 0,7 ± 0,2, the warm air butterfly «f»should be fully open.
Checking the cold air closing.
Connect the tool [1]on the cold air butterfly control diaphragm at «g».
Apply a vacuum of 0,65 ± 0,2, the cold air butterfly «h»should be fully closed.
Refit:
- The air duct (4).
- The air duct (5).
- The air duct (6).
C4
Angl.-t2-page283-305-2005 9/01/06 10:18 Page 300
Page 307 of 462
![Citroen BERLINGO 2005 1.G Workshop Manual Downloaded from www.Manualslib.com manuals search engine 301
INJECTION
CHECKING THE AIR SUPPLY CIRCUIT
Tool.
[1]Manual vacuum pump: FACOM DA 16
IMPERATIVE: Respect the safety and cleanliness requireme Citroen BERLINGO 2005 1.G Workshop Manual Downloaded from www.Manualslib.com manuals search engine 301
INJECTION
CHECKING THE AIR SUPPLY CIRCUIT
Tool.
[1]Manual vacuum pump: FACOM DA 16
IMPERATIVE: Respect the safety and cleanliness requireme](/img/9/4138/w960_4138-306.png)
Downloaded from www.Manualslib.com manuals search engine 301
INJECTION
CHECKING THE AIR SUPPLY CIRCUIT
Tool.
[1]Manual vacuum pump: FACOM DA 16
IMPERATIVE: Respect the safety and cleanliness requirements.
Vacuum pump.
Connect the tool [1]on the vacuum pump (1).
Start the engine.
Pressure should be 0.8 barat 780 rpm.
Boost pressure regulator electrovalve.
Connect the tool [1]between the electrovalve (2)and the valve (3)of the boost pressure regulator.
Compare readings with the values in the table below.
Engine speed (rpm) Pressure (bar)
780 0,6
4000 0,25
Pressure regulator valve.
Connect the tool [1]on the valve (3).
Appy a pressure of 0.5 barto activate the rod "a".
Rod "a"should move 12 mm.
B1HP12FD
Engines: RHY - RHZ
XSARA PICASSO
Angl.-t2-page283-305-2005 9/01/06 10:18 Page 301
Page 308 of 462
![Citroen BERLINGO 2005 1.G Workshop Manual Downloaded from www.Manualslib.com manuals search engine 302
INJECTION
CHECKS: EXHAUST GASES RECYCLING CIRCUIT
Tool.
[1] Manual pressure-vacuum pump: FACOM DA 16
IMPERATIVE: Respect the safety and cle Citroen BERLINGO 2005 1.G Workshop Manual Downloaded from www.Manualslib.com manuals search engine 302
INJECTION
CHECKS: EXHAUST GASES RECYCLING CIRCUIT
Tool.
[1] Manual pressure-vacuum pump: FACOM DA 16
IMPERATIVE: Respect the safety and cle](/img/9/4138/w960_4138-307.png)
Downloaded from www.Manualslib.com manuals search engine 302
INJECTION
CHECKS: EXHAUST GASES RECYCLING CIRCUIT
Tool.
[1] Manual pressure-vacuum pump: FACOM DA 16
IMPERATIVE: Respect the safety and cleanliness requirements.
EGR valve.
Connect tool [1] on the capsule take-off (2).
Apply a vacuum of approx. 0,6 barseveral times to activate the rod «a».
In abruptly suppressing the vacuum, the valve should click and lock itself back on its seating.
Regulation electrovalve (EGR).
Check to be performed between the electrovalve (1)and the EGR valve (2).
Link the tool [1]in series, between the electrovalve (1)and the capsule (2).
Compare the values noted with those in the table below.
Engine speed (rpm) Vacuum value
780 0,5 bar
2500 0 bar
B1HP1K6D
Engines: 8HX - 8HZ
XSARA
Angl.-t2-page283-305-2005 9/01/06 10:18 Page 302
Page 309 of 462
Downloaded from www.Manualslib.com manuals search engine 303
INJECTION
CHECKS: EXHAUST GASES RECYCLING CIRCUIT
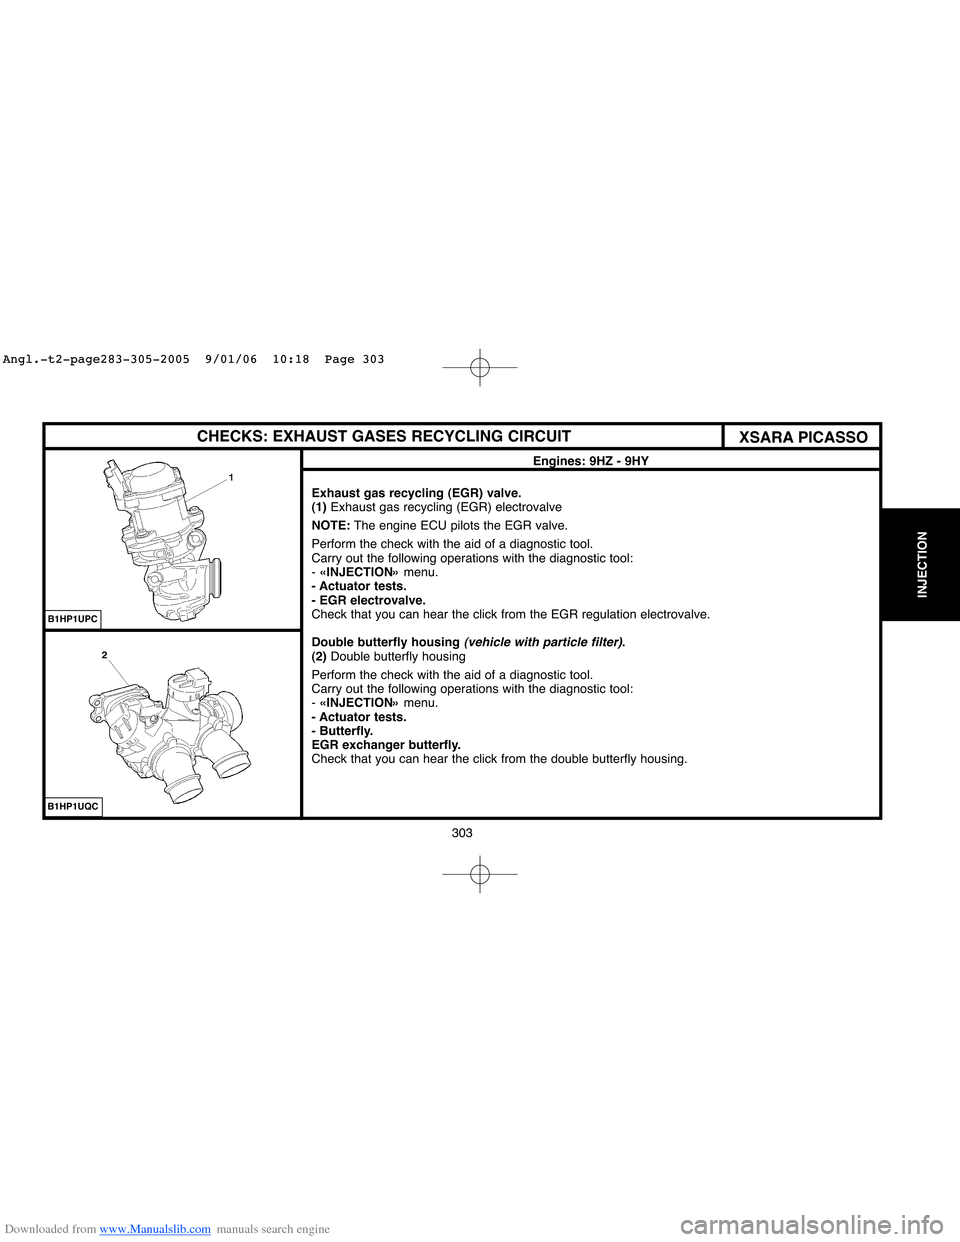
Exhaust gas recycling (EGR) valve.
(1)Exhaust gas recycling (EGR) electrovalve
NOTE:The engine ECU pilots the EGR valve.
Perform the check with the aid of a diagnostic tool.
Carry out the following operations with the diagnostic tool:
- «INJECTION»menu.
- Actuator tests.
- EGR electrovalve.
Check that you can hear the click from the EGR regulation electrovalve.
Double butterfly housing
(vehicle with particle filter).
(2)Double butterfly housing
Perform the check with the aid of a diagnostic tool.
Carry out the following operations with the diagnostic tool:
- «INJECTION»menu.
- Actuator tests.
- Butterfly.
EGR exchanger butterfly.
Check that you can hear the click from the double butterfly housing.
B1HP1UPC
B1HP1UQC
XSARA PICASSO
Engines: 9HZ - 9HY
Angl.-t2-page283-305-2005 9/01/06 10:18 Page 303
Page 310 of 462
![Citroen BERLINGO 2005 1.G Workshop Manual Downloaded from www.Manualslib.com manuals search engine 304
INJECTION
CHECKS: EXHAUST GASES RECYCLING CIRCUIT
Tool.
[1]Manual vacuum pump: FACOM DA 16
IMPERATIVE: Respect the safety and cleanliness r Citroen BERLINGO 2005 1.G Workshop Manual Downloaded from www.Manualslib.com manuals search engine 304
INJECTION
CHECKS: EXHAUST GASES RECYCLING CIRCUIT
Tool.
[1]Manual vacuum pump: FACOM DA 16
IMPERATIVE: Respect the safety and cleanliness r](/img/9/4138/w960_4138-309.png)
Downloaded from www.Manualslib.com manuals search engine 304
INJECTION
CHECKS: EXHAUST GASES RECYCLING CIRCUIT
Tool.
[1]Manual vacuum pump: FACOM DA 16
IMPERATIVE: Respect the safety and cleanliness requirements.
EGR valve.
Connect the tool [1]to the capsule union (1).
Apply, several times in succession, a vacuum of approx. 0.6 barto activate the rod "a".
In abrupt reaction to the vacuum, the valve should close on its seating with a clicking noise.
Exhaust gas reycling (EGR) electrovalve.
Check, not under load, between the electrovalve (2)and the EGR valve (1).
Connect the tool [1]between the electrovalve (2)and the capsule (1).
Compare readings with the values in the table below.
Engine speed (rpm) Vacuum value
780 0,5 bar
2500 0 bar
B1HP12GD
Engines: RHY - RHZ
XSARA PICASSO
Angl.-t2-page283-305-2005 9/01/06 10:18 Page 304
Page 312 of 462
Downloaded from www.Manualslib.com manuals search engine 306
CLUTCH
GEARBOX
TRANSMISSION
SPEEDOMETER
An E.E.C. decree of 25 June 1976, regulates the speed displayed by the speedmeter in relation to the actual speed travelled.
This decree stipulates:
- The speed indicated by a speedometer must never be lower than the actual vehicle speed.
- Between the speed displayed «SD»and the speed travelled «ST», there must always be the following relationship:
ST < SD < 1.10 ST + 4 Kph
Example:For an actual speed of 100 Kphthe speed displayed by the speedometer may be between 100and 114 Kph.
The speed indicated by the speedometer may be influenced by:
- The speedometer.
- The tyres fitted to the vehicle.
- The final drive ratio.
- The speedometer drive ratio.
Any of these components can be checked without removing them from the vehicle
(see information note N° 78-85 TT of 19 October 1978).
NOTE:Before replacing the speedometer, check the conformity of the following points:
- The tyres fitted to the vehicle.
- The gearbox final drive ratio.
- The speedometer drive ratio.
Angl.-t2-page306-360-2005 9/01/06 10:20 Page 306
Page 322 of 462
Downloaded from www.Manualslib.com manuals search engine 316
CLUTCH
GEARBOX
TRANSMISSION
CLUTCH SPECIFICATIONS
Engines: KFW - NFU - NFV - 6FZ - RFN - 8HX - 8HZ - 9HY - 9HZ - WJY - RHY - RHZ
NOTE:All the clutches are «push»type with hydraulic control.
Description.
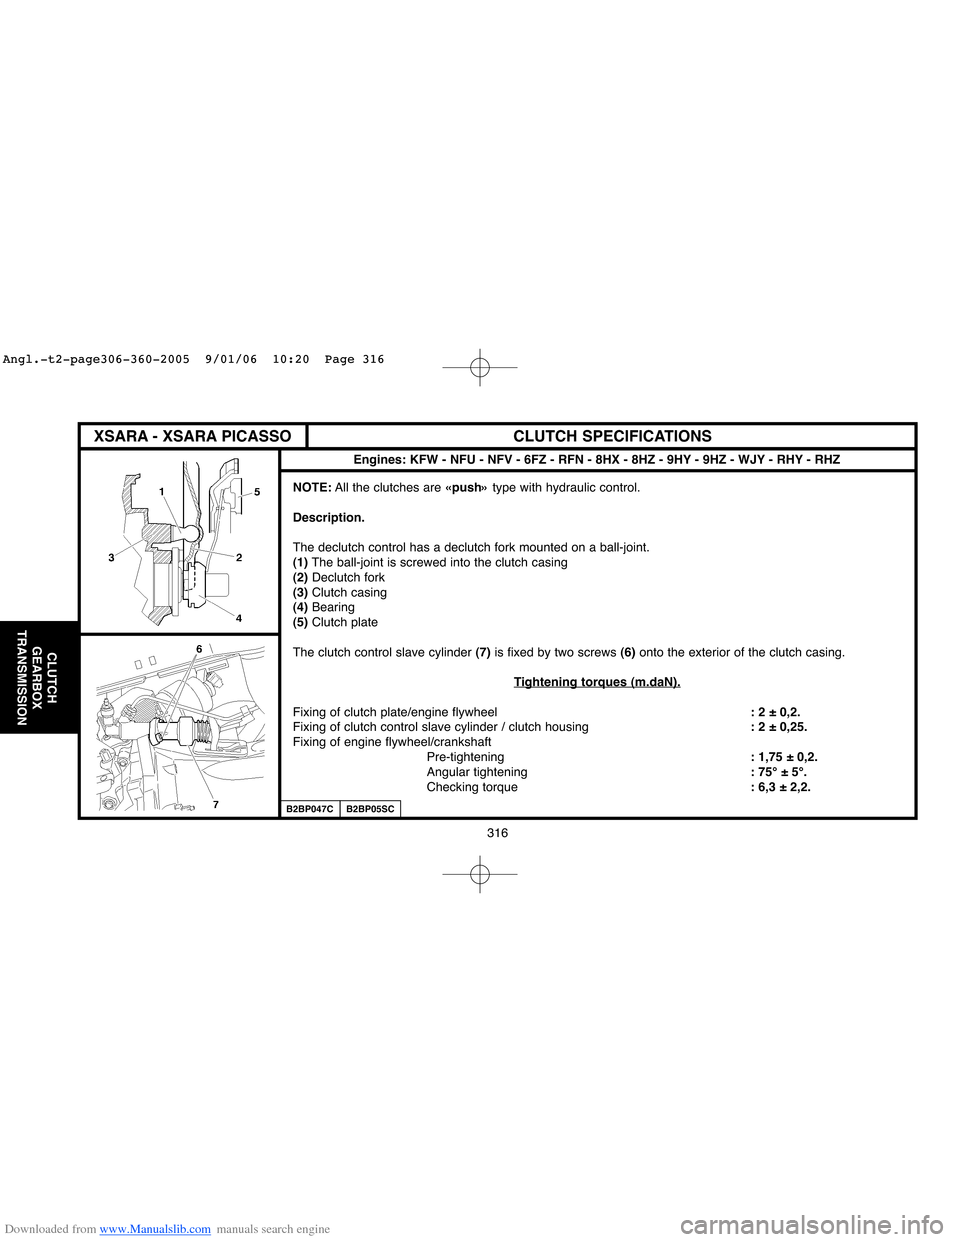
The declutch control has a declutch fork mounted on a ball-joint.
(1)The ball-joint is screwed into the clutch casing
(2)Declutch fork
(3)Clutch casing
(4)Bearing
(5)Clutch plate
The clutch control slave cylinder (7)is fixed by two screws (6)onto the exterior of the clutch casing.
T
ightening torques (m.daN).
Fixing of clutch plate/engine flywheel: 2 ± 0,2.
Fixing of clutch control slave cylinder / clutch housing: 2 ± 0,25.
Fixing of engine flywheel/crankshaft
Pre-tightening: 1,75 ± 0,2.
Angular tightening: 75° ± 5°.
Checking torque: 6,3 ± 2,2.
B2BP047CB2BP05SC
XSARA - XSARA PICASSO
Angl.-t2-page306-360-2005 9/01/06 10:20 Page 316
Page 323 of 462
Downloaded from www.Manualslib.com manuals search engine 317
CLUTCH
GEARBOX
TRANSMISSION
HYDRAULIC CLUTCH CONTROL: CHECKS AND ADJUSTMENTS
B2BP04XC
IMPERATIVE: Use only new brake brake fluid that is not emulsified, avoid any
ingress of impurities into the hydraulic circuit.
IMPERATIVE: Do not use automatic bleeding equipment
(risk of the brake fluid
emulsifying in the hydraulic circuit).
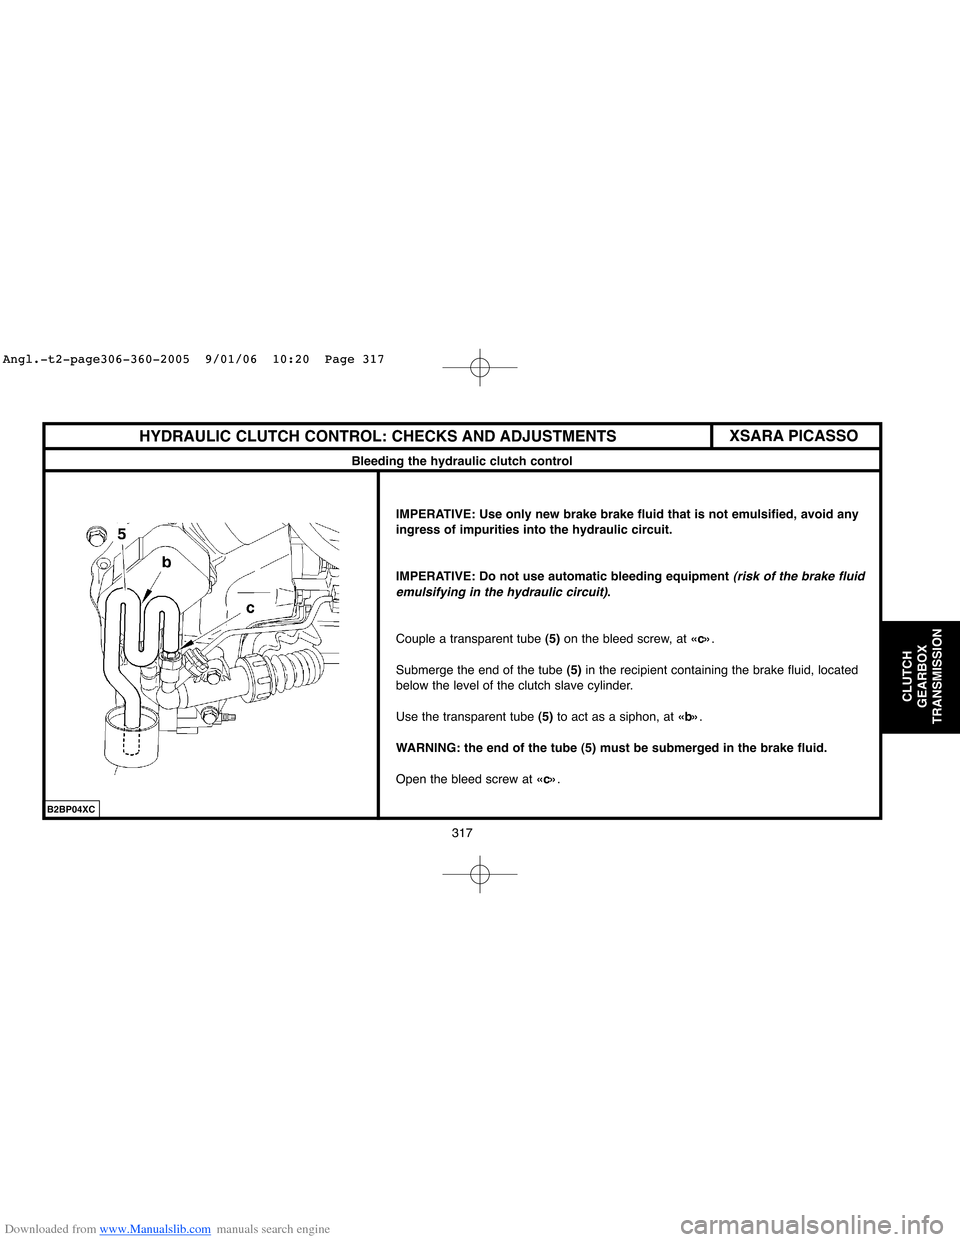
Couple a transparent tube (5)on the bleed screw, at «c».
Submerge the end of the tube (5)in the recipient containing the brake fluid, located
below the level of the clutch slave cylinder.
Use the transparent tube (5) to act as a siphon, at «b».
WARNING: the end of the tube (5) must be submerged in the brake fluid.
Open the bleed screw at «c».
XSARA PICASSO
Bleeding the hydraulic clutch control
Angl.-t2-page306-360-2005 9/01/06 10:20 Page 317