Sign Citroen BERLINGO 2014 2.G Owner's Manual
[x] Cancel search | Manufacturer: CITROEN, Model Year: 2014, Model line: BERLINGO, Model: Citroen BERLINGO 2014 2.GPages: 268, PDF Size: 13.39 MB
Page 20 of 268
18
Access
Good practice
Take care not to allow the remote
control to come into contact with
grease, dust, rain or a damp
environment.
A heavy object attached to the key
(keyring, ...) weighing on the shaft of
the key in the switch, may cause a
malfunction.
REMOTE CONTROL
Reinitialising the remote control
Following changing of the remote
control battery or disconnection of the
vehicle battery, the remote control may
have to be reinitialised.
Wait at least one minute before using
the remote control.
Insert the key in the ignition switch with
the buttons (padlocks) of the remote
control facing you.
Switch on the ignition.
Press the locking padlock for at
least fi ve seconds within the next
ten seconds.
Switch off the ignition.
Wait at least one minute before using
the remote control.
The remote control is now working
again.
Use only identical batteries or
batteries of an equivalent type to those
recommended by CITROËN dealers.
Do not discard the remote control
batteries, they contain metals which
are harmful to the environment.
Deposit them at a CITROËN
dealership, or at an authorised
collection point.
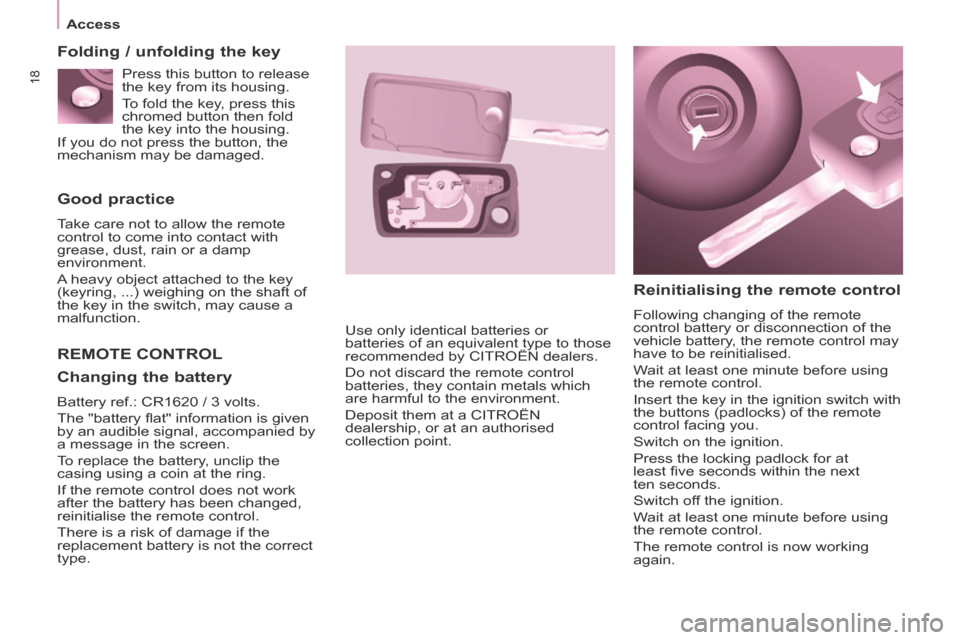
Folding / unfolding the key
Changing the battery
Battery ref.: CR1620 / 3 volts.
The "battery fl at" information is given
by an audible signal, accompanied by
a message in the screen.
To replace the battery, unclip the
casing using a coin at the ring.
If the remote control does not work
after the battery has been changed,
reinitialise the remote control.
There is a risk of damage if the
replacement battery is not the correct
type. Press this button to release
the key from its housing.
To fold the key, press this
chromed button then fold
the key into the housing.
If you do not press the button, the
mechanism may be damaged.
Page 26 of 268
24
Access
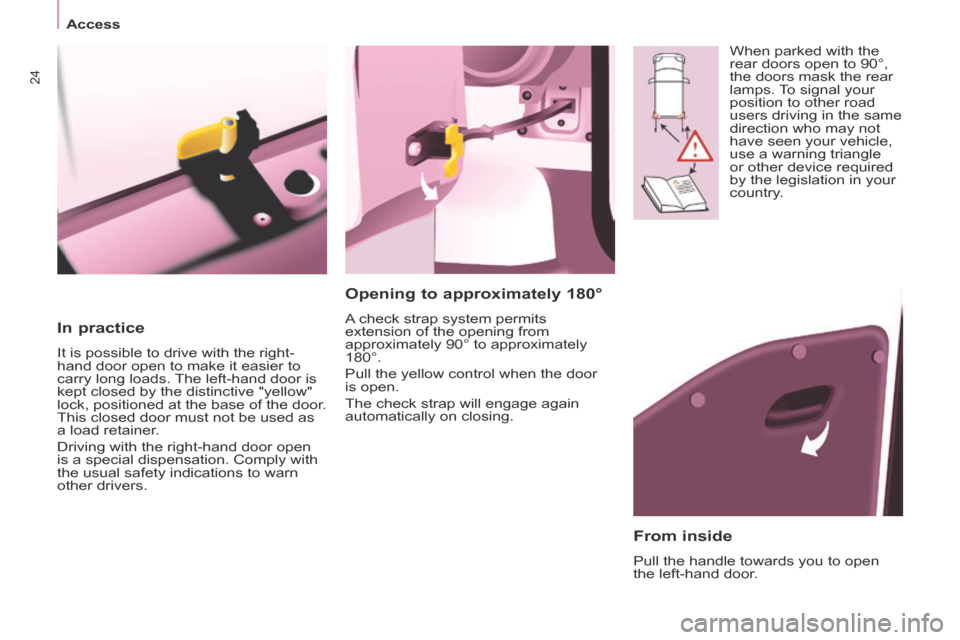
In practice
It is possible to drive with the right-
hand door open to make it easier to
carry long loads. The left-hand door is
kept closed by the distinctive "yellow"
lock, positioned at the base of the door.
This closed door must not be used as
a load retainer.
Driving with the right-hand door open
is a special dispensation. Comply with
the usual safety indications to warn
other drivers.
From inside
Pull the handle towards you to open
the left-hand door.
Opening to approximately 180°
A check strap system permits
extension of the opening from
approximately 90° to approximately
180°.
Pull the yellow control when the door
is open.
The check strap will engage again
automatically on closing. When parked with the
rear doors open to 90°,
the doors mask the rear
lamps. To signal your
position to other road
users driving in the same
direction who may not
have seen your vehicle,
use a warning triangle
or other device required
by the legislation in your
country.
Page 31 of 268
2
Instruments and controls
29
READY TO GO
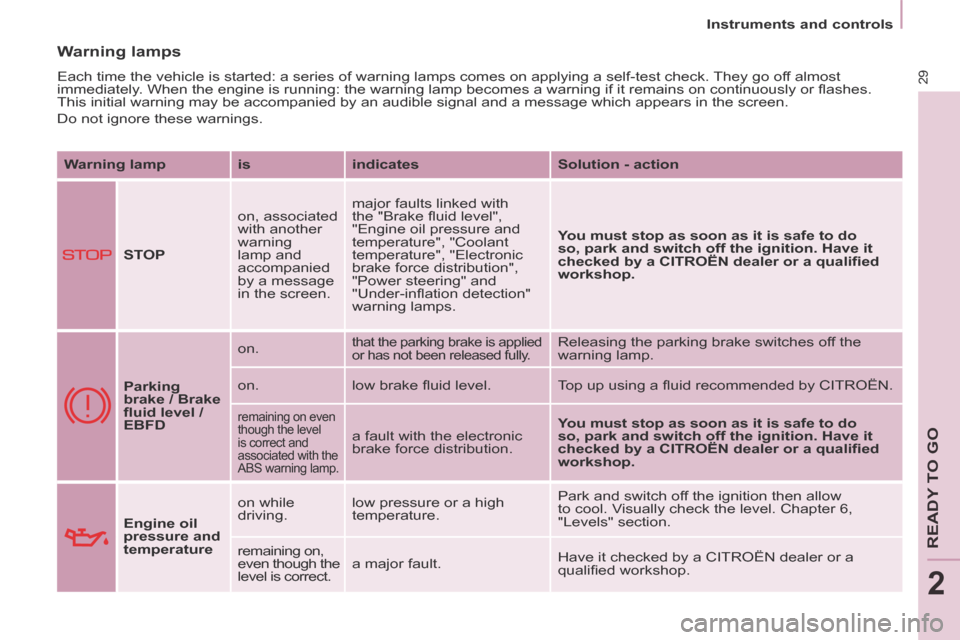
Warning lamps
Each time the vehicle is started: a series of warning lamps comes on app\
lying a self-test check. They go off almost
immediately. When the engine is running: the warning lamp becomes a warning if it remains on continuously or fl ashes.
This initial warning may be accompanied by an audible signal and a messa\
ge which appears in the screen.
Do not ignore these warnings. Warning lamp is indicates Solution - action
STOP on, associated
with another
warning
lamp and
accompanied
by a message
in the screen. major faults linked with
the "Brake fl uid level",
"Engine oil pressure and
temperature", "Coolant
temperature", "Electronic
brake force distribution",
"Power steering" and
"Under-infl ation detection"
warning lamps.
You must stop as soon as it is safe to do
so, park and switch off the ignition. Have it
checked by a CITROËN dealer or a qualifi ed
workshop.
Parking
brake / Brake
fl uid level /
EBFD on.
that the parking brake is applied
or has not been released fully. Releasing the parking brake switches off the
warning lamp.
on. low brake fl uid level. Top up using a fl uid recommended by CITROËN.
remaining on even
though the level
is correct and
associated with the
ABS warning lamp.
a fault with the electronic
brake force distribution. You must stop as soon as it is safe to do
so, park and switch off the ignition. Have it
checked by a
CITROËN dealer or a qualifi ed
workshop.
Engine oil
pressure and
temperature on while
driving.
low pressure or a high
temperature. Park and switch off the ignition then allow
to cool. Visually check the level. Chapter 6,
"Levels" section.
remaining on,
even though the
level is correct. a major fault.
Have it checked by a CITROËN dealer or a
qualifi ed workshop.
Page 32 of 268
Instruments and controls
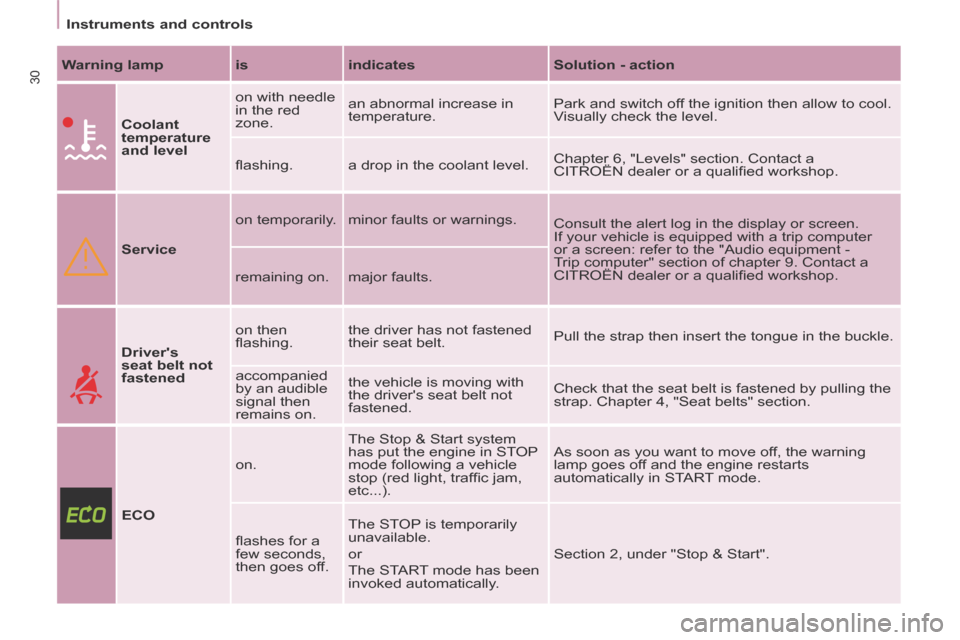
30 Warning lamp is indicates Solution - action
Coolant
temperature
and level on with needle
in the red
zone.
an abnormal increase in
temperature.
Park and switch off the ignition then allow to cool.
Visually check the level.
fl ashing. a drop in the coolant level. Chapter 6, "Levels" section. Contact a
CITROËN dealer or a qualifi ed workshop.
Service on temporarily.
minor faults or warnings.
Consult the alert log in the display or screen.
If your vehicle is equipped with a trip computer
or a screen: refer to the "Audio equipment -
Trip computer" section of chapter 9. Contact a
CITROËN dealer or a qualifi ed workshop.
remaining on. major faults.
Driver's
seat belt not
fastened on then
fl ashing.
the driver has not fastened
their seat belt.
Pull the strap then insert the tongue in the buckle.
accompanied
by an audible
signal then
remains on. the vehicle is moving with
the driver's seat belt not
fastened.
Check that the seat belt is fastened by pulling the
strap. Chapter 4, "Seat belts" section.
ECO on.
The Stop & Start system
has put the engine in STOP
mode following a vehicle
stop (red light, traffi c jam,
etc...). As soon as you want to move off, the warning
lamp goes off and the engine restarts
automatically in START mode.
fl ashes for a
few seconds,
then goes off. The STOP is temporarily
unavailable.
or
The START mode has been
invoked automatically.
Section 2, under "Stop & Start".
Page 35 of 268
2
Instruments and controls
33
READY TO GO
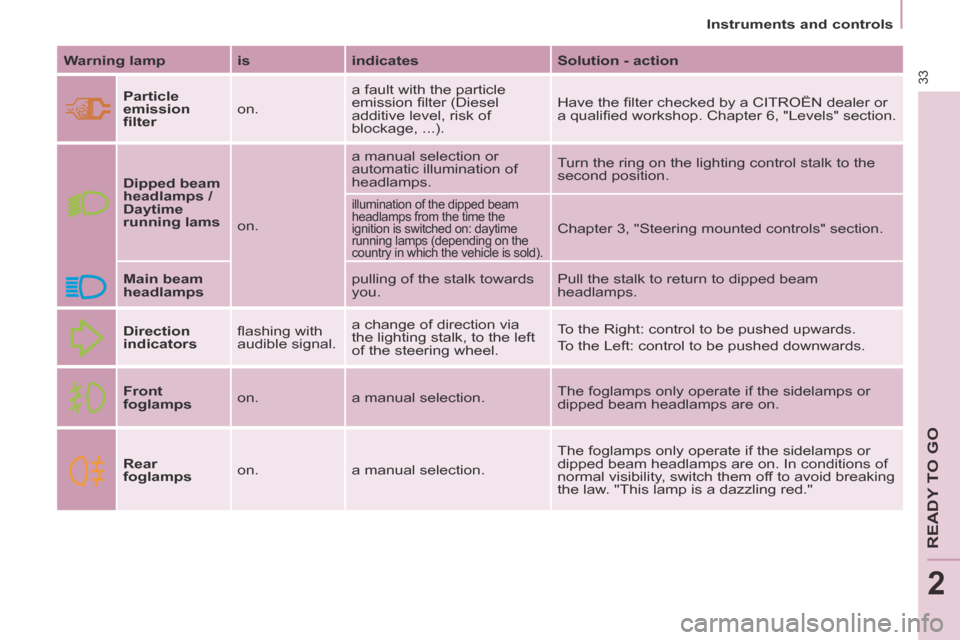
Warning lamp is indicates Solution - action
Particle
emission
fi lter on. a fault with the particle
emission fi lter (Diesel
additive level, risk of
blockage, ...). Have the fi lter checked by a CITROËN dealer or
a qualifi ed workshop. Chapter 6, "Levels" section.
Dipped beam
headlamps /
Daytime
running lams
on. a manual selection or
automatic illumination of
headlamps.
Turn the ring on the lighting control stalk to the
second position.
illumination of the dipped beam
headlamps from the time the
ignition is switched on: daytime
running lamps (depending on the
country in which the vehicle is sold).
Chapter 3, "Steering mounted controls" section.
Main beam
headlamps pulling of the stalk towards
you. Pull the stalk to return to dipped beam
headlamps.
Direction
indicators fl ashing with
audible signal. a change of direction via
the lighting stalk, to the left
of the steering wheel. To the Right: control to be pushed upwards.
To the Left: control to be pushed downwards.
Front
foglamps on.
a manual selection. The foglamps only operate if the sidelamps or
dipped beam headlamps are on.
Rear
foglamps on.
a manual selection. The foglamps only operate if the sidelamps or
dipped beam headlamps are on. In conditions of
normal visibility, switch them off to avoid breaking
the law. "This lamp is a dazzling red."
Page 39 of 268
2
Instruments and controls
37
READY TO GO
The alert is maintained until
the tyre or tyres concerned is
reinfl ated, repaired or replaced.
The spare wheel (space-saver
type or a steel rim) does not have a
sensor.
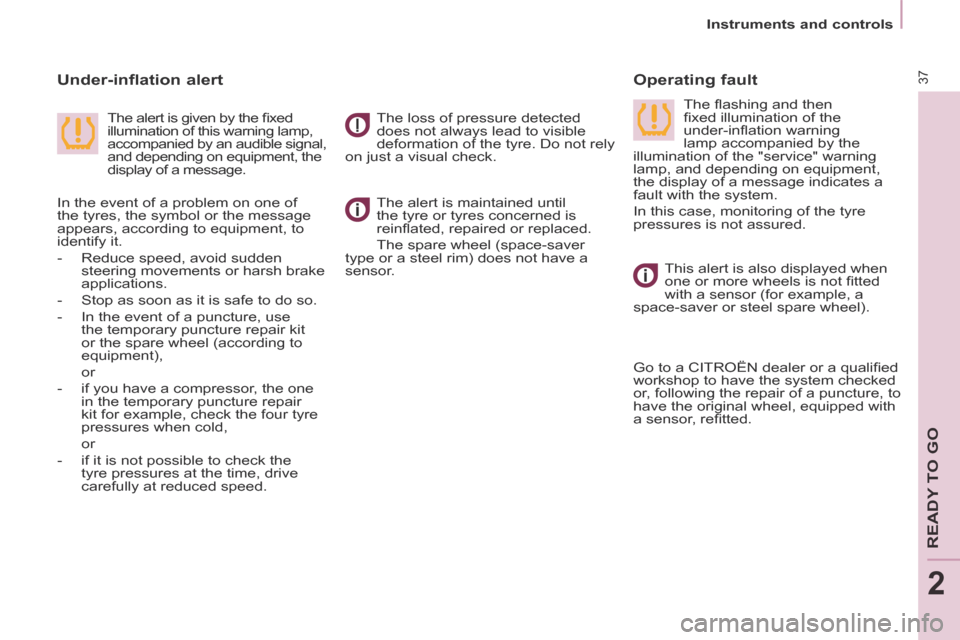
Operating fault
Under-inflation alert
The loss of pressure detected
does not always lead to visible
deformation of the tyre. Do not rely
on just a visual check.
The alert is given by the fi xed
illumination of this warning lamp,
accompanied by an audible signal,
and depending on equipment, the
display of a message. The fl ashing and then
fi xed illumination of the
under-infl ation warning
lamp accompanied by the
illumination of the "service" warning
lamp, and depending on equipment,
the display of a message indicates a
fault with the system.
In this case, monitoring of the tyre
pressures is not assured.
In the event of a problem on one of
the tyres, the symbol or the message
appears, according to equipment, to
identify it.
- Reduce speed, avoid sudden
steering movements or harsh brake
applications.
- Stop as soon as it is safe to do so.
- In the event of a puncture, use the temporary puncture repair kit
or the spare wheel (according to
equipment),
or
- if you have a compressor, the one in the temporary puncture repair
kit for example, check the four tyre
pressures when cold,
or
- if it is not possible to check the tyre pressures at the time, drive
carefully at reduced speed. This alert is also displayed when
one or more wheels is not fi tted
with a sensor (for example, a
space-saver or steel spare wheel).
Go to a CITROËN dealer or a qualifi ed
workshop to have the system checked
or, following the repair of a puncture, to
have the original wheel, equipped with
a sensor, refi tted.
Page 41 of 268
2
Instruments and controls
39
READY TO GO
Trip recorder zero reset button
After this operation, if you wish to
disconnect the battery, lock the
vehicle and wait for at least fi ve
minutes, otherwise the zero re-set will
not be registered.
Zero re-set
Your CITROËN dealer or a qualifi ed
workshop carries out this operation
after each service.
However, if you carry out the service
yourself, the re-set procedure is as
follows:
- switch off the ignition,
- press and hold the trip recorder reset button,
- switch on the ignition.
The display begins a countdown.
When the display shows "=0" , release
the button; the spanner disappears.
Engine oil level indicator
When the ignition is switched on, the
engine oil level is indicated for a few
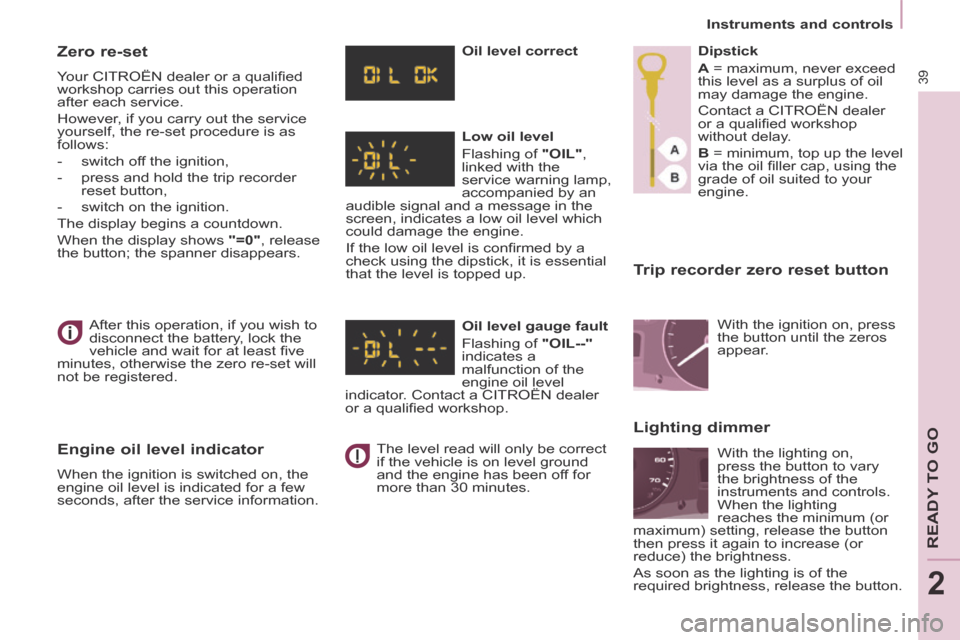
seconds, after the service information. Oil level correct
Low oil level
Flashing of
"OIL" ,
linked with the
service warning lamp,
accompanied by an
audible signal and a message in the
screen, indicates a low oil level which
could damage the engine.
If the low oil level is confi rmed by a
check using the dipstick, it is essential
that the level is topped up.
Oil level gauge fault
Flashing of "OIL--"
indicates a
malfunction of the
engine oil level
indicator. Contact a CITROËN dealer
or a qualifi ed workshop.
The level read will only be correct
if the vehicle is on level ground
and the engine has been off for
more than 30 minutes. Dipstick
A = maximum, never exceed
this level as a surplus of oil
may damage the engine.
Contact a CITROËN dealer
or a qualifi ed workshop
without delay.
B = minimum, top up the level
via the oil fi ller cap, using the
grade of oil suited to your
engine.
Lighting dimmer
With the ignition on, press
the button until the zeros
appear.
With the lighting on,
press the button to vary
the brightness of the
instruments and controls.
When the lighting
reaches the minimum (or
maximum) setting, release the button
then press it again to increase (or
reduce) the brightness.
As soon as the lighting is of the
required brightness, release the button.
Page 45 of 268
2
Gearbox and steering wheel
43
READY TO GO
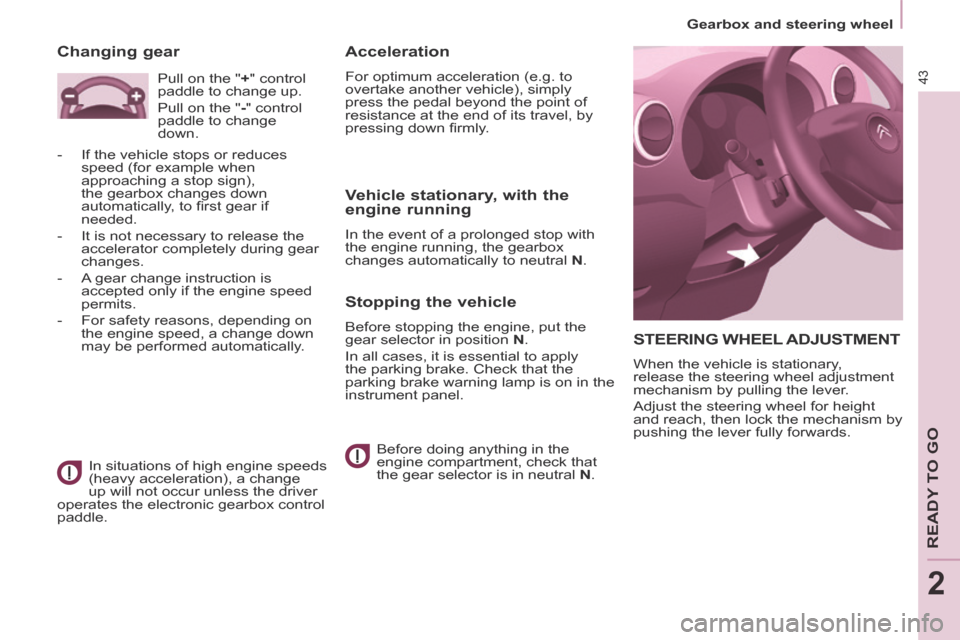
STEERING WHEEL ADJUSTMENT
When the vehicle is stationary,
release the steering wheel adjustment
mechanism by pulling the lever.
Adjust the steering wheel for height
and reach, then lock the mechanism by
pushing the lever fully forwards.
Acceleration
For optimum acceleration (e.g. to
overtake another vehicle), simply
press the pedal beyond the point of
resistance at the end of its travel, by
pressing down fi rmly.
Vehicle stationary, with the
engine running
In the event of a prolonged stop with
the engine running, the gearbox
changes automatically to neutral N .
Stopping the vehicle
Before stopping the engine, put the
gear selector in position N .
In all cases, it is essential to apply
the parking brake. Check that the
parking brake warning lamp is on in the
instrument panel.
Before doing anything in the
engine compartment, check that
the gear selector is in neutral N .
Changing gear
In situations of high engine speeds
(heavy acceleration), a change
up will not occur unless the driver
operates the electronic gearbox control
paddle. Pull on the "
+ " control
paddle to change up.
Pull on the " - " control
paddle to change
down.
- If the vehicle stops or reduces speed (for example when
approaching a stop sign),
the gearbox changes down
automatically, to fi rst gear if
needed.
- It is not necessary to release the accelerator completely during gear
changes.
- A gear change instruction is accepted only if the engine speed
permits.
- For safety reasons, depending on the engine speed, a change down
may be performed automatically.
Page 50 of 268
Starting and stopping
48
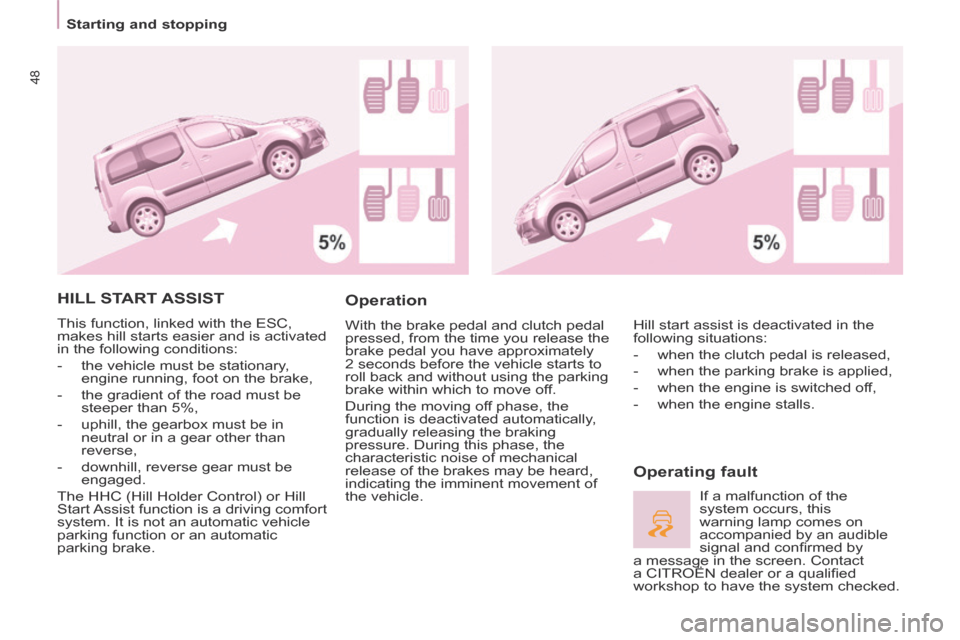
HILL START ASSIST
This function, linked with the ESC,
makes hill starts easier and is activated
in the following conditions:
- the vehicle must be stationary, engine running, foot on the brake,
- the gradient of the road must be steeper than 5%,
- uphill, the gearbox must be in neutral or in a gear other than
reverse,
- downhill, reverse gear must be engaged.
The HHC (Hill Holder Control) or Hill
Start Assist function is a driving comfort
system. It is not an automatic vehicle
parking function or an automatic
parking brake.
Operation
With the brake pedal and clutch pedal
pressed, from the time you release the
brake pedal you have approximately
2 seconds before the vehicle starts to
roll back and without using the parking
brake within which to move off.
During the moving off phase, the
function is deactivated automatically,
gradually releasing the braking
pressure. During this phase, the
characteristic noise of mechanical
release of the brakes may be heard,
indicating the imminent movement of
the vehicle.
Operating fault
Hill start assist is deactivated in the
following situations:
- when the clutch pedal is released,
- when the parking brake is applied,
- when the engine is switched off,
- when the engine stalls.
If a malfunction of the
system occurs, this
warning lamp comes on
accompanied by an audible
signal and confi rmed by
a message in the screen. Contact
a CITROËN dealer or a qualifi ed
workshop to have the system checked.
Page 53 of 268
51
Steering mounted controls
EASE OF U
SE and
COMFORT
3
If the sunshine sensor
does not function correctly ,
the lighting comes on
accompanied by the service
warning lamp, an audible
signal and a message in the screen.
Contact a CITROËN dealer or a
qualifi ed workshop.
Guide-me-home lighting
Keeping the dipped beam headlamps
on temporarily with the ignition off,
makes the driver's exit easier when the
light is poor.
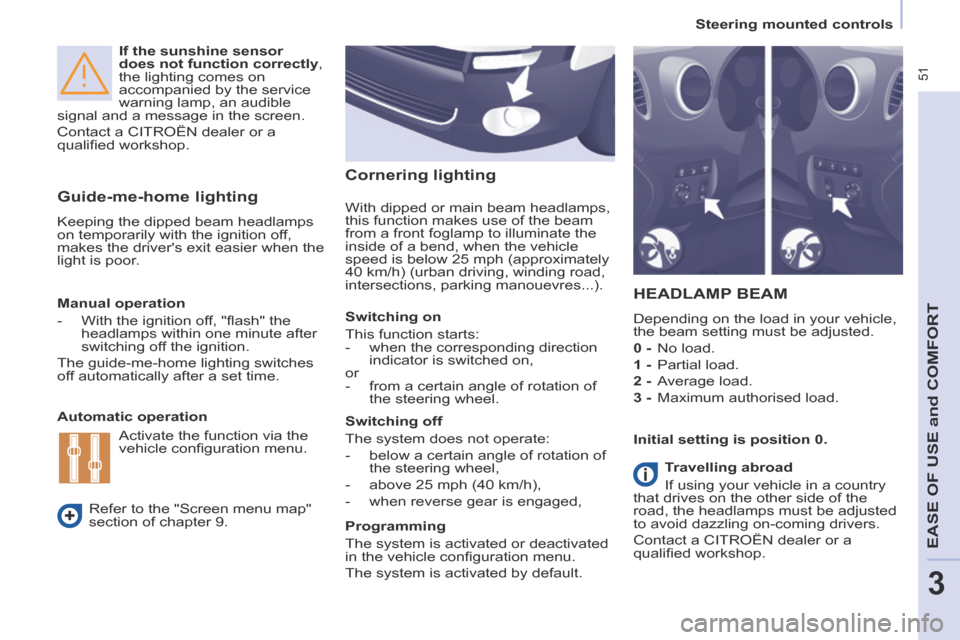
HEADLAMP BEAM
Depending on the load in your vehicle,
the beam setting must be adjusted.
0 - No load.
1 - Partial load.
2 - Average load.
3 - Maximum authorised load.
Manual operation
- With the ignition off, "fl ash" the
headlamps within one minute after
switching off the ignition.
The guide-me-home lighting switches
off automatically after a set time.
Automatic operation
Refer to the "Screen menu map"
section of chapter 9. Initial setting is position 0.
Activate the function via the
vehicle confi guration menu.
Programming
The system is activated or deactivated
in the vehicle confi guration menu.
The system is activated by default. Switching off
The system does not operate:
- below a certain angle of rotation of the steering wheel,
- above 25 mph (40 km/h),
- when reverse gear is engaged, Switching on
This function starts:
- when the corresponding direction indicator is switched on,
or
- from a certain angle of rotation of the steering wheel.
With dipped or main beam headlamps,
this function makes use of the beam
from a front foglamp to illuminate the
inside of a bend, when the vehicle
speed is below 25 mph (approximately
40 km/h) (urban driving, winding road,
intersections, parking manouevres...).
Cornering lighting
Travelling abroad
If using your vehicle in a country
that drives on the other side of the
road, the headlamps must be adjusted
to avoid dazzling on-coming drivers.
Contact a CITROËN dealer or a
qualifi ed workshop.