bonnet Citroen BERLINGO MULTISPACE 2015 2.G User Guide
[x] Cancel search | Manufacturer: CITROEN, Model Year: 2015, Model line: BERLINGO MULTISPACE, Model: Citroen BERLINGO MULTISPACE 2015 2.GPages: 298, PDF Size: 12.69 MB
Page 53 of 298

Berlingo-2-VP_en_Chap03_Pret-a-partir_ed01-2015Berlingo-2-VP_en_Chap03_Pret-a-partir_ed01-2015
51
Reactivation
Press the "ECO OFF" switch again.
The system is active again; this is
confirmed
by the switch warning
lamp
going off and a message in the
instrument
panel.
The
system is reactivated
automatically
at every new start
using
the key.
Operating fault
In the event of a malfunction with the system, the "ECO
OFF"
switch warning lamp
flashes,
then comes on
continuously
.
Maintenance
Before working under the bonnet, deactivate the Stop & Start system
to
avoid any risk of injury resulting
from
automatic operation of START
mode.
This
system requires a specific
battery
with a special specification
and
technology (reference numbers
available
from a CITROËN dealer or a
qualified
workshop).
Fitting a battery not listed by
CITROËN introduces
the risk of
malfunction
of the system.
The
Stop & Start system makes
use
of advanced technology.
All
work
on this type of battery must
be done only by a CITR
o Ë n dealer or
a
qualified workshop.
have
it
checked
by
a
CITROËN
dealer
or
a
qualified
workshop.
In
the
event
of
a
fault
in
STOP
mode,
the
vehicle
may
stall.
All
of
the
warning
lamps
in
the
instrument
panel
come
on.
It
is
then
necessary
to
switch
off
the ignition and start the engine again
using
the
key.
Stop & Start
REadY To Go
3
Page 54 of 298
Berlingo-2-VP_en_Chap03_Pret-a-partir_ed01-2015
52
Good practice when stopping Good practice when starting
Diesel pre-heating warning
lamp
If the temperature is high
enough,
the warning lamp
comes
on for less than
one
second, you can start
without
waiting.
In cold weather, wait for this warning
lamp
to
go off then operate the starter
(Starting position) until the engine
starts.
Door or bonnet open warning lamp
If this comes on, a door or the bonnet
is
not closed correctly, check!
Minimise engine and gearbox wear
When switching off the ignition, let the
engine run for a few seconds to allow
the turbocharger (
d iesel engine) to
return
to idle.
d
o not press the accelerator when
switching
off the ignition.
There is no need to engage a gear
after
parking the vehicle.
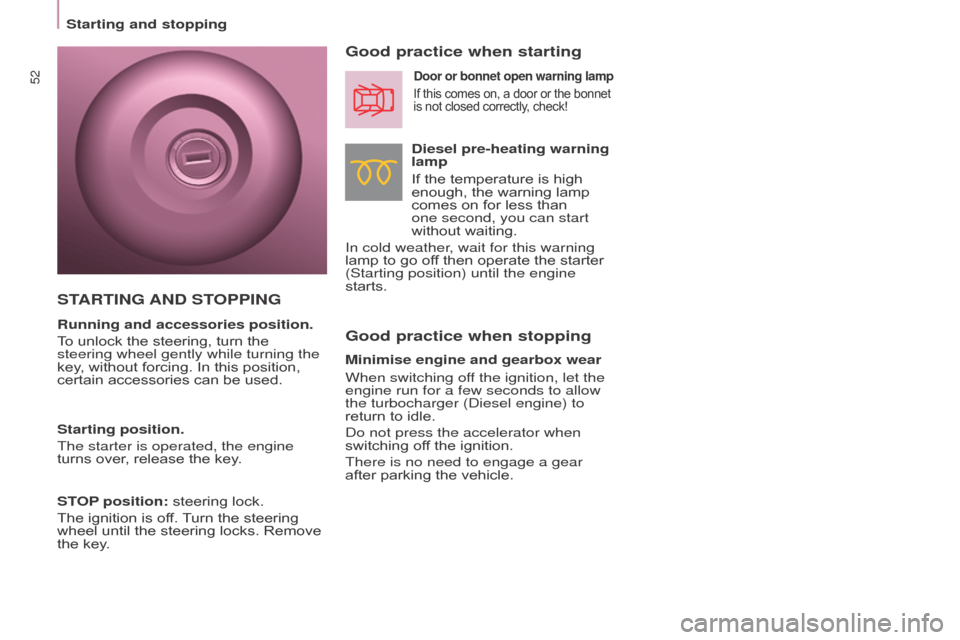
STARTING AND ST OPPING
Running and accessories position.
To
unlock the steering, turn the
steering wheel gently while turning the
key
, without forcing. In this position,
certain
accessories can be used.
Starting position.
The starter is operated, the engine
turns
over, release the key.
STOP position:
steering lock.
The
ignition is off.
T
urn the steering
wheel
until the steering locks. Remove
the
key.
Starting and stopping
Page 122 of 298

120
Berlingo-2-VP_en_Chap05_Securite_ed01-2015
Operation
When your vehicle is too close to or
approaches the vehicle ahead too
quickly the system automatically
applies
the brakes to avoid a collision.
You are then alerted by the display of a
message.
The
brake lamps on your vehicle come
on
to warn other road users.
The collision can be avoided
automatically
if the difference in
speed between your vehicle and the
vehicle
ahead does not exceed 9 mph
(15 km/h).
Above
this threshold, the system will
do what is possible to avoid or reduce
the accident by lowering the speed of
impact.
The
automatic braking may bring
the
vehicle to a complete stop if the
situation
requires it.
In this case, the vehicle is held
stationary
temporarily (for about
1.5 seconds)
to allow the driver to take
back
control by pressing the brake
pedal. The
triggering of the system may cause the engine to stall, unless
the driver depresses the clutch
pedal
quickly enough during automatic
braking.
During
automatic braking, the
driver can always obtain a higher
rate of deceleration than that
controlled
by the system, by pressing
firmly
on the brake pedal.
After
an impact, the system is
automatically
put out of service: it
no
longer operates.
You
must go to a CITROËN dealer or a
qualified
workshop to have the system
made
operational again.
Operating limits
The system only detects vehicles that are stationary or moving in the same
direction
as your vehicle.
It
does not detect small vehicles
(bicycles,
motorcycles),
pedestrians
or animals, nor non-
reflective
stationary objects.
The
system is not triggered or is
interrupted
if the driver:
-
accelerates strongly
-
or turns the steering wheel
suddenly
(avoiding manoeuvre).
In
difficult weather conditions (very
heavy
rain, snow, fog, hail...),
braking
distances increase, which
can
reduce the ability of the system to
avoid
a collision.
The
driver must therefore remain
particularly
vigilant.
Never
leave accumulations of
snow
or any object projecting
above the bonnet or in front of
the
roof: this might fall into the field of
vision of the sensor and generate a
detection.
driving safely
Page 154 of 298
152
Berlingo-2-VP_en_Chap07_Verification_ed01-2015
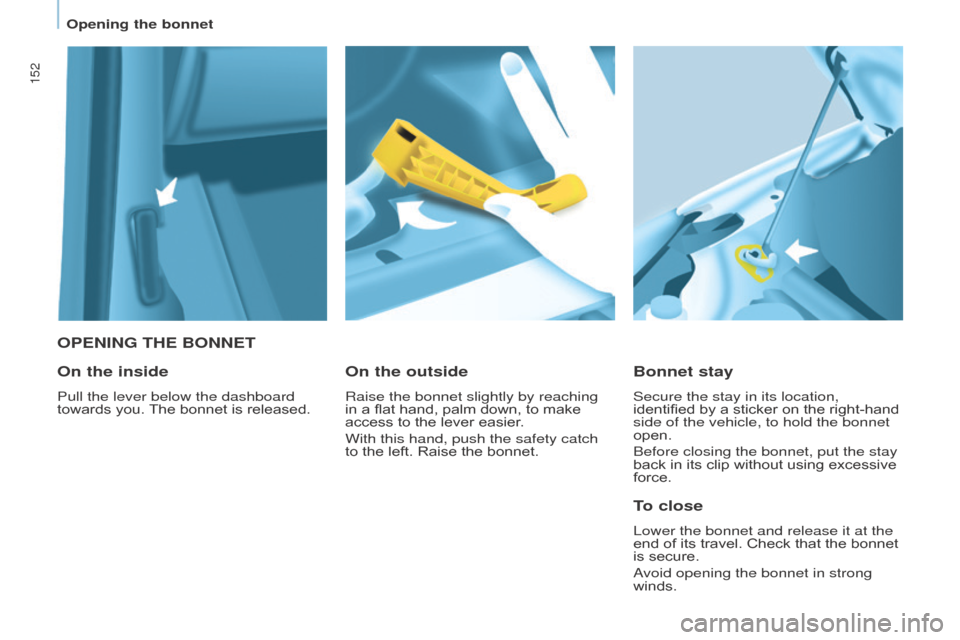
OPENING THE BONNET
Bonnet stay
Secure the stay in its location,
identified by a sticker on the right-hand
side of the vehicle, to hold the bonnet
open.
Before closing the bonnet, put the stay
back
in its clip without using excessive
force.
On the outside
Raise the bonnet slightly by reaching
in a flat hand, palm down, to make
access
to the lever easier.
With this hand, push the safety catch
to
the left. Raise the bonnet.
On the inside
Pull the lever below the dashboard
towards you. The bonnet is released.
To close
Lower the bonnet and release it at the
end of its travel. Check that the bonnet
is
secure.
avoid opening the bonnet in strong
winds.
opening the bonnet
Page 155 of 298
153
Berlingo-2-VP_en_Chap07_Verification_ed01-2015Berlingo-2-VP_en_Chap07_Verification_ed01-2015
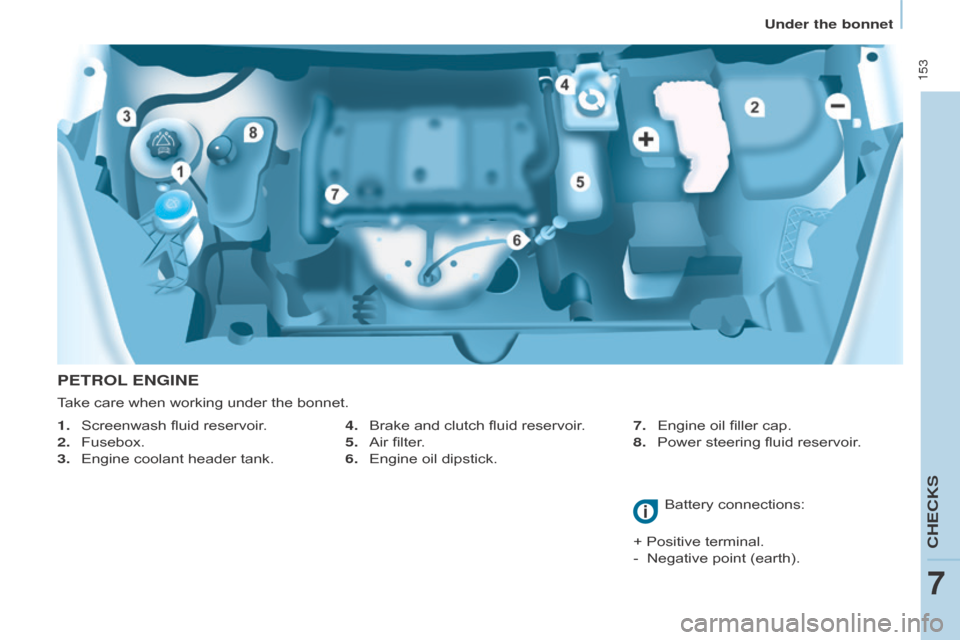
PETROL ENGINE
1. Screenwash fluid reservoir.
2.
Fusebox.
3.
Engine
coolant header tank.
Battery
connections:
+
Positive terminal.
-
Negative point (earth).
Take
care when working under the bonnet.
4. Brake and clutch fluid reservoir.
5.
Air
filter.
6.
Engine
oil dipstick.7.
Engine oil filler cap.
8.
Power
steering fluid reservoir.
CHECkS
7
Under the bonnet
Page 156 of 298
154
Berlingo-2-VP_en_Chap07_Verification_ed01-2015Berlingo-2-VP_en_Chap07_Verification_ed01-2015
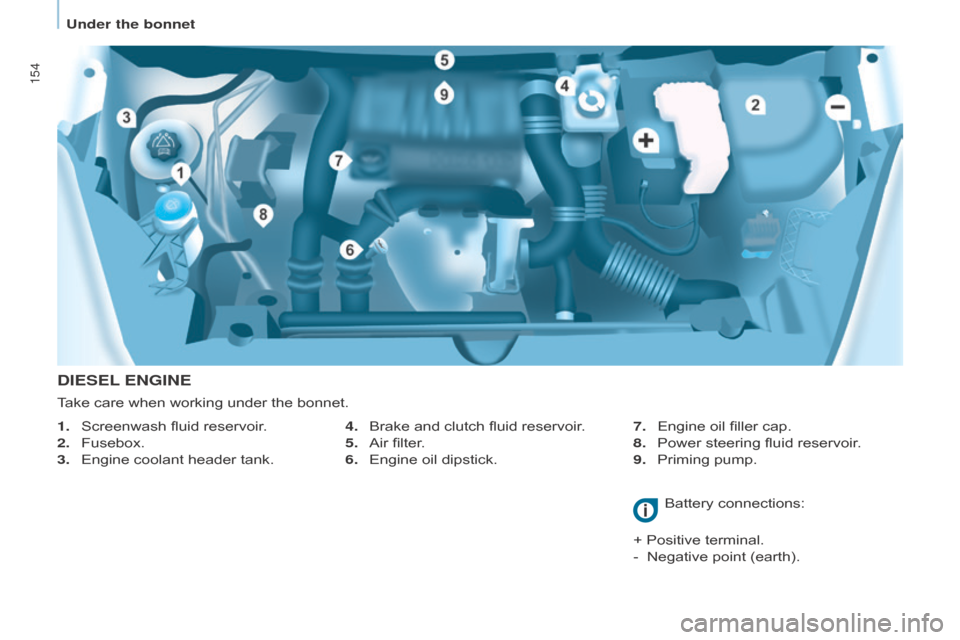
DIESEL ENGINE
4. Brake and clutch fluid reservoir.
5.
Air
filter.
6.
Engine
oil dipstick. 7.
Engine oil filler cap.
8.
Power
steering fluid reservoir.
9.
Priming
pump.
1.
Screenwash
fluid
reservoir.
2.
Fusebox.
3.
Engine
coolant
header
tank.
Battery
connections:
+
Positive terminal.
-
Negative point (earth).
Take
care
when
working
under
the
bonnet.
Under the bonnet
Page 157 of 298
155
Berlingo-2-VP_en_Chap07_Verification_ed01-2015Berlingo-2-VP_en_Chap07_Verification_ed01-2015
LEVELS
Oil change
This must be carried out at the intervals specified in the
manufacturer's
servicing schedule.
Ask
for
advice from a CITROËN dealer.
Remove
the dipstick before filling.
Check
the level after filling (never
exceed
the max mark).
Refit
the oil filler cap before closing the
bonnet.
Changing the brake fluid
The brake fluid must be changed at the intervals stated, according to the
manufacturer's servicing schedule.
Use
fluids recommended by the
manufacturer
, which meet the DOT4
standard.
The
level must be between the MIN
and
MAX marks on the reservoir.
If
fluid has to be added frequently,
this
indicates a fault which must be
checked
by a CITROËN dealer or
a
qualified workshop as soon as
possible.
Warning lamps
If you have to remove / refit the engine style cover, handle it with
care
to avoid damaging the fixing
clips.
Oil level
It is recommended that the oil level be checked every 3 000 miles (5 000 km)
and topped up if necessary between oil
changes.
Check
the level with the vehicle level,
engine
cold, using the dipstick.
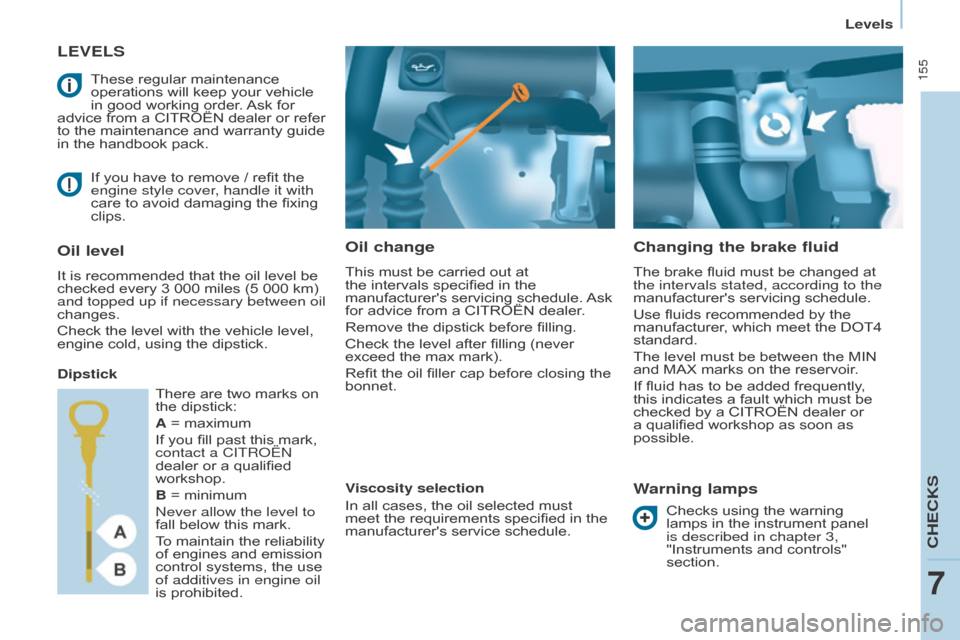
Dipstick
Viscosity selection
In
all cases, the oil selected must
meet
the requirements specified in the
manufacturer's
service schedule.
These
regular maintenance
operations
will keep your vehicle
in
good working order.
Ask
for
advice
from a CITROËN dealer or refer
to
the maintenance and warranty guide
in
the handbook pack.
Checks using the warning
lamps
in the instrument panel
is described in chapter 3,
"Instruments
and controls"
section.
There
are two marks on
the
dipstick:
A
= maximum
If
you fill past this mark,
contact a CITR
o Ë n
dealer
or a qualified
workshop.
B
= minimum
n
ever allow the level to
fall
below this mark.
To
maintain the reliability
of
engines and emission
control
systems, the use
of additives in engine oil
is
prohibited.
CHECkS
7
Levels
Page 162 of 298
DIESEL
160
Berlingo-2-VP_en_Chap07_Verification_ed01-2015Berlingo-2-VP_en_Chap07_Verification_ed01-2015
FUEL CUT- OFF
In a serious collision, a mechanism automatically
prevents fuel from
reaching
the engine.
The
flashing of this warning
lamp
is accompanied by a
message
in the screen.
Check
that there is no odour or
leakage
of fuel outside the vehicle and
re-establish
the fuel supply:
-
switch of
f the ignition (ST
o
P
position),
-
remove
the key,
-
put
the key back in the ignition,
-
switch
on the ignition and start.
DIESEL PRIMING PUMP
Refer to chapter 7, "Under the bonnet"
section.
Fuel used for Diesel engines
The Diesel engines are compatible with biofuels
which conform to current and
future European standards (
d iesel fuel
which
complies with standard EN 590
mixed
with a biofuel which complies
with standard E
n 14214) available at
the
pumps (containing up to 7 % Fatty
Acid
Methyl Ester).
B30 biofuel can be used in certain
Diesel
engines. However, this use,
even occasional, requires strict
application of the special servicing
conditions.
Contact a CITROËN dealer
or
a qualified workshop.
The use of any other type of (bio)
fuel
(vegetable or animal oils, pure
or
diluted, domestic fuel...) is strictly
prohibited
(risk of damage to the
engine
and fuel system). If you run out of fuel, it is necessary to
prime
the fuel circuit.
-
Fill
the fuel tank with at least five
litres
of Diesel.
-
Squeeze
and release the manual
priming
pump, under the bonnet,
under
the protective cover.
-
o perate the starter until the engine
starts.
Fuel
Page 182 of 298
180
Berlingo-2-VP_en_Chap08_aide-rapide_ed01-2015Berlingo-2-VP_en_Chap08_aide-rapide_ed01-2015
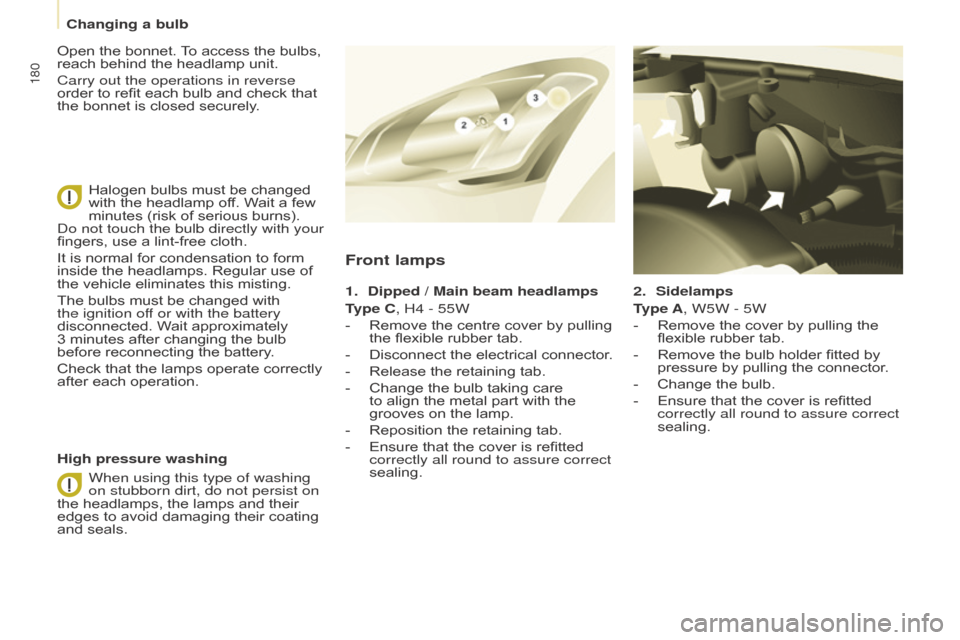
2. Sidelamps
T ype A, W5W - 5W
-
Remove
the cover by pulling the
flexible
rubber tab.
-
Remove
the bulb holder fitted by
pressure
by pulling the connector.
-
Change
the bulb.
-
Ensure
that the cover is refitted
correctly all round to assure correct
sealing.
Front lamps
1. Dipped / Main beam headlamps
T ype C, H4 - 55W
-
Remove
the centre cover by pulling
the
flexible rubber tab.
-
Disconnect
the electrical connector.
-
Release
the retaining tab.
-
Change
the bulb taking care
to
align the metal part with the
grooves
on the lamp.
-
Reposition
the retaining tab.
-
Ensure
that the cover is refitted
correctly all round to assure correct
sealing.
High pressure washing Open
the
bonnet.
T
o
access
the
bulbs,
reach
behind
the
headlamp
unit.
Carry out the operations in reverse
order
to
refit
each
bulb
and
check
that
the
bonnet
is
closed
securely.
Halogen
bulbs
must
be
changed
with
the
headlamp
off.
Wait
a
few
minutes
(risk
of
serious
burns).
d
o not touch the bulb directly with your
fingers,
use
a
lint-free
cloth.
It
is
normal
for
condensation
to
form
inside
the
headlamps.
Regular
use
of
the
vehicle
eliminates
this
misting.
The
bulbs
must
be
changed
with
the ignition of
f or with the battery
disconnected.
Wait
approximately
3
minutes
after
changing
the
bulb
before
reconnecting
the
battery.
Check
that
the
lamps
operate
correctly
after
each
operation.
When using this type of washing
on stubborn dirt, do not persist on
the
headlamps,
the
lamps
and
their
edges
to
avoid
damaging
their
coating
and
seals.
Changing a bulb
Page 187 of 298
185
Berlingo-2-VP_en_Chap08_aide-rapide_ed01-2015Berlingo-2-VP_en_Chap08_aide-rapide_ed01-2015
CHANGING A FUSE
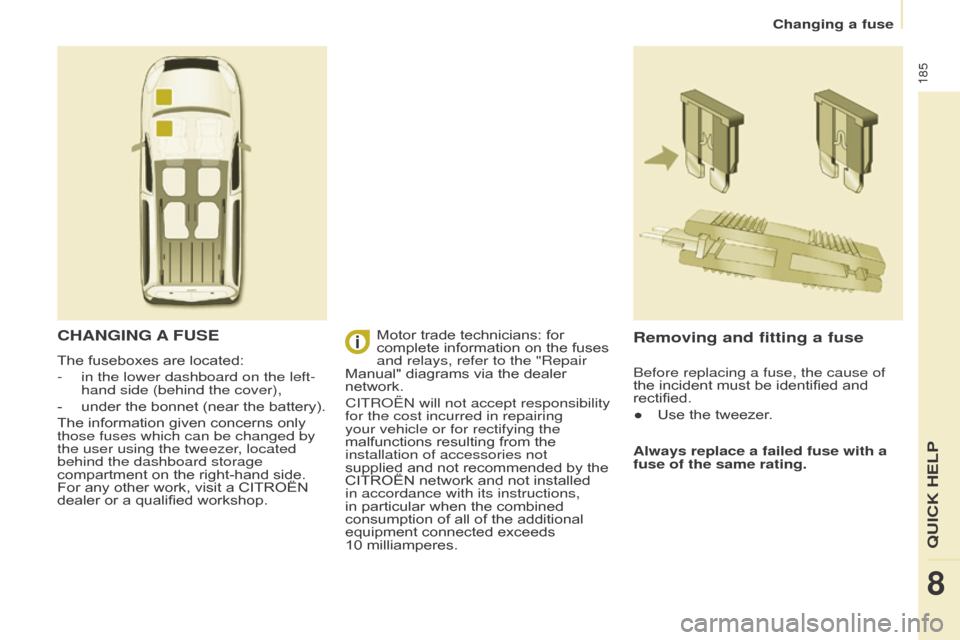
The fuseboxes are located:
-
in the lower dashboard on the left-
hand side (behind the cover),
-
under
the bonnet (near the battery).
The
information given concerns only
those fuses which can be changed by
the user using the tweezer
, located
behind the dashboard storage
compartment
on the right-hand side.
For
any other work, visit a CITROËN
dealer
or a qualified workshop.
Removing and fitting a fuse
Always replace a failed fuse with a
fuse of the same rating.
Motor
trade
technicians:
for
complete
information
on
the
fuses
and relays, refer to the "Repair
Manual"
diagrams
via
the
dealer
network.
CITR
o
Ë
n
will not accept responsibility
for the cost incurred in repairing
your vehicle or for rectifying the
malfunctions
resulting
from
the
installation of accessories not
supplied
and
not
recommended
by
the
CITROËN
network
and
not
installed
in accordance with its instructions,
in
particular
when
the
combined
consumption
of
all
of
the
additional
equipment
connected
exceeds
10
milliamperes. Before replacing a fuse, the cause of
the
incident must be identified and
rectified.
●
Use
the tweezer.
QUICk HELP
8
Changing a fuse