light Citroen BERLINGO MULTISPACE RHD 2014 2.G Owner's Guide
[x] Cancel search | Manufacturer: CITROEN, Model Year: 2014, Model line: BERLINGO MULTISPACE RHD, Model: Citroen BERLINGO MULTISPACE RHD 2014 2.GPages: 268, PDF Size: 13.36 MB
Page 135 of 268
133
Opening the bonnet
CHECKS
6
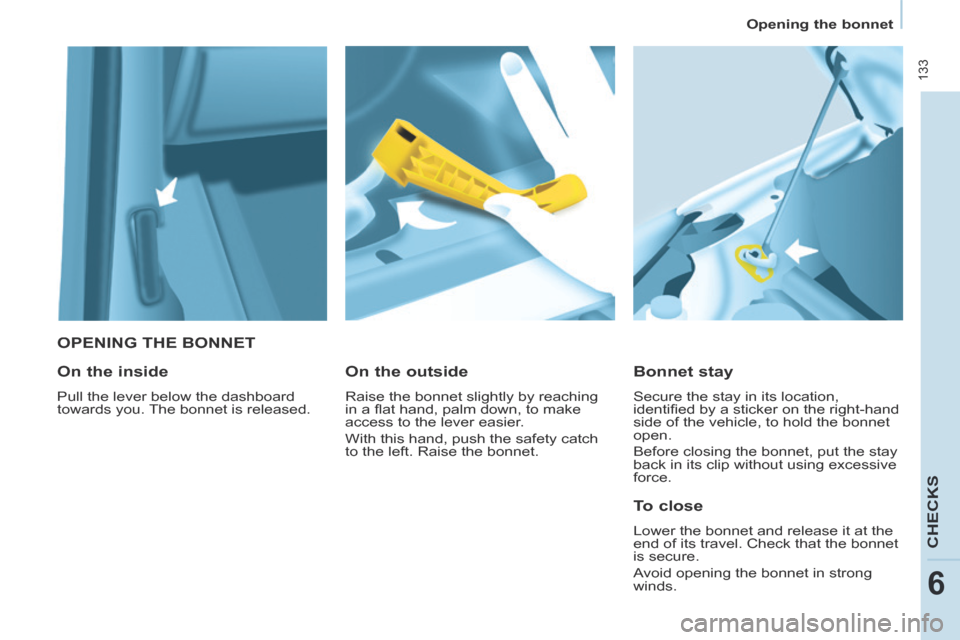
OPENING THE BONNET
Bonnet stay
Secure the stay in its location,
identifi ed by a sticker on the right-hand
side of the vehicle, to hold the bonnet
open.
Before closing the bonnet, put the stay
back in its clip without using excessive
force.
On the outside
Raise the bonnet slightly by reaching
in a fl at hand, palm down, to make
access to the lever easier.
With this hand, push the safety catch
to the left. Raise the bonnet.
On the inside
Pull the lever below the dashboard
towards you. The bonnet is released.
To close
Lower the bonnet and release it at the
end of its travel. Check that the bonnet
is secure.
Avoid opening the bonnet in strong
winds.
Page 139 of 268

Levels
137
CHECKS
6
Cooling system
Only use the fl uid recommended by the
manufacturer.
Otherwise, you risk seriously damaging
your engine.
When the engine is warm, the
temperature of the coolant is controlled
by the engine fan. As this fan can
operate with the ignition key removed
and because the cooling system is
pressurised, wait for at least one hour
after the engine has stopped before
carrying out any work.
Slacken the cap by 1/4 of a turn to
release the pressure to prevent any
risk of scalding. When the pressure
has dropped, remove the cap and top
up the level with coolant.
If fl uid has to be added frequently,
this indicates a fault which must be
checked by a CITROËN dealer as
soon as possible.
Power steering fluid level
The vehicle must be parked on level
ground with the engine cold. Unscrew
the cap integrated with the gauge and
check the level which must be between
the MIN and MAX marks. In order to regenerate the fi lter, you
are advised to drive at a speed higher
than 40 mph (60 km/h) for at least fi ve
minutes as soon as possible, when
traffi c conditions permit (until the
message disappears and the service
warning lamp goes off).
During regeneration of the particle
emission fi lter, the noise of a relay
operating may be heard under the
dashboard.
If the message is still displayed and
if the service warning lamp remains
on, consult a CITROËN dealer or a
qualifi ed workshop.
Topping up
The level must be between the MIN
and MAX marks on the expansion
bottle. If more than 1 litre of fl uid is
required to top up the level, have the
system checked by a CITROËN dealer
or a qualifi ed workshop.
Screenwash and headlamp
wash level
For best quality cleaning and for your
safety, we would advise that you use
products of the CITROËN range.
For optimum cleaning and to avoid
freezing, this fl uid must not be topped
up or replaced with plain water.
Capacity of the screenwash reservoir:
approximately 3 litres.
If your vehicle is fi tted with headlamp
washers, the capacity of the reservoir
is 6 litres.
Diesel additive level
(Diesel with particle
emission filter)
Topping up
This additive must be topped up by
a CITROËN dealer or a qualifi ed
workshop without delay.
Waste products
Avoid prolonged contact of used oil
with the skin.
Brake fl uid is harmful to health and
very corrosive.
Do not dispose of used oil, brake fl uid
or coolant into drains or into the ground
but into the containers dedicated to this
use at CITROËN dealer (France) or an
authorised waste disposal site.
The minimum level of this additive
is indicated by lighting of the service
warning lamp, accompanied by an
audible signal and a message in the
screen.
When this occurs with the engine
running it is due to the start of
saturation of the particle emission fi lter
(exceptionally prolonged urban type
driving conditions: low speed, long
traffi c jams, ...).
Page 141 of 268
Checks
139
CHECKS
6
To check the main levels
and certain components,
in accordance with the
manufacturer's servicing schedule,
refer to the pages of the maintenance
and warranty guide which correspond
to your vehicle's engine.
Bleeding water from the Diesel
filter Manual gearbox
Have the level checked in accordance with
the manufacturer's servicing schedule.
Only use products recommended
by CITROËN or products
of equivalent quality and
specifi cation.
In order to optimise the operation
of units as important as the braking
system, CITROËN selects and offers
specifi c products.
In order to avoid damaging the
electrical units, high pressure washing
to clean the engine compartment is
strictly prohibited.
After washing the vehicle dampness,
or in winter, ice may form on the brake
discs and pads: braking effi ciency may
be reduced. Make some light brake
applications to dry and de-ice the
brakes.
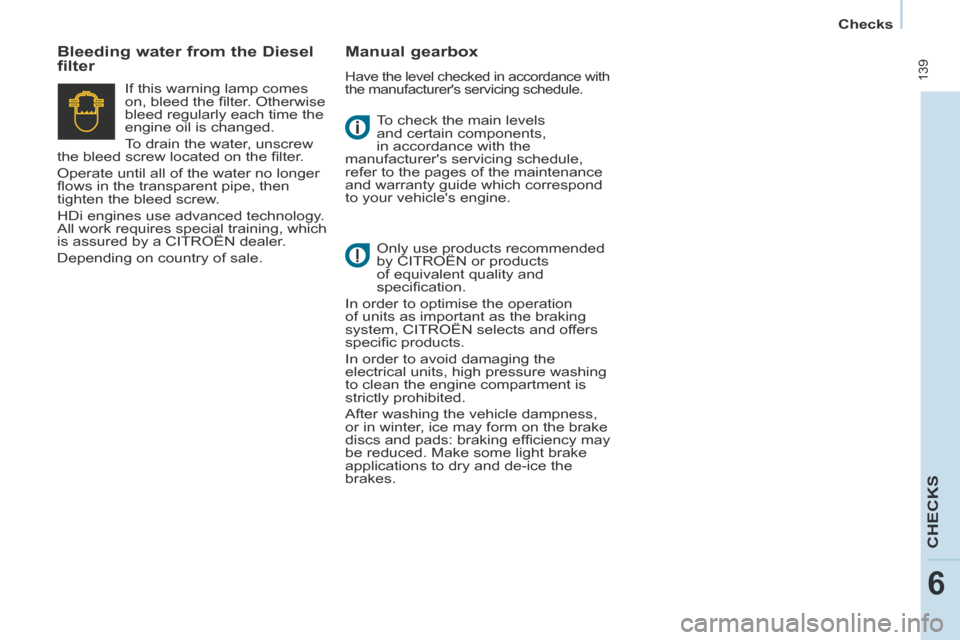
If this warning lamp comes
on, bleed the fi lter. Otherwise
bleed regularly each time the
engine oil is changed.
To drain the water, unscrew
the bleed screw located on the fi lter.
Operate until all of the water no longer
fl ows in the transparent pipe, then
tighten the bleed screw.
HDi engines use advanced technology.
All work requires special training, which
is assured by a CITROËN dealer.
Depending on country of sale.
Page 142 of 268

Fuel
140
FILLING WITH FUEL
Low fuel level
Filling
The fuel tank must be fi lled with the
engine off .
- Open the fuel fi ller fl ap.
- Insert the key, then turn it a quarter turn.
- Remove the cap and hook it onto the clip located on the inside of the
fl ap.
When fi lling with fuel, a
mechanical system prevents
opening of the left-hand side door.
When the fuel fi ller fl ap is open, ensure
that no one tries to slide this door.
Once the fl ap has been closed, the
sliding side door may jam, push the
door to close it then open it.
When the minimum fuel tank
level is reached, this warning
light comes on.
You then have
approximately 8 litres of
fuel remaining. Fill up without delay to
avoid running out of fuel.
Never risk driving until you run out of
fuel as this may damage the emissions
control and injection systems. A label affi xed to the inside of the fl ap
reminds you of the type of fuel to be
used.
You must fi ll with at least 5 litres of fuel
for it to be registered by the fuel gauge.
When the fuel fi ller cap is opened,
there may be a slight air suction noise.
This vacuum is entirely normal and is
due to the sealing of the fuel circuit.
When fi lling the fuel tank, do not
continue after the 3
rd cut-off of the
nozzle. This could cause malfunctions.
The capacity of the fuel tank is
approximately 60 litres.
- After fi lling the fuel tank, lock the cap and close the fl ap.
Quality of the fuel used for
petrol engines
The petrol engines are perfectly
compatible with E10 or E24 type petrol
biofuels (containing 10 % or 24 %
ethanol), conforming to European
standards EN 228 and EN 15376.
E85 type fuels (containing up to
85 % ethanol) are reserved exclusively
for vehicles marketed for the use of
this type of fuel (BioFlex vehicles). The
quality of the ethanol must comply with
European standard EN 15293.
For Brazil only, special vehicles are
marketed to run on fuels containing up
to 100 % ethanol (E100 type).
Page 147 of 268
Changing a wheel
145
QUICK HELP
7
1. PARKING THE VEHICLE
- The occupants must get out of the vehicle and wait in a safe location.
- If possible, park the vehicle on level, stable and non-slippery
ground.
- Apply the parking brake, switch off the ignition and engage fi rst or
reverse gear. - If available, place a chock under
the wheel diagonally opposite the
one to be changed.
If the vehicle is fi tted with a towbar,
it is sometimes necessary to raise
the vehicle slightly to make it easier
to remove the spare wheel from its
carrier.
On certain types of ground and/
or if considerable loads are being
transported, call a CITROËN dealer or
a qualifi ed workshop.
CHANGING A WHEEL
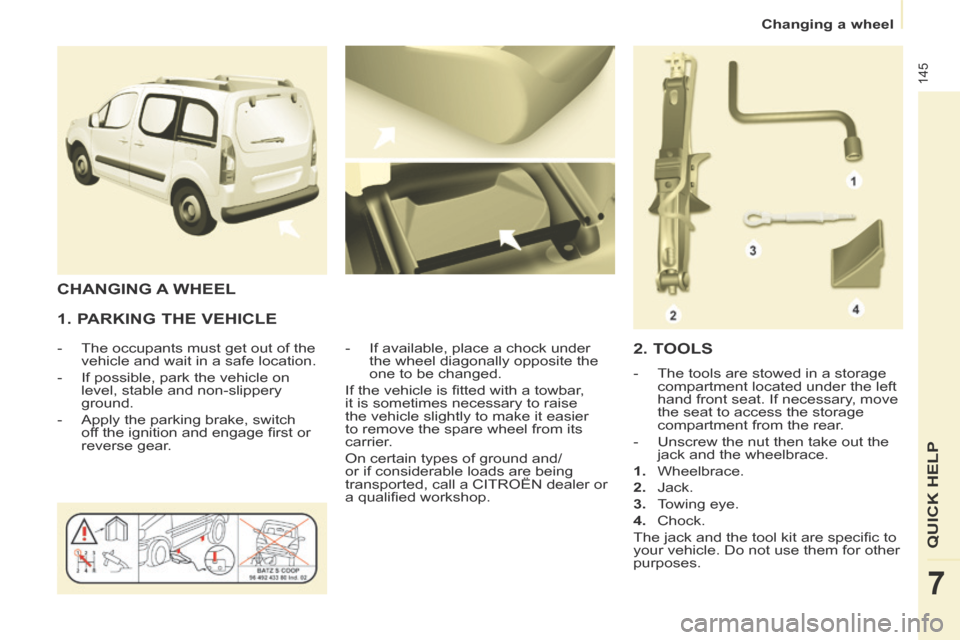
2. TOOLS
- The tools are stowed in a storage compartment located under the left
hand front seat. If necessary, move
the seat to access the storage
compartment from the rear.
- Unscrew the nut then take out the jack and the wheelbrace.
1. Wheelbrace.
2. Jack.
3. Towing eye.
4. Chock.
The jack and the tool kit are specifi c to
your vehicle. Do not use them for other
purposes.
Page 153 of 268
Changing a bulb
151
QUICK HELP
7
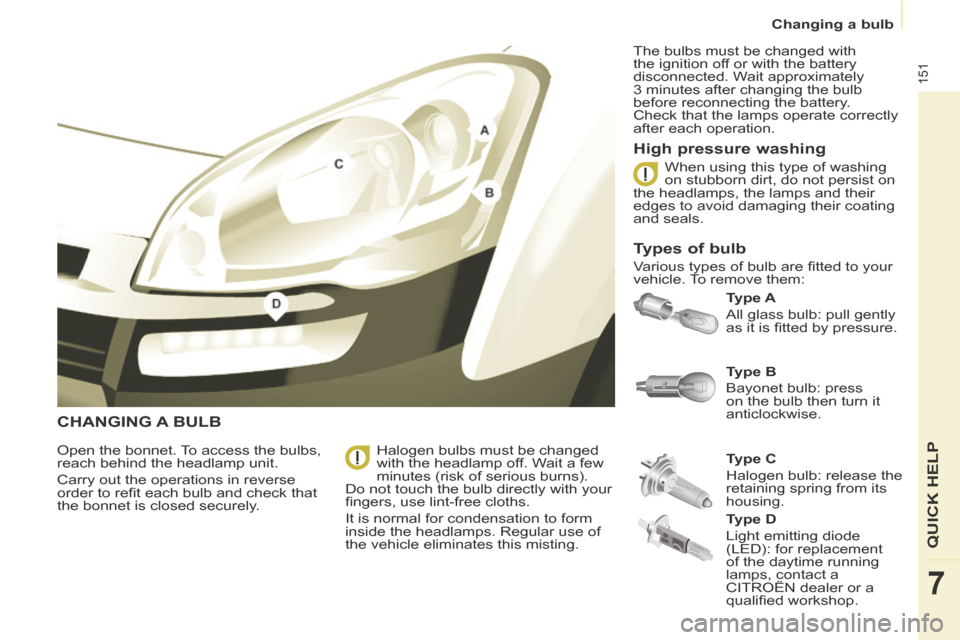
CHANGING A BULB
Type A
All glass bulb: pull gently
as it is fi tted by pressure.
High pressure washing
Open the bonnet. To access the bulbs,
reach behind the headlamp unit.
Carry out the operations in reverse
order to refi t each bulb and check that
the bonnet is closed securely. Type C
Halogen bulb: release the
retaining spring from its
housing. Type B
Bayonet bulb: press
on the bulb then turn it
anticlockwise.
Halogen bulbs must be changed
with the headlamp off. Wait a few
minutes (risk of serious burns).
Do not touch the bulb directly with your
fi ngers, use lint-free cloths.
It is normal for condensation to form
inside the headlamps. Regular use of
the vehicle eliminates this misting. The bulbs must be changed with
the ignition off or with the battery
disconnected. Wait approximately
3 minutes after changing the bulb
before reconnecting the battery.
Check that the lamps operate correctly
after each operation.
When using this type of washing
on stubborn dirt, do not persist on
the headlamps, the lamps and their
edges to avoid damaging their coating
and seals.
Types of bulb
Various types of bulb are fi tted to your
vehicle. To remove them:
Type D
Light emitting diode
(LED): for replacement
of the daytime running
lamps, contact a
CITROËN dealer or a
qualifi ed workshop.
Page 154 of 268

Changing a bulb
152
3. Direction indicators
Type B , PY21W - 21W (amber)
- Remove the cover by pulling the fl exible rubber tab.
- Turn the bulb holder a quarter turn anticlockwise.
- Remove the bulb by pressing it lightly while turning it
anticlockwise.
- Change the bulb.
- Ensure that the cover is refi tted correctly all round to assure
correct sealing.
2. Sidelamps
Type A , W5W - 5W
- Remove the cover by pulling the fl exible rubber tab.
- Remove the bulb holder fi tted by pressure by pulling the connector.
- Change the bulb.
- Ensure that the cover is refi tted correctly all round to assure
correct sealing.
FRONT LAMPS
1. Dipped / Main beam headlamps
Type C , H4 - 55W
- Remove the centre cover by pulling the fl exible rubber tab.
- Disconnect the electrical connector.
- Release the retaining tab.
- Change the bulb taking care to align the metal part with the
grooves on the lamp.
- Reposition the retaining tab.
- Ensure that the cover is refi tted correctly all round to assure
correct sealing.
Page 156 of 268
Changing a bulb
154
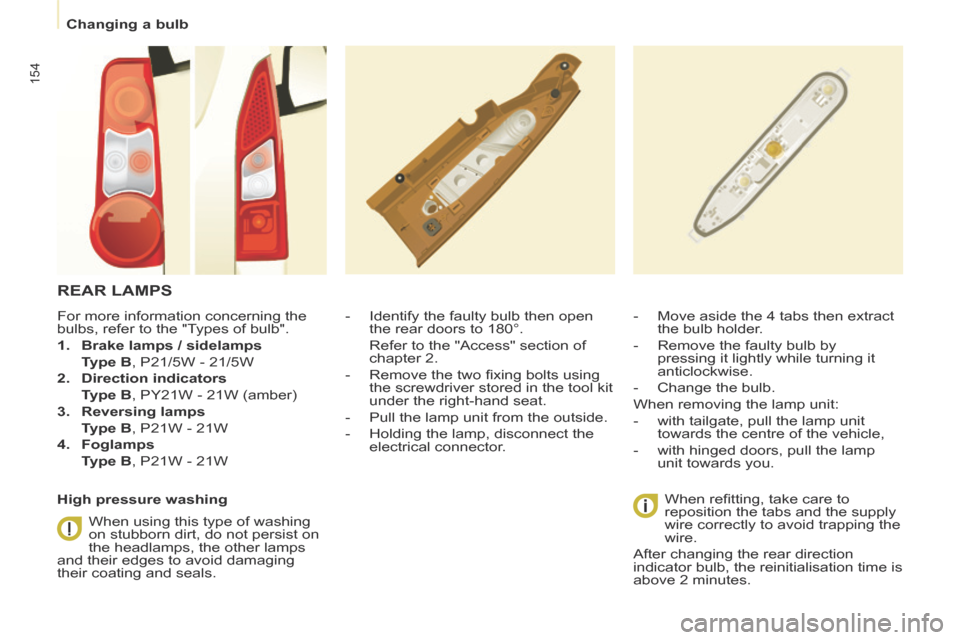
REAR LAMPS
- Identify the faulty bulb then open the rear doors to 180°.
Refer to the "Access" section of chapter 2.
- Remove the two fi xing bolts using the screwdriver stored in the tool kit
under the right-hand seat.
- Pull the lamp unit from the outside.
- Holding the lamp, disconnect the electrical connector.
When refi tting, take care to
reposition the tabs and the supply
wire correctly to avoid trapping the
wire.
After changing the rear direction
indicator bulb, the reinitialisation time is
above 2 minutes. - Move aside the 4 tabs then extract the bulb holder.
- Remove the faulty bulb by pressing it lightly while turning it
anticlockwise.
- Change the bulb.
When removing the lamp unit:
- with tailgate, pull the lamp unit towards the centre of the vehicle,
- with hinged doors, pull the lamp unit towards you.
For more information concerning the
bulbs, refer to the "Types of bulb".
1. Brake lamps / sidelamps
Type B , P21/5W - 21/5W
2. Direction indicators
Type B , PY21W - 21W (amber)
3. Reversing lamps
Type B , P21W - 21W
4. Foglamps
Type B , P21W - 21W
High pressure washing When using this type of washing
on stubborn dirt, do not persist on
the headlamps, the other lamps
and their edges to avoid damaging
their coating and seals.
Page 168 of 268
Weights
166
WEIGHTS AND TOWED LOADS (KG)
General points
For more information, refer to your
registration certifi cate.
In each country, it is imperative that
the towed loads authorised by local
legislation are complied with. To fi nd
out your vehicle's towing capacities
and its gross train weight, consult a
CITROËN dealer. With load transfer, the braked trailer
weight can be increased, on condition
that the equivalent of this load is
removed from the vehicle so that the
GTW is not exceeded. Warning: towing
with a lightly loaded towing vehicle
may have an adverse effect on its road
holding.
The speed of a towing vehicle must not
exceed 50 mph (80 km/h) (comply with
the legislation in force in your country). High ambient temperatures may result
in a reduction in the performance
of the vehicle in order to protect the
engine; when the ambient temperature
is higher than 37 °C, limit the towed
weight.
The kerb weight is equal to the weight
without load + driver (75 kg) + fuel tank
fi lled to 90%.
The GTW and towed load values
indicated are valid up to a maximum
altitude of 1000 metres; the towed load
mentioned must be reduced by 10 %
for each additional 1000 metres.
Page 180 of 268

9.10
05
List of recent destinations.
" " " " " " " " " " " " " " " " " " " " " " " Navigation - guidanceNavigation - guidanceNavigation - guidanceNavigation - guidanceNavigation - guidanceNavigation - guidanceNavigation - guidanceNavigation - guidanceNavigation - guidanceNavigation - guidanceNavigation - guidanceNavigation - guidanceNavigation - guidanceNavigation - guidanceNavigation - guidanceNavigation - guidanceNavigation - guidanceNavigation - guidanceNavigation - guidanceNavigation - guidanceNavigation - guidanceNavigation - guidanceNavigation - guidanceNavigation - guidanceNavigation - guidanceNavigation - guidanceNavigation - guidanceNavigation - guidance " " " " " " " " " " " " " " " " " " " " " " "
To delete the list of recent destinations, select " Guidance options " in the navigation menu then select " Delete last destinations " and confi rm. Select " Ye s " and confi rm. Select " Ye s " and confi rm. Select " " then confi rm.
Deleting just one destination is not possible.
Go from the list to the menu (left/right).
" Select destination "
" Journey leg and route "
" Guidance options "
" Map management "
" Stop / Restore guidance "
NAVIGATION - GUIDANCE
Access to the "NAVIGATION" menu
Press N AV .
or
Contact a CITROËN dealer for mapping updates.
A short press on the end of the lighting control stalk repeats the last navigation message.