CITROEN C-ELYSÉE 2015 Owners Manual
Manufacturer: CITROEN, Model Year: 2015, Model line: C-ELYSÉE, Model: CITROEN C-ELYSÉE 2015Pages: 285, PDF Size: 13.42 MB
Page 141 of 285

139
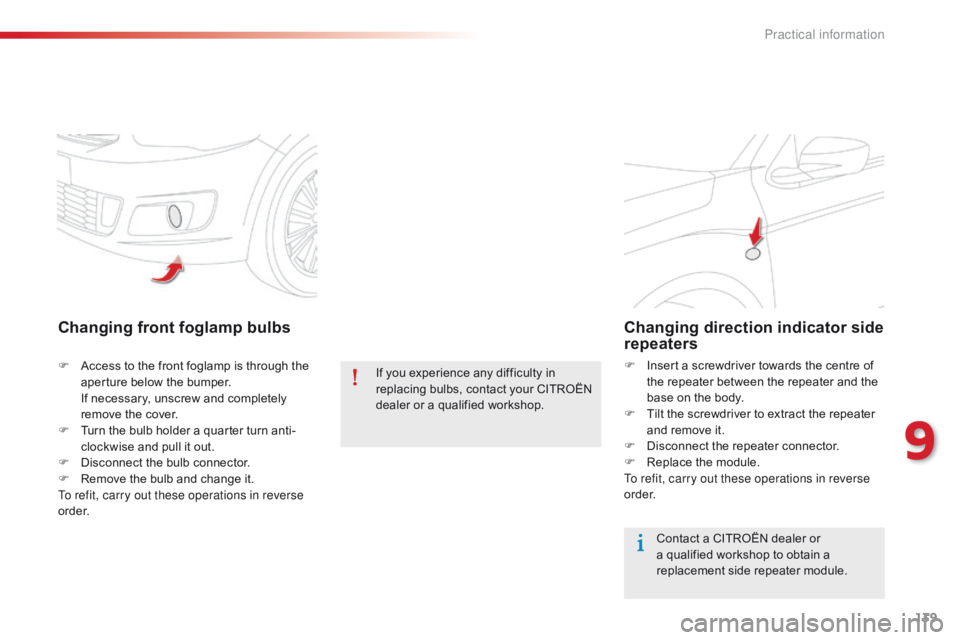
Changing front foglamp bulbs
F Access to the front foglamp is through the aperture below the bumper.
I
f necessary, unscrew and completely
remove the cover.
F
T
urn the bulb holder a quarter turn anti-
clockwise and pull it out.
F
D
isconnect the bulb connector.
F
R
emove the bulb and change it.
To refit, carry out these operations in reverse
o r d e r. If you experience any difficulty in
replacing bulbs, contact your CITROËN
dealer or a qualified workshop.
Changing direction indicator side
repeaters
F Insert a screwdriver towards the centre of
the repeater between the repeater and the
base on the body.
F
T
ilt the screwdriver to extract the repeater
and remove it.
F
D
isconnect the repeater connector.
F
R
eplace the module.
To refit, carry out these operations in reverse
o r d e r.
Contact a CITROËN dealer or
a qualified workshop to obtain a
replacement side repeater module.
9
Practical information
Page 142 of 285

140
Changing bulbs
These bulbs are changed from inside the boot:
F
o
pen the boot,
F
r
emove the access grille from the
corresponding side trim panel,
F
s
lacken and remove the nut,
F
d
isconnect the lamp unit connector,
F
u
nclip the lamp unit by lowering the tongue
and carefully extract it pulling in line
towards the outside, F
r
emove the four screws and lift off the bulb
h o l d e r,
F
t
urn the failed bulb a quarter of a turn and
change it.
To refit, carry out these operations in reverse
o r d e r.
Take care to engage the lamp unit in its guides,
while keeping it in line with the vehicle.
Tighten sufficiently to ensure sealing, but
without damaging the lamp.
1.
D
irection indicators (PY21W amber).
2. R
eversing lamps (R10W).
3. F
oglamp (P21W).
4.
S
idelamps (P21/5W).
5.
B
rake lamps
/ sidelamps (P21/5W).
Rear lamps
Practical information
Page 143 of 285

141
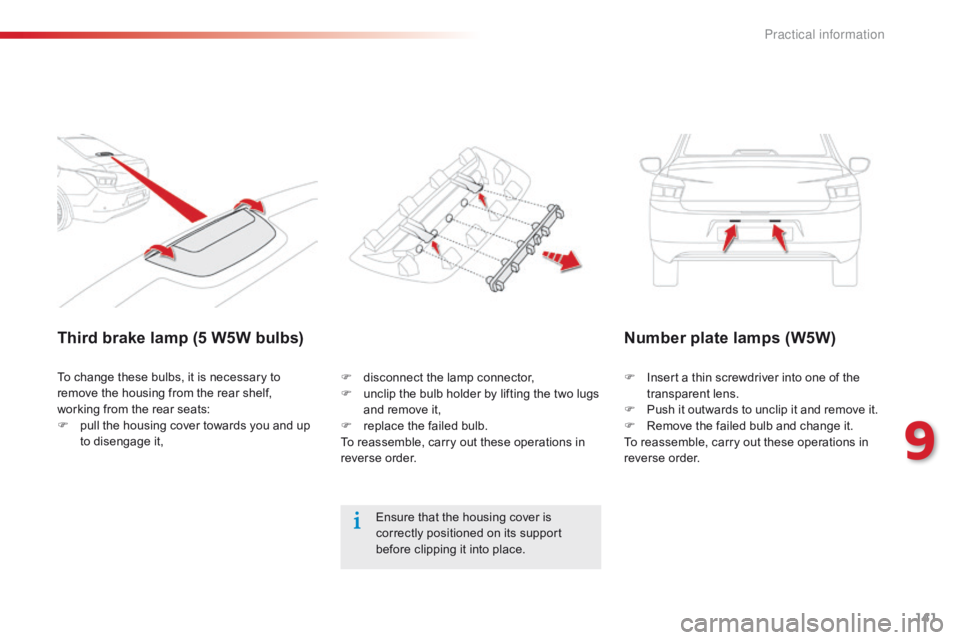
Third brake lamp (5 W5W bulbs)Number plate lamps (W5W)
F Insert a thin screwdriver into one of the
transparent lens.
F
P
ush it outwards to unclip it and remove it.
F
R
emove the failed bulb and change it.
To reassemble, carry out these operations in
reverse order.
Ensure that the housing cover is
correctly positioned on its support
before clipping it into place.
To change these bulbs, it is necessary to
remove the housing from the rear shelf,
working from the rear seats:
F
p
ull the housing cover towards you and up
to disengage it, F
d
isconnect the lamp connector,
F
u
nclip the bulb holder by lifting the two lugs
and remove it,
F
r
eplace the failed bulb.
To reassemble, carry out these operations in
reverse order.
9
Pr
Page 144 of 285

142
Changing a fuse
The extraction tweezer is fitted to the back of
the dashboard fusebox cover.
F
u
nclip the cover by pulling at the top right,
then left,
F
d
isengage the cover completely and turn it
ove r,
Access to the tools
F remove the tweezer.
Practical information
Page 145 of 285

143
Changing a fuse
GoodFailedCITRoËn will not accept responsibility
for the cost incurred in repairing your
vehicle or for rectifying malfunctions
resulting from the installation of
accessories not supplied and not
recommended by CITROËN and
not installed in accordance with its
instructions, in particular when the
combined consumption of all of the
additional equipment connected
exceeds 10 milliamperes.
Installing electrical
accessories
Your vehicle's electrical system is
designed to operate with standard or
optional equipment.
Before installing other electrical
equipment or accessories on your
vehicle, contact a CITROËN dealer or a
qualified workshop.
Before changing a fuse:
F
t
he cause of the failure must be identified
and rectified,
F
a
ll electrical consumers must be switched
of f,
F
t
he vehicle must be immobilised with the
ignition off,
F
i
dentify the failed fuse using the tables and
layout drawings in the following pages.
To replace a fuse, you must:
F
u
se the special tweezer to extract the fuse
from its housing and check the condition of
its filament.
F
a
lways replace the failed fuse with a fuse
of the same rating (same colour); using a
different rating could cause faults (risk of
f i r e).
Tw e e z e r
The replacement of a fuse not shown in
the tables below may cause a serious
malfunction of your vehicle. Contact
a CITROËN dealer or a qualified
workshop.
If the fuse fails again soon after
replacement, have the vehicle's electrical
system checked by a CITROËN dealer or
a qualified workshop.
9
Practical information
Page 146 of 285

144
Dashboard fuses
The fusebox is placed in the lower dashboard
(left-hand side).
Access to the fuses
F Refer to the paragraph "Access to the tools".Fuse N°
Rating Functions
F02 5 AHeadlamp adjusters, diagnostic socket, air conditioning panel.
F09 5 AAlarm, alarm (accessory).
F11 5 AAdditional heating.
F13 5 AParking sensors, parking sensors (accessory)
F14 10 AAir conditioning panel.
F16 15 ACigarette lighter, 12 V socket.
F17 15 AAudio system, audio system (accessory).
F18 20 AAudio system / Bluetooth, audio system (accessory).
F19 5 AMonochrome screen C.
F23 5 ACourtesy lamps, map reading lamps.
F26 15 AHorn.
F27 15 AScreenwash pump.
F28 5 AAnti-theft.
Fuse tables
Practical information
Page 147 of 285

145
Fuse N°Rating Functions
F29 -Not used.
F30 10 AHeated door mirrors.
F31 25 AHeated rear window.
F32 -Not used.
F33 30 AFront electric windows.
F34 30 ARear electric windows.
F35 30 AHeated front seats.
F36 -Not used.
F37 20 ATrailer inter face.
9
Practical information
Page 148 of 285

146
Fuse N°Rating Functions
F14 15 AHeated lower windscreen.
F15 5 AAir conditioning compressor.
F16 15 AFront foglamps.
F18 10 ARight hand main beam headlamp.
F19 10 ALeft hand main beam headlamp.
F29 40 AFront wiper motor.
F30 80 APre-heater plugs (Diesel).
Access to the fuses
F Unclip the cover.
F
C hange the fuse (see corresponding
paragraph).
F
W
hen you have finished, close the cover
carefully to ensure correct sealing of the
fusebox.
Fuse tableEngine compartment fuses
The fusebox is placed in the engine
compartment near the battery (left-hand side).
Practical information
Page 149 of 285

147
battery
Disconnecting the cables
F Raise the locking tab fully.
Reconnecting the cables
F Position the open clip 1 of the cable on the positive terminal (+) of the battery.
F
P
ress vertically on the clip 1 to position it
correctly against the battery.
F
L
ock the clip by spreading the positioning
lug and then lowering the tab 2 .
Do not force the tab as locking will not
be possible if the clip is not positioned
correctly; start the procedure again.
Procedure for charging your battery when it is flat or for starting the engine using another battery.
The battery is located under the bonnet.
To gain access to it:
F
o
pen the bonnet using the interior release
lever, then the exterior safety catch,
F
s
ecure the bonnet stay,
F
r
emove the plastic cover on the (+)
terminal.
Access to the battery
9
Practical information
Page 150 of 285

148
Starting using another
battery
When your vehicle's battery is discharged, the
engine can be started using a slave battery
(external or on another vehicle) and jump lead
cables.F
R
emove the plastic cover from the (+)
terminal, if your vehicle has one.
F
C
onnect the red cable to the positive
terminal (+) of the flat battery A , then to the
positive terminal (+) of the slave battery B.
F
C
onnect one end of the green or black
cable to the negative terminal (-) of the
slave battery B (or earth point on the other
vehicle).
F
C
onnect the other end of the green or black
cable to the earth point C on the broken
down vehicle (or on the engine mounting).
F
S
tart the engine of the vehicle with the
good battery and leave it running for a few
minutes.
F O perate the starter on the broken down
vehicle and let the engine run
I
f the engine does not start straight away,
switch off the ignition and wait a few
moments before trying again.
F
W
ait until the engine returns to idle then
disconnect the jump lead cables in the
reverse order.
F
R
efit the plastic cover to the (+) terminal, if
your vehicle has one.
First check that the slave battery has a
nominal voltage of 12 V and a capacity
at least equal to that of the discharged
battery.
Do not try to start the engine by
connecting a battery charger.
Do not disconnect the (+) terminal when
the engine is running.
Practical information