USB CITROEN C-ELYSÉE 2021 Owners Manual
[x] Cancel search | Manufacturer: CITROEN, Model Year: 2021, Model line: C-ELYSÉE, Model: CITROEN C-ELYSÉE 2021Pages: 180, PDF Size: 4.77 MB
Page 6 of 180
4
Overview
Presentation
These illustrations and descriptions are intended
as a guide. The presence and location of some
components varies according to the version, trim
level and country of sale.
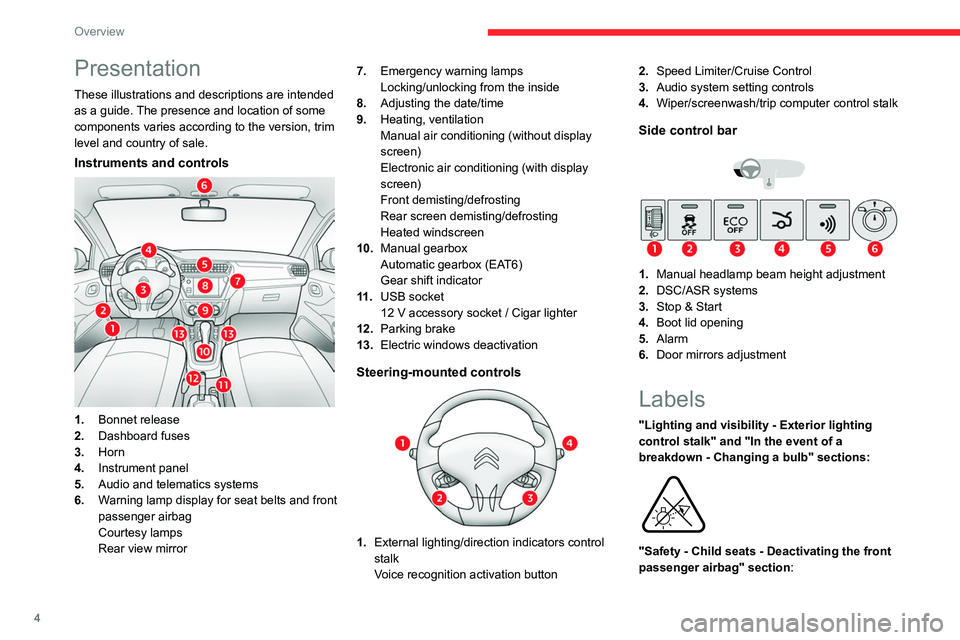
Instruments and controls
1.Bonnet release
2. Dashboard fuses
3. Horn
4. Instrument panel
5. Audio and telematics systems
6. Warning lamp display for seat belts and front
passenger airbag
Courtesy lamps
Rear view mirror 7.
Emergency warning lamps
Locking/unlocking from the inside
8. Adjusting the date/time
9. Heating, ventilation
Manual air conditioning (without display
screen)
Electronic air conditioning (with display
screen)
Front demisting/defrosting
Rear screen demisting/defrosting
Heated windscreen
10. Manual gearbox
Automatic gearbox (EAT6)
Gear shift indicator
11 . USB socket
12 V accessory socket / Cigar lighter
12. Parking brake
13. Electric windows deactivation
Steering-mounted controls
1.External lighting/direction indicators control
stalk
Voice recognition activation button 2.
Speed Limiter/Cruise Control
3. Audio system setting controls
4. Wiper/screenwash/trip computer control stalk
Side control bar
1.Manual headlamp beam height adjustment
2. DSC/ASR systems
3. Stop & Start
4. Boot lid opening
5. Alarm
6. Door mirrors adjustment
Labels
"Lighting and visibility - Exterior lighting
control stalk" and "In the event of a
breakdown - Changing a bulb" sections:
"Safety - Child seats - Deactivating the front
passenger airbag" section:
Page 33 of 180
31
Ease of use and comfort
3Storage compartments
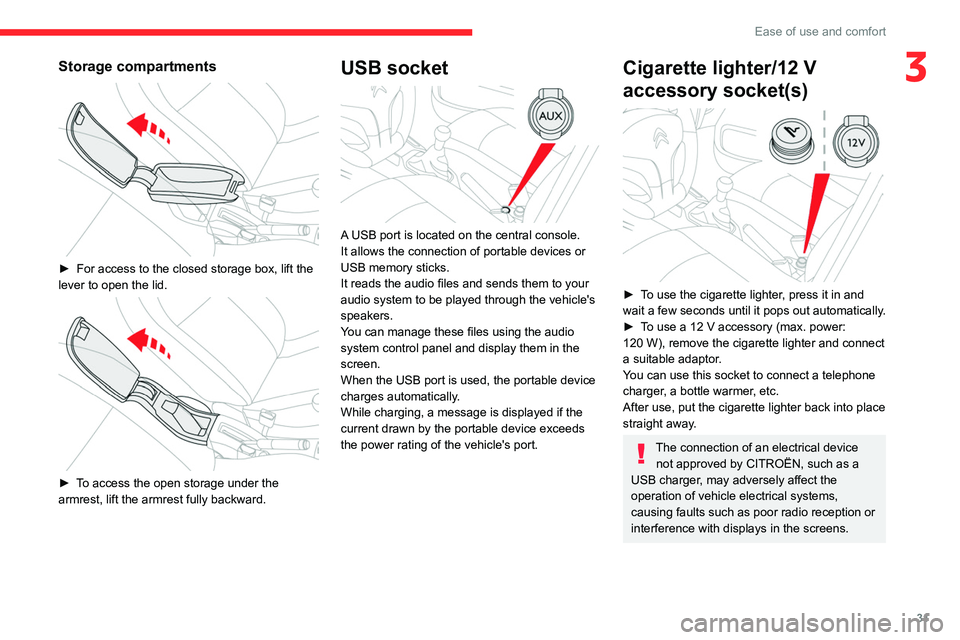
► For access to the closed storage box, lift the
lever to open the lid.
► To access the open storage under the
armrest, lift the armrest fully backward.
USB socket
A USB port is located on the central console.
It allows the connection of portable devices or
USB memory sticks.
It reads the audio files and sends them to your
audio system to be played through the vehicle's
speakers.
You can manage these files using the audio
system control panel and display them in the
screen.
When the USB port is used, the portable device
charges automatically.
While charging, a message is displayed if the
current drawn by the portable device exceeds
the power rating of the vehicle's port.
Cigarette lighter/12 V
accessory socket(s)
► To use the cigarette lighter, press it in and
wait a few seconds until it pops out automatically.
►
T
o use a 12 V accessory (max. power:
120
W), remove the cigarette lighter and connect
a suitable adaptor.
You can use this socket to connect a telephone
charger, a bottle warmer, etc.
After use, put the cigarette lighter back into place
straight away.
The connection of an electrical device not approved by CITROËN, such as a
USB charger, may adversely affect the
operation of vehicle electrical systems,
causing faults such as poor radio reception or
interference with displays in the screens.
Page 104 of 180
102
Bluetooth® audio system
Bluetooth® audio system
As a safety measure and because it requires sustained attention by the driver,
the pairing of a Bluetooth mobile telephone
with the Bluetooth hands-free system of your
audio system must be done with the vehicle
stationary and the ignition on.
Your audio system is coded in such a way that it will only operate in your
vehicle.
All work on the system must be carried out
exclusively by a dealer or qualified workshop,
to avoid any risk of electrocution, fire or
mechanical faults.
To avoid discharging the battery, the audio system may switch off after a few
minutes if the engine is not running.
First steps
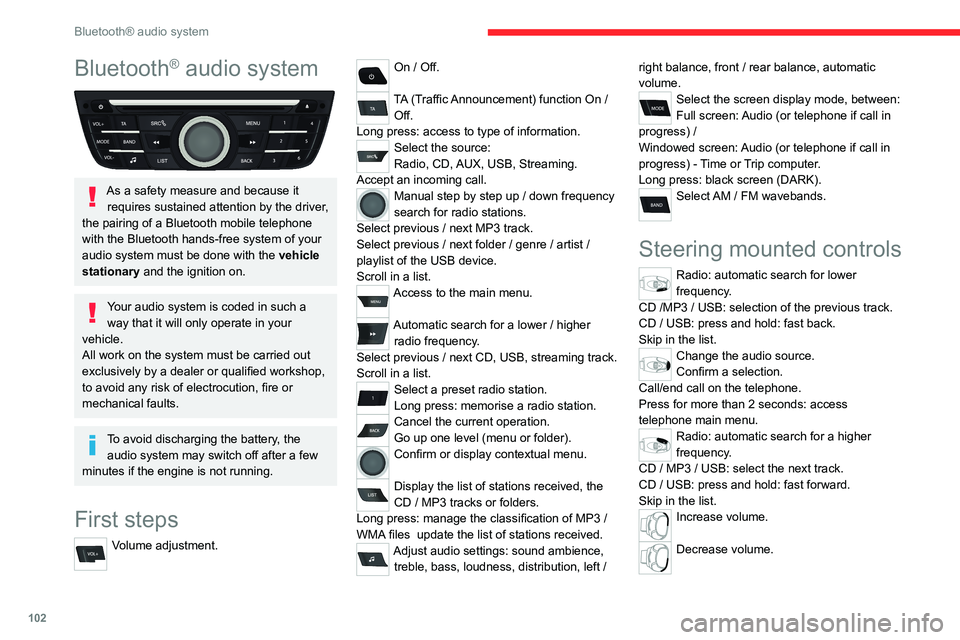
Volume adjustment.
On / Off.
TA (Traffic Announcement) function On /
Off.
Long press: access to type of information.
Select the source:
Radio, CD, AUX, USB, Streaming.
Accept an incoming call.
Manual step by step up / down frequency
search for radio stations.
Select previous
/ next MP3 track.
Select previous
/ next folder / genre / artist /
playlist of the USB device.
Scroll in a list.
Access to the main menu.
Automatic search for a lower / higher
radio frequency .
Select previous
/ next CD, USB, streaming track.
Scroll in a list.
Select a preset radio station.
Long press: memorise a radio station.
Cancel the current operation.
Go up one level (menu or folder).
Confirm or display contextual menu.
Display the list of stations received, the
CD
/ MP3 tracks or folders.
Long press: manage the classification of MP3
/
WMA files
update the list of stations received.
Adjust audio settings: sound ambience, treble, bass, loudness, distribution, left / right balance, front
/ rear balance, automatic
volume.
Select the screen display mode, between:
Full screen: Audio (or telephone if call in
progress)
/
Windowed screen: Audio (or telephone if call in
progress)
- Time or Trip computer.
Long press: black screen (DARK).
Select AM / FM wavebands.
Steering mounted controls
Radio: automatic search for lower
frequency.
CD /MP3 / USB: selection of the previous track.
CD / USB: press and hold: fast back.
Skip in the list.
Change the audio source.
Confirm a selection.
Call/end call on the telephone.
Press for more than 2 seconds: access
telephone main menu.
Radio: automatic search for a higher
frequency.
CD / MP3 / USB: select the next track.
CD / USB: press and hold: fast forward.
Skip in the list.
Increase volume.
Decrease volume.
Page 105 of 180
103
Bluetooth® audio system
10Mute on: cut the sound by simultaneously
pressing the volume up and down
buttons.
Radio: select the previous / next preset
radio station.
USB: select the genre / artist / folder from the list
depending on classification.
Select the previous / next item in a menu.
Menus
Screen C
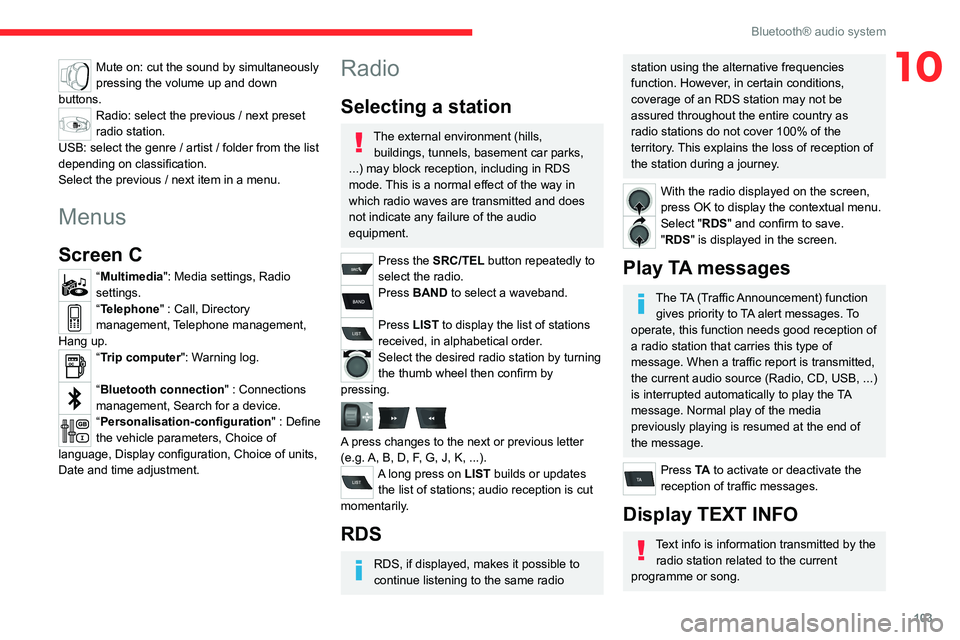
“Multimedia": Media settings, Radio
settings.
“Telephone" : Call, Directory
management, Telephone management,
Hang up.
“Trip computer": Warning log.
“Bluetooth connection " : Connections
management, Search for a device.
“Personalisation-configuration " : Define
the vehicle parameters, Choice of
language, Display configuration, Choice of units,
Date and time adjustment.
Radio
Selecting a station
The external environment (hills, buildings, tunnels, basement car parks,
...) may block reception, including in RDS
mode. This is a normal effect of the way in
which radio waves are transmitted and does
not indicate any failure of the audio
equipment.
Press the SRC/TEL button repeatedly to
select the radio.
Press BAND to select a waveband.
Press LIST to display the list of stations
received, in alphabetical order.
Select the desired radio station by turning
the thumb wheel then confirm by
pressing.
A press changes to the next or previous letter
(e.g. A, B, D, F, G, J, K, ...).
A long press on LIST builds or updates the list of stations; audio reception is cut
momentarily.
RDS
RDS, if displayed, makes it possible to
continue listening to the same radio
station using the alternative frequencies
function. However, in certain conditions,
coverage of an RDS station may not be
assured throughout the entire country as
radio stations do not cover 100% of the
territory. This explains the loss of reception of
the station during a journey.
With the radio displayed on the screen,
press OK to display the contextual menu.
Select "RDS" and confirm to save.
"RDS" is displayed in the screen.
Play TA messages
The TA (Traffic Announcement) function gives priority to TA alert messages. To
operate, this function needs good reception of
a radio station that carries this type of
message. When a traffic report is transmitted,
the current audio source (Radio, CD, USB, ...)
is interrupted automatically to play the TA
message. Normal play of the media
previously playing is resumed at the end of
the message.
Press TA to activate or deactivate the
reception of traffic messages.
Display TEXT INFO
Text info is information transmitted by the radio station related to the current
programme or song.
Page 106 of 180
104
Bluetooth® audio system
Screen C
With the radio displayed on the screen,
press OK to display the contextual menu.
Turn the thumb wheel to select '’RADIO TEXT'', press to save.
Media
Audio CD
Playing a CD
Insert 12 cm diameter circular compact
discs only.
Some anti-pirating systems, on original discs
or CDs copied using a personal recorder, may
cause faults which are no reflection on the
quality of the original player.
Without pressing the EJECT button, insert a CD
in the player, play begins automatically.
To play a disc which has already been inserted, press the SRC/TEL button
several times and select " CD".
Press one of the buttons to select
a track on the CD.
Press LIST to display the list of tracks on
the CD.
Press and hold one of these
buttons for fast forward or fast
back.
CD, USB
Information and advice
The audio system will only play files with extension ".mp3" or ".wma" and a
compression rate that is constant or variable
between 32 Kbps and 320 Kbps.
File names should have less than 20
characters, avoiding special characters
(e.g.: “
? ; ù) so as to avoid any reading or
display problems.
Playlists accepted are types .m3u and
.pls.
The number of files is limited to 5 000 in 500
directories on a maximum of 8 levels.
On a single disc, the CD player can read
up to 255 MP3 files spread over 8
directory levels. However, it is recommended
that this be kept to 2 levels so as to limit the
time taken to access and play the CD.
The folder structure is not observed during
playback.
In order to be able to play a burned CDR
or CDRW, select standards ISO 9660
level 1, 2 or Joliet if possible when burning the
CD.
If the disc is burned in another format, it may not
be played correctly.
It is recommended that the same burning
standard is always used on an individual disc,
with the lowest speed possible (4x maximum) for
the best acoustic quality.
In the particular case of a multi-session CD, the
Joliet standard is recommended.
Do not connect a hard disk or USB
device other than audio players to the
USB port. This may cause damage to your
installation.
Playing a compilation
Insert an MP3 compilation in the CD player or
connect a memory stick to the USB port, directly
or via an extension lead.
The system creates playlists (temporary memory); this operation can take from a
few seconds to several minutes.
The playlists are updated every time the
ignition is switched off or a USB memory stick
is connected.
Play starts automatically after a certain
amount of time depending on the capacity of
the USB memory stick.
Use only USB memory sticks formatted FAT
32 (File Allocation Table).
On first connection, the order suggested is
by folder. When connecting again, the order
previously chosen is retained.
To play a disc or memory stick which has already been inserted, press the SRC/
TEL button repeatedly and select " CD" or "USB".
Page 107 of 180
105
Bluetooth® audio system
10
Press one of the buttons to select the next or
previous track.
Rotate the thumb wheel to select the next
or previous folder in the order chosen.
Press and hold one of these
buttons for fast forward or fast
back.
Press LIST to display the structure of the
folders in the compilation.
Select a line in the list.
Select a track or a folder.
Up a level in the menu.
Skip a track.
USB memory stick - File
sorting
Make a long press on LIST or press
MENU, select “Multimedia", then “Media
settings" and finally “ Choice of track listing " to
display the different types of sorting.
Having selected the desired sorting (“ By
folders", “By artists", “By genres", “By
playlists") press the thumb wheel.
* (Check the manua l for your player)
Then press the thumb wheel to confirm and save
the changes.
–
By folders
: all folders containing audio
files recognised on the peripheral device, in
alphabetical order without following the folder
structure.
–
By artists : all of the artist names defined in
the ID3
Tags, in alphabetical order.
–
By genres
: all of the genres defined in the
ID3 Tags.
–
By playlists
: if playlists have been saved.
Apple® players or portable
player
Audio files on a portable mass storage player*
can be heard through the vehicle's speakers
by connecting it to the USB port (cable not
supplied).
Management of the device is via the
audio system controls.
If the portable player is not recognised by
the USB port, connect it to the auxiliary Jack
socket.
The Apple
® player software must be updated
regularly for the best connection.
The playlists are those defined in the Apple
®
player.
The Apple
® player must be generation 5 or
later.
Auxiliary input (AUX)
JACK socket
The auxiliary Jack socket permits the connection of a portable non-mass
storage device or an Apple
® player if not
recognised by the USB port.
Do not connect a device to the USB port
and to the auxiliary Jack socket at the
same time.
Connect the portable device to the auxiliary Jack
socket using a suitable cable (not supplied).
Press the SRC/TEL button repeatedly
and select "AUX".
First adjust the volume on your portable device.
Then adjust the volume of the audio system.
The display and management of controls is on the portable device.
Page 113 of 180
111
Bluetooth® audio system
10– Check that the CD is inserted in the player the
right way up.
–
Check the condition of the CD: the CD cannot
be played if it is too badly damaged.
–
Check the content in the case of a recorded
CD: consult the advice in the "Audio" section.
–
The audio system’
s CD player does not read
DVDs.
–
Because of low quality
, certain burned CDs
will not be read by the audio system.
The CD sound is of poor quality.
1.The CD used is scratched or of poor quality.
Insert good quality CDs and store them in
suitable conditions.
2.The audio settings (bass, treble, ambience) are
unsuitable.
Return bass and treble settings to 0, without
selecting an ambience.
I am unable to connect my Bluetooth
telephone.
1.It is possible that Bluetooth is switched off on
the telephone or that the telephone has been
made not visible.
–
Check that your telephone has Bluetooth
switched on.
–
Check in the telephone settings that it is
"visible to all".
2.
The Bluetooth telephone is not compatible with
the system.
To check the compatibility of your telephone
(services), visit the Manufacturer's website in
your country.
The Bluetooth connection is cut.The battery of the peripheral may not be
sufficiently charged.
Charge the battery of the peripheral device.
The "USB peripheral error" or "Peripheral not
recognised" message appears on the screen.
The USB memory stick is not recognised. The
memory stick could be corrupt.
Reformat the memory stick (FAT 32).
A telephone connects automatically,
disconnecting another telephone.
Automatic connection overrides manual
connection.
Modify the telephone settings to remove
automatic connection.
The Apple
® player is not recognised when
connecting to the USB port.
The Apple
® player is of a generation that is not
compatible with a USB connection.
Connect the Apple
® player to the AUX Jack
socket using a suitable cable (not supplied).
The hard disk or peripheral is not recognised
when connecting to the USB socket.
Some hard disks and devices need a power
supply greater than is provided by the audio
system.
Connect the peripheral to the 230 V socket, the
12V socket or an external power supply.
Ensure that the device does not transmit
a voltage greater than 5 V (risk of
destruction of the system).
When streaming, the sound cuts
momentarily. Some telephones prioritise connection of the
"hands-free" profile.
Delete the "hands-free" connection profile to
improve streaming.
In "Random all" play, not all of the tracks are
played.
In "Random all" play, the system can only take
into account up to 999 tracks.
With the engine off, the audio system
switches off after a few minutes of use.
When the engine is switched off, the audio
system operating time depends on the battery
charge.
The switch-off is normal: the audio system
switches to economy mode and switches off to
prevent discharging the vehicle's battery.
Start the vehicle’s engine to increase the battery
charge.
The message "the audio system is
overheated" appears on the display.
In order to protect the installation if the
surrounding temperature is too high, the audio
system switches to an automatic thermal
protection mode leading to a reduction of the
volume or stopping of the playing of the CD.
Switch the audio system off for a few minutes to
allow the system to cool.
Page 114 of 180
11 2
CITROËN Connect Radio
CITROËN Connect Radio
Multimedia audio system -
Applications - Bluetooth
®
telephone
The functions and settings described
vary according to the vehicle version and
configuration, as well as the country of sale.
For safety reasons and because they
require sustained attention by the driver,
the following operations must be carried out
with the vehicle stationary and the ignition
on:
–
Pairing the smartphone with the system via
Bluetooth.
–
Using the smartphone.
–
Connecting to the CarPlay® or Android
Auto applications (certain applications stop
displaying when the vehicle is moving).
–
Changing the system settings and
configuration.
The system is protected so that it only operates in the vehicle.
The message Energy economy mode is
displayed when the system is about to go into
standby.
The system’s Open Source Software (OSS) source codes are available at the
following addresses:
https://www.groupe-psa.com/fr/oss/
https://www.groupe-psa.com/en/oss/
First steps
With the engine running, a press mutes
the sound.
With the ignition off, a press turns the system on.
Increase or decrease the volume using
the wheel or the "plus" or "minus" buttons
(depending on the equipment).
Use the buttons on either side of or below the
touch screen to access the menus, then press
the virtual buttons on the touch screen.
Depending on the model, use the "Source" and
"Menu" buttons on the left of the touch screen to
access the menus, then press the virtual buttons
on the touch screen.
At all times it is possible to display the rolling
menus by pressing the screen briefly with three
fingers.
All touch-sensitive areas on the screen are
white.
On pages with multiple tabs at the bottom of the
screen, you can switch between pages either
by tapping the tab for the desired page or by
swiping the pages to the left or right with your
finger.
Press in the shaded area to go back up a level
or confirm.
Press the back arrow to go back a level or
confirm.
The touch screen is of the "capacitive" type.
To clean the screen, use a soft, non-abrasive
cloth (e.g. spectacles cloth) with no additional
product.
Do not use sharp objects on the screen.
Do not touch the screen with wet hands.
Certain information is displayed permanently in
the upper bar of the touch screen:
–
Air conditioning status information (depending
on version), and direct access to the
corresponding menu.
–
Radio Media and
Telephone menu status
information.
–
Privacy status information.
–
Access to the touch screen and digital
instrument panel settings.
Audio source selection (depending on
equipment):
–
FM/DAB/AM radio stations (depending on
equipment).
–
T
elephone connected via Bluetooth and
Bluetooth multimedia broadcast (streaming).
–
USB Memory stick.
–
Media player connected via the auxiliary
socket (depending on equipment).
Page 115 of 180
11 3
CITROËN Connect Radio
11
In the "Settings" menu, it is possible to
create a profile for an individual or for a
group of people with shared interests, and
configure a wide range of settings (radio
presets, audio settings, ambiences, etc.).
Settings are applied automatically.
In very hot conditions, the volume may
be limited to protect the system. It may
enter standby mode (with the screen and
sound off) for 5 minutes or more.
The system will resume normal operation
when the temperature in the passenger
compartment has dropped.
Steering mounted controls
Steering mounted controls -
Type 1
Radio:
Select the previous/next preset radio
station.
Select the previous/next item in a menu or a list.
Media:
Select the previous/next track.
Select the previous/next item in a menu or a list.
Radio:
Short press: display the list of radio
stations.
Long press: update the list.
Media:
Short press: display the list of folders.
Long press: display the available sorting options.
Change audio source (radio; USB; AUX if
equipment connected; CD; streaming).
Confirm a selection.
Increase volume.
Decrease volume.
Mute/restore sound by simultaneously
pressing the increase and decrease
volume buttons.
Steering mounted controls -
Type 2
Voice commands: This control is located on the steering wheel or
at the end of the lighting control stalk (depending
on equipment).
Short press, smartphone voice commands via
the system.
Increase volume.
Decrease volume.
Mute by pressing the volume increase
and decrease buttons simultaneously
(depending on equipment).
Restore the sound by pressing one of the two
volume buttons.
Media (short press): change the
multimedia source.
Telephone (short press): start telephone
call.
Call in progress (short press): access
telephone menu.
Telephone (long press): reject an incoming call,
end call; when no call is in progress, access
telephone menu.
Radio (rotate): automatic search for the
previous/next station.
Media (rotate): previous/next track, move in a
list.
Short press: confirm a selection; if nothing
selected, access to presets.
Radio: display the list of stations.
Media: display the list of tracks.
Radio (press and hold): update the list of
stations received.
Page 117 of 180
11 5
CITROËN Connect Radio
11Air conditioning
21,518,5
Manage various temperature and air flow
settings.
Applications
Viewing photos
Insert a USB memory stick in the USB port.
To protect the system, do not use a USB hub.
The system can read folders and image files in
the formats: .tiff; .gif; .jpg/jpeg; .bmp and .png.
Press Applications to display the main
page.
Press "Photos".
Select a folder.
Select an image to view.
Press this button to display the details of
the photo.
Press the back arrow to go back a level.
Managing messages
Press Applications to display the main
page.
Press "SMS".
Select the "SMS” tab.
Press this button to select the display
settings for messages.
Press this button to search and select a
recipient.
Select the "Quick messages” tab.
Press this button to select the display
settings for messages.
Press this button to write a new message.
Press the bin alongside the selected
message to delete it.
Press this button alongside the selected
message to display the secondary page.
Press this button to edit and modify the
existing text.
Press this button to write a new message.
Press the bin to delete the message.
Radio
Selecting a station
Press Radio Media to display the main
page.
Press one of the buttons to perform an
automatic search for radio stations.
Or
Move the slider to manually search for
frequencies up or down.
Or
Press the frequency.
Enter the FM and AM waveband values
using the virtual keypad.
Press "OK" to confirm.
Radio reception may be affected by the
use of electrical equipment not approved
by the Brand, such as a USB charger
connected to the 12 V socket.
The exterior environment (hills, buildings,
tunnels, basement car parks, etc.) may
block reception, including in RDS mode.
This phenomenon is perfectly normal in the
context of radio wave transmission, and
in no way indicative of an audio system
malfunction.