parking brake CITROEN C-ELYSÉE 2022 Handbook (in English)
[x] Cancel search | Manufacturer: CITROEN, Model Year: 2022, Model line: C-ELYSÉE, Model: CITROEN C-ELYSÉE 2022Pages: 260, PDF Size: 8.4 MB
Page 88 of 260

86
Never select position N while the vehicle
is moving.
Never select position P or R unless the
vehicle is completely stationary.
Reverse gear
When selecting reverse R with the ignition
on, the rear parking sensors are activated
automatically.
For more information on the Rear parking
sensors, refer to the corresponding section.
Autonomous traction function
(moving without using the accelerator)
This function facilitates manoeuvring of the
vehicle at low speed (when parking, in traffic
jams, etc.).
With the engine at idle, parking brake released
and position D , M or R selected, the vehicle
moves as soon as you take your foot off
the brake pedal (even without pressing the
accelerator).
Sport and snow
programmes
These two special programmes supplement the
automatic operation in very specific conditions
of use.
Sport programme "S"
For maximum acceleration without touching
the selector, press the accelerator pedal down
fully (kick down). The gearbox changes down
automatically or maintains the gear selected
until the maximum engine speed is reached.
On braking, the gearbox changes down
automatically to provide efficient engine
braking.
If you release the accelerator sharply, the
gearbox will not change to a higher gear for
safety reasons.
F
P
ress button S, after starting the engine.
The gearbox automatically favours a dynamic
style of driving.
S appears in the instrument panel.Snow programme T
F Press the " T" button, after starting the
engine.
The gearbox adapts to driving on slippery
roads.
This programme improves starting and traction
when grip is poor.
T appears in the instrument panel.
At any time, press the selected button
again to quit the programme engaged and
return to auto-adaptive mode.
Manual operation
F Select position M for sequential changing
of the six gears.
F
M
ove the selector towards the + sign to
change up a gear.
F
M
ove the selector towards the - sign to
change down a gear.
It is only possible to change from one gear to
another if the vehicle speed and engine speed
permit; otherwise, the gearbox will operate
temporarily in automatic mode.
Driving
Page 89 of 260

87
Invalid value during manual
operation
This symbol is displayed if a gear
is not engaged correctly (selector
between two positions).
Stopping the vehicle
Malfunction
When the ignition is on, the lighting
of this warning lamp, accompanied
by an audible signal and a message
in the screen, indicates a gearbox
fault.
In this case, the gearbox switches to back-up
mode and is locked in 3rd gear. You may feel
a substantial knock when changing from P
to R and from N to R. This will not cause any
damage to the gearbox. There is a risk of damage to the gearbox:
-
i
f you press the accelerator and brake
pedals at the same time,
-
i
f you force the movement of the
selector from position P to another
position when the battery is flat.
To reduce fuel consumption when at
a prolonged standstill with the engine
running (traffic jam, etc.), put the
selector in position N and apply the
parking brake.
D disappears and the gears
engaged appear in succession in
the instrument panel.
If the engine speed is too low or too high, the
selected gear flashes for a few seconds, then
the actual gear engaged is displayed.
It is possible to change from position D
(automatic) to position M (manual) at any time.
When the vehicle is stationary or moving
very slowly, the gearbox engages first gear
automatically.
The sport and snow programmes are
inactive in manual mode. Before switching off the engine, you can
engage position P or N to place the gearbox in
neutral.
In both cases, apply the parking brake to keep
the vehicle stationary.
If the selector is not in position P , when the
driver's door is opened or approximately
45
seconds after the ignition is switched
off, a warning message appears on the
screen.
F
R
eturn the selector to position P
; the
message disappears.
When driving on flooded roads or when
crossing a ford, proceed at walking pace. Do not exceed 60 mph (100 km/h), local speed
restrictions permitting.
Contact a CITROËN dealer or a qualified
workshop as soon as possible.
6
Driving
Page 108 of 260

106
Snow chains
In wintry conditions, snow chains improve
traction as well as the behaviour of the vehicle
when braking.The snow chains must be fitted only to the
front wheels. They must never be fitted to
"space-saver" type spare wheels.
Take account of the legislation in force
in your country on the use of snow
chains and the maximum running speed
authorised .
Advice on installation
F If you have to fit the chains during a journey, stop the vehicle on a flat sur face on the side
of the road.
F
A
pply the parking brake and, if necessary,
put wheel chocks against the wheels to
prevent your vehicle from sliding.
F
F
it the chains following the instructions
provided by the manufacturer.
F
M
ove off gently and drive for a few seconds,
without exceeding 30 mph (50 km/h).
F
S
top your vehicle and check that the snow
chains are correctly tightened.
It is strongly recommended that before
you leave, you practise fitting the snow
chains on a level and dry sur face.
Avoid driving with snow chains on roads
that have been cleared of snow to avoid
damaging your vehicle's tyres and the
road sur face. If your vehicle is fitted with
alloy wheels, check that no part of the
chain or its fixings is in contact with the
wheel rim. Use only the chains designed to be fitted to the
type of wheel fitted to your vehicle:
Original tyre size Maximum link size.
185/65
R159
mm
195/55
R16
For more information on snow chains, contact a
CITROËN dealer or a qualified workshop.
Practical information
Page 119 of 260

117
On a new vehicle, the first particle
filter regeneration operations may be
accompanied by a "burning" smell, which
is per fectly normal.
Following prolonged operation of the
vehicle at very low speed or at idle,
you may, in exceptional circumstances,
notice the emission of water vapour at the
exhaust on acceleration. This does not
affect the behaviour of the vehicle or the
environment.
Manual gearbox
The gearbox does not require any
maintenance (no oil change).
Automatic gearbox
The gearbox does not require any
maintenance (no oil change).
Brake pads
Brake wear depends on the style
of driving, particularly in the case
of vehicles used in town, over short
distances. It may be necessary to
have the condition of the brakes
checked, even between vehicle
services.
Unless there is a leak in the circuit, a drop in
the brake fluid level indicates that the brake
pads are worn.
Brake disc wear
For information on checking brake
disc wear, contact a CITROËN
dealer or a qualified workshop.
Parking brake
If excessive travel or a loss of
effectiveness of this system is
noticed, the parking brake must
be checked, even between two
services.
This system must be checked by a CITROËN
dealer or a qualified workshop. Only use products recommended by
CITROËN or products of equivalent quality
and specification.
In order to optimise the operation of units
as important as those in the braking
system, CITROËN selects and offers very
specific products.
After washing the vehicle, dampness, or
in wintry conditions, ice can form on the
brake discs and pads: braking efficiency
may be reduced. Make light brake
applications to dry and defrost the brakes.
7
Practical information
Page 126 of 260

124
Removing a wheel
Parking the vehicle
* Position P for the automatic gearbox
Park the vehicle where it does not block
traffic: the ground must be level, stable
and non-slippery.
Apply the parking brake, switch off the
ignition and engage first gear* so as to
block the wheels.
Check that the parking brake warning
lamp comes on fixed in the instrument
panel.
The occupants must get out of the vehicle
and wait where they are safe.
Make sure that the jack is correctly
positioned at one of the vehicle's jacking
points.
Incorrect use of the jack could cause the
vehicle to collapse.
Never go underneath a vehicle raised
using a jack; use an axle stand.
Do not use a jack other than the one
supplied by the manufacturer.
Wheel with hub cap
When removing the wheel
, first remove
the hub cap using the wheelbrace by
pulling at the valve aperture.
When refitting the wheel , after tightening
the wheel bolts, refit the hub cap, starting
by placing its aperture in line with the
valve and then pushing it into place all
round its edge with the palm of your hand.
List of operations
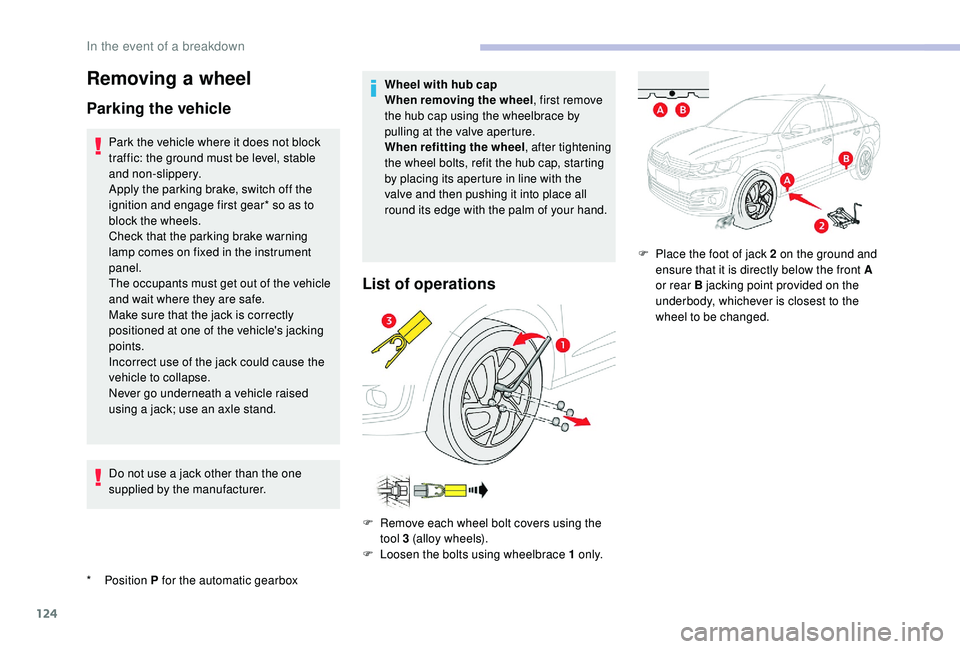
F Remove each wheel bolt covers using the tool 3 (alloy wheels).
F
L
oosen the bolts using wheelbrace 1 o n l y.F
P
lace the foot of jack 2 on the ground and
ensure that it is directly below the front A
or rear B jacking point provided on the
underbody, whichever is closest to the
wheel to be changed.
In the event of a breakdown
Page 141 of 260

139
Towing the vehicle
Access to the tools
General recommendations
Obser ve the legislation in force in your
c o u nt r y.
Ensure that the weight of the towing
vehicle is greater than that of the towed
vehicle.
The driver must remain at the wheel of
the towed vehicle and must have a valid
driving licence.
When towing a vehicle with all four wheels
on the ground, always use an approved
towbar; rope and straps are prohibited.
The towing vehicle must move off gently.
When the vehicle is towed with its engine
off, there is no longer any braking or
steering assistance.
In the following cases, you must always
call on a professional recovery ser vice:
-
v
ehicle broken down on a motor way or
fast road,
-
f
our-wheel drive vehicle,
-
w
hen it is not possible to put the
gearbox into neutral, unlock the
steering, or release the parking brake,
-
t
owing with only two wheels on the
ground,
-
w
here there is no approved towbar
available.Towing your vehicle
F On the front bumper, unclip the cover by pressing on its left side.
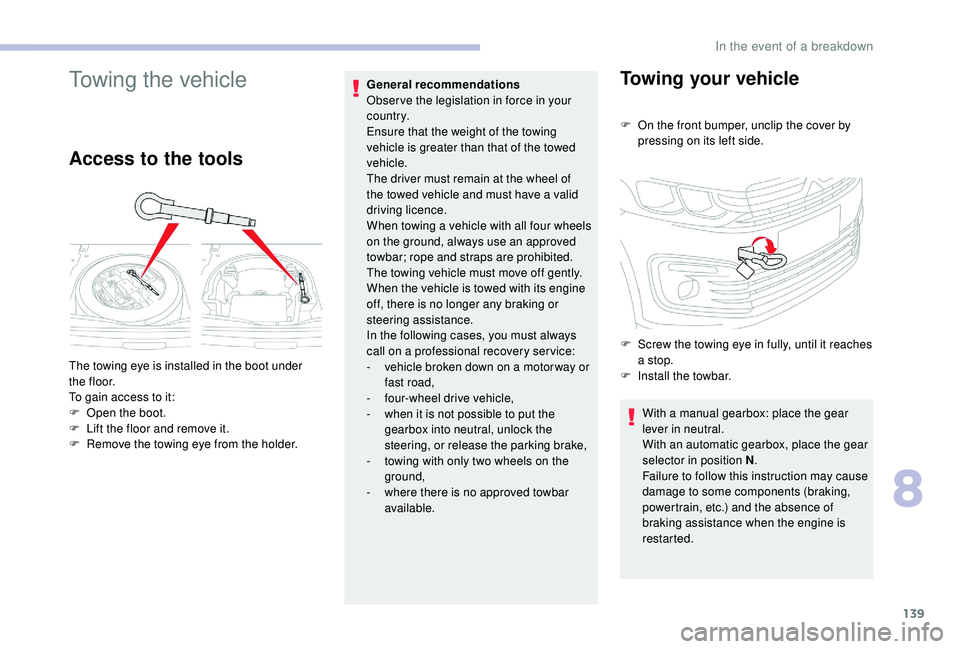
The towing eye is installed in the boot under
t h e f l o o r.
To gain access to it:
F
O
pen the boot.
F
L
ift the floor and remove it.
F
R
emove the towing eye from the holder. F
S
crew the towing eye in fully, until it reaches
a stop.
F
I
nstall the towbar.With a manual gearbox: place the gear
lever in neutral.
With an automatic gearbox, place the gear
selector in position N .
Failure to follow this instruction may cause
damage to some components (braking,
powertrain, etc.) and the absence of
braking assistance when the engine is
restarted.
8
In the event of a breakdown
Page 142 of 260

140
Towing another vehicle
This type of towing is strictly prohibited
(risk of damage to your vehicle).
F
U
nlock the steering by turning the ignition
key one notch and release the parking
brake.
F
S
witch on the hazard warning lamps on
both vehicles.
F
S
et off gently, drive slowly and for a short
distance.
In the event of a breakdown
Page 255 of 260

149
Maintenance (advice) ....................................10 9
Map reading lamps ................................... 55
-56
Markings, identification
.................................145
Mat
.................................................................. 50
Menu
............................................................... 13
Menu, main
....................................................... 3
M
enus (audio)
........................................ 4-5, 4-6
Messages
........................................................ 32
Messages, quick
............................................. 3
2
Mirror, rear view
.............................................. 41
Mirrors, door .............................................. 4 0 - 41
Mirror, vanity
................................................... 48
Misfuel prevention
......................................... 101
Mountings, Isofix
....................................... 75, 77
MP3
CD ......................................................... 5-6Pads, brake
...................................................
117
Paint
..............................................................
145
Paint colour code ..........................................
145
Parking brake
....................................
10, 83, 117
Parking sensors, rear ...................................... 97
Passenger’s airbag
......................................... 14
P
lates, identification
...................................... 145
Player, Apple® ........................................... 2 7, 11
Player, MP3
CD ............................... ........26, 5 - 6
Player, USB
....................................... 26, 10, 5, 4
Port, USB
................................ 49, 26, 10, 5, 7, 4
Power steering
...............................
.................14
Pre-heater, Diesel
........................................... 12
Pressures, tyres
.................................... 121, 14 5
Pre-tensioning seat belts
................................ 64
Priming the fuel system
................................ 11 8
Profiles
...................................................... 3 4, 18
Protecting children
.......65 - 66, 68 -70, 74, 76 -77
Puncture
................................................. 11 8 -12 0
Radio
.................................. 23 -24, 27, 7, 11, 3, 2
Radio, digital (Digital Audio Broadcasting – DAB)
................................ 25, 9
Range, AdBlue
........................................... 21-22
RDS
................
....................................... 24-25, 7
Rear screen, demisting
................................... 46
Recharging the battery
.......................... 137-13 8
Reduction of electrical load
.......................... 107
Regeneration of the particle filter
.................11 6
Reinitialisation of the under- inflation detection system
............................. 91
Reinitialising the remote control
..................... 3
0
Reminder, key in ignition
................................. 83
R
eminder, lighting on
...................................... 52
R
emote control
.......................................... 29, 31
Removing a wheel
................................. 124 -126
Removing the mat
........................................... 50
Replacing bulbs
............................. 12
6 -127, 13 0Safety, children
.......................65 - 66, 68 -70, 76
Screen, cold climate
.....................................10
9
Screen menu map
...........................................13
Screen, multifunction (with audio system)
........3
Screens, very cold conditions
.....................10
9
Screenwash, front
...........................................55
SCR (Selective Catalytic Reduction)
............103
SCR system
..................................................103
Seat belts
......................................10, 63 - 64, 73
Seats, front
...............................
.......................37
Seats, heated
..................................................38
Seats, rear
.......................................................39
Selector, gear
............................................84- 87
Serial number, vehicle
..................................145
Service
............................................................17
Service indicator
.............................................19
Servicing
......................................................... 19
S
ettings, system
........................................35, 19
Sidelamps
....................................... 5
1, 128, 13 0
Side repeater
................................................12 9
Snow chains
..................................................10 6
Socket, 12
V accessory ..................................49
Socket, auxiliary
.................................... 2
6, 10, 7
Socket, JACK
..................................49, 26, 10, 7
Sockets, audio
........................................ 4
9, 7, 5
Sockets, auxiliary
...............................
...............5
Oil change
.....................................................
11
4
Oil consumption
............................................ 114
Oil, engine
.......................................... 1 0 -11, 114
Opening the bonnet
...................................... 112
Opening the boot
...................................... 29, 34
Opening the doors
.................................... 29, 33
Number plate lamps
...................................... 131M
P
R
S
O
N
Load reduction mode .................................... 107
Locating your vehicle ...................................... 30
Locking the doors
........................................... 33
L
ow fuel level
.......................................... 12
, 10 0 Replacing fuses
......................131-132, 13 4 -13 5
Replacing the air filter ................................... 11
6
Replacing the oil filter
................................... 11
6
Replacing the passenger compartment filter .....116
Reservoir, screenwash
................................. 115
Resetting the service indicator
....................... 21
Resetting the trip recorder
.............................. 24
Reversing camera
...............................
............ 99
Reversing lamps
..............................
............. 13 0
Roof bars
....................................................... 11 0
Running out of fuel (Diesel)
.......................... 11 8
.
Alphabetical index