lock CITROEN C-ELYSÉE 2023 User Guide
[x] Cancel search | Manufacturer: CITROEN, Model Year: 2023, Model line: C-ELYSÉE, Model: CITROEN C-ELYSÉE 2023Pages: 180, PDF Size: 4.77 MB
Page 24 of 180
22
Access
The alarm is deactivated: the indicator lamp goes off.
Triggering of the alarm
This is indicated by sounding of the siren and
flashing of the direction indicators for thirty
seconds.
When the vehicle is unlocked using the
remote control, rapid flashing of the
indicator lamp informs you that the alarm was
triggered during your absence. Upon ignition,
this flashing stops immediately.
Locking the vehicle without
activating the alarm
► Lock the vehicle using the key .
Failure of the remote control
To deactivate the monitoring functions:
►
Unlock the vehicle using the key .
►
Open the door; this sets off the alarm.
►
Switch on the ignition; this stops the alarm.
Malfunction
When the ignition is switched on, the fixed
lighting of the red indicator lamp in the button
indicates a system malfunction.
Have it checked by a CITROËN dealer or a
qualified workshop.
Electric windows
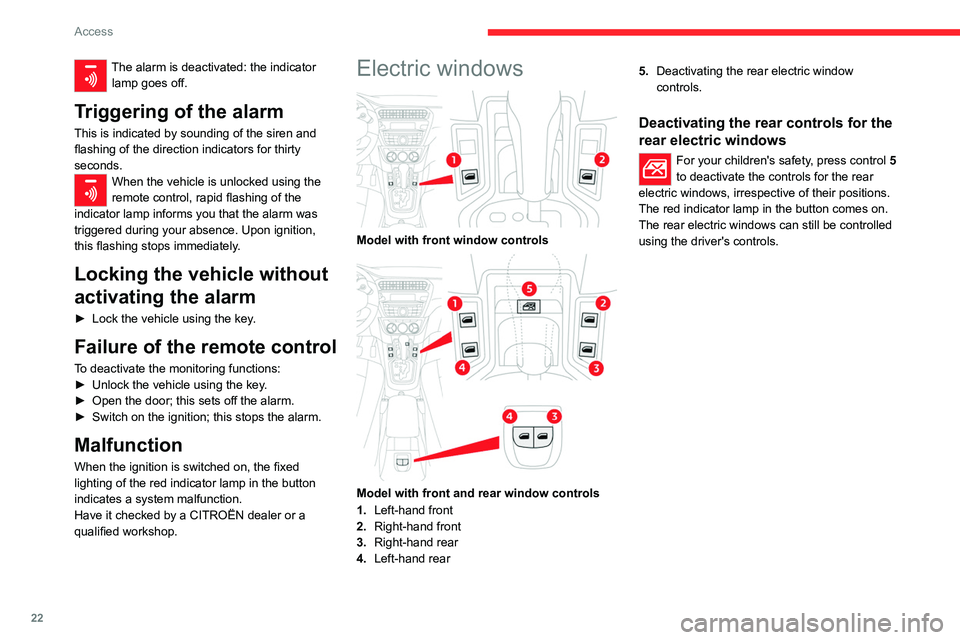
Model with front window controls
Model with front and rear window controls
1. Left-hand front
2. Right-hand front
3. Right-hand rear
4. Left-hand rear 5.
Deactivating the rear electric window
controls.
Deactivating the rear controls for the
rear electric windows
For your children's safety, press control 5
to deactivate the controls for the rear
electric windows, irrespective of their positions.
The red indicator lamp in the button comes on.
The rear electric windows can still be controlled
using the driver's controls.
Page 25 of 180
23
Ease of use and comfort
3Correct driving position
For safety reasons, adjustments must
only be made when the vehicle is
stationary.
Before taking to the road and to make the most
of the ergonomic layout of the instruments and
controls, carry out these adjustments in the
following order:
–
head restraint height.
–
seat backrest angle.
–
seat cushion height.
–
longitudinal seat position.
–
steering wheel height.
–
rear view mirror and door mirrors.
Once these adjustments have been
made, check that the instrument panel
can be viewed correctly from your driving
position.
Front head restraints
Adjusting the height
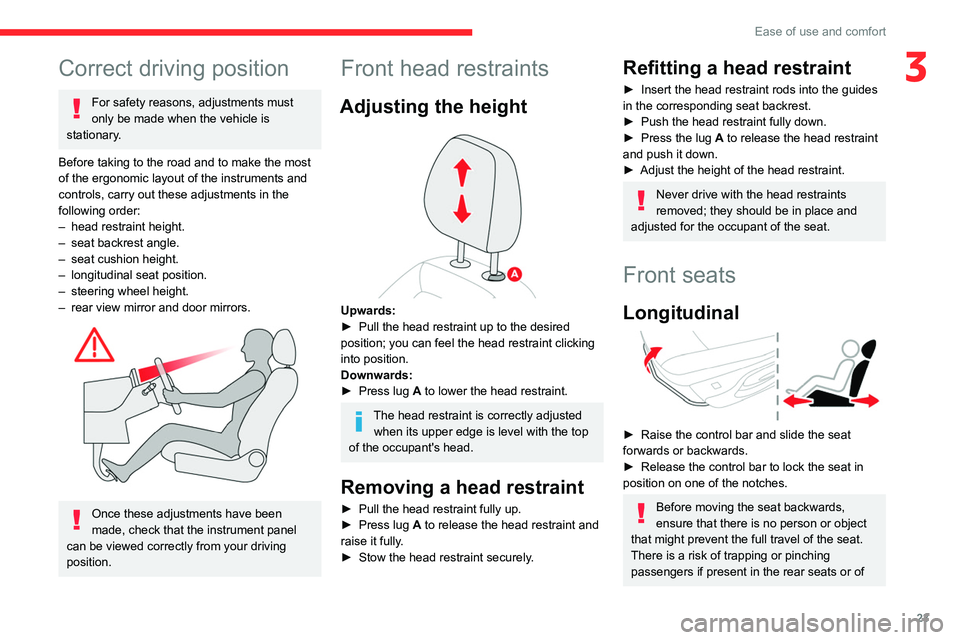
Upwards:
► Pull the head restraint up to the desired
position; you can feel the head restraint clicking
into position.
Downwards:
►
Press lug
A to lower the head restraint.
The head restraint is correctly adjusted when its upper edge is level with the top
of the occupant's head.
Removing a head restraint
► Pull the head restraint fully up.
► Press lug A to release the head restraint and
raise it fully.
►
Stow the head restraint securely
.
Refitting a head restraint
► Insert the head restraint rods into the guides
in the corresponding seat backrest.
►
Push the head restraint fully down.
►
Press the lug
A to release the head restraint
and push it down.
►
Adjust the height of the head restraint.
Never drive with the head restraints
removed; they should be in place and
adjusted for the occupant of the seat.
Front seats
Longitudinal
► Raise the control bar and slide the seat
forwards or backwards.
►
Release the control bar to lock the seat in
position on one of the notches.
Before moving the seat backwards,
ensure that there is no person or object
that might prevent the full travel of the seat.
There is a risk of trapping or pinching
passengers if present in the rear seats or of
Page 27 of 180
25
Ease of use and comfort
3Please note: an incorrectly latched
backrest compromises the safety of
passengers in the event of sudden braking or
an accident.
When repositioning the seat backrest, take
care not to trap the seat belts.
The contents of the boot may be thrown
forwards - risk of serious injury!
Adjustable head restraints
These have just one position for use (up) and
one position for storage (down).
They can be removed and are interchangeable
side to side.
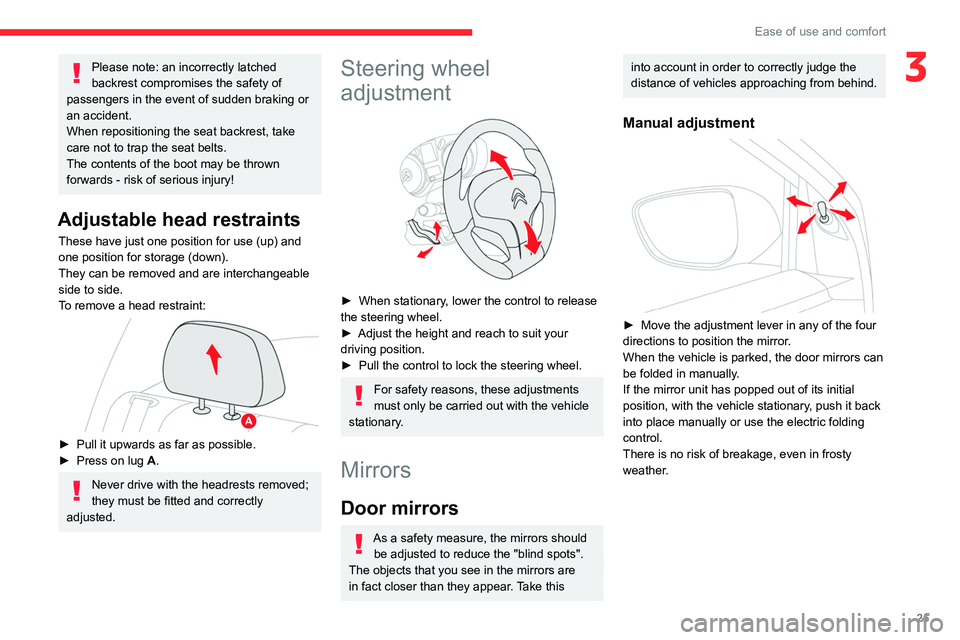
To remove a head restraint:
► Pull it upwards as far as possible.
► Press on lug A.
Never drive with the headrests removed;
they must be fitted and correctly
adjusted.
Steering wheel
adjustment
► When stationary , lower the control to release
the steering wheel.
►
Adjust the height and reach to suit your
driving position.
►
Pull the control to lock the steering wheel.
For safety reasons, these adjustments
must only be carried out with the vehicle
stationary.
Mirrors
Door mirrors
As a safety measure, the mirrors should be adjusted to reduce the "blind spots".
The objects that you see in the mirrors are
in fact closer than they appear. Take this
into account in order to correctly judge the
distance of vehicles approaching from behind.
Manual adjustment
► Move the adjustment lever in any of the four
directions to position the mirror .
When the vehicle is parked, the door mirrors can
be folded in manually.
If the mirror unit has popped out of its initial
position, with the vehicle stationary, push it back
into place manually or use the electric folding
control.
There is no risk of breakage, even in frosty
weather.
Page 34 of 180

32
Ease of use and comfort
Courtesy lamps
1.Courtesy lamps
2. Front reading lamps
Front and rear courtesy
lamps
In this position, the courtesy lamp comes
on gradually:
–
when the vehicle is unlocked.
–
when the key is removed from the ignition
switch.
–
when a door is opened.
–
when the remote control locking button is
activated, in order to locate the vehicle.
It switches off gradually:
–
when the vehicle is locked.
–
when the ignition is switched on.
–
30 seconds after the last door is closed.
Permanently off.
Permanent lighting.
In "Permanent lighting" mode, the lighting time
varies according to the circumstances:
–
With
the ignition off, approximately 10 minutes.
–
In energy saving mode, approximately 30
seconds.
–
With the engine running, unlimited.
Reading lamps
► With the ignition on, operate the
corresponding switch.
Do not place anything against the
courtesy lamps.
Page 40 of 180

38
Safety
Horn
► Press the central part of the steering wheel.
Electronic stability control
(ESC)
The electronic stability control programme includes the following systems:
–
Anti-lock braking system (ABS) and Electronic
brake force distribution (EBFD).
–
Emergency braking assistance (EBA).
–
Anti-slip regulation (ASR).
–
Dynamic stability control (DSC).
Anti-lock braking system (ABS)/Electronic brake force
distribution (EBFD)
These systems enhance the vehicle’s stability
and handling during braking, and enable greater
control while cornering, particularly on poor or
slippery road surfaces.
ABS prevents wheel locking in the event of
emergency braking.
Electronic brake force distribution (EBFD)
manages overall braking pressure on each
individual wheel.
►
When braking in an emergency
, depress
the pedal very firmly and maintain this
pressure.
Normal operation of the ABS may make
itself felt by slight vibrations of the brake
pedal.
The fixed illumination of this warning lamp signals that there is a fault with the ABS.
The vehicle retains conventional braking. Drive
carefully at a moderate speed.
Have it checked by a CITROËN dealer or a
qualified workshop.
This warning lamp, when lit together with the STOP and ABS warning lamps,
accompanied by a message and an audible
signal, indicates an EBFD malfunction.
You must stop the vehicle.
Stop as soon as it is safe to do so and switch off
the ignition.
Contact a CITROËN dealer or a qualified
workshop.
When changing wheels (tyres and rims),
ensure that these are approved for your
vehicle.
After an impact
Have it checked by a CITROËN dealer or
a qualified workshop.
Emergency braking
assistance (EBA)
This system reduces the emergency stopping
distance, by optimising the braking pressure.
It is triggered in relation to the speed at which
the brake pedal is depressed. The effect of this
is a reduction in the resistance of the pedal and
an increase in braking efficiency.
Anti-slip regulation (ASR) / Dynamic stability control
(DSC)
Anti-slip regulation (or traction control) optimises
traction by using engine braking and by applying
the brakes on the driving wheels to avoid one
or more wheels spinning. It also enhances the
vehicle's directional stability.
If there is a difference between the vehicle’s
trajectory and the path desired by the driver, the
dynamic stability control system automatically
uses engine braking and the brakes on one or
more wheels to return the vehicle to the desired
path, within the limits of the laws of physics.
These systems are activated automatically every
time the vehicle is started.
These systems are activated in the event of a problem with grip or trajectory
Page 46 of 180
44
Safety
the passenger seat is adjustable, move it
forwards if necessary.
Remove the head restraint before
installing a child seat with a backrest on a
passenger seat.
Ensure that the head restraint is stored or
attached securely to prevent it from being
thrown around the vehicle in the event of
sharp braking. Refit the head restraint once
the child seat has been removed.
Installing a booster seat
The chest part of the seat belt must be
positioned on the child's shoulder without
touching the neck.
Ensure that the lap part of the seat belt
passes correctly over the child's thighs.
Use a booster seat with a backrest, equipped
with a belt guide at shoulder level.
Additional protections
To prevent accidental opening of the
doors and rear windows, use the "Child lock".
Take care not to open the rear windows by
more than one third.
To protect young children from the sun's rays,
fit side blinds on the rear windows.
As a safety measure, do not leave:
–
A
child alone and unsupervised inside a
vehicle.
–
A
child or an animal in a vehicle which is
exposed to the sun, with the windows closed.
– The keys within reach of children inside the
vehicle.
Child seat at the rear
Forward-facing or rearward-facing
► Move the vehicle's front seat forward and
straighten the backrest so that the legs of the
child in the forward-facing or rearward-facing
child seat itself do not touch the vehicle's front
seat.
►
Check that the backrest of the forward-facing
child seat is as close as possible to the backrest
of the vehicle's rear seat, and ideally in contact
with it.
Centre rear seat
A child seat with a support leg must never be
installed on the centre rear passenger seat .
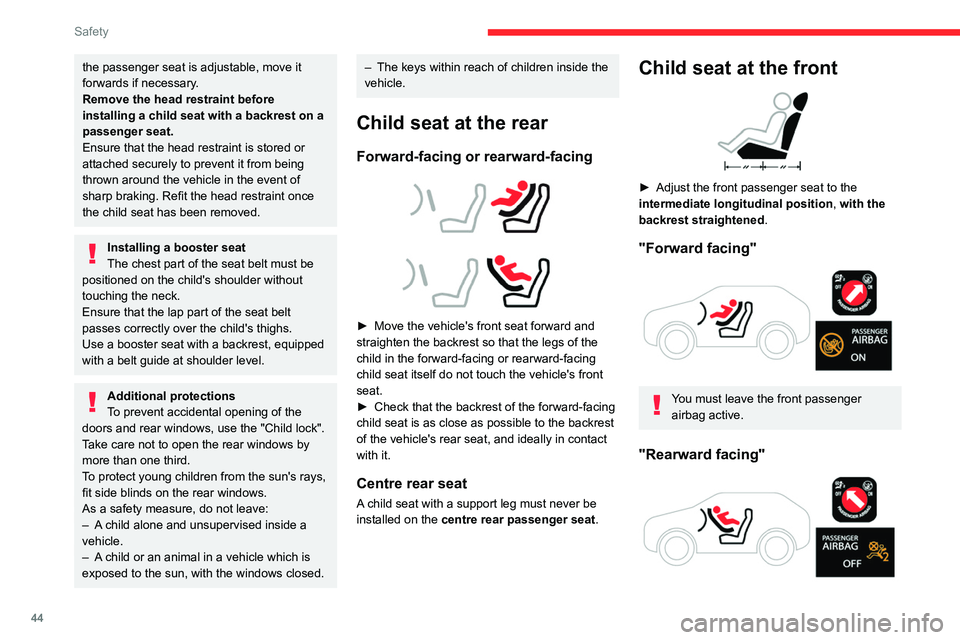
Child seat at the front
► Adjust the front passenger seat to the
intermediate longitudinal position ,
with the
backrest straightened .
"Forward facing"
You must leave the front passenger
airbag active.
"Rearward facing"
Page 52 of 180
50
Safety
IL-SUSeat suitable for the installation of an
Isofix Semi-Universal seat which is either:
–
"rearward facing" fitted with a top tether
or a support leg,
–
"forward facing" fitted with a support
leg.
For advice on securing of the upper strap,
refer to the "ISOFIX mountings" section.
X Seat which is not suitable for the
installation of an ISOFIX seat of the size
category indicated.
Manual child lock
The system prevents a rear door from being
opened using its interior handle.
The control is located on the edge of each rear
door.
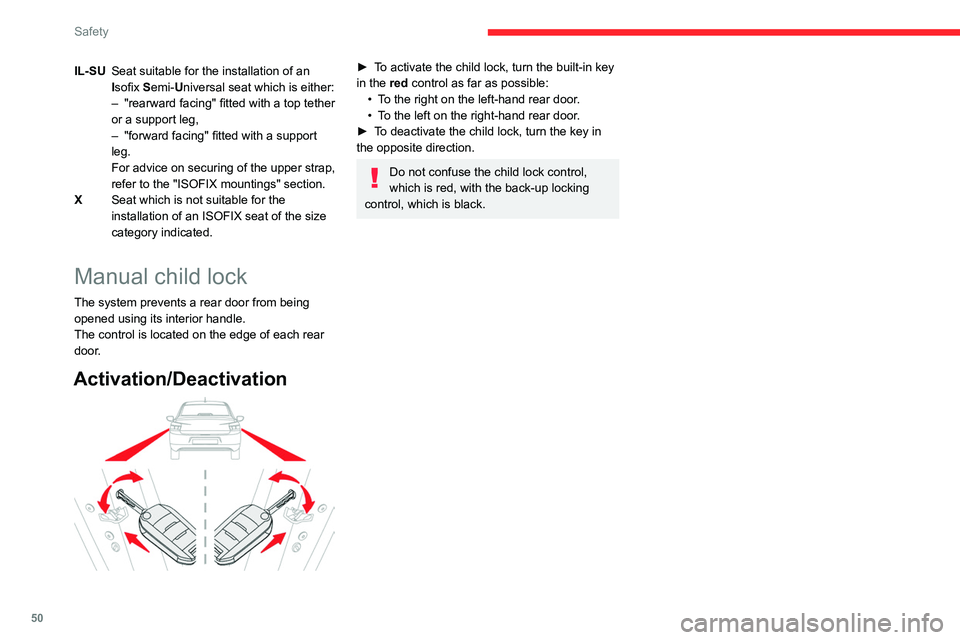
Activation/Deactivation
► To activate the child lock, turn the built-in key
in the red control as far as possible:
•
T
o the right on the left-hand rear door.
•
T
o the left on the right-hand rear door.
►
T
o deactivate the child lock, turn the key in
the opposite direction.
Do not confuse the child lock control,
which is red, with the back-up locking
control, which is black.
Page 54 of 180

52
Driving
Towing
Driving with a trailer places greater
demands on the towing vehicle and
particular care must be taken.
Do not exceed the maximum towable
weights.
At altitude: reduce the maximum load by
10% per 1,000 metres of altitude; the lower
air density at high altitudes decreases engine
performance.
New vehicle: do not tow a trailer until the
vehicle has driven at least 620 miles
(1,000 kilometres).
If the outside temperature is high, let the
engine idle for 1 to 2 minutes after the
vehicle comes to a stop, to help it to cool.
Before setting off
Nose weight
► Distribute the load in the trailer so that the
heaviest items are located as close as possible
to the axle, and the nose weight (at the point
where it joins your vehicle) approaches the
maximum permitted, without exceeding it.
Tyres
► Check the tyre pressures of the towing
vehicle and of the trailer , observing the
recommended pressures.
Lighting
► Check the electrical signalling on the trailer
and the headlamp beam height of your vehicle.
If a genuine CITROËN towing device is
used, the rear parking sensors will be
deactivated automatically to avoid activating
the audible signal.
When driving
Cooling
Towing a trailer uphill causes the coolant
temperature to increase. The maximum towable
load depends on the gradient and the exterior
temperature. The fan’s cooling capacity does not
increase with engine speed.
►
Reduce speed and lower the engine speed to
limit the amount of heating produced.
►
Pay constant attention to the coolant
temperature.
If this warning lamp and the STOP
warning lamp come on, stop the vehicle
and switch off the engine as soon as possible.
Brakes
Using the engine brake is recommended to limit
the overheating of the brakes. Braking distances
are increased when towing a trailer.
Side wind
Bear in mind that the vehicle will be more
susceptible to wind when towing.
Anti-theft protection
Electronic immobiliser
The remote control contains an electronic chip
which has a special code. When the ignition is
switched on, this code must be recognised in
order for starting to be possible.
A few seconds after switching off the ignition,
this system locks the engine control system,
therefore preventing the engine from being
started in the event of a break-in.
In the event of a fault, you are informed
by illumination of this warning lamp, an
audible signal and a message on the screen.
The vehicle will not start; contact a CITROËN
dealer as soon as possible.
Page 55 of 180

53
Driving
6Starting-switching off the
engine
Key ignition switch
It has 3 positions:
1. StopInserting/removing the key, steering column
locked.
2. Ignition on Steering column unlocked, ignition on,
preheating (Diesel), switching the engine on.
3. Starting
Avoid attaching heavy objects to the key or the remote control. This would weigh
down on its shaft in the ignition switch and
could cause a malfunction.
Ignition on position
It allows the use of the vehicle's electric
equipment or the charging of accessories.
Once the state of charge of the battery drops to
the reserve level, the system switches to energy
economy mode. The power supply is cut off
automatically to preserve the remaining battery
charge.
Avoid attaching heavy objects to the key or the remote control, which would weigh
down on its blade in the ignition switch and
could cause a malfunction.
Starting the engine
With the parking brake applied:
► With a manual gearbox, place the gear lever
in neutral then fully depress the clutch pedal.
►
With an
automatic gearbox, place the gear
selector in mode N or P then depress the brake
pedal.
►
Insert the key into the ignition switch; the
system recognises the code.
►
Unlock
the steering column by simultaneously
turning the steering wheel and the key.
In certain cases, you may need to apply
significant force to move the steering
wheel (e.g.
wheels turned to full lock).
►
With a
petrol engine , operate the starter
motor by turning the key to position 3 without
pressing the accelerator pedal, until the engine
starts. Once the engine has started, release the
key and allow it to return to position 2.
Petrol engines
After a cold start, preheating the catalytic
converter can cause noticeable engine
vibrations, for anything up to 2 minutes
(accelerated idle speed).
►
With a
Diesel engine, turn the key to position
2, to
activate the engine preheating system.
Wait until this warning lamp goes off on
the instrument panel, then turn the key to
position 3 without pressing the accelerator pedal,
to operate the starter motor. Once the engine
has started, release the key and allow it to return
to position 2.
In wintry conditions, the warning lamp
may stay on for a longer period. When
the engine is hot, the warning lamp does not
come on.
In mild conditions, do not leave the engine
to warm up while stationary, but move off
straight away and drive at moderate speed.
If the engine does not start straight away,
switch off the ignition. Wait a few
seconds before operating the starter motor
again. If the engine does not start after a few
attempts, do not keep trying - risk of
damaging the starter motor and the engine!
Contact a CITROËN dealer or a qualified
workshop.
Page 56 of 180
54
Driving
Switching off the engine
► Immobilise the vehicle.
► With the engine at idle, turn the key to
position 1
.
►
Remove the key from the ignition switch.
►
T
o lock the steering column, turn the steering
wheel until it locks.
To facilitate unlocking of the steering column, it is recommended that the
wheels be returned to the straight ahead
position before switching off the engine.
Never switch off the ignition before the
complete immobilisation of the vehicle.
With the engine off, the braking and steering
assistance systems are also cut off - risk of
loss of control of the vehicle!
Check that the parking brake is correctly
applied, particularly on sloping ground.
When leaving the vehicle, keep the key in
your possession and lock the vehicle.
Energy economy mode
After the engine has stopped (position 1. Stop),
for a maximum combined duration of 30 minutes,
you can still use functions such as the audio and
telematics system, courtesy lamps or dipped
beam headlamps.
For more information on Energy
economy mode, refer to the
corresponding section.
Key left in
When the driver's door is opened, a
message is displayed, accompanied by an
audible signal, if the key has been left in the
ignition switch in position 1.
If the key has been left in the ignition switch
in position 2, the ignition will be switched off
automatically after one hour.
To switch the ignition back on, turn the key to
position 1, then back to position 2.
Parking brake
Release
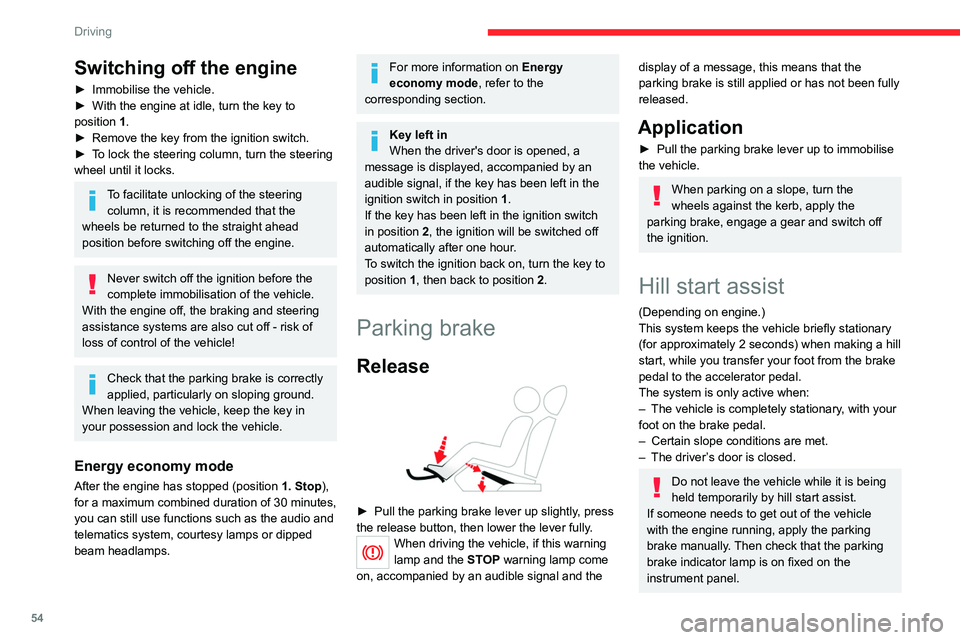
► Pull the parking brake lever up slightly , press
the release button, then lower the lever fully.
When driving the vehicle, if this warning
lamp and the STOP warning lamp come
on, accompanied by an audible signal and the
display of a message, this means that the
parking brake is still applied or has not been fully
released.
Application
► Pull the parking brake lever up to immobilise
the vehicle.
When parking on a slope, turn the
wheels against the kerb, apply the
parking brake, engage a gear and switch off
the ignition.
Hill start assist
(Depending on engine.)
This system keeps the vehicle briefly stationary
(for approximately 2
seconds) when making a hill
start, while you transfer your foot from the brake
pedal to the accelerator pedal.
The system is only active when:
–
The vehicle is completely stationary
, with your
foot on the brake pedal.
–
Certain slope conditions are met.
–
The driver
’s door is closed.
Do not leave the vehicle while it is being
held temporarily by hill start assist.
If someone needs to get out of the vehicle
with the engine running, apply the parking
brake manually. Then check that the parking
brake indicator lamp is on fixed on the
instrument panel.