Citroen C ZERO 2014.5 1.G Owner's Manual
Manufacturer: CITROEN, Model Year: 2014.5, Model line: C ZERO, Model: Citroen C ZERO 2014.5 1.GPages: 176, PDF Size: 5.22 MB
Page 131 of 176
129
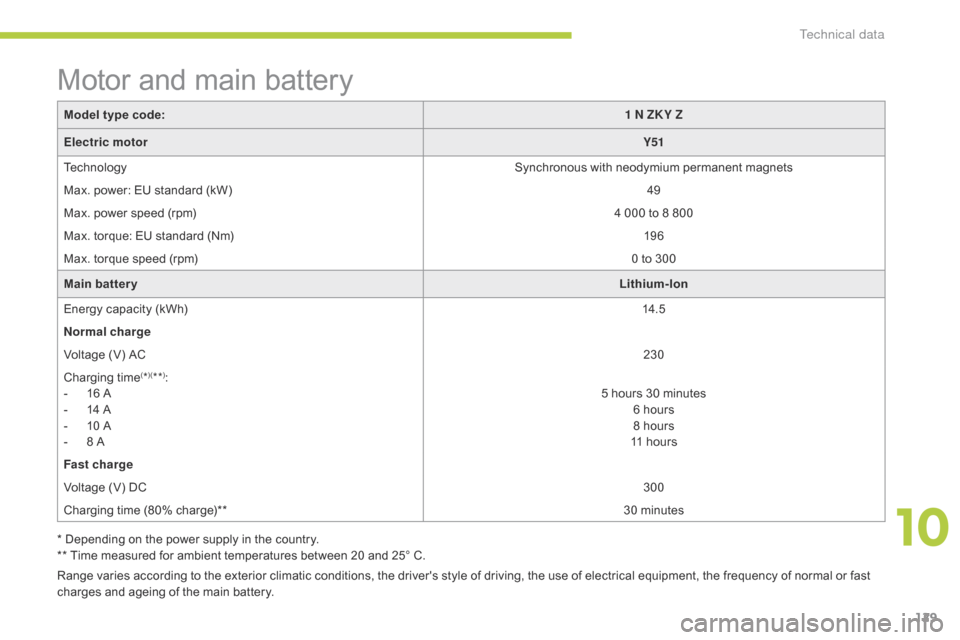
Motor and main battery
Model type code:1 N ZK Y Z
Electric motor Y51
Technology Synchronous with neodymium permanent magnets
Max. power: EU standard (kW) 49
Max. power speed (rpm) 4 000 to 8 800
Max. torque: EU standard (Nm) 19 6
Max. torque speed (rpm) 0 to 300
Main batter y Lithium-Ion
Energy capacity (kWh) 14.5
Normal charge
Voltage (V) AC 230
Charging time
(*)(**):
-
1
6 A
-
1
4 A
-
1
0 A
-
8 A 5 h
ours 30 minutes
6 hours
8 hours
11 hours
Fast charge
Voltage (V) DC 300
Charging time (80% charge)** 30 minutes
Range varies according to the exterior climatic conditions, the driver's style of driving, the use of electrical equipment, the frequency of normal or fast
charges and ageing of the main battery. * Depending on the power supply in the country.
** Time measured for ambient temperatures between 20 and 25° C.
10
Technical data
Page 132 of 176
130
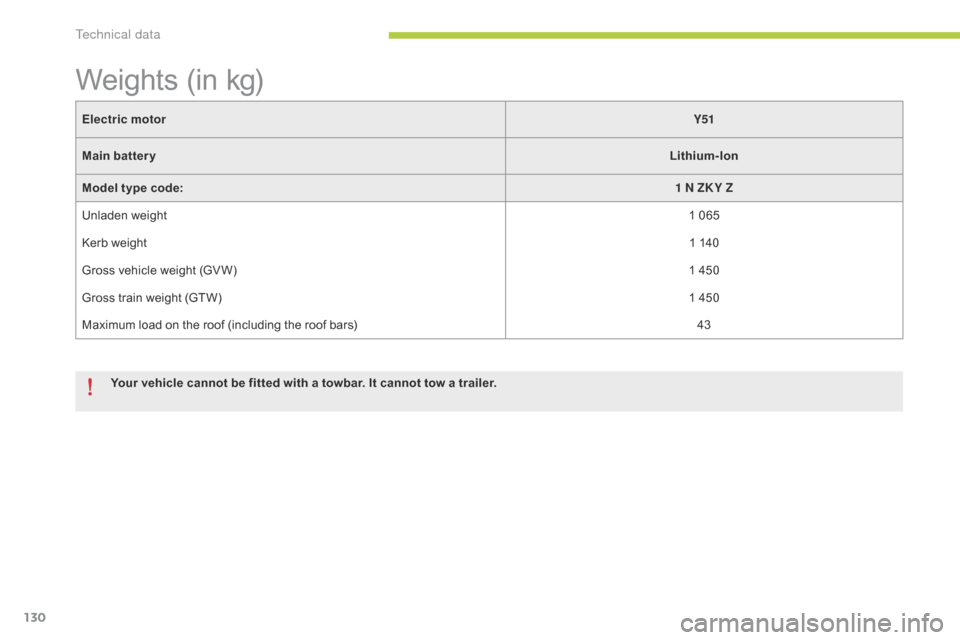
Electric motorY51
Main batter y Lithium-Ion
Model type code: 1 N ZK Y Z
Unladen weight 1 065
Kerb weight 1 140
Gross vehicle weight (GV W) 1 450
Gross train weight (GTW) 1 450
Maximum load on the roof (including the roof bars) 43
Your vehicle cannot be fitted with a towbar. It cannot tow a trailer.
Weights (in kg)
Technical data
Page 133 of 176
131
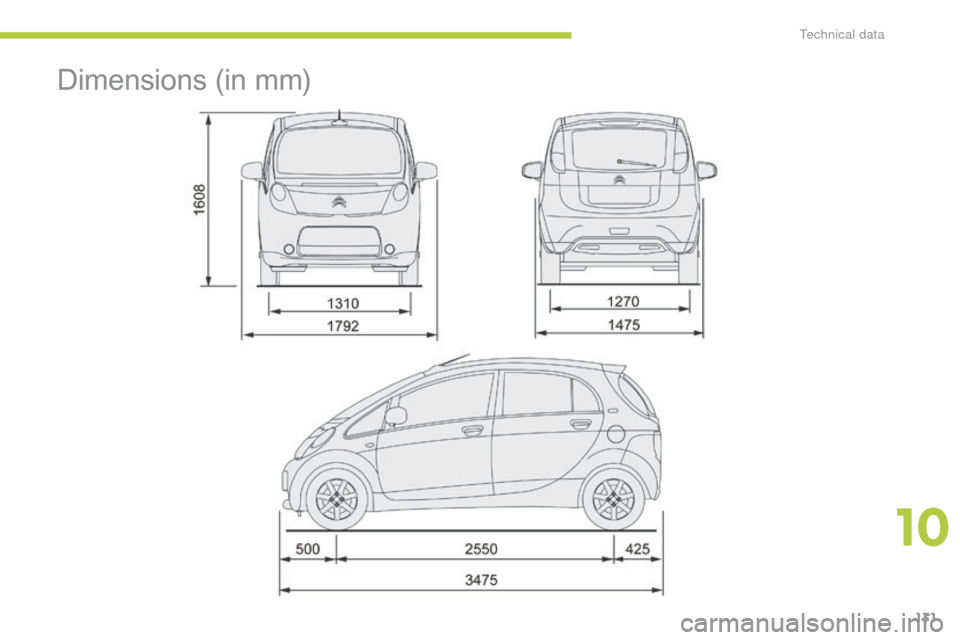
Dimensions (in mm)
10
T
Page 134 of 176
132
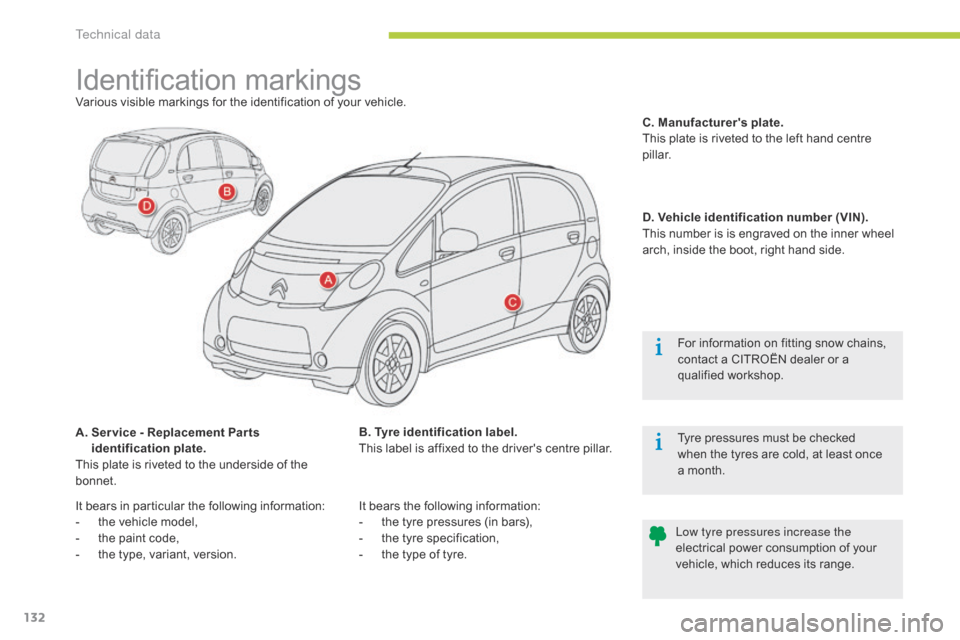
Identification markingsVarious visible markings for the identification of your vehicle.
A.
S
er vice - Replacement Par ts
identification plate.
This plate is riveted to the underside of the
bonnet. Tyre pressures must be checked
when the tyres are cold, at least once
a
month.
Low tyre pressures increase the
electrical power consumption of your
vehicle, which reduces its range.
B. Tyre identification label.
This label is affixed to the driver's centre pillar.
It bears the following information:
-
t
he tyre pressures (in bars),
-
t
he tyre specification,
-
t
he type of tyre.C. Manufacturer's plate
.
This plate is riveted to the left hand centre
pillar.
D. Vehicle identification number (VIN).
This number is is engraved on the inner wheel
arch, inside the boot, right hand side.
For information on fitting snow chains,
contact a CITROËN dealer or a
qualified workshop.
It bears in particular the following information:
-
t
he vehicle model,
-
t
he paint code,
-
t
he type, variant, version.
Technical data
Page 135 of 176

133
EMERGENCY OR ASSIST ANCE CALL
Page 136 of 176
134
EMERGENCY OR ASSIST ANCE CALL
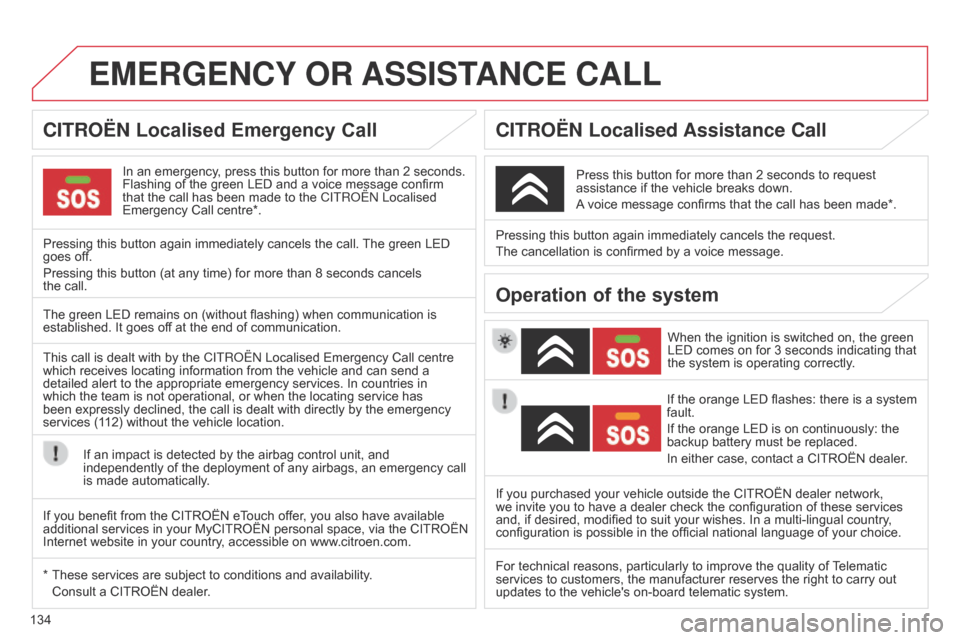
In an emergency, press this button for more than 2 seconds.
Flashing of the green LED and a voice message confirm
that the call has been made to the C
ITR o Ë n Localised
Emergency Call centre*.
Pressing this button again immediately cancels the call. The green LED
goes off.
Pressing this button (at any time) for more than 8 seconds cancels
the
call. When the ignition is switched on, the green
LED comes on for 3 seconds indicating that
the system is operating correctly.
Pressing this button again immediately cancels the request.
The cancellation is confirmed by a voice message.
Press this button for more than 2 seconds to request
assistance if the vehicle breaks down.
A voice message confirms that the call has been made*.
The green LED remains on (without flashing) when communication is
established. It goes off at the end of communication.
This call is dealt with by the C
ITR o Ë n Localised Emergency Call centre
which receives locating information from the vehicle and can send a
detailed alert to the appropriate emergency services. In countries in
which the team is not operational, or when the locating service has
been expressly declined, the call is dealt with directly by the emergency
services (112) without the vehicle location.
If an impact is detected by the airbag control unit, and
independently of the deployment of any airbags, an emergency call
is made automatically. If the orange LED flashes: there is a system
fault.
If the orange LED is on continuously: the
backup battery must be replaced.
In either case, contact a CITROËN dealer.
If you purchased your vehicle outside the CITROËN dealer network,
we invite you to have a dealer check the configuration of these services
and, if desired, modified to suit your wishes. In a multi-lingual country ,
configuration is possible in the official national language of your choice.
For technical reasons, particularly to improve the quality of Telematic
services to customers, the manufacturer reserves the right to carry out
updates to the vehicle's on-board telematic system.
If you benefit from the CITROËN eTouch offer, you also have available
additional services in your MyCITROËN personal space, via the CITROËN
Internet website in your country, accessible on www.citroen.com.
*
These services are subject to cond
itions and availability.
Consult a CITROËN dealer
.
CITROËN Localised Emergency Call C ITROËN Localised Assistance Call
Operation of the system
Page 137 of 176
135
Audio system / Bluetooth®
01 First steps
For safety reasons, the driver must only carry out
operations which require prolonged attention while the
vehicle is stationary.
When the engine is switched off and to prevent
discharging of the battery, the system switches off after
activation of the energy economy mode.
CONTENTS
02 Radio
03
Audio
04
Using
the telephone
05
Audio
settings
06
Configuration
07
Screen
menu maps
Frequently asked questions p.
p.
p.
p.
p.
p.
p.
p.
136
137
140
146
152
153
154
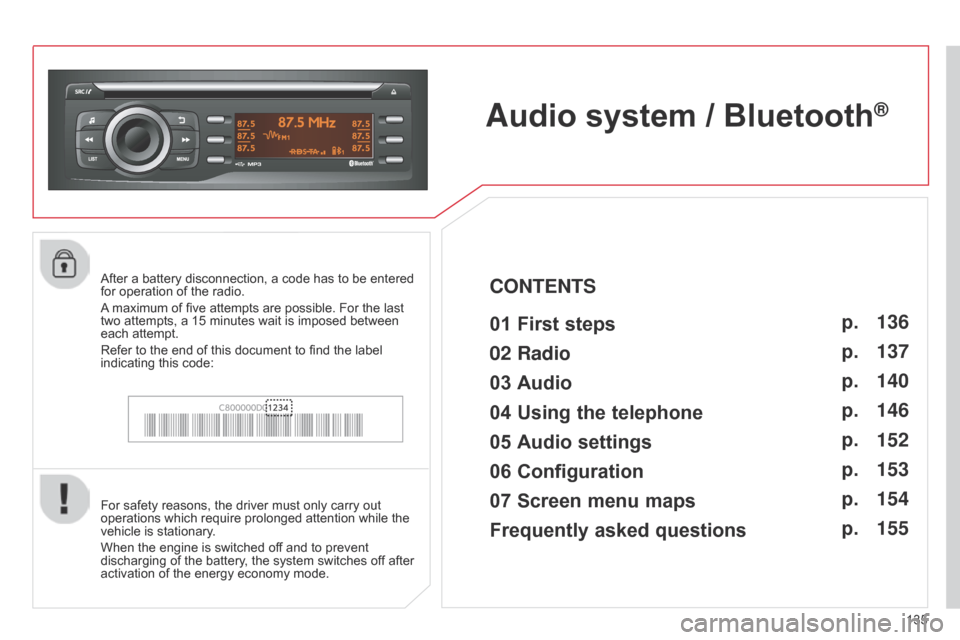
155After a battery disconnection, a code has to be entered
for operation of the radio.
A maximum of five attempts are possible. For the last
two
attempts, a 15 minutes wait is imposed between
each attempt.
Refer to the end of this document to find the label
indicating this code:
Page 138 of 176
01
136
FIRST STEPS
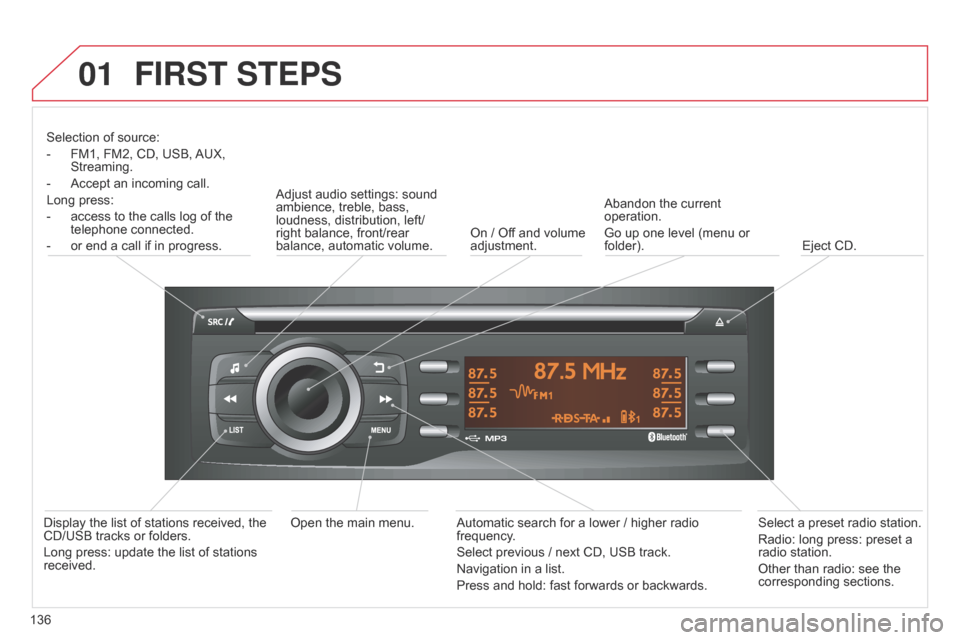
Selection of source:
-
FM1, FM2, CD, USB,
AUX,
Streaming.
-
Accept an incoming call.
Long press:
-
access to the calls log of the
telephone connected.
-
or end a call if in progress. Adjust audio settings: sound
ambience, treble, bass,
loudness, distribution, left/
right balance, front/rear
balance, automatic volume.
On / Of
f and volume
adjustment. Abandon the current
operation.
Go up one level (menu or
folder).
Eject CD.
Select a preset radio station.
Radio: long press: preset a
radio station.
Other than radio: see the
corresponding sections.
Automatic search for a lower / higher radio
frequency.
Select previous / next CD, USB track.
Navigation in a list.
Press and hold: fast forwards or backwards.
Open the main menu.
Display the list of stations received, the
CD/USB tracks or folders.
Long press: update the list of stations
received.
Page 139 of 176
02
137
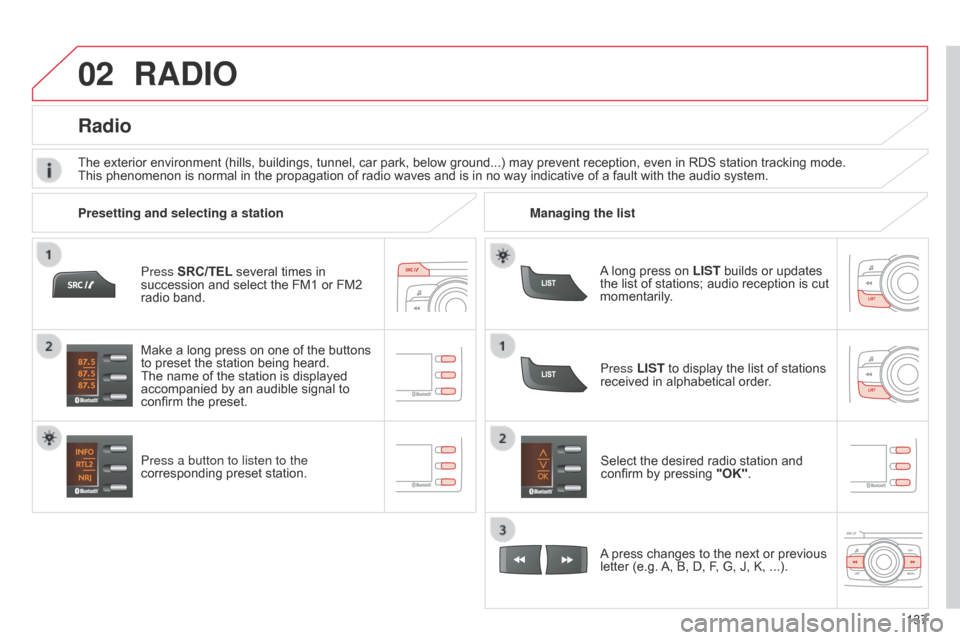
Press SRC/TEL several times in
succession and select the FM1 or FM2
radio band.
Press a button to listen to the
corresponding preset station.
Select the desired radio station and
confirm by pressing
"OK".
Radio
Press LIST to display the list of stations
received in alphabetical order.
The exterior environment (hills, buildings, tunnel, car park, below ground...) may prevent reception, even in RDS station tracking mode.
This phenomenon is normal in the propagation of radio waves and is in no way indicative of a fault with the audio system.
A long press on LIST builds or updates
the list of stations; audio reception is cut
momentarily.
Make a long press on one of the buttons
to preset the station being heard.
The name of the station is displayed
accompanied by an audible signal to
confirm the preset.
A press changes to the next or previous
letter (e.g. A, B, D, F, G, J, K, ...).
Managing the list
Presetting and selecting a station
RADIO
Page 140 of 176
02
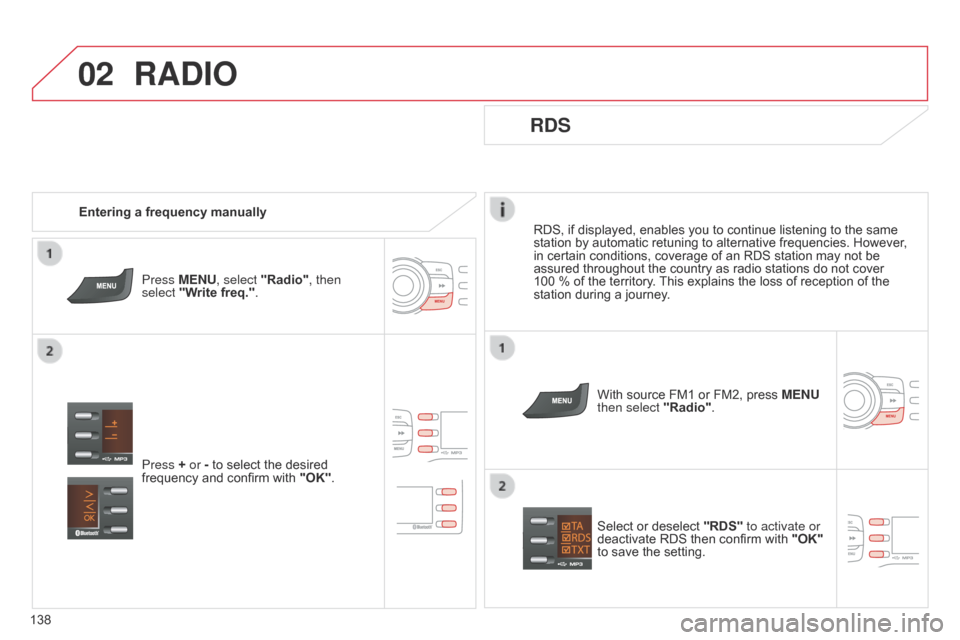
138RDS, if displayed, enables you to continue listening to the same
station by automatic retuning to alternative frequencies. However
,
in certain conditions, coverage of an RDS station may not be
assured throughout the country as radio stations do not cover
100 % of the territory. This explains the loss of reception of the
station during a journey.
RDS
With source FM1 or FM2, press MENU
then select "Radio".
Select or deselect "RDS" to activate or
deactivate RDS then confirm with "OK"
to save the setting.
Entering a frequency manually
Press MENU, select "Radio", then
select "Write freq.".
Press + or - to select the desired
frequency and confirm with "OK".
RADIO