dashboard Citroen C ZERO RHD 2017 1.G Owner's Manual
[x] Cancel search | Manufacturer: CITROEN, Model Year: 2017, Model line: C ZERO RHD, Model: Citroen C ZERO RHD 2017 1.GPages: 174, PDF Size: 4.16 MB
Page 8 of 174

6
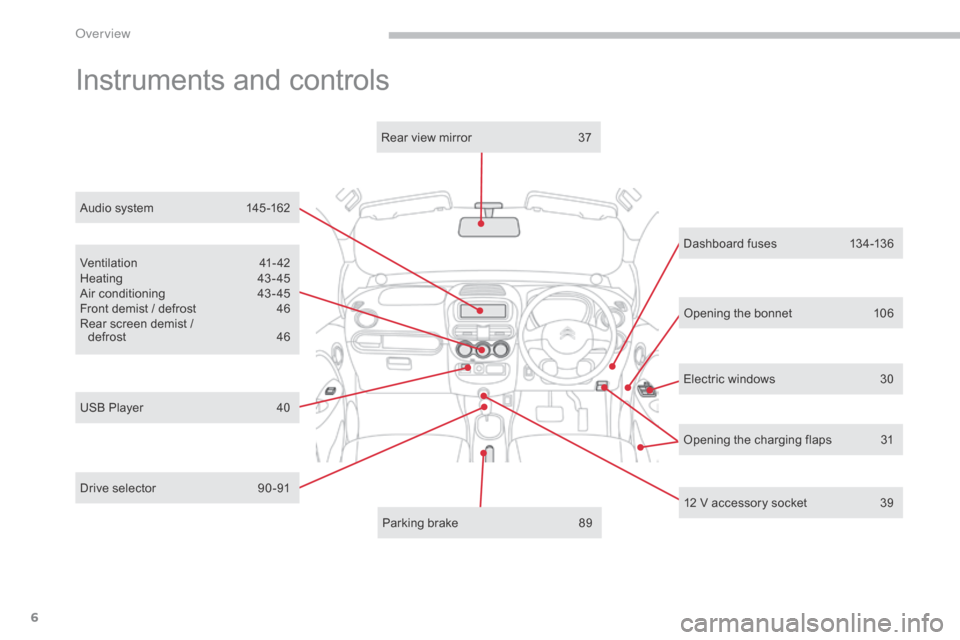
Electric windows 30
Dashboard fuses
1
34-136
Ventilation
4
1-42
Heating
4
3- 45
Air conditioning
4
3 - 45
Front demist / defrost
4
6
Rear screen demist /
defrost
4
6
12 V accessory socket
3
9
Parking brake
8
9
Rear view mirror
3
7
USB Player
4
0 Opening the bonnet
1
06
Instruments and controls
Opening the charging flaps 3
1
Audio system
1
45 -162
Drive selector
9
0 -91
Over view
Page 14 of 174

12
Operation indicator lamps
Warning / indicator lamp State Cause Action / Observations
Left-hand
direction
indicato r Flashing with audible
signal.
The lighting stalk is pushed down.
Right-hand
direction
indicator Flashing with audible
signal.
The lighting stalk is pushed up.
Hazard warning
lamps Flashing with audible
signal. The hazard warning lamps switch,
located on the dashboard, has been
operated. The left-hand and right-hand direction indicators and
their associated indicator lamps flash simultaneously.
Sidelamps and/
or dipped beam
headlamps On fixed.
The sidelamps and/or dipped beam
headlamps are on.
Front foglamps On fixed. The front foglamps are switched on. Turn the ring on the stalk rear wards twice to switch off
the front foglamps.
Rear foglamp On fixed. The rear foglamp is switched on. Turn the ring on the stalk rear wards to switch off the
rear foglamp.
Main beam
headlamps
On fixed.
The lighting stalk is pulled towards you. Pull the stalk to return to dipped beam headlamps.
If one of the following indicator lamps comes on in the instrument panel, this confirms that the corresponding system has come into operation.
Instruments
Page 16 of 174

14
Deactivation indicator lamps
Warning / indicator lamp State Cause Action / Observations
Passenger's
airbag system On fixed, on the
centre console. The control switch, located on the
centre console, is set to the OFF
position.
The passenger's front airbag is
deactivated. Set the control switch to the ON
position to activate
the passenger's front airbag. In this case, do not fit a
child seat in the rear ward facing position.
Remember to check the position of the control switch
before starting your vehicle.
ESP/ASR On fixed. The ESP/ASR off switch, located
in the dashboard (driver's side) is
activated.
The ESP/ASR is deactivated.
ESP: electronic stability programme
ASR: anti-slip regulation. Press the button to activate the ESP/ASR.
The ESP/ASR system is automatically activated on
starting the vehicle.
If one of the following indicator lamps comes on, this confirms that the corresponding system has been switched off intentionally.
This may be accompanied by an audible signal.
Instruments
Page 33 of 174

31
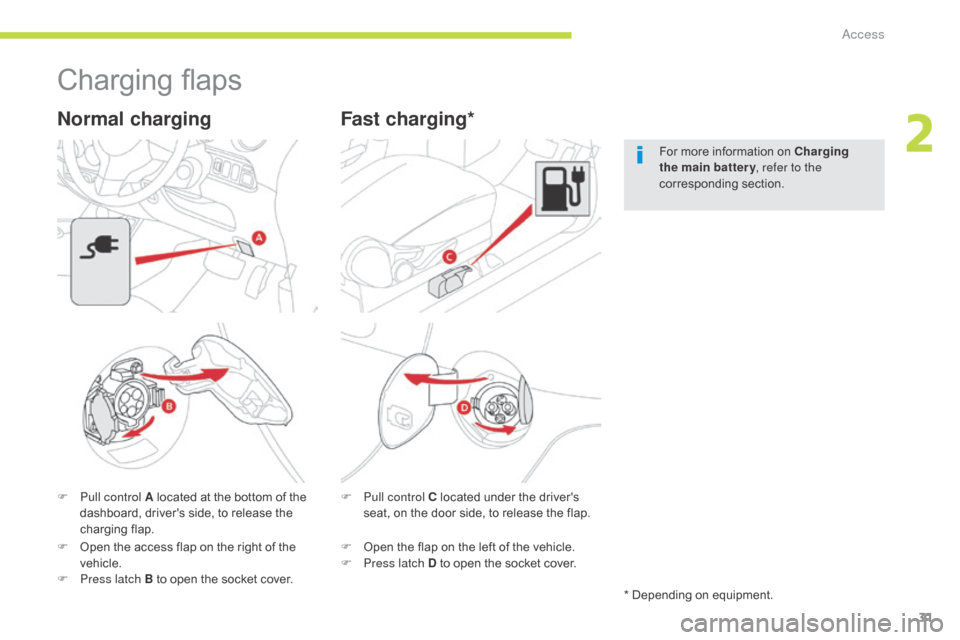
Charging flaps
F Pull control A located at the bottom of the dashboard, driver's side, to release the
charging flap.
Normal charging
F Pull control C located under the driver's seat, on the door side, to release the flap.
Fast charging*
For more information on Charging
the main battery , refer to the
corresponding section.
F
O
pen the access flap on the right of the
vehicle.
F
P
ress latch B to open the socket cover. * Depending on equipment.
F
O
pen the flap on the left of the vehicle.
F
P
ress latch D to open the socket cover.
2
Access
Page 35 of 174

33
Head restraint height adjustment
F To raise it, pull upwards.
F T o lower it, push it downwards, pressing
the height adjustment button at the same
time.
F
T
o remove it, raise it to the high position,
then remove it pressing the height
adjustment button at the same time.
F
T
o refit it, engage the rods of the head
restraint in the apertures, pressing the
height adjustment button at the same time. Never drive with the removed head
restraints in the vehicle as they could
be thrown around the vehicle on sharp
braking. They must always be in place
and adjusted correctly.
After installing the head restraint, check
that the height adjustment button has
engaged correctly.
The adjustment is correct when the top
of the head restraint is aligned with the
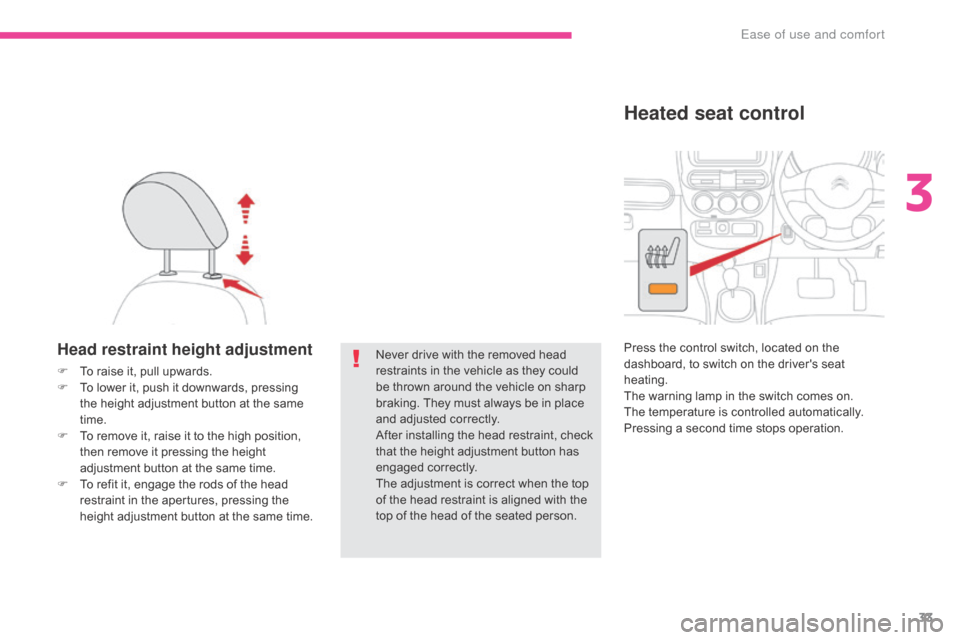
top of the head of the seated person.Press the control switch, located on the
dashboard, to switch on the driver's seat
heating.
The warning lamp in the switch comes on.
The temperature is controlled automatically.
Pressing a second time stops operation.
Heated seat control
3
Ease of use and comfort
Page 48 of 174

46
Switch off the demisting/defrosting
of the rear screen and, depending on
version, the door mirrors as soon as
appropriate, so as to limit electrical
consumption and optimise the range of
the vehicle.
Front demist -
defrostRear screen demist - defrostThe control button is located on the dashboard, to the right of the steering wheel.
F
P
ress this button to demist /
defrost the rear screen and,
depending on version, the door
mirrors. The indicator lamp
associated with the button
comes on.
Place the air distribution control in
this position.
Switching on
Switching off
The demisting/defrosting switches off
automatically to prevent an excessive electric
consumption.
F
I
t is possible to stop the demisting/
defrosting operation before it is switched
off automatically by pressing the button
again. The indicator lamp associated with
the button goes off.
For rapid demisting - defrosting, you
can also press the " MAX" button.
The intake of exterior air is selected (indicator
lamp off) and depending on equipment, the air
conditioning starts running (indicator lamp on).
Place the temperature control
between "●" and " H".
Place the air flow control
in the desired position.
Ease of use and comfort
Page 67 of 174

65
Anti-slip regulation (ASR)
and electronic stability
programme (ESP)
Trajectory control systems
Deactivation
In exceptional conditions (starting a vehicle
which is bogged down, stuck in snow, on soft
ground, ...), it may be advisable to deactivate
the ASR and ESP systems to regain grip.
F
P
ress this button button, located on the
dashboard to the right of the steering
wheel, until the corresponding symbol
appears in the instrument panel screen.
Activation
These systems are activated automatically
each time the vehicle is started.
They come into operation in the event of a grip
or trajectory problem. The display of this symbol indicates
that the ASR and ESP systems are
deactivated.
Reactivation
These systems are not reactivated
automatically.
F
P
ress this button again to reactivate them
manually.
The symbol going off in the instrument panel
indicates the reactivation of the ASR and ESP
systems.
The anti-slip regulation (also known as Traction
Control) optimises traction to limit wheel spin,
by acting on the brakes of the driving wheels
and on the engine.
The electronic stability programme acts on the
brake of one or more wheels and on the engine
to keep the vehicle on the trajectory required
by the driver, within the limits of the laws of
physics.
This is indicated by flashing of this
symbol in the instrument panel. The ASR /ESP systems offer should not
encourage the driver to take extra risks
or drive at high speed.
The correct functioning of these
systems depends on observation of
the manufacturer's recommendations
regarding the wheels (tyres and rims),
the braking components, the electronic
components and the assembly
and repair procedures used by the
CITROËN dealer network.
After an impact, have these systems
checked by a CITROËN dealer or a
qualified workshop.
Operating fault
The display of this message
in the instrument panel
indicates a malfunction of
these systems.
Contact a CITROËN dealer or a qualified
workshop to have the ASR /ESP systems
checked.
Excessive wheel spin may damage your
vehicle's differential.
5
Safety
Page 72 of 174

70
Airbags
The airbags have been designed to contribute
towards improving the safety of the occupants
in the event of violent collisions. They
supplement the action of the force-limiting seat
belts.
In this case, the electronic detectors record and
analyse the front and side impacts suffered in
the impact detection zones:
-
i
n the event of a serious impact, the
airbags are deployed instantaneously
and contribute towards protecting the
occupants of the vehicle; immediately after
the impact, the airbags deflate rapidly
so that they do not hinder the visibility of
the occupants or their possible exit from
the
vehicle,
-
i
n the event of a minor impact or rear
impact and in certain roll-over conditions,
the airbags may not be deployed; the seat
belt alone contributes towards providing
your protection in these situations.
The airbags do not operate when the
ignition is off.
This equipment only operates once. If a
second impact occurs (during the same
or a subsequent accident), the airbag
will not be deployed again. The deployment of one or more airbags
is accompanied by a slight discharge
of smoke and a noise, due to the
activation of the pyrotechnic cartridge
incorporated in the system.
This smoke is not harmful, but sensitive
individuals may experience some
irritation.
The noise of the detonation related to
the deployment of one or more airbags
may result in a slight loss of hearing for
a short time.
Impact detection zones
A. Front impact zone.
B. S
ide impact zone.
Front airbags
Deployment
The airbags are deployed, except the
passenger's front airbag if it is deactivated,
in the event of a serious front impact applied
to all or part of the front impact zone A , in
the longitudinal centreline of the vehicle on a
horizontal plane and directed from the front to
the rear of the vehicle.
The front airbag inflates between the front
occupant of the vehicle and the dashboard to
cushion their for ward movement. System which protects the head and chest of
the driver and front passenger in the event of a
front impact.
The driver's airbag is fitted in the centre of the
steering wheel; the front passenger's airbag is
fitted in the dashboard above the glove box.
Safety
Page 75 of 174

73
For the airbags to be fully
effective, observe the safety
recommendations below:
Sit in a normal upright position.
Wear a correctly adjusted seat belt.
Do not leave anything between the
occupants and the airbags (a child, pet,
object...), nor fix or attach anything close to
the inflation trajectory of the airbags; this
could cause injuries during their deployment.
Never modify the original definition of your
vehicle, particularly in the area directly
around the airbags.
After an accident or if the vehicle has been
stolen or broken into, have the airbag
systems checked.
All work on the airbag system must be
carried out by a CITROËN dealer or a
qualified workshop.
Even if all of the precautions mentioned are
observed, a risk of injury or of minor burns
to the head, chest or arms when an airbag is
deployed cannot be ruled out.
Lateral airbags
Use only approved covers on the seats,
compatible with the deployment the lateral
airbags. For information on the range of seat
covers suitable for your vehicle, you can
contact a CITROËN dealer.
Do not fix or attach anything to the seat
backs (clothing...). This could cause injury
to the chest or arms if the lateral airbag is
deployed.
Do not sit with the upper part of the body any
nearer to the door than necessary.
The
bag inflates almost instantly (within
a few milliseconds) then deflates within
the same time discharging the hot gas via
openings provided for this purpose.
Front airbags
Do not drive holding the steering wheel by its
spokes or resting your hands on the centre
part of the wheel.
Passengers must not place their feet on the
dashboard.
Do not smoke as deployment of the airbags
can cause burns or the risk of injury from a
cigarette or pipe.
Never remove or pierce the steering wheel or
hit it violently.
Do not fit or attach anything to the steering
wheel or dashboard, this could cause
injuries with deployment of the airbags.
Advice
Curtain airbags
Do not fix or attach anything to the roof. This
could cause injury to the head if the curtain
airbag is deployed.
If fitted on your vehicle, do not remove the
grab handles installed on the roof, they play
a part in securing the curtain airbags.
5
Safety
Page 100 of 174

98
F Pull lever 1, located at the bottom of the
dashboard, driver's side, to open the
access flap for the normal charging socket
(right-hand side of the vehicle).
F
T
ake the charging cable from the storage
bag provided. This cable has a control unit.
F
C
onnect the charging cable to a compatible
standard power socket. On connecting
the cable, the three P O W E R , FA U LT and
CHARGING lamps all come on temporarily,
then only the green POWER lamp stays on.
If the exterior temperature is lower
than
-25° C, charging may not be
possible. Do not touch the metal end of the
normal charging socket or of the
charging cable (risk of electrocution
and/or faults).
F
P
ress the latch 2 to open the socket cover.F
E nsure that there is no foreign object on
the vehicle's socket.
F
R
emove the protective cover from the
charging cable.
F
I
nsert the charging plug into the socket
without pressing the button, until it clicks
into place .
Do not use an electrical
extension, multi-gang
socket, adaptor or timer.
Never connect or disconnect the cable
or charging plug with wet hands (risk of
electrocution).
Use the cord supplied to hook the
control unit, so that it does not weigh
down on the power point (risk of
damage to the charging cable or
electric power point).
Practical information