key Citroen C ZERO RHD 2017 1.G Owner's Manual
[x] Cancel search | Manufacturer: CITROEN, Model Year: 2017, Model line: C ZERO RHD, Model: Citroen C ZERO RHD 2017 1.GPages: 174, PDF Size: 4.16 MB
Page 3 of 174
Key This handbook describes all of the equipment available in
the whole range.
Your vehicle will be fitted with some of the equipment
described in this document, depending on its trim level,
version and the specification for the country in which it
is sold.
The descriptions and illustrations are given without any
obligation. Automobiles CITROËN reserves the right
to modify the technical specifications, equipment and
accessories without having to update this edition of the
handbook.
This document is an integral part of your vehicle. It
should be passed on to the new user in the event of sale
or transfer.safety warning
contributes to the protection of the
environment additional information
CITROËN h
as a presence on every continent,
a complete product range,
bringing together technology and a permanent spirit of innovation,
for a modern and creative approach to mobility.
We thank you and congratulate you on your choice.
Happy motoring!
At the wheel of your new vehicle,
getting to know each system,
each control, each setting,
makes your trips, your journeys
more comfortable and more enjoyable.
Page 4 of 174
.
.
Instrument panel 10
Indicator and warning lamps
1
1
Main battery state of charge indicator
1
9
Energy consumption / generation indicator
2
0
Distance recorder
2
1
Trip distance recorder
2
1
Lighting dimmer
2
2
Service indicator
2
2
Range indicator
2
4Remote control key
2
5
Doors
2
8
Boot
2
9
Electric windows
3
0
Charging flaps
3
1
Front seats 3 2
Rear seats
3
4
Mirrors
36
I
nterior fittings
3
8
Ventilation
4
1
Heating
4
3
Air conditioning
4
3
Front demist - defrost
4
6
Rear screen demist - defrost
4
6
Remote control
4
7Lighting controls
5
3
Automatic illumination of headlamps
5
5
Headlamp adjustment
5
6
Wiper control
5
6
Courtesy lamp
5
7
General safety recommendations 5 8
Hazard warning lamps
5
9
Automatic operation of brake lamps
5
9
Horn
5
9
Pedestrian horn
6
0
Emergency or assistance
6
1
Braking assistance systems
6
3
Trajectory control systems
6
5
Engine brake reduction indicator lamp
6
6
Front seat belts
6
7
Airbags
7
0
Child seats
7
4
Deactivating the passenger front airbag
7
7
ISOFIX child seats
8
3
Child lock
8
6
Over view
Eco-driving
Instruments Access
Ease of use and comfort Lighting and visibility
Safety
Contents
Page 6 of 174
4
Exterior
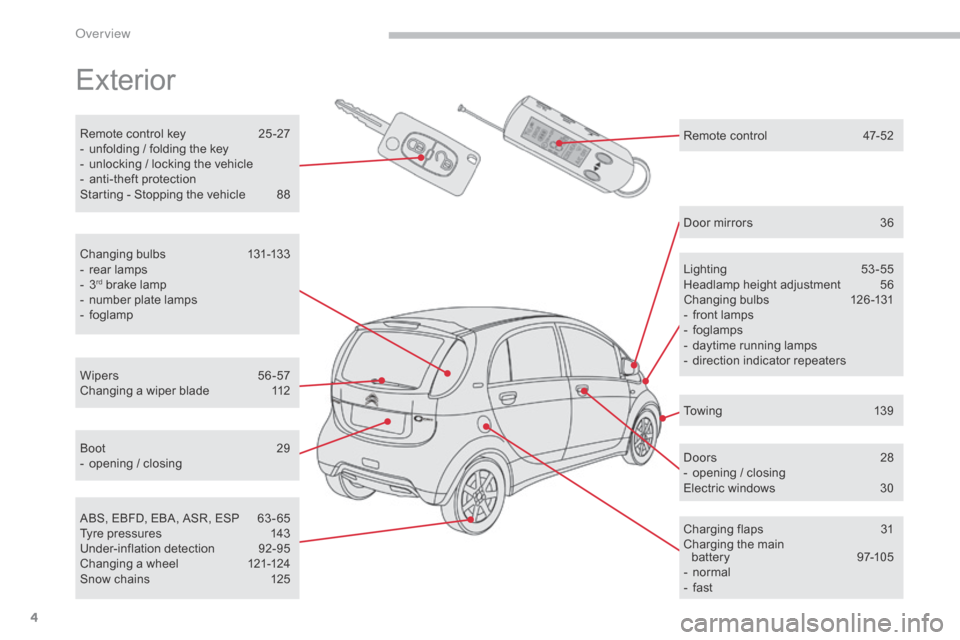
Remote control key 25 -27
- u nfolding / folding the key
-
u
nlocking / locking the vehicle
-
a
nti-theft protection
Starting - Stopping the vehicle
8
8
Lighting
5
3-55
Headlamp height adjustment
5
6
Changing bulbs
1
26-131
-
f
ront lamps
-
fo
glamps
-
d
aytime running lamps
-
d
irection indicator repeaters
Wipers
5
6 -57
Changing a wiper blade
1
12 Door mirrors
3
6
Doors
2
8
-
o
pening / closing
Electric windows
3
0
Charging flaps
3
1
Charging the main battery
9
7-105
-
n
ormal
-
f
ast
ABS, EBFD, EBA, ASR, ESP
6
3 - 65
Tyre pressures
1
43
Under-inflation detection
9
2-95
Changing a wheel
1
21-124
Snow chains
1
25
Boot
2
9
-
o
pening / closing
Changing bulbs
1
31-133
-
r
ear lamps
-
3rd brake lamp
-
n
umber plate lamps
-
fo
glamp
To w i n g
1
3 9
Remote control
4
7-52
Over view
Page 27 of 174
25
System used for centralised locking or unlocking of the vehicle using the door lock barrel or from a distance. It is also used to start the vehicle, as well
as providing protection against theft.
Remote control key
Unfolding / Folding the key
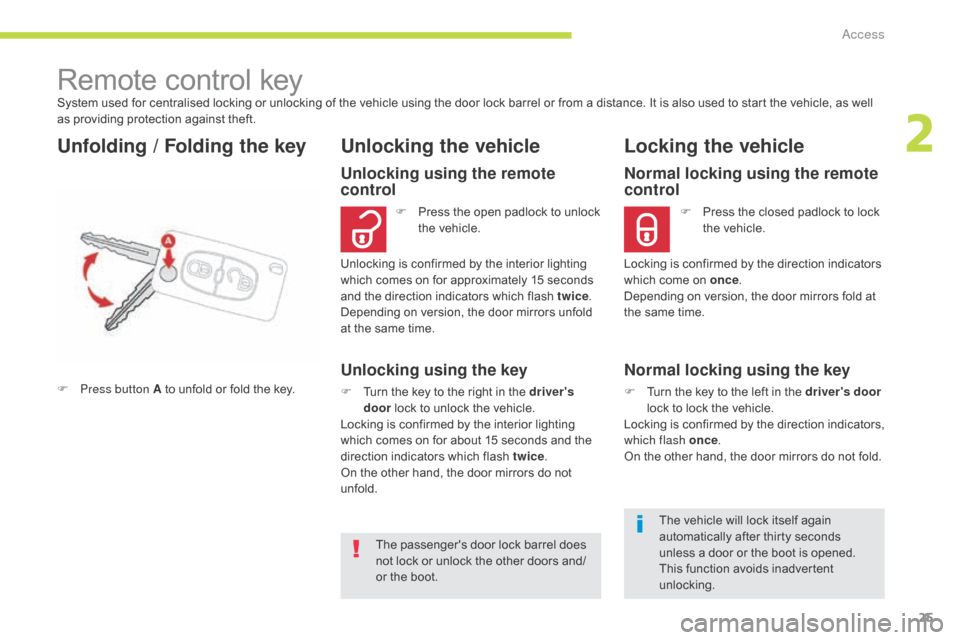
F Press button A to unfold or fold the key.
Unlocking using the remote
control
F Press the open padlock to unlock the vehicle.
Locking the vehicle
Unlocking is confirmed by the interior lighting
which comes on for approximately 15 seconds
and the direction indicators which flash twice .
Depending on version, the door mirrors unfold
at the same time.
Unlocking using the key
F Turn the key to the right in the driver's door lock to unlock the vehicle.
Locking is confirmed by the interior lighting
which comes on for about 15 seconds and the
direction indicators which flash twice .
On the other hand, the door mirrors do not
unfold.
Normal locking using the remote
control
F Press the closed padlock to lock the vehicle.
Locking is confirmed by the direction indicators
which come on once .
Depending on version, the door mirrors fold at
the same time.
Normal locking using the key
F Turn the key to the left in the driver's door
lock to lock the vehicle.
Locking is confirmed by the direction indicators,
which flash once .
On the other hand, the door mirrors do not fold.
The vehicle will lock itself again
automatically after thirty seconds
unless a door or the boot is opened.
This function avoids inadvertent
unlocking.
The passenger's door lock barrel does
not lock or unlock the other doors and/
or the boot.
Unlocking the vehicle
2
Access
Page 28 of 174
26
Anti-theft protection
Electronic immobiliser
The key contains an electronic chip which has
a special code. When the ignition is switched
on, this code must be recognised to permit
starting.
This electronic immobiliser locks the control
system a few moments after the ignition is
switched off and prevents starting by anyone
who does not have the key.
In the event of a malfunction and if your vehicle
does not start, contact a CITROËN dealer as
soon as possible.
Remote control problem
In the event of a remote control malfunction,
you can neither unlock nor lock your vehicle.
F
F
irst of all, use the key in the driver's door
lock to unlock or lock your vehicle.
F
T
hen, contact a CITROËN dealer to check
the operation of the remote control and
replace the battery if necessary.
Access
Page 29 of 174
27
Lost keys
Visit a CITROËN dealer with the vehicle's V5 registration document and your personal
identification documents.
The CITROËN dealer will be able to retrieve the key code and the transponder code
required to order a replacement key.
Remote control
The high frequency remote control is a sensitive system; do not operate it while it is in your
pocket as there is a possibility that it may unlock the vehicle, without you being aware of it.
Do not repeatedly press the buttons of your remote control out of range and out of sight of
your vehicle. You run the risk of stopping it from working.
The remote control does not operate when the key is in the ignition, even when the ignition
is switched off.
Locking the vehicle
Driving with the doors locked may make access to the passenger compartment by the
emergency services more difficult in an emergency.
As a safety precaution (with children on board), remove the key from the ignition when you
leave the vehicle, even for a short time.
Anti-theft protection
Do not make any modifications to the electronic immobiliser system; this could cause
malfunctions.
When purchasing a second-hand vehicle
Have the key codes memorised by a CITROËN dealer, to ensure that the keys in your
possession are the only ones which can start the vehicle.
2
Access
Page 30 of 174
28
Doors
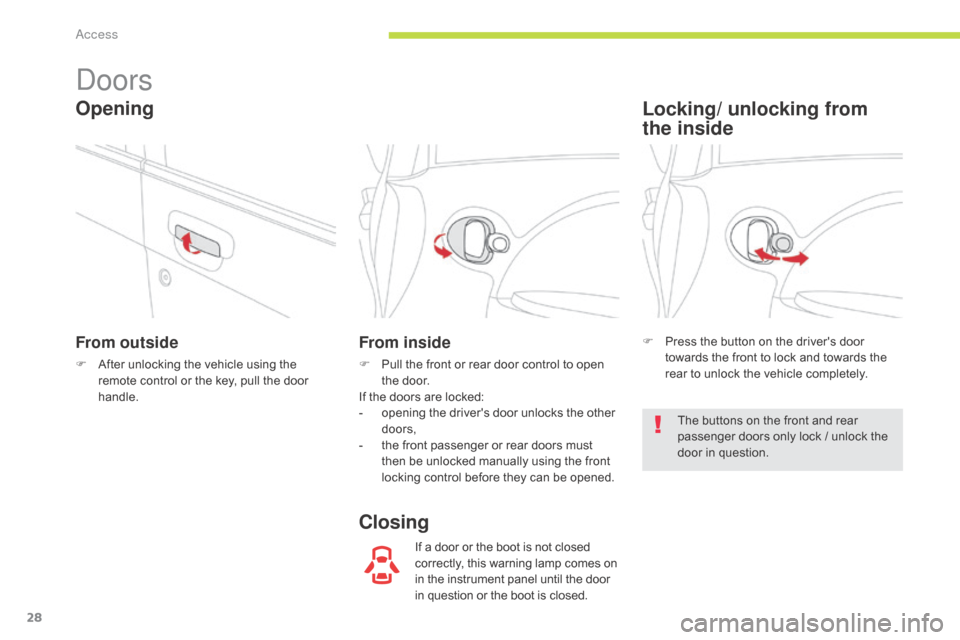
From outside
F After unlocking the vehicle using the remote control or the key, pull the door
handle.
From inside
F Pull the front or rear door control to open the door.
If the doors are locked:
-
o
pening the driver's door unlocks the other
doors,
-
t
he front passenger or rear doors must
then be unlocked manually using the front
locking control before they can be opened.
If a door or the boot is not closed
correctly, this warning lamp comes on
in the instrument panel until the door
in question or the boot is closed.
Opening
ClosingLocking/ unlocking from
the
inside
F Press the button on the driver's door
towards the front to lock and towards the
rear to unlock the vehicle completely.
The buttons on the front and rear
passenger doors only lock / unlock the
door in question.
Access
Page 31 of 174
29
Boot
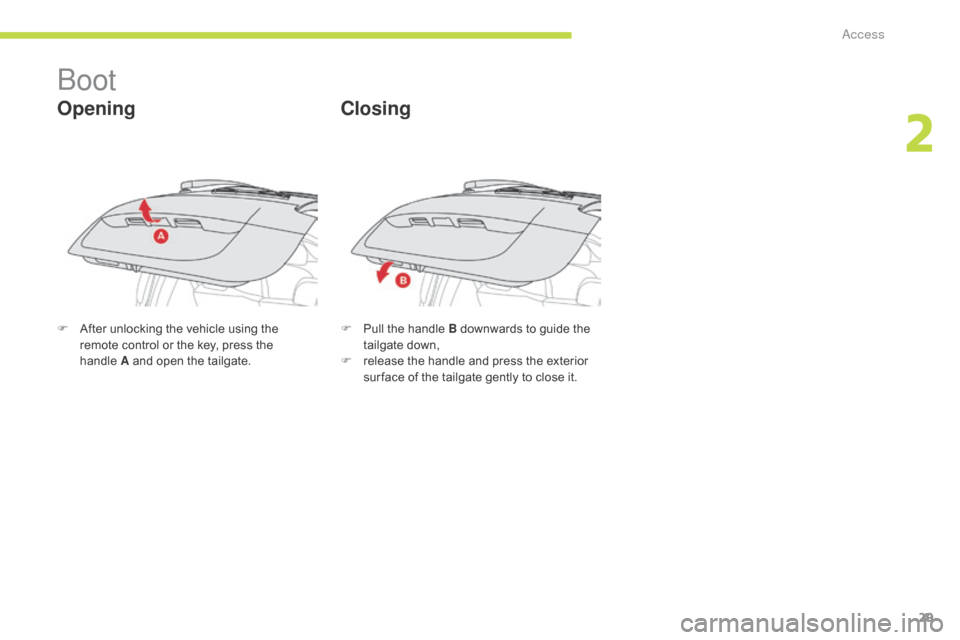
Opening
F After unlocking the vehicle using the remote control or the key, press the
handle
A
and open the tailgate. F
P ull the handle B downwards to guide the
tailgate down,
F
r
elease the handle and press the exterior
sur face of the tailgate gently to close it.
Closing
2
Access
Page 32 of 174
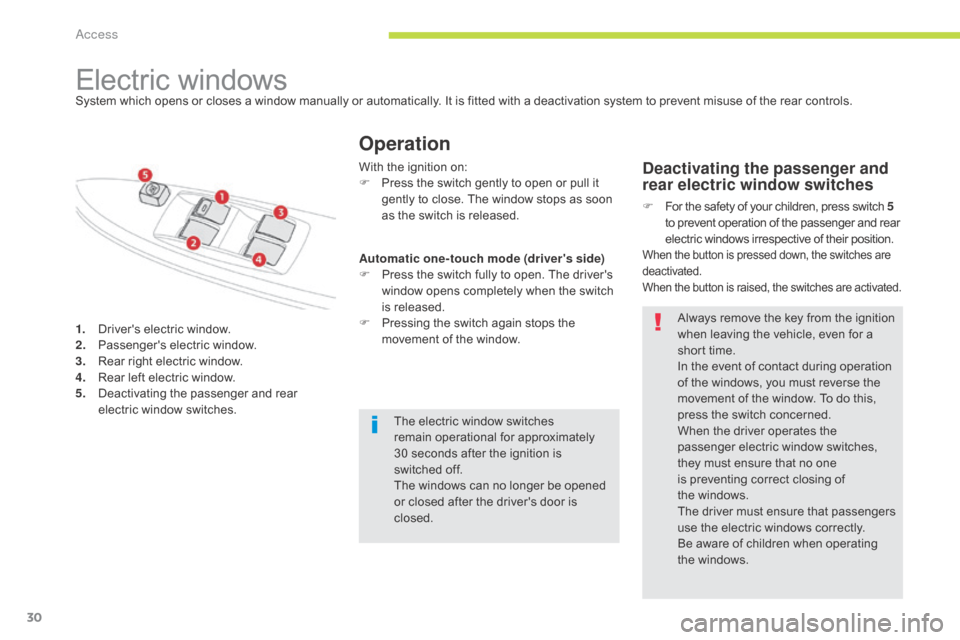
30
1. Driver's electric window.
2. Passenger's electric window.
3.
R
ear right electric window.
4.
R
ear left electric window.
5.
D
eactivating the passenger and rear
electric window switches.
Electric windows
Operation
Deactivating the passenger and
rear electric window switches
F For the safety of your children, press switch 5
to prevent operation of the passenger and rear
electric windows irrespective of their position.
When the button is pressed down, the switches are
deactivated.
When the button is raised, the switches are activated.
System which opens or closes a window manually or automatically. It is fitted with a deactivation system to prevent misuse of the rear controls.
The electric window switches
remain operational for approximately
30
seconds after the ignition is
switched
off.
The windows can no longer be opened
or closed after the driver's door is
closed.
With the ignition on:
F
P
ress the switch gently to open or pull it
gently to close. The window stops as soon
as the switch is released.
Always remove the key from the ignition
when leaving the vehicle, even for a
short time.
In the event of contact during operation
of the windows, you must reverse the
movement of the window. To do this,
press the switch concerned.
When the driver operates the
passenger electric window switches,
they must ensure that no one
is preventing correct closing of
the
w
indows.
The driver must ensure that passengers
use the electric windows correctly.
Be aware of children when operating
the windows.
Automatic one-touch mode (driver's side)
F
P
ress the switch fully to open. The driver's
window opens completely when the switch
is released.
F
P
ressing the switch again stops the
movement of the window.
Access
Page 57 of 174

55
Direction indicators
F Left: lower the lighting stalk, passing the point of resistance.
F
R
ight: raise the lighting stalk, passing the
point of resistance.
Daytime running lamps
Special daytime lighting so that the vehicle can
be seen more easily.
The daytime running lamps come on
automatically when starting the motor, if no
other lighting is on.
They cannot be deactivated.Automatic illumination of headlamps
With the main lighting control ring in the AUTO
position, the sidelamps and dipped beam headlamps
come on automatically, without any action by the
driver, when a low level of ambient light is detected.
When the light returns to a sufficient level or the
wipers are switched off, the lighting is switched off
automatically.
The sensor is located at the base of the windscreen.
Automatic illumination of
headlamps
Automatic lighting off
When the lighting stalk is in the
"AUTO" position, if the ignition switch is in
the "LOCK" or "ACC" position or if the key
has been removed, the lighting switches off
automatically when the driver's door is
opened .
Although these lamps are located in
the same unit as the front foglamp, they
operate with a specific bulb.
Their use is covered by road vehicle
lighting regulations.
In foggy weather or in snow, the
sunshine sensor may detect sufficient
light. The lighting will not come on
automatically.
Do not cover the sunshine sensor, the
associated functions will no longer be
controlled.
4
Lighting and visibility