Citroen C1 2015 1.G Owner's Manual
Manufacturer: CITROEN, Model Year: 2015, Model line: C1, Model: Citroen C1 2015 1.GPages: 271, PDF Size: 7.18 MB
Page 131 of 271
129
C1_en_Chap08_securite-enfants_ed01-2015
a: Universal child seat: child seat that can be installed in any vehicle using the vehicle's
seat belt.
b :
G
roup 0: from birth to 10 kg. Infant car
seats and "car cots" cannot be installed on
the front passenger seat.
W
hen installed on the 2
nd row, they may
prevent the use of the other seats.
c :
R
efer the legislation in force in your country
before installing your child on this seat.
d :
T
o install a child seat on a rear seat,
rear ward or for ward facing, move the
vehicle's seats in front for wards and
straighten the backrests to leave enough
space for the child seat and the child's
legs.
e :
W
hen a rear ward facing child seat is
installed on the front passenger seat ,
the passenger's front airbag must be
deactivated. Otherwise, the child would
risk being seriously injured or killed
during deployment of the airbag .
W
hen a for ward facing child seat is
installed on the front passenger seat ,
the passenger's front airbag must remain
active. Remove and stow the head restraint
before installing a child seat with a
backrest on a passenger seat. Refit the
head restraint once the child seat has
been removed.
U
:
S
eat suitable for the installation of a
universally approved child seat secured
using a seat belt, rear ward facing and/or
for ward facing, with the passenger seat
adjusted to the midway longitudinal position.
U (R) :
s
ame as for U
, with the vehicle's seat in
the fully back position and the backrest
straightened.
8
Child safety
Page 132 of 271

130
C1_en_Chap08_securite-enfants_ed01-2015
Your vehicle has been approved in accordance
with the latest ISOFIX regulation .
The seats, represented below, are fitted with
regulation ISOFIX mountings:
"ISOFIX" mountings
There are three anchorages for each seat: -
a
n anchorage B behind the seat for
fixing the upper strap, referred to as the
Top
Tether
. I t is identified by a marking.
The top tether is used to secure the upper strap
of child seats that have one. This arrangement
limits the for ward tipping of the child seat in the
event of a front impact.
This ISOFIX mounting system provides fast,
reliable and safe fitting of the child seat in your
vehicle. Follow the instructions for fitting
child seats contained in the seat
manufacturer's installation guide. The incorrect installation of a child seat
in a vehicle compromises the child's
protection in the event of an accident.
The ISOFIX child seats are fitted with
two latches which are secured on the two
anchorages A.
Some seats also have an upper strap ,
known as the Top Tether, which is attached to
anchorage B. To secure the child seat to the top tether:
-
r
emove and stow the head restraint before
installing the child seat in this seating
position (refit it once the child seat has
been removed),
-
p
ass the strap of the child seat over the
top of the seat backrest, between the
apertures for the head restraint rods,
-
f
ix the hook of the upper strap to the
anchorage B,
-
t
ighten the upper strap.
For information on the possibilities for installing
ISOFIX child seats in your vehicle, refer to the
summary table.
-
t
wo anchorages A , located between the
vehicle seat back and cushion, indicated by
a marking,
Child safety
Page 133 of 271
131
C1_en_Chap08_securite-enfants_ed01-2015
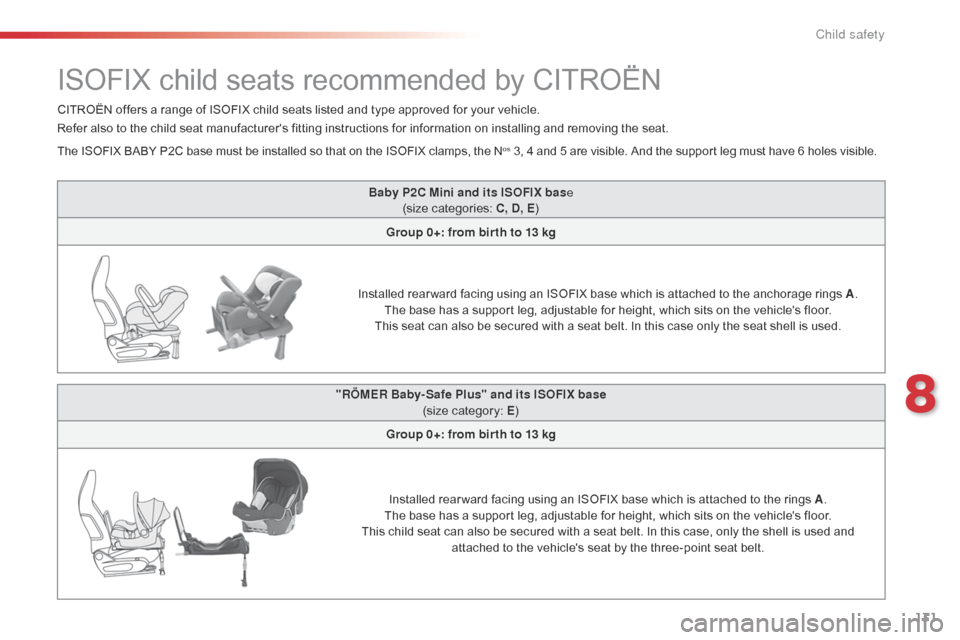
Baby P2C Mini and its ISOFIX base
(size categories: C, D, E)
Group 0+: from bir th to 13 kg
Installed rear ward facing using an ISOFIX base which is attached to the anchorage rings A .
The base has a support leg, adjustable for height, which sits on the vehicle's floor.
This seat can also be secured with a seat belt. In this case only the seat shell is used.
ISOFIX child seats recommended by CITROËN
CITROËN offers a range of ISOFIX child seats listed and type approved for your vehicle.
Refer also to the child seat manufacturer's fitting instructions for information on installing and removing the seat.
The ISOFIX BABY P2C base must be installed so that on the ISOFIX clamps, the N
os 3, 4 and 5 are visible. And the support leg must have 6 holes visible.
"RÖMER Baby- Safe Plus" and its ISOFIX base (size category: E )
Group 0+: from bir th to 13 kg
Installed rear ward facing using an ISOFIX base which is attached to the rings A .
The base has a support leg, adjustable for height, which sits on the vehicle's floor.
This child seat can also be secured with a seat belt. In this case, only the shell is used and attached to the vehicle's seat by the three-point seat belt.
8
Child safety
Page 134 of 271
132
C1_en_Chap08_securite-enfants_ed01-2015
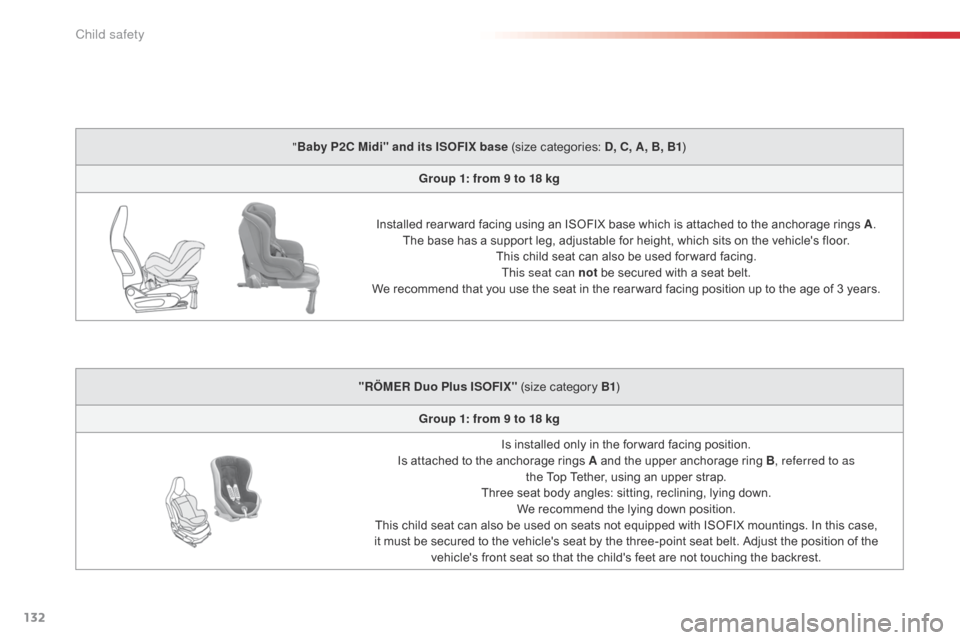
"Baby P2C Midi" and its ISOFIX base (size categories: D, C, A, B, B1 )
Group 1: from 9 to 18 kg
Installed rear ward facing using an ISOFIX base which is attached to the anchorage rings A .
The base has a support leg, adjustable for height, which sits on the vehicle's floor. This child seat can also be used for ward facing.This seat can not be secured with a seat belt.
We recommend that you use the seat in the rear ward facing position up to the age of 3 years.
"RÖMER Duo Plus ISOFIX" (size category B1 )
Group 1: from 9 to 18 kg Is installed only in the for ward facing position.
Is attached to the anchorage rings A and the upper anchorage ring B, referred to as the Top Tether, using an upper strap.
Three seat body angles: sitting, reclining, lying down. We recommend the lying down position.
This child seat can also be used on seats not equipped with ISOFIX mountings. In this case,
it must be secured to the vehicle's seat by the three-point seat belt. Adjust the position of the vehicle's front seat so that the child's feet are not touching the backrest.
Child safety
Page 135 of 271
133
C1_en_Chap08_securite-enfants_ed01-2015
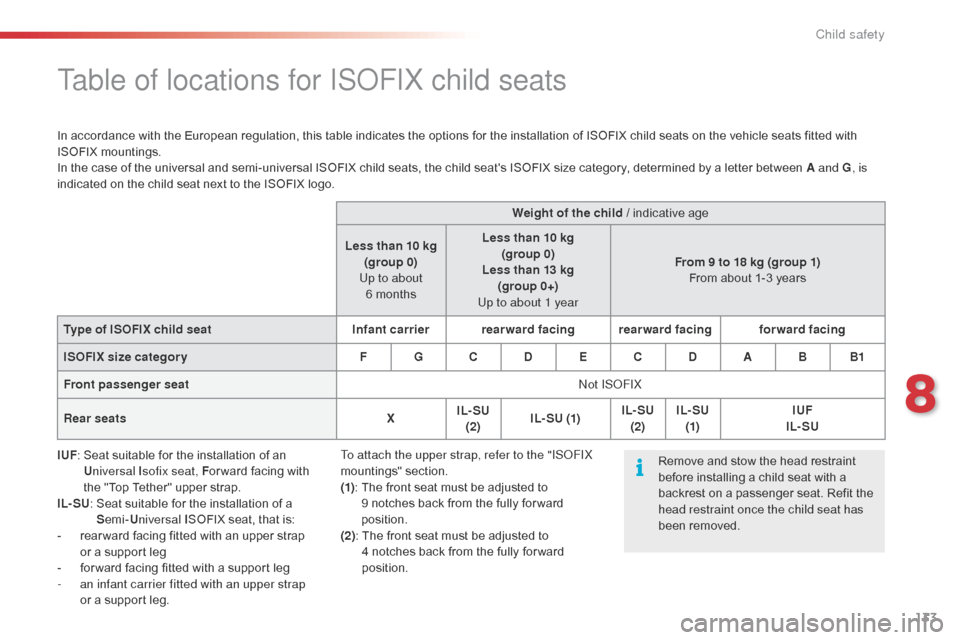
Table of locations for ISOFIX child seats
In accordance with the European regulation, this table indicates the options for the installation of ISOFIX child seats on the vehicle seats fitted with
ISOFIX mountings.
In the case of the universal and semi-universal ISOFIX child seats, the child seat's ISOFIX size category, determined by a letter between A and G, is
indicated on the child seat next to the ISOFIX logo.
IUF :
S
eat suitable for the installation of an
U niversal I sofix seat, F or ward facing with
the "Top Tether" upper strap.
IL- SU :
S
eat suitable for the installation of a
S emi- Universal I SOFIX seat, that is:
-
r
ear ward facing fitted with an upper strap
or a support leg
-
f
or ward facing fitted with a support leg
-
a
n infant carrier fitted with an upper strap
or a support leg. Weight of the child / indicative age
Less than 10 kg (group 0)
Up to about 6
monthsLess than 10 kg
(group 0)
Less than 13 kg (group 0+)
Up to about 1 year From 9 to 18 kg (group 1)
From about 1-3 years
Type of ISOFIX child seat Infant carrierrearward facing rearward facing forward facing
ISOFIX size categor y F G C D E C D ABB1
Front passenger seat Not ISOFIX
Rear seats XIL- SU
(2) I L- SU (1) IL- SU
(2) IL- SU
(1) IUF
IL- SU
Remove and stow the head restraint
before installing a child seat with a
backrest on a passenger seat. Refit the
head restraint once the child seat has
been removed.
To attach the upper strap, refer to the "ISOFIX
mountings" section.
(1)
:
T
he front seat must be adjusted to
9 notches back from the fully for ward
position.
(2):
T
he front seat must be adjusted to
4
notches back from the fully for ward
position.
8
Child safety
Page 136 of 271
134
C1_en_Chap08_securite-enfants_ed01-2015
The incorrect installation of a child seat in a
vehicle compromises the child's protection in
the event of an accident.
Check that there is no seat belt or seat belt
buckle under the child seat as this could
destabilise it.
Remember to fasten the seat belts or the
child seat harnesses keeping the slack in
relation to the child's body to a minimum,
even for short journeys.
For the installation of a child seat using a
seat belt, ensure that this is well tensioned
on the child seat and that it is holding the
child seat firmly against the seat of your
vehicle. If your front passenger seat is
adjustable, move it for ward if necessary.
At the rear seats, always leave sufficient
space between the front seat and:
-
a r
ear ward facing child seat,
-
t
he feet of a child seated in a for ward
facing child seat.
For this, move the front seat for ward and if
necessary straighten its backrest.
Recommendations on child seats
The chest part of the seat belt must be
positioned on the child's shoulder without
touching the neck.
Ensure that the lap part of the seat belt
passes correctly over the child's thighs.
CITROËN recommends the use of a booster
seat which has a back, fitted with a seat belt
guide at shoulder level.
As a safety precaution, never leave:
-
o
ne or more children alone and
unsupervised in a vehicle,
-
a c
hild or an animal in a vehicle which
is exposed to the sun, with the windows
closed,
-
t
he keys within reach of children inside
the vehicle.
To prevent accidental opening of the doors,
use the "Child lock".
Take care not to open the rear windows by
more than one third.
To protect young children from the rays of
the sun, fit side blinds on the rear windows.
The legislation on carrying a child on the
front passenger seat is specific to each
country. Refer to the legislation in force in
your country.
Deactivate the passenger's front airbag
when a rear ward facing child seat is installed
on the front seat. Other wise, the child would
risk being seriously injured or killed if the
airbag were deployed. For optimum installation of the forward facing
child seat, ensure that the back of the child
seat is as close as possible to the backrest
of the vehicle's seat, or in contact if possible.
The head restraint must be removed before
installing a child seat with a backrest on the
passenger seat.
Ensure that the head restraint is stowed or
attached securely so that it is not thrown
around the vehicle in the event of sharp
braking.
Refit the head restraint as soon as the child
seat is removed.
Installing a booster
cushion
Children at the front
Child safety
Page 137 of 271
135
C1_en_Chap08_securite-enfants_ed01-2015
Child lock
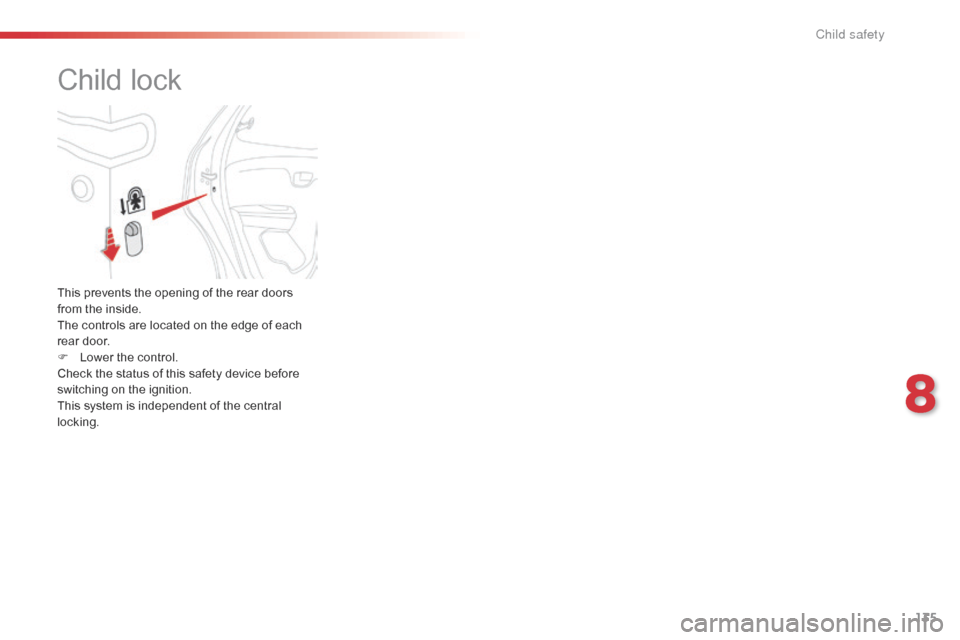
This prevents the opening of the rear doors
from the inside.
The controls are located on the edge of each
rear door.
F
L
ower the control.
Check the status of this safety device before
switching on the ignition.
This system is independent of the central
locking.
8
C
Page 138 of 271
136
C1_en_Chap09_info-pratiques_ed01-2015
Fuel tank
Low fuel levelRefuelling
When the low fuel level is reached,
this warning lamp comes on and the
last bar flashes, accompanied by an
audible signal.
You have approximately 5 litres remaining.
In certain driving conditions and depending on the
engine, the distance which can be travelled with the
fuel remaining may be less than 30 miles (50 km).
When the frequency of the flashing increases, you
have approximately 3 litres remaining .
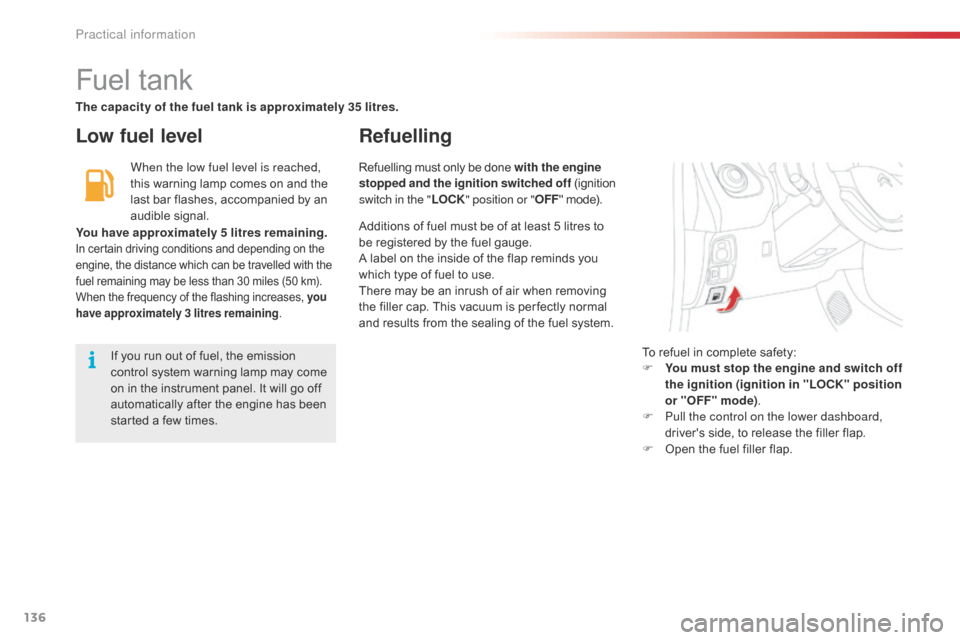
To refuel in complete safety:
F
Y ou must stop the engine and switch off
the ignition (ignition in "LOCK" position
or "OFF" mode) .
F
P
ull the control on the lower dashboard,
driver's side, to release the filler flap.
F
O
pen the fuel filler flap.
If you run out of fuel, the emission
control system warning lamp may come
on in the instrument panel. It will go off
automatically after the engine has been
started a few times. Refuelling must only be done with the engine
stopped and the ignition switched off
(ignition
switch in the " LOCK" position or " OFF" mode).
The capacity of the fuel tank is approximately 35 litres.
Additions of fuel must be of at least 5 litres to
be registered by the fuel gauge.
A label on the inside of the flap reminds you
which type of fuel to use.
There may be an inrush of air when removing
the filler cap. This vacuum is per fectly normal
and results from the sealing of the fuel system.
Practical information
Page 139 of 271
137
C1_en_Chap09_info-pratiques_ed01-2015
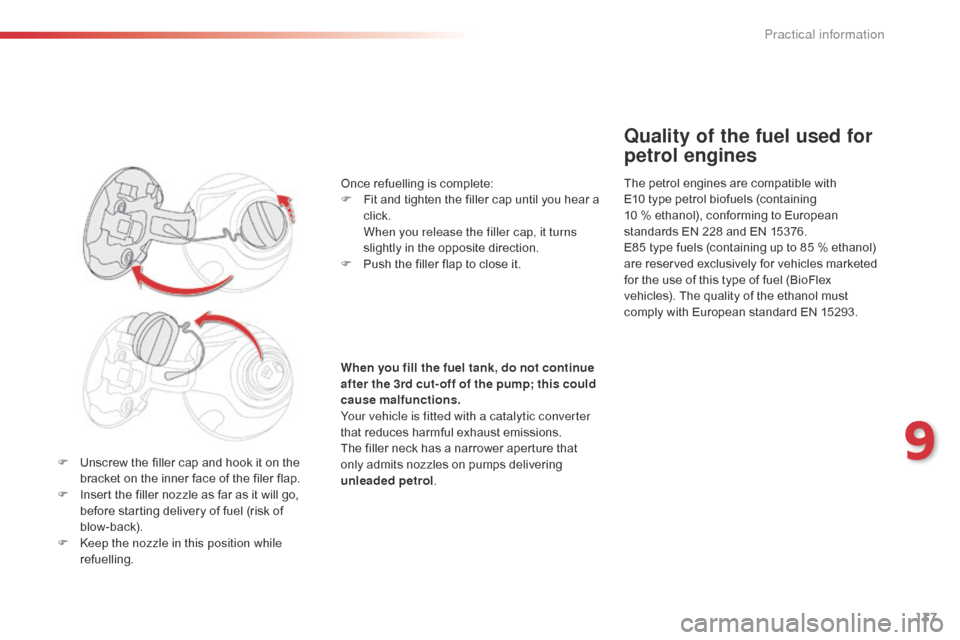
F Unscrew the filler cap and hook it on the bracket on the inner face of the filer flap.
F
I
nsert the filler nozzle as far as it will go,
before starting delivery of fuel (risk of
blow- back).
F
K
eep the nozzle in this position while
refuelling.
Quality of the fuel used for
petrol engines
The petrol engines are compatible with
E10 type petrol biofuels (containing
10 % ethanol), conforming to European
standards EN 228 and EN 15376.
E85 type fuels (containing up to 85 % ethanol)
are reserved exclusively for vehicles marketed
for the use of this type of fuel (BioFlex
vehicles). The quality of the ethanol must
comply with European standard EN 15293.
Once refuelling is complete:
F
F
it and tighten the filler cap until you hear a
click.
W
hen you release the filler cap, it turns
slightly in the opposite direction.
F
P
ush the filler flap to close it.
When you fill the fuel tank, do not continue
after the 3rd cut- off of the pump; this could
cause malfunctions.
Your vehicle is fitted with a catalytic converter
that reduces harmful exhaust emissions.
The filler neck has a narrower aperture that
only admits nozzles on pumps delivering
unleaded petrol .
9
Practical information
Page 140 of 271
138
C1_en_Chap09_info-pratiques_ed01-2015
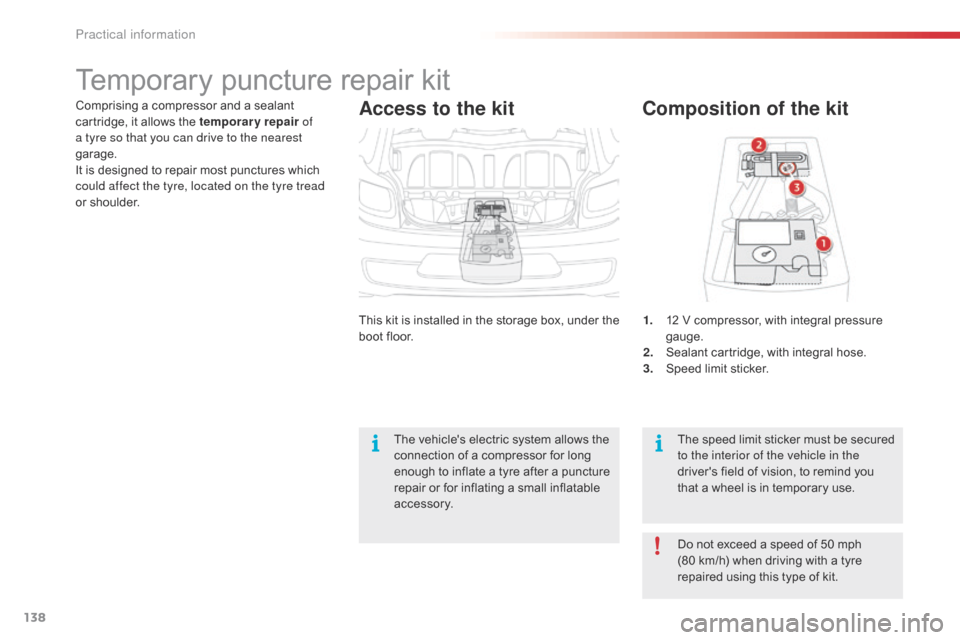
Comprising a compressor and a sealant
cartridge, it allows the temporary repair of
a tyre so that you can drive to the nearest
garage.
It is designed to repair most punctures which
could affect the tyre, located on the tyre tread
or shoulder.
Temporary puncture repair kit
Composition of the kit
1. 12 V compressor, with integral pressure gauge.
2.
S
ealant cartridge, with integral hose.
3.
S
peed limit sticker.
The speed limit sticker must be secured
to the interior of the vehicle in the
driver's field of vision, to remind you
that a wheel is in temporary use.
This kit is installed in the storage box, under the
boot floor.
The vehicle's electric system allows the
connection of a compressor for long
enough to inflate a tyre after a puncture
repair or for inflating a small inflatable
accessory. Do not exceed a speed of 50 mph
(80 km/h) when driving with a tyre
repaired using this type of kit.
Access to the kit
Practical information