tow Citroen C1 RHD 2015 1.G Owner's Manual
[x] Cancel search | Manufacturer: CITROEN, Model Year: 2015, Model line: C1 RHD, Model: Citroen C1 RHD 2015 1.GPages: 260, PDF Size: 6.35 MB
Page 5 of 260
.
.
Direction indicators 101
Horn
10
1
Hazard warning lamps
1
02
Under-inflation detection
1
02
ESC system
1
05
Active City Brake
1
08
Seat belts
1
13
Airbags
1
16
Safety
Child seats 121
Deactivating the passenger's front airbag
1
24
ISOFIX child seats
1
30
Child lock
1
35
Child safety Checks
Fuel tank 1
36
Temporary puncture
repair kit
1
38
Changing a wheel
1
43
Snow chains
1
48
Changing a bulb
1
49
Changing a fuse
1
54
12 V battery
1
63
Electrical energy economy mode
1
66
Changing a wiper blade
1
66
Towing the vehicle
1
67
Fitting roof bars
1
68
Accessories
1
69
Practical information Technical data
7-inch touch screen tablet 183
Audio system
2
23
Audio and telematics
Visual search
Alphabetical index
B o n n et 17 2
Petrol engines
1
73
Checking levels
1
74
C h e c ks
17
7Engines
1
79
Weights
18
0
Dimensions
1
81
Identification markings
1
82
Contents
Page 10 of 260
8
Optimise the use of your gearbox
With a manual gearbox, move off gently and change up without waiting.
During acceleration change up early.
With an ETG electronic gearbox, give preference to automatic (Easy)
mode and avoid pressing the accelerator pedal heavily or suddenly.
Control the use of your electrical
equipment
Before moving off, if the passenger compartment is too warm, ventilate it
by opening the windows and air vents before using the air conditioning.
Above 30 mph (50 km/h), close the windows and leave the air vents
open.
Remember to make use of equipment that can help keep the
temperature in the passenger compartment down (sunroof and window
blinds...).
Switch off the air conditioning, unless it has automatic regulation, as
soon as the desired temperature is attained.
Switch off the demisting and defrosting controls, if not automatic.
Switch off the heated seat as soon as possible.
Switch off the headlamps and front foglamps when the level of light
does not require their use.
Avoid running the engine before moving off, particularly in winter; your
vehicle will warm up much faster while driving.
As a passenger, if you avoid connecting your multimedia devices
(film, music, video game...), you will contribute towards limiting the
consumption of electrical energy, and so of fuel.
Disconnect your portable devices before leaving the vehicle.
Eco-driving
Eco-driving is a range of everyday practices that allow the motorist to optimise their fuel consumption and CO2 emissions.
The gear efficiency indicator invites you engage the most suitable gear:
as soon as the indication is displayed in the instrument panel, follow it
straight away.
For vehicles fitted with an ETG electronic gearbox, this indicator
appears only in manual mode.
Drive smoothly
Maintain a safe distance between vehicles, use engine braking rather
than the brake pedal, and press the accelerator progressively. These
practices contribute towards a reduction in fuel consumption and
CO
2 emissions and also helps reduce the background traffic noise.
Eco-driving
Page 22 of 260
20
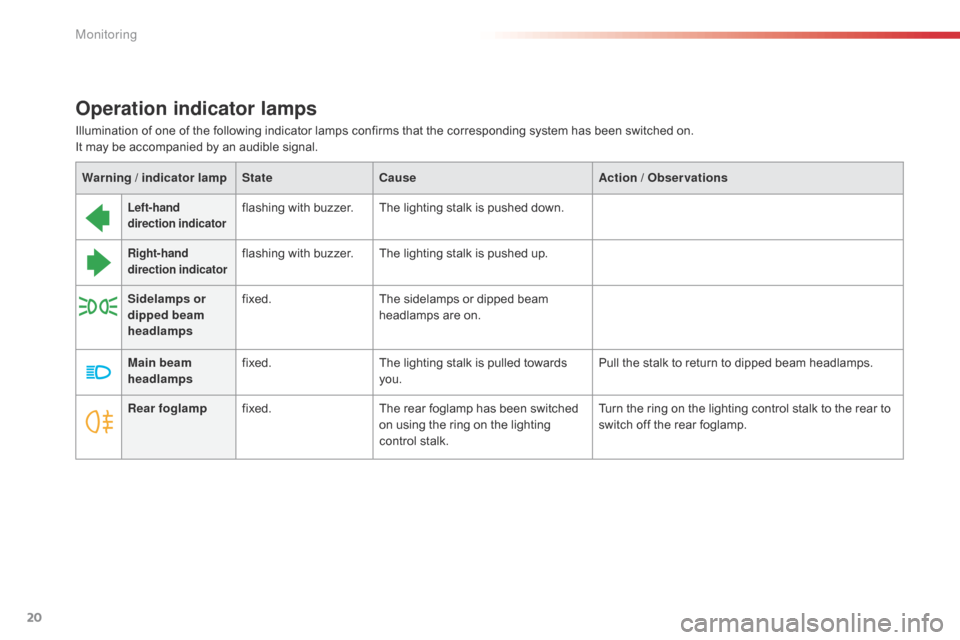
Operation indicator lamps
Left-hand
direction indicatorflashing with buzzer.The lighting stalk is pushed down.
Right-hand
direction indicatorflashing with buzzer.The lighting stalk is pushed up.
Sidelamps or
dipped beam
headlamps fixed.
The sidelamps or dipped beam
headlamps are on.
Main beam
headlamps fixed.
The lighting stalk is pulled towards
you. Pull the stalk to return to dipped beam headlamps.
Warning
/ indicator lamp
State Cause Action
/ Observations
Illumination of one of the following indicator lamps confirms that the corresponding system has been switched on.
It may be accompanied by an audible signal.
Rear foglamp fixed. The rear foglamp has been switched
on using the ring on the lighting
control stalk. Turn the ring on the lighting control stalk to the rear to
switch off the rear foglamp.
Monitoring
Page 32 of 260
30
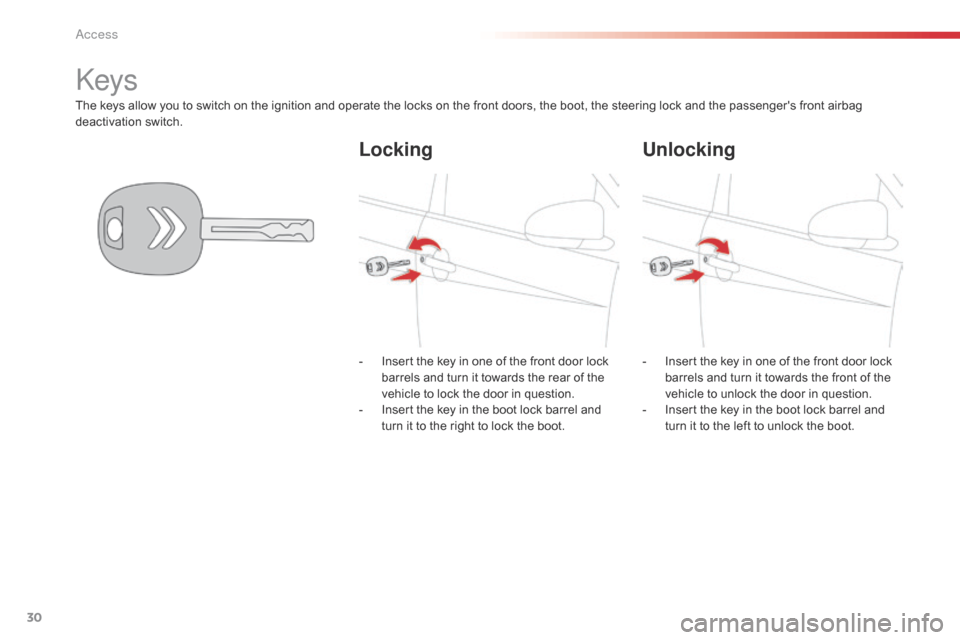
The keys allow you to switch on the ignition and operate the locks on the front doors, the boot, the steering lock and the passenger's front airbag
d eactivation switch.
Keys
Locking Unlocking
- Insert the key in one of the front door lock
barrels and turn it towards the rear of the
vehicle to lock the door in question.
-
I
nsert the key in the boot lock barrel and
turn it to the right to lock the boot. -
I nsert the key in one of the front door lock
barrels and turn it towards the front of the
vehicle to unlock the door in question.
-
I
nsert the key in the boot lock barrel and
turn it to the left to unlock the boot.
Access
Page 37 of 260
35
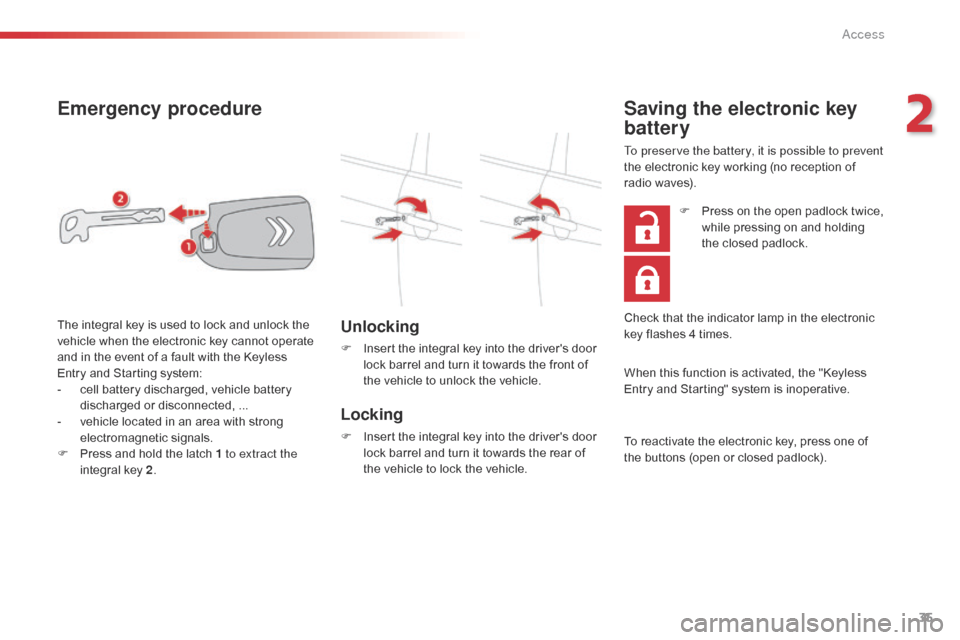
Emergency procedure
Unlocking
F Insert the integral key into the driver's door lock barrel and turn it towards the front of
the vehicle to unlock the vehicle.
Locking
F Insert the integral key into the driver's door lock barrel and turn it towards the rear of
the vehicle to lock the vehicle.
The integral key is used to lock and unlock the
vehicle when the electronic key cannot operate
and in the event of a fault with the Keyless
Entry and Starting system:
-
c
ell battery discharged, vehicle battery
discharged or disconnected, ...
-
v
ehicle located in an area with strong
electromagnetic signals.
F
P
ress and hold the latch 1 to extract the
integral key 2 .
Saving the electronic key
battery
To preserve the battery, it is possible to prevent
the electronic key working (no reception of
radio waves).
When this function is activated, the "Keyless
Entry and Starting" system is inoperative.
To reactivate the electronic key, press one of
the buttons (open or closed padlock).F
P
ress on the open padlock twice,
while pressing on and holding
the closed padlock.
Check that the indicator lamp in the electronic
key flashes 4 times.
2
Access
Page 48 of 260
46
Ensure that no person or object
prevents the seat slide from returning to
its initial position.
Check that the seat belt has reeled in
correctly so as to not impede access for
passengers to the rear seats.
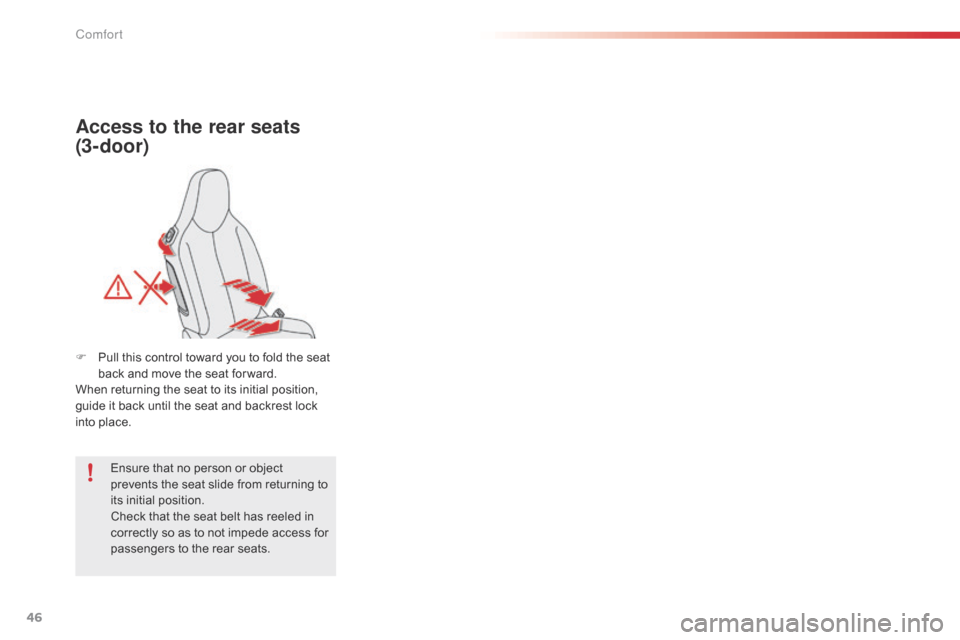
Access to the rear seats
(3-door)
F Pull this control toward you to fold the seat back and move the seat for ward.
When returning the seat to its initial position,
guide it back until the seat and backrest lock
into place.
Comfort
Page 49 of 260
47
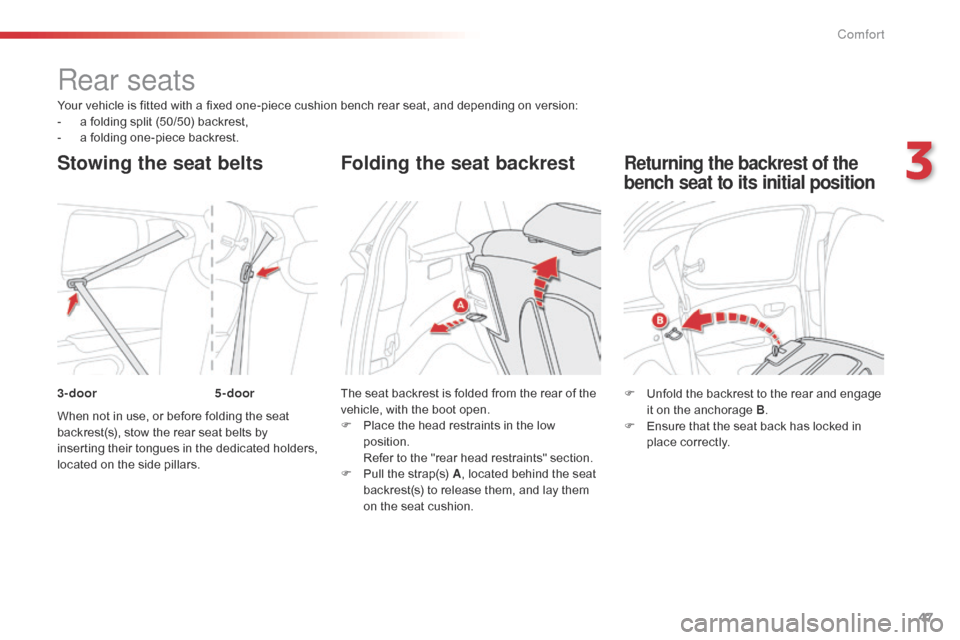
Your vehicle is fitted with a fixed one-piece cushion bench rear seat, and depending on version:
- a f olding split (50/50) backrest,
-
a f
olding one-piece backrest.
When not in use, or before folding the seat
backrest(s), stow the rear seat belts by
inserting their tongues in the dedicated holders,
located on the side pillars. The seat backrest is folded from the rear of the
vehicle, with the boot open.
F
P
lace the head restraints in the low
position.
R
efer to the "rear head restraints" section.
F
P
ull the strap(s) A, located behind the seat
backrest(s) to release them, and lay them
on the seat cushion.
Rear seats
Stowing the seat belts Folding the seat backrest
F Unfold the backrest to the rear and engage it on the anchorage B .
F
E
nsure that the seat back has locked in
place correctly.
Returning the backrest of the
bench seat to its initial position
3-door 5-door
3
Comfort
Page 58 of 260
56
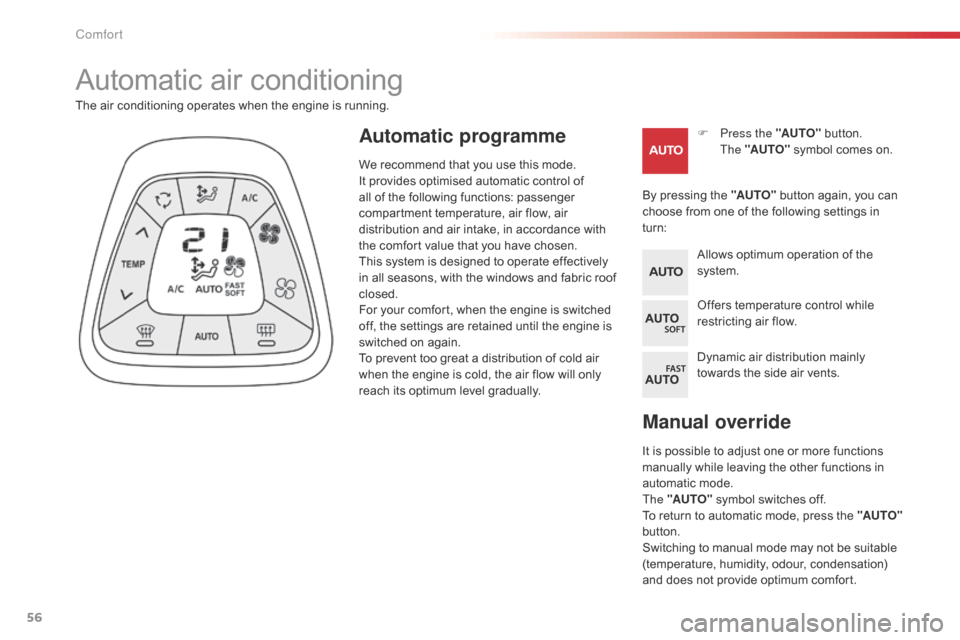
Manual override
It is possible to adjust one or more functions
manually while leaving the other functions in
automatic mode.
The "AUTO" symbol switches off.
To return to automatic mode, press the "AUTO"
button.
Switching to manual mode may not be suitable
(temperature, humidity, odour, condensation)
and does not provide optimum comfort.
Automatic air conditioning
F Press the "AUTO" button.
The "AUTO" symbol comes on.
The air conditioning operates when the engine is running.
By pressing the "AUTO" button again, you can
choose from one of the following settings in
turn:Automatic programme
Allows optimum operation of the
system.
Offers temperature control while
restricting air flow.
Dynamic air distribution mainly
towards the side air vents.
We recommend that you use this mode.
It provides optimised automatic control of
all of the following functions: passenger
compartment temperature, air flow, air
distribution and air intake, in accordance with
the comfort value that you have chosen.
This system is designed to operate effectively
in all seasons, with the windows and fabric roof
closed.
For your comfort, when the engine is switched
off, the settings are retained until the engine is
switched on again.
To prevent too great a distribution of cold air
when the engine is cold, the air flow will only
reach its optimum level gradually.
Comfort
Page 61 of 260
59
Front demist - defrost
These markings on the control panels indicate the control positions for rapid demisting or defrosting of the windscreen and side windows.
During the winter period, direct the side air vents towards the side glasses to optimise their demisting and defrosting.
With the heating /
ventilation system
F Put the temperature and air flow controls to the dedicated marked position.
F
P
ut the air distribution control to the
"Windscreen" position.
With the manual air
conditioning system
F Put the temperature and air flow controls to the dedicated marked position.
F
P
ut the air intake control to the "Exterior air
intake" position
(
manual control to the right).
F
P
ut the air distribution control to the
"Windscreen" position.
F
S
witch on the air conditioning by pressing
the appropriate button; the indicator lamp
in the button comes on.
With the automatic air
conditioning system
F Press this button. T he indicator lamp in the button comes on.
F
P
ress this button again to switch it off.
T
he indicator lamp in the button goes off.
Other settings (air flow, air
distribution...) are controlled
automatically.
3
Comfort
Page 67 of 260
65
Rear parcel shelf
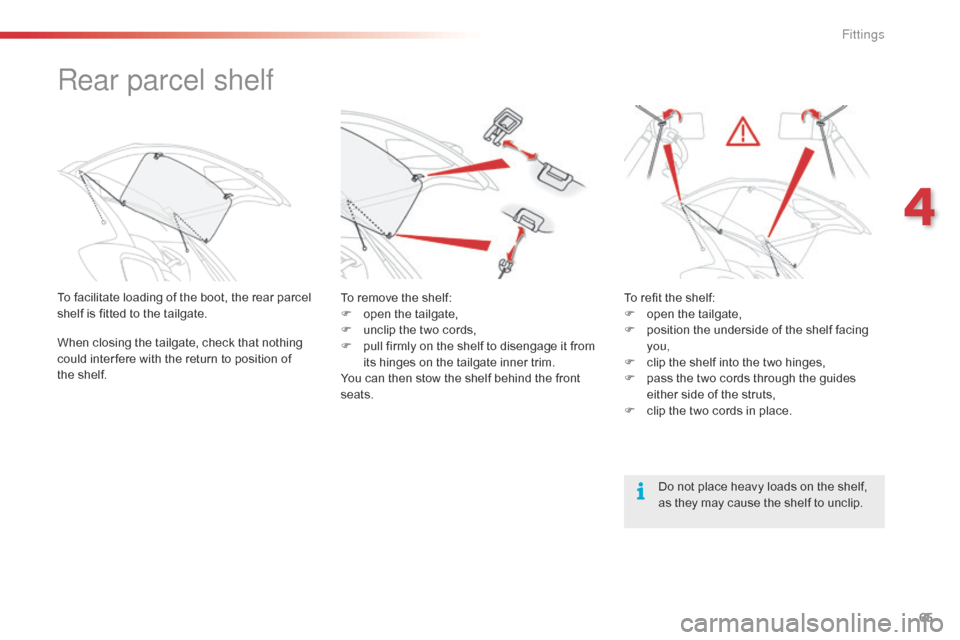
To facilitate loading of the boot, the rear parcel
shelf is fitted to the tailgate.
When closing the tailgate, check that nothing
could inter fere with the return to position of
the
s
helf.
Do not place heavy loads on the shelf,
as they may cause the shelf to unclip.
To remove the shelf:
F
o
pen the tailgate,
F
u
nclip the two cords,
F
p
ull firmly on the shelf to disengage it from
its hinges on the tailgate inner trim.
You can then stow the shelf behind the front
seats. To refit the shelf:
F
o
pen the tailgate,
F
p
osition the underside of the shelf facing
you,
F
c
lip the shelf into the two hinges,
F
p
ass the two cords through the guides
either side of the struts,
F
c
lip the two cords in place.
4
Fittings