tow Citroen C1 RHD 2015 1.G Owner's Guide
[x] Cancel search | Manufacturer: CITROEN, Model Year: 2015, Model line: C1 RHD, Model: Citroen C1 RHD 2015 1.GPages: 260, PDF Size: 6.35 MB
Page 144 of 260

142
Should the pressure of one or more
tyres be adjusted, it is necessary to
reinitialise the under-inflation detection
system.
Refer to the "Under-inflation detection"
section.
Tyre under-inflation
detection
After repair of the tyre, the warning
lamp will remain on until the system is
reinitialised.
For more information, refer to the
"Under-inflation detection" section.
F
S
tart the compressor by placing the switch
at the " I" position and adjust the pressure
to the value shown on the vehicle's tyre
pressure label.
T
o deflate: press the black button on the
compressor pipe, at the valve connector.
F
O
nce the correct pressure is reached, put
the switch to the " O" position.
F
R
emove the kit then stow it.
Practical information
Page 146 of 260

144
Access to the spare wheel
and tools
Tools provided
The following tools are installed in a carrier,
located in the centre of the spare wheel:
1.
Wheelbrace
2.
J
ack with handle
3.
R
emovable towing eye.
Refer to the "Towing the vehicle" section.
Tyre pressures
These are indicated on the label affixed to the
middle pillar of the left door, driver's side.
Refer to the "Identification markings" section. All of these tools are specific to your
vehicle and can vary according to
equipment. Do not use them for any
other purposes.
Never go underneath a vehicle
supported only by a jack (use an axle
stand).
Never use a jack other than the one
listed by the manufacturer. If your
vehicle does not have one, contact
a CITROËN dealer or a qualified
workshop to obtain the correct jack for
your vehicle.
Depending on version, the spare wheel and
tools are stowed in the boot under the floor.
F
R
emove the boot carpet.
F
R
emove the tool carrier.
F
S
lacken the central wheel retaining bolt.
F
R
emove the wheel.
Practical information
Page 151 of 260

149
Changing a bulb
Front lamps
1. Sidelamps (W5W).
2. Direction indicators (PY21W amber).
3.
D
ipped beam headlamps (H7-55W).
4.
M
ain beam headlamps (H7-55W).
5.
L
ED* daytime running lamps. In some weather conditions (e.g. low
temperature or humidity), the presence
of misting on the internal sur face of the
glass of the headlamps and rear lamps
is normal; it disappears after the lamps
have been on for a few minutes.
The headlamps are fitted with
polycarbonate glass with a protective
coating:
F
d
o not clean them using a dr y
or abrasive cloth, nor with a
detergent or solvent product,
F
u
se a sponge and soapy water or a
pH neutral product,
F
w
hen using a high pressure washer
on persistent marks, do not keep
the lance directed towards the
lamps or their edges for too long,
so as not to damage their protective
coating and seals.
Changing a bulb should only be done
after the headlamp has been switched
off for several minutes (risk of serious
burns).
F
D
o not touch the bulb directly with
your fingers, use a lint-free cloth.
It is imperative to use only anti-
ultraviolet (UV) type bulbs to avoid
damaging the headlamp.
Always replace a failed bulb with a
new bulb with the same type and
specification.
* LED: light-emitting diodes.
9
Practical information
Page 155 of 260

153
Number plate lamps (W5W)
F Insert a thin screwdriver into one of the cutouts in the the lens.
F
P
ush it outwards to unclip it.
F
R
emove the lens.
F
C
hange the faulty bulb.
Third brake lamp
(4 W5W bulbs)
F With the boot open, unclip the plastic cover.
F P ress the metal clips to disengage the lamp.
F
R
emove the lamp via the exterior of the
tailgate.
F
R
emove the bulb-holder by squeezing the
plastic catches.
F
C
hange the failed bulb(s).
Direction indicator side repeaters
(WY 5W amber)
F Push the repeater for wards or rear wards and detach it by pulling towards you.
F
D
isconnect the bulb holder and change it.
To refit, press on the lens to clip it in place. To refit, carry out these operations in reverse
o r d e r.
9
Practical information
Page 168 of 260

166
Electrical energy economy mode*
System which manages the duration of use of certain functions to conserve a sufficient level of
charge in the battery.
After the engine has stopped, you can still use functions such as the audio system, windscreen
wipers, dipped beam headlamps,
courtesy lamps, etc. for a maximum combined duration of
twenty
m
inutes.
This period may be greatly reduced if the battery is not fully charged.
Let the engine run for the duration
specified to ensure that the battery
charge is sufficient.
Do not repeatedly and continuously
restart the engine in order to charge the
battery.
A flat battery prevents the engine from
starting.
Refer to the "Battery" section.
Switching to economy mode
Once this time has elapsed the active functions
are put on standby.
Exiting economy mode
These functions are reactivated automatically
next time the vehicle is driven.
To restore the use of these functions
immediately, start the engine and let it run for at
least 5 minutes.
Changing a wiper
blade
Removing the front wiper blade
F Raise the wiper arm.
F R emove the wiper blade, sliding it towards
the outside.
Fitting the front wiper blade
F Put the corresponding new wiper blade in place and fix it.
F
F
old down the wiper arm carefully.
To conserve the effectiveness of
the flat-blade type wiper blades, we
recommend that they are:
-
h
andled with care,
-
c
leaned regularly with soapy water,
-
n
ot used to hold a cardboard sheet
against the windscreen,
-
r
eplaced at the first signs of wear.
*
O
nly on vehicles with the "Keyless Entry and
Starting" system.
Practical information
Page 169 of 260
167
Towing the vehicle
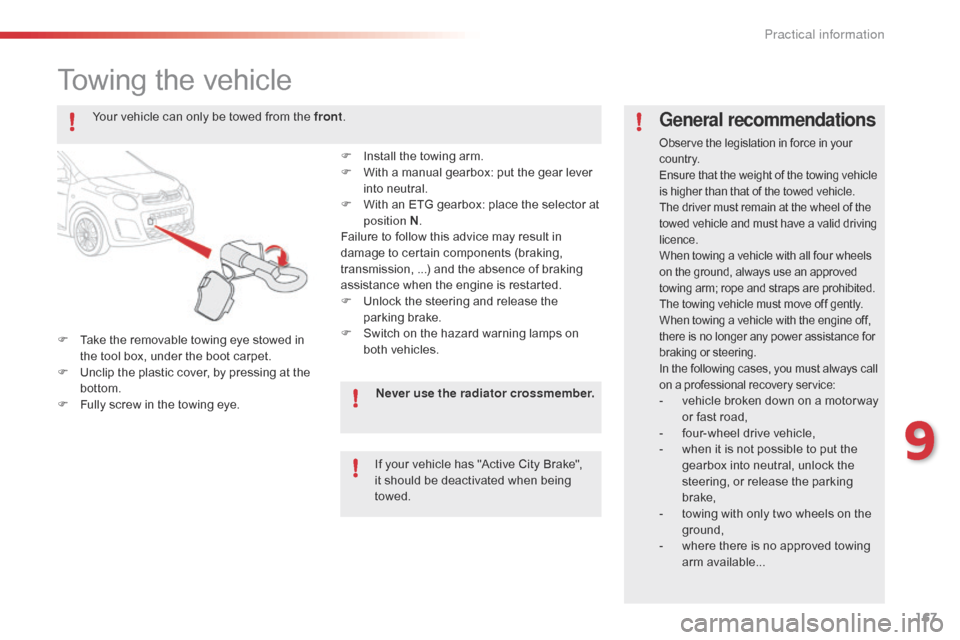
F Take the removable towing eye stowed in the tool box, under the boot carpet.
F
U
nclip the plastic cover, by pressing at the
bottom.
F
F
ully screw in the towing eye.
General recommendations
Observe the legislation in force in your
c o unt r y.
Ensure that the weight of the towing vehicle
is higher than that of the towed vehicle.
The driver must remain at the wheel of the
towed vehicle and must have a valid driving
licence.
When towing a vehicle with all four wheels
on the ground, always use an approved
towing arm; rope and straps are prohibited.
The towing vehicle must move off gently.
When towing a vehicle with the engine off,
there is no longer any power assistance for
braking or steering.
In the following cases, you must always call
on a professional recovery service:
- vehicle broken down on a motor way or fast road,
-
f
our-wheel drive vehicle,
-
w
hen it is not possible to put the
gearbox into neutral, unlock the
steering, or release the parking
brake,
-
t
owing with only two wheels on the
ground,
-
w
here there is no approved towing
arm available...
Your vehicle can only be towed from the front
.
F
I
nstall the towing arm.
F
W
ith a manual gearbox: put the gear lever
into neutral.
F
W
ith an ETG gearbox: place the selector at
position N .
Failure to follow this advice may result in
damage to certain components (braking,
transmission, ...) and the absence of braking
assistance when the engine is restarted.
F
U
nlock the steering and release the
parking brake.
F
S
witch on the hazard warning lamps on
both vehicles.
Never use the radiator crossmember.
If your vehicle has "Active City Brake",
it should be deactivated when being
towed.
9
Practical information
Page 173 of 260
171
TOTAL & CITROËN
Partners in performance and
protecting the environment
Innovation in the search for
performance
For over 40 year, the TOTAL Research and
Development departments have developed lubricants
for CITROËN, to match the latest technical innovations
on CITROËN vehicles, both for competition and for
everyday motoring.
For you, this is an assurance that you will obtain the
best per formance from your engine.
Optimum protection for
your engine
By having your CITROËN vehicle
serviced with TOTAL lubricants, you are
contributing towards improving the life
and per formance of your engine, while
also protecting the environment.
10
Checks
Page 174 of 260
172
Bonnet
Do not open the bonnet when there is a
very strong wind.
When the engine is hot, handle the
exterior safety catch and the stay with
care (risk of burns).
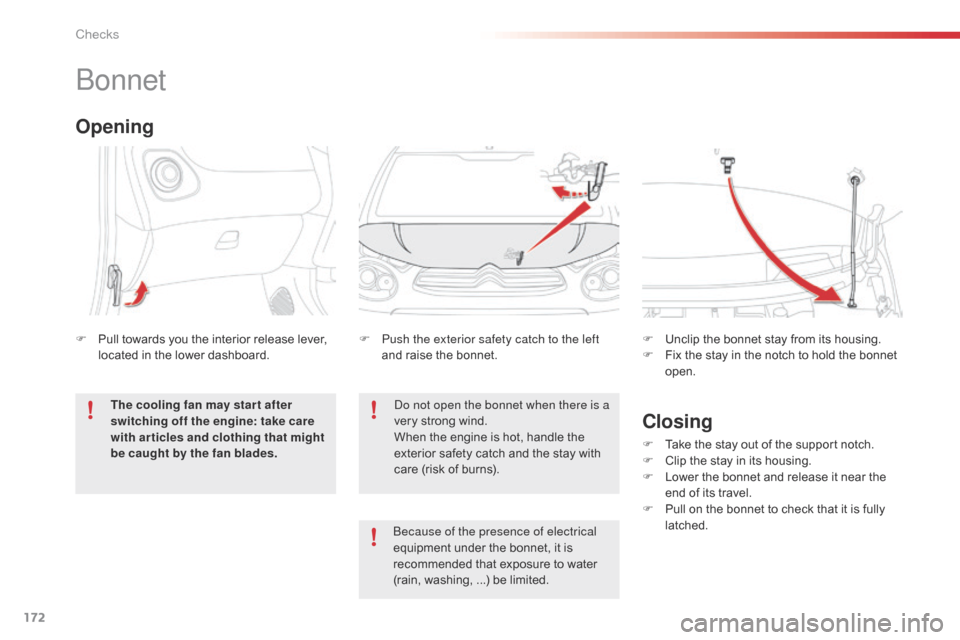
F
P
ush the exterior safety catch to the left
and raise the bonnet. F
U
nclip the bonnet stay from its housing.
F
F
ix the stay in the notch to hold the bonnet
open.
Opening
F Pull towards you the interior release lever, located in the lower dashboard.
The cooling fan may star t after
switching off the engine: take care
with articles and clothing that might
be caught by the fan blades.
Closing
F Take the stay out of the support notch.
F C lip the stay in its housing.
F
L
ower the bonnet and release it near the
end of its travel.
F
P
ull on the bonnet to check that it is fully
latched.
Because of the presence of electrical
equipment under the bonnet, it is
recommended that exposure to water
(rain, washing, ...) be limited.
Checks
Page 180 of 260
178
ETG gearbox
The ETG gearbox does not require
any maintenance (no oil change).
Refer to the manufacturer's service
schedule for information on when this
unit should be checked.
Brake wear depends on the style
of driving, particularly in the case
of vehicles used in town, over short
distances. It may be necessary to
Brake pads
For information on checking brake
disc wear, contact a CITROËN dealer
or a qualified workshop.
Brake disc wearOnly use products recommended by
CITROËN or products of equivalent
quality and specification.
In order to optimise the operation of
units as important as those in the
braking system, CITROËN selects and
offers very specific products.
After washing the vehicle, dampness,
or in wintry conditions, ice can form
on the brake discs and pads: braking
efficiency may be reduced. Make light
brake applications to dry and defrost
the brakes.
Parking brake
If excessive travel or a loss of
effectiveness of this system is
noticed, the parking brake must be
checked, even between two
ser
vices.
Checking this system must be done by a
CITROËN dealer or a qualified workshop.
have the condition of the brakes checked, even
between vehicle services.
Unless there is a leak in the circuit, a drop in
the brake fluid level indicates that the brake
pads are worn.
Checks
Page 182 of 260
180
EngineVTi 68VTi 68 S&SPureTech 82
Gearbox Manual
(5 - speed) ETG electronic
(5 - speed) Manual
(5 - speed) Manual
(5 - speed)
Model code:
P... SCFBB
SCFBC ...B1A
...H1A ...P1A
...W1A SCFBB
SCFBC ...B1C
...H1C ...P1C
...W1C SCFB2
SCFB3 ...B1B
...H1B ...P1B
...W1B AHMTB
AHMTC ...B1A
...H1A ...P1A
...W1A
Kerb weight 840860 855865
Unladen weiight* 915935 930940
Gross vehicle weight (GV W) 1 2401 2401 2401 240
Gross train weight (GTW) 1 2401 2401 2401 240
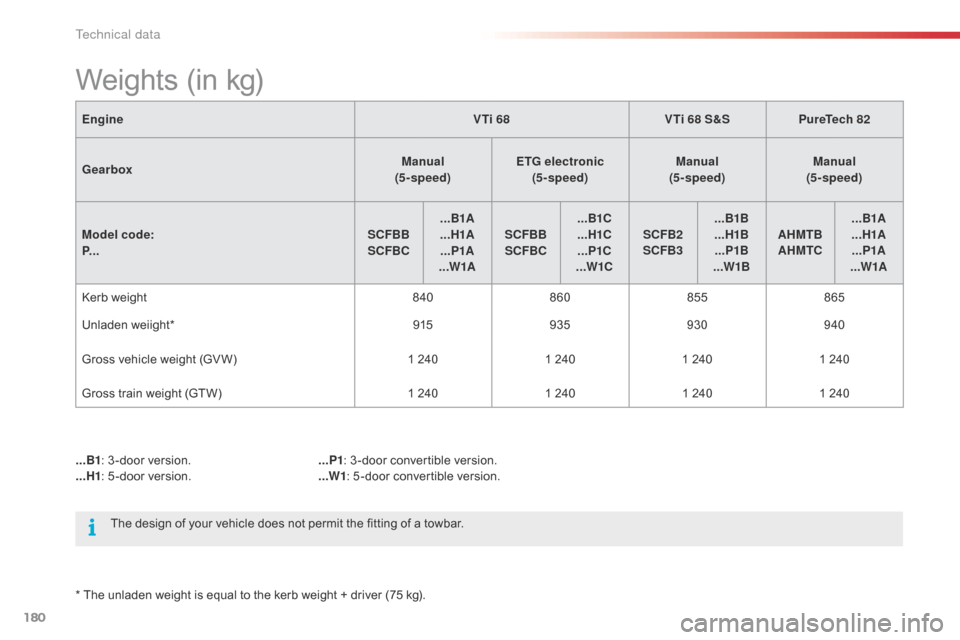
Weights (in kg)
The design of your vehicle does not permit the fitting of a towbar.
* The unladen weight is equal to the kerb weight + driver (75 kg). ...B1 : 3 -door version.
...H1 : 5 -door version. ...P1
: 3 -door convertible version.
...W1 : 5 -door convertible version.
Technical data