changing a Citroen C3 2015 2.G Owner's Guide
[x] Cancel search | Manufacturer: CITROEN, Model Year: 2015, Model line: C3, Model: Citroen C3 2015 2.GPages: 401, PDF Size: 13.04 MB
Page 182 of 401

180
Changing main beam headlamp
bulbs
F Remove the protective cover by pulling on the tab.
F
d
i
sconnect the bulb connector.
F
S
pread the springs to release the bulb.
F
R
emove the bulb and change it.
To refit, carry out these operations in reverse
o r d e r.
Changing sidelamp bulbs
F Remove the protective cover by pulling on the tab.
F
P
ull the bulb holder pressing on the tabs on
both sides.
F
P
ull the bulb and change it.
To refit, carry out these operations in reverse
o r d e r.
Practical information
Page 183 of 401
181
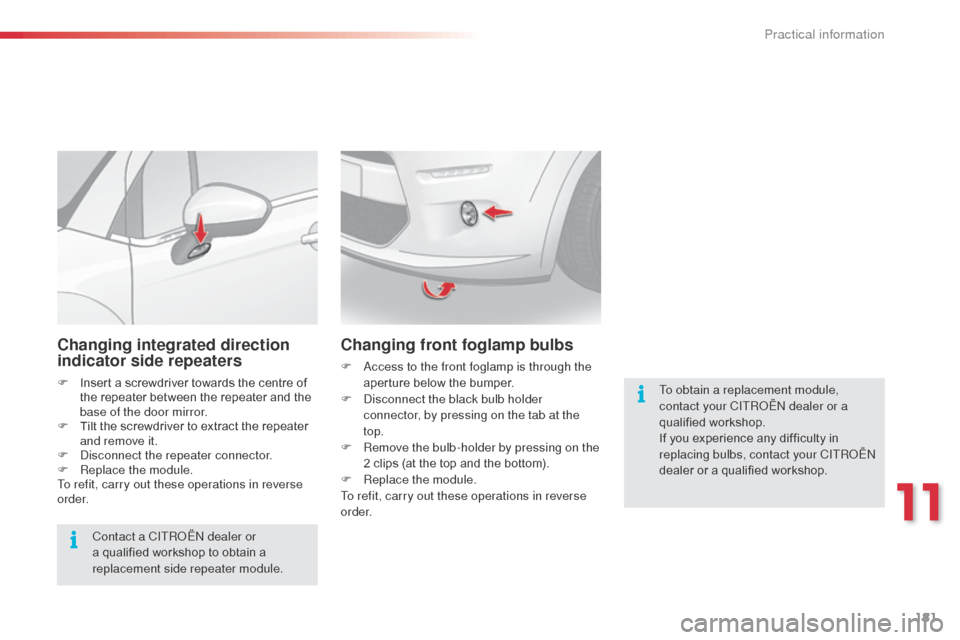
Changing integrated direction
indicator side repeaters
F Insert a screwdriver towards the centre of the repeater between the repeater and the
base of the door mirror.
F
T
ilt the screwdriver to extract the repeater
and remove it.
F
d
i
sconnect the repeater connector.
F
R
eplace the module.
To refit, carry out these operations in reverse
o r d e r.
Contact a CITR
oËn
dealer or
a qualified workshop to obtain a
replacement side repeater module.
Changing front foglamp bulbs
F access to the front foglamp is through the aperture below the bumper.
F
d
i
sconnect the black bulb holder
connector, by pressing on the tab at the
top.
F
R
emove the bulb-holder by pressing on the
2 clips (at the top and the bottom).
F
R
eplace the module.
To refit, carry out these operations in reverse
o r d e r. To obtain a replacement module,
contact your CITR
oËn
dealer or a
qualified workshop.
If you experience any difficulty in
replacing bulbs, contact your CITR
oËn
dealer or a qualified workshop.
11
Practical information
Page 184 of 401
182
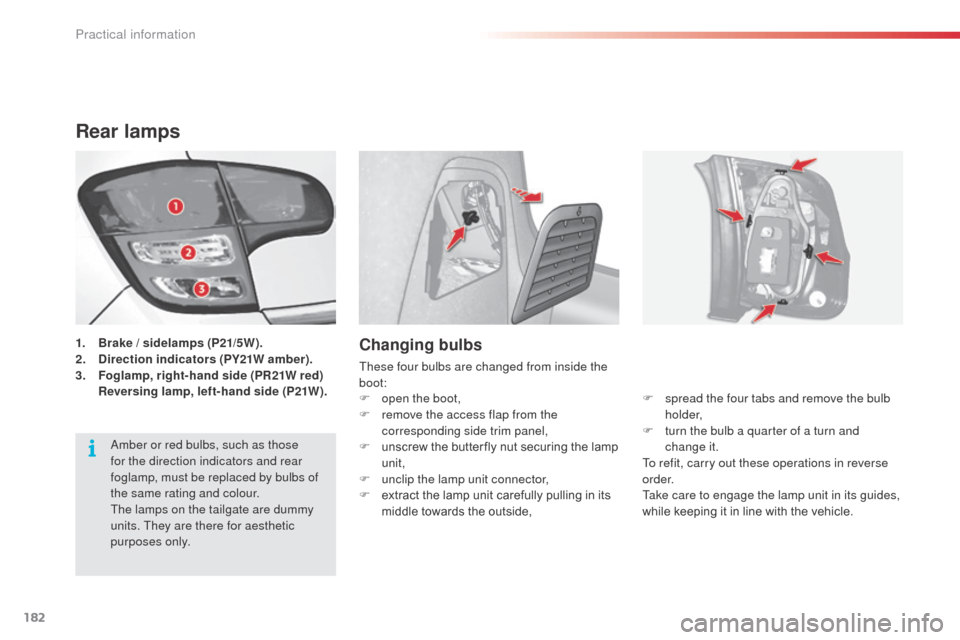
Rear lamps
1. Brake / sidelamps (P21/5W).
2. D irection indicators (PY21W amber).
3.
F
oglamp, right-hand side (PR21W red)
R
eversing lamp, left-hand side (P21W).Changing bulbs
These four bulbs are changed from inside the
boot: F
s
pread the four tabs and remove the bulb
h o l d e r,
F
t
urn the bulb a quarter of a turn and
change it.
To refit, carry out these operations in reverse
o r d e r.
Take care to engage the lamp unit in its guides,
while keeping it in line with the vehicle.
F
o
pen the boot,
F
r
emove the access flap from the
corresponding side trim panel,
F
u
nscrew the butter fly nut securing the lamp
unit,
F
u
nclip the lamp unit connector,
F
e
xtract the lamp unit carefully pulling in its
middle towards the outside,
am
ber or red bulbs, such as those
for the direction indicators and rear
foglamp, must be replaced by bulbs of
the same rating and colour.
The lamps on the tailgate are dummy
units. They are there for aesthetic
purposes only.
Practical information
Page 185 of 401
183
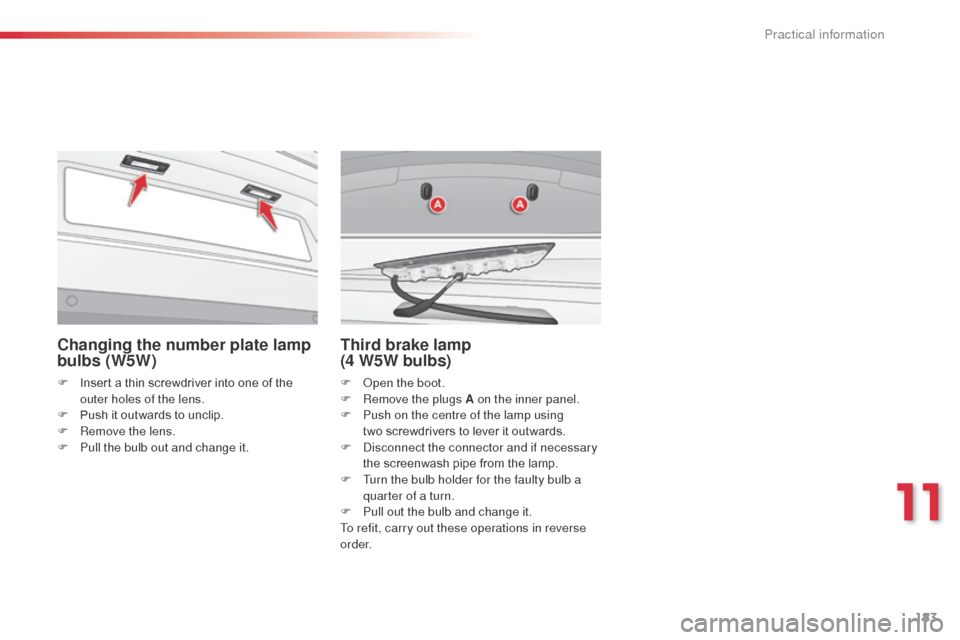
Changing the number plate lamp
bulbs (W5W)
F Insert a thin screwdriver into one of the outer holes of the lens.
F
P
ush it outwards to unclip.
F
R
emove the lens.
F
P
ull the bulb out and change it.
Third brake lamp
(4 W5W bulbs)
F open the boot.
F R emove the plugs A on the inner panel.
F
P
ush on the centre of the lamp using
two
screwdrivers to lever it outwards.
F
d
i
sconnect the connector and if necessary
the screenwash pipe from the lamp.
F
T
urn the bulb holder for the faulty bulb a
quarter of a turn.
F
P
ull out the bulb and change it.
To refit, carry out these operations in reverse
o r d e r.
11
Practical information
Page 187 of 401
185
Changing a fuseProcedure for replacing a faulty fuse with a new fuse to rectify a failure of the corresponding function.
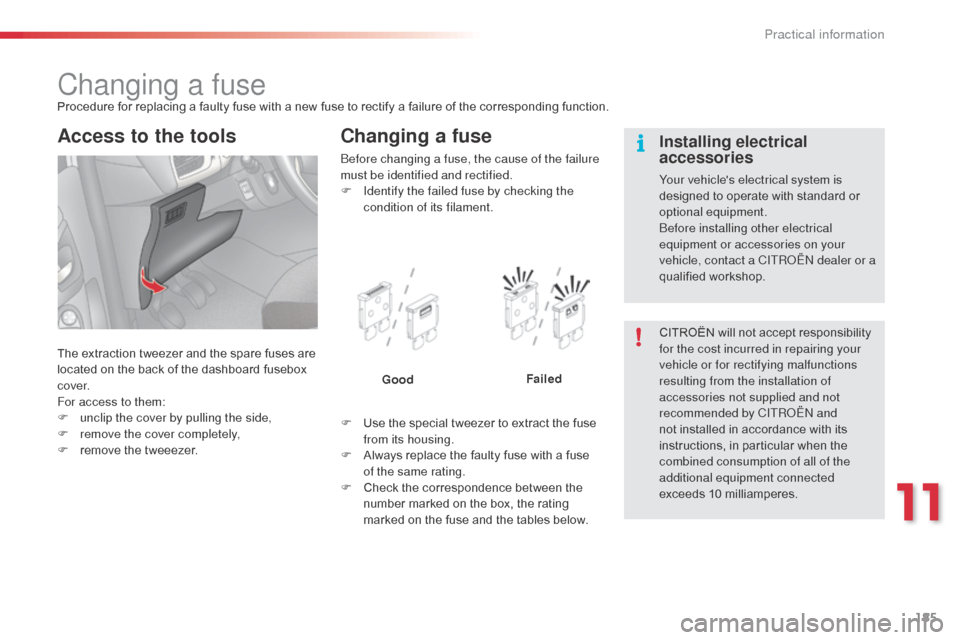
The extraction tweezer and the spare fuses are
located on the back of the dashboard fusebox
c ove r.
For access to them:
F
u
nclip the cover by pulling the side,
F
r
emove the cover completely,
F
r
emove the tweeezer.
Changing a fuse
before changing a fuse, the cause of the failure
must be identified and rectified.
F
I
dentify the failed fuse by checking the
condition of its filament.
F
U
se the special tweezer to extract the fuse
from its housing.
F
A
lways replace the faulty fuse with a fuse
of the same rating.
F
C
heck the correspondence between the
number marked on the box, the rating
marked on the fuse and the tables below. Good
FailedCITROËN will not accept responsibility
for the cost incurred in repairing your
vehicle or for rectifying malfunctions
resulting from the installation of
accessories not supplied and not
recommended by CITR
oËn
and
not installed in accordance with its
instructions, in particular when the
combined consumption of all of the
additional equipment connected
exceeds 10 milliamperes.Installing electrical
accessories
Your vehicle's electrical system is
designed to operate with standard or
optional equipment.
be
fore installing other electrical
equipment or accessories on your
vehicle, contact a CITR
oËn
dealer or a
qualified workshop.
Access to the tools
11
Practical information
Page 194 of 401

192
Changing a front or rear wiper blade
Removal
F Raise the corresponding wiper arm.
F U nclip the wiper blade and remove it.
Fitting
F At the front, check the size of the wiper blade as the shorter blade is fitted to the
passenger side of the vehicle.
F
P
ut the corresponding new wiper blade in
place and clip it.
F
F
old down the wiper arm carefully.
Before removing a front
wiper blade
F Within one minute after switching off the ignition, operate the wiper stalk to position
the wiper blades in the vertical position.
This position must be used in order to avoid
damaging the wiper blade and the bonnet.
After fitting a front wiper
blade
F Switch on the ignition.
F O perate the wiper stalk again to park the
wiper blades.
Procedure for replacing a worn wiper blade with a new one without the use of tools.
Practical information
Page 244 of 401
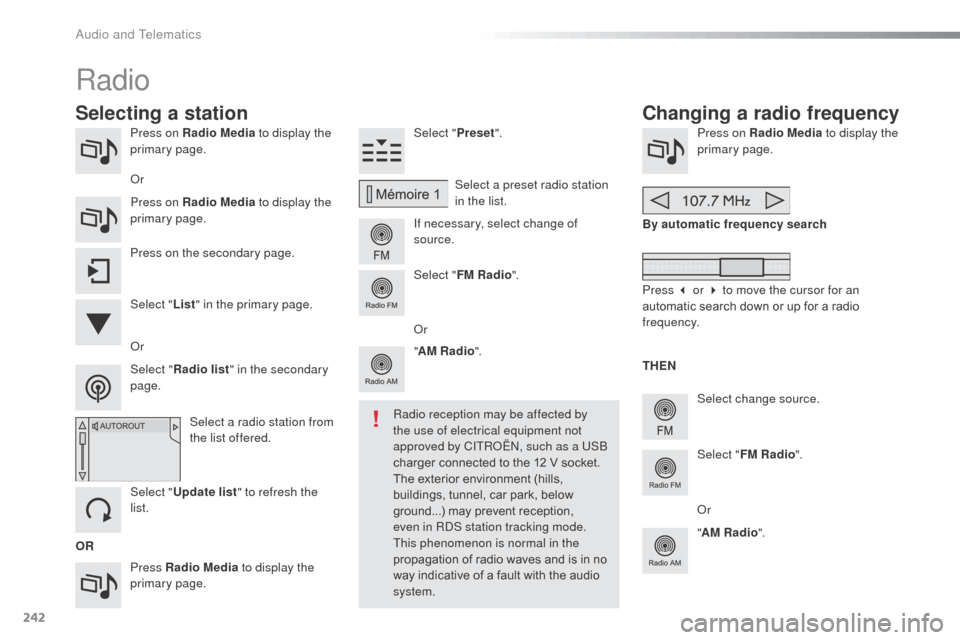
242
Press on Radio Media to display the
primary page.
Press Radio Media to display the
primary page. Select "
Preset".
If necessary, select change of
source. Press on Radio Media
to display the
primary page.
Select change source.
"
AM Radio ". By automatic frequency search
Select "FM Radio ".
" AM Radio ".
Press on the secondary page.
Select a preset radio station
in the list.
Select " FM Radio ".
Select a radio station from
the list offered.
Select " Update list " to refresh the
list. Select " List" in the primary page.
o
r
Press on Radio Media
to display the
primary page.
Radio
Changing a radio frequency
Selecting a station
OR THEN
Radio reception may be affected by
the use of electrical equipment not
approved by CITR
oËn, s
uch as a US
b
charger connected to the 12 V socket.
The exterior environment (hills,
buildings, tunnel, car park, below
ground...) may prevent reception,
even in R
dS s
tation tracking mode.
This phenomenon is normal in the
propagation of radio waves and is in no
way indicative of a fault with the audio
system.
o
r
Select " Radio list " in the secondary
page.
o
r
Press 3 or 4 to move the cursor for an
automatic search down or up for a radio
frequency.
o
r
audio and Telematics
Page 245 of 401
243
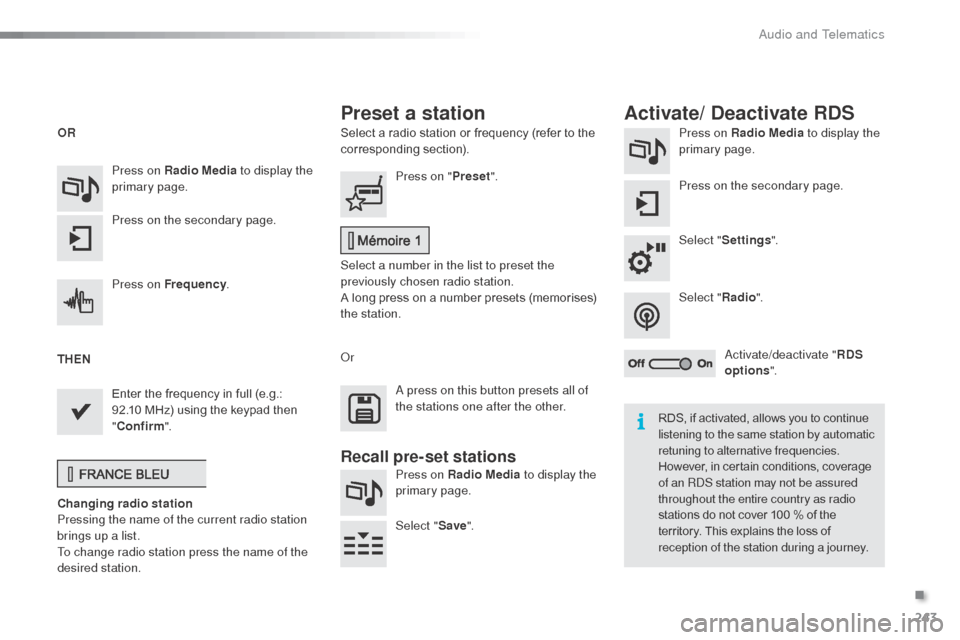
Select a radio station or frequency (refer to the
corresponding section).Press on Radio Media
to display the
primary page.
Press on the secondary page.
Select " Settings ".
Select " Radio".
ac
tivate/deactivate "RDS
options ".
Press on Radio Media
to display the
primary page.
Press on the secondary page. Press on "
Preset".
Select a number in the list to preset the
previously chosen radio station.
A long press on a number presets (memorises)
the station.
Press on Frequency
.
Enter the frequency in full (e.g.:
92.10 MHz) using the keypad then
" Confirm ".
Changing radio station
Pressing the name of the current radio station
brings up a list.
To change radio station press the name of the
desired station.
o
r Press on Radio Media to display the
primary page.
Select " Save".
Preset a station Activate/ Deactivate RDS
OR
THEN
a
press on this button presets all of
the stations one after the other.
Recall pre-set stations
RDS, if activated, allows you to continue
listening to the same station by automatic
retuning to alternative frequencies.
However, in certain conditions, coverage
of an R
dS s
tation may not be assured
throughout the entire country as radio
stations do not cover 100 % of the
territory. This explains the loss of
reception of the station during a journey.
.
audio and Telematics
Page 278 of 401
276
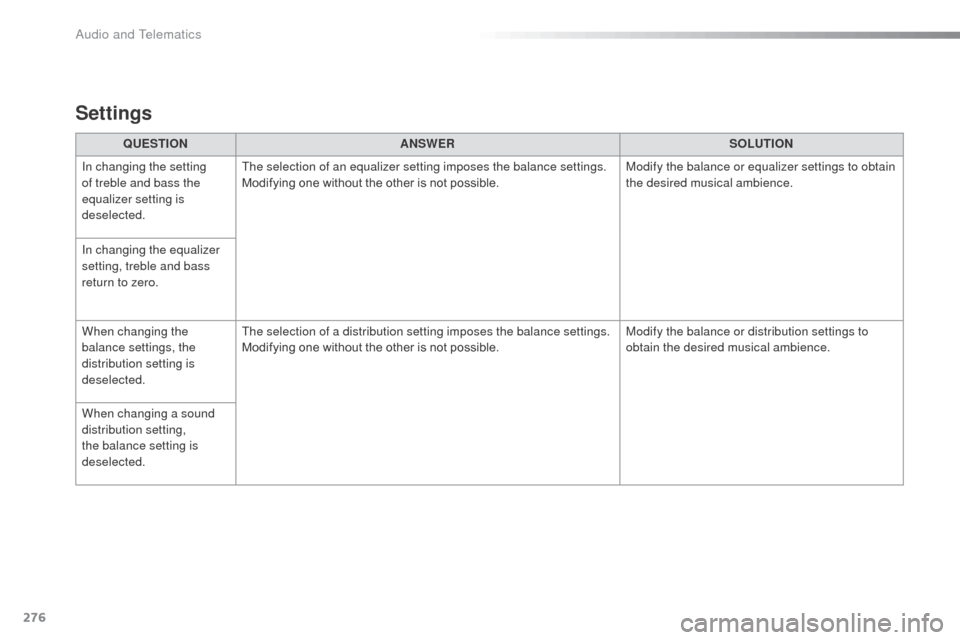
QUESTIONANSWER SOLUTION
In changing the setting
of treble and bass the
equalizer setting is
deselected. The selection of an equalizer setting imposes the balance settings.
Modifying one without the other is not possible.
Modify the balance or equalizer settings to obtain
the desired musical ambience.
In changing the equalizer
setting, treble and bass
return to zero.
When changing the
balance settings, the
distribution setting is
deselected. The selection of a distribution setting imposes the balance settings.
Modifying one without the other is not possible.
Modify the balance or distribution settings to
obtain the desired musical ambience.
When changing a sound
distribution setting,
the balance setting is
deselected.
Settings
Audio and Telematics
Page 279 of 401
277
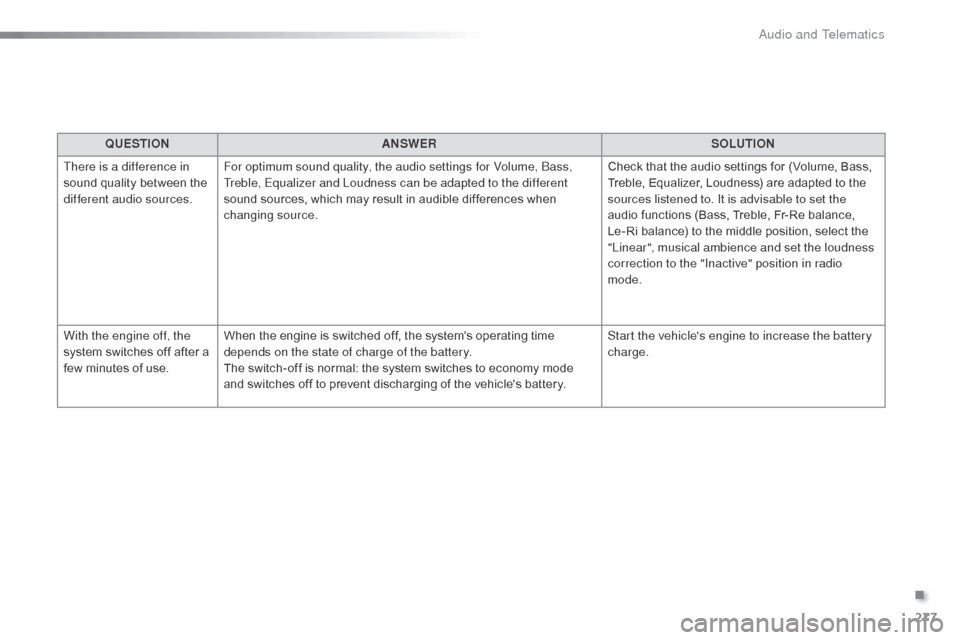
QUESTIONANSWER SOLUTION
There is a difference in
sound quality between the
different audio sources. For optimum sound quality, the audio settings for Volume,
b
a
ss,
Treble, Equalizer and Loudness can be adapted to the different
sound sources, which may result in audible differences when
changing source. Check that the audio settings for (Volume, Bass,
Treble, Equalizer, Loudness) are adapted to the
sources listened to. It is advisable to set the
audio functions (Bass, Treble, Fr-Re balance,
Le-Ri balance) to the middle position, select the
"Linear", musical ambience and set the loudness
correction to the "Inactive" position in radio
mode.
With the engine off, the
system switches off after a
few minutes of use. When the engine is switched off, the system's operating time
depends on the state of charge of the battery.
The switch-off is normal: the system switches to economy mode
and switches off to prevent discharging of the vehicle's battery. Start the vehicle's engine to increase the battery
charge.
.
Audio and Telematics