boot Citroen C3 2017 2.G User Guide
[x] Cancel search | Manufacturer: CITROEN, Model Year: 2017, Model line: C3, Model: Citroen C3 2017 2.GPages: 450, PDF Size: 10.11 MB
Page 74 of 450
72
B618_en_Chap02_ouvertures_ed01-2016
* Depending on the country of sale.
Alarm*
System which protects and provides a deterrent
against theft and break-ins. It provides the
following type of monitoring:
- exterior perimeter
The system checks for opening of the vehicle.
The alarm is triggered if anyone tries to open a
door, the boot, the bonnet, etc.
Self-protection function
The system checks for the putting out of
service of its components.
The alarm is triggered if the battery, the central
control or the siren wiring are put out of service
or damaged.For all work on the alarm system,
contact a CITROËN dealer or a
qualified workshop. Following an instruction to lock
the vehicle, the exterior perimeter
monitoring is activated after a delay of
5 seconds.
If an opening (door, boot, etc.) is not
fully closed, the vehicle is not locked but
the exterior perimeter monitoring will be
activated after a delay of 45 seconds.
Locking the vehicle with alarm system
Activation
F Switch off the ignition and get out of the
vehicle.
F
L
ock the vehicle with the remote control
or with the "Keyless Entry and Starting"
system.
The monitoring system is active: the indicator
lamp in the locking button on the dashboard
flashes once per second and the direction
indicators come on for about 2 seconds.
Deactivation
F Unlock the vehicle with the "Keyless Entry and Starting" system.
The monitoring system is deactivated: the
indicator lamp in the locking button goes off
and the direction indicators flash for about
2
seconds.
If the vehicle automatically locks itself
again (as happens if a door or boot
is not opened within 30 seconds of
unlocking), the monitoring system is
also reactivated automatically.
Access
Page 81 of 450
79
B618_en_Chap03_Ergonomie-et-confort_ed01-2016
Rear seats
Bench seat with fixed cushions and split folding backrests (2/3 -1/3) to adapt the boot load space.
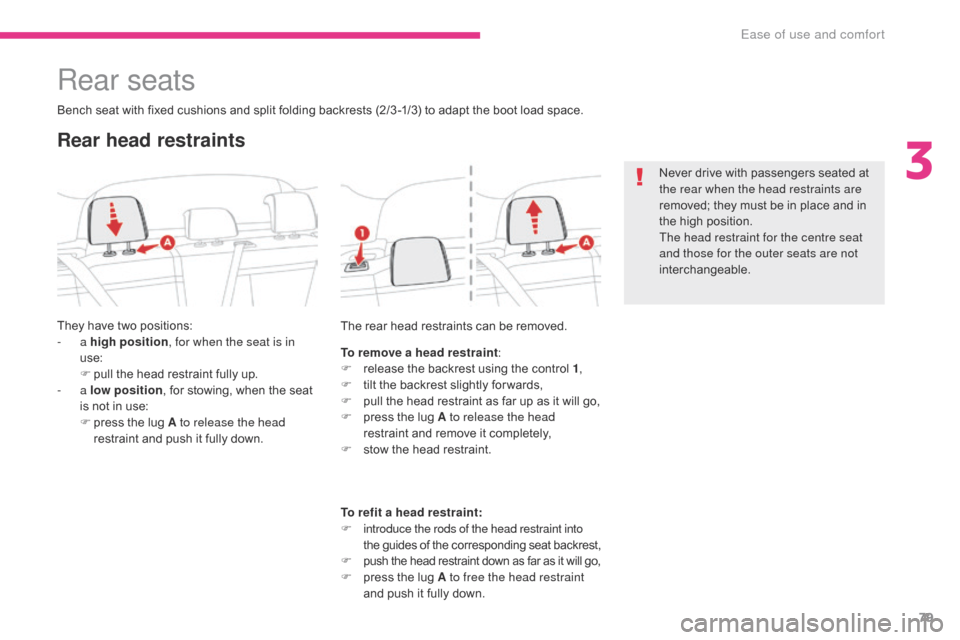
They have two positions:
- a high position , for when the seat is in
use:
F
p
ull the head restraint fully up.
-
a low position , for stowing, when the seat
is not in use:
F
p
ress the lug A to release the head
restraint and push it fully down. Never drive with passengers seated at
the rear when the head restraints are
removed; they must be in place and in
the high position.
The head restraint for the centre seat
and those for the outer seats are not
interchangeable.
To remove a head restraint :
F
r
elease the backrest using the control 1,
F
t
ilt the backrest slightly for wards,
F
p
ull the head restraint as far up as it will go,
F
p
ress the lug A to release the head
restraint and remove it completely,
F
s
tow the head restraint.
Rear head restraints
The rear head restraints can be removed.
To refit a head restraint:
F
i
ntroduce the rods of the head restraint into
the guides of the corresponding seat backrest,
F
push the head restraint down as far as it will go,F press the lug A to free the head restraint and push it fully down.
3
Ease of use and comfort
Page 83 of 450
81
B618_en_Chap03_Ergonomie-et-confort_ed01-2016
Caution, a backrest that has not latched
correctly compromises the safety of
passengers in the event of sudden
braking or an accident.
The contents of the boot may be thrown
for ward - Risk of serious injury!
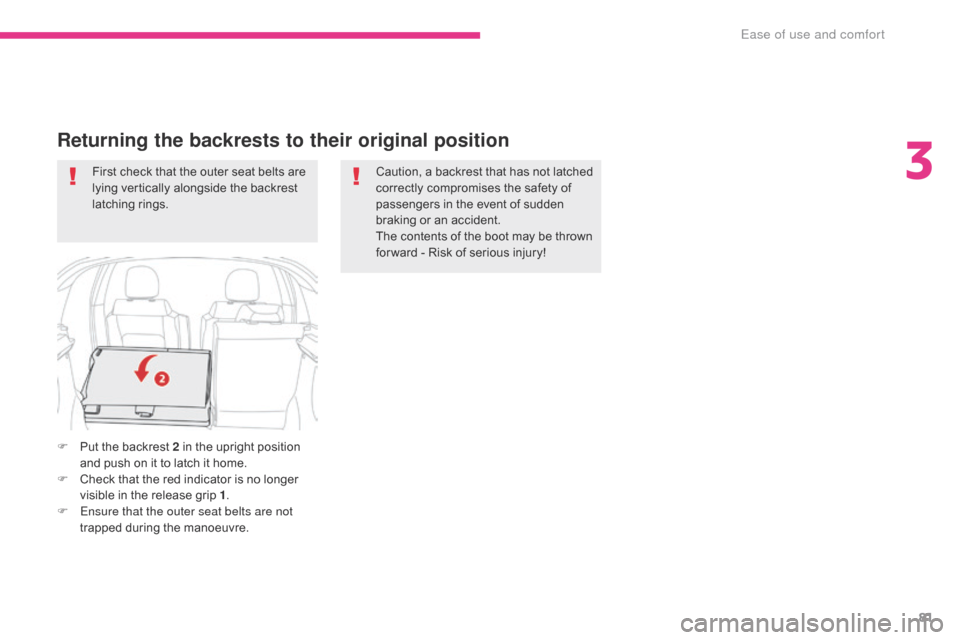
First check that the outer seat belts are
lying vertically alongside the backrest
latching rings.
Returning the backrests to their original position
F Put the backrest 2 in the upright position
and push on it to latch it home.
F
C
heck that the red indicator is no longer
visible in the release grip 1 .
F
E
nsure that the outer seat belts are not
trapped during the manoeuvre.
3
Ease of use and comfort
Page 86 of 450
84
B618_en_Chap03_Ergonomie-et-confort_ed01-2016
In order for these systems to be fully effective, follow the operation and maintenance
guidelines below:
F
T
o obtain an even air distribution, take care not to obstruct the exterior air intake grilles
located at the base of the windscreen, the nozzles, the vents and the air outlets, as well
as the air extractor located in the boot.
F
D
o not cover the sunshine sensor, located on the dashboard; this is used for regulation
of the air conditioning system.
F
O
perate the air conditioning system for at least 5 to 10 minutes, once or twice a month
to keep it in per fect working order.
F
E
nsure that the passenger compartment filter is in good condition and have the filter
elements replaced regularly.
W
e recommend the use of a combined passenger compartment filter. Thanks to its
special active additive, it contributes to the purification of the air breathed by the
occupants and the cleanliness of the passenger compartment (reduction of allergic
symptoms, bad odours and greasy deposits).
F
T
o ensure correct operation of the air conditioning system, you are also advised to have
it checked regularly as recommended in the maintenance and warranty guide.
F
I
f the system does not produce cold air, switch it off and contact a CITROËN dealer or a
qualified workshop.
Recommendations for ventilation and air conditioning
If after an extended stop in sunshine,
the interior temperature is very high, first
ventilate the passenger compartment for
a few moments.
Put the air flow control at a setting high
enough to quickly change the air in the
passenger compartment.
The condensation created by the air
conditioning results in a discharge
of water under the vehicle which is
per fectly normal.
When towing the maximum load on a steep gradient in high temperatures, switching off the
air conditioning increases the available engine power and so improves the towing ability.
Stop & Start
The heating and air conditioning
systems only work when the engine is
running.
To maintain a comfortable temperature
in the passenger compartment, you can
temporarily deactivate the Stop & Start
system.
For more information on Stop & Star t ,
refer to the corresponding section.
Ease of use and comfort
Page 97 of 450
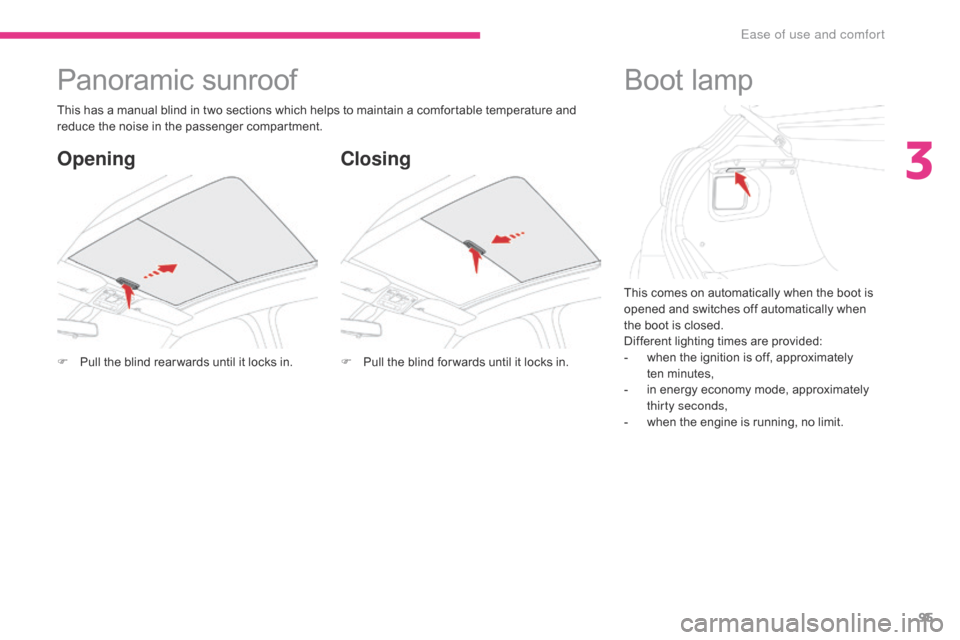
95
B618_en_Chap03_Ergonomie-et-confort_ed01-2016
This comes on automatically when the boot is
opened and switches off automatically when
the boot is closed.
Different lighting times are provided:
-
w
hen the ignition is off, approximately
ten
m
inutes,
-
i
n energy economy mode, approximately
thirty seconds,
-
w
hen the engine is running, no limit.
Boot lamp
This has a manual blind in two sections which helps to maintain a comfortable temperature and
reduce the noise in the passenger compartment.
Panoramic sunroof
F Pull the blind rear wards until it locks in.
Closing
Opening
F Pull the blind for wards until it locks in.
3
Ease of use and comfort
Page 102 of 450
100
B618_en_Chap03_Ergonomie-et-confort_ed01-2016
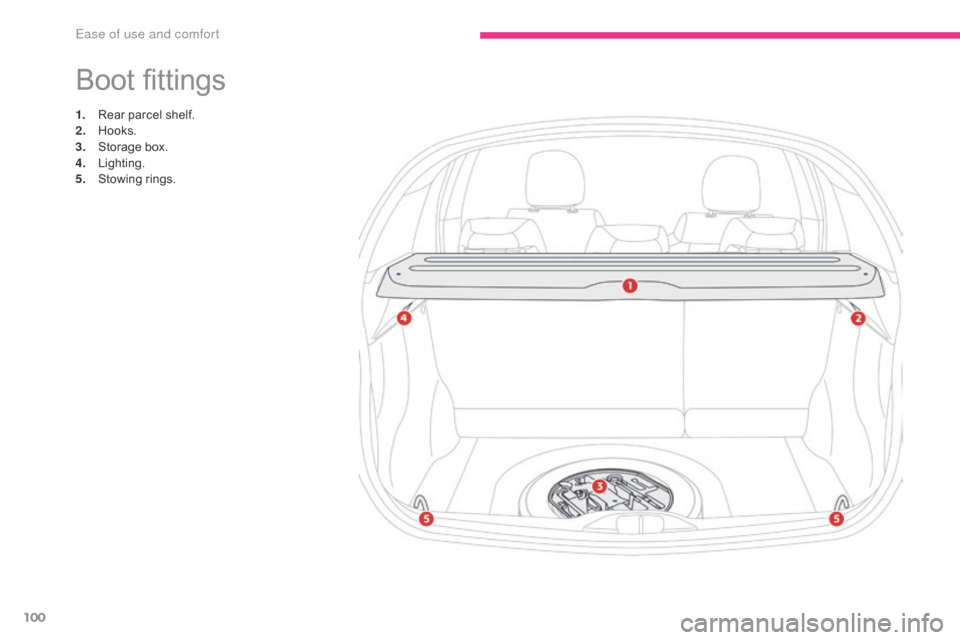
Boot fittings
1. Rear parcel shelf.
2. Hooks.
3.
St
orage box.
4.
L
ighting.
5.
S
towing rings.
Ease of use and comfort
Page 103 of 450
101
B618_en_Chap03_Ergonomie-et-confort_ed01-2016
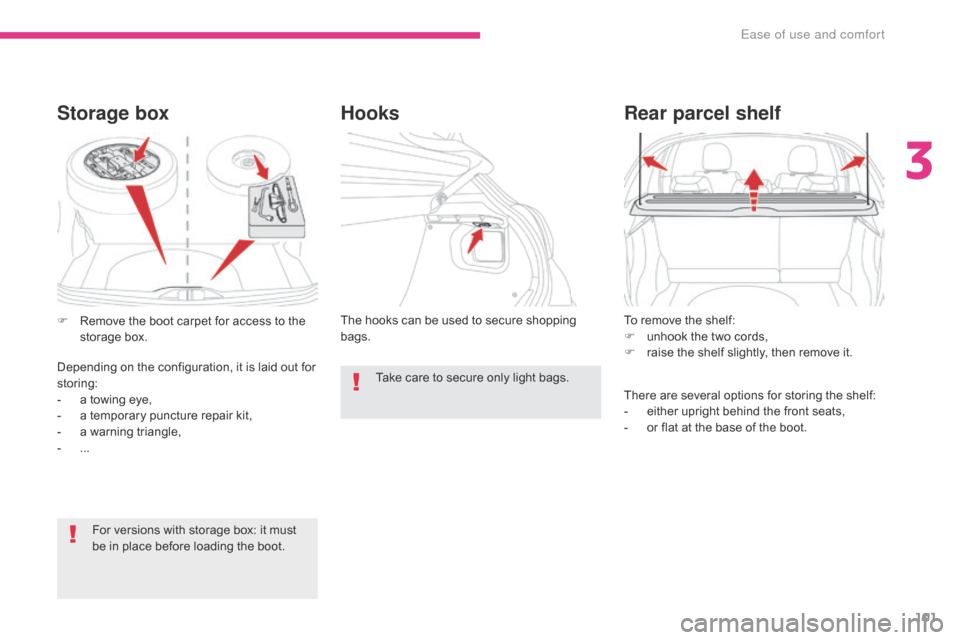
To remove the shelf:
F u nhook the two cords,
F
r
aise the shelf slightly, then remove it.
Rear parcel shelf
There are several options for storing the shelf:
- e ither upright behind the front seats,
-
o
r flat at the base of the boot.
The hooks can be used to secure shopping
bags.
Hooks
Storage box
For versions with storage box: it must
be in place before loading the boot.
F
R
emove the boot carpet for access to the
storage box.
Depending on the configuration, it is laid out for
storing:
-
a t
owing eye,
-
a t
emporary puncture repair kit,
-
a w
arning triangle,
-
... T
ake care to secure only light bags.
3
Ease of use and comfort
Page 114 of 450
112
B618_en_Chap04_Eclairage-et-visibilite_ed01-2016
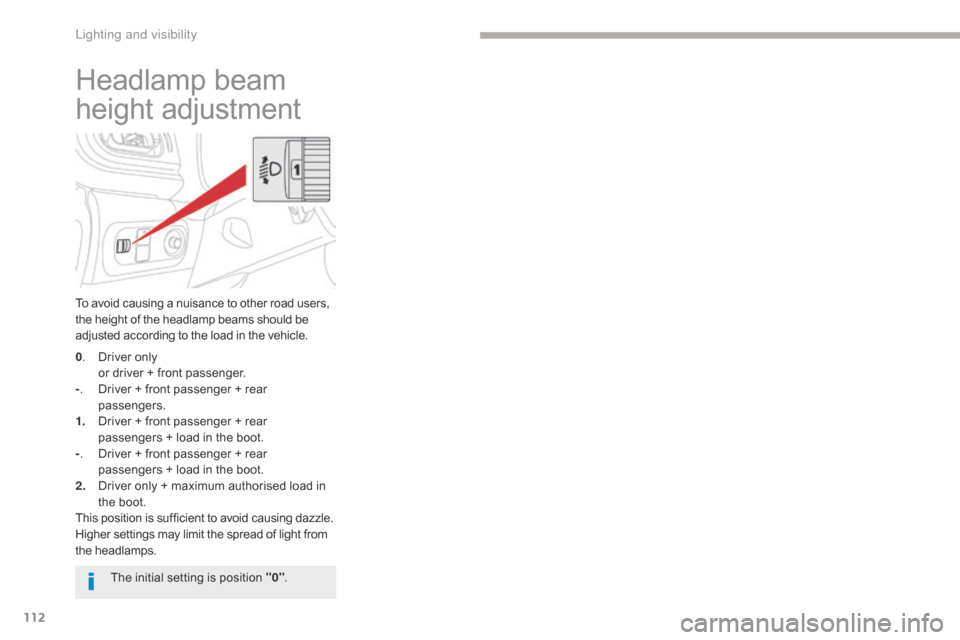
Headlamp beam
height adjustment
To avoid causing a nuisance to other road users,
the height of the headlamp beams should be
adjusted according to the load in the vehicle.
0.
D
river only
o
r driver + front passenger.
- .
D
river + front passenger + rear
passengers.
1.
D
river + front passenger + rear
passengers
+ load in the boot.
- .
D
river + front passenger + rear
passengers
+ load in the boot.
2.
D
river only + maximum authorised load in
the boot.
This position is sufficient to avoid causing dazzle.
Higher settings may limit the spread of light from
the headlamps.
The initial setting is position "0" .
Lighting and visibility
Page 116 of 450

114
B618_en_Chap04_Eclairage-et-visibilite_ed01-2016
Rear wiper
Park.
Intermittent wipe (proportional to the
vehicle speed).
Wash-wipe (set duration).
Rear wiper selection ring:
Reverse gear
When reverse gear is engaged, the rear wiper
will come into operation automatically if the
windscreen wipers are operating.
Activation or deactivation of this automatic
function can only
be set via the touch screen.
Windscreen wash
Pull the wiper stalk towards you. The
windscreen wash, then the windscreen wipers,
operate for a pre-determined time.
The screenwash jets are not adjustable.
Do not try to move them (risk of
damage).
F
I
n the Driving
menu, select the
" Vehicle settings " tab.
F
Sel
ect "
Comfort " then "Rear
wiper in reverse ".
This function is activated by default.
If a significant accumulation of snow or
ice is present, or when using a bicycle
carrier on the boot, deactivate the
automatic rear wiper.
Lighting and visibility
Page 222 of 450
220
B618_en_Chap08_En-cas-de-panne_ed01-2016
Warning triangle
The triangle can be stored on the rear face of
the boot, secured by straps.
Assembling the triangle
As a safety precaution, before leaving your
vehicle to set up and install the triangle, switch
on the hazard warning lamps and put on your
high visibility vest.Refer to the instructions provided with the
triangle.
Positioning the triangle
Running out of fuel
(Diesel)
On vehicles fitted with Diesel engines, the fuel
system must be primed if you run out of fuel. For more information on Misfuel
prevention (Diesel) , refer to the
corresponding section.
If the engine does not start first
time, don't keep trying, but start the
procedure again from the beginning.
BlueHDi engines
F Fill the fuel tank with at least five litres of Diesel.
F
S
witch on the ignition (without starting the
engine).
F
W
ait around 6 seconds and switch off the
ignition.
F
R
epeat the operation 10 times.
F
O
perate the starter to run the engine.
F
P
lace the triangle behind the vehicle, as
required by local legislation.
Other HDi engines
(except BlueHDi version)
F A dd at least five litres of Diesel fuel to the
tank.
F
O
pen the bonnet.
F
I
f necessary, unclip the styling cover for
access to the priming pump.
F
S
queeze and release the priming pump
repeatedly until resistance is felt (there
may be resistance at the first press).
F
O
perate the starter to start the engine
(if the engine does not start at the first
attempt, wait around 15 seconds before
trying again).
F
I
f the engine does not start after a few
attempts, operate the priming pump again
then start the engine.
F
R
efit the styling cover and clip it in place.
F
C
lose the bonnet.
In the event of a breakdown