boot Citroen C3 2017 2.G Owner's Guide
[x] Cancel search | Manufacturer: CITROEN, Model Year: 2017, Model line: C3, Model: Citroen C3 2017 2.GPages: 450, PDF Size: 10.11 MB
Page 223 of 450
221
B618_en_Chap08_En-cas-de-panne_ed01-2016
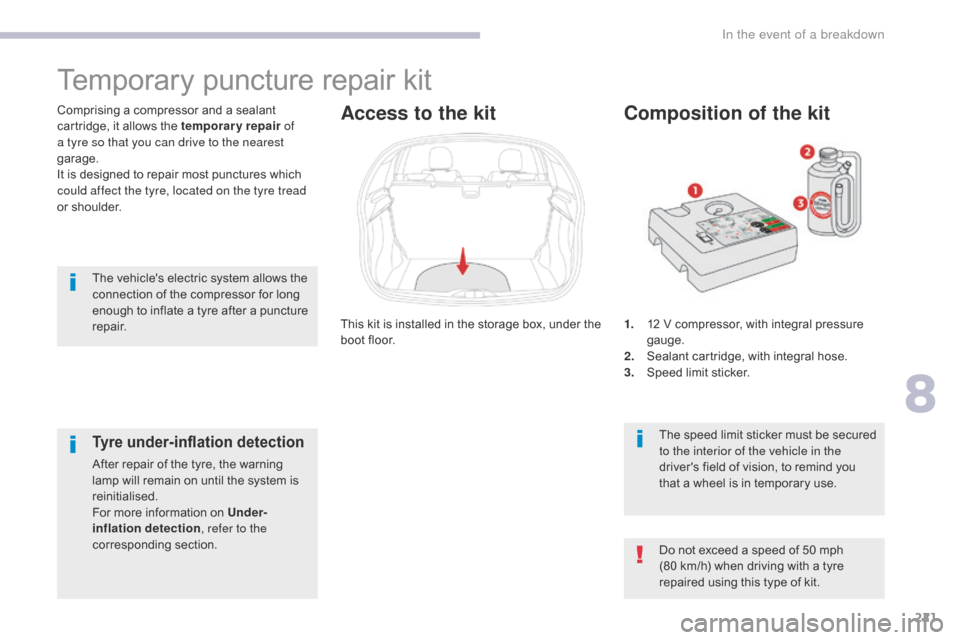
1. 12 V compressor, with integral pressure gauge.
2.
S
ealant cartridge, with integral hose.
3.
S
peed limit sticker.
Composition of the kit
The speed limit sticker must be secured
to the interior of the vehicle in the
driver's field of vision, to remind you
that a wheel is in temporary use.
The vehicle's electric system allows the
connection of the compressor for long
enough to inflate a tyre after a puncture
repair.
This kit is installed in the storage box, under the
boot floor.
Comprising a compressor and a sealant
cartridge, it allows the temporary repair
of
a tyre so that you can drive to the nearest
garage.
It is designed to repair most punctures which
could affect the tyre, located on the tyre tread
or shoulder.
Temporary puncture repair kit
Access to the kit
Do not exceed a speed of 50 mph
(80 km/h) when driving with a tyre
repaired using this type of kit.
Tyre under-inflation detection
After repair of the tyre, the warning
lamp will remain on until the system is
reinitialised.
For more information on Under-
inflation detection , refer to the
corresponding section.
8
In the event of a breakdown
Page 228 of 450
226
B618_en_Chap08_En-cas-de-panne_ed01-2016
Spare wheel
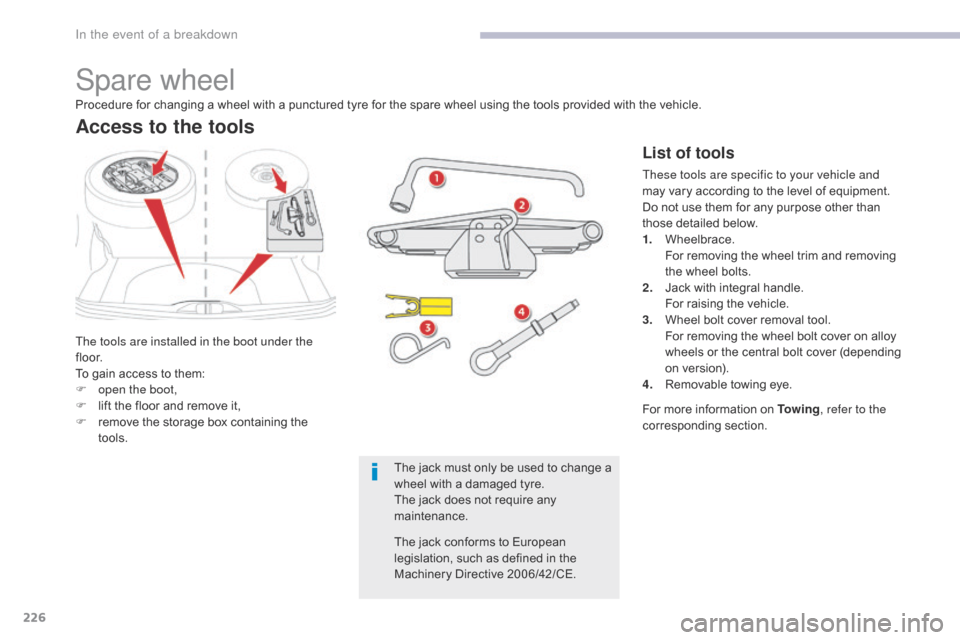
The tools are installed in the boot under the
f l o o r.
To gain access to them:
F
o
pen the boot,
F
l
ift the floor and remove it,
F
r
emove the storage box containing the
tools.
Access to the tools
List of tools
These tools are specific to your vehicle and
may vary according to the level of equipment.
Do not use them for any purpose other than
those detailed below.
1.
W
heelbrace.
F
or removing the wheel trim and removing
the wheel bolts.
2.
J
ack with integral handle.
F
or raising the vehicle.
3.
W
heel bolt cover removal tool.
F
or removing the wheel bolt cover on alloy
wheels or the central bolt cover (depending
on version).
4.
R
emovable towing eye.
Procedure for changing a wheel with a punctured tyre for the spare wheel using the tools provided with the vehicle.
For more information on To w i n g, refer to the
corresponding section.
The jack must only be used to change a
wheel with a damaged tyre.
The jack does not require any
maintenance.
The jack conforms to European
legislation, such as defined in the
Machinery Directive 2006/42/CE.
In the event of a breakdown
Page 229 of 450

227
B618_en_Chap08_En-cas-de-panne_ed01-2016
Taking out the wheel
F Unclip the tool storage box (standard spare wheel).
F
U
nscrew the central nut.
F
R
emove the fixing parts (nut and bolt).
F
R
aise the spare wheel towards you from
the rear.
F
T
ake the wheel out of the boot.
The spare wheel is installed in the boot under
the floor.
Depending on engine, the spare wheel is
a standard wheel or the space-saver type
(BlueHDi).
Access to the spare wheel
8
In the event of a breakdown
Page 233 of 450
231
B618_en_Chap08_En-cas-de-panne_ed01-2016
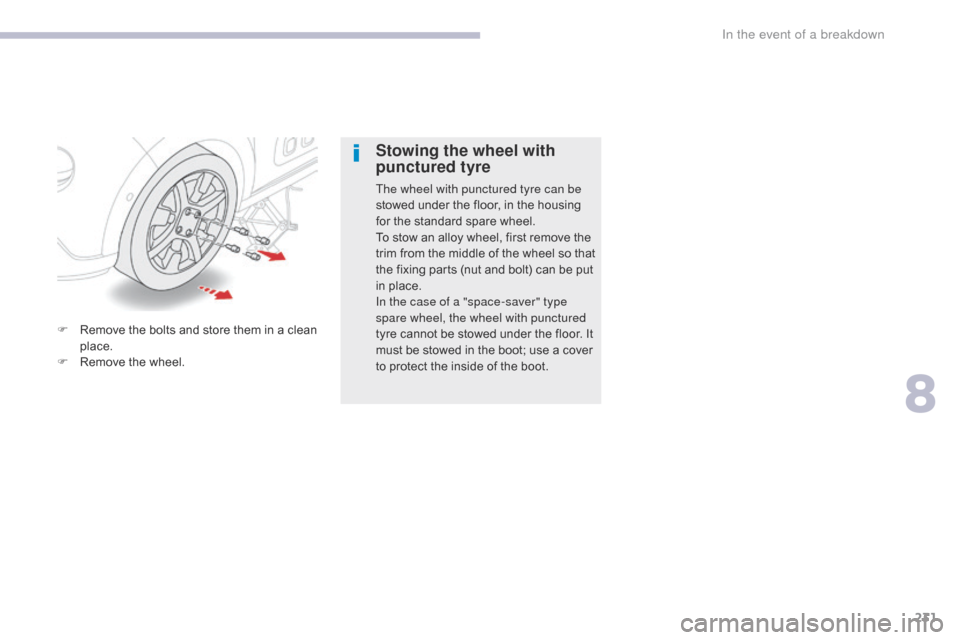
F Remove the bolts and store them in a clean place.
F
R
emove the wheel.
Stowing the wheel with
punctured tyre
The wheel with punctured tyre can be
stowed under the floor, in the housing
for the standard spare wheel.
To stow an alloy wheel, first remove the
trim from the middle of the wheel so that
the fixing parts (nut and bolt) can be put
in place.
In the case of a "space-saver" type
spare wheel, the wheel with punctured
tyre cannot be stowed under the floor. It
must be stowed in the boot; use a cover
to protect the inside of the boot.
8
In the event of a breakdown
Page 240 of 450
238
B618_en_Chap08_En-cas-de-panne_ed01-2016
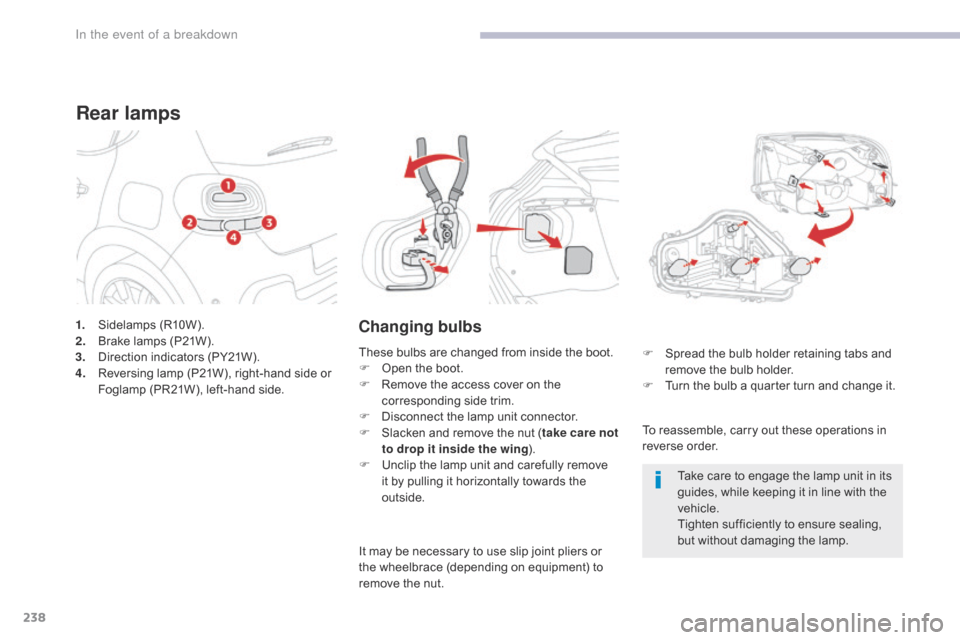
1. Sidelamps (R10W).
2. Brake lamps (P21W).
3.
D
irection indicators (PY21W).
4.
R
eversing lamp (P21W), right-hand side or
Foglamp (PR21W), left-hand side.
Rear lamps
Changing bulbs
To reassemble, carry out these operations in
reverse order. F
S
pread the bulb holder retaining tabs and
remove the bulb holder.
F
T
urn the bulb a quarter turn and change it.
These bulbs are changed from inside the boot.
F
O
pen the boot.
F
R
emove the access cover on the
corresponding side trim.
F
D
isconnect the lamp unit connector.
F
S
lacken and remove the nut ( take care not
to drop it inside the wing ).
F
U
nclip the lamp unit and carefully remove
it by pulling it horizontally towards the
outside. Take care to engage the lamp unit in its
guides, while keeping it in line with the
vehicle.
Tighten sufficiently to ensure sealing,
but without damaging the lamp.
It may be necessary to use slip joint pliers or
the wheelbrace (depending on equipment) to
remove the nut.
In the event of a breakdown
Page 241 of 450
239
B618_en_Chap08_En-cas-de-panne_ed01-2016
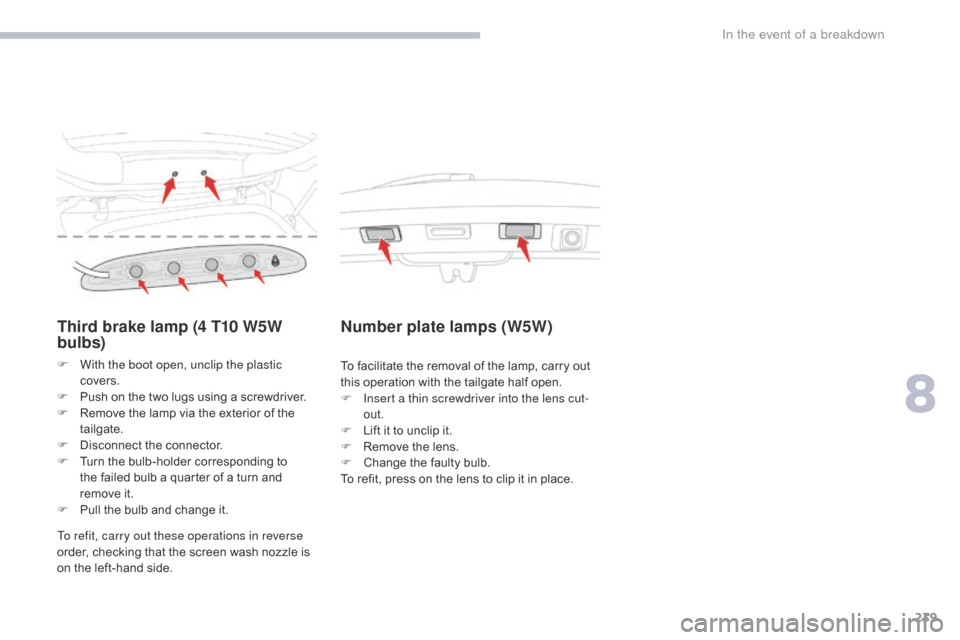
Third brake lamp (4 T10 W5W
bulbs)
F With the boot open, unclip the plastic covers.
F
P
ush on the two lugs using a screwdriver.
F
R
emove the lamp via the exterior of the
tailgate.
F
D
isconnect the connector.
F
T
urn the bulb-holder corresponding to
the failed bulb a quarter of a turn and
remove
it.
F
P
ull the bulb and change it.
Number plate lamps (W5W)
To facilitate the removal of the lamp, carry out
this operation with the tailgate half open.
F
I
nsert a thin screwdriver into the lens cut-
out.
F
L
ift it to unclip it.
F
R
emove the lens.
F
C
hange the faulty bulb.
To refit, press on the lens to clip it in place.
To refit, carry out these operations in reverse
order, checking that the screen wash nozzle is
on the left-hand side.
8
In the event of a breakdown
Page 242 of 450

240
B618_en_Chap08_En-cas-de-panne_ed01-2016
Courtesy lamp (W5W)
F Using a small flat blade screwdriver, unclip the console assembly surrounding the
courtesy lamp.
F
R
emove the failed bulb and change it.
F
R
efit the console around the courtesy
lamp, ensuring that it is clipped in correctly.
Boot (W5W)
F Unclip the lamp by pushing the body from behind.
F
R
emove the bulb and change.
F
R
efit the lamp.
Interior lighting
Courtesy lamp with LEDs
For the replacement of the light-emitting
diodes (LEDs), contact a CITROËN dealer or a
qualified workshop.
In the event of a breakdown
Page 253 of 450
251
B618_en_Chap08_En-cas-de-panne_ed01-2016
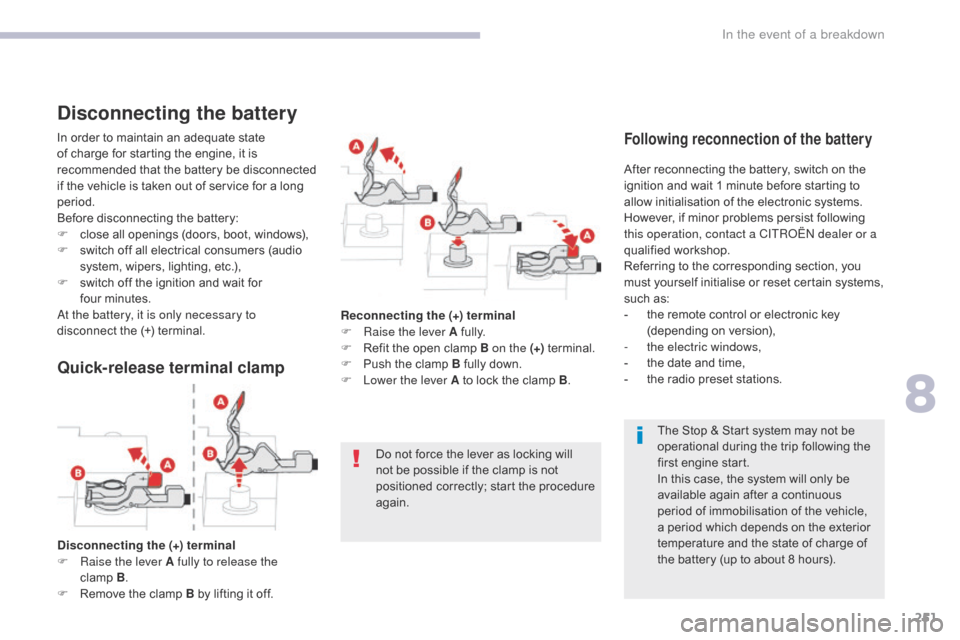
Do not force the lever as locking will
not be possible if the clamp is not
positioned correctly; start the procedure
again.
Quick-release terminal clamp
Disconnecting the (+) terminal
F Ra ise the lever A fully to release the
clamp
B .
F
R
emove the clamp B by lifting it off. The Stop & Start system may not be
operational during the trip following the
first engine start.
In this case, the system will only be
available again after a continuous
period of immobilisation of the vehicle,
a period which depends on the exterior
temperature and the state of charge of
the battery (up to about 8 hours).
In order to maintain an adequate state
of charge for starting the engine, it is
recommended that the battery be disconnected
if the vehicle is taken out of service for a long
period.
Before disconnecting the battery:
F
c
lose all openings (doors, boot, windows),
F
s
witch off all electrical consumers (audio
system, wipers, lighting, etc.),
F
s
witch off the ignition and wait for
four
m
inutes.
At the battery, it is only necessary to
disconnect the (+) terminal.
Disconnecting the battery
After reconnecting the battery, switch on the
ignition and wait 1 minute before starting to
allow initialisation of the electronic systems.
However, if minor problems persist following
this operation, contact a CITROËN dealer or a
qualified workshop.
Referring to the corresponding section, you
must yourself initialise or reset certain systems,
such as:
-
t
he remote control or electronic key
(depending on version),
-
t
he electric windows,
-
t
he date and time,
-
t
he radio preset stations.
Following reconnection of the battery
Reconnecting the (+) terminal
F Ra ise the lever A fully.
F
R
efit the open clamp B on the (+) terminal.
F
P
ush the clamp B fully down.
F
L
ower the lever A to lock the clamp B .
8
In the event of a breakdown
Page 254 of 450
252
B618_en_Chap08_En-cas-de-panne_ed01-2016
To w i n g
General recommendations
Observe the legislation in force in your country.
Ensure that the weight of the towing vehicle is higher than that of the towed vehicle.
The driver must remain at the wheel of the towed vehicle and must have a valid driving licence.
When towing a vehicle with all four wheels on the ground, always use an approved towing arm;
rope and straps are prohibited.
The towing vehicle must move off gently.
When towing a vehicle with the engine off, there is no longer any power assistance for braking or
steering.
In the following cases, you must always call on a professional recovery service:
- vehicle broken down on a motor way or fast road,- four-wheel drive vehicle,- when it is not possible to put the gearbox into neutral, unlock the steering, or release the
parking brake,
- towing with only two wheels on the ground,- where there is no approved towing arm available...
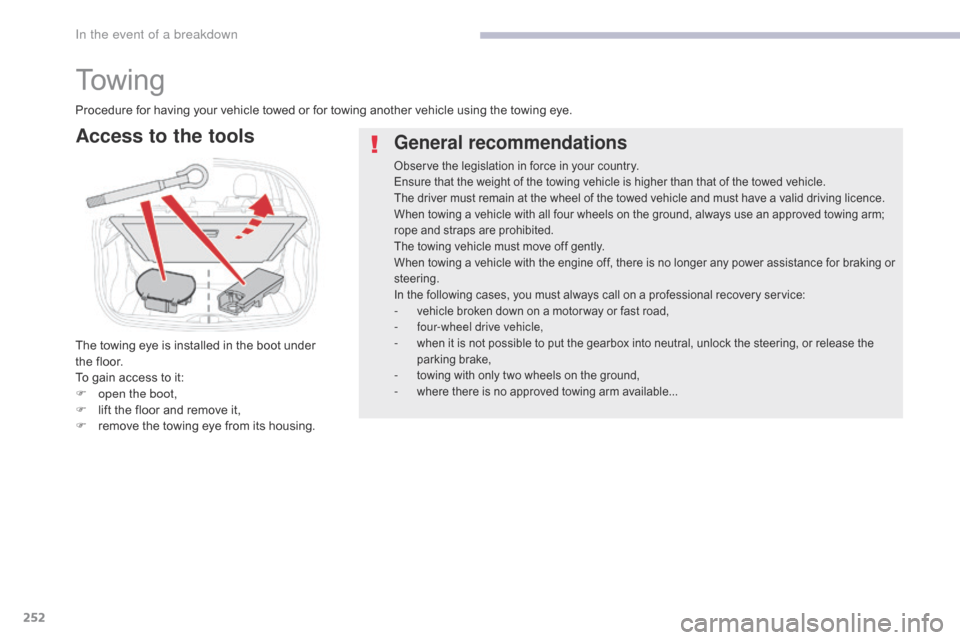
Procedure for having your vehicle towed or for towing another vehicle using the towing eye.
Access to the tools
The towing eye is installed in the boot under
the floor.
To gain access to it:
F
o
pen the boot,
F
l
ift the floor and remove it,
F
r
emove the towing eye from its housing.
In the event of a breakdown
Page 262 of 450
260
B618_en_Chap11_index-alpha_ed01-2016
Accessories ...........................................117, 157
AdBlue® ............................... ......26, 36, 215, 216
Adjusting headlamps .................................... 11
2
Adjusting head restraints
................................ 77
A
djusting seat
................................................. 76
A
djusting the air distribution
.....................8
5, 88
Adjusting the air flow
.................................8
5, 88
Adjusting the date
..................................... 4
1, 54
Adjusting the height and reach of the steering wheel
...............................
.........82
Adjusting the temperature
........................8
5, 88
Adjusting the time
............................... 4
1, 54, 55
Advice on driving
..............................
....151, 152
Airbags
...............
............................. 29, 129, 137
Airbags, curtain
..................................... 13
2, 13 3
Airbags, front......................................... 13 0, 13 3
Airbags, lateral
...................................... 13
1, 13 3
AIRBUMP
® .................................................... 2 19
Air conditioning ............................... ............ 9, 87
Air conditioning, automatic
.......................8
4, 88
Air conditioning, manual
........................... 8
4, 86
Air intake
...............
.................................... 86, 88
Air vents
..............................
............................ 83
Alarm
............................................................... 72
A
nti-lock braking system (ABS)
....................12
3
Anti-slip regulation (ASR)
............................. 12
3
Anti-theft
..............................
.........................153
Armrest, front
............................................9
6, 98
Assistance call
...............................
....... 119, 121
Assistance, emergency braking
................... 12
3
Audio system
...............................
....................41
Auxiliary socket
............................................... 98
ABChild seats, ISOFIX .......................14 3 -145, 147
C ITROËN C onnect Box ....................... 1 19, 121
C
ITROËN
L
ocalised Emergency Call... 119, 121
Closing the boot
...............................
......... 57, 69
Closing the doors
.......................... 5
7, 60, 61, 68
Coat hanger
..............................
......................99
Configuration, vehicle
......................... 4
1, 44, 46
ConnectedCAM C
ITROËN
™
.......................19
3
Control, electric windows
................................ 74
C
ontrol, emergency boot release
...................69
C
ontrol, emergency door
................................ 64
C
ontrol, heated seats
...................................... 78
C
ontrol stalk, lighting
.............. 1
6, 105, 106, 110
Control stalk, wipers
..............................11
3 -115
Courtesy lamp
...............................
..........94, 240
Cruise control
................................ 1
70, 173, 178
Cruise control by speed limit recognition
.....17
3
Cup holder
...............................
........................96
Capacity, fuel tank
..............................
.......... 19 6
Cap, fuel filler
................................................ 19
6
Central locking
.................................... 6
0, 61, 70
Changing a bulb
........................... 2
34, 238, 240
Changing a fuse
............................ 2
41, 243, 246
Changing a wheel
...............................
. 226, 227
Changing a wiper blade
........................ 11
6 , 2 0 4
Changing the remote control battery
.............. 66
C
hecking the engine oil level
.......................... 35
C
hecking the levels
............................... 2
0 9 -212
Checking tyre pressures (using the kit)
........ 2
21
Checks
...............
................... 207, 208, 213, 214
Child lock
...............................
........................ 150
Children
...............................
... 141, 143 -145, 147
Children (safety)
...............................
............. 150
Child seats
............ 1
28, 134-136, 140, 141, 149
Child seats, conventional
...................... 14
0, 141
Child seats, i-Size
...............................
.......... 147 Date (setting)
...............................
.............. 41, 54
Daytime running lamps
.........1
06, 110, 234, 235
Deactivating the passenger airbag
....... 13
0, 137
Deadlocking
...............................
............... 57, 62
Demisting - defrosting
...............................9
2, 93
Dimensions
..............................
.....................257
Dipstick
................
....................................35, 209
Direction indicators
...... 1
08, 110, 234, 235, 238
Display screen, instrument panel
.................16
5
Doors
..............................................................
.68
Driving economically ......................................... 9
Driving time warning
..................................... 18
2
Dynamic stability control (DSC)
...... 2
2, 123, 125
C
D
Battery ................................... 203, 213, 248 -251
Battery, charging ............................... ............250
Battery, remote control
.............................6
3, 66
Blanking screen (snow shield)
......................2
01
Blind, panoramic roof
...................................... 95
B
lind spot monitoring system
........................18
4
Blind spot sensors
.................................. 18
, 18 4
BlueHDi
...............................
......32, 36, 215, 220
Bonnet
...............
............................................ 206
Boot
........
.......................................... 69, 95, 100
Brake discs
.................................................... 2
14
Brake lamps
...............................
...................238
Brakes
..................................................... 2
2, 214
Bulbs (changing)
...............................
... 234, 238
Alphabetical index