ESP CITROEN C3 AIRCROSS 2021 Handbook (in English)
[x] Cancel search | Manufacturer: CITROEN, Model Year: 2021, Model line: C3 AIRCROSS, Model: CITROEN C3 AIRCROSS 2021Pages: 244, PDF Size: 6.29 MB
Page 136 of 244
134
Practical information
For more information on the precautions
to take before any work on the 12 V battery, refer to the corresponding section.
Versions equipped with Stop & Start are fitted with a 12 V lead-acid battery of specific technology and specification.
Its replacement should be carried out only by
a CITROËN dealer or a qualified workshop.
Passenger compartment
filter
Depending on the environment and the use of the vehicle (e.g. dusty atmosphere,
city driving), change it twice as often, if
necessary .
A clogged passenger compartment filter
can adversely affect air conditioning
system performance and generate
undesirable odours.
Air filter
Depending on the environment and the use of the vehicle (e.g. dusty atmosphere,
city driving), change it twice as often, if
necessary .
Oil filter
Change the oil filter each time the engine oil is changed.
Particle filter (Diesel)
When the particle filter is approaching saturation, this warning lamp comes on
temporarily, accompanied by a message warning
of the risk of filter clogging.
As soon as the traffic conditions permit,
regenerate the filter by driving at a speed of at
least 37 mph (60 km/h) until the warning lamp goes off.
If the warning lamp stays on, this
indicates a low Diesel additive level.
For more information on Checking levels,
refer to the corresponding section.
Following prolonged operation of the
vehicle at very low speed or at idle, you
may, in exceptional circumstances, notice the
emission of water vapour at the exhaust while
accelerating. This has no impact on the
vehicle’s behaviour or the environment.
New vehicle
During the first few particle filter
regeneration operations, you may notice a
"burning" smell. This is perfectly normal.
Manual gearbox
The gearbox does not require any maintenance (no oil change).
Automatic gearbox
The gearbox does not require any maintenance (no oil change).
Brake pads
Brake wear depends on the style of driving, particularly in the case of vehicles
used in town, over short distances. It may be
necessary to have the condition of the brakes
checked, even between vehicle services.
Unless there is a leak in the circuit, a drop in the
brake fluid level indicates that the brake pads
are worn.
After washing the vehicle, moisture, or in wintry conditions, ice can form on the
brake discs and pads: braking efficiency may
be reduced. Gently dab the brakes to dry and
defrost them.
Brake disc wear
For information on checking brake disc
wear, contact a CITROËN dealer or a
qualified workshop.
Manual parking brake
If you notice excessive brake lever travel or decreased effectiveness, the parking
brake must be adjusted, even between two
services.
This system must be checked by a CITROËN
dealer or a qualified workshop.
Wheels and tyres
The inflation pressure of all tyres, including the spare wheel, must be
checked on "cold” tyres.
The pressures indicated on the tyre pressure
label are valid for "cold" tyres. If you have driven
for more than 10 minutes or more than 6 miles
(10 kilometres) at over 31 mph (50 km/h), add 0.3 bar (30 kPa) to the values indicated on the
label.
Under-inflation increases fuel
consumption. Non-compliant tyre
pressure causes premature wear on tyres and
has an adverse effect on the vehicle's road
holding - risk of an accident!
Driving with worn or damaged tyres reduces the
braking and road holding performance of the
vehicle. It is recommended to regularly check the
condition of the tyres (tread and sidewalls) and
wheel rims as well as the presence of the valves.
When the wear indicators no longer appear set
back from the tread, the depth of the grooves is
less than 1.6 mm; it is imperative to replace the
tyres.
Using different size wheels and tyres from those
specified can affect the lifetime of tyres, wheel
rotation, ground clearance, the speedometer
reading and have an adverse effect on road
holding.
Fitting different tyres on the front and rear axles
can cause the ESC to mistime.
Page 137 of 244
135
Practical information
7Wheels and tyres
The inflation pressure of all tyres, including the spare wheel, must be
checked on "cold” tyres.
The pressures indicated on the tyre pressure
label are valid for "cold" tyres. If you have driven
for more than 10 minutes or more than 6 miles
(10 kilometres) at over 31 mph (50 km/h), add 0.3 bar (30 kPa) to the values indicated on the
label.
Under-inflation increases fuel
consumption. Non-compliant tyre
pressure causes premature wear on tyres and
has an adverse effect on the vehicle's road
holding - risk of an accident!
Driving with worn or damaged tyres reduces the
braking and road holding performance of the
vehicle. It is recommended to regularly check the
condition of the tyres (tread and sidewalls) and
wheel rims as well as the presence of the valves.
When the wear indicators no longer appear set
back from the tread, the depth of the grooves is
less than 1.6 mm; it is imperative to replace the
tyres.
Using different size wheels and tyres from those
specified can affect the lifetime of tyres, wheel
rotation, ground clearance, the speedometer
reading and have an adverse effect on road
holding.
Fitting different tyres on the front and rear axles
can cause the ESC to mistime.
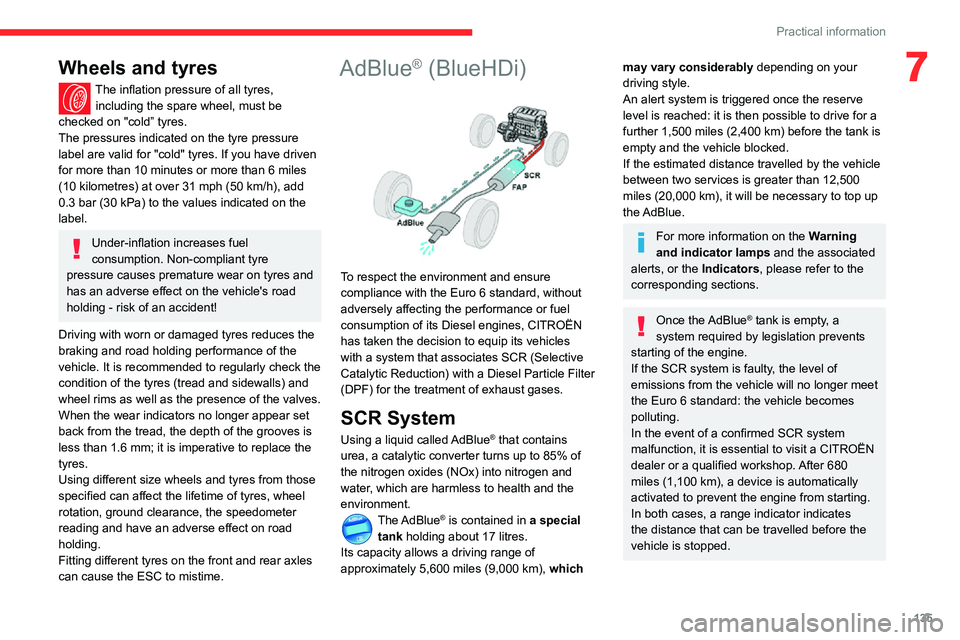
AdBlue® (BlueHDi)
To respect the environment and ensure
compliance with the Euro 6 standard, without
adversely affecting the performance or fuel
consumption of its Diesel engines, CITROËN
has taken the decision to equip its vehicles
with a system that associates SCR (Selective
Catalytic Reduction) with a Diesel Particle Filter
(DPF) for the treatment of exhaust gases.
SCR System
Using a liquid called AdBlue® that contains
urea, a catalytic converter turns up to 85% of
the nitrogen oxides (NOx) into nitrogen and
water, which are harmless to health and the
environment.
The AdBlue® is contained in a special
tank holding about 17 litres.
Its capacity allows a driving range of
approximately 5,600 miles (9,000 km), which
may vary considerably depending on your
driving style.
An alert system is triggered once the reserve
level is reached: it is then possible to drive for a
further 1,500 miles (2,400 km) before the tank is empty and the vehicle blocked.
If the estimated distance travelled by the vehicle
between two services is greater than 12,500
miles (20,000 km), it will be necessary to top up
the AdBlue.
For more information on the Warning
and indicator lamps and the associated
alerts, or the Indicators, please refer to the
corresponding sections.
Once the AdBlue® tank is empty, a
system required by legislation prevents
starting of the engine.
If the SCR system is faulty, the level of
emissions from the vehicle will no longer meet
the Euro 6 standard: the vehicle becomes
polluting.
In the event of a confirmed SCR system
malfunction, it is essential to visit a CITROËN
dealer or a qualified workshop. After 680
miles (1,100 km), a device is automatically
activated to prevent the engine from starting.
In both cases, a range indicator indicates
the distance that can be travelled before the
vehicle is stopped.
Page 141 of 244

139
In the event of a breakdown
8Running out of fuel
(Diesel)
With Diesel engines, the fuel system must be
primed if you run out of fuel.
Before starting to prime the system, it is
essential to put at least 5 litres of Diesel into the
fuel tank.
For more information on Refuelling and
on Misfuel prevention (Diesel), please
refer to the corresponding section.
For non-BlueHDi versions, the fuel system
components are located in the engine
compartment, possibly under the removable
cover.
For more information on the Engine
compartment, in particular the location
of these components under the bonnet,
please refer to the corresponding section.
BlueHDi engines
► Switch on the ignition (without starting the engine).► Wait around 1 minute and switch off the ignition.► Operate the starter motor to start the engine.If the engine does not start at the first attempt,
do not keep trying, but restart the procedure.
Non-BlueHDi engines
► Open the bonnet and then, if necessary , unclip the cover to access the priming pump.► Operate the priming pump repeatedly until resistance is felt (resistance may be
felt at the first press).
► Operate the starter motor to start the engine (if the engine does not start at the first attempt,
wait around 15 seconds before trying again).
► If the engine does not start after a few attempts, operate the priming pump again, then
the starter motor.
► Put the cover back in place and clip it in, then close the bonnet.
Tool kit
Set of tools supplied with the vehicle.
Its content depends on your vehicle's equipment:
– Temporary puncture repair kit.– Spare wheel.
Accessing the tools
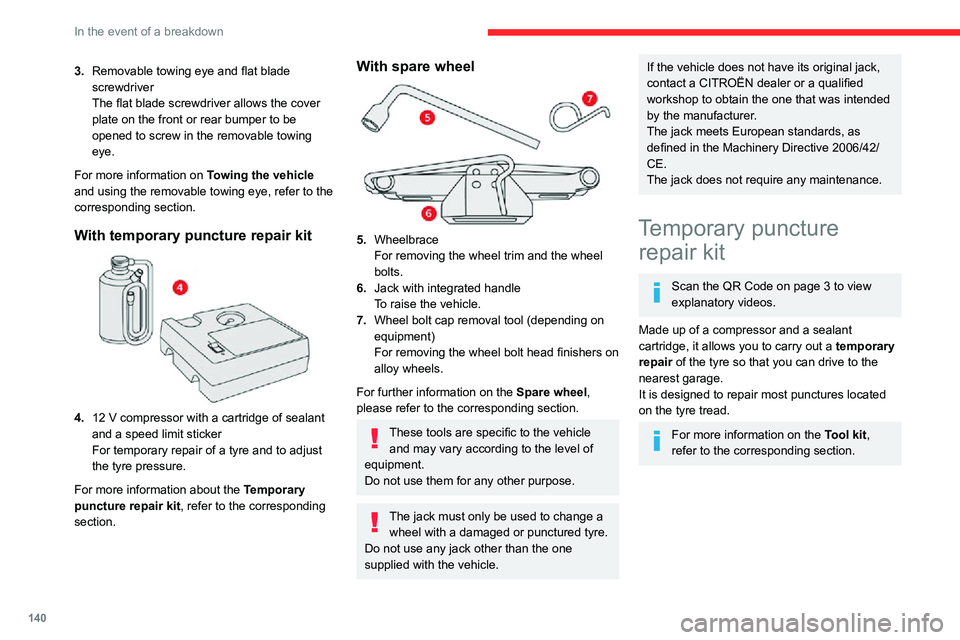
List of tools
1. Chocks to immobilise the vehicle (depending
on equipment)
2. Socket for the wheel security bolts (located in
the glove box or in the tool box) (depending
on country of sale)
For adapting the wheelbrace to the special
‘security’ bolts.
Page 142 of 244
140
In the event of a breakdown
Access to the kit
This kit is installed in the storage box, under the
boot floor.
Repair procedure
Do not remove any foreign bodies (e.g.
nail, screw) which have penetrated into
the tyre.
► Park the vehicle without obstructing traffic and apply the parking brake.► Follow the safety instructions (hazard warning lamps, warning triangle, high visibility
vest, etc.) according to the legislation in force in
the country of driving.
► Switch off the ignition.► Uncoil the pipe stowed under the compressor.
3.Removable towing eye and flat blade
screwdriver
The flat blade screwdriver allows the cover
plate on the front or rear bumper to be
opened to screw in the removable towing
eye.
For more information on Towing the vehicle
and using the removable towing eye, refer to the
corresponding section.
With temporary puncture repair kit
4.12 V compressor with a cartridge of sealant and a speed limit sticker
For temporary repair of a tyre and to adjust
the tyre pressure.
For more information about the Temporary
puncture repair kit, refer to the corresponding
section.
With spare wheel
5. Wheelbrace
For removing the wheel trim and the wheel
bolts.
6. Jack with integrated handle
To raise the vehicle.
7. Wheel bolt cap removal tool (depending on
equipment)
For removing the wheel bolt head finishers on
alloy wheels.
For further information on the Spare wheel,
please refer to the corresponding section.
These tools are specific to the vehicle and may vary according to the level of
equipment.
Do not use them for any other purpose.
The jack must only be used to change a wheel with a damaged or punctured tyre.
Do not use any jack other than the one
supplied with the vehicle.
If the vehicle does not have its original jack,
contact a CITROËN dealer or a qualified
workshop to obtain the one that was intended
by the manufacturer.
The jack meets European standards, as
defined in the Machinery Directive 2006/42/
CE.
The jack does not require any maintenance.
Temporary puncture repair kit
Scan the QR Code on page 3 to view
explanatory videos.
Made up of a compressor and a sealant
cartridge, it allows you to carry out a temporary
repair of the tyre so that you can drive to the
nearest garage.
It is designed to repair most punctures located
on the tyre tread.
For more information on the Tool kit,
refer to the corresponding section.
Page 145 of 244

143
In the event of a breakdown
8The tyre inflation pressures are given on this label.
► Start the compressor by placing the switch at position " I" and adjust the pressure to the value
shown on the vehicle's tyre pressure label. To
deflate: press the black button located on the
compressor pipe, near the valve connection.
If after 7 minutes the pressure of 2 bar is
not reached, the tyre is damaged;
contact a CITROËN dealer or a qualified
workshop for assistance.
► Once the correct pressure is reached, put the switch in position " O".► Remove the kit and stow it.
Should the pressure of one or more tyres
be adjusted, it is necessary to reinitialise
the under-inflation detection system.
For more information on Tyre under-inflation
detection, refer to the corresponding section.
Spare wheel
Scan the QR Code on page 3 to view
explanatory videos.
For more information on the Tool kit,
refer to the corresponding section.
Access to the spare wheel
The spare wheel is installed in the boot, under
the floor.
Removing the spare wheel
► Unclip and remove the tool storage box or remove the polystyrene cover (depending on
version).
► Slacken the central nut.► Remove the fastening device (nut and bolt).► Lift the spare wheel towards you from the rear.► Take the wheel out of the boot.
Removing a wheel
Parking the vehicle
Immobilise the vehicle where it does
not obstruct traffic: the ground must be level,
stable and non-slippery.
With a manual gearbox, engage first gear
to lock the wheels, apply the parking brake,
unless it is programmed to be in automatic
mode, and switch off the ignition.
Page 150 of 244

148
In the event of a breakdown
the bulbs on the corresponding side has
failed.
► Turn the bulb holder a eighth of a turn anti-clockwise and remove it.► Remove the bulb and replace it.
Amber coloured bulbs must be replaced by bulbs with identical specifications and
colour.
Dipped beam headlamps
► Remove the protective cover by unscrewing it.► Disconnect the bulb connector .► Pull out the bulb and replace it.
Main beam headlamps
► Remove the protective cover by unscrewing it.► Disconnect the bulb connector.► Pull out the bulb and replace it.
Front foglamps
► Remove the protective cover by unscrewing it.► Disconnect the bulb connector.
► Turn the lamp a quarter turn anti-clockwise, pull it out and replace it.
Rear lamps
1.Brake lamps / Sidelamps (W21/5W)
2. Direction indicators (WY21W)
3. Reversing lamp or foglamp (P21W)
Replacing lamp units
These bulbs are changed from outside the boot.
Page 152 of 244

150
In the event of a breakdown
Fuses in the dashboard
Access to the fuses
The 2 fuseboxes are located in the lower part of
the dashboard, below the steering wheel.
► Unclip the cover by pulling at the top left, then right.
The 2 fuseboxes are located in the lower part of
the dashboard, in the glove box.
► Open the glove box.► Unclip the fusebox protection cover.
Changing a fuse
Access to tooling
The extraction tweezers are located behind the
dashboard fuse box cover.
► Unclip the cover by pulling at the top left, then right.► Disengage the cover completely and turn it over,► Take the tweezers from their housing.
Changing a fuse
Before changing a fuse:► Identify the cause of the fault and fix it.► Stop all power consumption.► Immobilise the vehicle and switch the ignition off.► Identify the defective fuse using the current allocation tables and diagrams.
To replace a fuse, it is essential to:
► Use the special tweezers to extract the fuse from its housing and check the condition of its
filament.
► Always replace the failed fuse with a fuse of the same rating (same colour); use of a different
rating may cause malfunctions - risk of fire!
If the fault recurs after replacing a fuse, have the
electrical system checked by a CITROËN dealer
or a qualified workshop.
The fuse allocation tables and the
corresponding diagrams are available
from a CITROËN dealer or from a qualified
workshop.
The replacement of a fuse not shown in the allocation tables may cause a serious
malfunction of your vehicle. Contact a
CITROËN dealer or a qualified workshop.
Good Failed
Tweezers
Installing electrical accessories
Your vehicle's electrical system is
designed to operate with standard or optional
equipment.
Before installing other electrical equipment
or accessories on your vehicle, contact a
CITROËN dealer or a qualified workshop.
CITROËN will not accept responsibility
for the cost incurred in repairing your
vehicle or for rectifying malfunctions resulting
from the installation of accessories not
supplied and not recommended by CITROËN
and not installed in accordance with its
instructions, in particular when the combined
consumption of all of the additional equipment
connected exceeds 10 milliamperes.
Page 157 of 244
155
In the event of a breakdown
8At the battery, it is only necessary to disconnect
the (+) terminal.
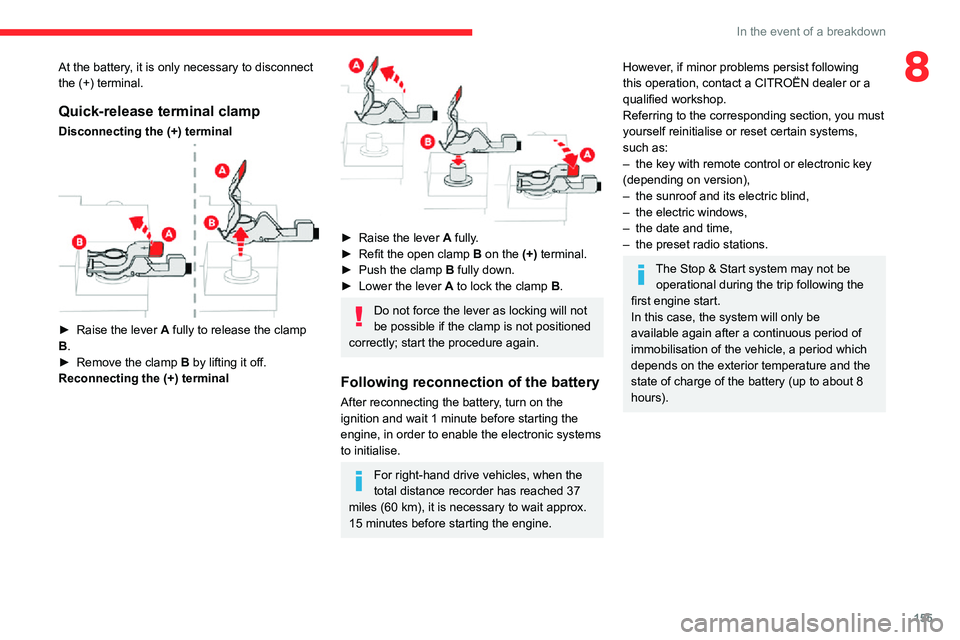
Quick-release terminal clamp
Disconnecting the (+) terminal
► Raise the lever A fully to release the clamp
B.
► Remove the clamp B by lifting it off.
Reconnecting the (+) terminal
► Raise the lever A fully.► Refit the open clamp B on the (+) terminal.► Push the clamp B fully down.► Lower the lever A to lock the clamp B.
Do not force the lever as locking will not
be possible if the clamp is not positioned
correctly; start the procedure again.
Following reconnection of the battery
After reconnecting the battery, turn on the
ignition and wait 1 minute before starting the
engine, in order to enable the electronic systems
to initialise.
For right-hand drive vehicles, when the
total distance recorder has reached 37
miles (60 km), it is necessary to wait approx.
15 minutes before starting the engine.
However, if minor problems persist following
this operation, contact a CITROËN dealer or a
qualified workshop.
Referring to the corresponding section, you must
yourself reinitialise or reset certain systems,
such as:
– the key with remote control or electronic key (depending on version),– the sunroof and its electric blind,– the electric windows,– the date and time,– the preset radio stations.
The Stop & Start system may not be
operational during the trip following the
first engine start.
In this case, the system will only be
available again after a continuous period of
immobilisation of the vehicle, a period which
depends on the exterior temperature and the
state of charge of the battery (up to about 8
hours).
Page 160 of 244

158
Technical data
Engine technical data and
towed loads
Engines
The engine specifications (capacity, max. power,
max. speed, energy, CO
2 emissions, etc.)
associated with your vehicle are indicated on
the registration document, as well as in sales
brochures.
These characteristics correspond to the values
type-approved on a test bed, under conditions
defined in European legislation (Directive
1999/99/EC).
For more information, contact a CITROËN dealer
or a qualified workshop.
Weights and towed loads
The weights and towed loads relating to
your vehicle are indicated on the registration
document, as well as in sales brochures.
These values are also indicated on the
manufacturer's plate or label.
For more information, contact a CITROËN dealer
or a qualified workshop.
The GTW values and the towed loads listed are
valid for a maximum altitude of 1,000 metres.
The towed load must be reduced by steps of
10% for each additional 1,000 metres.
The maximum authorised nose weight
corresponds to the weight permitted on the
towball.
GTW: Gross train weight.
When exterior temperatures are high, the
vehicle performance may be limited in
order to protect the engine. When the exterior
temperature is higher than 37°C, limit the
towed weight.
Towing using a lightly loaded vehicle can adversely affect roadholding.
Braking distances are increased when towing
a trailer.
When using a vehicle to tow, never exceed a
speed of approximately 60 mph (100 km/h)
(observe the local legislation in force).
If the exterior temperature is high, it is
recommended that the engine is allowed
to idle for 1 to 2 minutes after the vehicle
comes to a stop, to facilitate its cooling.
Engines and towed loads - PETROL
Engine PureTech 110 S&SPureTech 110 S&S
Gearbox Manual 5-speed
(BVM5)Automatic
6-speed (EAT6)Manual 6-speed
(BVM6)Automatic
6-speed (EAT6)Manual 6-speed
(BVM6)
Code EB2DT
(Euro 6.1)EB2ADT(Euro 6.2)EB2ADT(Euro 6.3)
Model codes: 2R...HNZBHNZWHNPJHNPXHNPM
Cubic capacity (cm
3) 1,1991,1991,1991,1991,199
Max. power: EC standard (kW) 8181818181
Fuel UnleadedUnleadedUnleadedUnleadedUnleaded
Braked trailer (within the GTW limit) on a
10 or 12% slope (kg) 840
840840840840
Unbraked trailer (kg) 600600600600600
Maximum authorised nose weight (kg) 6565656565
Page 168 of 244
166
Bluetooth® audio system
"Connections": Manage connections,
search for devices.
"Personalisation-configuration ": Define
the vehicle parameters, Choice of
language, Display configuration, Choice of units,
Date and time adjustment.
Press the "MENU" button.
Move from one menu to another.
Enter a menu.
Radio
Selecting a station
Press the SOURCE button repeatedly
and select the radio.
Press this button to select a waveband (FM / AM / DAB).Press one of the buttons for an automatic
search for radio stations.
Press one of the buttons to carry out a
manual search up / down for radio
frequencies.
Press this button to display the list of stations received locally.
To update this list, press for more than two
seconds. The sound is cut while updating.
RDS
The external environment (hills, buildings, tunnels, basement car parks,
etc.) may block reception, including in RDS
mode. This is a normal effect of the way in
which radio waves are transmitted and does
not indicate any failure of the audio
equipment.
If RDS is not available, the RDS symbol
appears struck out in the screen.
The RDS, if activated, enables you to continue listening to the same station by
automatic retuning to alternative frequencies.
However, in certain conditions, coverage of
an RDS station may not be assured
throughout the entire country as radio stations
do not cover 100% of the territory. This
explains the loss of reception of the station
during a journey.
Short procedure
In "Radio" mode, press the OK button to activate
or deactivate RDS directly.
Long procedure
Press the MENU button.
Select "Audio functions ".
Press OK.
Select the "FM waveband preferences"
function.
Press OK.
Select "Frequency tracking (RDS)".
Press OK, RDS is displayed on the
screen.
Play TA messages
The TA (Traffic Announcement) function gives priority to TA alert messages. To
operate, this function needs good reception of
a radio station that carries this type of
message. When a traffic report is transmitted,
the current audio source (Radio, CD, etc.) is
interrupted automatically to play the TA
message. Normal play of the media
previously playing is resumed at the end of
the message.
Take care when increasing the volume while listening to TA messages. The
volume may prove too high on return to the
original audio source.
Press the TA button to activate or
deactivate traffic messages.
Receiving INFO messages
The INFO function gives priority to TA alert messages. To be active, this
function needs good reception of a radio
station that transmits this type of message.
When a message is transmitted, the current
audio source (Radio, CD, USB, etc.) is
interrupted automatically to receive the INFO
message. Normal play of the media
previously playing is resumed at the end of
the message.
Make a long press on this button to display the list of categories.Select or deselect categories.
Activate or deactivate the reception of the corresponding messages.
Display TEXT INFOS
Radio text is information transmitted by
the radio station related to the station's
current programme or song.
When the radio station is displayed in the screen, press OK to display the
contextual menu.
Select "RadioText (TXT) display " and
confirm OK to save.