Citroen C3 PICASSO 2014 1.G Owner's Manual
Manufacturer: CITROEN, Model Year: 2014, Model line: C3 PICASSO, Model: Citroen C3 PICASSO 2014 1.GPages: 292, PDF Size: 9.23 MB
Page 171 of 292
169
C3Picasso_en_Chap11_informations-pratiques_ed01-2014
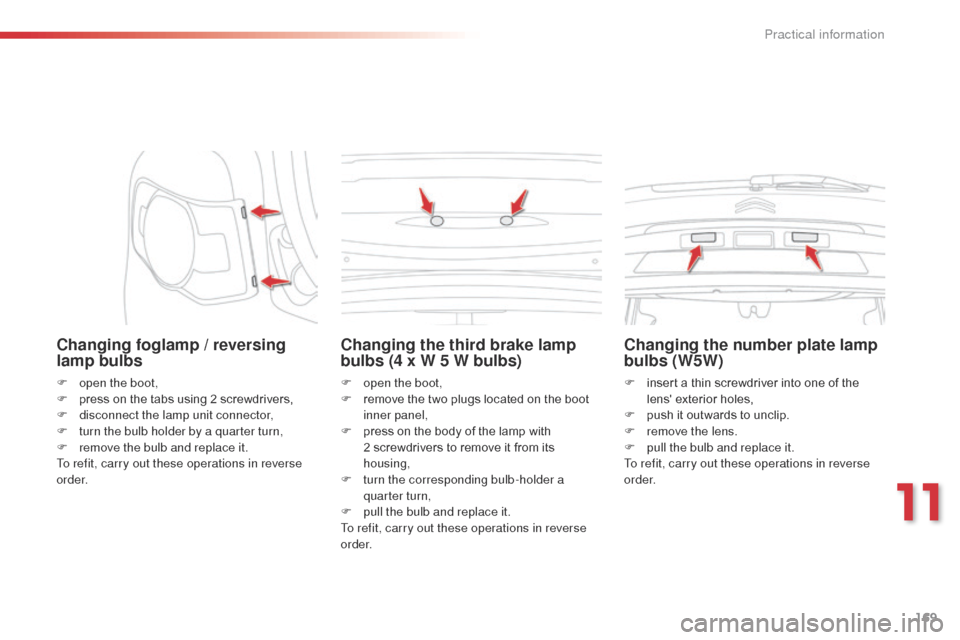
Changing foglamp / reversing
lamp bulbs
F open the boot,
F p ress on the tabs using 2 screwdrivers,
F
d
isconnect the lamp unit connector,
F
t
urn the bulb holder by a quarter turn,
F
r
emove the bulb and replace it.
To refit, carry out these operations in reverse
o r d e r.
Changing the third brake lamp
bulbs (4 x W 5 W bulbs)
F open the boot,
F r emove the two plugs located on the boot
inner panel,
F
p
ress on the body of the lamp with
2
screwdrivers to remove it from its
housing,
F
t
urn the corresponding bulb-holder a
quarter turn,
F
p
ull the bulb and replace it.
To refit, carry out these operations in reverse
o r d e r.
Changing the number plate lamp
bulbs (W5W)
F insert a thin screwdriver into one of the lens' exterior holes,
F
p
ush it outwards to unclip.
F
r
emove the lens.
F
p
ull the bulb and replace it.
To refit, carry out these operations in reverse
o r d e r.
11
Practical information
Page 172 of 292
170
C3Picasso_en_Chap11_informations-pratiques_ed01-2014
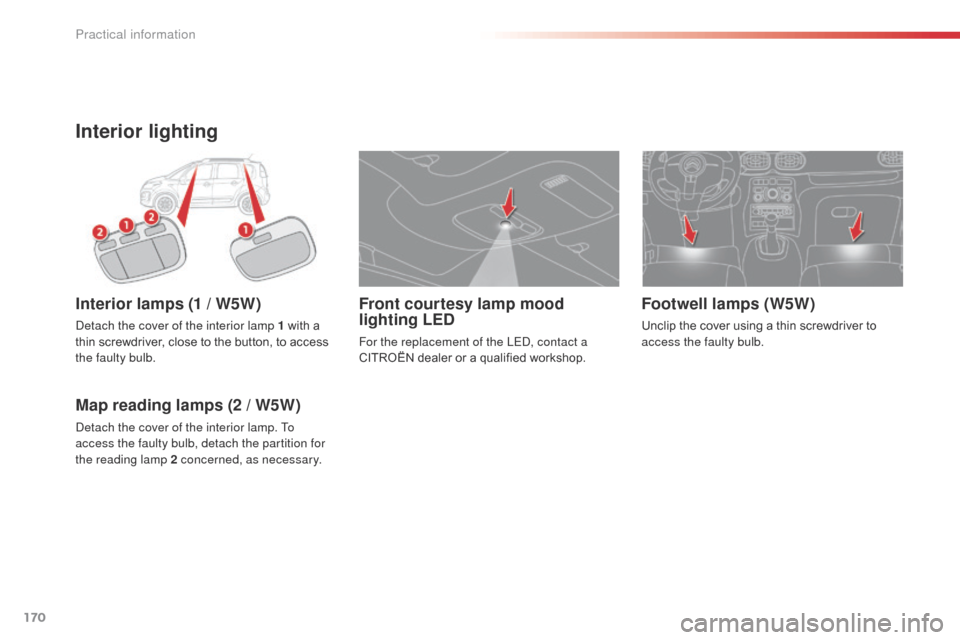
Interior lighting
Interior lamps (1 / W5W)
detach the cover of the interior lamp 1 with a
thin screwdriver, close to the button, to access
the faulty bulb.
Map reading lamps (2 / W5W)
detach the cover of the interior lamp. To
access the faulty bulb, detach the partition for
the reading lamp 2 concerned, as necessary.
Footwell lamps (W5W)
Unclip the cover using a thin screwdriver to
access the faulty bulb.
Front courtesy lamp mood
lighting LED
For the replacement of the LEd, contact a
CITROËN dealer or a qualified workshop.
Practical information
Page 173 of 292
171
C3Picasso_en_Chap11_informations-pratiques_ed01-2014
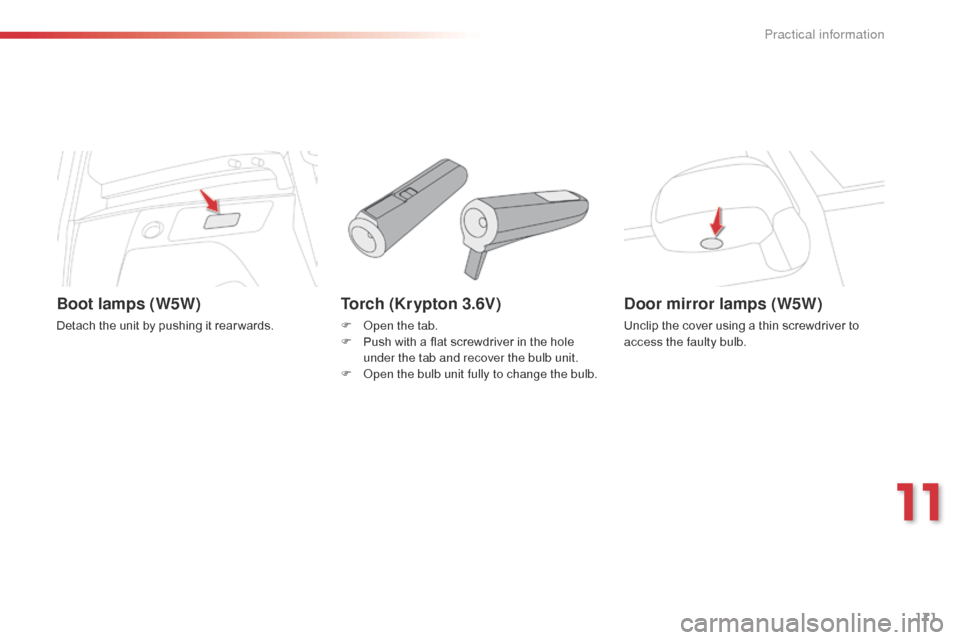
Torch (Krypton 3.6V)
F open the tab.
F P ush with a flat screwdriver in the hole
under the tab and recover the bulb unit.
F
o
p
en the bulb unit fully to change the bulb.
Door mirror lamps (W5W)
Unclip the cover using a thin screwdriver to
access the faulty bulb.
Boot lamps (W5W)
Detach the unit by pushing it rear wards.
11
Practical information
Page 174 of 292

172
C3Picasso_en_Chap11_informations-pratiques_ed01-2014
Changing a fuseProcedure for replacing a failed fuse with a new fuse to rectify a failure of the corresponding function.
The extraction tweezer and the spare fuse
storage compartment are installed on the back
of the dashboard fusebox cover.
For access to them:
F
u
nclip the cover by pulling on the side,
F
r
emove the cover completely,
F
r
emove the tweezer.
Changing a fuse
before changing a fuse, the cause of the failure
must be identified and rectified.
F
I
dentify the faulty fuse by checking the
condition of its filament.
F
U
se the special tweezer to extract the fuse
from its housing.
F
A
lways replace the faulty fuse with a fuse
of the same rating.
F
C
heck that the number marked on the
fusebox, the rating marked on the fuse and
the following tables all agree. Good
FailedCITROËN will not accept responsibility
for the cost incurred in repairing your
vehicle or for rectifying malfunctions
resulting from the installation of
accessories not supplied and not
recommended by CITR
oËn
and
not installed in accordance with its
instructions, in particular when the
combined consumption of all of the
additional equipment connected
exceeds 10 milliamperes.Installing electrical
accessories
Your vehicle's electrical system is
designed to operate with standard or
optional equipment.
be
fore installing other electrical
equipment or accessories on your
vehicle, contact a CITR
oËn
dealer or a
qualified workshop.
Access to tools
Practical information
Page 175 of 292
173
C3Picasso_en_Chap11_informations-pratiques_ed01-2014
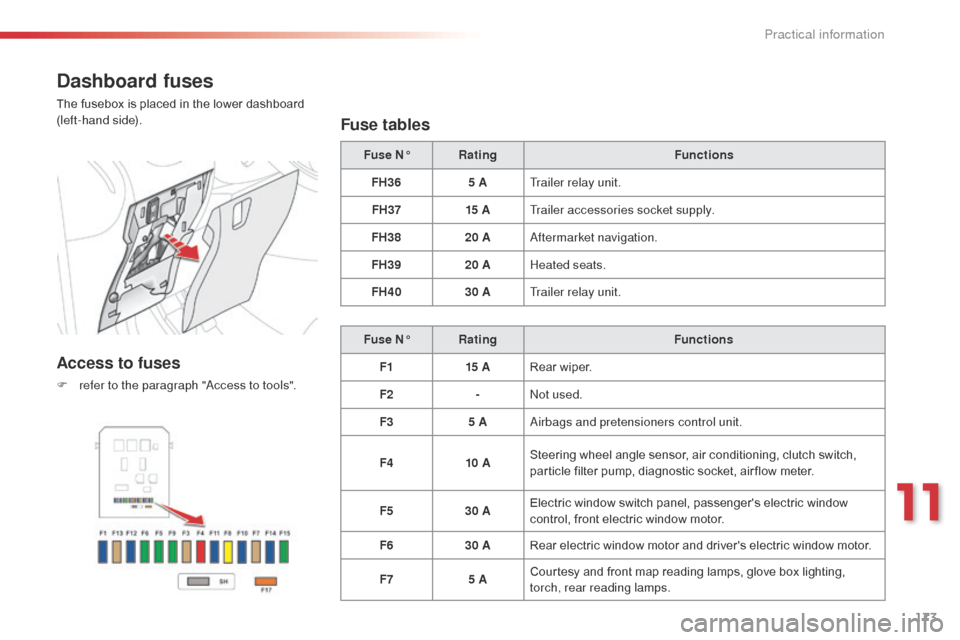
Dashboard fuses
The fusebox is placed in the lower dashboard
(left-hand side).
Access to fuses
F refer to the paragraph "access to tools".
Fuse tables
Fuse N°Rating Functions
FH36 5 ATrailer relay unit.
FH37 15 ATrailer accessories socket supply.
FH38 20 A
af
termarket navigation.
FH39 20 AHeated seats.
FH40 30 ATrailer relay unit.
Fuse N° Rating Functions
F1 15 ARear wiper.
F2 -
no
t used.
F3 5 A
ai
rbags and pretensioners control unit.
F4 10 ASteering wheel angle sensor, air conditioning, clutch switch,
particle filter pump, diagnostic socket, air flow meter.
F5 30 AElectric window switch panel, passenger's electric window
control, front electric window motor.
F6 30 ARear electric window motor and driver's electric window motor.
F7 5 ACourtesy and front map reading lamps, glove box lighting,
torch, rear reading lamps.
11
Practical information
Page 176 of 292
174
C3Picasso_en_Chap11_informations-pratiques_ed01-2014
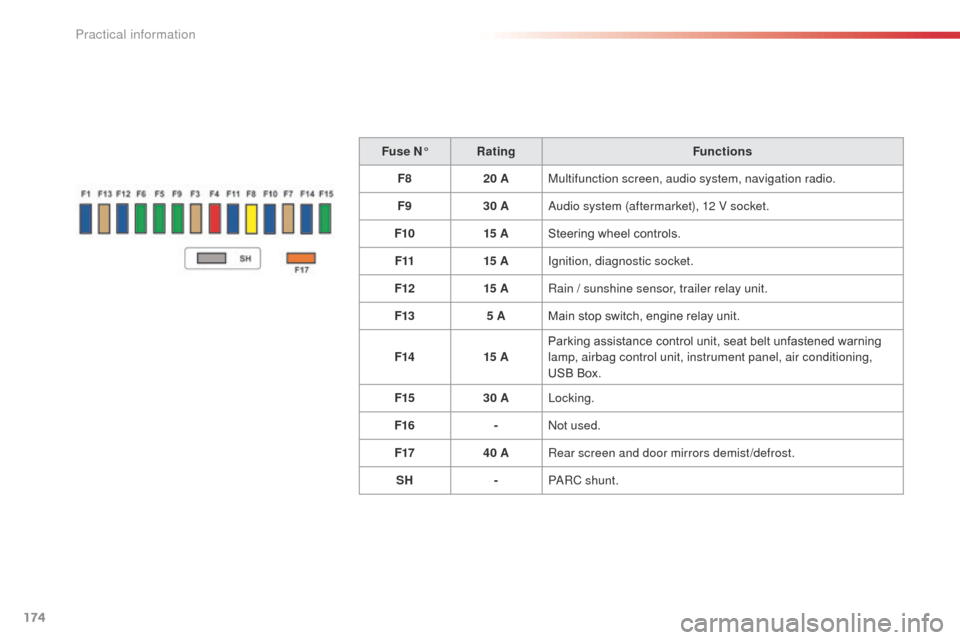
Fuse N°Rating Functions
F8 20 AMultifunction screen, audio system, navigation radio.
F9 30 A
au
dio system (aftermarket), 12 V socket.
F10 15 ASteering wheel controls.
F11 15 AIgnition, diagnostic socket.
F12 15 ARain / sunshine sensor, trailer relay unit.
F13 5 AMain stop switch, engine relay unit.
F14 15 AParking assistance control unit, seat belt unfastened warning
lamp, airbag control unit, instrument panel, air conditioning,
USB Box.
F15 30 ALocking.
F16 -
no
t used.
F17 40 ARear screen and door mirrors demist/defrost.
SH -P
aR
C shunt.
Practical information
Page 177 of 292

175
C3Picasso_en_Chap11_informations-pratiques_ed01-2014
Engine compartment fuses
The fusebox is placed in the engine
compartment near the battery (left-hand side).
Access to fuses
F Unclip the cover.
F C hange the fuse (see corresponding
paragraph).
F
W
hen you have finished, close the cover
carefully to ensure the correct sealing of
the fusebox.
All work on these fuses, located on
the battery, must be carried out by
a CITR
oËn
dealer or a qualified
workshop.
11
Practical information
Page 178 of 292
176
C3Picasso_en_Chap11_informations-pratiques_ed01-2014
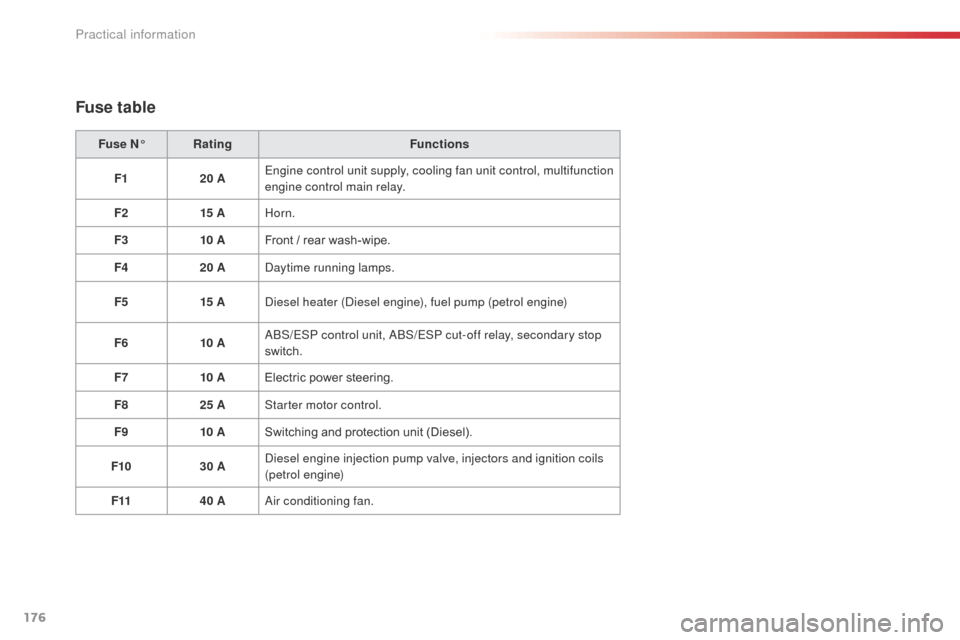
Fuse table
Fuse N°Rating Functions
F1 20 AEngine control unit supply, cooling fan unit control, multifunction
engine control main relay.
F2 15 AHorn.
F3 10 AFront / rear wash-wipe.
F4 20 A
da
ytime running lamps.
F5 15 A
di
esel heater (
di
esel engine), fuel pump (petrol engine)
F6 10 A
a
b
S
/ESP control unit, ab
S
/ESP cut-off relay, secondary stop
switch.
F7 10 AElectric power steering.
F8 25 AStarter motor control.
F9 10 ASwitching and protection unit (Diesel).
F10 30 A
di
esel engine injection pump valve, injectors and ignition coils
(petrol engine)
F11 40 A
air
conditioning fan.
Practical information
Page 179 of 292
177
C3Picasso_en_Chap11_informations-pratiques_ed01-2014
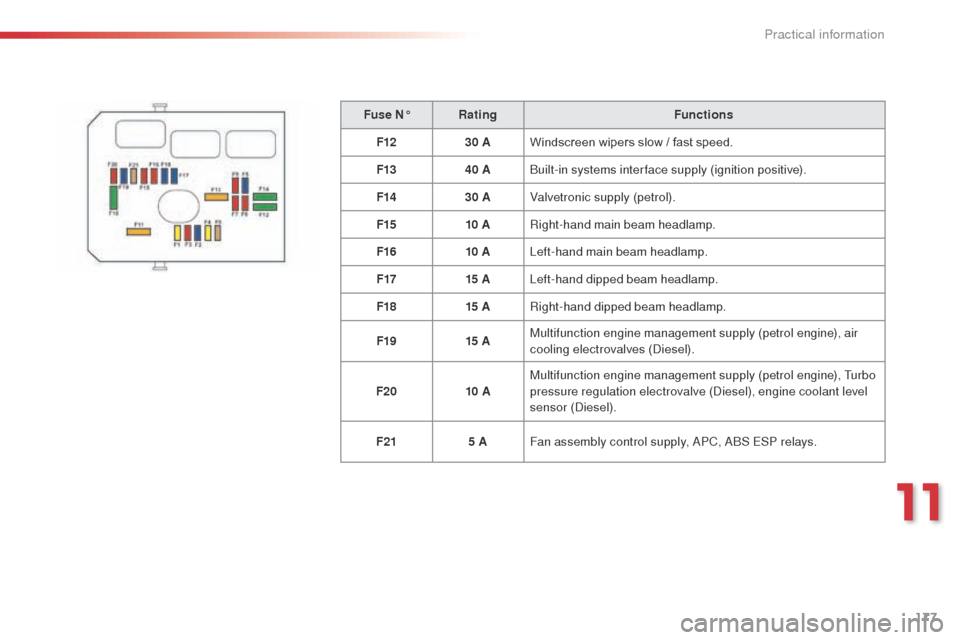
Fuse N°Rating Functions
F12 30 AWindscreen wipers slow / fast speed.
F13 40 A
bu
ilt-in systems inter face supply (ignition positive).
F14 30 AValvetronic supply (petrol).
F15 10 ARight-hand main beam headlamp.
F16 10 ALeft-hand main beam headlamp.
F17 15 ALeft-hand dipped beam headlamp.
F18 15 ARight-hand dipped beam headlamp.
F19 15 AMultifunction engine management supply (petrol engine), air
cooling electrovalves (
die
sel).
F20 10 AMultifunction engine management supply (petrol engine), Turbo
pressure regulation electrovalve (
di
esel), engine coolant level
sensor (
di
esel).
F21 5 AFan assembly control supply,
a
P
C, ab
S E
SP relays.
11
Practical information
Page 180 of 292
178
C3Picasso_en_Chap11_informations-pratiques_ed01-2014
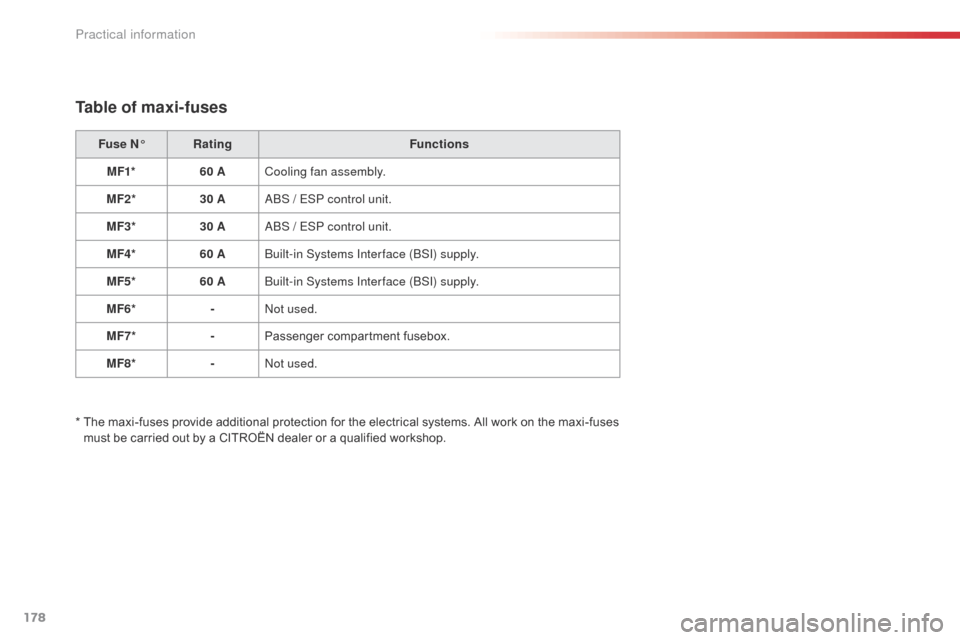
Table of maxi-fuses
Fuse N°Rating Functions
MF1* 60 ACooling fan assembly.
MF2* 30 A
a
b
S / E
SP control unit.
MF3* 30 A
a
b
S / E
SP control unit.
MF4* 60 A
bu
ilt-in Systems Inter face (
bS
I) supply.
MF5* 60 A
bu
ilt-in Systems Inter face (
bS
I) supply.
MF6* -
no
t used.
MF7* -Passenger compartment fusebox.
MF8* -
no
t used.
*
T
he maxi-fuses provide additional protection for the electrical systems. All work on the maxi-fuses
must be carried out by a CITROËN dealer or a qualified workshop.
Practical information