headlamp Citroen C3 RHD 2014 2.G Owner's Manual
[x] Cancel search | Manufacturer: CITROEN, Model Year: 2014, Model line: C3 RHD, Model: Citroen C3 RHD 2014 2.GPages: 284, PDF Size: 8.99 MB
Page 4 of 284

.
.
Child seats 86
dea
ctivating the passenger's front airbag
8
9
IS
oF
IX child seats
9
4
Electric child lock
9
8
Child safety
Instrument panels 10
Indicator and warning lamps
1
2
Adjustment buttons
2
5
Trip computer
2
7
MonitoringOver view
Monochrome screen a 3
0
Monochrome screen C
3
3
16/9 colour screen (eMyWay)
3
7
Multifunction screens
Ventilation 39
Heating
41
Manual air conditioning
4
1
Front demist - defrost
4
3
di
gital air conditioning
4
4
Rear screen demist - defrost
4
6
Scented air freshener
4
7
Front seats
4
8
Rear seats
5
0
M i r r o r s
51
S
teering wheel adjustment
5
2
Comfort
Remote control key 53
Alarm
5
8
Window controls
6
0
Doors
6
2
Boot
6
5
Fuel tank
6
6
Misfuel prevention (
die
sel)
6
8
access
Lighting controls 69
LED lamps
7
3
Headlamp adjustment
7
3
Wiper controls
7
4
Courtesy lamps
7
7
Interior mood lighting
7
8
Boot lamp
7
8
Visibility
Interior fittings 79
Boot fittings
8
4
Fittings
Eco-driving
Contents
Page 9 of 284

7
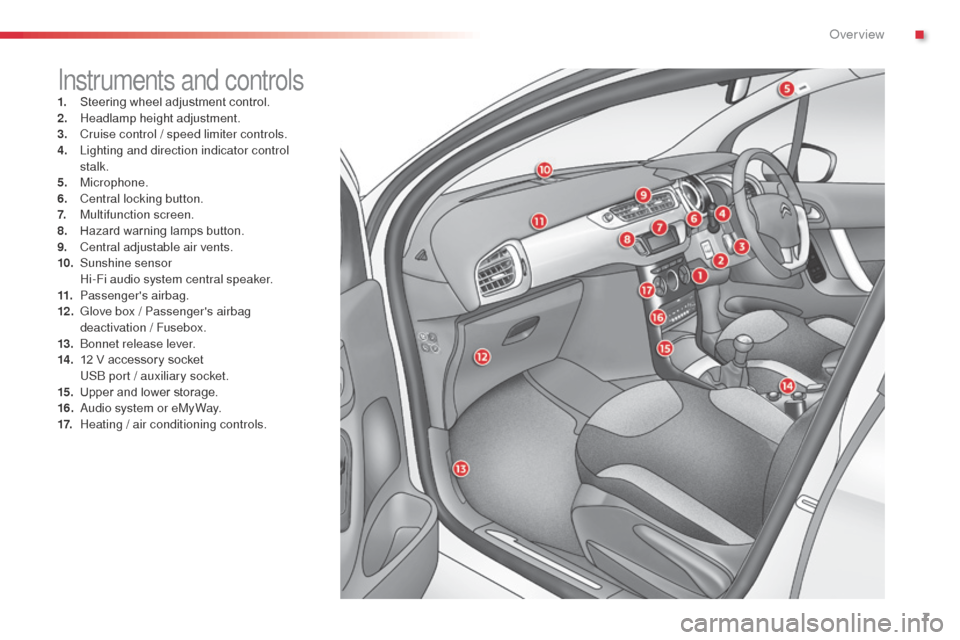
Instruments and controls1. Steering wheel adjustment control.
2. Headlamp height adjustment.
3.
C
ruise control / speed limiter controls.
4.
L
ighting and direction indicator control
stalk.
5.
Microphone.
6.
C
entral locking button.
7.
M
ultifunction screen.
8.
H
azard warning lamps button.
9.
C
entral adjustable air vents.
10.
S
unshine sensor
H
i-Fi audio system central speaker.
11.
P
assenger's airbag.
12 .
G
love box / Passenger's airbag
deactivation / Fusebox.
13.
b
o
nnet release lever.
14 .
1
2 V accessory socket
U
S
b
port / auxiliary socket.
15.
U
pper and lower storage.
16.
a
u
dio system or eMyWay.
17.
H
eating / air conditioning controls.
.
over view
Page 10 of 284

8
Eco-drivingEco-driving is a range of everyday practices that allow the motorist to optimise their fuel consumption and CO2 emissions.
Optimise the use of your gearbox
With a manual gearbox, move off gently and change up without waiting. during acceleration change up early.
With an automatic or electronic gearbox, give preference to automatic
mode and avoid pressing the accelerator pedal heavily or suddenly.
Drive smoothly
Maintain a safe distance between vehicles, use engine braking rather
than the brake pedal, and press the accelerator progressively. These
practices contribute towards a reduction in fuel consumption and CO
2
emissions and also helps reduce the background traffic noise.
If your vehicle has cruise control, make use of the system at speeds
above 25 mph (40 km/h) when the traffic is flowing well. The gear shift indicator invites you engage the most suitable gear: as
soon as the indication is displayed in the instrument panel, follow it
straight away.
For vehicles fitted with an electronic or automatic gearbox, this
indicator appears only in manual mode.
Control the use of your electrical
equipment
Before moving off, if the passenger compartment is too warm, ventilate it
by opening the windows and air vents before using the air conditioning.
Above 30 mph (50 km/h), close the windows and leave the air vents
open.
Remember to make use of equipment that can help keep the temperature
in the passenger compartment down (sunroof and window blinds...).
Switch off the air conditioning, unless it has automatic regulation, as soon
as the desired temperature is attained.
Switch off the demisting and defrosting controls, if not automatic.
Switch off the heated seat as soon as possible.
Switch off the headlamps and front foglamps when the level of light
does not require their use.
Avoid running the engine before moving off, particularly in winter; your
vehicle will warm up much faster while driving.
as a p
assenger, if you avoid connecting your multimedia devices
(film, music, video game...), you will contribute towards limiting the
consumption of electrical energy, and so of fuel.
dis
connect your portable devices before leaving the vehicle.
Eco-driving
Page 15 of 284

13
Front foglampsfixed. The front foglamps are switched on
using the ring on the lighting control
stalk. Turn the ring on the lighting control stalk rear wards
twice to switch off the front foglamps.
Rear foglamps fixed. The rear foglamps are switched on. Turn the ring on the stalk rear wards to switch off the
rear foglamps.
Diesel engine
pre-heating fixed.
The key is at position 2 (ignition on) in
the ignition switch. Wait until the warning lamp goes off before starting.
The period of illumination of the warning lamp is
determined by the climatic conditions (up to about
thirty seconds in extreme climatic conditions).
If the engine does not start, switch the ignition off and
then on, wait until the warning lamp goes off again,
then start the engine.
Parking brake fixed. The parking brake is applied or not
properly released. Release the parking brake to switch off the warning
lamp, keeping your foot on the brake pedal.
ob
serve the safety recommendations.
For more information on the parking brake, refer to the
corresponding section.
Dipped beam
headlamps
fixed.
The lighting stalk is in the "
di
pped
beam headlamps" position.
Main beam
headlamps fixed.
The lighting stalk is pulled towards
you. Pull the stalk to return to dipped beam headlamps.
Warning/indicator lamp
is onCause Action / Observations
1
Monitoring
Page 35 of 284

33
Monochrome screen C
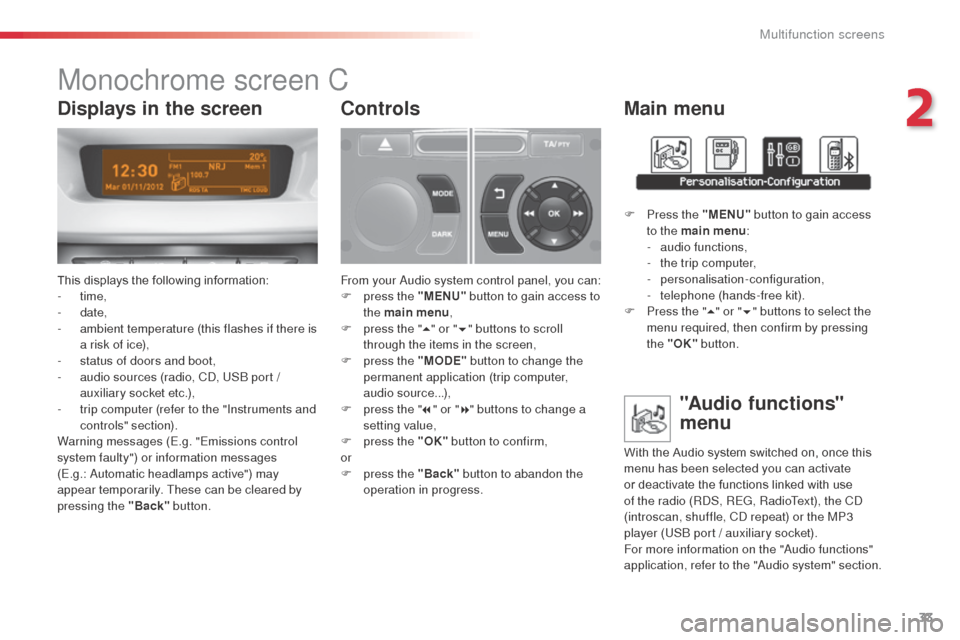
This displays the following information:
- time,
-
date,
-
a
mbient temperature (this flashes if there is
a risk of ice),
-
s
tatus of doors and boot,
-
a
udio sources (radio, C
d, U
S
b
port /
auxiliary socket etc.),
-
t
rip computer (refer to the "Instruments and
controls" section).
Warning messages (E.g. "Emissions control
system faulty") or information messages
(E.g.:
a
u
tomatic headlamps active") may
appear temporarily. These can be cleared by
pressing the "Back" button.
Controls
From your audio system control panel, you can:
F p ress the "MENU" button to gain access to
the main menu ,
F
p
ress the " 5" or " 6" buttons to scroll
through the items in the screen,
F
p
ress the "MODE" button to change the
permanent application (trip computer,
audio source...),
F
p
ress the " 7" or " 8" buttons to change a
setting value,
F
p
ress the "OK" button to confirm,
or
F
p
ress the "Back" button to abandon the
operation in progress.
Main menu
F Press the "MENU" button to gain access
to the main menu :
-
a
udio functions,
-
t
he trip computer,
-
personalisation-configuration,
-
t
elephone (hands-free kit).
F
P
ress the " 5" or " 6" buttons to select the
menu required, then confirm by pressing
the "OK" button.
"Audio functions"
menu
With the Audio system switched on, once this
menu has been selected you can activate
or deactivate the functions linked with use
of the radio (R
dS
, REG, RadioText), the C
d
(introscan, shuffle, C
d
repeat) or the MP3
player (US
b
port / auxiliary socket).
For more information on the "
au
dio functions"
application, refer to the "
au
dio system" section.
Displays in the screen
2
Multifunction screens
Page 37 of 284

35
Example: setting of the duration of the guide-
me-home lighting
F
P
ress the " 5" or " 6" buttons, then
the
"OK" button to select the menu
required.
F
P
ress the " 5" or " 6" buttons, then
the
"OK" button to select the "Guide-me-
home headlamps" line.
F
P
ress the " 7" or " 8" buttons to set the
value required (15, 30 or 60 seconds), then
press the "OK" button to confirm. F
P
ress the "
5" or " 6" buttons, then
the "OK"
button to select the "OK" box
and confirm or press the "Back" button to
cancel.
"Personalisation-
Configuration" menu
Define the vehicle parameters
once this menu has been selected, you can
activate or deactivate the following equipment:
-
w
iper linked to reverse gear (refer to the
"Visibility"),
-
g
uide-me-home lighting and duration (see
"Visibility"),
-
p
arking sensors (refer to the "
dr
iving"
section).
Using this menu, you can also reinitialise the
tyre under-inflation detection system (see the
"Safety") section.
on
ce this menu has been selected, you can
gain access to the following functions:
-
d
efine the vehicle parameters,
-
d
isplay configuration,
-
c
hoice of language.
2
Multifunction screens
Page 54 of 284

52
Steering wheel adjustment
F When stationary, pull the control lever to
release the adjustment mechanism.
F
a
d
just the height and reach to suit your
driving position.
F
P
ush the control lever to lock the
adjustment mechanism.
Rear view mirror
Adjustable mirror providing a central rear ward
view.
Equipped with an anti-dazzle system, which
darkens the mirror glass and reduces the
nuisance to the driver caused by the sun,
headlamps from other vehicles...
Adjustment
F adjust the mirror so that the glass is directed correctly in the "day" position.
Day / night position
F Pull the lever to change to the "night" anti-dazzle position.
F
P
ush the lever to change to the normal
"day" position.
Automatic day/night model
By means of a sensor, which measures the
light from the rear of the vehicle, this system
automatically and progressively changes
between the day and night uses.
Manual day/night model
as a safety measure, the mirrors should
be adjusted to reduce the "blind spot". In order to ensure optimum visibility
during your manoeuvres, the mirror
lightens automatically when reverse
gear is engaged.
as a s
afety precaution, these
operations should only be carried out
with the vehicle stationary.
Comfort
Page 71 of 284

69
Lighting controls
Main lighting
The various front and rear lamps of the vehicle
are designed to adapt the driver's visibility
progressively according to climatic conditions:
-
s
idelamps, to be seen,
-
d
ipped beam headlamps to see without
dazzling other drivers,
-
m
ain beam headlamps to see clearly when
the road is clear.
Additional lighting
other lamps are installed to fulfil the
requirements of particular conditions of
visibility:
-
a r
ear foglamp to be seen from afar,
-
f
ront foglamps for even better for ward
vision.
Programming
Various automatic lighting control modes
are also available according to the following
options:
-
gu
ide-me-home lighting,
-
a
utomatic illumination of headlamps.
Model without AUTO lighting
Model with AUTO lighting
Lighting off / daytime running
lam ps.
automatic illumination of headlamps.
Sidelamps only.
dip
ped or main beam headlamps.
B.
S
talk for switching the headlamp beam:
pull the stalk to switch between dipped and
main beam headlamps.
In the lamps off and sidelamps modes,
the
driver can switch on the main beam
headlamps temporarily ("headlamp flash") by
maintaining a pull on the stalk.
Displays
Lighting of the corresponding indicator lamp on
the instrument panel confirms the switching on
of the lighting selected.
dep
ending on version, the instrument panel
may have permanent back-lighting. Illumination
of the instrument panel is therefore not linked to
the exterior lighting.
Manual controls
The lighting is controlled directly by the driver
by means of the ring A and the stalk B .A.
M
ain lighting mode selection ring: turn it
to position the symbol required facing the
mark.
System for selection and control of the various front and rear lamps providing the vehicle's lighting.
5
Visibility
Page 72 of 284

70
C. Foglamp selection ring.
The foglamps operate with the dipped and main
beam headlamps.Rear foglamp
Rotate and release the ring C :
F
f
or wards a first time to switch on the front
foglamps,
F
f
or wards a second time to switch on the
rear foglamp,
F
r
ear wards a first time to switch off the rear
foglamp,
F
r
ear wards a second time to switch of the
front fog lamps.Model with rear foglamp only
F To switch on the foglamp, turn the ring C forwards.
When the lighting is switched off automatically
(with AUTO model), the foglamp and the dipped
beam headlamps will remain on.
F
T
o switch off all of the lighting, turn the
ring
C rearwards.
Model with front foglamps and a
rear foglamp
Front and rear foglamps When the lighting is switched off automatically
(with AUTO model) or when the dipped
headlamps are switched off manually, the
foglamps and sidelamps will remain on.
F
T
urn the ring rear wards to switch off the
foglamps, the sidelamps will then switch
of f.
In good or rainy weather, by both day
and night, the front foglamps and the
rear foglamp are prohibited. In these
situations, the power of their beams
may dazzle other drivers.
Do not forget to switch off the front
foglamps and the rear foglamp when
they are no longer necessary.
Visibility
Page 73 of 284

71
Manual guide-me-home
lighting
The temporary illumination of the dipped beam
headlamps after the vehicle's ignition has been
switched off makes the driver's exit easier
when the light is poor.
Switching on
F With the ignition off, "flash" the headlamps using the lighting stalk.
F
A f
urther "headlamp flash" switches the
function off.
Switching off
The manual guide-me-home lighting switches
off automatically after a set time.
In some weather conditions (e.g. low
temperature or humidity), the presence
of misting on the internal sur face of the
glass of the headlamps and rear lamps
is normal; it disappears after the lamps
have been on for a few minutes.
Lighting on audible warning
When the ignition is switched off, all
of the lamps switch off automatically,
unless guide-me-home lighting is
activated.
If the lighting is switched on manually
after switching off the ignition, there
is an audible signal when a front door
is opened to warn the driver that they
have forgotten to switch off the vehicle's
lighting, with the ignition off.
5
Visibility