M.dan Citroen C4 2005 2.G Workshop Manual
[x] Cancel search | Manufacturer: CITROEN, Model Year: 2005, Model line: C4, Model: Citroen C4 2005 2.GPages: 462, PDF Size: 10.48 MB
Page 258 of 462
![Citroen C4 2005 2.G Workshop Manual Downloaded from www.Manualslib.com manuals search engine 252
ENGINECHECKING AND SETTING THE VALVE TIMING
Engines: 9HZ - 9HY
Refitting.
Refit tool [1]at «b».
Remove the screw (10).
Refit:
- The uppe Citroen C4 2005 2.G Workshop Manual Downloaded from www.Manualslib.com manuals search engine 252
ENGINECHECKING AND SETTING THE VALVE TIMING
Engines: 9HZ - 9HY
Refitting.
Refit tool [1]at «b».
Remove the screw (10).
Refit:
- The uppe](/img/9/4138/w960_4138-257.png)
Downloaded from www.Manualslib.com manuals search engine 252
ENGINECHECKING AND SETTING THE VALVE TIMING
Engines: 9HZ - 9HY
Refitting.
Refit tool [1]at «b».
Remove the screw (10).
Refit:
- The upper timing cover (12).
- The lower timing cover (11).
- The accessories drive pulley (9).
- The screw (10).
Tightening torque
Screw (10)Pre-tighten to : 3 ± 0,3 m.daN.
Angular tighten : 180° ± 5°.
Remove tool [1].
Refit:
- The engine support (8), tighten to 5,5 ± 0,4 m.daN.
- The engine support (4), tighten to 6,1 ± 0,6 m.daN.
- The engine support (5), tighten to 2,5 ± 0,2 m.daN.
- The electrical harness (7).
- The power steering fluid reservoir (6).
XSARA PICASSO
Couple:
- The tube (2).
- The exhaust line, tighten the clip to 2,5 ± 0,3 m.daN.
- The fuel unions (1).
- The air/air heat exchanger inlet and outlet pipes (3).
Connect the connector at «a».
Refit:
- The accessories drive belt
(see corresponding operation).
- The front RH splash-shield (see corresponding operation).
- The front RH wheel, tighten to 9 ± 1 m.daN.
- Reconnect the positive and negative terminals of the battery.
IMPERATIVE: Perform the operations that are necessary following
a reconnection of the battery
(see corresponding operation).
Angl.-t2-page240-282-2005 9/01/06 10:16 Page 252
Page 263 of 462
Downloaded from www.Manualslib.com manuals search engine 257
ENGINE
CHECKING AND SETTING THE VALVE TIMING
Engines: 9HZ - 9HY
B1EP1E8C
Adjusting the timing belt tension.
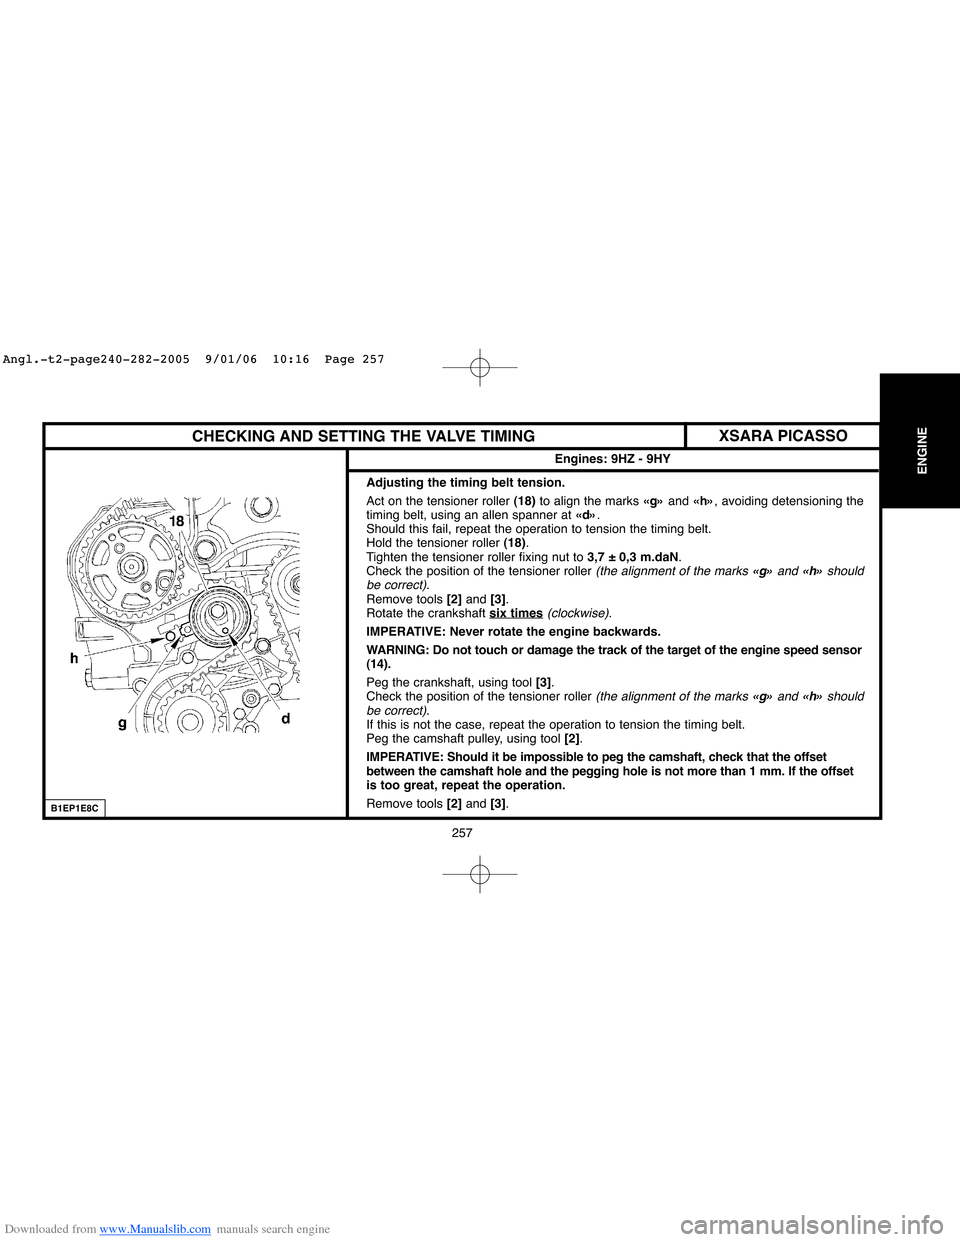
Act on the tensioner roller (18)to align the marks «g»and «h», avoiding detensioning the
timing belt, using an allen spanner at «d».
Should this fail, repeat the operation to tension the timing belt.
Hold the tensioner roller (18).
Tighten the tensioner roller fixing nut to 3,7 ± 0,3 m.daN.
Check the position of the tensioner roller
(the alignment of the marks «g»and «h»should
be correct).
Remove tools [2] and [3].
Rotate the crankshaft six times
(clockwise).
IMPERATIVE: Never rotate the engine backwards.
WARNING: Do not touch or damage the track of the target of the engine speed sensor
(14).
Peg the crankshaft, using tool[3].
Check the position of the tensioner roller
(the alignment of the marks «g» and «h»should
be correct).
If this is not the case, repeat the operation to tension the timing belt.
Peg the camshaft pulley, using tool [2].
IMPERATIVE: Should it be impossible to peg the camshaft, check that the offset
between the camshaft hole and the pegging hole is not more than 1 mm. If the offset
is too great, repeat the operation.
Remove tools [2] and [3].
XSARA PICASSO
Angl.-t2-page240-282-2005 9/01/06 10:16 Page 257
Page 264 of 462
![Citroen C4 2005 2.G Workshop Manual Downloaded from www.Manualslib.com manuals search engine 258
ENGINECHECKING AND SETTING THE VALVE TIMING
Engines: 9HZ - 9HY
Refitting (continued).
Refit tool [1]at «b».
Remove the screw (10).
Refit: Citroen C4 2005 2.G Workshop Manual Downloaded from www.Manualslib.com manuals search engine 258
ENGINECHECKING AND SETTING THE VALVE TIMING
Engines: 9HZ - 9HY
Refitting (continued).
Refit tool [1]at «b».
Remove the screw (10).
Refit:](/img/9/4138/w960_4138-263.png)
Downloaded from www.Manualslib.com manuals search engine 258
ENGINECHECKING AND SETTING THE VALVE TIMING
Engines: 9HZ - 9HY
Refitting (continued).
Refit tool [1]at «b».
Remove the screw (10).
Refit:
- The upper timing cover (12).
- The lower timing cover (11).
- The accessories drive pulley (9).
- The screw (10).
Tightening torque
- Screw (10)Pre-tighten to: 3 ± 0,3 m.daN.
Angular tighten: 180° ± 5°.
Remove tool [1].
Refit:
- The engine support (8), tighten to 5,5 ± 0,4 m.daN.
- The engine support (4), tighten to 6,1 ± 0,6 m.daN.
- The engine support (5), tighten to 2,5 ± 0,2 m.daN.
- The electrical harness (7).
- The power steering fluid reservoir (6).
XSARA PICASSO
Disengage the jack from under the engine.
Couple:
- The tube (2).
- The exhaust line, tighten the clip to 2,5 ± 0,3 m.daN.
- The fuel unions (1).
- The air/air heat exchanger inlet and outlet pipes (3).
Connect the connector at «a».
Refit:
- The accessories drive belt
(see corresponding operation).
- The front RH splash-shield (see corresponding operation).
- The front RH wheel, tighten to 9 ± 1 m.daN.
Reconnect the positive and negative terminals of the battery.
IMPERATIVE: Perform the operations that are necessary following
a reconnection of the battery
(see corresponding operation).
Angl.-t2-page240-282-2005 9/01/06 10:16 Page 258
Page 269 of 462
Downloaded from www.Manualslib.com manuals search engine 263
ENGINE
CHECKING AND SETTING THE VALVE TIMING
Engine: WJY
Setting the timing (continued).
Tighten:
- Screw (9)to 2.1 ± 0.2 m.daN.
- Screws (5)to 2,3 ± 0.2 m.daN.
- Screws (6)to 2,3 ± 0.2 m.daN.
- Remove and refit tool [7].
- The tension value should be between 38 and 46 SEEMunits.
- Remove tools [7], [2], [3]and [4].
- Turn the crankshaft 2 times
in the normal direction of rotation.
- Peg the flywheel, using the peg [2].
- Visually check the peggings of the camshaft and injection pump.
ESSENTIAL: Visually check that the offsets between the holes of
the camshaft and injection pump hubs and the corresponding
pegging holes are not more than 1 mm. If necessary, recommence
the procedure for fitting the timing belt.
XSARA
Setting the timing (continued).
Remove the peg [2].
Remove the screw (4)and the washer.
Refit the lower cover (3).
Refit the intermediate cover (2).
Refit the upper cover (1).
Remove the RH engine support.
Take away the workshop hoist.
Remove the plugs and recouple the diesel fuel delivery and return
hoses.
Refit the accessories drive belt
(see corresponding operation).
Refit the RH lower splash-shield.
Disengage 5th gear.
Connect the battery.
Angl.-t2-page240-282-2005 9/01/06 10:16 Page 263
Page 275 of 462
![Citroen C4 2005 2.G Workshop Manual Downloaded from www.Manualslib.com manuals search engine 269
ENGINE
CHECKING AND SETTING THE VALVE TIMING
Engines: RHY - RHZ
Lock the engine flywheel, using tool [6].
Slacken the accessories drive pul Citroen C4 2005 2.G Workshop Manual Downloaded from www.Manualslib.com manuals search engine 269
ENGINE
CHECKING AND SETTING THE VALVE TIMING
Engines: RHY - RHZ
Lock the engine flywheel, using tool [6].
Slacken the accessories drive pul](/img/9/4138/w960_4138-274.png)
Downloaded from www.Manualslib.com manuals search engine 269
ENGINE
CHECKING AND SETTING THE VALVE TIMING
Engines: RHY - RHZ
Lock the engine flywheel, using tool [6].
Slacken the accessories drive pulley (8).
The screw (17)of the tensioner roller (18).
Fit the tool [1].
Turn the tensioner roller, using tool [2], to attain a tension of: 54 ± 2 SEEMunits.
Tighten screw (17)of the tensioner roller (18)to 2,5 ± 0,2 m.daN.
Remove tool [1].
Fit tool [1].
The tension value should be: 54 ± 3 SEEMunits.
ESSENTIAL: If the value is incorrect, recommence the operation.
Remove tools [1], [3], [5]and [6].
Rotate the crankshaft two times in the normal direction of rotation.
Peg:
- The crankshaft, using tool [3].
- The camshaft drive pulley.
IMPERATIVE: If the pegging is not possible, recommence the operation.
B1EP1ACC
XSARA - XSARA PICASSO
Angl.-t2-page240-282-2005 9/01/06 10:16 Page 269
Page 276 of 462
![Citroen C4 2005 2.G Workshop Manual Downloaded from www.Manualslib.com manuals search engine 270
ENGINECHECKING AND SETTING THE VALVE TIMING
Engines: RHY - RHZ
Remove:
- Tools [3]and [5], Screw (7)and the spacer.
Refit:
- The lower, i Citroen C4 2005 2.G Workshop Manual Downloaded from www.Manualslib.com manuals search engine 270
ENGINECHECKING AND SETTING THE VALVE TIMING
Engines: RHY - RHZ
Remove:
- Tools [3]and [5], Screw (7)and the spacer.
Refit:
- The lower, i](/img/9/4138/w960_4138-275.png)
Downloaded from www.Manualslib.com manuals search engine 270
ENGINECHECKING AND SETTING THE VALVE TIMING
Engines: RHY - RHZ
Remove:
- Tools [3]and [5], Screw (7)and the spacer.
Refit:
- The lower, intermediate and upper covers (5).
- Screw (7), tighten to 1,5 ± 0,1 m.daN.
- Screws (3), (4)and (6).
- The bracket (13).
Screws (11), tighten to 6,1 ± 0,5 m.daN.
The nut (12), tighten to 4,5 ± 0,5 m.daN.
Fit the bearing shell (10).
Take away the workshop hoist.
Clip the fuel delivery and return pipes.
Remove the tool [7].
Couple:
- The fuel delivery pipe (12).
- The fuel return pipe (1).
- Coat the screw (8)with loctite FRENETANCH.
Refit the tool [6]and the screw (8)with the washer (22), tighten to 7 ± 0,2 m.daN
and angular tighten to A= 60°±5°.
Refit the torque reaction rod on the lower engine support.
Remove the tool [6].
Reposition and reclip the cooling hose.
Complete the refitting of components in reverse order to removal.
B1EP1A7CB1BP2R4CB1EP1ADC
XSARA - XSARA PICASSO
Angl.-t2-page240-282-2005 9/01/06 10:16 Page 270
Page 282 of 462
![Citroen C4 2005 2.G Workshop Manual Downloaded from www.Manualslib.com manuals search engine 276
ENGINECHECKING AND SETTING THE VALVE TIMING
Engine: RHR
Refitting.
Centre the crankshaft pinion (15), using tool [5].
Reposition the timimg Citroen C4 2005 2.G Workshop Manual Downloaded from www.Manualslib.com manuals search engine 276
ENGINECHECKING AND SETTING THE VALVE TIMING
Engine: RHR
Refitting.
Centre the crankshaft pinion (15), using tool [5].
Reposition the timimg](/img/9/4138/w960_4138-281.png)
Downloaded from www.Manualslib.com manuals search engine 276
ENGINECHECKING AND SETTING THE VALVE TIMING
Engine: RHR
Refitting.
Centre the crankshaft pinion (15), using tool [5].
Reposition the timimg belt on the pulley (18).
Put the tool [4]in place
(tighten moderately).
Reposition the timimg belt, strip «a»well tensioned
in the following order:
- Guide roller (14).
- Crankshaft pinion (15).
- Coolant pump pinion (16).
- Tensioner roller (17).
Remove tools [4]and [5].
Bring the index «d»outside the plate at «c», by
turning the tensioner roller in the direction of the
arrow «b», using a hexagonal spanner at «e».
Tighten screw (12)of the tensioner roller (17)to
2,1 ± 0,2 m.daN.
Lock the flywheel, by means of tool [6].
Refit the auxiliaries drive pulley (7).
Tighten the screw (8)to 7 ± 0,7 m.daN.
Remove tools [6], [2]and [3].
B1EP1FFC
B1EP1FGC
B1EP1FHC
B1EP1FJC
C4
Angl.-t2-page240-282-2005 9/01/06 10:16 Page 276
Page 283 of 462
Downloaded from www.Manualslib.com manuals search engine 277
ENGINE
CHECKING AND SETTING THE VALVE TIMING
Engine: RHR
Refitting.
Rotate the crankshaft ten times
(in the direction of rotation of the engine).
Peg the crankshaft, using tool [2] and the camshaft drive pinion, using tool [3].
Lock the flywheel, using tool [6].
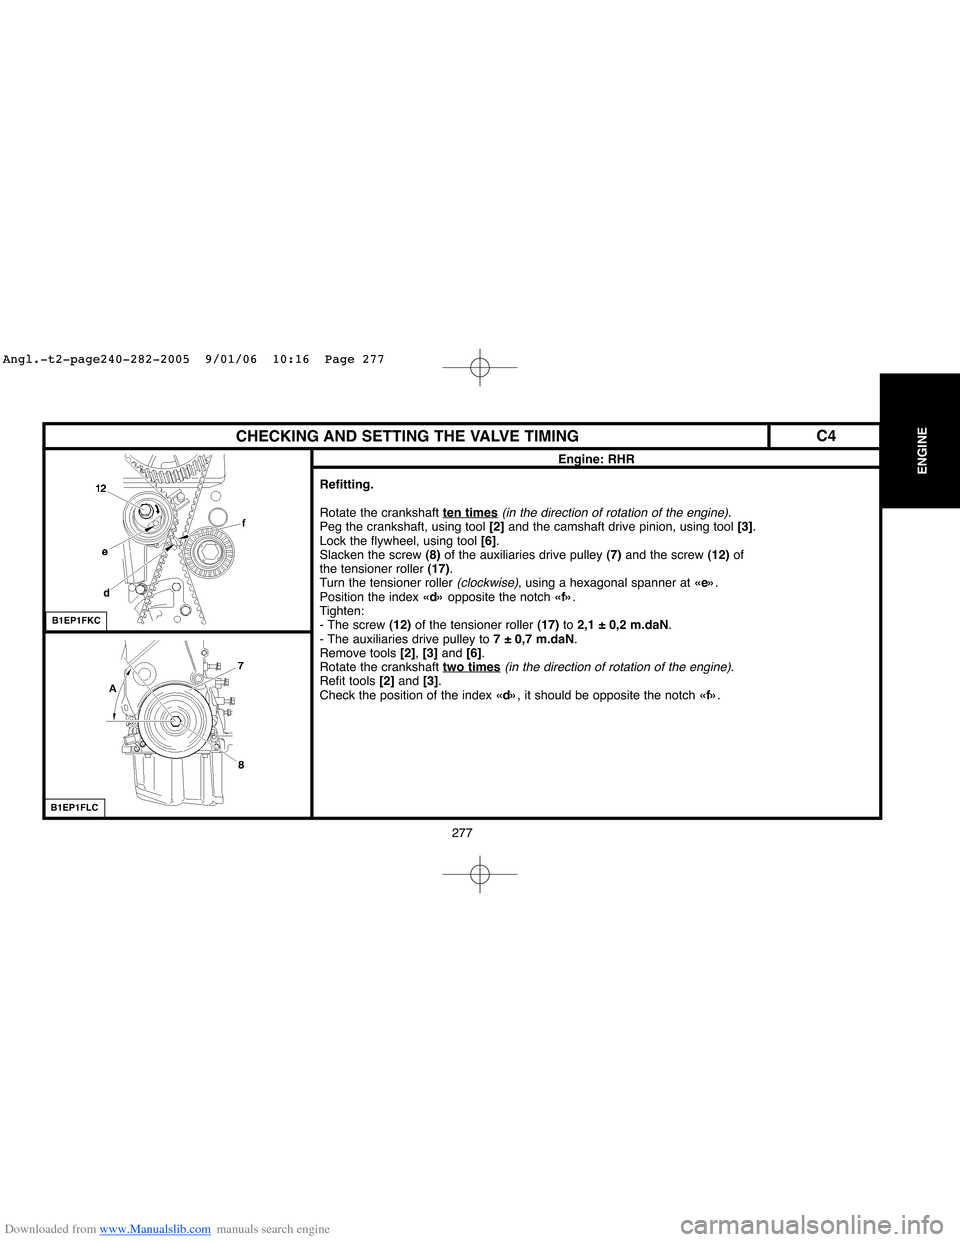
Slacken the screw (8)of the auxiliaries drive pulley (7) and the screw (12)of
the tensioner roller (17).
Turn the tensioner roller
(clockwise), using a hexagonal spanner at «e».
Position the index «d»opposite the notch «f».
Tighten:
- The screw (12)of the tensioner roller (17)to 2,1 ± 0,2 m.daN.
- The auxiliaries drive pulley to 7 ± 0,7 m.daN.
Remove tools [2], [3]and [6].
Rotate the crankshaft two times
(in the direction of rotation of the engine).
Refit tools [2]and [3].
Check the position of the index «d», it should be opposite the notch «f».
B1EP1FKC
B1EP1FLC
C4
Angl.-t2-page240-282-2005 9/01/06 10:16 Page 277
Page 284 of 462
Downloaded from www.Manualslib.com manuals search engine 278 278
ENGINECHECKING AND SETTING THE VALVE TIMING
Engine: RHR
Refitting.
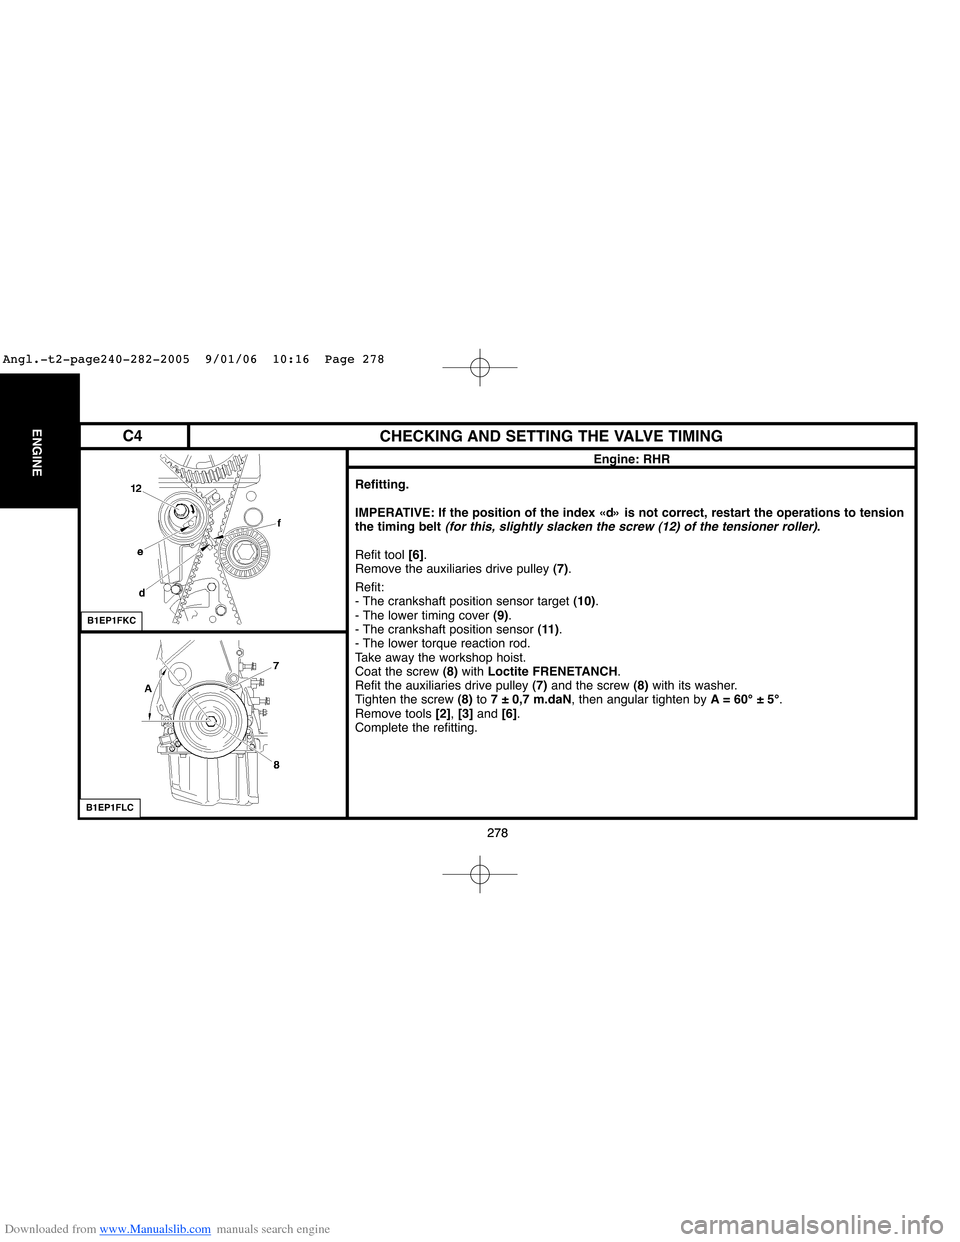
IMPERATIVE: If the position of the index «d» is not correct, restart the operations to tension
the timing belt
(for this, slightly slacken the screw (12) of the tensioner roller).
Refit tool [6].
Remove the auxiliaries drive pulley (7).
Refit:
- The crankshaft position sensor target (10).
- The lower timing cover (9).
- The crankshaft position sensor (11).
- The lower torque reaction rod.
Take away the workshop hoist.
Coat the screw (8)with Loctite FRENETANCH.
Refit the auxiliaries drive pulley (7) and the screw (8)with its washer.
Tighten the screw (8)to 7 ± 0,7 m.daN, then angular tighten by A= 60°±5°.
Remove tools [2], [3] and [6].
Complete the refitting.
B1EP1FKC
B1EP1FLC
C4
Angl.-t2-page240-282-2005 9/01/06 10:16 Page 278
Page 322 of 462
Downloaded from www.Manualslib.com manuals search engine 316
CLUTCH
GEARBOX
TRANSMISSION
CLUTCH SPECIFICATIONS
Engines: KFW - NFU - NFV - 6FZ - RFN - 8HX - 8HZ - 9HY - 9HZ - WJY - RHY - RHZ
NOTE:All the clutches are «push»type with hydraulic control.
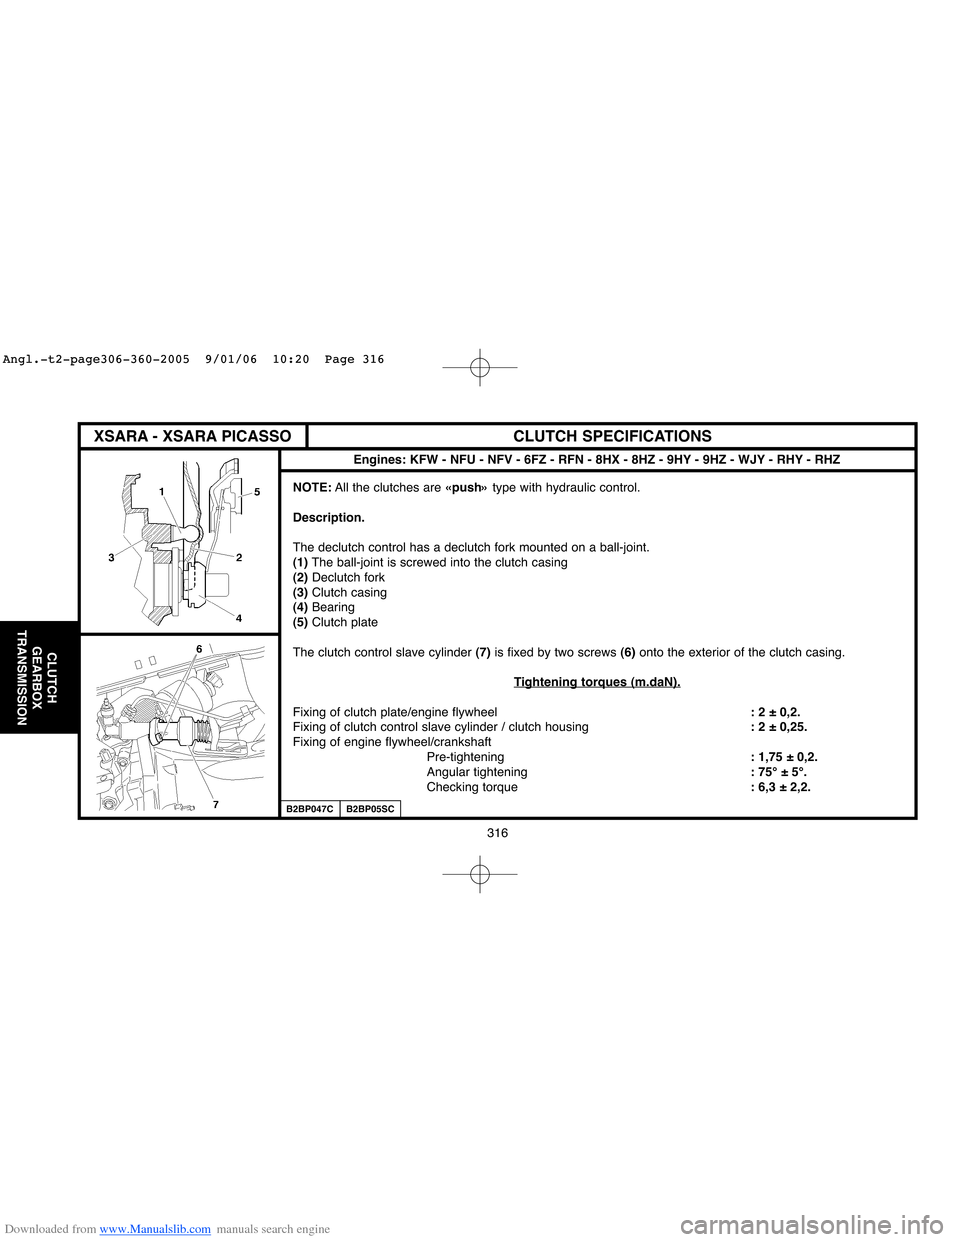
Description.
The declutch control has a declutch fork mounted on a ball-joint.
(1)The ball-joint is screwed into the clutch casing
(2)Declutch fork
(3)Clutch casing
(4)Bearing
(5)Clutch plate
The clutch control slave cylinder (7)is fixed by two screws (6)onto the exterior of the clutch casing.
T
ightening torques (m.daN).
Fixing of clutch plate/engine flywheel: 2 ± 0,2.
Fixing of clutch control slave cylinder / clutch housing: 2 ± 0,25.
Fixing of engine flywheel/crankshaft
Pre-tightening: 1,75 ± 0,2.
Angular tightening: 75° ± 5°.
Checking torque: 6,3 ± 2,2.
B2BP047CB2BP05SC
XSARA - XSARA PICASSO
Angl.-t2-page306-360-2005 9/01/06 10:20 Page 316