boot Citroen C4 2014.5 2.G Owner's Guide
[x] Cancel search | Manufacturer: CITROEN, Model Year: 2014.5, Model line: C4, Model: Citroen C4 2014.5 2.GPages: 494, PDF Size: 21.47 MB
Page 113 of 494
111
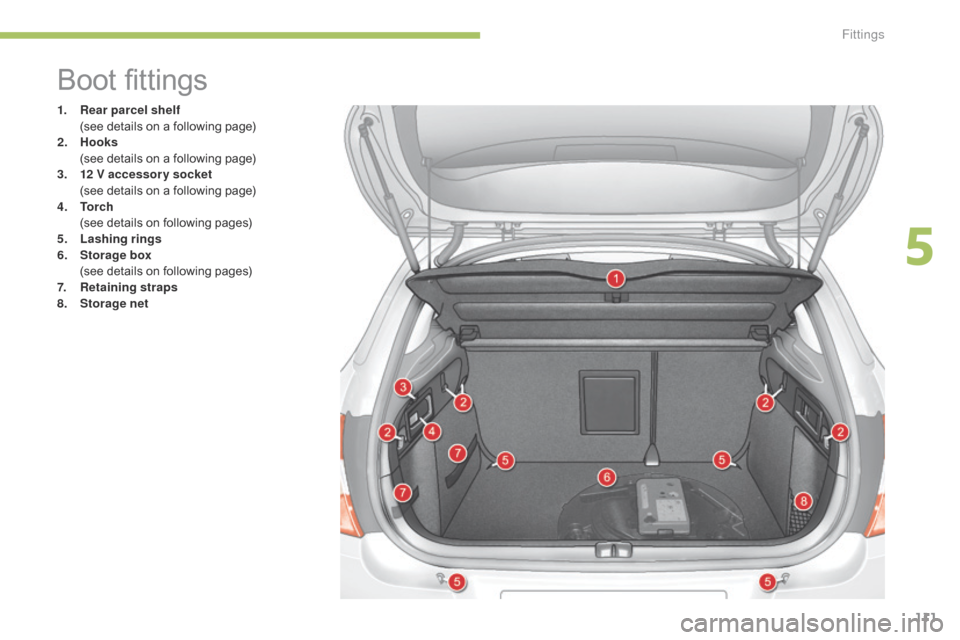
Boot fittings
1. Rear parcel shelf (see details on a following page)
2.
Hoo
ks
(
see details on a following page)
3.
1
2 V accessory socket
(
see details on a following page)
4.
T
o r c h
(
see details on following pages)
5.
L
ashing rings
6.
Sto
rage box
(
see details on following pages)
7.
R
etaining straps
8.
Sto
rage net
5
Fittings
Page 114 of 494
112
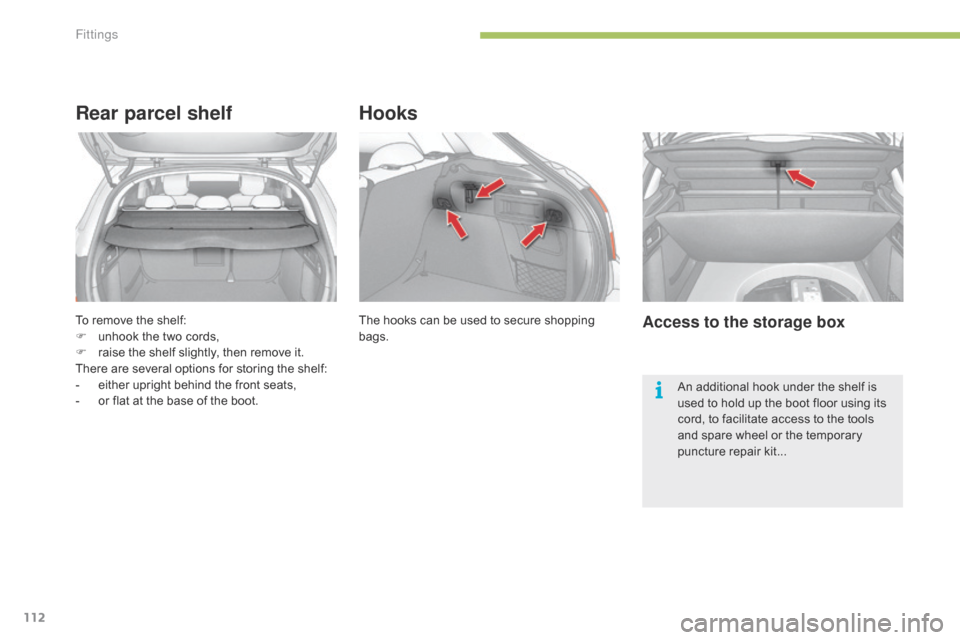
To remove the shelf:
F u nhook the two cords,
F
r
aise the shelf slightly, then remove it.
There
are several options for storing the shelf:
-
e
ither upright behind the front seats,
-
o
r flat at the base of the boot.
Rear parcel shelf
The hooks can be used to secure shopping bags.
Hooks
Access to the storage box
An additional hook under the shelf is u sed to hold up the boot floor using its
c
ord, to facilitate access to the tools
a
nd spare wheel or the temporary
p
uncture repair kit...
Fittings
Page 115 of 494
113
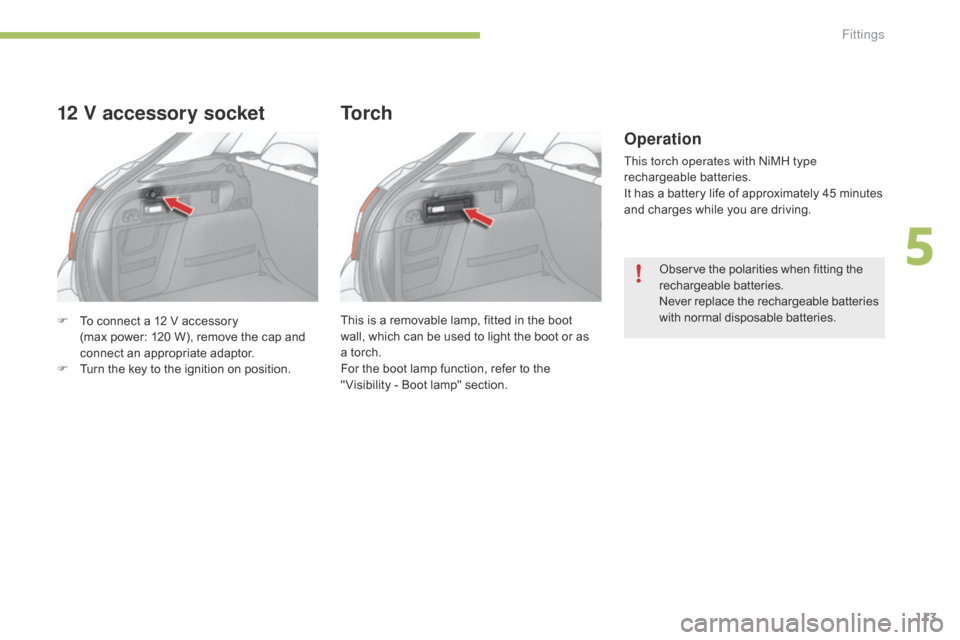
F To connect a 12 V accessory
(max power: 120 W), remove the cap and
c
onnect an appropriate adaptor.
F
T
urn the key to the ignition on position.
12 V accessory socket
This is a removable lamp, fitted in the boot wall, which can be used to light the boot or as
a
torch.
For
the boot lamp function, refer to the
"
Visibility - Boot lamp" section.
To r c h
Operation
This torch operates with ni MH type
rechargeable b atteries.
It
has a battery life of approximately 45 minutes
a
nd charges while you are driving.
Observe
the polarities when fitting the
r
echargeable
b
atteries.
Never
r
eplace
t
he
r
echargeable
b
atteries
w
ith normal disposable batteries.
5
Fittings
Page 116 of 494
114
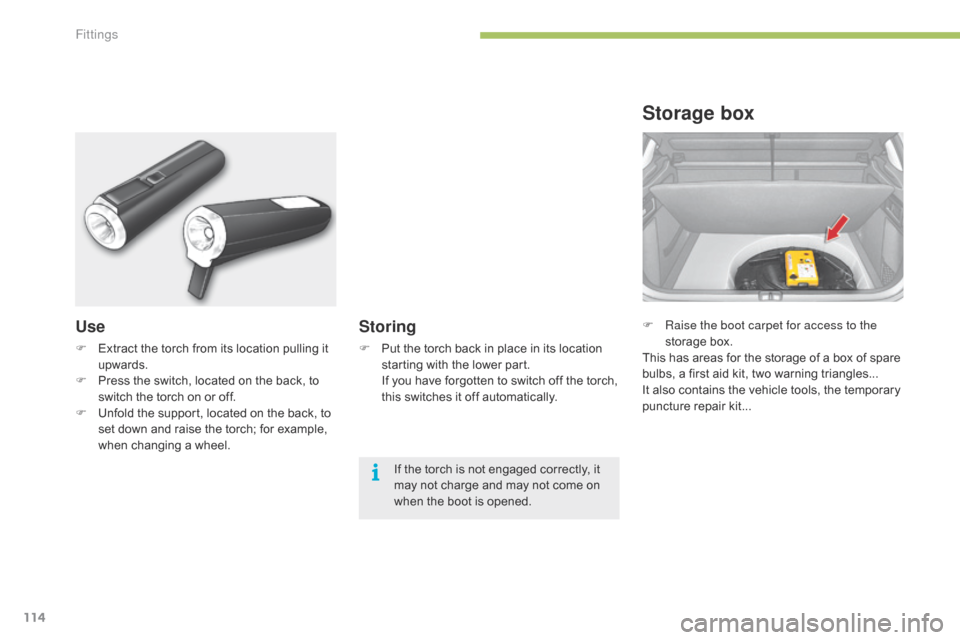
F Raise the boot carpet for access to the storage box.
This
has areas for the storage of a box of spare
b
ulbs, a first aid kit, two warning triangles...
It
also contains the vehicle tools, the temporary
p
uncture repair kit...
Storage box
Use
F Extract the torch from its location pulling it up
wards.
F
P
ress the switch, located on the back, to
s
witch the torch on or off.
F
U
nfold the support, located on the back, to
s
et down and raise the torch; for example,
w
hen changing a wheel.
Storing
F Put the torch back in place in its location s
tarting with the lower part.
I
f you have forgotten to switch off the torch,
t
his switches it off automatically.
If
the torch is not engaged correctly, it
m
ay not charge and may not come on
w
hen the boot is opened.
Fittings
Page 133 of 494
131
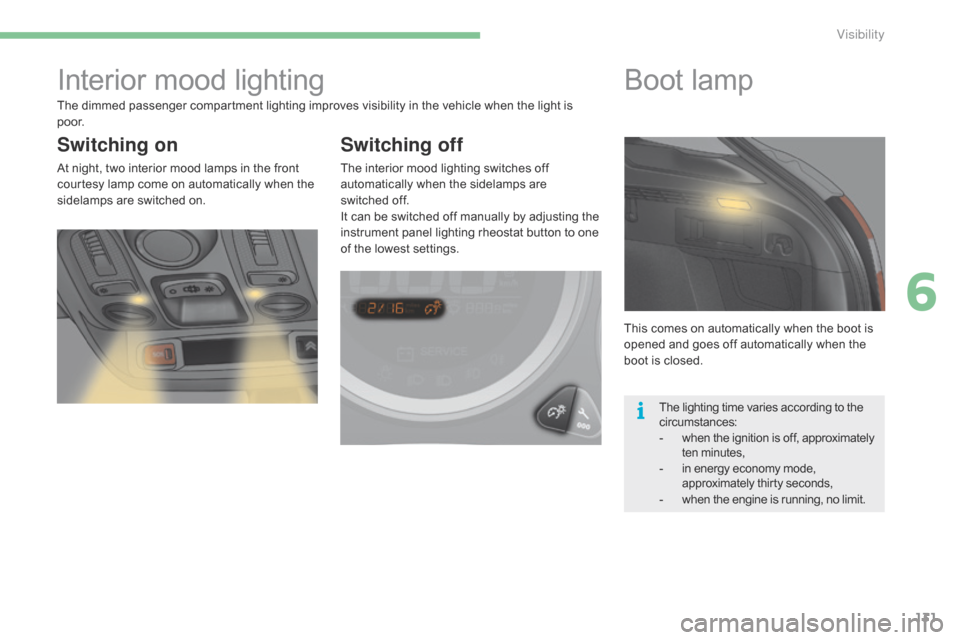
Interior mood lighting
Switching on
At night, two interior mood lamps in the front c
ourtesy lamp come on automatically when the
s
idelamps are switched on.
Switching off
The interior mood lighting switches off automatically when the sidelamps are
switched
off.
It
can be switched off manually by adjusting the
i
nstrument panel lighting rheostat button to one
o
f the lowest settings. This
comes on automatically when the boot is
o
pened and goes off automatically when the
b
oot is closed.
Boot lamp
The lighting time varies according to the circumstances:
-
w
hen the ignition is off, approximately
t
en
m
inutes,
-
i
n energy economy mode,
a
pproximately thirty seconds,
-
w
hen the engine is running, no limit.
The
dimmed
passenger
compartment
lighting
improves
visibility
in
the
vehicle
when
the
light
is
p
o o r.
6
Visibility
Page 219 of 494
217
AdBlue® additive and SCR system
f
or
BlueHDi Diesel engines
To assure respect for the environment and c
onformity with the new Euro 6 emissions
s
tandard, without adversely affecting the
p
er formance or fuel consumption of Diesel
e
ngines, CITROËN has taken the decision to
e
quip its vehicles with an effective system that
a
ssociates SCR (Selective Catalytic Reduction)
w
ith a particle filter (FAP) for the treatment of
e
xhaust gases.
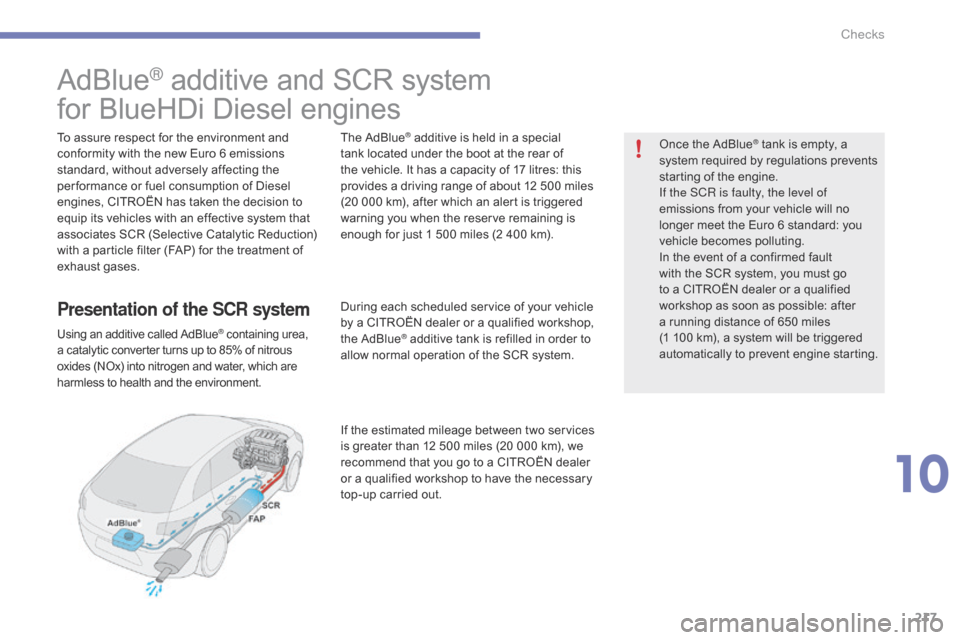
Presentation of the SCR system
Using an additive called AdBlue® containing urea, a
catalytic
converter
turns
up
to
85% of nitrous o
xides
(NOx)
into
nitrogen
and
water, which are
h
armless
to
health
and
the
environment.
The AdBlue® additive is held in a special t
ank
located
under the boot at the rear of
t
he
vehicle.
It has a capacity of 17 litres: this
p
rovides
a
driving range of about 12 500 miles
(
20
000
km),
after which an alert is triggered
w
arning
you
when the reserve remaining is
e
nough
for
just 1 500 miles (2 400 km).
During
each
scheduled service of your vehicle
b
y
a
CITROËN dealer or a qualified workshop,
t
he
AdBlue
® additive tank is refilled in order to a
llow
normal operation of the SCR system.
If
the
estimated mileage between two services
i
s
greater
than 12 500 miles (20 000 km), we
r
ecommend
that you go to a CITROËN dealer
o
r
a
qualified workshop to have the necessary
t
op-up
carried out. Once
the AdBlue
® tank is empty, a s
ystem
required
by regulations prevents
s
tarting
of
the
engine.
If the SCR
is faulty, the level of
emissions
from
your vehicle will no
l
onger
meet
the
Euro 6 standard: you
v
ehicle
becomes
polluting.
In
the
event
of
a
confirmed fault
w
ith
the
SCR
system, you must go
t
o
a
CITROËN
dealer or a qualified
w
orkshop
as
soon as possible: after
a
running
distance of 650 miles
(
1 100
km),
a
system will be triggered
a
utomatically
to
prevent engine starting.
10
Checks
Page 225 of 494
223
Recommendations on storage Procedure
F Switch off the ignition and remove the k
ey, or if your vehicle has one, press the
S
TART/STOP button to switch off the
e
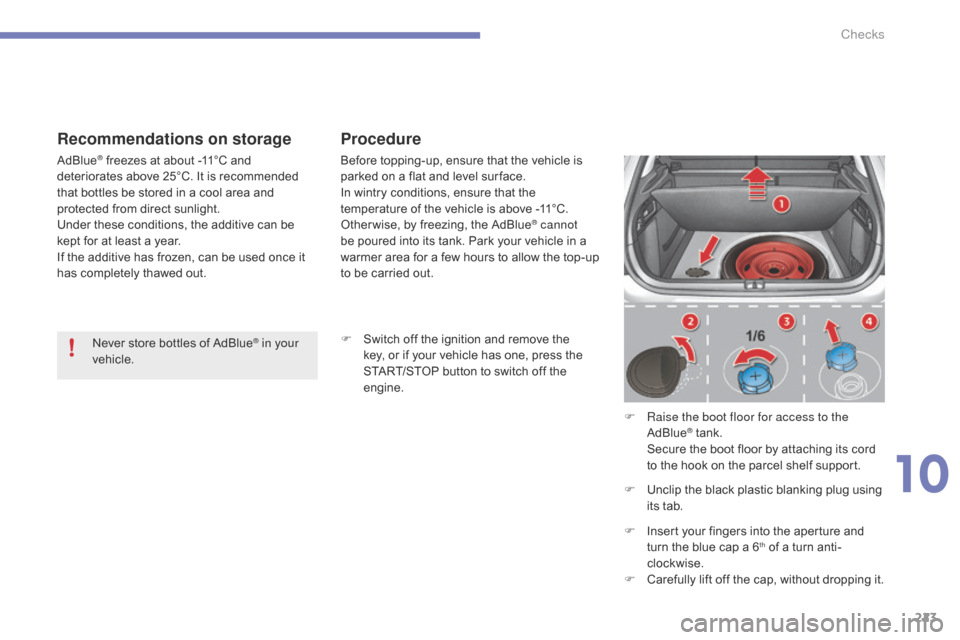
ngine. F
R
aise the boot floor for access to the
AdBlue
® tank. S
ecure
the boot floor by attaching its cord
t
o
the
hook on the parcel shelf support.
F
U
nclip
the black plastic blanking plug using
i
ts
tab.
F
I
nsert
your fingers into the aperture and
t
urn
the
blue cap a 6
th of a turn anti-
c
lockwise.
F
C
arefully
lift
off
the
cap, without dropping it.
Never
store
bottles
of
AdBlue
® in your
vehicle. Before
topping-up, ensure that the vehicle is
p
arked on a flat and level sur face.
In wintry conditions, ensure that the
t
emperature of the vehicle is above -11°C.
O
ther wise, by freezing, the AdBlue
® cannot
be
poured
into
its
tank.
Park
your
vehicle in a
w
armer
area
for
a
few
hours
to
allow the top-up
t
o
be
carried
out.
AdBlue
® freezes at about -11°C and d
eteriorates above 25°C. It is recommended
t
hat
bottles be stored in a cool area and
p
rotected from direct sunlight.
Under
these conditions, the additive can be
k
ept
for
at least a year.
If
the
additive has frozen, can be used once it
h
as
completely thawed out.
10
Checks
Page 226 of 494
224
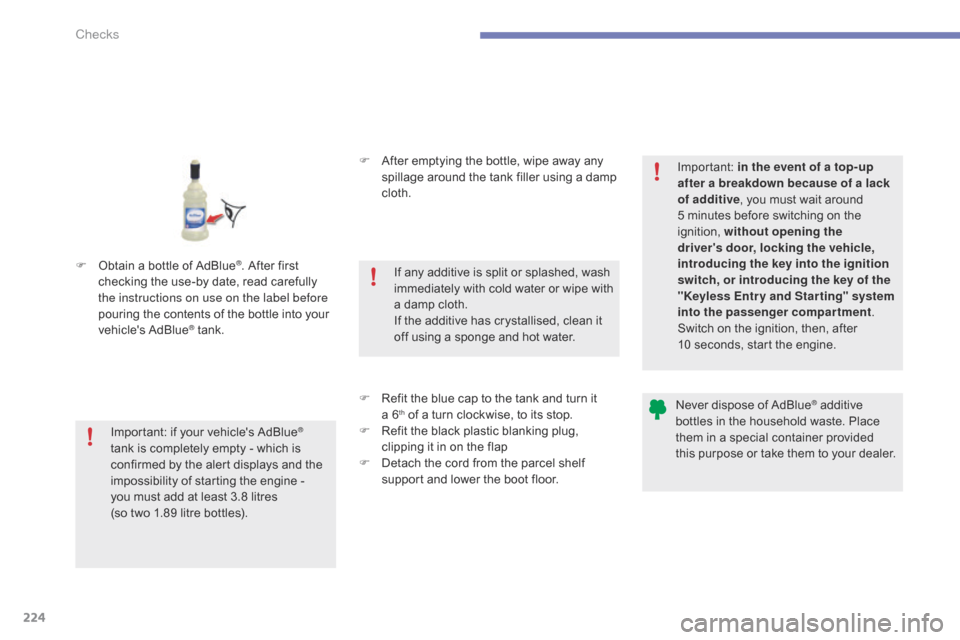
F Obtain a bottle of AdBlue®. After first c
hecking
the
use-by
date,
read carefully
t
he instructions on use on the label before
pouring
the
contents
of
the bottle into your
v
ehicle's
Ad
Blue
® tank. F
A
fter emptying the bottle, wipe away any
s
pillage around the tank filler using a damp
c
loth.
F
R
efit the blue cap to the tank and turn it
a
6
th of a turn clockwise, to its stop.
F
R
efit the black plastic blanking plug,
c
lipping it in on the flap
F
D
etach the cord from the parcel shelf
s
upport and lower the boot floor.
Important:
if
your
vehicle's
AdBlue®
tank
is
completely
empty
-
which
is
c
onfirmed
by
the
alert
displays
and
the
i
mpossibility
of
starting
the
engine
-
you
must
add
at
least
3.8 litres
(so
two
1.89
litre
bottles). If
any additive is split or splashed, wash
i
mmediately
w
ith
c
old
w
ater
o
r
w
ipe
w
ith
a
damp cloth.
If the additive has crystallised, clean it
o
ff using a sponge and hot water.Important:
i
n the event of a top-up
after a breakdown because of a lack
of additive , you must wait around
5 minutes before switching on the
ig
nition,
w
ithout opening the
driver's door, locking the vehicle,
introducing the key into the ignition
switch, or introducing the key of the
"Keyless Entr y and Star ting" system
into the passenger compartment .
Switch on the ignition, then, after
10 seconds, start the engine.
Never dispose of AdBlue
® additive b
ottles
in
the
household
waste. Place
t
hem
in
a
special
container provided
t
his
p
urpose
o
r
t
ake
t
hem
t
o
y
our
d
ealer.
Checks
Page 232 of 494
230
Changing a wheel
Access to the tools
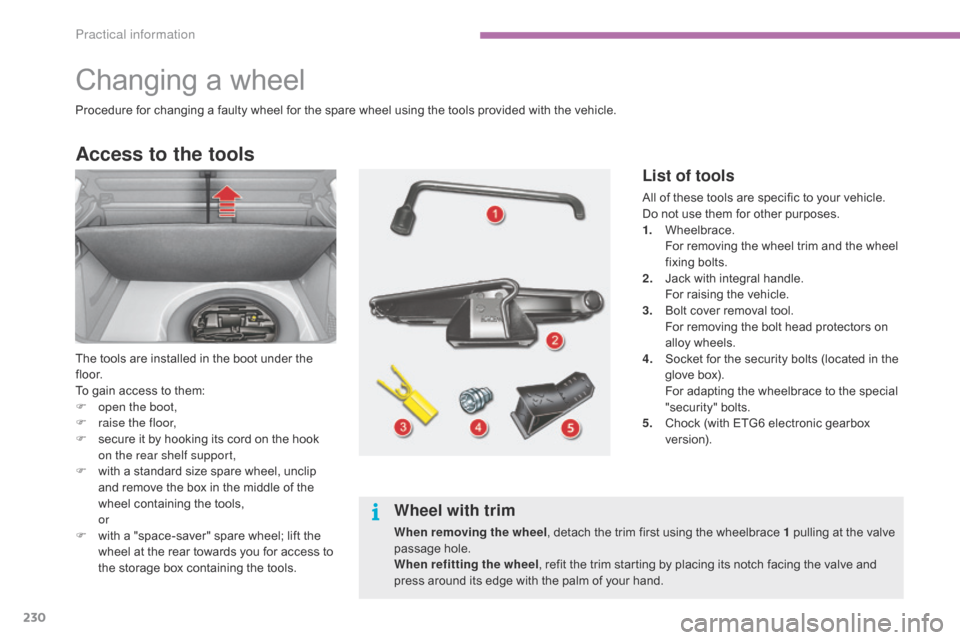
The tools are installed in the boot under the fl o o r.
To
gain access to them:
F
o
pen the boot,
F
r
aise the floor,
F
s
ecure it by hooking its cord on the hook
o
n the rear shelf support,
F
w
ith a standard size spare wheel, unclip
a
nd remove the box in the middle of the
w
heel containing the tools,
or
F
w
ith a "space-saver" spare wheel; lift the
w
heel at the rear towards you for access to
t
he storage box containing the tools.
List of tools
All of these tools are specific to your vehicle. Do not use them for other purposes.
1.
W
heelbrace.
F
or removing the wheel trim and the wheel
f
ixing
bol
ts.
2.
J
ack with integral handle.
F
or raising the vehicle.
3.
B
olt cover removal tool.
F
or removing the bolt head protectors on
a
lloy wheels.
4.
S
ocket for the security bolts (located in the
g
love box).
F
or adapting the wheelbrace to the special
"s
ecurity"
b
olts.
5.
C
hock (with ETG6 electronic gearbox
v
e r s i o n).
Wheel with trim
When removing the wheel , detach the trim first using the wheelbrace 1 pulling at the valve p
assage hole.
When refitting the wheel ,
refit the trim starting by placing its notch facing the valve and
p
ress around its edge with the palm of your hand.
Procedure
for
changing
a
faulty
wheel
for
the
spare
wheel
using the tools provided with the vehicle.
Practical information
Page 233 of 494
231
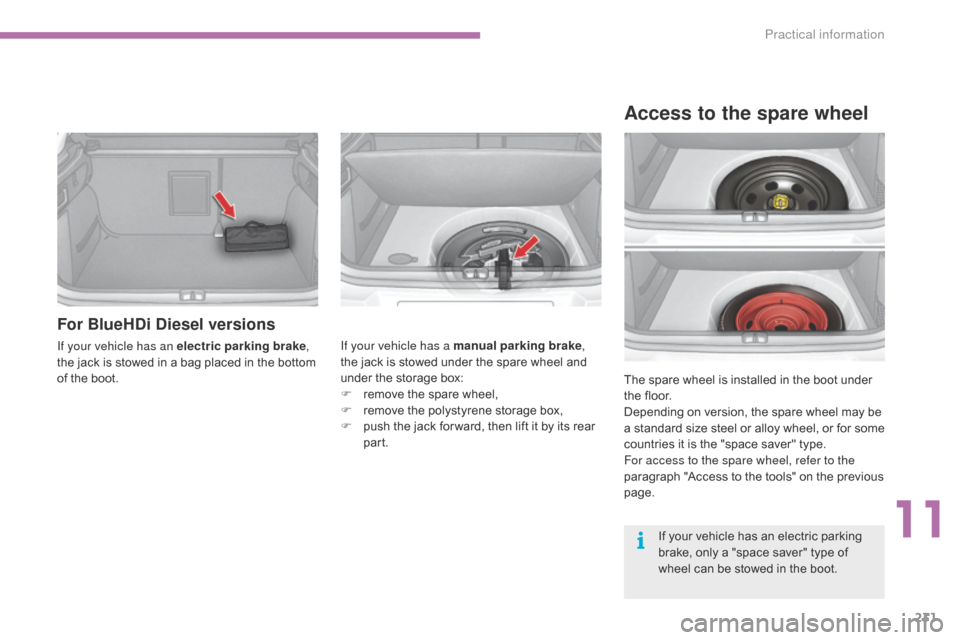
For BlueHDi Diesel versions
If your vehicle has an electric parking brake,
the jack is stowed in a bag placed in the bottom
o
f the boot. If your vehicle has a manual parking brake
,
the jack is stowed under the spare wheel and
u
nder the storage box:
F
r
emove the spare wheel,
F
r
emove the polystyrene storage box,
F
p
ush the jack for ward, then lift it by its rear
par
t.The
spare wheel is installed in the boot under
t
he floor.
Depending
on version, the spare wheel may be
a
standard
size
steel
or
alloy
wheel,
or
for
some
c
ountries it is the "space saver" type.
For access to the spare wheel, refer to the
paragraph
"Access to the tools" on the previous
pag
e.
Access to the spare wheel
If your vehicle has an electric parking brake, only a "space saver" type of
w
heel can be stowed in the boot.
11
Practical information