engine Citroen C4 2014.5 2.G Owner's Guide
[x] Cancel search | Manufacturer: CITROEN, Model Year: 2014.5, Model line: C4, Model: Citroen C4 2014.5 2.GPages: 494, PDF Size: 21.47 MB
Page 100 of 494
98
Automatic tilting in reverse gear
System which provides a view of the ground during parking manoeuvres in reverse gear.
Programming
F With the engine running, engage reverse g
e a r.
F
S
elect and adjust the left-hand and right-
hand
mirrors in succession.
The
adjustment is stored immediately.
Switching on
F With the engine running, engage reverse g
e a r.
F
M
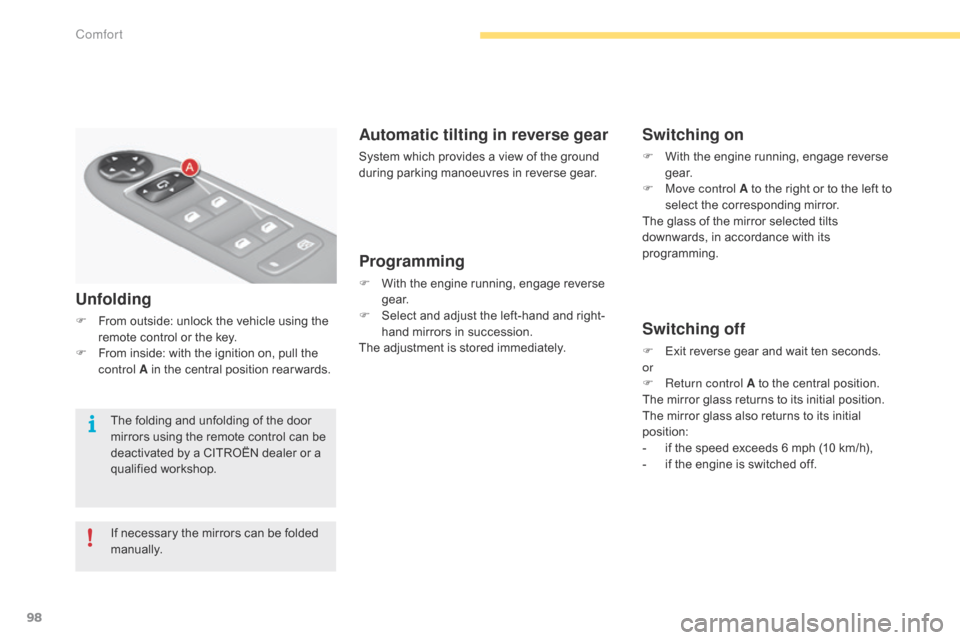
ove control A to the right or to the left to
s
elect the corresponding mirror.
The
glass of the mirror selected tilts
d
ownwards, in accordance with its
p
rogramming.
Switching off
F Exit reverse gear and wait ten seconds.
or
F
R
eturn control A to the central position.
The
mirror glass returns to its initial position.
The
mirror glass also returns to its initial
p
osition:
-
i
f the speed exceeds 6 mph (10 km/h),
-
i
f the engine is switched off.
Unfolding
F From outside: unlock the vehicle using the r
emote control or the key.
F
F
rom inside: with the ignition on, pull the
c
ontrol A in the central position rear wards.
If
necessary the mirrors can be folded
m
anually.
The
folding and unfolding of the door
m
irrors using the remote control can be
d
eactivated by a CITROËN dealer or a
q
ualified
w
orkshop.
Comfort
Page 118 of 494
116
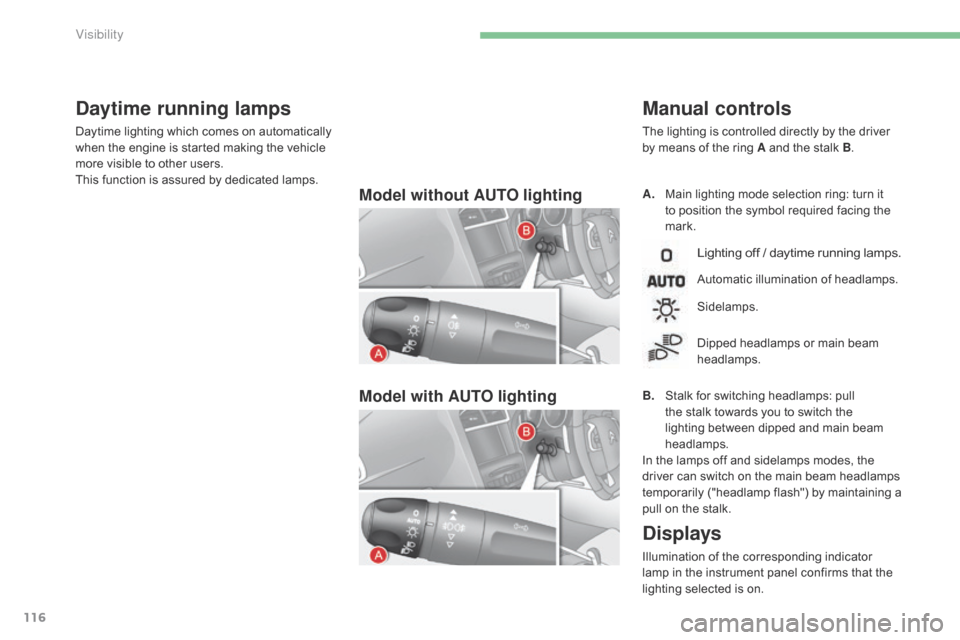
Model without AUTO lighting
Model with AUTO lightingA. Main lighting mode selection ring: turn it t
o position the symbol required facing the
ma
rk.
Manual controls
The lighting is controlled directly by the driver by means of the ring A and the stalk B.
Lighting off / daytime running lamps.
Automatic illumination of headlamps.
B.
S
talk
for switching headlamps: pull
t
he
stalk towards you to switch the
l
ighting between dipped and main beam
h
eadlamps.
In
the
lamps off and sidelamps modes, the
d
river
can
switch on the main beam headlamps
t
emporarily ("headlamp flash") by maintaining a
p
ull
on
the stalk.
Sidelamps.
Dipped
headlamps or main beam
h
eadlamps.
Displays
Illumination of the corresponding indicator lamp in the instrument panel confirms that the
l
ighting selected is on.
Daytime running lamps
Daytime lighting which comes on automatically when the engine is started making the vehicle
m
ore visible to other users.
This
function is assured by dedicated lamps.
Visibility
Page 129 of 494
127
Operating fault
If an automatic rain sensitive wiper malfunction occurs, the wipers will operate in intermittent
m
ode.
Contact
a CITROËN dealer or a qualified
w
orkshop.
Windscreen and headlamp
wash
Low screenwash / headlamp
wash fluid level
On vehicle fitted with headlamp washers, the low level of this fluid is indicated by gauge in
t
he reservoir filler neck under the bonnet.
Checking
and topping up this fluid can should
b
e done with the engine off.
The
level of this fluid should be checked
r
egularly,
par
ticularly
d
uring
w
inter.
Refer
to "Checks - Screenwash / headlamp
w
ash level" section for the procedure on
c
hecking the level.
F
P
ull
the
windscreen
wiper
stalk
towards
y
ou.
The
windscreen
wash
then
the
w
indscreen
wipers
operate
for
a
fixed
p
eriod.
The
headlamp
washers
only
operate
when
the
dipped or main beam headlamps are on, with
the vehicle moving .
Do
not
cover
the
rain
sensor,
linked
with
t
he
sunshine
sensor
and
located
in
the
c
entre
of
the
windscreen
behind
the
rear
v
iew
mirror.
Switch
off
the
automatic
rain
sensitive
w
ipers
when
using
an
automatic
car
wash.
In
winter,
it
is
advisable
to
wait
until
the
w
indscreen
is
completely
clear
of
ice
b
efore
activating
the
automatic
rain
sen
sitive
w
ipers. To
reduce
the
consumption
of
the
fluid
b
y
the
headlamp
washers,
they
operate
o
nly with every seventh use of the
screenwash
or
every
25
miles
(40
km)
d
uring
a
given
journey.
6
Visibility
Page 132 of 494
130
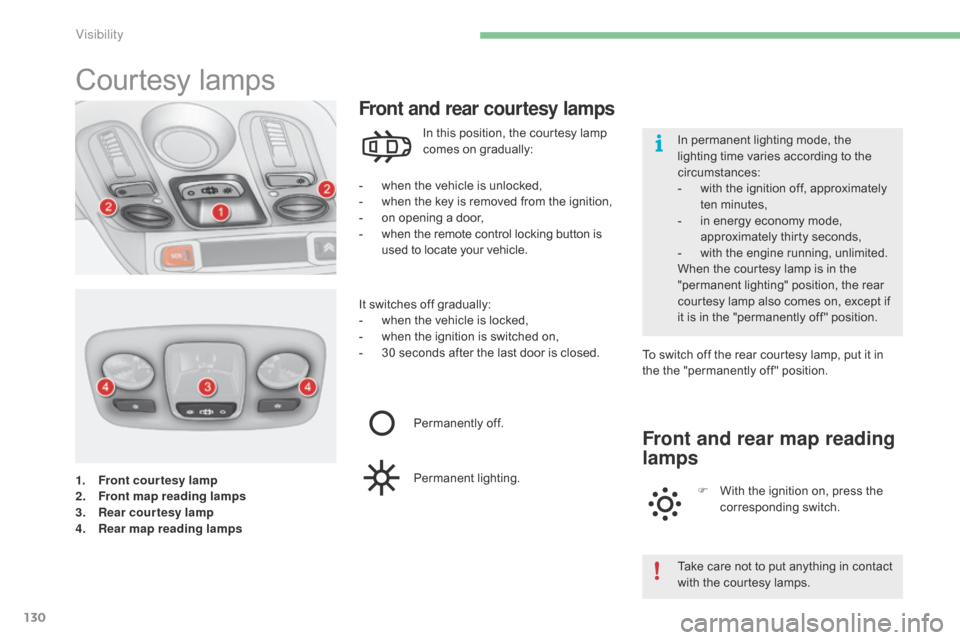
1. Front courtesy lamp
2. Front map reading lamps
3.
R
ear courtesy lamp
4.
R
ear map reading lamps
Courtesy lam ps
- when the vehicle is unlocked,
- w hen the key is removed from the ignition,
-
o
n opening a door,
-
w
hen the remote control locking button is
u
sed to locate your vehicle.
Front and rear courtesy lamps
In this position, the courtesy lamp comes on gradually:
It
switches
off gradually:
-
w
hen
the vehicle is locked,
-
w
hen
the ignition is switched on,
-
3
0
seconds after the last door is closed.To
switch off the rear courtesy lamp, put it in
t
he the "permanently off " position.
Permanently
off.
Permanent
l
ighting.
Front and rear map reading
lamps
F With the ignition on, press the c
orresponding s witch.
Take
care not to put anything in contact
w
ith the courtesy lamps.
In
permanent lighting mode, the
l
ighting time varies according to the
c
ircumstances:
-
w
ith the ignition off, approximately
t
en
m
inutes,
-
i
n energy economy mode,
a
pproximately thirty seconds,
-
w
ith the engine running, unlimited.
When the courtesy lamp is in the
"
permanent lighting" position, the rear
c
ourtesy lamp also comes on, except if
i
t
is
in the "permanently off " position.
Visibility
Page 133 of 494
131
Interior mood lighting
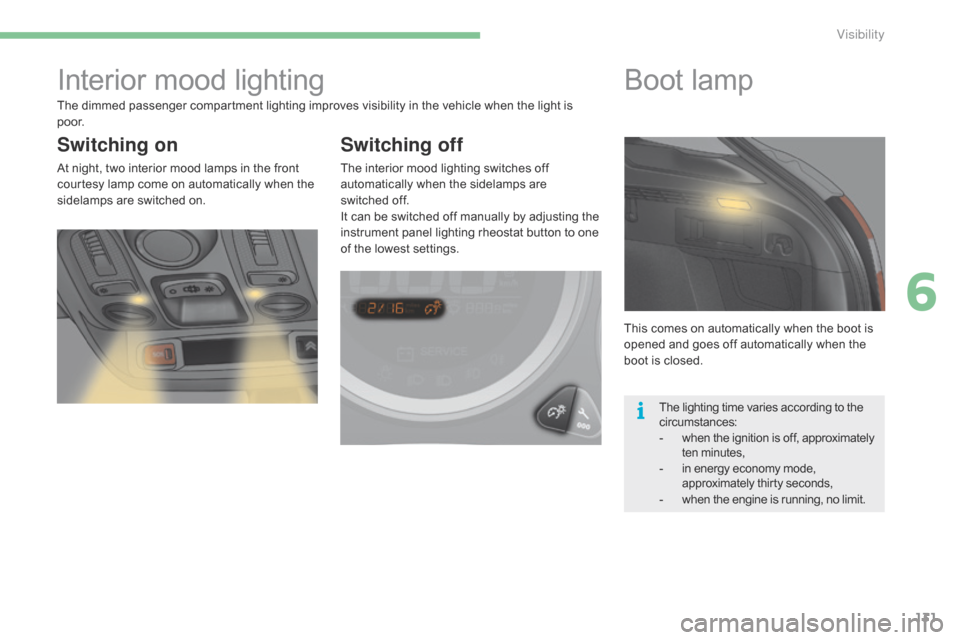
Switching on
At night, two interior mood lamps in the front c
ourtesy lamp come on automatically when the
s
idelamps are switched on.
Switching off
The interior mood lighting switches off automatically when the sidelamps are
switched
off.
It
can be switched off manually by adjusting the
i
nstrument panel lighting rheostat button to one
o
f the lowest settings. This
comes on automatically when the boot is
o
pened and goes off automatically when the
b
oot is closed.
Boot lamp
The lighting time varies according to the circumstances:
-
w
hen the ignition is off, approximately
t
en
m
inutes,
-
i
n energy economy mode,
a
pproximately thirty seconds,
-
w
hen the engine is running, no limit.
The
dimmed
passenger
compartment
lighting
improves
visibility
in
the
vehicle
when
the
light
is
p
o o r.
6
Visibility
Page 151 of 494
149
Trajectory control systems
Anti-slip regulation (ASR)
and dynamic stability
control (DSC)
The anti-slip regulation (also known as traction control) optimises traction to prevent skidding
o
f the wheels, by acting on the brakes of the
d
riving wheels and on the engine.
The electronic stability control acts on the
brake
of one or more wheels and on the engine
t
o keep the vehicle on the trajectory required
b
y the driver, within the limits of the laws of
p
hysics.
Activation
These systems are activated automatically each time the vehicle is started.
They
come into operation in the event of a grip
o
r
t
rajectory
pro
blem.
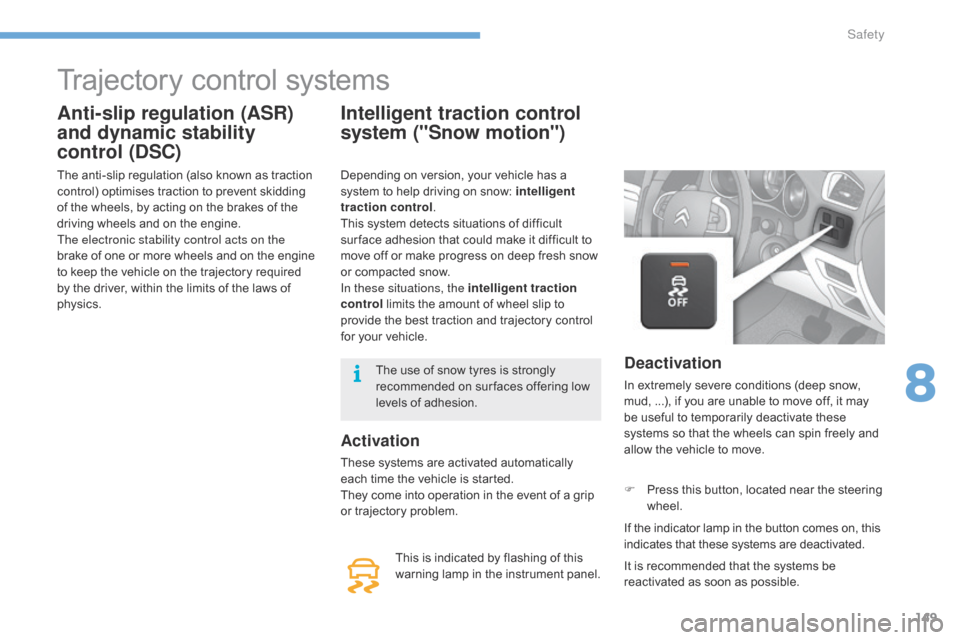
This
is indicated by flashing of this
w
arning lamp in the instrument panel.
Intelligent traction control
system ("Snow motion")
Deactivation
In extremely severe conditions (deep snow, mud, ...), if you are unable to move off, it may
b
e useful to temporarily deactivate these
s
ystems so that the wheels can spin freely and
a
llow the vehicle to move.
F
P
ress this button, located near the steering
w
heel.
If
the indicator lamp in the button comes on, this
i
ndicates that these systems are deactivated.
Depending
on
version,
your
vehicle
has
a
s
ystem
to
help
driving
on
snow:
intelligent
traction control .
This
system
detects
situations
of
difficult
s
ur face
adhesion
that
could
make
it
difficult
to
m
ove
off
or
make
progress
on
deep
fresh
snow
o
r
compacted
snow.
In these situations, the intelligent traction
control
limits
the
amount
of
wheel
slip
to
p
rovide
the
best
traction
and
trajectory
control
f
or
your
vehicle.
It is recommended that the systems be
r
eactivated as soon as possible.
The
use
of
snow
tyres
is
strongly
r
ecommended
on
sur faces
offering
low
l
evels
of
adhesion.
8
Safety
Page 155 of 494
153
Rear seat
belts
Fastening
F Pull the strap, then insert the tongue in the buc
kle.
F
C
heck that the seat belt is fastened
c
orrectly by pulling the strap.
Unfastening
F Press the red button on the buckle.
F G uide the seat belt as it reels in.
F
o
n t
he outer seat belts, raise the bar to the
top
of the backrest to prevent the tongue
f
rom knocking against the side trim.
This
warning lamp comes on in the
i
nstrument
panel
when
one
or
more
rear
p
assengers
u
nfasten
t
heir
sea
t
b
elt.
Seat belt unfastened warning
lamp in the instrument panelSeat belt unfastened warning
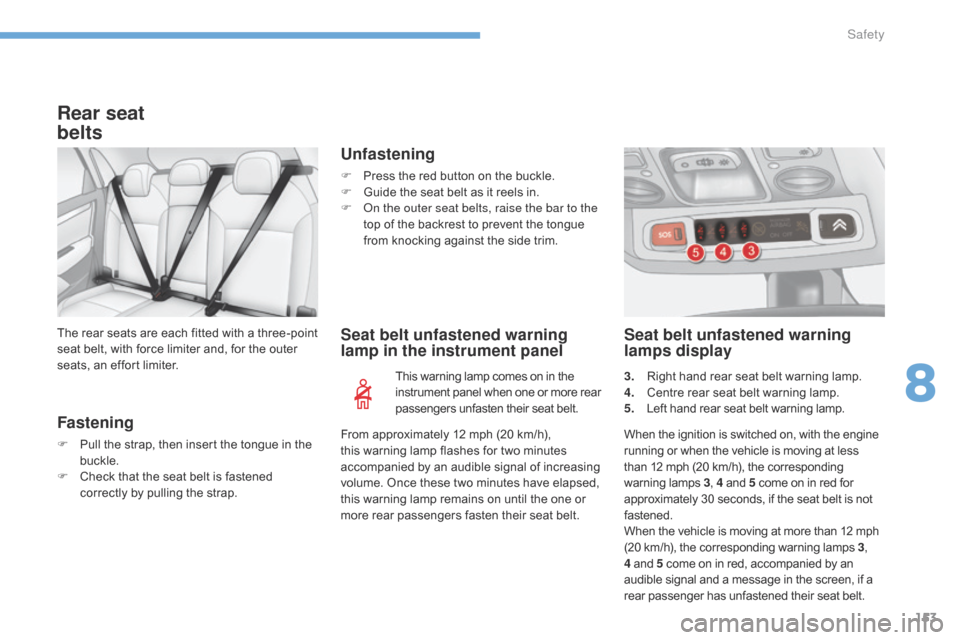
lamps display
3. Right
hand rear seat belt warning lamp.
4. C entre rear seat belt warning lamp.
5.
L
eft hand rear seat belt warning lamp.
From
approximately
12 mph
(20 km/h),
t
his
warning
lamp
flashes
for
two
minutes
a
ccompanied
by
an
audible
signal
of
increasing
v
olume.
Once
these
two
minutes
have
elapsed,
t
his
warning
lamp
remains
on
until
the
one
or
m
ore
rear
passengers
fasten
their
seat
belt.
The
rear
seats
are
each
fitted
with
a
three-point
s
eat
belt,
with
force
limiter
and,
for
the
outer
s
eats,
an
effort
limiter.
When the ignition is switched on, with the engine
r
unning or when the vehicle is moving at less
t
han 12 mph (20 km/h), the corresponding
w
arning
lam
ps
3, 4
and 5
come on in red for
a
pproximately 30 seconds, if the seat belt is not
f
astened.
When
the vehicle is moving at more than 12 mph
(
20 km/h), the corresponding warning lamps 3,
4
and 5
come on in red, accompanied by an
a
udible signal and a message in the screen, if a
r
ear passenger has unfastened their seat belt.
8
Safety
Page 161 of 494
159
A few driving recommendations
Observe the driving regulations at all times and remain vigilant whatever the traffic conditions.
Pay
close attention to the traffic and keep your
h
ands on the wheel so that you are ready to
r
eact at any time to any eventuality.
On
a long journey, a break every two hours is
s
trongly
re
commended.
In
difficult weather, drive smoothly, anticipate
t
he need to brake and increase the distance
f
rom other vehicles.
Driving on flooded roads
We strongly advise against driving on flooded roads, as this could cause serious damage
t
o the engine or gearbox, as well as to the
e
lectrical systems of your vehicle.
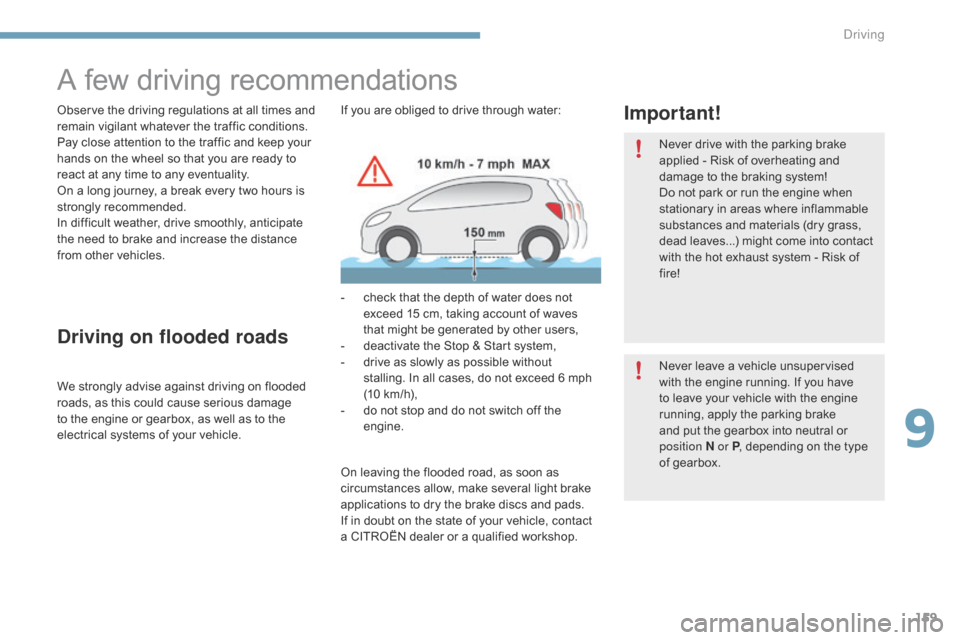
Important!If you are obliged to drive through water:
-
c
heck that the depth of water does not
e
xceed 15 cm, taking account of waves
t
hat might be generated by other users,
-
d
eactivate the Stop & Start system,
-
d
rive as slowly as possible without
s
talling. In all cases, do not exceed 6 mph
(
10 km/h),
-
d
o not stop and do not switch off the
e
ngine. Never
drive with the parking brake
a
pplied - Risk of overheating and
d
amage to the braking system!
Do
not park or run the engine when
s
tationary in areas where inflammable
s
ubstances and materials (dry grass,
d
ead leaves...) might come into contact
w
ith the hot exhaust system - Risk of
f
ire!
Never
leave a vehicle unsupervised
w
ith the engine running. If you have
t
o leave your vehicle with the engine
r
unning, apply the parking brake
a
nd put the gearbox into neutral or
p
osition
N or P,
depending on the type
o
f gearbox.
On
leaving the flooded road, as soon as
c
ircumstances allow, make several light brake
a
pplications to dry the brake discs and pads.
If
in doubt on the state of your vehicle, contact
a
CITROËN dealer or a qualified workshop.
9
Driving
Page 162 of 494
160
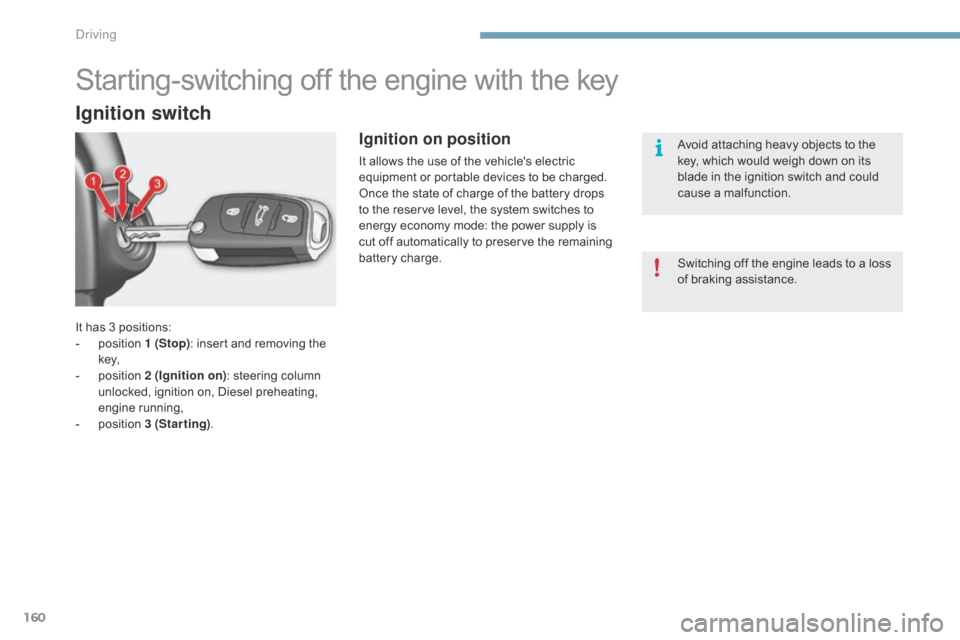
It has 3 positions:
- p osition 1 (Stop):
insert and removing the
k
ey,
-
p
osition 2 (Ignition on) :
steering column
u
nlocked, ignition on, Diesel preheating,
e
ngine
r
unning,
-
p
osition 3 (Starting).
Ignition on position
It allows the use of the vehicle's electric e
quipment or portable devices to be charged.
Once
the state of charge of the battery drops
t
o the reserve level, the system switches to
e
nergy economy mode: the power supply is
c
ut off automatically to preserve the remaining
b
attery charge.
Starting-switching off the engine with the key
Ignition switch
Avoid attaching heavy objects to the key, which would weigh down on its
b
lade in the ignition switch and could
c
ause a malfunction.
Switching
off the engine leads to a loss
o
f braking assistance.
Driving
Page 163 of 494
161
Starting the engine
F With a petrol engine, operate the starter m
otor by turning the key to position 3
without
pressing the accelerator pedal,
u
ntil the engine starts. Once the engine is
r
unning, release the key. F
W
ith a Diesel engine, turn the key to
p
osition 2
, ignition on, to operate the
eng
ine
p
re-heating
s
ystem.
Wait until this warning lamp goes off
i
n the instrument panel then operate
t
he starter motor by turning the key
t
o position 3 without pressing the
a
ccelerator pedal, until the engine
s
tarts. Once the engine is running,
r
elease the key.
If the engine does not start straight
a
way, switch off the ignition. Wait a
f
ew moments before operating the
s
tarter motor again. If the engine does
n
ot start after several attempts, do not
k
eep trying: you risk damaging the
s
tarter motor or the engine. Contact
a
CITROËN dealer or a qualified
w
orkshop.Never
leave the engine running in
a
n enclosed area without adequate
v
entilation:
in
ternal
c
ombustion
e
ngines emit toxic exhaust gases,
s
uch as carbon monoxide. Danger of
i
ntoxication and death.
In very severe wintry conditions
(
temperatures below -23°C), to ensure
t
he correct operation and durability of
t
he mechanical components of your
v
ehicle, engine and gearbox, it is n
ecessary to leave the engine running f
or 4 minutes before moving off.
In
certain cases, you may have to apply
m
ore force to the steering (wheels on
f
ull lock, for example).
In wintry conditions, the warning lamp
c
an stay on for a longer period. When
t
he engine is hot, the warning lamp
d
oes not come on.In temperate conditions, do not leave
t
he engine at idle to warm up but move
o
ff straight away and drive at moderate
s
peed.
With the parking brake applied and the gearbox
i
n neutral or position N or P
:
F
d
epress the clutch pedal fully (manual
g
earbox),
or
F
p
ress the brake pedal firmly (electronic or
a
utomatic gearbox),
F
i
nsert the key into the ignition switch; the
s
ystem recognises the code,
F
u
nlock the steering column by
s
imultaneously turning the steering and the
k
ey.
9
Driving