tow Citroen C4 2016 2.G User Guide
[x] Cancel search | Manufacturer: CITROEN, Model Year: 2016, Model line: C4, Model: Citroen C4 2016 2.GPages: 396, PDF Size: 10.22 MB
Page 99 of 396
97
C4-2_en_Chap03_ergonomie-et-confort_ed02-2015
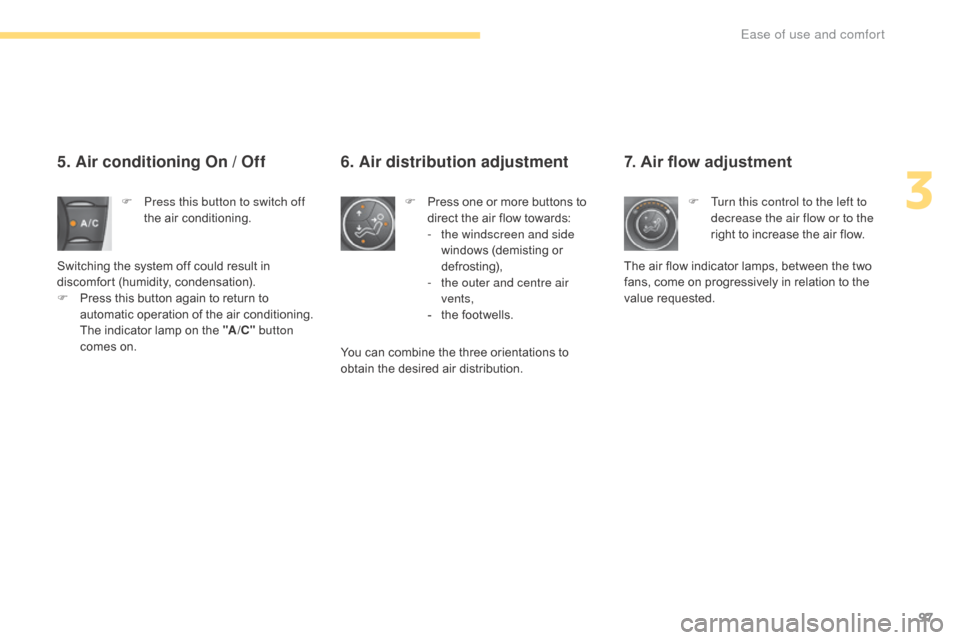
7. Air flow adjustment
F Turn this control to the left to decrease the air flow or to the
right
to increase the air flow.
The
air
flow
indicator lamps, between the two
f
ans,
come
on progressively in relation to the
v
alue
re
quested.
5. Air conditioning On / Off
F Press this button to switch off the air conditioning.
Switching
the system off could result in
d
iscomfort
(
humidity,
c
ondensation).
F
P
ress
this button again to return to
a
utomatic operation of the air conditioning.
T
he
indicator lamp on the "A /C " button
comes
on. F
P ress one or more buttons to d
irect the air flow towards:
-
t
he windscreen and side
windows
(demisting or
d
ef r o st ing),
-
t
he outer and centre air
vents,
-
t
he footwells.
6. Air distribution adjustment
You can combine the three orientations to obtain the desired air distribution.
3
Ease of use and comfort
Page 102 of 396

100
C4-2_en_Chap03_ergonomie-et-confort_ed02-2015
Front demist - defrost
These markings on the control panel indicate the control positions for rapid demisting or defrosting of the windscreen and side windows.
With manual air
conditioning
F Put the temperature, air flow and distribution c
ontrols to the dedicated marked position.
F
P
ut the air intake control to the "Exterior air
i
ntake" position
(
indicator lamp on the control off).
F
S
witch on the air conditioning by pressing
t
he "A /C "
button; the warning lamp in the
b
utton comes on.
With digital dual-zone air
conditioning
Automatic visibility programme
F Select this programme to demist or defrost t
he windscreen and side windows as
quickly
as possible.
The
system automatically manages the air
c
onditioning, air flow and air intake, and
p
rovides optimum distribution towards the
w
indscreen and side windows.
F
To stop the programme, press either the "visibility" button again or "AUTO", the
warning
lamp on the button goes off and the
w
arning lamp on the "AUTO"
button comes on.
The system starts again with the values in use before it was overridden by the visibility
programme.
With
Stop & Start, when demisting has
b
een activated, the STOP mode is not
a
vailable.
With
Stop
&
Start,
when
the
demisting,
a
ir
conditioning
and
air
flow
functions
a
re
activated,
STOP
mode
is
not
a
vailable.
Ease of use and comfort
Page 113 of 396
111
C4-2_en_Chap03_ergonomie-et-confort_ed02-2015
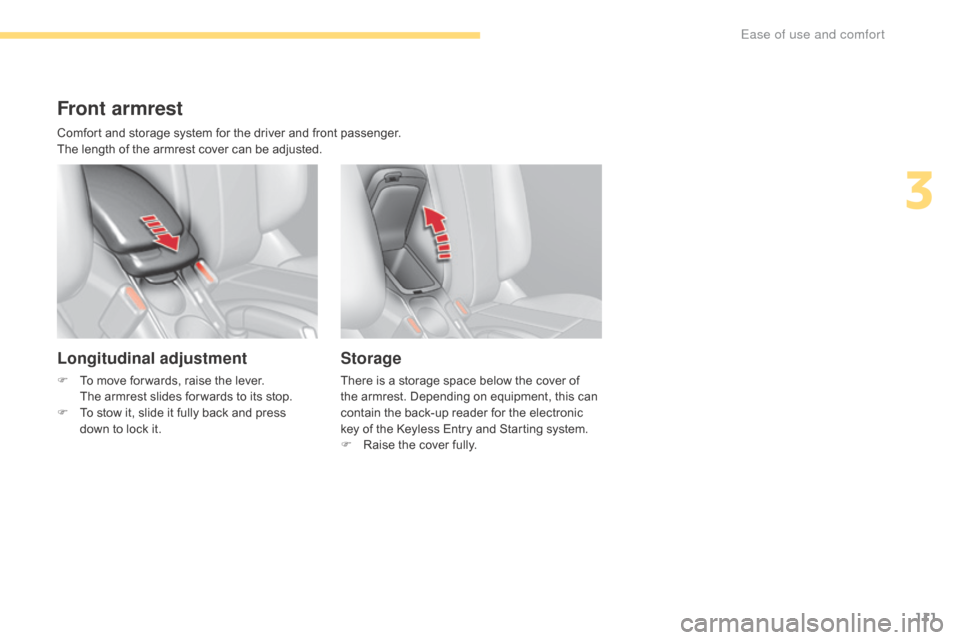
Front armrest
Longitudinal adjustment
F To move for wards, raise the lever.
The armrest slides for wards to its stop.
F
T
o stow it, slide it fully back and press
d
own to lock it.
Storage
There is a storage space below the cover of the armrest. Depending on equipment, this can
c
ontain the back-up reader for the electronic
k
ey of the Keyless Entry and Starting system.
F
R
aise the cover fully.
Comfort
and
storage
system
for
the
driver
and
front
passenger.
The
length
of
the
armrest
cover
can
be
adjusted.
3
Ease of use and comfort
Page 117 of 396
115
C4-2_en_Chap03_ergonomie-et-confort_ed02-2015
Rear seats
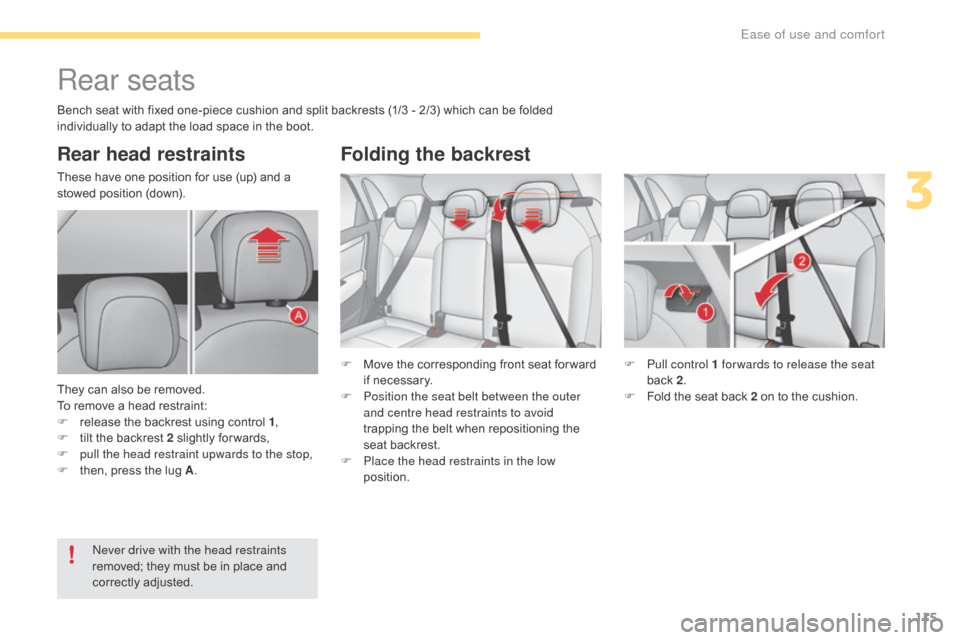
Rear head restraints
These have one position for use (up) and a stowed position (down).
They
can also be removed.
To
remove a head restraint:
F
r
elease the backrest using control 1,
F
t
ilt the backrest 2 slightly for wards,
F
p
ull the head restraint upwards to the stop,
F
t
hen, press the lug A. F
M
ove the corresponding front seat for ward
i
f necessary.
F
P
osition the seat belt between the outer
and centre head restraints to avoid
trapping
the belt when repositioning the
s
eat backrest.
F
P
lace the head restraints in the low
position. F
P
ull control 1 for wards to release the seat
back
2.
F
F
old the seat back 2 on to the cushion.
Never drive with the head restraints
removed;
they must be in place and
c
orrectly
adj
usted.
Folding the backrest
Bench seat with fixed one-piece cushion and split backrests (1/3 - 2/3) which can be folded individually to adapt the load space in the boot.
3
Ease of use and comfort
Page 125 of 396
123
C4-2_en_Chap03_ergonomie-et-confort_ed02-2015
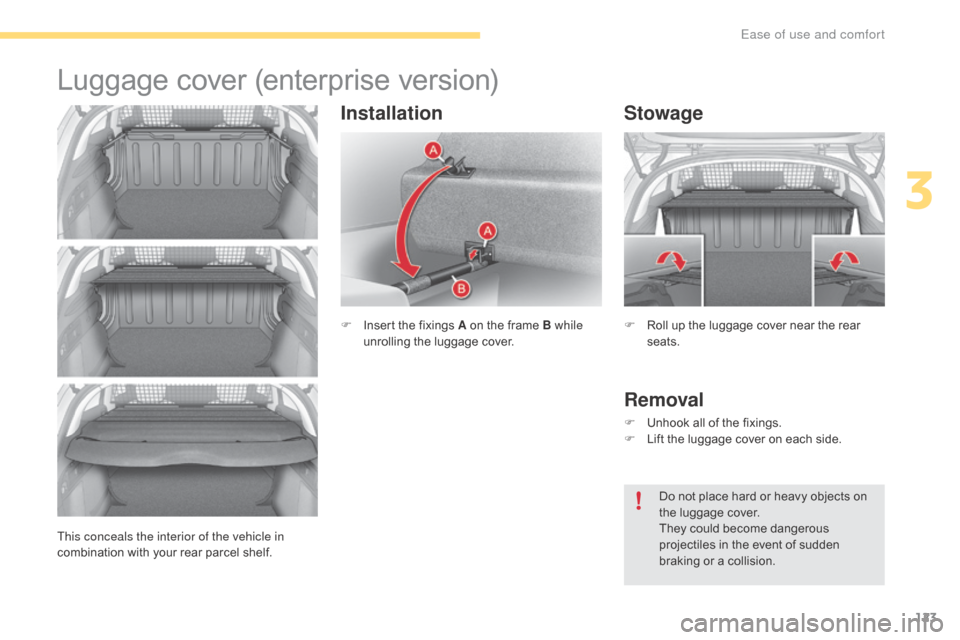
Luggage cover (enterprise v ersion)
F Insert the fixings A on the frame B while
unrolling the luggage cover.
Stowage
Removal
F Unhook all of the fixings.
F L ift the luggage cover on each side.
This conceals the interior of the vehicle in
combination
with
your
rear
parcel
shelf.
Installation
F Roll up the luggage cover near the rear sea
ts.
Do
not place hard or heavy objects on
t
he luggage cover.
They
could become dangerous
p
rojectiles in the event of sudden
b
raking or a collision.
3
Ease of use and comfort
Page 127 of 396
125
C4-2_en_Chap04_eclairage-et-visibilite_ed02-2015
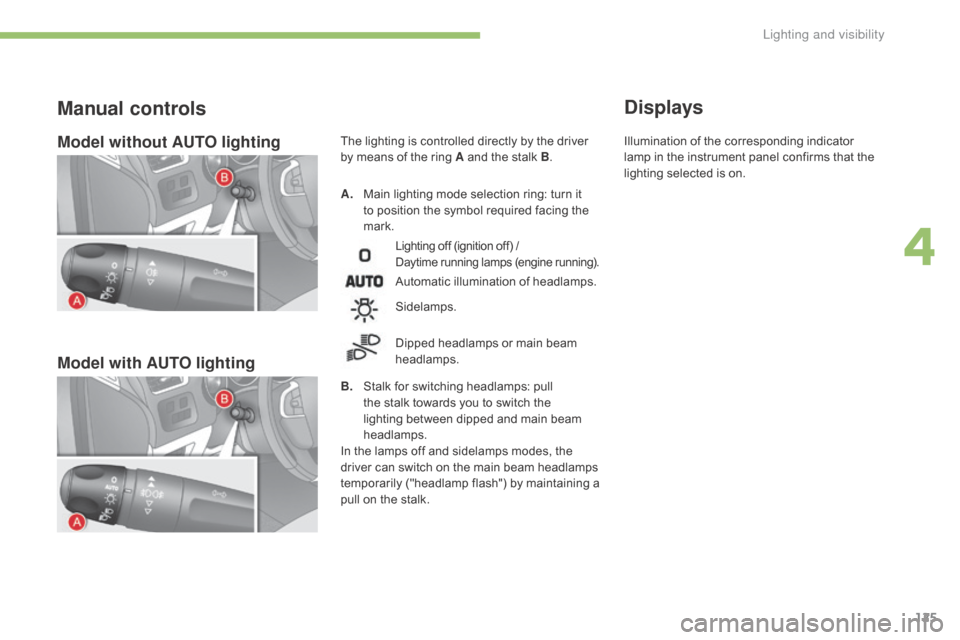
Model without AUTO lighting
Model with AUTO lighting
A. Main lighting mode selection ring: turn it t
o position the symbol required facing the
ma
rk.
Manual controls
Lighting off (ignition off) /
D aytime running lamps (engine running).
Automatic illumination of headlamps.
B.
S
talk
for switching headlamps: pull
t
he
stalk towards you to switch the
l
ighting between dipped and main beam
h
eadlamps.
In
the
lamps off and sidelamps modes, the
d
river
can
switch on the main beam headlamps
t
emporarily ("headlamp flash") by maintaining a
p
ull
on
the stalk.
Sidelamps.
Dipped
headlamps or main beam
h
eadlamps.
Displays
The lighting is controlled directly by the driver by means of the ring A and the stalk B. Illumination
of the corresponding indicator l
amp in the instrument panel confirms that the
l
ighting selected is on.
4
Lighting and visibility
Page 137 of 396
135
C4-2_en_Chap04_eclairage-et-visibilite_ed02-2015
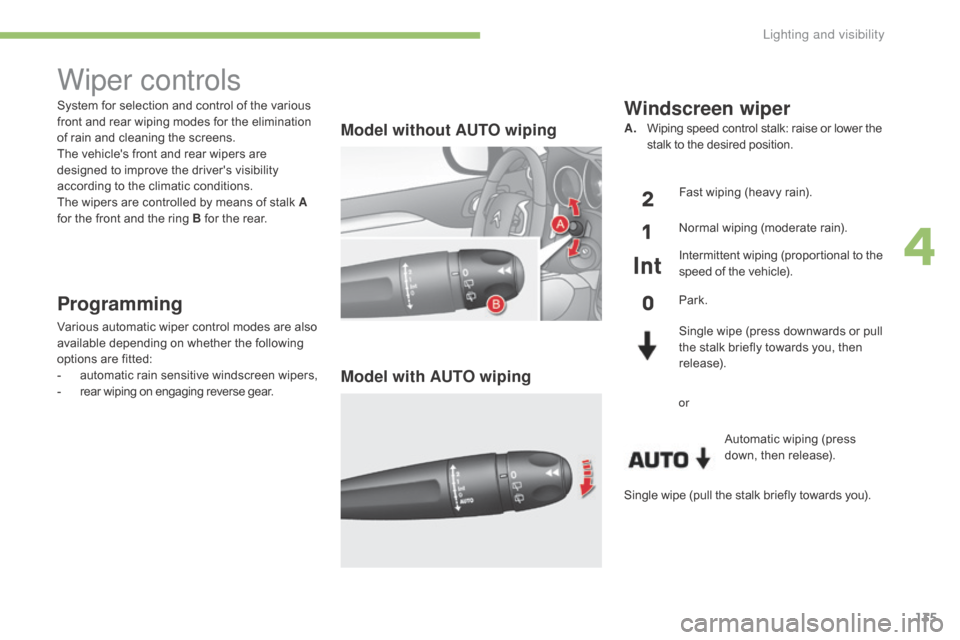
System for selection and control of the various front and rear wiping modes for the elimination
o
f rain and cleaning the screens.
The
vehicle's front and rear wipers are
d
esigned to improve the driver's visibility
a
ccording to the climatic conditions.
The
wipers are controlled by means of stalk A
for
the front and the ring B for the rear.
Programming
Various automatic wiper control modes are also available depending on whether the following
o
ptions are fitted:
-
a
utomatic
r
ain
sen
sitive
w
indscreen
w
ipers,
-
r
ear wiping on engaging reverse gear.
Model without AUTO wiping
Model with AUTO wiping
Windscreen wiper
A. Wiping speed control stalk: raise or lower the s
talk to the desired position.
Fast
wiping (heavy rain).
Normal
wiping (moderate rain).
Intermittent
wiping (proportional to the
s
peed of the vehicle).
Park.
Single
wipe (press downwards or pull
t
he stalk briefly towards you, then
r
elease).Automatic
wiping (press
do
wn,
t
hen
r
elease).
or
Wiper controls
Single wipe (pull the stalk briefly towards you).
4
Lighting and visibility
Page 139 of 396
137
C4-2_en_Chap04_eclairage-et-visibilite_ed02-2015
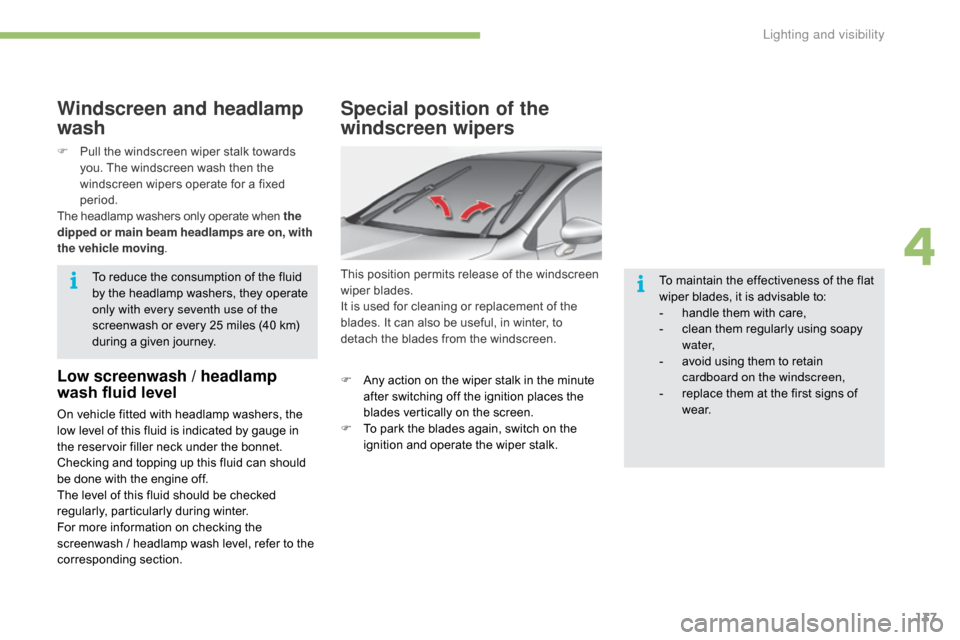
Special position of the
windscreen wipers
This position permits release of the windscreen wiper blades.
It
is used for cleaning or replacement of the
b
lades. It can also be useful, in winter, to
d
etach the blades from the windscreen.
F
A
ny action on the wiper stalk in the minute
a
fter switching off the ignition places the
b
lades vertically on the screen.
F
T
o park the blades again, switch on the
i
gnition and operate the wiper stalk.To
maintain the effectiveness of the flat
w
iper blades, it is advisable to:
-
h
andle them with care,
-
c
lean them regularly using soapy
w
ater,
-
a
void using them to retain
c
ardboard on the windscreen,
-
r
eplace them at the first signs of
w
e a r.
Windscreen and headlamp
wash
Low screenwash / headlamp
wash fluid level
On vehicle fitted with headlamp washers, the low level of this fluid is indicated by gauge in
t
he reservoir filler neck under the bonnet.
Checking
and topping up this fluid can should
b
e done with the engine off.
The
level of this fluid should be checked
r
egularly,
par
ticularly
d
uring
w
inter.
For
more information on checking the
s
creenwash / headlamp wash level, refer to the
c
orresponding
s
ection.
F
P
ull the windscreen wiper stalk towards
y
ou. The windscreen wash then the
w
indscreen wipers operate for a fixed
p
eriod.
The headlamp washers only operate when the
dipped or main beam headlamps are on , with
the vehicle moving .
To reduce the consumption of the fluid
b
y the headlamp washers, they operate
o
nly with every seventh use of the
screenwash or every 25 miles (40 km)
d
uring a given journey.
4
Lighting and visibility
Page 141 of 396
139
C4-2_en_Chap05_securite_ed02-2015
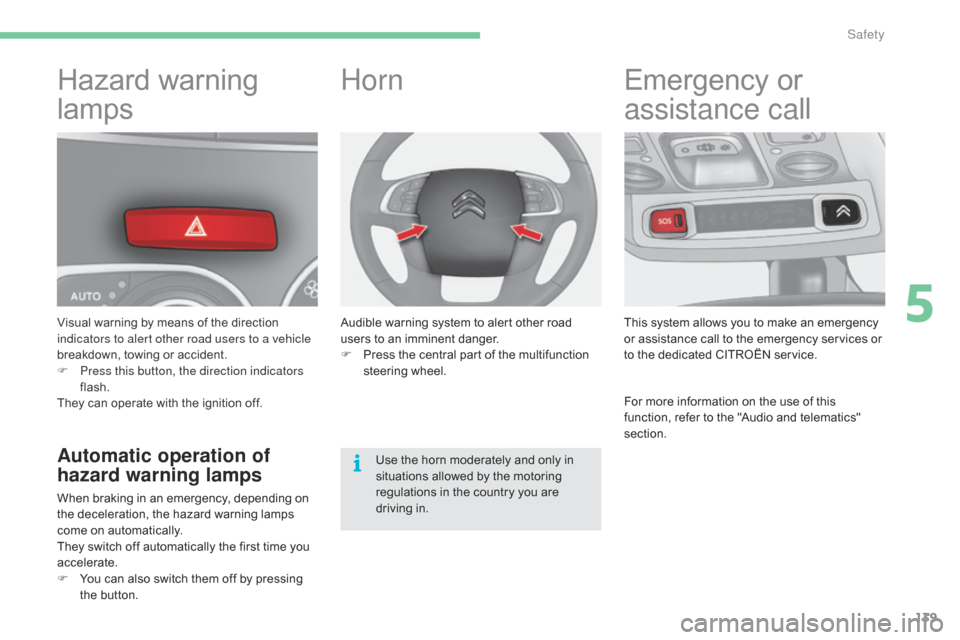
Hazard warning
lam
ps
Visual warning by means of the direction i
ndicators to alert other road users to a vehicle
breakdown,
towing or accident.
F
P
ress this button, the direction indicators
flash.
They
can operate with the ignition off.
Automatic operation of
hazard warning lamps
When braking in an emergency, depending on the deceleration, the hazard warning lamps
c
ome on automatically.
They
switch off automatically the first time you
a
ccelerate.
F
Y
ou can also switch them off by pressing
t
he button.
Horn
Audible warning system to alert other road users to an imminent danger.
F
P
ress the central part of the multifunction
s
teering
w
heel.
Use
the horn moderately and only in
s
ituations allowed by the motoring
r
egulations in the country you are
d
riving in.
Emergency or
a
ssistance call
This system allows you to make an emergency o
r assistance call to the emergency services or
t
o the dedicated CITROËN service.
For
more information on the use of this
f
unction, refer to the "Audio and telematics"
s
ection.
5
Safety
Page 148 of 396
146
C4-2_en_Chap05_securite_ed02-2015
The driver must ensure that passengers use the seat belts correctly and that they are all
fastened
before setting off.
Wherever you are seated in the vehicle,
always fasten your seat belt, even for short
journeys.
Do
not interchange the seat belt buckles as
t
hey will not fulfil their role fully.
The seat belts are fitted with an inertia reel
permitting
automatic adjustment of the length
o
f the strap to your size. The seat belt is
s
towed automatically when not in use.
Before and after use, ensure that the seat belt
is
reeled in correctly.
The
lower part of the strap must be positioned
a
s low as possible on the pelvis.
The
upper part must be positioned in the
h
ollow of the shoulder.
The
inertia reels are fitted with an automatic
l
ocking device which comes into operation in
t
he event of a collision, emergency braking
o
r if the vehicle rolls over. You can release
t
he device by pulling the strap firmly and then
r
eleasing it so that it reels in slightly.Recommendations for children
Use a suitable child seat if the passenger is less than 12 years old or shorter than one
and
a half metres.
Never
use the same seat belt to secure more
t
han one person.
Never
allow a child to travel on your lap.
For
more information on child seats, refer to
t
he corresponding section.
In the event of an impact
Depending on the nature and seriousness
of the impact,
the pretensioning device may
b
e deployed before and independently of the
airbags.
Deployment of the pretensioners
i
s accompanied by a slight discharge of
h
armless smoke and a noise, due to the
a
ctivation of the pyrotechnic cartridge
i
ncorporated in the system.
In
all cases, the airbag warning lamp comes on.
Following
an impact, have the seat belts
s
ystem checked, and if necessary replaced,
b
y a CITROËN dealer or a qualified
w
orkshop.
Advice
In order to be effective, a seat belt must:
- b e tightened as close to the body as
p
ossible,
-
b
e pulled in front of you with a smooth
m
ovement, checking that it does not
t
wist,
-
b
e used to restrain only one person,
-
n
ot bear any trace of cuts or fraying,
-
n
ot be converted or modified to avoid
a
ffecting
it
s
p
erformance.
In accordance with current safety
regulations,
for all repairs on your vehicle's
s
eat belts, go to a qualified workshop with
t
he skills and equipment needed, which a
C
ITROËN dealer is able to provide.
Have
your seat belts checked regularly by
a
CITROËN dealer or a qualified workshop,
p
articularly if the straps show signs of
d
amage.
Clean the seat belt straps with soapy
water
or a textile cleaning product, sold by
C
ITROËN dealers.
After
folding or moving a seat or rear bench
s
eat, ensure that the seat belt is positioned
and
reeled in correctly.
Safety