display CITROEN C4 CACTUS 2017 User Guide
[x] Cancel search | Manufacturer: CITROEN, Model Year: 2017, Model line: C4 CACTUS, Model: CITROEN C4 CACTUS 2017Pages: 256, PDF Size: 7.62 MB
Page 27 of 256
25
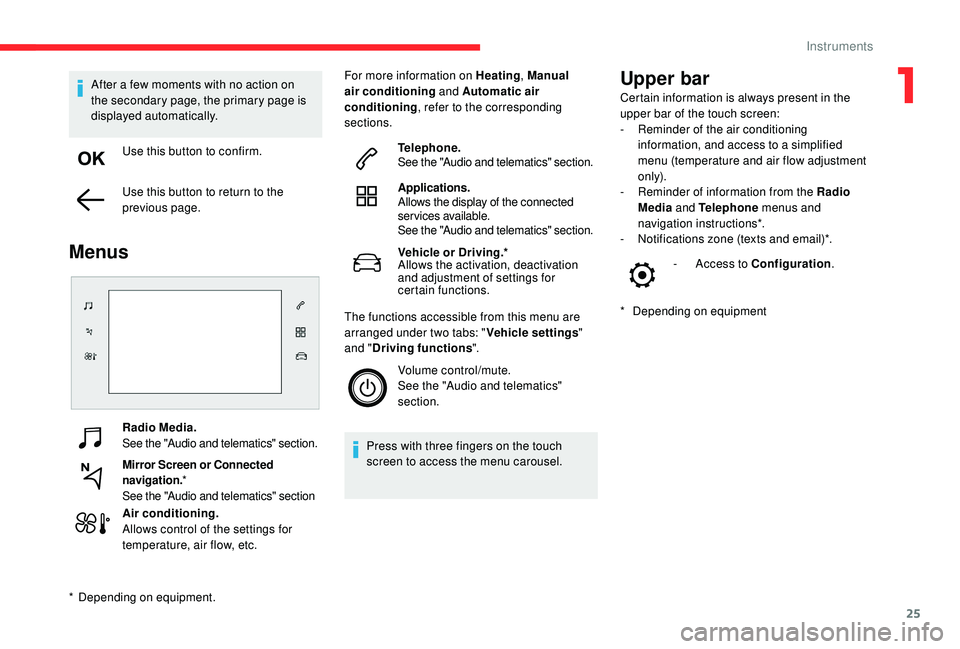
Radio Media.
See the "Audio and telematics" section.
Mirror Screen or Connected
navigation.*
See the "Audio and telematics" section
Air conditioning.
Allows control of the settings for
temperature, air flow, etc. For more information on Heating
, Manual
air conditioning and Automatic air
conditioning , refer to the corresponding
sections.
Telephone.
See the "Audio and telematics" section.
Applications.
Allows the display of the connected
services available.
See the "Audio and telematics" section.
Vehicle or Driving.*
Allows the activation, deactivation
and adjustment of settings for
certain functions.
The functions accessible from this menu are
arranged under two tabs: " Vehicle settings"
and " Driving functions ".
Volume control/mute.
See the "Audio and telematics"
section.
Press with three fingers on the touch
screen to access the menu carousel.
Upper bar
* Depending on equipment -
A
ccess to Configuration
.
After a few moments with no action on
the secondary page, the primary page is
displayed automatically.
Use this button to confirm.
Use this button to return to the
previous page.
Menus
* Depending on equipment. Certain information is always present in the
upper bar of the touch screen:
-
R
eminder of the air conditioning
information, and access to a simplified
menu (temperature and air flow adjustment
only).
-
R
eminder of information from the Radio
Media and Telephone menus and
navigation instructions*.
-
N
otifications zone (texts and email)*.
1
Instruments
Page 28 of 256

26
The functions are grouped into 4 families.Families Functions
"Parking" -
"Rear wiper in reverse ": activation/deactivation of the rear wiper with
reverse gear.
-
"Automatic folding of mirrors ": activation/deactivation of the
automatic door mirror folding/unfolding when locking/unlocking.
"Headlamps" -
"Guide-me-home lighting ": activation/deactivation of automatic guide-
me-home lighting.
-
"Welcome lighting ": activation/deactivation of exterior welcome
lighting.
-
"Daytime running lamps " (depending on country of sale).
-
"Directional headlamps " activation/deactivation of the cornering
lighting.
"Comfort" -
"Unlock: Boot only ": activation/deactivation of selective unlocking of
the tailgate.
"Safety" -
"Fatigue Detection System ": activation/deactivation of the driver
fatigue detection system.
-
"Recommended speed display " activation/deactivation of speed limit
display.
-
"Collision risk alert and automatic braking ": activation/deactivation
of the collision risk alert and automatic emergency braking.
-
"Blind spot sensors ": activation/deactivation of blind spot sensors.
"Driving functions" tab
Function Comments
Park Assist Activation of the
function.
Stop & Star t Activation/deactivation
of the function.
Parking sensors Activation/deactivation
of the function.
Traction control Activation/deactivation
of the function.
Blind spot
sensors Activation/deactivation
of the function.
Under-inflation
initialisation Reinitialisation of
the under-inflation
detection system.
Diagnostics List of current alerts.
"Vehicle" menu/"Driving"
menu
"Vehicle settings" tab
For more information on one of these
functions, refer to the corresponding
section.
Instruments
Page 29 of 256

27
Configuration
The functions available via the upper
bar are detailed in the table below.
Some settings are accessible on a
secondary page.
Button Comments
Theme.
Audio settings.
Turn off screen.
System administration.
Languages.
Setting the date and time.
Adjustment of the display
parameters (text scrolling,
animations, etc.) and
brightness.
Choice and settings for three
user profiles.
CITROËN Connect Nav
ButtonComments
Switch off the screen.
Brightness adjustment.
Choice and settings for three
user profiles.
Choice of units:
-
t
emperature (°Celsius or
°Fahrenheit)
-
d
istances and fuel
consumption (l/100 km, mpg
or km/l).
Theme.
Languages.
Adjustment of the display
parameters (text scrolling,
animations, etc.) and
brightness.
Setting the date and time.
CITROËN Connect RadioTrip computer
Information displayed about the current journey
(range, fuel consumption, average speed, etc.).
The information is accessible via the touch
screen.
Display of information in
the touch screen
F In the " Applications " menu,
select the " Vehicle application "
tab, then " Trip computer ".
The trip computer information is displayed on
the page.
F
P
ress one of the buttons to display the
desired tab.
For a temporary display in a specific
window, press the end of the wiper control
stalk for access to the information and
scroll through the different tabs.
-
T
he current information tab with:
•
t
he remaining range,
•
t
he current fuel consumption,
•
t
he Stop & Start time counter.
1
Instruments
Page 30 of 256

28
- The trip "1" tab with:
• t he average speed,
•
t
he average fuel consumption,
•
t
he distance travelled, for the first trip.
-
T
he trip " 2" tab with:
•
t
he average speed,
•
t
he average fuel consumption,
•
t
he distance travelled, for the second trip.
Resetting the trip recorder
F When the desired trip is displayed, press the "Reset" button or the end of the wiper
control stalk until zeros appear.
Tr i p s " 1" and " 2" are independent.
For example, trip " 1" can be used for daily
figures, and trip " 2" for monthly figures.
A few definitions…
Range
(miles or km)
The distance which can still be
travelled with the fuel remaining in
the tank (related to the average fuel
consumption over the last few miles
(kilometres) travelled). This value may fluctuate if a change
of driving style or terrain results in a
significant change in the current fuel
consumption.
Dashes are displayed when the range falls
below 19 miles (30 km).
After filling with at least 5 litres of fuel, the
range is recalculated and is displayed if it
exceeds 60 miles (100 km).
If dashes instead of figures continue to
be displayed when driving, contact a
CITROËN dealer or a qualified workshop.
Current fuel consumption
(mpg or l/100 km or km/l) Calculated during the last few
seconds.
This function is only displayed at speeds
above 19 mph (30 km/h).
Average fuel consumption
(mpg or l/100 km or km/l) Calculated since the last trip
computer reset.
Average speed
(mph or km/h)
Calculated since the last trip
computer reset.
Distance travelled
(miles or km)Calculated since the last trip
computer reset.
Stop & Star t time counter
(minutes/seconds or hours/minutes)
A cumulative time counter for periods in STOP
mode during a journey.
It resets to zero every time the ignition is
switched on.
Distance recorders
The total and trip distances are displayed for
thirty seconds when the ignition is switched off,
when the driver's door is opened and when the
vehicle is locked or unlocked.
Instruments
Page 31 of 256

29
When travelling abroad, you may have to
change the units of distance: the display
of road speed must be in the official units
(miles or km) for the country.
The change of units is done via the screen
configuration menu, with the vehicle
stationary.
Total distance recorder
It measures the total distance travelled by the
vehicle since its first registration.
Trip recorder
It measures the distance travelled since it was
reset to zero by the driver.
This function can be accessed by the touch
screen's trip computer. F
I
n the "
Applications "
menu, select the " Vehicle
Application " tab, then "Tr i p
Computer ".
F
S
elect the trip "
1" or trip " 2" tab.
F
T
o reset the trip recorder to zero, press
the " Reset " button or the end of the wiper
control stalk until zeros appear.
Setting the date and time
With CITROËN Connect
Radio
F Select the Settings menu.
F T hen "Configuration ".
F
Sel
ect " System configuration ".
F
Sel
ect "Date and time ".
F
Sel
ect " Date " or "Time ".
F
C
hoose the display formats.
F
C
hange the date and/or time using the
numeric keypad.
F
C
onfirm with " OK".
With CITROËN Connect
Nav
Setting of the time and date is only available if
synchronisation with the GPS is deactivated.
F
Sel
ect the Settings menu.
F
P
ress the " OPTIONS " button to go to the
secondary page.
F
Sel
ect "Setting the time- date".
F
Sel
ect the " Date" or "Time " tab.
F
S
et the date and/or time using the numeric
keypad.
F
C
onfirm with " OK".
Additional adjustments
You can choose:
-
T o change the display format of the date
and time (12h/24h).
-
T
o activate or deactivate the summer/winter
time management function.
-
T
o activate or deactivate the
synchronisation with the GPS (UTC).
1
Instruments
Page 52 of 256
50
Heating/Manual air
conditioning
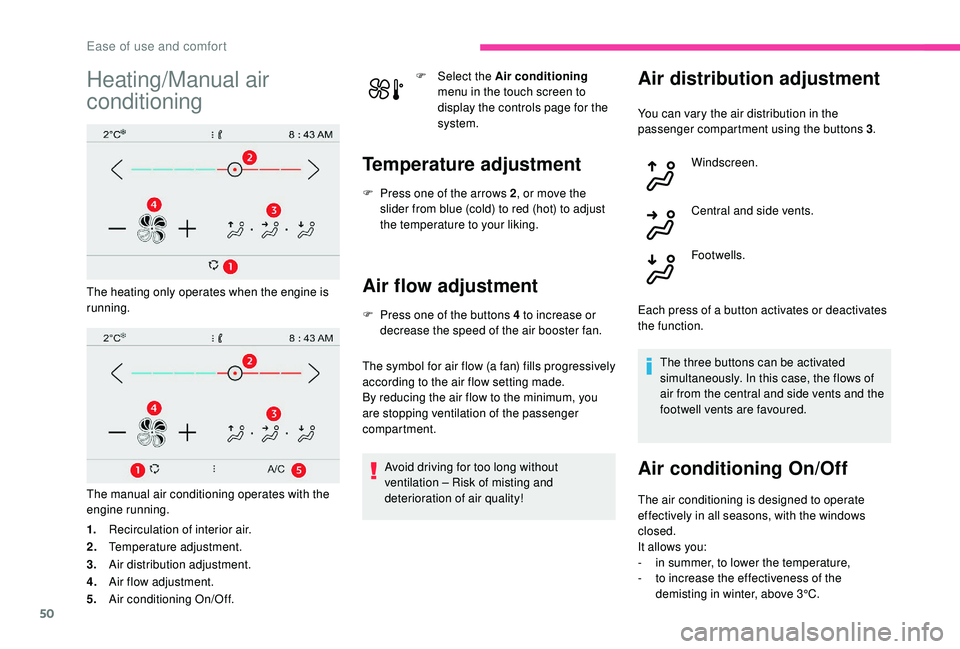
The heating only operates when the engine is
running.
The manual air conditioning operates with the
engine running.
1.Recirculation of interior air.
2. Temperature adjustment.
3. Air distribution adjustment.
4. Air flow adjustment.
5. Air conditioning On/Off. F
Sel
ect the
Air conditioning
menu in the touch screen to
display the controls page for the
system.
Temperature adjustment
F Press one of the arrows 2 , or move the
slider from blue (cold) to red (hot) to adjust
the temperature to your liking.
Air flow adjustment
F Press one of the buttons 4 to increase or decrease the speed of the air booster fan.
The symbol for air flow (a fan) fills progressively
according to the air flow setting made.
By reducing the air flow to the minimum, you
are stopping ventilation of the passenger
compartment.
Avoid driving for too long without
ventilation – Risk of misting and
deterioration of air quality!
Air distribution adjustment
You can vary the air distribution in the
passenger compartment using the buttons 3 .
Windscreen.
Central and side vents.
Footwells.
Each press of a button activates or deactivates
the function. The three buttons can be activated
simultaneously. In this case, the flows of
air from the central and side vents and the
footwell vents are favoured.
Air conditioning On/Off
The air conditioning is designed to operate
effectively in all seasons, with the windows
closed.
It allows you:
-
i
n summer, to lower the temperature,
-
t
o increase the effectiveness of the
demisting in winter, above 3°C.
Ease of use and comfort
Page 53 of 256
51
F Press button 5 to activate/deactivate the air conditioning system.
When the indicator lamp is on, the air
conditioning function is activated.
The air conditioning does not operate
when the air flow adjustment is inhibited.
Switching the system off
F Press this button; the indicator lamp in the button comes on.
This action switches off all of the functions of
the system.
The temperature is no longer controlled.
However, a slight flow of air, due to the
movement of the vehicle, can still be felt.
Pressing any button reactivates the system with
the settings that were previously in use. Avoid driving for long periods with
the system off – Risk of misting and
deterioration of air quality!
Automatic air conditioning
The air conditioning operates with the engine
running, but the ventilation and its controls are
available with the ignition on.
Operation of the air conditioning and regulation
of temperature, air flow and air distribution in
the passenger compartment are automatic.
F
Sel
ect the Air conditioning
menu in the touch screen to
display the controls page for the
system.
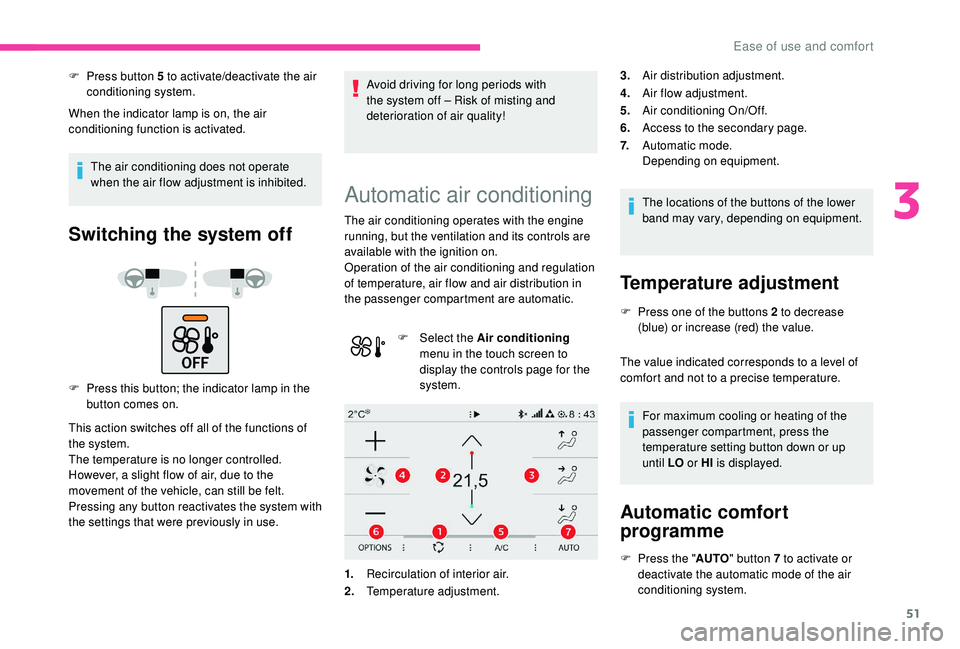
1. Recirculation of interior air.
2. Temperature adjustment. The locations of the buttons of the lower
band may vary, depending on equipment.
Temperature adjustment
F Press one of the buttons 2 to decrease
(blue) or increase (red) the value.
The value indicated corresponds to a level of
comfort and not to a precise temperature.
For maximum cooling or heating of the
passenger compartment, press the
temperature setting button down or up
until LO or HI is displayed.
Automatic comfort
programme
F Press the " AUTO" button 7 to activate or
deactivate the automatic mode of the air
conditioning system.
3.
Air distribution adjustment.
4. Air flow adjustment.
5. Air conditioning On/Off.
6. Access to the secondary page.
7. Automatic mode.
Depending on equipment.
3
Ease of use and comfort
Page 54 of 256
52
Mode AUTO
The air conditioning system operates
automatically: the system manages the
temperature, air flow and air distribution in
the passenger compartment in an optimum
way according to the comfort level you have
selected.
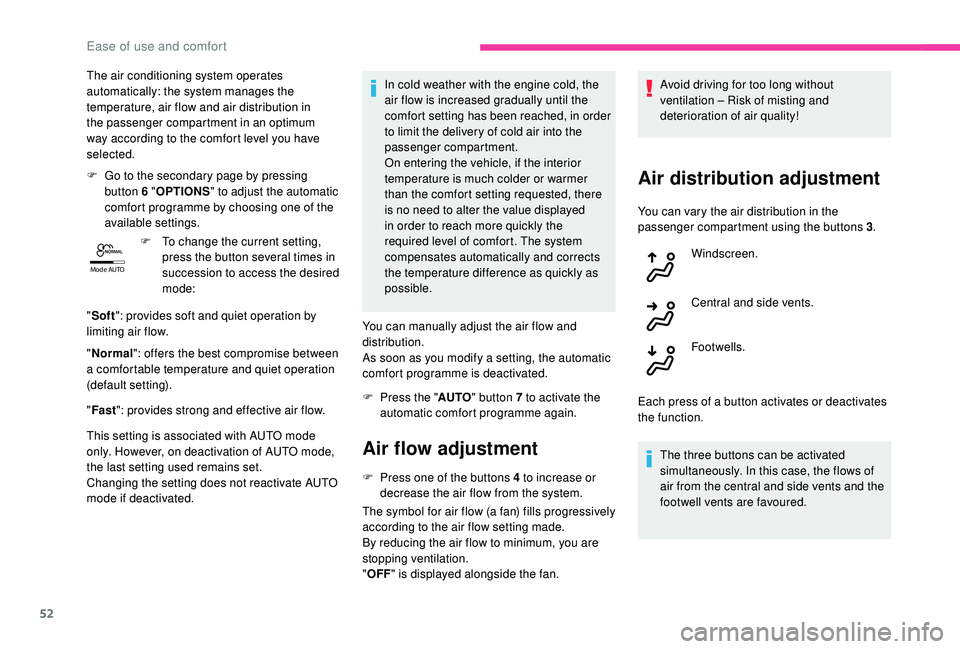
F
G
o to the secondary page by pressing
button 6 " OPTIONS " to adjust the automatic
comfort programme by choosing one of the
available settings.
F
T
o change the current setting,
press the button several times in
succession to access the desired
mode:
" Soft ": provides soft and quiet operation by
limiting air flow.
" Normal ": offers the best compromise between
a comfortable temperature and quiet operation
(default setting).
" Fast ": provides strong and effective air flow.
This setting is associated with AUTO mode
only. However, on deactivation of AUTO mode,
the last setting used remains set.
Changing the setting does not reactivate AUTO
mode if deactivated. In cold weather with the engine cold, the
air flow is increased gradually until the
comfort setting has been reached, in order
to limit the delivery of cold air into the
passenger compartment.
On entering the vehicle, if the interior
temperature is much colder or warmer
than the comfort setting requested, there
is no need to alter the value displayed
in order to reach more quickly the
required level of comfort. The system
compensates automatically and corrects
the temperature difference as quickly as
possible.
You can manually adjust the air flow and
distribution.
As soon as you modify a setting, the automatic
comfort programme is deactivated.
F
P
ress the "AUTO" button 7 to activate the
automatic comfort programme again.
Air flow adjustment
F Press one of the buttons 4 to increase or decrease the air flow from the system.
The symbol for air flow (a fan) fills progressively
according to the air flow setting made.
By reducing the air flow to minimum, you are
stopping ventilation.
" OFF " is displayed alongside the fan. Avoid driving for too long without
ventilation – Risk of misting and
deterioration of air quality!
Air distribution adjustment
You can vary the air distribution in the
passenger compartment using the buttons 3
.
Windscreen.
Central and side vents.
Footwells.
Each press of a button activates or deactivates
the function. The three buttons can be activated
simultaneously. In this case, the flows of
air from the central and side vents and the
footwell vents are favoured.
Ease of use and comfort
Page 59 of 256
57
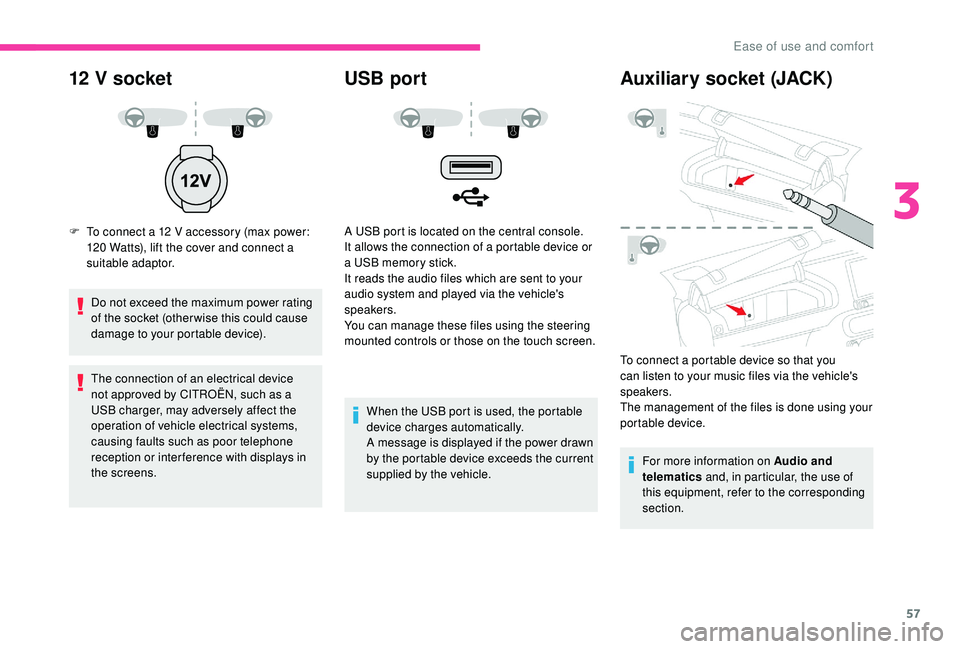
12 V socket
F To connect a 12 V accessory (max power: 120 Watts), lift the cover and connect a
suitable adaptor.
Do not exceed the maximum power rating
of the socket (other wise this could cause
damage to your portable device).
The connection of an electrical device
not approved by CITROËN, such as a
USB charger, may adversely affect the
operation of vehicle electrical systems,
causing faults such as poor telephone
reception or inter ference with displays in
the screens.
USB port
A USB port is located on the central console.
It allows the connection of a portable device or
a USB memory stick.
It reads the audio files which are sent to your
audio system and played via the vehicle's
speakers.
You can manage these files using the steering
mounted controls or those on the touch screen.
When the USB port is used, the portable
device charges automatically.
A message is displayed if the power drawn
by the portable device exceeds the current
supplied by the vehicle.
Auxiliary socket (JACK)
To connect a portable device so that you
can listen to your music files via the vehicle's
speakers.
The management of the files is done using your
portable device.For more information on Audio and
telematics and, in particular, the use of
this equipment, refer to the corresponding
section.
3
Ease of use and comfort
Page 63 of 256

61
Lighting control stalk
In some weather conditions (e.g. low
temperature or humidity), the presence
of misting on the internal sur face of the
glass of the headlamps and rear lamps is
normal; it disappears after the lamps have
been on for a few minutes.
If one or more lamps fails, a message
asks you to check the lamp or lamps
concerned.
Travelling abroad
If planning to use your vehicle in a country
that drives on the other side of the road,
the headlamp dipped beams must be
adjusted to avoid dazzling oncoming
drivers. Contact a CITROËN dealer or a
qualified workshop.
Main lighting
Selection of main lighting mode
Turn the ring to align the desired symbol with
the marking.Lighting off/Daytime running lamps.
Sidelamps only.
Dipped or main beam headlamps.
Automatic illumination of headlamps.
Without AUTO lighting
With AUTO lighting
Headlamp dipping
In the lighting off and sidelamps modes, the
driver can switch on the main beam headlamps
temporarily ("headlamp flash"), for as long as
the stalk is kept pulled.
Display
Illumination of the corresponding indicator
lamp in the instrument panel confirms that the
lighting selected is on.
Foglamps
The foglamps operate with the dipped and main
beam headlamps.
Rear foglamp
Pull the stalk to switch between dipped and
main beam headlamps.
F
T
o switch it on, turn the ring for wards.
4
Lighting and visibility