display CITROEN C4 CACTUS 2017 Owner's Manual
[x] Cancel search | Manufacturer: CITROEN, Model Year: 2017, Model line: C4 CACTUS, Model: CITROEN C4 CACTUS 2017Pages: 256, PDF Size: 7.62 MB
Page 65 of 256

63
Automatic illumination of
headlamps
As soon as the light returns to a sufficient level
or after the windscreen wipers are switched off,
the lamps are switched off automatically.
Switching on
Switching off
F Turn the ring to another position.
Deactivation of the function is accompanied by
the display of a message.
Malfunction
In the event of a malfunction of the
sunshine sensor, the lamps come
on, this warning lamp is displayed on
the instrument panel together with
an audible signal and/or a message.
Contact a CITROËN dealer or a
qualified workshop.
Do not cover the sunshine sensor,
integrated with the rain sensor and located
at the top centre of the windscreen behind
the rear view mirror; the associated
functions would no longer be controlled.
In fog or snow, the sunshine sensor may
detect sufficient light. In this case, the
lighting will not come on automatically.
Daytime running lamps/
Sidelamps (LEDs)
The LEDs are brighter when operating as
daytime running lamps.
F
T
urn the ring to the "
AUTO" position.
The activation of the function is accompanied
by the display of a message.
Three flashes
F Press briefly upwards or downwards, without going beyond the point of
resistance; the direction indicators will flash
3 times.
The light-emitting diodes (LEDs) come on
automatically when the engine is started.
They provide the following functions:
-
D
aytime running lamps (lighting control
stalk at position " 0" or " AUTO " with
adequate light level).
-
S
idelamps (lighting control stalk in position
" AUTO " with low light level or "Sidelamps
only" or "Main or dipped beam headlamps").
4
Lighting and visibility
Page 70 of 256
68
Automatic windscreen
wipers
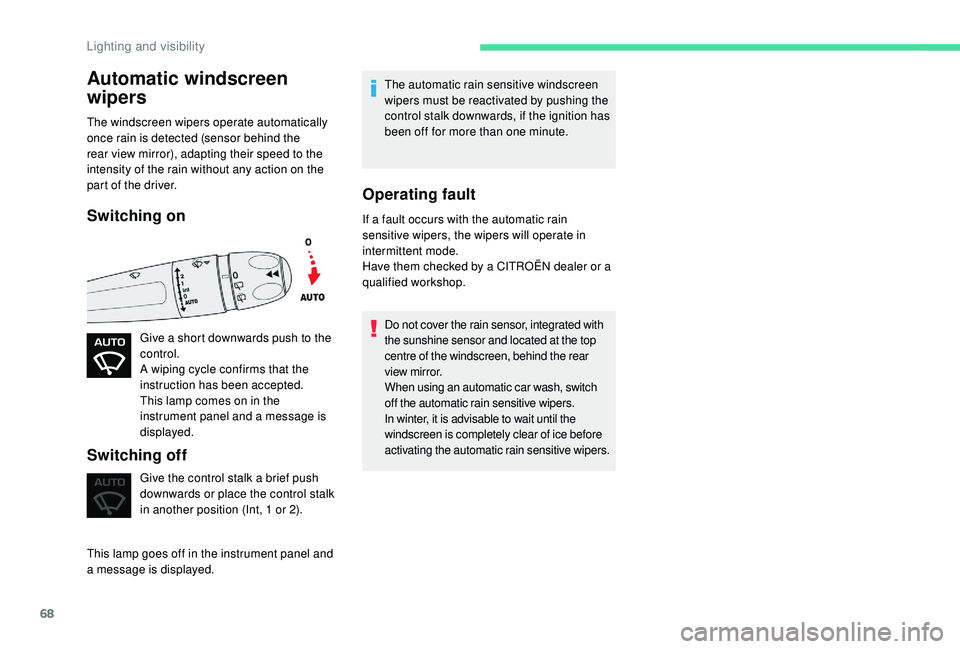
The windscreen wipers operate automatically
once rain is detected (sensor behind the
rear view mirror), adapting their speed to the
intensity of the rain without any action on the
part of the driver.
Switching on
Give a short downwards push to the
control.
A wiping cycle confirms that the
instruction has been accepted.
This lamp comes on in the
instrument panel and a message is
displayed.
Switching off
Give the control stalk a brief push
downwards or place the control stalk
in another position (Int, 1 or 2).
This lamp goes off in the instrument panel and
a message is displayed. The automatic rain sensitive windscreen
wipers must be reactivated by pushing the
control stalk downwards, if the ignition has
been off for more than one minute.
Operating fault
If a fault occurs with the automatic rain
sensitive wipers, the wipers will operate in
intermittent mode.
Have them checked by a CITROËN dealer or a
qualified workshop.
Do not cover the rain sensor, integrated with
the sunshine sensor and located at the top
centre of the windscreen, behind the rear
view mirror.
When using an automatic car wash, switch
off the automatic rain sensitive wipers.
In winter, it is advisable to wait until the
windscreen is completely clear of ice before
activating the automatic rain sensitive wipers.
Lighting and visibility
Page 76 of 256
74
ASR/DSC
These systems offer increased safety
in normal driving, but they should not
encourage the driver to take extra risks or
drive at high speed.
It is in conditions of reduced grip (rain,
snow, ice) that the risk of loss of grip
increases. It is therefore important for your
safety to keep these systems activated in
all conditions, and particularly in difficult
conditions.
The correct operation of these
systems depends on obser vation of
the manufacturer's recommendations
regarding as much the wheels (tyres and
rims), braking and electronic components
as the assembly and repair procedures
used by CITROËN dealers.
To benefit in full from the effectiveness
of these systems in wintry conditions,
the vehicle must be fitted with four snow
tyres, allowing the vehicle to retain neutral
behaviour on the road.Grip control
Special patented traction control system which
improves traction on snow, mud and sand.
This system, the operation of which has been
optimised for each situation, allows you to
manoeuvre in most conditions of poor grip
(encountered when using a passenger car).
Associated with 205/50 R17 all-season M+S
(Mud and Snow) tyres, this system offers a
compromise between safety, grip and traction.
These tyres are efficient in winter and summer
conditions.
The accelerator pedal should be pressed
sufficiently to allow the system to use the power
of the engine. Operation at high engine speeds
is completely normal.
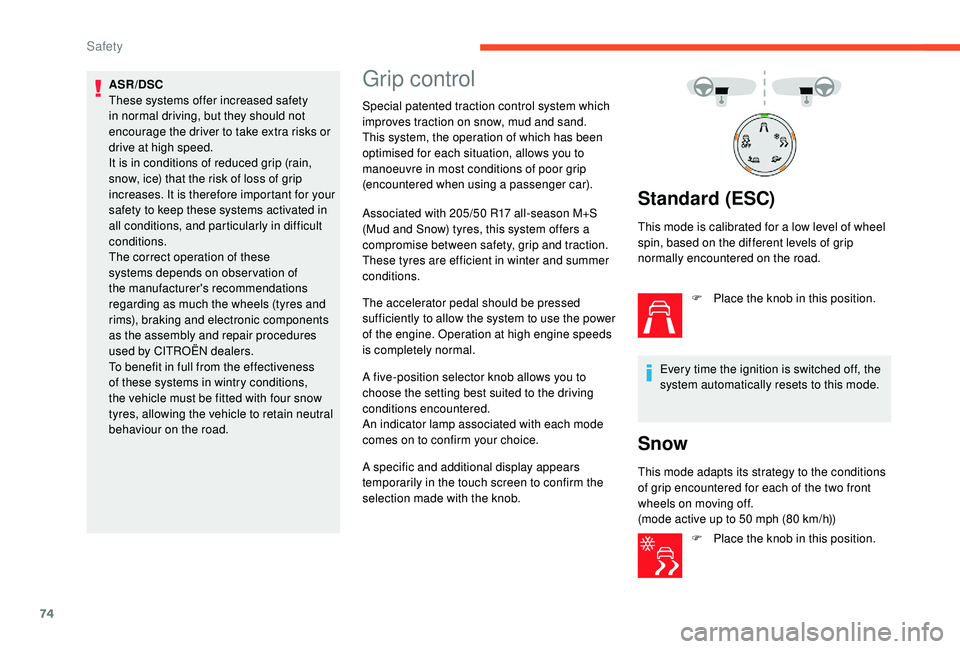
A five-position selector knob allows you to
choose the setting best suited to the driving
conditions encountered.
An indicator lamp associated with each mode
comes on to confirm your choice.
A specific and additional display appears
temporarily in the touch screen to confirm the
selection made with the knob.
Standard (ESC)
This mode is calibrated for a low level of wheel
spin, based on the different levels of grip
normally encountered on the road.F
P
lace the knob in this position.
Every time the ignition is switched off, the
system automatically resets to this mode.
Snow
This mode adapts its strategy to the conditions
of grip encountered for each of the two front
wheels on moving off.
(mode active up to 50 mph (80 km/h)) F
P
lace the knob in this position.
Safety
Page 78 of 256
76
Fastening
F Pull the strap then insert the tongue in the buckle.
F
C
heck that the seat belt is fastened
correctly by pulling the strap.
Unfastening
F Press the red button on the buckle.
F G uide the seat belt as it reels in.
Rear seat belts
The rear seats are each fitted with a three-point
seat belt.
Fastening
F Pull the strap then insert the tongue in the buckle.
F
C
heck that the seat belt is fastened
correctly by pulling the strap.
Unfastening
F Press the red button on the buckle.
F G uide the seat belt as it reels in.
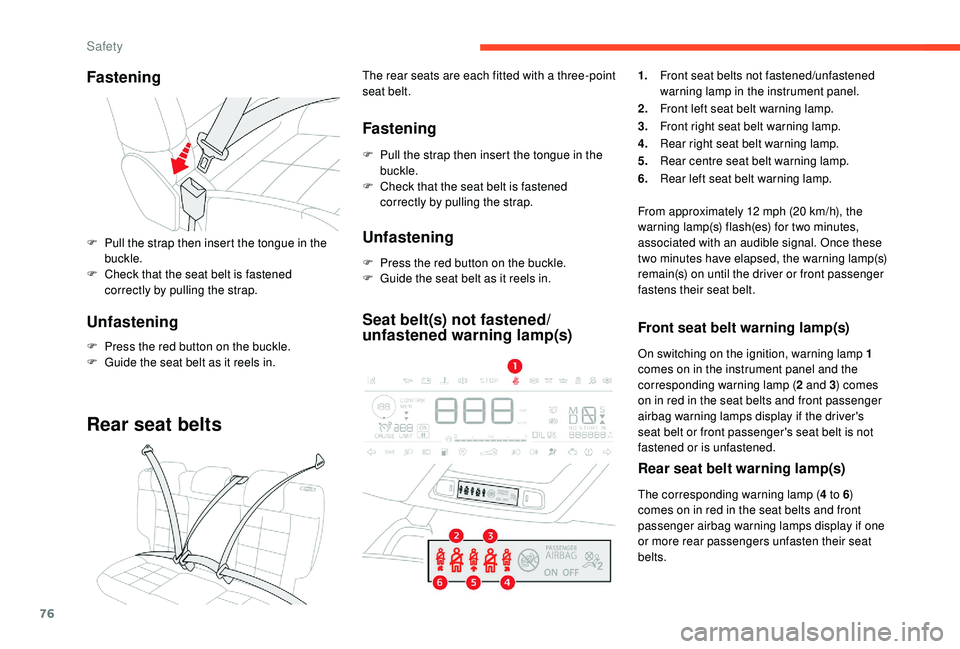
Seat belt(s) not fastened/
unfastened warning lamp(s)
1.Front seat belts not fastened/unfastened
warning lamp in the instrument panel.
2. Front left seat belt warning lamp.
3. Front right seat belt warning lamp.
4. Rear right seat belt warning lamp.
5. Rear centre seat belt warning lamp.
6. Rear left seat belt warning lamp.
From approximately 12 mph (20 km/h), the
warning lamp(s) flash(es) for two minutes,
associated with an audible signal. Once these
two minutes have elapsed, the warning lamp(s)
remain(s) on until the driver or front passenger
fastens their seat belt.
Front seat belt warning lamp(s)
On switching on the ignition, warning lamp 1
c omes on in the instrument panel and the
corresponding warning lamp ( 2 and 3) comes
on in red in the seat belts and front passenger
airbag warning lamps display if the driver's
seat belt or front passenger's seat belt is not
fastened or is unfastened.
Rear seat belt warning lamp(s)
The corresponding warning lamp ( 4 to 6)
comes on in red in the seat belts and front
passenger airbag warning lamps display if one
or more rear passengers unfasten their seat
belts.
Safety
Page 85 of 256
83
Deactivating the front
passenger airbag
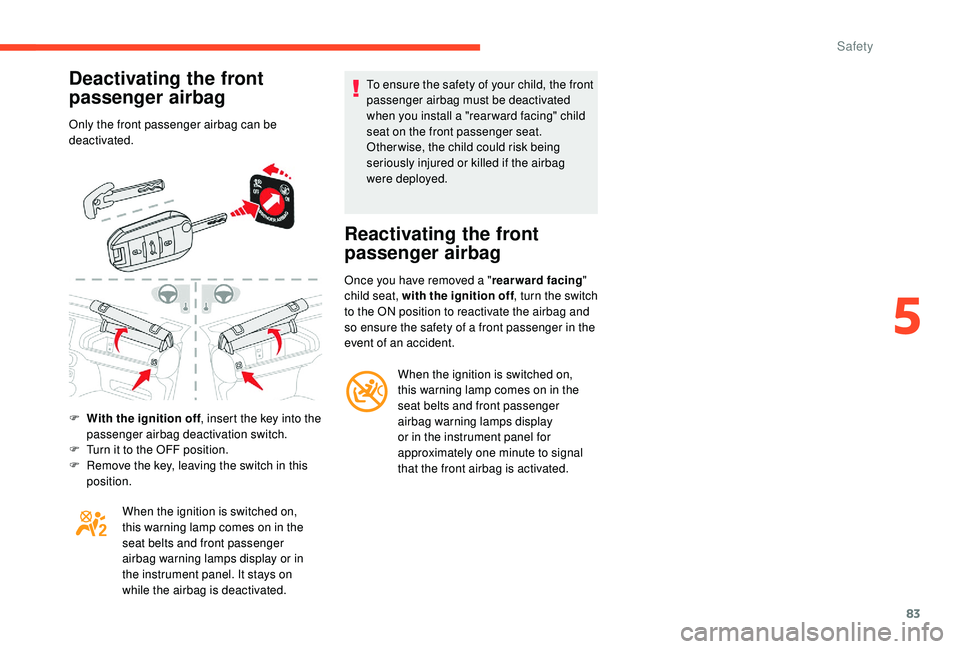
Only the front passenger airbag can be
deactivated.
F
W
ith the ignition off , insert the key into the
passenger airbag deactivation switch.
F
T
urn it to the OFF position.
F
R
emove the key, leaving the switch in this
position.
When the ignition is switched on,
this warning lamp comes on in the
seat belts and front passenger
airbag warning lamps display or in
the instrument panel. It stays on
while the airbag is deactivated. To ensure the safety of your child, the front
passenger airbag must be deactivated
when you install a "rear ward facing" child
seat on the front passenger seat.
Otherwise, the child could risk being
seriously injured or killed if the airbag
were deployed.
Reactivating the front
passenger airbag
Once you have removed a "
rearward facing"
child seat, with the ignition off , turn the switch
to the ON position to reactivate the airbag and
so ensure the safety of a front passenger in the
event of an accident.
When the ignition is switched on,
this warning lamp comes on in the
seat belts and front passenger
airbag warning lamps display
or in the instrument panel for
approximately one minute to signal
that the front airbag is activated.
5
Safety
Page 100 of 256

98
F With an automatic gearbox, place the gear
selector in mode P or N then depress the
brake pedal fully.
F
W
ith an electronic gearbox , place the gear
selector in mode N then depress the brake
pedal fully.
F
B
riefly press the " START/STOP" button
while maintaining pressure on the pedal
until the engine starts.
The steering column unlocks and the engine
starts.
For Diesel engines , when the temperature is
below zero and/or the engine is cold, starting
will only be done once the pre-heater warning
lamp is off.
If this warning lamp comes on after
pressing the " START/STOP " button:
F
W
ith a manual gearbox , you should keep
the clutch pedal fully depressed until the
warning lamp goes off and not press the
" START/STOP " button again until the
engine is running. F
W ith an automatic or electronic gearbox
,
you should keep the brake pedal fully
depressed until the warning lamp goes off
and not press the " START/STOP" button
again until the engine is running.
The presence of the "
K
eyless Entry and
Starting" electronic key in the recognition
zone is essential.
If the electronic key is not detected in this
zone, a message is displayed.
Move the electronic key into this zone so
that the engine can be started.
If there is still a problem, refer to the "Key
not detected – Back-up starting" section.
If one of the starting conditions is not met,
a reminder message is displayed in the
instrument panel.
In some circumstances, it is necessary
to turn the steering wheel slightly while
pressing the " START/STOP " button to
assist unlocking of the steering column; a
message warns you when this is needed.
For safety reasons, never leave the
vehicle while the engine is running.Switching off the engine
F Immobilise the vehicle, engine at idle.
F W ith a manual gearbox , put the gear lever
into neutral.
F
W
ith an automatic gearbox , place the gear
selector in mode P or N.
F
W
ith an electronic gearbox , select mode
N .
F
W
ith the electronic key inside the vehicle,
press the " START/STOP " button.
The engine stops and the steering column
locks.
In some circumstances, it is necessary to turn
the steering wheel slightly to lock the steering
column.
If the vehicle is not immobilised, the
engine will not stop.
Never leave your vehicle with the
electronic key still inside.
Switching off the engine leads to a loss of
braking assistance.
Driving
Page 103 of 256
101
As a safety precaution and to facilitate
starting the engine:
-
a
lways select neutral,
-
p
ress the clutch pedal.
Automatic gearbox (EAT6)
Six-speed automatic gearbox which offers a
choice between the comfort of fully automatic
operation, enhanced by a sport programme, or
manual gear changing.
Two driving modes are available:
-
a
utomatic operation with electronic
management of the gears by the gearbox,
with a sport programme for a more dynamic
driving style,
-
man
ual operation for sequential changing
of the gears by the driver.
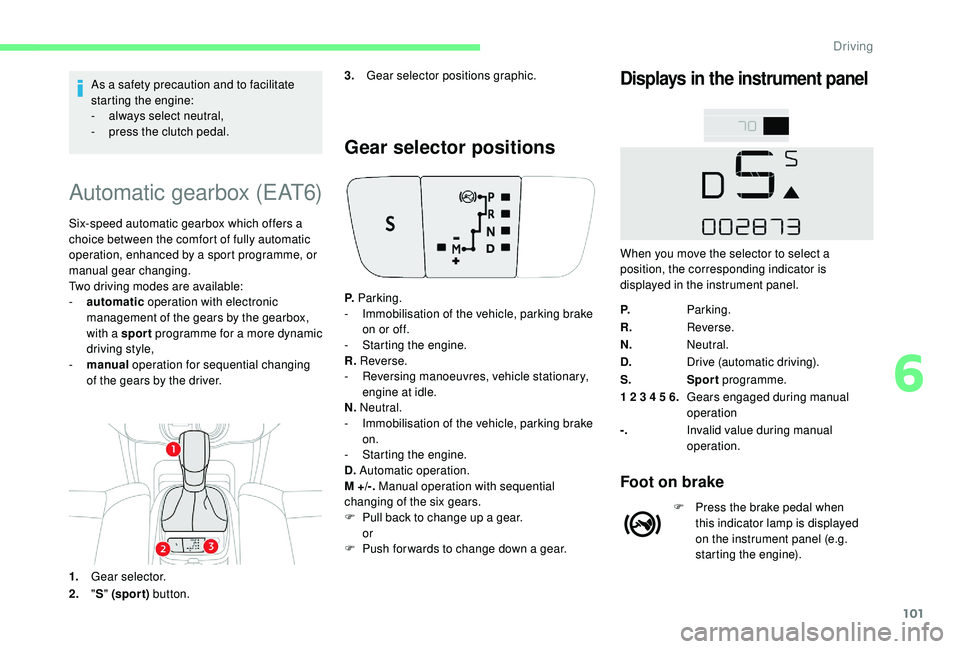
1. Gear selector.
2. "S " (spor t) button.
Gear selector positions
Displays in the instrument panel3.Gear selector positions graphic.
P. Parking.
-
I
mmobilisation of the vehicle, parking brake
on or off.
-
S
tarting the engine.
R. Reverse.
-
R
eversing manoeuvres, vehicle stationary,
engine at idle.
N. Neutral.
-
I
mmobilisation of the vehicle, parking brake
on.
-
S
tarting the engine.
D. Automatic operation.
M +/-. Manual operation with sequential
changing of the six gears.
F
P
ull back to change up a gear.
or
F
P
ush forwards to change down a gear. P.
Parking.
R. Reverse.
N. Neutral.
D. Drive (automatic driving).
S. Sport programme.
1 2 3 4 5 6. Gears engaged during manual
operation
-. Invalid value during manual
operation.
Foot on brake
F Press the brake pedal when
this indicator lamp is displayed
on the instrument panel (e.g.
starting the engine).
When you move the selector to select a
position, the corresponding indicator is
displayed in the instrument panel.
6
Driving
Page 104 of 256
102
Starting the vehicle
F Apply the parking brake.
F Sel ect position P or N .
F
S
tart the engine.
If these conditions are not met, there is an
audible signal, accompanied by the display of a
warning message.
F
W
ith the engine running, press the brake
pedal.
F
R
elease the parking brake.
F
Sel
ect position R , D or M.
F
G
radually release the brake pedal.
The vehicle moves off immediately.
If position N is selected inadvertently while
driving, allow the engine to return to idle,
then select position D to accelerate.
If the temperature is below -23°C, the
engine should be left at idle for four
minutes, to ensure the correct operation
and longevity of the engine and gearbox. When the engine is running at idle, with
the brakes released, if position R
, D or
M is selected, the vehicle moves even
without the accelerator being pressed.
Do not leave children unsuper vised inside
the vehicle when the engine is running.
When carrying out maintenance with the
engine running, apply the parking brake
and select position P .
Automatic operation
F Select position D for automatic changing of
the six gears.
The gearbox then operates in auto-adaptive
mode, without any action needed from the
driver. It continuously selects the most suitable
gear according to the style of driving, the profile
of the road and the load in the vehicle.
For maximum acceleration without touching
the selector, press the accelerator pedal down
fully (kick down). The gearbox changes down
automatically or maintains the gear selected
until the maximum engine speed is reached.
On braking, the gearbox changes down
automatically to provide efficient engine
braking. If you release the accelerator sharply, the
gearbox will not change to a higher gear for
safety reasons.
Never select position N while the vehicle
is moving.
Never select position P or R unless the
vehicle is completely stationary.
Sport programme "S"
F Press button S, after starting the engine.
The gearbox automatically favours a dynamic
style of driving.
S appears in the instrument panel.
Return to standard
automatic operation
F At any time, press the selected button again to quit the programme engaged and return
to auto-adaptive mode.
Manual operation
F Select position M for sequential changing
of the six gears.
Driving
Page 105 of 256
103
F Move the selector towards the + sign to change up a gear.
F
M
ove the selector towards the - sign to
change down a gear.
It is only possible to change from one gear to
another if the vehicle speed and engine speed
permit; otherwise, the gearbox will operate
temporarily in automatic mode.
D disappears, and the gears engaged appear
in succession on the instrument panel.
If the engine speed is too low or too high, the
selected gear flashes for a few seconds, then
the actual gear engaged is displayed.
It is possible to change from position D
(automatic) to position M (manual) at any time.
When the vehicle is stationary or moving
very slowly, the gearbox engages first gear
automatically.
The sport programme is inactive in manual
operation.
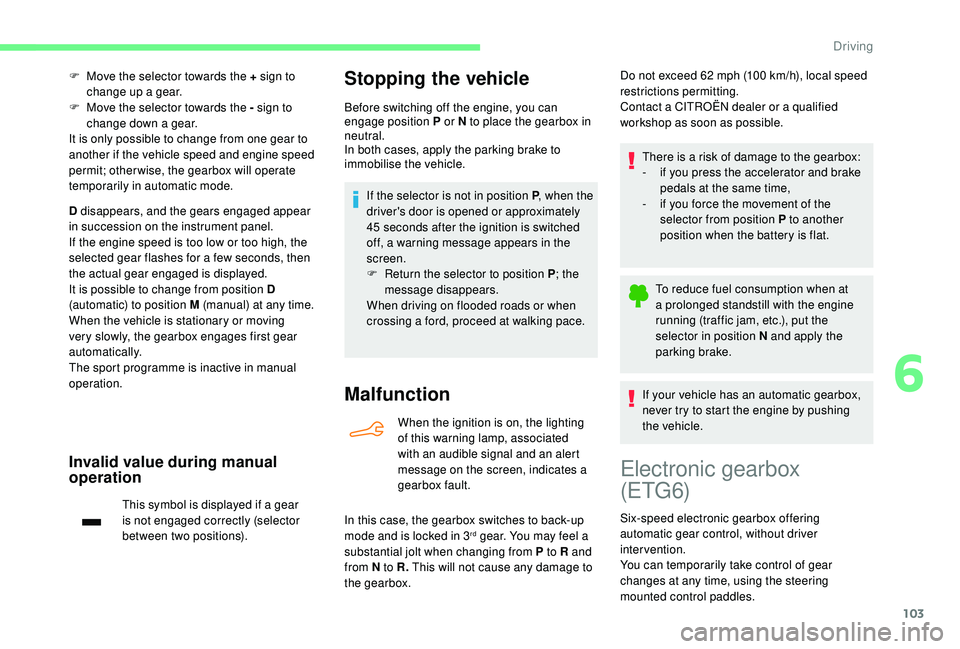
Invalid value during manual
operation
This symbol is displayed if a gear
is not engaged correctly (selector
between two positions).
Stopping the vehicle
Before switching off the engine, you can
engage position P or N to place the gearbox in
neutral.
In both cases, apply the parking brake to
immobilise the vehicle.
If the selector is not in position P , when the
driver's door is opened or approximately
45 seconds after the ignition is switched
off, a warning message appears in the
screen.
F
R
eturn the selector to position P ; the
message disappears.
When driving on flooded roads or when
crossing a ford, proceed at walking pace.
Malfunction
When the ignition is on, the lighting
of this warning lamp, associated
with an audible signal and an alert
message on the screen, indicates a
gearbox fault.
In this case, the gearbox switches to back-up
mode and is locked in 3
rd gear. You may feel a
substantial jolt when changing from P to R and
from N to R. This will not cause any damage to
the gearbox. There is a risk of damage to the gearbox:
-
i
f you press the accelerator and brake
pedals at the same time,
-
i
f you force the movement of the
selector from position P to another
position when the battery is flat.
To reduce fuel consumption when at
a prolonged standstill with the engine
running (traffic jam, etc.), put the
selector in position N and apply the
parking brake.
If your vehicle has an automatic gearbox,
never try to start the engine by pushing
the vehicle.
Do not exceed 62 mph (100 km/h), local speed
restrictions permitting.
Contact a CITROËN dealer or a qualified
workshop as soon as possible.
Electronic gearbox
(ETG 6)
Six-speed electronic gearbox offering
automatic gear control, without driver
intervention.
You can temporarily take control of gear
changes at any time, using the steering
mounted control paddles.
6
Driving
Page 106 of 256
104
Control panel
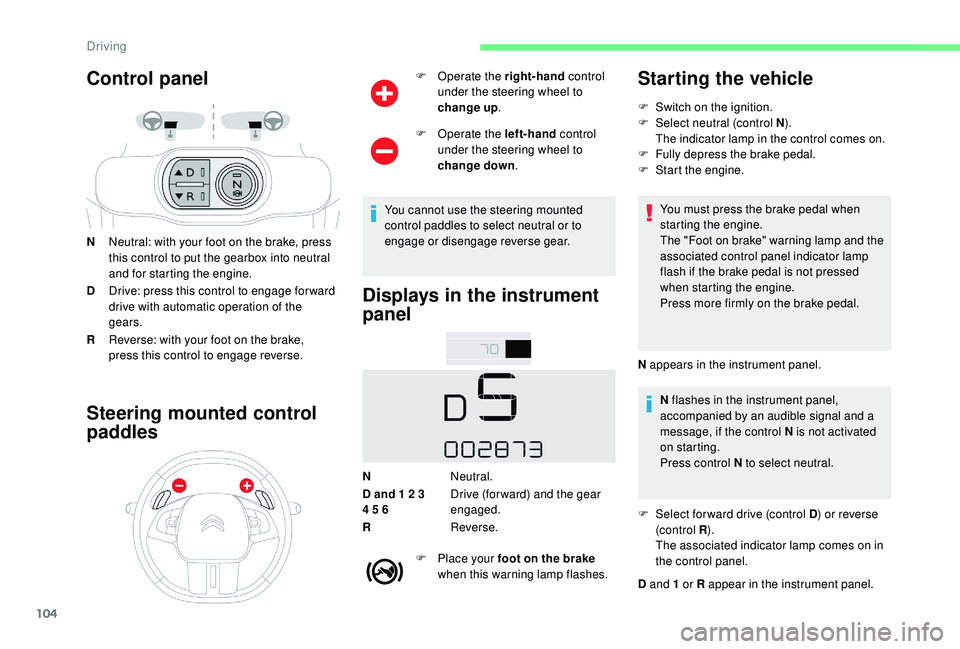
NNeutral: with your foot on the brake, press
this control to put the gearbox into neutral
and for starting the engine.
D Drive: press this control to engage for ward
drive with automatic operation of the
gears.
R Reverse: with your foot on the brake,
press this control to engage reverse.
Steering mounted control
paddles
F Operate the right-hand control
under the steering wheel to
change up .
F
O
perate the left-hand control
under the steering wheel to
change down .
You cannot use the steering mounted
control paddles to select neutral or to
engage or disengage reverse gear.
Displays in the instrument
panel
N Neutral.
D and 1 2 3
4 5 6 Drive (for ward) and the gear
engaged.
R Reverse.
F
P
lace your foot on the brake
when this warning lamp flashes.
Starting the vehicle
F Switch on the ignition.
F Sel ect neutral (control N ).
The indicator lamp in the control comes on.
F
F
ully depress the brake pedal.
F
S
tart the engine.
You must press the brake pedal when
starting the engine.
The "Foot on brake" warning lamp and the
associated control panel indicator lamp
flash if the brake pedal is not pressed
when starting the engine.
Press more firmly on the brake pedal.
N appears in the instrument panel. N flashes in the instrument panel,
accompanied by an audible signal and a
message, if the control N is not activated
on starting.
Press control N to select neutral.
F
S
elect for ward drive (control D ) or reverse
(c ontrol R ).
The associated indicator lamp comes on in
the control panel.
D and 1 or R appear in the instrument panel.
Driving