CITROEN C4 CACTUS 2023 User Guide
Manufacturer: CITROEN, Model Year: 2023, Model line: C4 CACTUS, Model: CITROEN C4 CACTUS 2023Pages: 196, PDF Size: 6.12 MB
Page 11 of 196
9
Instruments
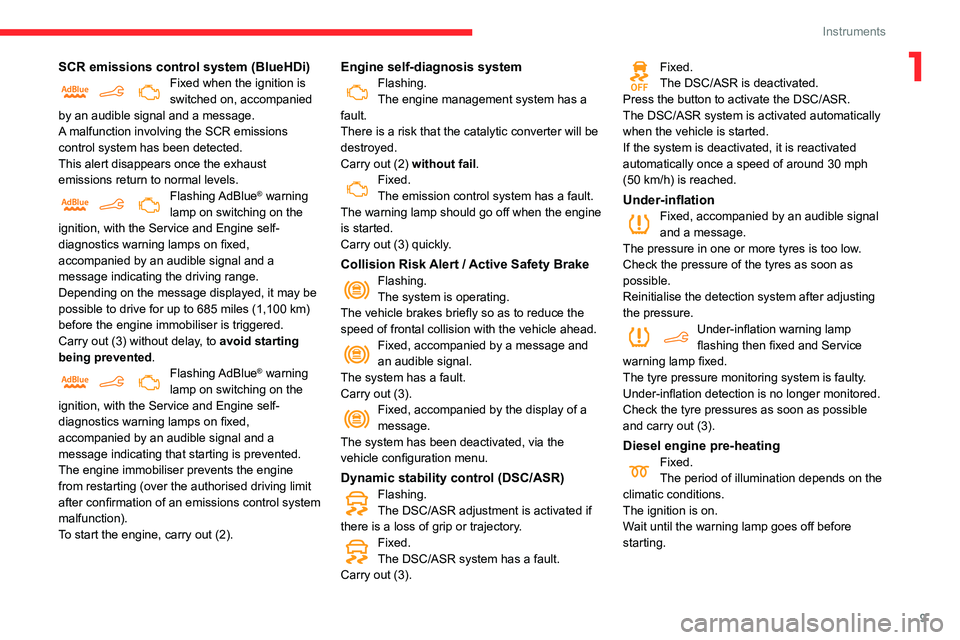
1SCR emissions control system (BlueHDi)Fixed when the ignition is
switched on, accompanied
by an audible signal and a message.
A malfunction involving the SCR emissions
control system has been detected.
This alert disappears once the exhaust
emissions return to normal levels.
Flashing AdBlue® warning
lamp on switching on the
ignition, with the Service and Engine self-
diagnostics warning lamps on fixed,
accompanied by an audible signal and a
message indicating the driving range.
Depending on the message displayed, it may be
possible to drive for up to 685
miles (1,100 km)
before the engine immobiliser is triggered.
Carry out (3) without delay, to avoid starting
being prevented.
Flashing AdBlue® warning
lamp on switching on the
ignition, with the Service and Engine self-
diagnostics warning lamps on fixed,
accompanied by an audible signal and a
message indicating that starting is prevented.
The engine immobiliser prevents the engine
from restarting (over the authorised driving limit
after confirmation of an emissions control system
malfunction).
To start the engine, carry out (2).
Engine self-diagnosis systemFlashing.
The engine management system has a
fault.
There is a risk that the catalytic converter will be
destroyed.
Carry out (2) without fail .
Fixed.
The emission control system has a fault.
The warning lamp should go off when the engine
is started.
Carry out (3) quickly.
Collision Risk Alert / Active Safety BrakeFlashing.
The system is operating.
The vehicle brakes briefly so as to reduce the
speed of frontal collision with the vehicle ahead.
Fixed, accompanied by a message and
an audible signal.
The system has a fault.
Carry out (3).
Fixed, accompanied by the display of a
message.
The system has been deactivated, via the
vehicle configuration menu.
Dynamic stability control (DSC/ASR)Flashing.
The DSC/ASR adjustment is activated if
there is a loss of grip or trajectory.
Fixed.
The DSC/ASR system has a fault.
Carry out (3).
Fixed.
The DSC/ASR is deactivated.
Press the button to activate the DSC/ASR.
The DSC/ASR system is activated automatically
when the vehicle is started.
If the system is deactivated, it is reactivated
automatically once a speed of around 30 mph
(50 km/h) is reached.
Under-inflationFixed, accompanied by an audible signal
and a message.
The pressure in one or more tyres is too low.
Check the pressure of the tyres as soon as
possible.
Reinitialise the detection system after adjusting
the pressure.
Under-inflation warning lamp
flashing then fixed and Service
warning lamp fixed.
The tyre pressure monitoring system is faulty.
Under-inflation detection is no longer monitored.
Check the tyre pressures as soon as possible
and carry out (3).
Diesel engine pre-heatingFixed.
The period of illumination depends on the
climatic conditions.
The ignition is on.
Wait until the warning lamp goes off before
starting.
Page 12 of 196
10
Instruments
Indicators
Service indicator
The service indicator is displayed on the
instrument panel. Depending on the vehicle
version:
– the distance recorder display line indicates
the distance remaining before the next service
is due, or the distance travelled since it was due
preceded by the sign “-”.
– an alert message indicates the distance
remaining, as well as the period before the next
service is due or how long it is overdue.
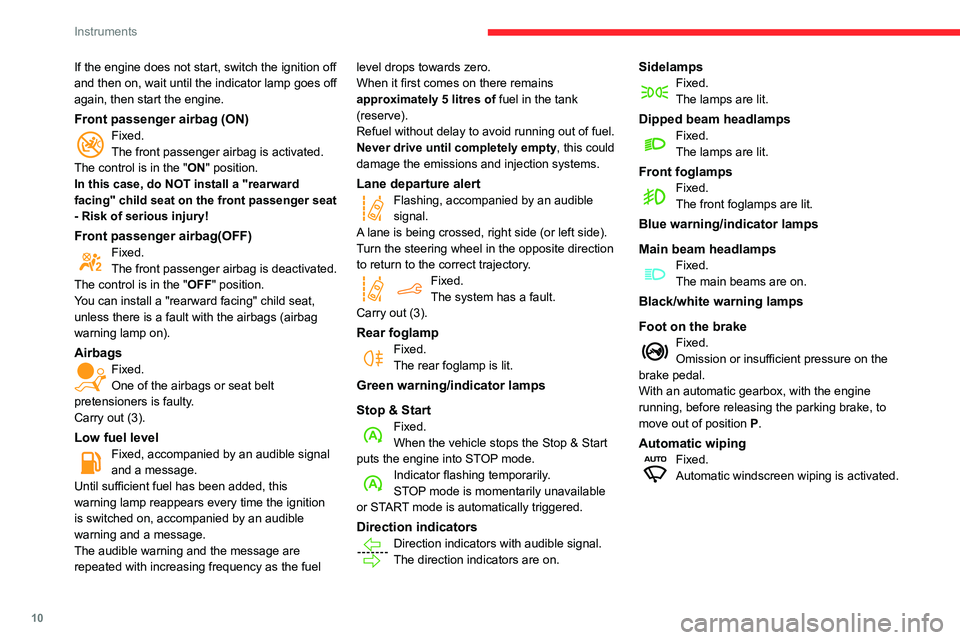
Service spannerLights up temporarily when the ignition is
switched on.
Between 1,800 miles (3,000 km) and 600 miles
(1,000 km) remain before the next service is due.
Fixed, when the ignition is switched on.
The service is due in less than 600 miles
(1,000 km).
Have your vehicle serviced very soon.
Service spanner flashingFlashing then fixed, when the
ignition is switched on.
(With BlueHDi Diesel engines, combined with the
Service warning lamp.)
The servicing interval has been exceeded.
Have your vehicle serviced as soon as possible.
The distance indicated (in miles or kilometres) is calculated according to the
If the engine does not start, switch the ignition off
and then on, wait until the indicator lamp goes off
again, then start the engine.
Front passenger airbag (ON)Fixed.
The front passenger airbag is activated.
The control is in the "ON" position.
In this case, do NOT install a "rearward
facing" child seat on the front passenger seat
- Risk of serious injury!
Front passenger airbag(OFF)Fixed.
The front passenger airbag is deactivated.
The control is in the "OFF" position.
You can install a "rearward facing" child seat,
unless there is a fault with the airbags (airbag
warning lamp on).
AirbagsFixed.
One of the airbags or seat belt
pretensioners is faulty.
Carry out (3).
Low fuel levelFixed, accompanied by an audible signal
and a message.
Until sufficient fuel has been added, this
warning lamp reappears every time the ignition
is switched on, accompanied by an audible
warning and a message.
The audible warning and the message are
repeated with increasing frequency as the fuel level drops towards zero.
When it first comes on there remains
approximately 5 litres of fuel in the tank
(reserve).
Refuel without delay to avoid running out of fuel.
Never drive until completely empty, this could
damage the emissions and injection systems.
Lane departure alertFlashing, accompanied by an audible
signal.
A lane is being crossed, right side (or left side).
Turn the steering wheel in the opposite direction
to return to the correct trajectory.
Fixed.
The system has a fault.
Carry out (3).
Rear foglampFixed.
The rear foglamp is lit.
Green warning/indicator lamps
Stop & Start
Fixed.
When the vehicle stops the Stop & Start
puts the engine into STOP mode.
Indicator flashing temporarily.
STOP mode is momentarily unavailable
or START mode is automatically triggered.
Direction indicatorsDirection indicators with audible signal.
The direction indicators are on.
SidelampsFixed.
The lamps are lit.
Dipped beam headlampsFixed.
The lamps are lit.
Front foglampsFixed.
The front foglamps are lit.
Blue warning/indicator lamps
Main beam headlamps
Fixed.
The main beams are on.
Black/white warning lamps
Foot on the brake
Fixed.
Omission or insufficient pressure on the
brake pedal.
With an automatic gearbox, with the engine
running, before releasing the parking brake, to
move out of position P.
Automatic wipingFixed.
Automatic windscreen wiping is activated.
Page 13 of 196
11
Instruments
1Indicators
Service indicator
The service indicator is displayed on the
instrument panel. Depending on the vehicle
version:
–
the distance recorder display line indicates
the distance remaining before the next service
is due, or the distance travelled since it was due
preceded by the sign “-”.
–
an alert message indicates the distance
remaining, as well as the period before the next
service is due or how long it is overdue.
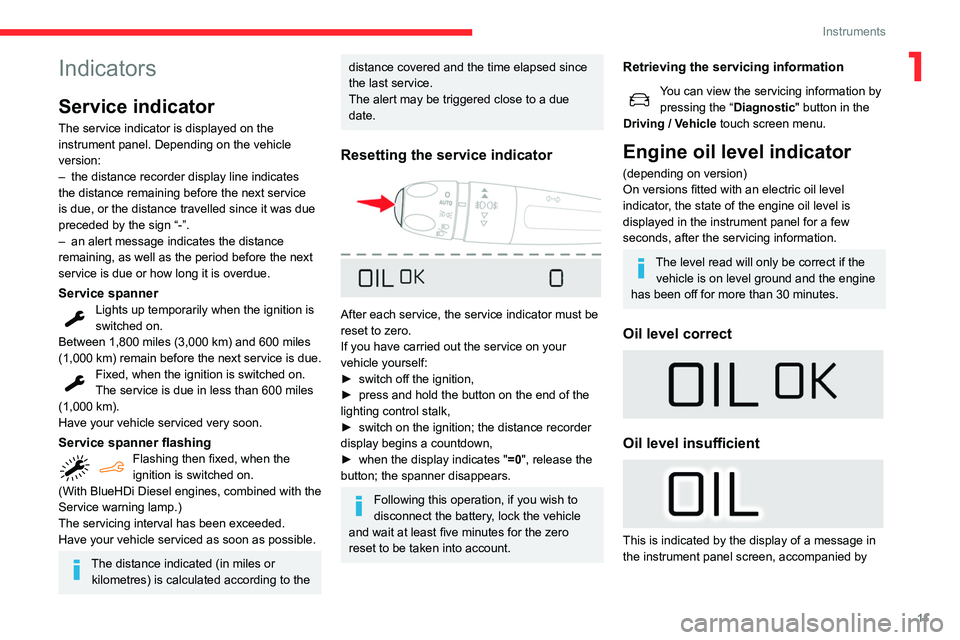
Service spannerLights up temporarily when the ignition is
switched on.
Between 1,800 miles (3,000 km) and 600 miles
(1,000 km) remain before the next service is due.
Fixed, when the ignition is switched on.
The service is due in less than 600 miles
(1,000 km).
Have your vehicle serviced very soon.
Service spanner flashingFlashing then fixed, when the
ignition is switched on.
(With BlueHDi Diesel engines, combined with the
Service warning lamp.)
The servicing interval has been exceeded.
Have your vehicle serviced as soon as possible.
The distance indicated (in miles or kilometres) is calculated according to the
distance covered and the time elapsed since
the last service.
The alert may be triggered close to a due
date.
Resetting the service indicator
After each service, the service indicator must be
reset to zero.
If you have carried out the service on your
vehicle yourself:
►
switch off the ignition,
►
press and hold the button on the end of the
lighting control stalk,
►
switch on the ignition; the distance recorder
display begins a countdown,
►
when the display indicates " =0
", release the
button; the spanner disappears.
Following this operation, if you wish to
disconnect the battery, lock the vehicle
and wait at least five minutes for the zero
reset to be taken into account.
Retrieving the servicing information
You can view the servicing information by
pressing the “ Diagnostic
" button in the
Driving / Vehicle touch screen menu.
Engine oil level indicator
(depending on version)
On versions fitted with an electric oil level
indicator, the state of the engine oil level is
displayed in the instrument panel for a few
seconds, after the servicing information.
The level read will only be correct if the vehicle is on level ground and the engine
has been off for more than 30 minutes.
Oil level correct
Oil level insufficient
This is indicated by the display of a message in
the instrument panel screen, accompanied by
Page 14 of 196
12
Instruments
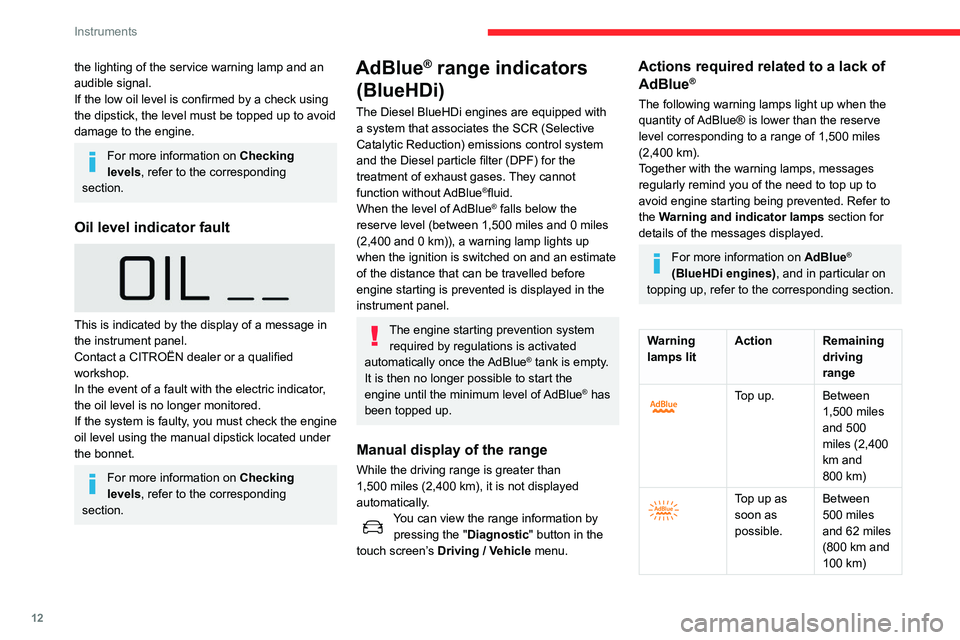
Warning
lamps litAction Remaining
driving
range
A top-up is
essential,
due to the
risk that the
engine will
be prevented
from starting.Between
62 miles
and 0 miles
(100 km and
0 km)
To be able
to restart
the engine,
add at least
5 litres of
AdBlue
® to
its tank. 0 miles (km)
Malfunction of the SCR emissions
control system
Malfunction detection
If a malfunction is detected,
these warning lamps come on,
accompanied by an audible
signal and an "Emissions fault”
message.
The alert is triggered while driving, when the
fault is detected for the first time, and thereafter
the lighting of the service warning lamp and an
audible signalK
If the low oil level is confirmed by a check using
the dipstick, the level must be topped up to avoid
damage to the engine.
For more information on Checking
levels, refer to the corresponding
section.
Oil level indicator fault
This is indicated by the display of a message in
the instrument panel.
Contact a CITROËN dealer or a qualified
workshop.
In the event of a fault with the electric indicator,
the oil level is no longer monitored.
If the system is faulty, you must check the engine
oil level using the manual dipstick located under
the bonnet.
For more information on Checking
levels, refer to the corresponding
section.
AdBlue® range indicators
(BlueHDi)
The Diesel BlueHDi engines are equipped with
a system that associates the SCR (Selective
Catalytic Reduction) emissions control system
and the Diesel particle filter (DPF) for the
treatment of exhaust gases. They cannot
function without AdBlue
®fluid.
When the level of AdBlue® falls below the
reserve level (between 1,500 miles and 0 miles
(2,400 and 0
km)), a warning lamp lights up
when the ignition is switched on and an estimate
of the distance that can be travelled before
engine starting is prevented is displayed in the
instrument panel.
The engine starting prevention system required by regulations is activated
automatically once the AdBlue
® tank is empty.
It is then no longer possible to start the
engine until the minimum level of AdBlue
® has
been topped up.
Manual display of the range
While the driving range is greater than
1,500 miles (2,400 km), it is not displayed
automatically.
You can view the range information by pressing the " Diagnostic" button
in the
touch screen’s Driving
/ Vehicle menu.
Actions required related to a lack of AdBlue®
The following warning lamps light up when the
quantity of AdBlue® is lower than the reserve
level corresponding to a range of 1,500 miles
(2,400
km).
Together with the warning lamps, messages
regularly remind you of the need to top up to
avoid engine starting being prevented. Refer to
the Warning and indicator lamps section for
details of the messages displayed.
For more information on AdBlue®
(BlueHDi engines), and in particular on
topping up, refer to the corresponding section.
Warning
lamps lit Action Remaining
driving
range
Top up. Between 1,500 miles
and 500
miles (2,400
km and
800
km)
Top up as
soon as
possible.Between
500 miles
and 62 miles
(800 km and
100
km)
Page 15 of 196
13
Instruments
1Warning
lamps litAction Remaining
driving
range
A top-up is
essential,
due to the
risk that the
engine will
be prevented
from starting.Between
62 miles
and 0 miles
(100 km and
0
km)
To be able
to restart
the engine,
add at least
5 litres of
AdBlue
® to
its tank. 0 miles (km)
Malfunction of the SCR emissions
control system
Malfunction detection
If a malfunction is detected,
these warning lamps come on,
accompanied by an audible
signal and an "Emissions fault”
message.
The alert is triggered while driving, when the
fault is detected for the first time, and thereafter
when switching on the ignition for subsequent
journeys, while the cause of the fault persists.
If the fault is temporary, the alert
disappears during the next journey, after
self-diagnostic checks of the SCR emissions
control system.
Malfunction confirmed during the
permitted driving phase (between 685
miles and 0
miles (1,100 km and 0 km))
If the fault indication is still displayed
permanently after 31 miles (50 km) of driving, the
fault in the SCR system is confirmed.
The AdBlue warning lamp flashes, and an
"Emissions fault: Starting prevented in X
miles" or "NO START IN X miles" message is
displayed, indicating the driving range in miles or
kilometres.
While driving, the message is displayed every 30
seconds. The alert is repeated when switching
on the ignition.
You can continue driving for up to 685 miles
(1,100
km) before the engine immobiliser
system is triggered.
Have the system checked by a
CITROËN dealer or a qualified workshop
as soon as possible.
Starting prevented
Whenever the ignition is switched on, the
"Emissions fault: Starting prevented" or "NO
START IN" message is displayed.
To be able to restart the engine, contact a CITROËN dealer or a qualified
workshop.
Touch screen
The touch screen gives access to:
– the heating / air conditioning controls,
–
menus for adjusting settings for vehicle
functions and systems,
–
audio system and telephone controls and the
display of associated information,
and, depending on equipment, allows:
–
the display of alert messages and the visual
parking sensors information,
–
the permanent display of the time and the
exterior temperature (a blue warning lamp
appears when there is a risk of ice),
–
access to the internet services and navigation
system controls and the display of associated
information.
As a safety measure, the driver must
only carry out operations that require
sustained attention with the vehicle
stationary.
Some functions are not accessible when
driving.
Page 16 of 196
14
Instruments
Display of information in the
touch screen
► In the “Applications ” menu, select the
"Vehicle application " tab, then "Trip
computer".
The trip computer information is displayed on
the page.
► Press one of the buttons to display the
desired tab.
For a temporary display in a specific
window, press the end of the wiper
control stalk for access to the information and
scroll through the different tabs.
– The current information tab with:
• the remaining range,
• current fuel consumption,
• time counter of the Stop & Start.
– The trip "1" tab with:
• the average speed,
• the average fuel consumption,
• the distance travelled, for the first trip.
– The trip "2" tab with:
• the average speed,
• the average fuel consumption,
• the distance travelled, for the second trip.
Trip reset
► When the desired trip is displayed, press the
Reset button or the end of the wiper control stalk
until zeros appear.
Trips “1“ and “2“ are independent.
Recommendations
This screen is of the capacitive type.
Use is possible in all temperatures.
Do not use pointed objects on the touch screen.
Do not touch the touch screen with wet hands.
Use a soft clean cloth to clean the touch screen.
Touch screen
Use the buttons on each side of the touch screen
to access the menus, then use the buttons that
appear on the touch screen.
Certain functions may be displayed over 1 or 2
pages.
To deactivate / activate a function, press OFF/
ON.
To modify a setting (lighting duration, etc.) or
access additional information, press the symbol
for the function.
After a few moments with no action on the secondary page, the primary page is
displayed automatically.
Use this button to confirm.
Use this button to return to the previous
page.
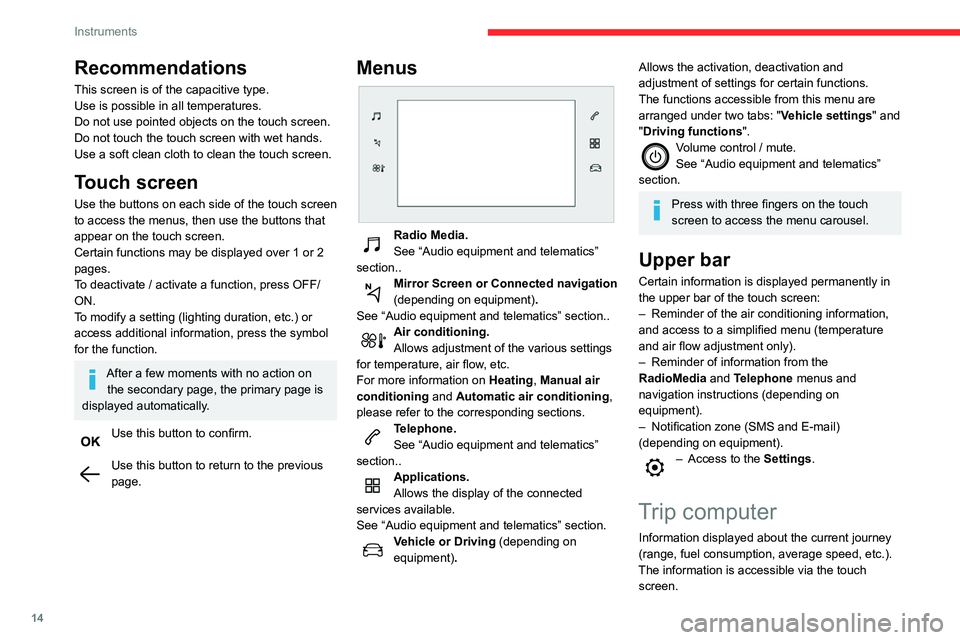
Menus
Radio Media.
See “Audio equipment and telematics”
section..
Mirror Screen or Connected navigation
(depending on equipment) .
See “Audio equipment and telematics” section..
Air conditioning.
Allows adjustment of the various settings
for temperature, air flow, etc.
For more information on Heating, Manual air
conditioning and Automatic air conditioning ,
please refer to the corresponding sections.
Telephone.
See “Audio equipment and telematics”
section..
Applications.
Allows the display of the connected
services available.
See “Audio equipment and telematics” section.
Vehicle or Driving (depending on
equipment) .
Allows the activation, deactivation and
adjustment of settings for certain functions.
The functions accessible from this menu are
arranged under two tabs: " Vehicle settings" and
"Driving functions ".
Volume control / mute.
See “Audio equipment and telematics”
section.
Press with three fingers on the touch
screen to access the menu carousel.
Upper bar
Certain information is displayed permanently in
the upper bar of the touch screen:
–
Reminder of the air conditioning information,
and access to a simplified menu (temperature
and air flow adjustment only).
–
Reminder of information from the
RadioMedia
and Telephone menus and
navigation instructions (depending on
equipment).
–
Notification zone (SMS and E-mail)
(depending on equipment).
– Access to the Settings.
Trip computer
Information displayed about the current journey
(range, fuel consumption, average speed, etc.).
The information is accessible via the touch screen.
Page 17 of 196
15
Instruments
1Display of information in the
touch screen
► In the “Applications ” menu, select the
"Vehicle application " tab, then "Trip
computer".
The trip computer information is displayed on
the page.
►
Press one of the buttons to display the
desired tab.
For a temporary display in a specific
window, press the end of the wiper
control stalk for access to the information and
scroll through the different tabs.
–
The current information tab with:
•
the remaining range,
•
current fuel consumption,
•
time counter of the Stop & Start.
–
The trip "
1" tab with:
•
the average speed,
•
the average fuel consumption,
•
the distance travelled, for the first trip.
–
The trip "
2" tab with:
•
the average speed,
•
the average fuel consumption,
•
the distance travelled, for the second trip.
Trip reset
► When the desired trip is displayed, press the
Reset button or the end of the wiper control stalk
until zeros appear
.
Trips “1“ and “2“ are independent.
For example, trip “1“ can be used for daily
figures, and trip “2“ for monthly figures.
A few definitions…
Range
(miles or km)The distance which can still be travelled with the fuel remaining in the tank (related
to the average fuel consumption over the last
few miles (kilometres) travelled).
This value may fluctuate if a change of driving style or terrain results in a
significant change in the current fuel
consumption.
Dashes are displayed when the range falls below
20 miles (30km).
After filling with at least 5 litres of fuel, the range
is recalculated and is displayed if it exceeds 60
miles (100 km).
If dashes instead of figures continue to
be displayed when driving, contact a
CITROËN dealer or a qualified workshop.
Current fuel consumption
(mpg or km/l or l/100 km)Calculated over the last few seconds.
This function is only displayed from 19 mph (30 km/h).
Average fuel consumption
(mpg or km/l or l/100 km)Calculated since the last trip computer
reset.
Average speed
(mph or km/h)Calculated since the last trip computer
reset.
Distance travelled
(miles or km)Calculated since the last trip computer
reset.
Time counter in Stop & Start
(minutes / seconds or hours / minutes)
A time counter calculates the time spent in STOP
mode during a journey.
It resets to zero every time the ignition is
switched on.
Distance recorders
The total and trip distances are displayed for
thirty seconds when the ignition is switched off,
when the driver's door is opened and when the
vehicle is locked or unlocked.
When travelling abroad, you may have to
change the units of distance: the display
Page 18 of 196
16
Instruments
of road speed must be in the official units
(miles or km) for the country.
The change of units is done via the screen
configuration menu, with the vehicle
stationary.
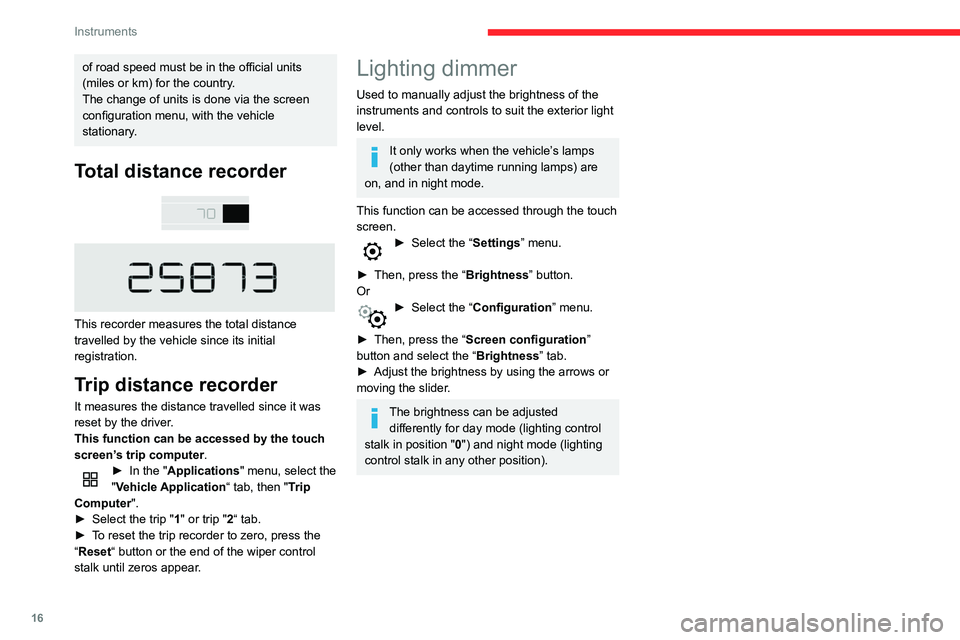
Total distance recorder
This recorder measures the total distance
travelled by the vehicle since its initial
registration.
Trip distance recorder
It measures the distance travelled since it was
reset by the driver.
This function can be accessed by the touch
screen’s trip computer.
► In the " Applications " menu, select the
"Vehicle Application “ tab, then "Trip
Computer".
►
Select the trip "
1" or trip "2“ tab.
►
T
o reset the trip recorder to zero, press the
“Reset “ button or the end of the wiper control
stalk until zeros appear.
Lighting dimmer
Used to manually adjust the brightness of the
instruments and controls to suit the exterior light
level.
It only works when the vehicle’s lamps
(other than daytime running lamps) are
on, and in night mode.
This function can be accessed through the touch
screen.
► Select the “ Settings” menu.
►
Then, press the “
Brightness” button.
Or
► Select the “ Configuration ” menu.
►
Then, press the “
Screen configuration”
button and select the “Brightness” tab.
►
Adjust the brightness by using the arrows or
moving the slider
.
The brightness can be adjusted differently for day mode (lighting control
stalk in position " 0") and night mode (lighting
control stalk in any other position).
Page 19 of 196
17
Access
2Electronic key with
remote control function
and built-in key,
Remote control function
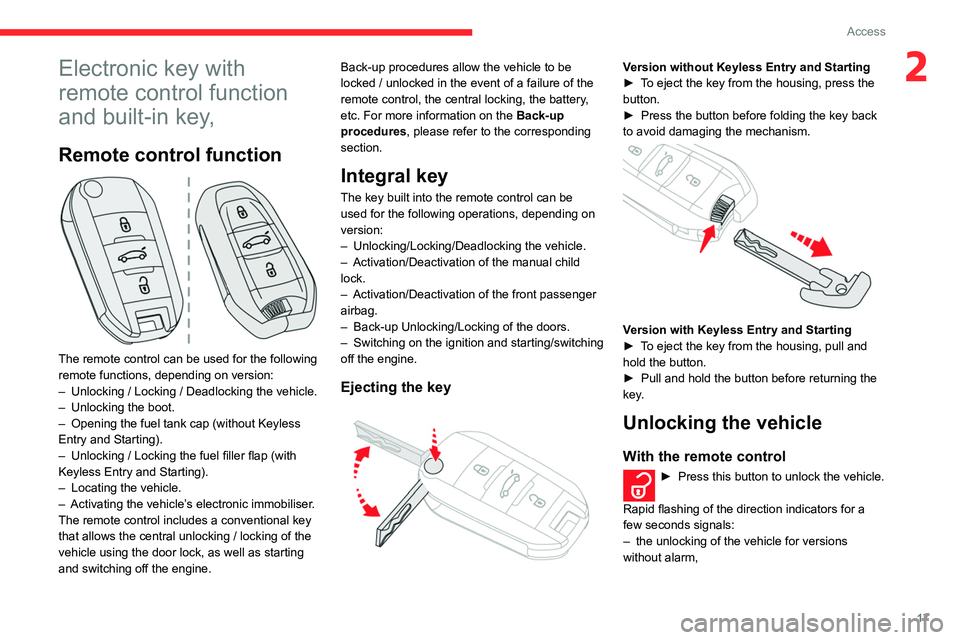
The remote control can be used for the following
remote functions, depending on version:
–
Unlocking / Locking / Deadlocking the vehicle.
–
Unlocking the boot.
–
Opening the fuel tank cap (without Keyless
Entry and Starting).
–
Unlocking / Locking the fuel filler flap (with
Keyless Entry and Starting).
–
Locating the vehicle.
–
Activating the vehicle’
s electronic immobiliser.
The remote control includes a conventional key
that allows the central unlocking / locking of the
vehicle using the door lock, as well as starting
and switching off the engine. Back-up procedures allow the vehicle to be
locked / unlocked in the event of a failure of the
remote control, the central locking, the battery,
etc. For more information on the Back-up
procedures, please refer to the corresponding
section.
Integral key
The key built into the remote control can be
used for the following operations, depending on
version:
–
Unlocking/Locking/Deadlocking the vehicle.
–
Activation/Deactivation of the manual child
lock.
–
Activation/Deactivation of the front passenger
airbag.
–
Back-up Unlocking/Locking of the doors.
–
Switching on the ignition and starting/switching
off the engine.
Ejecting the key
Version without Keyless Entry and Starting
► T o eject the key from the housing, press the
button.
►
Press the button before folding the key back
to avoid damaging the mechanism.
Version with Keyless Entry and Starting
► T o eject the key from the housing, pull and
hold the button.
►
Pull and hold the button before returning the
key
.
Unlocking the vehicle
With the remote control
► Press this button to unlock the vehicle.
Rapid flashing of the direction indicators for a
few seconds signals:
–
the unlocking of the vehicle for versions
without alarm,
Page 20 of 196
18
Access
– the deactivation of the alarm for other
versions.
Depending on version, the door mirrors unfold,
and the welcome lighting comes on.
With the key
► Turn the key in the driver's door lock towards
the front of the vehicle to unlock.
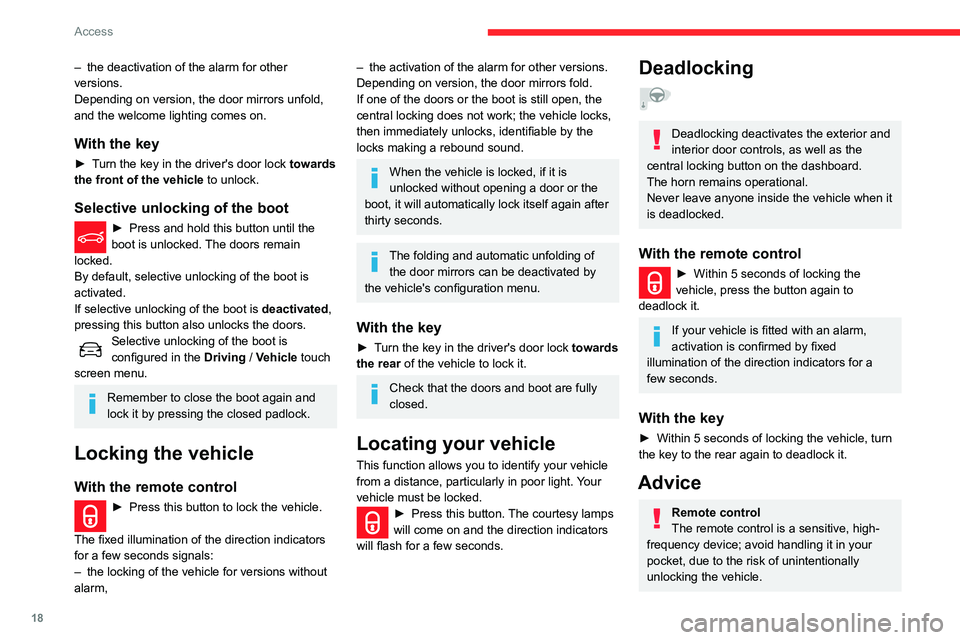
Selective unlocking of the boot
► Press and hold this button until the
boot is unlocked. The doors remain
locked.
By default, selective unlocking of the boot is
activated.
If selective unlocking of the boot is deactivated,
pressing this button also unlocks the doors.
Selective unlocking of the boot is
configured in the Driving / Vehicle touch
screen menu.
Remember to close the boot again and
lock it by pressing the closed padlock.
Locking the vehicle
With the remote control
► Press this button to lock the vehicle.
The fixed illumination of the direction indicators
for a few seconds signals:
–
the locking of the vehicle for versions without
alarm,
– the activation of the alarm for other versions.
Depending on version, the door mirrors fold.
If one of the doors or the boot is still open, the
central locking does not work; the vehicle locks,
then immediately unlocks, identifiable by the
locks making a rebound sound.
When the vehicle is locked, if it is
unlocked without opening a door or the
boot, it will automatically lock itself again after
thirty seconds.
The folding and automatic unfolding of the door mirrors can be deactivated by
the vehicle's configuration menu.
With the key
► Turn the key in the driver's door lock towards
the rear of the vehicle to lock it.
Check that the doors and boot are fully
closed.
Locating your vehicle
This function allows you to identify your vehicle
from a distance, particularly in poor light. Your
vehicle must be locked.
► Press this button. The courtesy lamps
will come on and the direction indicators
will flash for a few seconds.
Deadlocking
Deadlocking deactivates the exterior and
interior door controls, as well as the
central locking button on the dashboard.
The horn remains operational.
Never leave anyone inside the vehicle when it
is deadlocked.
With the remote control
► Within 5 seconds of locking the
vehicle, press the button again to
deadlock it.
If your vehicle is fitted with an alarm,
activation is confirmed by fixed
illumination of the direction indicators for a
few seconds.
With the key
► Within 5 seconds of locking the vehicle, turn
the key to the rear again to deadlock it.
Advice
Remote control
The remote control is a sensitive, high-
frequency device; avoid handling it in your
pocket, due to the risk of unintentionally
unlocking the vehicle.