run flat CITROEN C4 CACTUS 2023 Owners Manual
[x] Cancel search | Manufacturer: CITROEN, Model Year: 2023, Model line: C4 CACTUS, Model: CITROEN C4 CACTUS 2023Pages: 196, PDF Size: 6.12 MB
Page 4 of 196
2
Contents
■
Overview
Instruments and controls 4
■
Eco-driving
1Instruments
Instrument Panel 7
Warning and indicator lamps 7
Indicators
11
Touch screen 13
Trip computer 14
Distance recorders 15
Lighting dimmer 16
2Access
Electronic key with remote control
function and built-in key, 17
Keyless Entry and Starting 19
Central locking 20
Back-up procedures 21
Doors 23
Boot 23
Alarm 24
Electric windows 25
Rear door windows 26
3Ease of use and comfort
Front seats 27
Steering wheel adjustment 29
Mirrors 29
Rear seats 30
Heating and Ventilation 31
Heating / Manual air conditioning 32
Automatic air conditioning 33
Front demisting - defrosting 35
Rear screen demisting - defrosting 36
Courtesy lamps 36
Boot lighting 37
Panoramic glass sunroof 37
Interior fittings
37
Boot fittings 40
Rear shelf (van version) 41
4Lighting and visibility
Lighting control 42
Direction indicators 43
Automatic illumination of headlamps 43
Daytime running lamps/sidelamps (LEDs) 44
Headlamp beam height adjustment 44
Cornering lighting 45
Wiper control stalk 45
Changing a wiper blade 47
Automatic wiping 48
5Safety
General safety recommendations 49
Hazard warning lamps 49
Horn 50
Emergency or assistance call 50
Electronic stability control (ESC) 52
Seat belts 53
Airbags 55
Child seats 57
Deactivating the front passenger airbag 59
ISOFIX child seats 62
i-Size child seats 65
Child lock 65
6Driving
Driving recommendations 67
Starting / Switching off the engine with
the key
68
Starting / Switching off the engine with
Keyless Entry and Starting
70
Parking brake 72
6-speed manual gearbox 72
Automatic gearbox (EAT6) 72
Gear efficiency indicator 74
Hill start assist 75
Tyre under-inflation detection 75
Stop & Start 77
Driving and manoeuvring aids - General
recommendations
78
Speed Limit Recognition
and Recommendation
80
Speed limiter 82
Cruise control - particular recommendations 83
Cruise control 84
Active Safety Brake with Collision Risk
Alert and Intelligent emergency braking
assistance
85
Distraction detection 88
Lane Departure Warning System 89
Page 72 of 196
70
Driving
Switching on the ignition
without starting the engine
With the electronic key in the passenger
compartment, pressing the “START/STOP”
button, without pressing any of the pedals ,
allows the ignition to be switched on without
starting the engine (turning on the instrument
panel and accessories such as the audio system
and the lighting).
► Press this button again to switch off the
ignition and allow the vehicle to be locked.
Key not detected
Back-up starting
A back-up reader is fitted underneath the
parking brake lever so that the engine can be
started if the system does not detect the key
in the recognition zone, or if the battery in the
electronic key is flat.
audible signal, to remind you that the key is
still in the ignition switch at position 1 (Stop).
If the key has been left in the ignition switch
at position 2 (Ignition on) , the ignition will be
switched off automatically after one hour.
To switch the ignition back on, turn the key
to position 1 (Stop), then back to position 2
(Ignition on) .
Starting / Switching off the
engine with Keyless Entry
and Starting
The electronic key must be present in the
passenger compartment.
If it is not detected, a message is displayed.
Move the electronic key so that the engine
can be started or switched off.
If there is still a problem, refer to the "Key
not detected - Back-up starting or Back-up
switch-off" section.
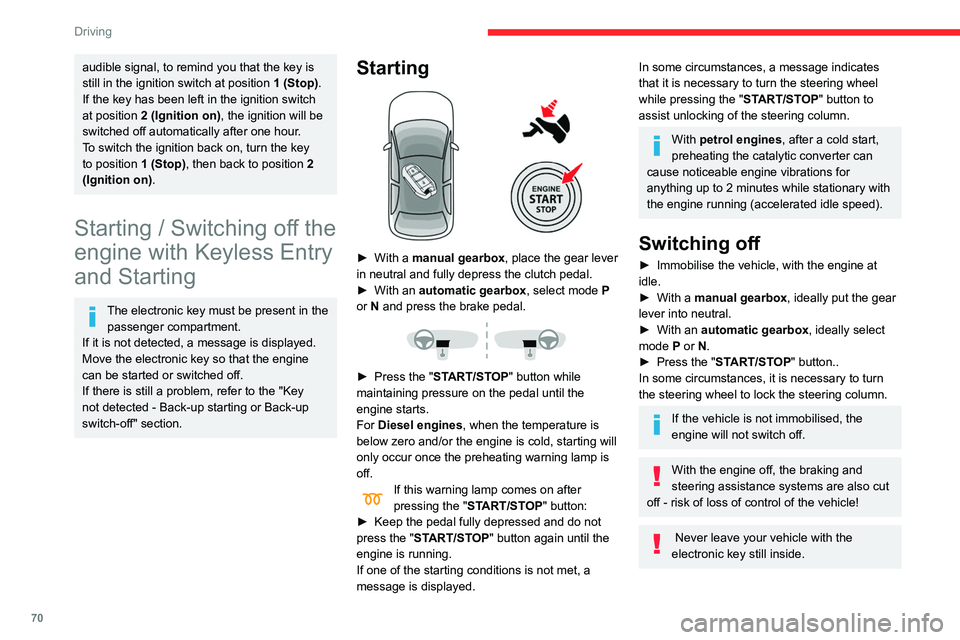
Starting
► With a manual gearbox, place the gear lever
in neutral and fully depress the clutch pedal.
►
With an
automatic gearbox, select mode P
or
N and press the brake pedal.
► Press the " START/STOP" button while
maintaining pressure on the pedal until the
engine starts.
For Diesel engines, when the temperature is
below zero and/or the engine is cold, starting will
only occur once the preheating warning lamp is
off.
If this warning lamp comes on after
pressing the " START/STOP" button:
►
Keep the pedal fully depressed and do not
press the "
START/STOP" button again until the
engine is running.
If one of the starting conditions is not met, a
message is displayed.
In some circumstances, a message indicates
that it is necessary to turn the steering wheel
while pressing the " START/STOP" button to
assist unlocking of the steering column.
With petrol engines , after a cold start,
preheating the catalytic converter can
cause noticeable engine vibrations for
anything up to 2 minutes while stationary with
the engine running (accelerated idle speed).
Switching off
► Immobilise the vehicle, with the engine at
idle.
►
With a
manual gearbox, ideally put the gear
lever into neutral.
►
With an
automatic gearbox, ideally select
mode
P or N.
►
Press the "
START/STOP" button..
In some circumstances, it is necessary to turn
the steering wheel to lock the steering column.
If the vehicle is not immobilised, the
engine will not switch off.
With the engine off, the braking and
steering assistance systems are also cut
off - risk of loss of control of the vehicle!
Never leave your vehicle with the
electronic key still inside.
Page 77 of 196
75
Driving
6The system adapts its gear shift recommendation according to the driving
conditions (slope, load, etc.) and the driver’s
requirements (request for power, acceleration,
braking, etc.).
The system never suggests:
–
engaging first gear
.
–
engaging a lower gear
.
–
engaging reverse.
With a manual gearbox, the arrow may
be accompanied by the recommended
gear. The system always suggests changing
to a higher gear when this is necessary.
Hill start assist
This system keeps your vehicle briefly stationary
(for approximately 2 seconds) when making a hill
start, while you transfer your foot from the brake
pedal to the accelerator pedal.
This system is only active when:
–
the vehicle is completely stationary
, with your
foot on the brake pedal,
–
certain slope conditions are met,
–
the driver
’s door is closed.
Do not leave the vehicle while it is being
held temporarily by hill start assist.
If someone needs to get out of the vehicle
with the engine running, apply the parking
brake manually. After that, ensure that the
parking brake indicator lamp and the indicator
lamp P in the electric parking brake control
lever are on fixed.
The hill start assist function cannot be deactivated. However, use of the parking
brake to immobilise the vehicle interrupts its
operation.
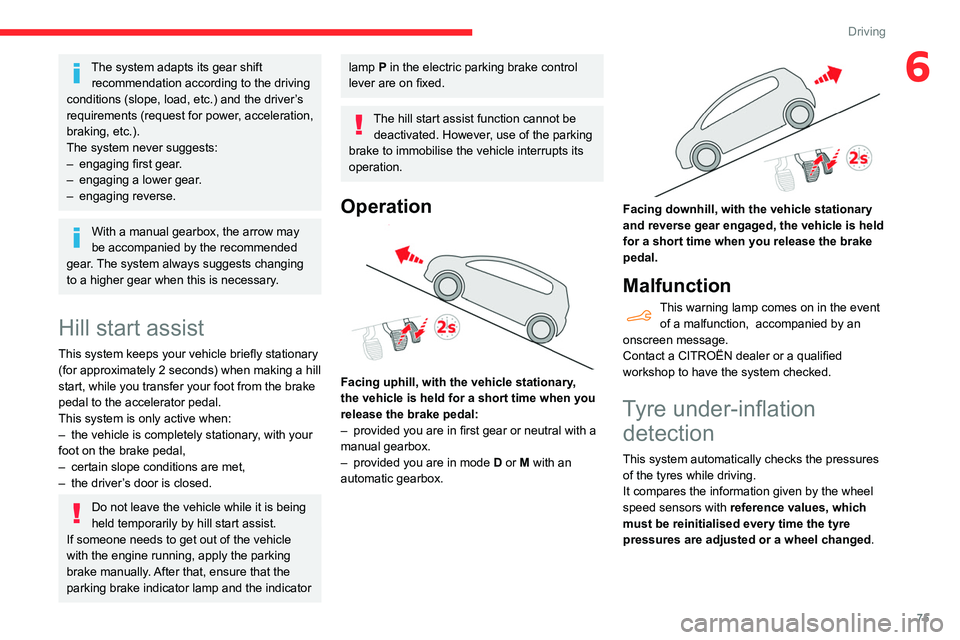
Operation
Facing uphill, with the vehicle stationary,
the vehicle is held for a short time when you
release the brake pedal:
–
provided you are in first gear or neutral with a
manual gearbox.
–
provided you are in mode D
or M with an
automatic gearbox.
Facing downhill, with the vehicle stationary
and reverse gear engaged, the vehicle is held
for a short time when you release the brake
pedal.
Malfunction
This warning lamp comes on in the event of a malfunction, accompanied by an
onscreen message.
Contact a CITROËN dealer or a qualified
workshop to have the system checked.
Tyre under-inflation detection
This system automatically checks the pressures
of the tyres while driving.
It compares the information given by the wheel
speed sensors with reference values, which
must be reinitialised every time the tyre
pressures are adjusted or a wheel changed.
Page 100 of 196
98
Practical information
Recommendations
► Distribute the load uniformly, taking
care to avoid overloading one of the sides.
► Arrange the heaviest part of the load as
close as possible to the roof.
► Lash the load down securely and fit a
warning flag if it overhangs the vehicle.
► Drive gently: the vehicle will be more
susceptible to the effects of side winds
(stability may be affected).
► Remove the roof bars once they are no
longer needed.
Maximum load, distributed over the roof
bars, for a loading height not exceeding
40 cm: 80 kg.
As this value may change, please verify the
maximum load quoted on the note supplied
with the roof bars.
If the height exceeds 40 cm, adapt the
speed of the vehicle to the profile of the road
to avoid damaging the roof bars and the
mountings on the vehicle.
Be sure to refer to national legislation in order
to comply with the regulations for transporting
objects which are longer than the vehicle.
Bonnet
Stop & Start
Before doing anything under the bonnet,
you must switch off the ignition to avoid any
systemI windscreen wipers, dipped beam
headlamps, courtesy lamps, etc. for a maximum
combined duration of about forty minutesK
Switching to the mode
A message indicating that the vehicle has
switched to economy mode is displayed on the
touch screen and the active functions are put on
standby.
If a telephone call is in progress at the
time, it will be maintained for around 10
minutes using your audio system’s hands-free
system.
Exiting the mode
These functions will be automatically restored
the next time the vehicle is used.
In order to restore the use of these functions
immediately, start the engine and let it run:
–
for less than ten minutes, to use the
equipment for approximately five minutes,
–
for more than ten minutes, to use the
equipment for up to approximately thirty minutes.
Let the engine run for the duration specified to
ensure that the battery charge is sufficient.
Do not repeatedly and continuously restart the
engine in order to charge the battery
.
A flat battery prevents the engine from starting.
For more information on the 12 V battery,
refer to the corresponding section.
Roof bars
For safety reasons and to avoid
damaging the roof, it is essential to use
the transverse bars approved for your vehicle.
Observe the fitting instructions and the
conditions of use in the guide supplied
with the roof bars.
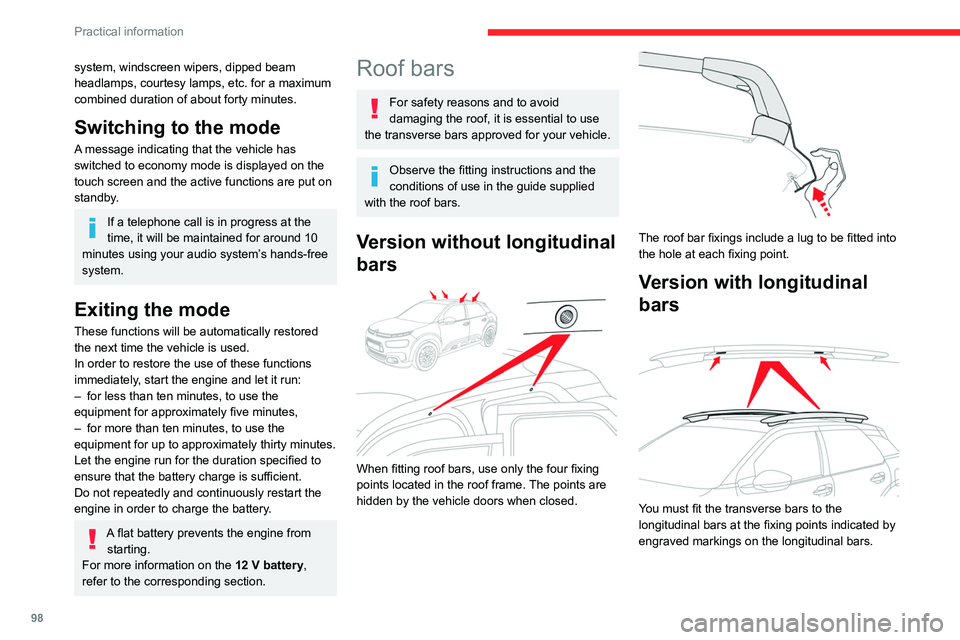
Version without longitudinal
bars
When fitting roof bars, use only the four fixing
points located in the roof frame. The points are
hidden by the vehicle doors when closed.
The roof bar fixings include a lug to be fitted into
the hole at each fixing point.
Version with longitudinal
bars
You must fit the transverse bars to the
longitudinal bars at the fixing points indicated by
engraved markings on the longitudinal bars.
Page 107 of 196
105
Practical information
7Storage recommendations
AdBlue® freezes at about -11°C and deteriorates
above +25°C. Containers should be stored in a
cool area and protected from direct sunlight.
Under these conditions, the fluid can be kept for
at least a year.
If the fluid has frozen, it can be used once it has
completely thawed out in the ambient air.
Never store AdBlue® containers in your
vehicle.
Precautions for use
AdBlue® is a urea-based solution. This fluid is
non-flammable, colourless and odourless (when
kept in a cool place).
In the event of contact with the skin, wash the
affected area with soap and running water. In the
event of contact with the eyes, immediately rinse
the eyes with large amounts of water or with an
eye wash solution for at least 15 minutes. Seek
medical attention if you feel a persistent burning
sensation or irritation.
If swallowed, immediately wash out the mouth
with clean water and then drink plenty of water.
In certain conditions (high temperature, for
example), the risk of release of ammonia cannot
be excluded: do not inhale the fluid. Ammonia
vapours have an irritant effect on mucous
membranes (eyes, nose and throat).
Store AdBlue® out of the reach of
children, in its original container.
Procedure
Before starting the top-up procedure, ensure that
the vehicle is parked on a flat and level surface.
In wintry conditions, ensure that the temperature
of the vehicle is above -11
°C. Otherwise, the
AdBlue
® may be frozen and therefore cannot
be poured into its tank. Park your vehicle in a
warmer area for a few hours to allow the top-up
to be carried out.
Never pour AdBlue® into the Diesel fuel
tank.
If any AdBlue® is splashed, or if there are
any spillages on the bodywork, rinse
immediately with cold water or wipe with a
damp cloth.
If the fluid has crystallised, clean it off using a
sponge and hot water.
Important: in the event of a top-up after
a breakdown because of a lack of
AdBlue, it is essential to wait around 5
minutes before switching on the ignition,
without opening the driver’s door,
unlocking the vehicle, introducing the key
into the ignition switch, or introducing the
key of the “Keyless Entry and Starting
”
system into the passenger compartment
.
Switch on the ignition, then wait for 10
seconds before starting the engine.
► Switch off the ignition and remove the key
from the switch to switch off the engine.
or
►
With Keyless Entry and Starting, press the
"
START/STOP" button to switch off the engine.
► With the vehicle unlocked and the fuel filler
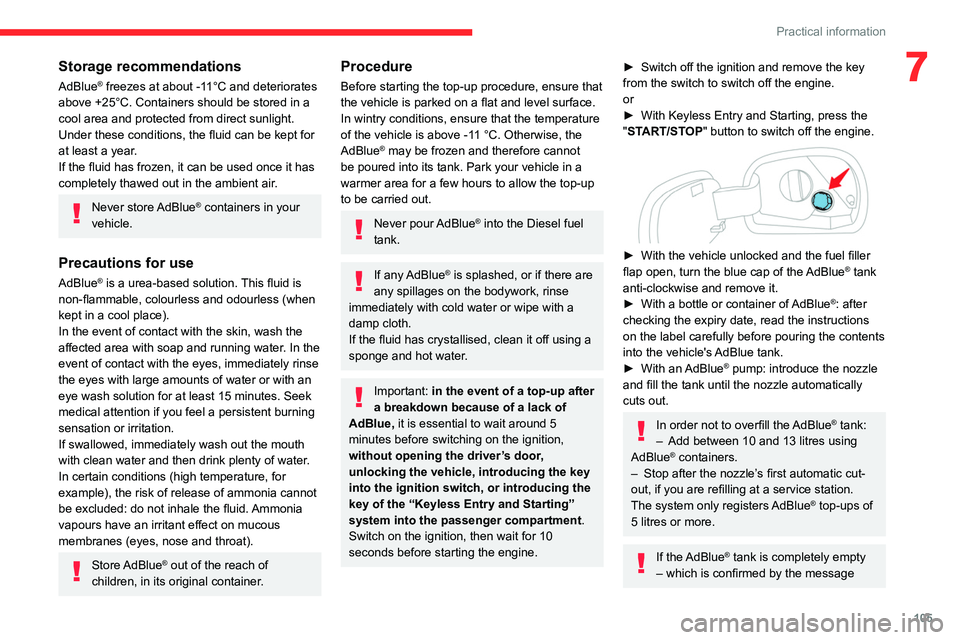
flap open, turn the blue cap of the AdBlue® tank
anti-clockwise and remove it.
►
With a bottle or container of
AdBlue
®: after
checking the expiry date, read the instructions
on the label carefully before pouring the contents
into the vehicle's AdBlue tank.
►
With an
AdBlue® pump: introduce the nozzle
and fill the tank until the nozzle automatically
cuts out.
In order not to overfill the AdBlue® tank:
–
Add between 10 and 13 litres using
AdBlue® containers.
–
Stop after the nozzle’ s first automatic cut-
out, if you are refilling at a service station.
The system only registers AdBlue
® top-ups of
5
litres or more.
If the AdBlue® tank is completely empty
– which is confirmed by the message
Page 110 of 196

108
In the event of a breakdown
Warning triangle (storage)
This safety device is used in addition to the
hazard warning lamps.
Its presence in the vehicle is mandatory.
The triangle may be stowed under the boot
carpet (in the storage well) or, depending on
version, under the front passenger seat.
Before leaving your vehicle to set up and
install the triangle, switch on the hazard
warning lamps and put on your high visibility
vest.
Refer to the manufacturer's instructions
on using the triangle.
Placing the triangle on the
road
► Place the triangle behind the vehicle, as
required by the legislation in force in your
country
.
The triangle is available as an accessory; contact a CITROËN dealer or a qualified
workshop.
Running out of fuel
(Diesel)
With Diesel engines, the fuel system must be
primed if you run out of fuel.
Before starting to prime the system, it is
essential to put at least 5 litres of Diesel into the
fuel tank.
For more information on Refuelling and
on Misfuel prevention (Diesel), please
refer to the corresponding section.
BlueHDi engines
► Switch on the ignition (without starting the
engine).
►
W
ait around 1 minute and switch off the
ignition.
►
Operate the starter motor to start the engine.
If the engine does not start at the first attempt,
do not keep trying, but restart the procedure.
Temporary puncture repair kit
Scan the QR Code on page 3 to view
explanatory videos.
Made up of a compressor and a sealant
cartridge,
it allows you to carry out a temporary
repair of the tyre so that you can drive to the
nearest garage.
It is designed to repair most punctures located
on the tyre tread.
Only the 12 V socket at the front of the
vehicle allows the compressor to be
connected for long enough to repair or inflate
the vehicle tyre.
The other 12 V sockets of the vehicle are not
designed to be used with the compressor.
Access to the kit
This kit is installed in the storage box, under the
boot floor.
List of tools
1. Temporary puncture repair kit.
Contains a sealant cartridge for the
temporary repair of a tyre and can also be
used for adjusting tyre pressures.
2. Socket for the security bolts (located in the
glove box or in the tool box) (depending on
version).
For adapting the wheelbrace to the special
"security" bolts.
3. Removable towing eye.
For more information on Towing the vehicle
and using the removable towing eye, refer to the
corresponding section.
Page 124 of 196
122
In the event of a breakdown
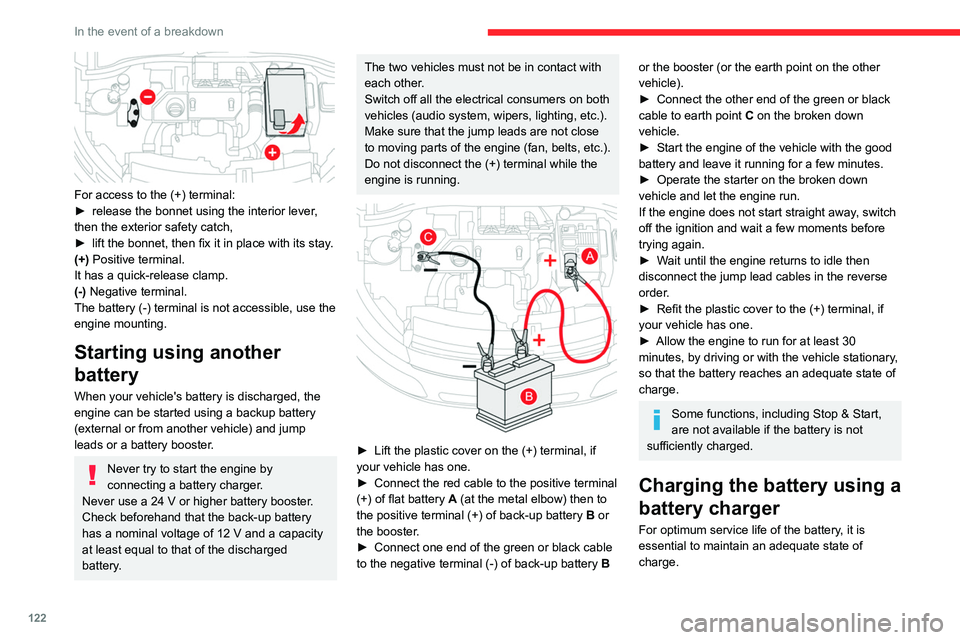
For access to the (+) terminal:
► release the bonnet using the interior lever ,
then the exterior safety catch,
►
lift the bonnet, then fix it in place with its stay
.
(+) Positive terminal.
It has a quick-release clamp.
(-) Negative terminal.
The battery (-) terminal is not accessible, use the
engine mounting.
Starting using another
battery
When your vehicle's battery is discharged, the
engine can be started using a backup battery
(external or from another vehicle) and jump
leads or a battery booster.
Never try to start the engine by
connecting a battery charger.
Never use a 24 V or higher battery booster.
Check beforehand that the back-up battery
has a nominal voltage of 12 V and a capacity
at least equal to that of the discharged
battery.
The two vehicles must not be in contact with
each other.
Switch off all the electrical consumers on both
vehicles (audio system, wipers, lighting, etc.).
Make sure that the jump leads are not close
to moving parts of the engine (fan, belts, etc.).
Do not disconnect the (+) terminal while the
engine is running.
► Lift the plastic cover on the (+) terminal, if
your vehicle has one.
►
Connect the red cable to the positive terminal
(+) of flat battery A
(at the metal elbow) then to
the positive terminal (+) of back-up battery B or
the booster.
►
Connect one end of the green or black cable
to the negative terminal (-) of back-up battery B
or the booster (or the earth point on the other
vehicle).
►
Connect the other end of the green or black
cable to earth point C
on the broken down
vehicle.
►
Start the engine of the vehicle with the good
battery and leave it running for a few minutes.
►
Operate the starter on the broken down
vehicle and let the engine run.
If the engine does not start straight away
, switch
off the ignition and wait a few moments before
trying again.
►
W
ait until the engine returns to idle then
disconnect the jump lead cables in the reverse
order.
►
Refit the plastic cover to the (+) terminal, if
your vehicle has one.
►
Allow the engine to run for at least 30
minutes, by driving or with the vehicle stationary
,
so that the battery reaches an adequate state of
charge.
Some functions, including Stop & Start,
are not available if the battery is not
sufficiently charged.
Charging the battery using a
battery charger
For optimum service life of the battery, it is
essential to maintain an adequate state of
charge.
Page 126 of 196
124
In the event of a breakdown
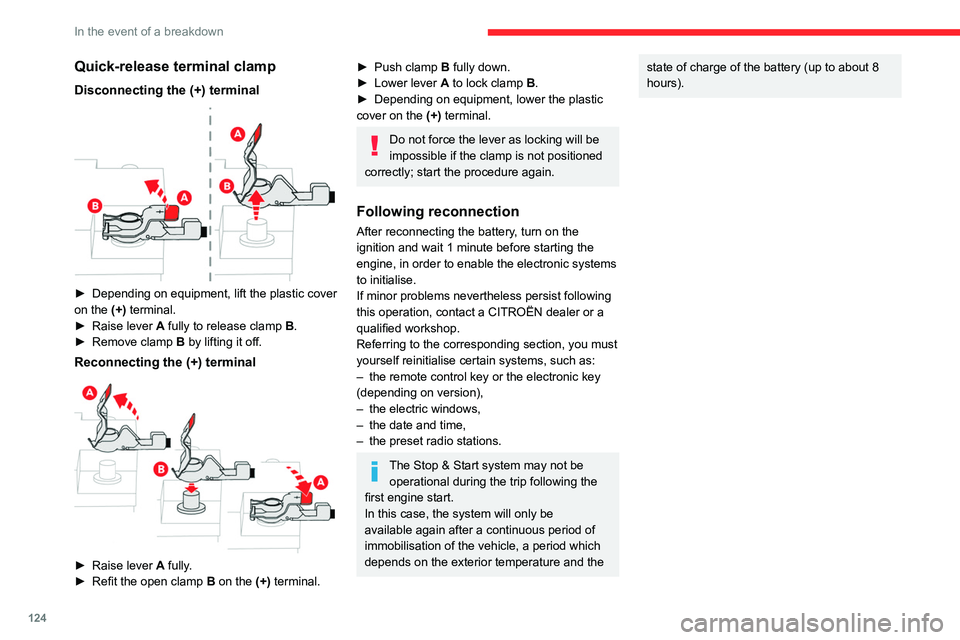
Quick-release terminal clamp
Disconnecting the (+) terminal
► Depending on equipment, lift the plastic cover
on the (+) terminal.
►
Raise lever
A
fully to release clamp
B
.
►
Remove clamp
B
by lifting it off.
Reconnecting the (+) terminal
► Raise lever A fully.
► Refit the open clamp B on the (+) terminal.
► Push clamp B fully down.
► Lower lever A to lock clamp B.
►
Depending on equipment, lower the plastic
cover on the
(+) terminal.
Do not force the lever as locking will be
impossible if the clamp is not positioned
correctly; start the procedure again.
Following reconnection
After reconnecting the battery, turn on the
ignition and wait 1 minute before starting the
engine, in order to enable the electronic systems
to initialise.
If minor problems nevertheless persist following
this operation, contact a CITROËN dealer or a
qualified workshop.
Referring to the corresponding section, you must
yourself reinitialise certain systems, such as:
–
the remote control key or the electronic key
(depending on version),
–
the electric windows,
–
the date and time,
–
the preset radio stations.
The Stop & Start system may not be operational during the trip following the
first engine start.
In this case, the system will only be
available again after a continuous period of
immobilisation of the vehicle, a period which
depends on the exterior temperature and the
state of charge of the battery (up to about 8
hours).Towing
Procedure for having your vehicle towed or for towing another vehicle us\
ing the towing eye.
General recommendations
Observe the legislation in force in the country where you are driving.
Ensure that the weight of the towing vehicle is higher than that of the \
towed vehicle.
The driver must remain at the wheel of the towed vehicle and must have a\
valid driving licence.
When towing a vehicle with all four wheels on the ground, always use an \
approved towbar; ropes and straps are prohibited.
The towing vehicle must move off gently.
When the vehicle is towed with its engine off, there is no longer braking and steering assistance.
A professional recovery service must be called if:
– broken down on a motorway or main road;
– not possible to put the gearbox into neutral, unlock the steering, or re\
lease the parking brake;
– not possible to tow a vehicle with an automatic gearbox, with the engine\
running;
– towing with only two wheels on the ground;
– four-wheel drive vehicle;
– no approved towbar available.
Towing constraints
Type of vehicle
(engine / gearbox)gearbox Font wheels on the
groundRear wheels on the
groundFlatbed
4 wheels on the ground
with towbar
Internal combustion /
Manual
Internal combustion /
Automatic
In case of battery failure, it is essential to call a professional using flatbed
recovery vehicles (excluding manual gearbox).
Page 127 of 196
125
In the event of a breakdown
8Towing
Procedure for having your vehicle towed or for towing another vehicle us\
ing the towing eye.
General recommendations
Observe the legislation in force in the country where you are driving.
Ensure that the weight of the towing vehicle is higher than that of the \
towed vehicle.
The driver must remain at the wheel of the towed vehicle and must have a\
valid driving licence.
When towing a vehicle with all four wheels on the ground, always use an \
approved towbar; ropes and straps are prohibited.
The towing vehicle must move off gently.
When the vehicle is towed with its engine off, there is no longer braking and steering assistance.
A professional recovery service must be called if:
– broken down on a motorway or main road;
–
not possible to put the gearbox into neutral, unlock the steering, or re\
lease the parking brake;
–
not possible to tow a vehicle with an automatic gearbox, with the engine\
running;
–
towing with only two wheels on the ground;
–
four-wheel drive vehicle;
–
no approved towbar available.
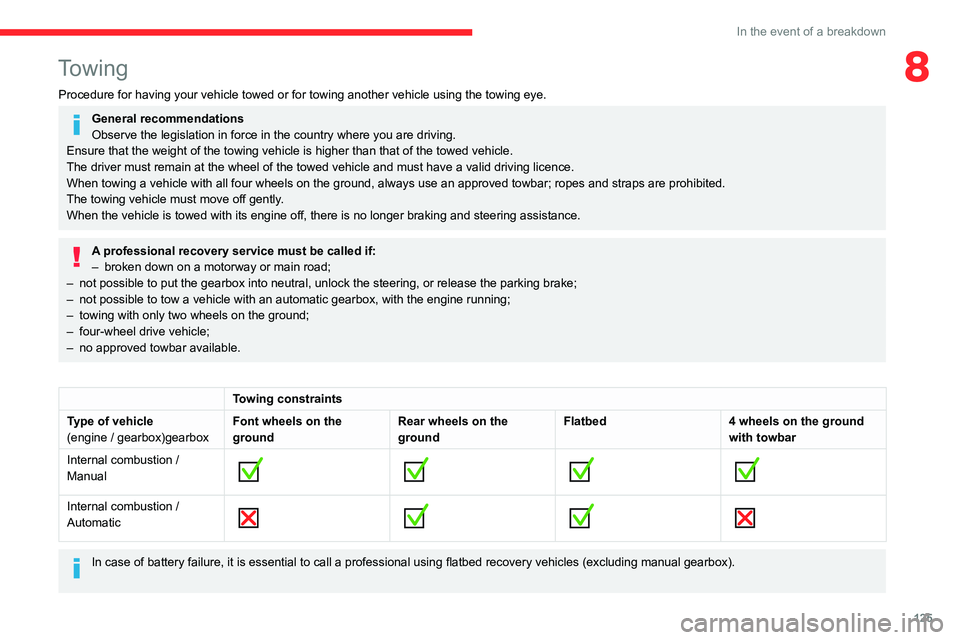
Towing constraints
Type of vehicle
(engine / gearbox)gearbox Font wheels on the
groundRear wheels on the
groundFlatbed
4 wheels on the ground
with towbar
Internal combustion /
Manual
Internal combustion /
Automatic
In case of battery failure, it is essential to call a professional using flatbed
recovery vehicles (excluding manual gearbox).
Page 176 of 196
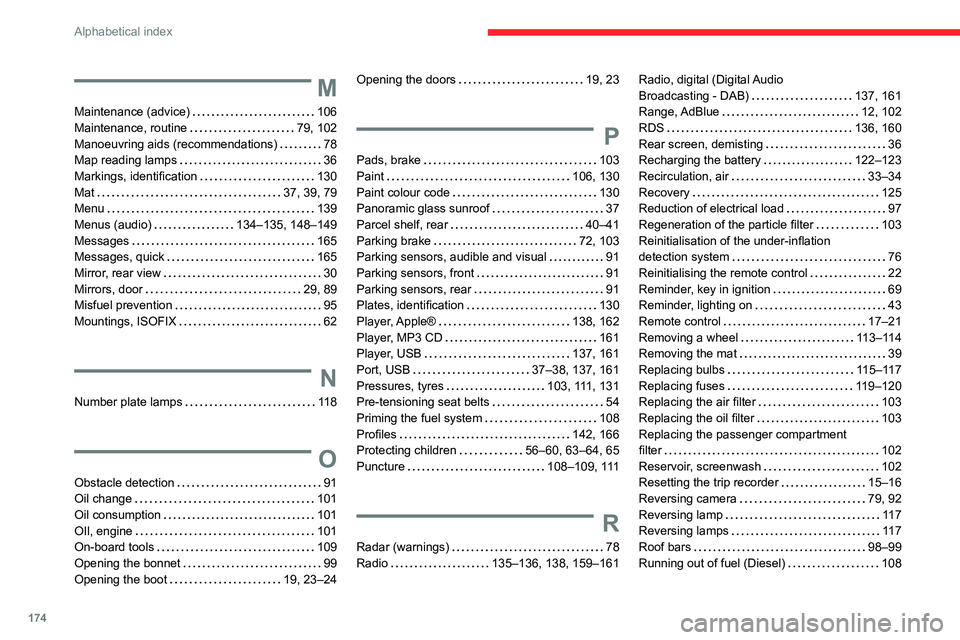
174
Alphabetical index
M
Maintenance (advice) 106
Maintenance, routine
79, 102
Manoeuvring aids (recommendations)
78
Map reading lamps
36
Markings, identification
130
Mat
37, 39, 79
Menu
139
Menus (audio)
134–135, 148–149
Messages
165
Messages, quick
165
Mirror, rear view
30
Mirrors, door
29, 89
Misfuel prevention
95
Mountings, ISOFIX
62
N
Number plate lamps 11 8
O
Obstacle detection 91
Oil change
101
Oil consumption
101
OIl, engine
101
On-board tools
109
Opening the bonnet
99
Opening the boot
19, 23–24
Opening the doors 19, 23
P
Pads, brake 103
Paint
106, 130
Paint colour code
130
Panoramic glass sunroof
37
Parcel shelf, rear
40–41
Parking brake
72, 103
Parking sensors, audible and visual
91
Parking sensors, front
91
Parking sensors, rear
91
Plates, identification
130
Player, Apple®
138, 162
Player, MP3 CD
161
Player, USB
137, 161
Port, USB
37–38, 137, 161
Pressures, tyres
103, 111, 131
Pre-tensioning seat belts
54
Priming the fuel system
108
Profiles
142, 166
Protecting children
56–60, 63–64, 65
Puncture
108–109, 111
R
Radar (warnings) 78
Radio
135–136, 138, 159–161
Radio, digital (Digital Audio
Broadcasting - DAB)
137, 161
Range, AdBlue
12, 102
RDS
136, 160
Rear screen, demisting
36
Recharging the battery
122–123
Recirculation, air
33–34
Recovery
125
Reduction of electrical load
97
Regeneration of the particle filter
103
Reinitialisation of the under-inflation
detection system
76
Reinitialising the remote control
22
Reminder, key in ignition
69
Reminder, lighting on
43
Remote control
17–21
Removing a wheel
113–114
Removing the mat
39
Replacing bulbs
115–117
Replacing fuses
119–120
Replacing the air filter
103
Replacing the oil filter
103
Replacing the passenger compartment
filter
102
Reservoir, screenwash
102
Resetting the trip recorder
15–16
Reversing camera
79, 92
Reversing lamp
11 7
Reversing lamps
11 7
Roof bars
98–99
Running out of fuel (Diesel)
108