Citroen C4 CACTUS RHD 2015 1.G Owner's Manual
Manufacturer: CITROEN, Model Year: 2015, Model line: C4 CACTUS RHD, Model: Citroen C4 CACTUS RHD 2015 1.GPages: 301, PDF Size: 8.07 MB
Page 201 of 301
199
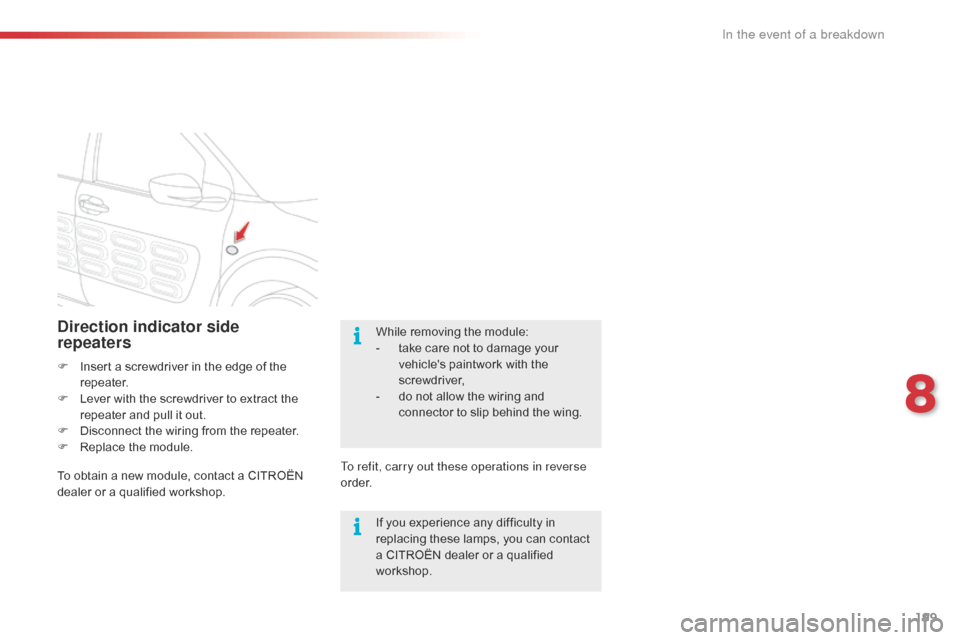
Direction indicator side
repeaters
F Insert a screwdriver i n t he e dge o f t he rep
eater.
F
Le
ver
w
ith
t
he
s
crewdriver
t
o
e
xtract
t
he
re
peater
a
nd
p
ull
i
t
o
ut.
F
Di
sconnect
t
he
w
iring
f
rom
t
he
r
epeater.
F
Re
place
t
he
m
odule.
To
o
btain
a n
ew
m
odule,
c
ontact
a C
ITROËN
de
aler
o
r
a q
ualified
w
orkshop. To refit, carry out these operations in reverse
o r d e r.While
r
emoving
t
he
m
odule:
-
ta
ke
c
are
n
ot
t
o
d
amage
y
our
ve
hicle's p aintwork w ith t he scre
wdriver,
-
do n
ot
a
llow
t
he
w
iring
a
nd
co
nnector
t
o
s
lip
b
ehind
t
he
w
ing.
If
y
ou
e
xperience
a
ny
d
ifficulty
i
n
re
placing
t
hese
l
amps,
y
ou
c
an
c
ontact
a C
ITROËN
d
ealer
o
r
a q
ualified
wo
rkshop.
8
In the event of a breakdown
Page 202 of 301
200
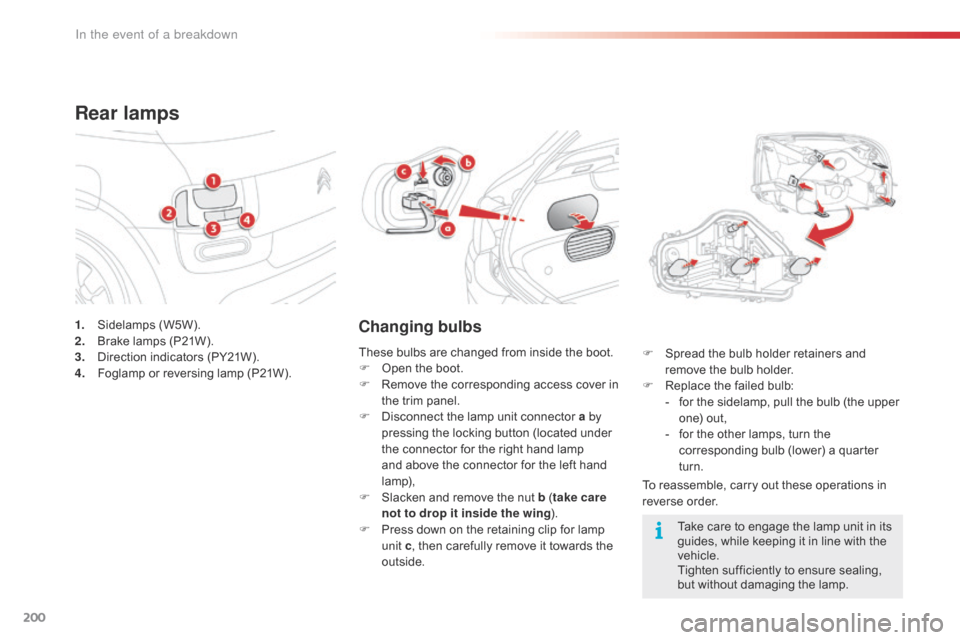
1. Sidelamps (W5W).
2. Br ake l amps ( P21W).
3.
Di
rection
i
ndicators
(
PY21W).
4.
Fo
glamp
o
r
r
eversing
l
amp
(
P21W).
Rear lamps
Changing bulbs
To reassemble, carry out these operations in reverse or der.
F
Sp
read
t
he
b
ulb
h
older
r
etainers
a
nd
re
move
t
he
b
ulb
h
older.
F
Re
place
t
he
f
ailed
b
ulb:
-
fo
r
t
he
s
idelamp,
p
ull
t
he
b
ulb
(
the
u
pper
on
e)
o
ut,
-
fo
r
t
he
o
ther
l
amps,
t
urn
t
he
co
rresponding
b
ulb
(
lower)
a q
uarter
tu
rn.
These
b
ulbs
a
re
c
hanged
f
rom
i
nside
t
he
b
oot.
F
Op
en
t
he
b
oot.
F
Re
move
t
he
c
orresponding
a
ccess
c
over
i
n
th
e
t
rim
p
anel.
F
Di
sconnect
t
he
l
amp
u
nit
c
onnector
a
by
pressing
t
he
l
ocking
b
utton
(
located
u
nder
th
e
c
onnector
f
or
t
he
r
ight
h
and
l
amp
an
d
a
bove
t
he
c
onnector
f
or
t
he
l
eft
h
and
lamp
),
F Sl
acken a
nd r
emove t
he n
ut b ( t
ake care
not to drop it inside the wing ).
F
Pr
ess
d
own
o
n
t
he
r
etaining
c
lip
f
or
l
amp
un
it c,
t
hen
c
arefully
r
emove
i
t
t
owards
t
he
ou
tside. Take
c
are
t
o
e
ngage
t
he
l
amp
u
nit
i
n
i
ts
gu
ides,
w
hile
k
eeping
i
t
i
n
l
ine
w
ith
t
he
ve
hicle.
Tighten
s
ufficiently
t
o
e
nsure
s
ealing,
bu
t
w
ithout
d
amaging
t
he
l
amp.
In the event of a breakdown
Page 203 of 301
201
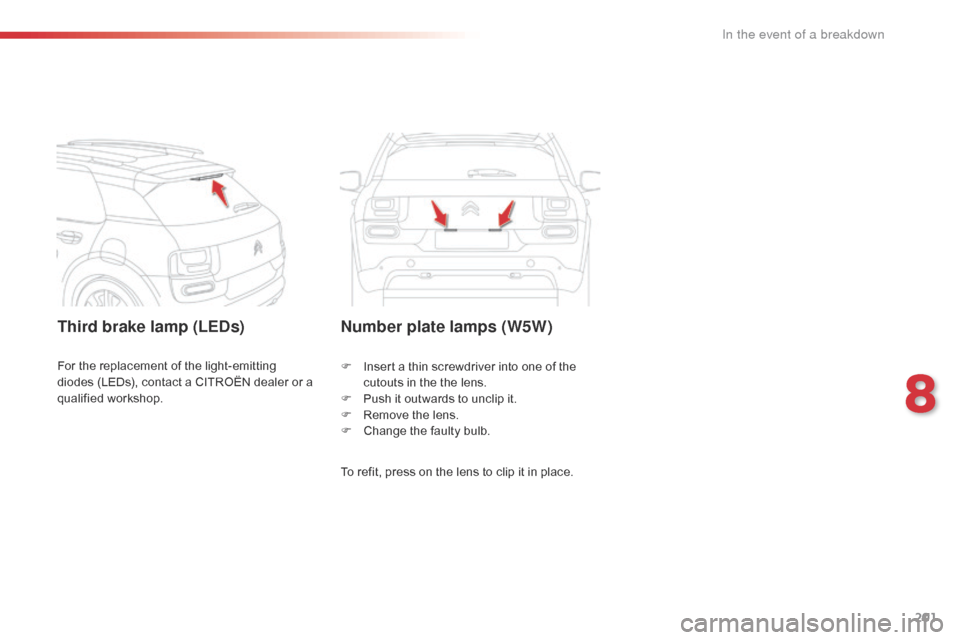
Third brake lamp (LEDs)Number plate lamps (W5W)
To refit, press on the lens to clip it in place.
F
In
sert
a t
hin
s
crewdriver
i
nto
o
ne
o
f
t
he
cu
touts
i
n
t
he
t
he
l
ens.
F
Pu
sh
i
t
o
utwards
t
o
u
nclip
i
t.
F
Re
move
t
he
l
ens.
F
Ch
ange
t
he
f
aulty
b
ulb.
For
t
he
r
eplacement
o
f
t
he
l
ight-emitting
di
odes
(
LEDs),
c
ontact
a C
ITROËN
d
ealer
o
r
a qu
alified
wo
rkshop.
8
In the event of a breakdown
Page 204 of 301
202
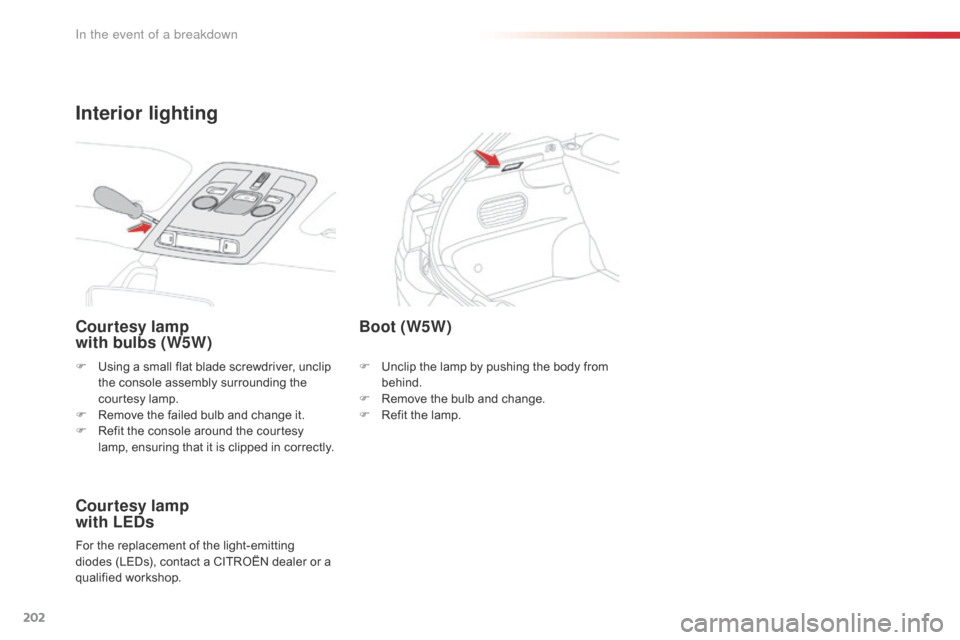
F Using a small f lat b lade s crewdriver, u nclip th
e c onsole a ssembly s urrounding t he co
urtesy
l
amp.
F
Re
move
t
he
f
ailed
b
ulb
a
nd
c
hange
i
t.
F
Re
fit
t
he
c
onsole
a
round
t
he
c
ourtesy
la
mp,
e
nsuring
t
hat
i
t
i
s
c
lipped
i
n
c
orrectly.
Courtesy lamp
with bulbs (W5W)
Courtesy lamp
with LEDs
For the replacement of the light-emitting diodes ( LEDs), c ontact a C ITROËN d ealer o r a qu
alified
wo
rkshop.
Boot (W5W)
F Unclip the l amp b y p ushing t he b ody f rom beh
ind.
F
Re
move
t
he
b
ulb
a
nd
c
hange.
F
Re
fit
t
he
l
amp.
Interior lighting
In the event of a breakdown
Page 205 of 301
203
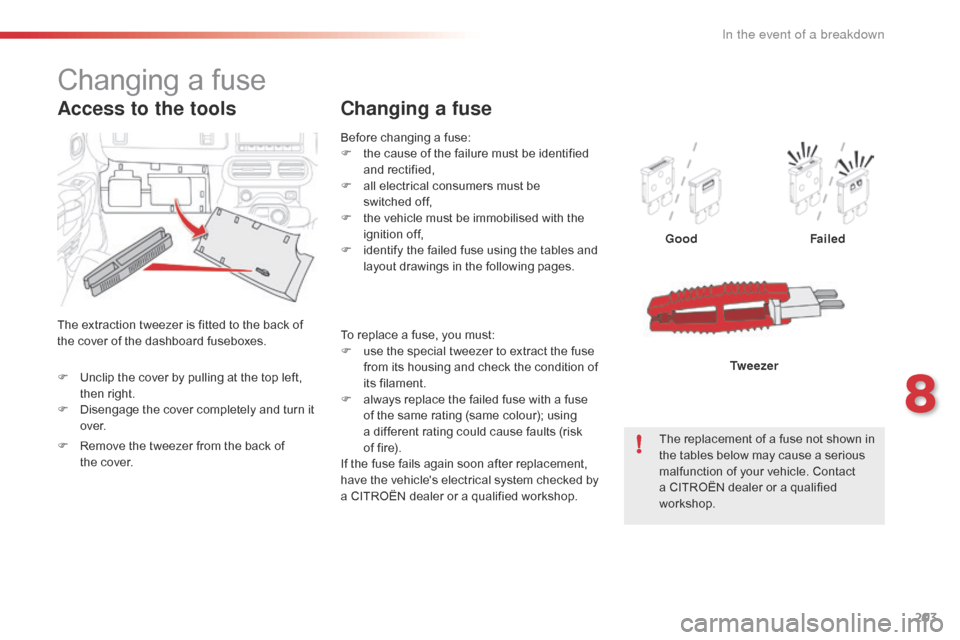
Before changing a fuse:
F th e c ause o f t he f ailure m ust b e i dentified an
d
rec
tified,
F
al
l
e
lectrical
c
onsumers
m
ust
b
e
sw
itched off,
F
th
e
v
ehicle
m
ust
b
e
i
mmobilised
w
ith
t
he
ign
ition
of
f,
F
id
entify
t
he
f
ailed
f
use
u
sing
t
he
t
ables
a
nd
la
yout
d
rawings
i
n
t
he
f
ollowing
p
ages.
Changing a fuse
GoodFailed
The
r
eplacement
o
f
a f
use
n
ot
s
hown
i
n
th
e
t
ables
b
elow
m
ay
c
ause
a s
erious
ma
lfunction
o
f
y
our
v
ehicle.
C
ontact
a C
ITROËN
d
ealer
o
r
a q
ualified
wo
rkshop. Tw e e z e r
Changing a fuse
The extraction tweezer is fitted to the back of th
e c over o f t he d ashboard f useboxes.
Access to the tools
To replace a fuse, you must:
F us e t he s pecial t weezer t o e xtract t he f use fr
om
i
ts
h
ousing
a
nd
c
heck
t
he
c
ondition
o
f
its fi
lament.
F
al
ways
r
eplace
t
he
f
ailed
f
use
w
ith
a f
use
of t
he
s
ame
r
ating
(
same
c
olour);
u
sing
a d
ifferent
r
ating
c
ould
c
ause
f
aults
(
risk
of f
ire).
If
t
he
f
use
f
ails
a
gain
s
oon
a
fter
r
eplacement,
ha
ve
t
he
v
ehicle's
e
lectrical
s
ystem
c
hecked
b
y
a C
ITROËN
d
ealer
o
r
a q
ualified
w
orkshop.
F
Un
clip
t
he
c
over
b
y
p
ulling
a
t
t
he
t
op
l
eft,
th
en
r
ight.
F
Di
sengage
t
he
c
over
c
ompletely
a
nd
t
urn
i
t
ov
e r.
F
Re
move
t
he
t
weezer
f
rom
t
he
b
ack
o
f
th
e cover.
8
In the event of a breakdown
Page 206 of 301
204
CITROËN will not accept responsibility
for the c ost i ncurred i n r epairing y our ve
hicle
o
r
f
or
r
ectifying
m
alfunctions
re
sulting
f
rom
t
he
i
nstallation
o
f
ac
cessories
n
ot
s
upplied
a
nd
n
ot
re
commended
b
y
C
ITROËN
a
nd
no
t
i
nstalled
i
n
a
ccordance
w
ith
i
ts
ins
tructions, in particular when the
combined
c
onsumption
o
f
a
ll
o
f
t
he
ad
ditional
e
quipment
c
onnected
ex
ceeds
10 mill
iamperes.
Installing electrical
accessories
Your vehicle's electrical system is designed t o o perate w ith s tandard o r op
tional
eq
uipment.
Before
i
nstalling
o
ther
e
lectrical
eq
uipment
o
r
a
ccessories
o
n
y
our
ve
hicle,
c
ontact
a C
ITROËN
d
ealer
o
r
a qu
alified
wo
rkshop.
In the event of a breakdown
Page 207 of 301

205
Dashboard fuses
The two fuseboxes are placed in the lower dashboard, a t t he g love b ox. Fuse
N° Rating
(A) Functions
F01 10Brake
p
edal
(
switch
2
),
S
top
& S
tart.
F02 5Headlamp
b
eam
h
eight
a
djuster,
a
dditional
h
eater
(
Diesel),
pa
rking
s
ensors,
d
iagnostic
s
ocket,
d
oor
m
irrors
(
electric
adju
stment).
F03 10Diesel a dditive p ump, e lectric p ower s teering, c lutch p edal (s
w i tc h).
F04 5Rain
a
nd
s
unshine
s
ensor.
F06 10Brake
p
edal
(
switch
1
),
d
iagnostic
s
ocket.
F08 5Top
o
f
s
teering
c
olumn
c
ontacts
w
ith
s
teering
m
ounted
c
ontrols.
F10 10Emergency
c
all
/ A
ssistance
c
all.
F12 5Stop
& S
tart,
A
BS,
ES
C.
F13 5Parking
s
ensors,
r
eversing
c
amera
F14 15Electronic
g
earbox,
s
witch
p
anel
(
below
t
he
t
ouch
s
creen
ta
blet),
a
ir
c
onditioning,
t
ouch
s
creen
t
ablet.
F16 1512
V
olt
s
ocket.
F18 20Radio.
Access to the fuses
F Unclip t he c over b y p ulling a t t op l eft, t hen ri
ght.
Left hand fusebox
8
In the event of a breakdown
Page 208 of 301
206
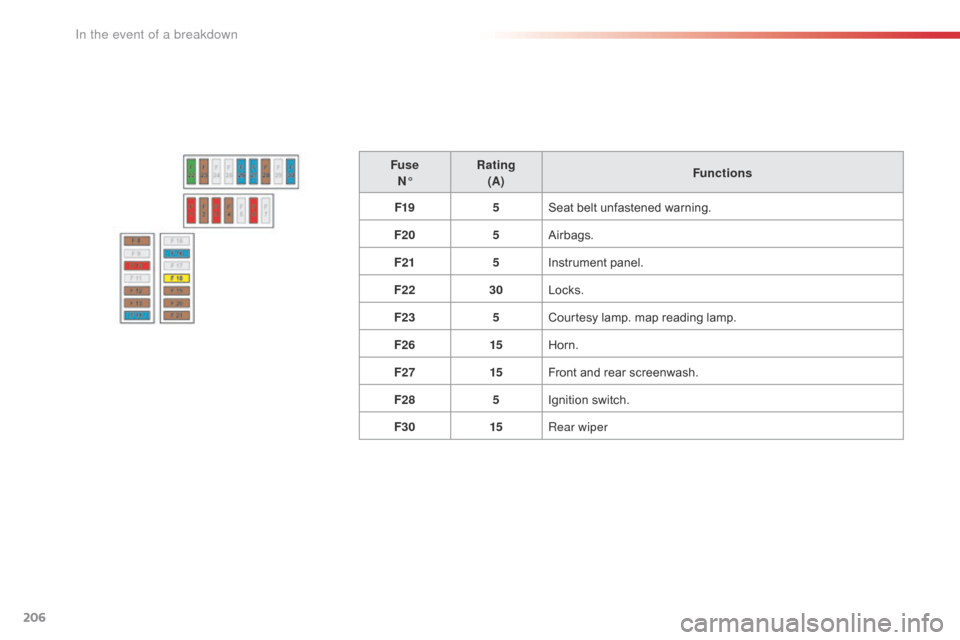
FuseN° Rating
(A) Functions
F19 5Seat
b
elt
u
nfastened
w
arning.
F20 5Airbags.
F21 5Instrument
p
anel.
F22 30Locks.
F23 5Courtesy
l
amp.
m
ap
r
eading
l
amp.
F26 15Horn.
F27 15Front
a
nd
r
ear
s
creenwash.
F28 5Ignition
swi
tch.
F30 15Rear wiper
In the event of a breakdown
Page 209 of 301
207
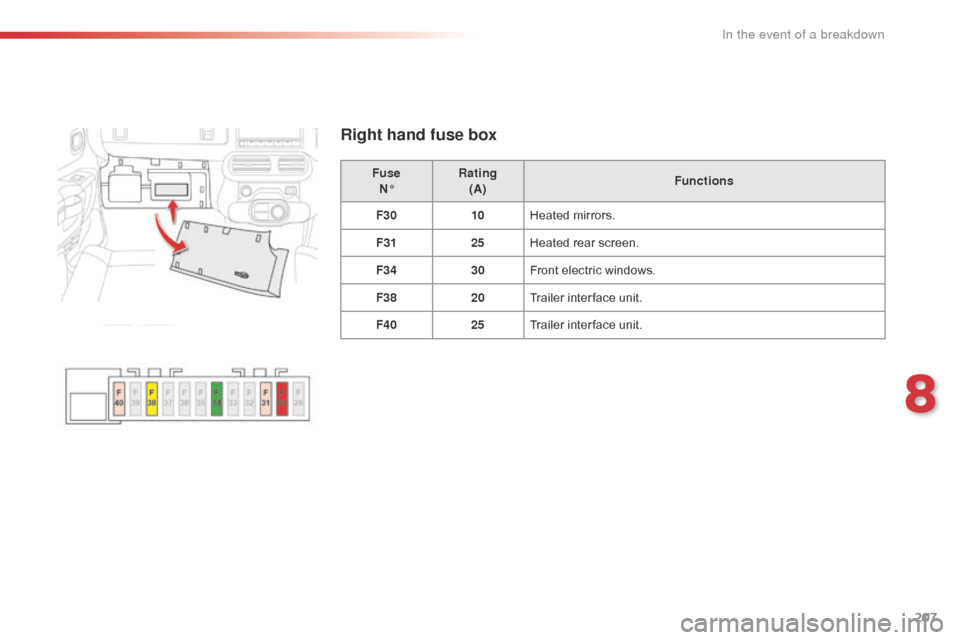
Right hand fuse box
FuseN° Rating
(A) Functions
F30 10Heated
m
irrors.
F31 25Heated
r
ear
s
creen.
F34 30Front
e
lectric
w
indows.
F38 20Trailer
i
nter face
u
nit.
F40 25Trailer
i
nter face
u
nit.
8
In the event of a breakdown
Page 210 of 301
208
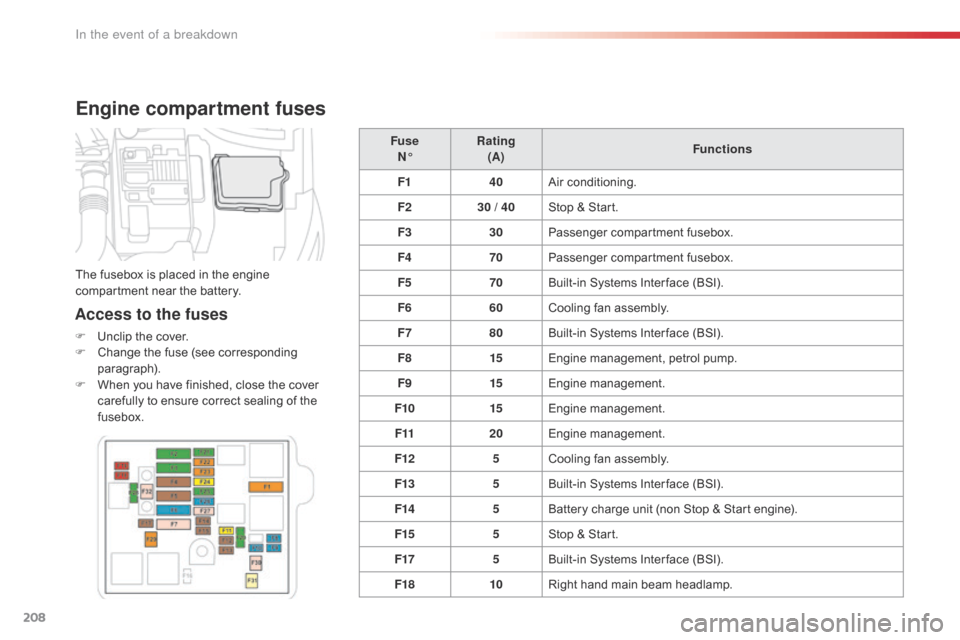
Engine compartment fuses
Access to the fuses
F Unclip the c over.
F Ch ange t he f use ( see c orresponding parag
raph).
F
Wh
en
y
ou
h
ave
f
inished,
c
lose
t
he
c
over
ca
refully
t
o
e
nsure
c
orrect
s
ealing
o
f
t
he
fus
ebox. Fuse
N° Rating
(A) Functions
F1 40Air
co
nditioning.
F2 30 / 40Stop
& S
tart.
F3 30Passenger
co
mpartment
fu
sebox.
F4 70Passenger
co
mpartment
fu
sebox.
F5 70Built-in
S
ystems
I
nter face
(
BSI).
F6 60Cooling
f
an
a
ssembly.
F7 80Built-in S ystems I nter face ( BSI).
F8 15Engine
m
anagement,
p
etrol
p
ump.
F9 15Engine
manag
ement.
F10 15Engine
manag
ement.
F11 20Engine
manag
ement.
F12 5Cooling
f
an
a
ssembly.
F13 5Built-in
S
ystems
I
nter face
(
BSI).
F14 5Battery
c
harge
u
nit
(
non
S
top
& S
tart
e
ngine).
F15 5Stop
& S
tart.
F17 5Built-in
S
ystems
I
nter face
(
BSI).
F18 10Right
h
and
m
ain
b
eam
h
eadlamp.
The
f
usebox
i
s
p
laced
i
n
t
he
e
ngine
co
mpartment
n
ear
t
he
b
attery.
In the event of a breakdown