Citroen C4 DAG 2014.5 2.G Owner's Manual
Manufacturer: CITROEN, Model Year: 2014.5, Model line: C4 DAG, Model: Citroen C4 DAG 2014.5 2.GPages: 340, PDF Size: 12.89 MB
Page 121 of 340
77
119ô
C4-2_en_Chap07_securite-enfants_ed01-2014
*ô Infantô carô seatsô andô "carô cots"ô cannotô beô installedô onô theô frontô passengerô seat.
** ô
The
ô ISOFIX ô infant ô car ô seat, ô secured ô on ô the ô lower ô rings ô of ô a ô vehicle ô ISOFIX ô seat, ô occupies ô two ô rear ô seats.
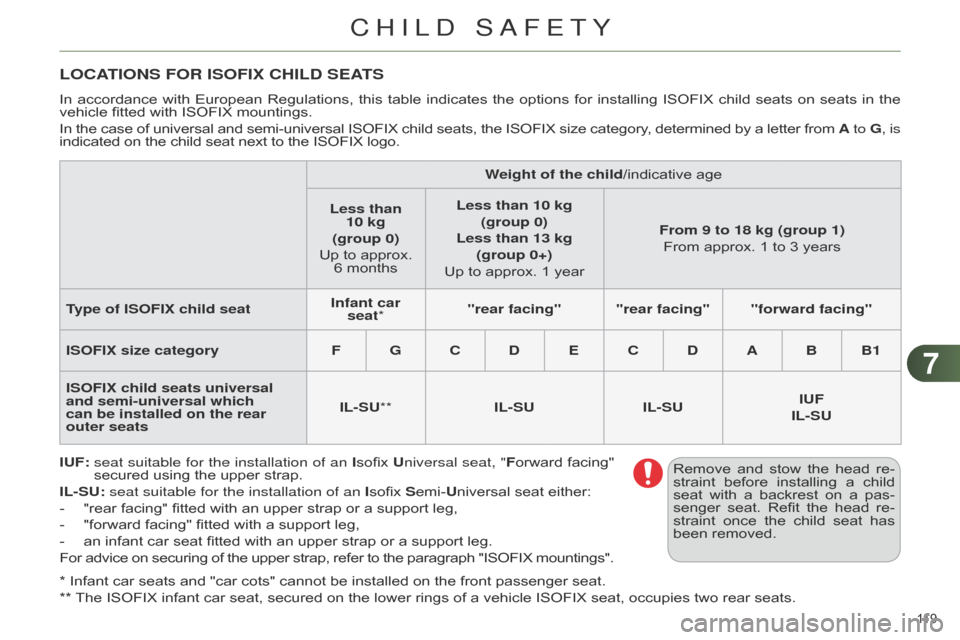
LOCATIONS FOR ISOFIX CHILD SEATS
Inô accordanceô with ô European ô Regulations, ô this ô table ô indicates ô the ô options ô for ô installin g ô ISOFIX ô child ô seats ô on ô seats ô in ô the ô vehicle
ô fitted ô with ô ISOFIX ô mountings.
In
ô
the
ô
case
ô
of
ô
universal
ô
and
ô
semi-universal
ô
ISOFIX
ô
child
ô
seats,
ô
the
ô
ISOFIX
ô
size
ô
category
, ô
determined
ô
by
ô
a
ô
letter
ô
from
ô
A to
G, is
indicated
ô on ô the ô child ô seat ô next ô to ô the ô ISOFIX ô logo.
IUF:
seat suitable for the installation of an
Isofix ô
U
niversal seat, "Forward ô
facing"
ô
secured
ô using ô the ô upper ô strap.
IL-SU: seat suitable for the installation of an Isofix
ô Semi-Universal ô seat ô either:
-
ô
"rear
ô facing" ô fitted ô with ô an ô upper ô strap ô or ô a ô support ô leg,
-
ô
"forward
ô facing" ô fitted ô with ô a ô support ô leg,
-
ô
an
ô infant ô car ô seat ô fitted ô with ô an ô upper ô strap ô or ô a ô support ô leg.
For
ô
advice
ô
on
ô
securing
ô
of
ô
the
ô
upper
ô
strap,
ô
refer
ô
to
ô
the
ô
paragraph
ô
"ISOFIX
ô
mountings".
W
eight of the child/indicative ô age
Less than 10
kg
(group 0)
Up
ô to ô approx. ô
6
ô monthsLess than 10 kg
(group 0)
Less than 13 kg (group 0+)
Up
ô to ô approx. ô 1 ô yearFrom 9 to 18 kg (group 1)
From
ô approx. ô 1 ô to ô 3 ô years
Type of ISOFIX child seat Infant car
seat* "rear facing" "rear facing" "forward facing"
ISOFIX size category F G C D E C D A B B1
ISOFIX child seats universal
and semi-universal which
can be installed on the rear
outer seats IL-SU**
IL-SUIL-SU IUF
IL-SU
Remove
ô
and
ô
stow
ô
the
ô
head
ô
re
-
straint
ô
before
ô
installin
g ô
a
ô
child
ô
seat
ô
with
ô
a
ô
backrest
ô
on
ô
a
ô
pas
-
senger
ô
seat.
ô
Refit
ô
the
ô
head
ô
re
-
straint
ô
once
ô
the
ô
child
ô
seat
ô
has
ô
been
ô removed.
CHILD SAFETY
Page 122 of 340
77
120ô
C4-2_en_Chap07_securite-enfants_ed01-2014
Forô optimumô installation ô of ô the ô "for -
ward-facing" ô child ô seat, ô ensure ô that ô
the
ô
back
ô
of
ô
the
ô
child
ô
seat
ô
is
ô
as
ô
close
ô
as
ô
possible
ô
to
ô
the
ô
backrest
ô
of
ô
the
ô
ve
-
hicle's
ô seat, ô in ô contact ô if ô possible.
You
ô
mst
ô
remove
ô
the
ô
head
ô
restraint
ô
before
ô
installin
g ô
a
ô
child
ô
seat
ô
with
ô
backrest
ô to ô a ô passenger ô seat.
Ensure
ô
that
ô
the
ô
head
ô
restraint
ô
is
ô
stored
ô
or
ô
attached
ô
securely
ô
to
ô
pre
-
vent
ô
it
ô
from
ô
being
ô
thrown
ô
around
ô
the
ô
vehicle
ô
in
ô
the
ô
event
ô
of
ô
sharp
ô
brak
-
ing.
ô
Refit
ô
the
ô
head
ô
restraint
ô
when
ô
the
ô
child
ô seat ô is ô removed.
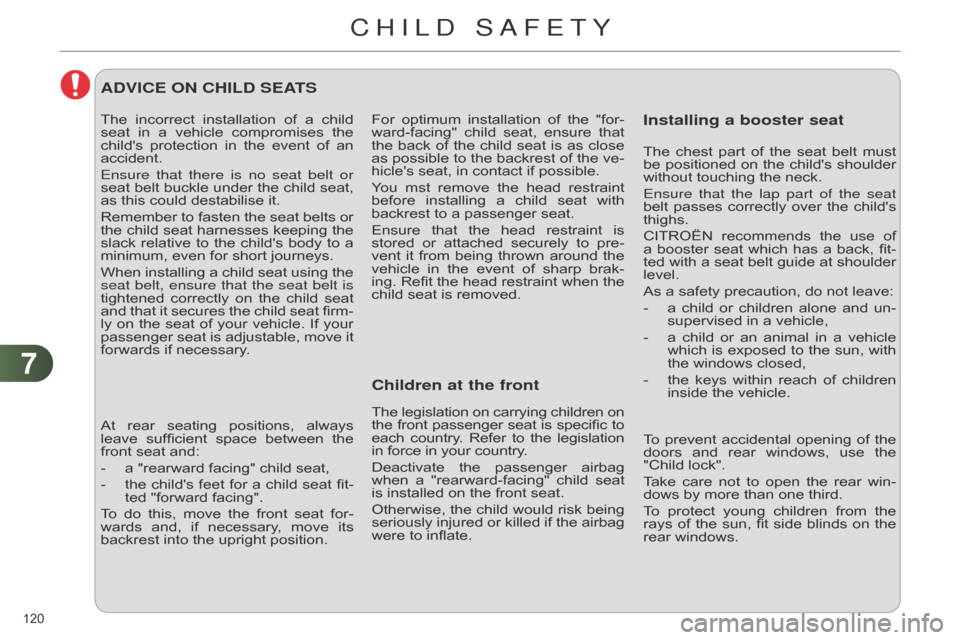
ADVICE ON CHILD SEATS
Installing a booster seat
Children at the frontTheô incorrect ô installation ô of ô a ô child ô seat
ô in ô a ô vehicle ô compromises ô the ô
child's
ô
protection
ô
in
ô
the
ô
event
ô
of
ô
an
ô
accident.
Ensure that there is no seat belt or
seat
ô
belt
ô
buckle
ô
under
ô
the
ô
child
ô
seat,
ô
as
ô this ô could ô destabilise ô it.
Remember
ô
to
ô
fasten
ô
the
ô
seat
ô
belts
ô
or
ô
the
ô
child
ô
seat
ô
harnesses
ô
keeping
ô
the
ô
slack
ô
relative
ô
to
ô
the
ô
child's
ô
body
ô
to
ô
a
ô
minimum,
ô even ô for ô short ô journeys.
When
ô
installin
g ô
a
ô
child
ô
seat
ô
using
ô
the
ô
seat belt, ensure that the seat belt is
tightened
ô
correctly
ô
on
ô
the
ô
child
ô
seat
ô
and
ô
that
ô
it
ô
secures
ô
the
ô
child
ô
seat
ô
firm
-
ly
ô
on
ô
the
ô
seat
ô
of
ô
your
ô
vehicle.
ô
If
ô
your
ô
passenger
ô
seat
ô
is
ô
adjustable,
ô
move
ô
it
ô
forwards
ô if ô necessary. The
ô
legislation
ô
on
ô
carrying
ô
children
ô
onô the
ô
front
ô
passenger
ô
seat
ô
is
ô
specific
ô
toô each
ô
country
. ô
Refer
ô
to
ô
the
ô
legislationô in
ô force ô in ô your ô country.
Deactivate
ô
the
ô
passenger
ô
airbag
ô
when
ô
a
ô
"rearward-facing"
ô
child
ô
seat
ô
is
ô installed ô on ô the ô front ô seat.
Otherwise,
ô
the
ô
child
ô
would
ô
risk
ô
being
ô
seriously
ô
injured
ô
or
ô
kille
d ô
if
ô
the
ô
airbag
ô
were
ô to ô inflate.The
ô
chest
ô
part
ô
of
ô
the
ô
seat
ô
belt
ô
must
ô
be
ô
positioned
ô
on
ô
the
ô
child's
ô
shoulder
ô
without
ô touching ô the ô neck.
Ensure that the lap part of the seat
belt
ô
passes
ô
correctly
ô
over
ô
the
ô
child's
ô
thighs.
CITROûN
ô
recommends
ô
the
ô
use
ô
of
ô
a
ô
booster
ô
seat
ô
which
ô
has
ô
a
ô
back,
ô
fit
-
ted
ô
with
ô
a
ô
seat
ô
belt
ô
guide
ô
at
ô
shoulder
ô
level.
As
ô a ô safety ô precaution, ô do ô not ô leave:
-
ô
a
ô
child
ô
or
ô
children
ô
alone
ô
and
ô
un
-
supervised
ô in ô a ô vehicle,
-
ô
a
ô
child
ô
or
ô
an
ô
animal
ô
in
ô
a
ô
vehicle
ô
which
ô
is
ô
exposed
ô
to
ô
the
ô
sun,
ô
with
ô
the
ô windows ô closed,
-
ô
the
ô
keys
ô
within
ô
reach
ô
of
ô
children
ô
inside
ô the ô vehicle.
At
ô
rear
ô
seating
ô
positions,
ô
always
ô
leave
ô
sufficient
ô
space
ô
between
ô
the
ô
front
ô seat ô and:
-
ô
a
ô "rearward ô facing" ô child ô seat,
-
ô
the
ô
child's
ô
feet
ô
for
ô
a
ô
child
ô
seat
ô
fit
-
ted
ô "forward ô facing".
To
ô
do
ô
this,
ô
move
ô
the
ô
front
ô
seat
ô
for
-
wards
ô
and,
ô
if
ô
necessary
, ô
move
ô
its
ô
backrest
ô into ô the ô upright ô position. To
ô
prevent
ô
accidental
ô
opening
ô
of
ô
the
ô
doors
ô
and
ô
rear
ô
windows,
ô
use
ô
the
ô
"Child
ô lock".
Take
ô
care
ô
not
ô
to
ô
open
ô
the
ô
rear
ô
win
-
dows
ô by ô more ô than ô one ô third.
To
ô
protect
ô
young
ô
children
ô
from
ô
the
ô
rays
ô
of
ô
the
ô
sun,
ô
fit
ô
side
ô
blinds
ô
on
ô
the
ô
rear
ô windows.
CHILD SAFETY
Page 123 of 340
77
121ô
C4-2_en_Chap07_securite-enfants_ed01-2014
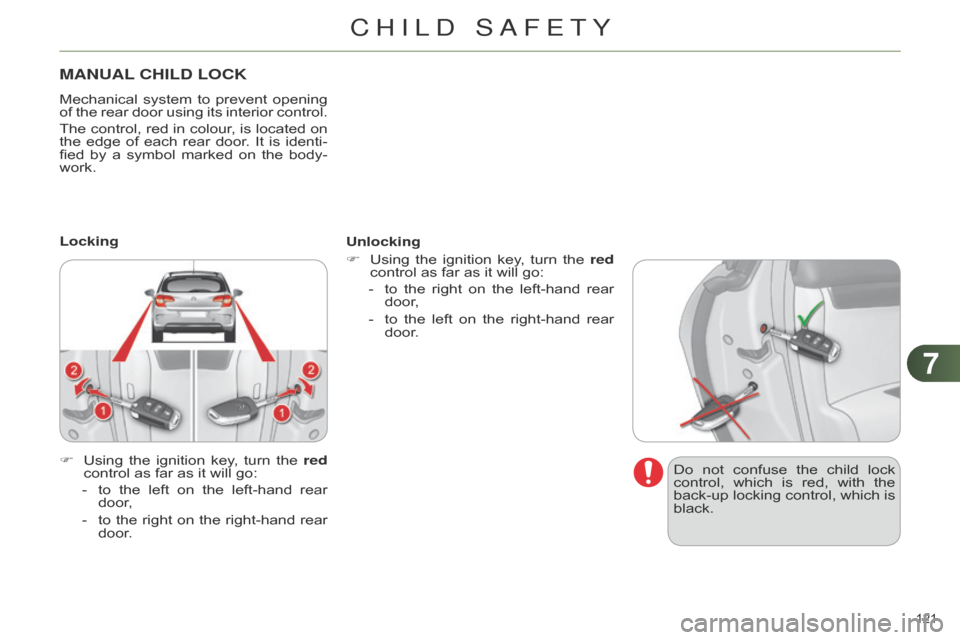
MANUAL CHILD LOCK
Mechanicalô system ô to ô prevent ô opening ô of
ô the ô rear ô door ô using ô its ô interior ô control.
The
ô
control,
ô
red
ô
in
ô
colour
, ô
is
ô
located
ô
on
ô
the
ô
edge
ô
of
ô
each
ô
rear
ô
door
. ô
It
ô
is
ô
identi
-
fied
ô
by
ô
a
ô
symbol
ô
marked
ô
on
ô
the
ô
body
-
work.
F
ô
Using
ô
the
ô
ignition
ô
key
, ô
turn
ô
the
ô
red
control
ô as ô far ô as ô it ô will ô go:
-
ô
to
ô
the
ô
left
ô
on
ô
the
ô
left-hand
ô
rear
ô
door
,
-
ô
to
ô
the
ô
right
ô
on
ô
the
ô
right-hand
ô
rear
ô
door
.
Locking
Unlocking
F
ô
Using
ô
the
ô
ignition
ô
key
, ô
turn
ô
the
ô
red
control
ô as ô far ô as ô it ô will ô go:
-
ô
to
ô
the
ô
right
ô
on
ô
the
ô
left-hand
ô
rear
ô
door
,
-
ô
to
ô
the
ô
left
ô
on
ô
the
ô
right-hand
ô
rear
ô
door
.Do
ô
not
ô
confuse
ô
the
ô
child
ô
lock
ô
control,
ô
which
ô
is
ô
red,
ô
with
ô
the
ô
back-up
ô
locking
ô
control,
ô
which
ô
is
ô
black.
CHILD SAFETY
Page 124 of 340
88
122ô
C4-2_en_Chap08_securite_ed01-2014
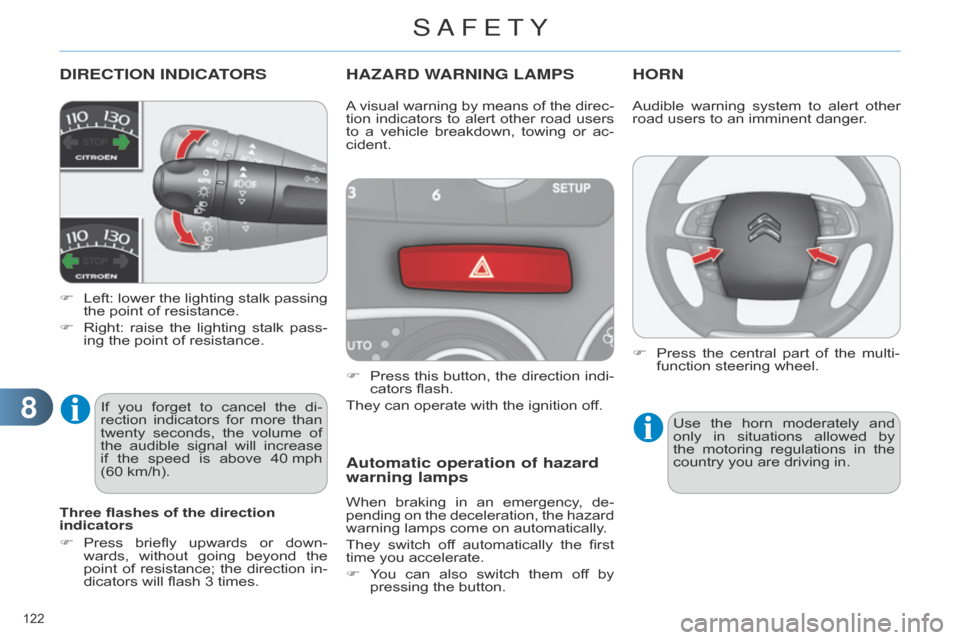
DIRECTION INDICATORS
Fô Left:ô lower ô the ô lighting ô stalk ô passing ô the
ô point ô of ô resistance.
F
ô
Right:
ô
raise
ô
the
ô
lighting
ô
stalk
ô
pass
-
ing
ô the ô point ô of ô resistance.
HAZARD WARNING LAMPS
Fô Pressô this ô button, ô the ô direction ô indi -
cators ô flash.
They
ô can ô operate ô with ô the ô ignition ô off.
Automatic operation of hazard
warning lamps
Whenô brakingô in ô an ô emergency , ô de -
pending ô on ô the ô deceleration, ô the ô hazard ô
warning
ô lamps ô come ô on ô automatically.
They
ô
switch
ô
of
f ô
automatically
ô
the
ô
first
ô
time
ô you ô accelerate.
F
ô
Y
ou ô
can
ô
also
ô
switch
ô
them
ô
of
f ô
by
ô
pressing
ô the ô button.
HORN
Aô visualô warning ô by ô means ô of ô the ô direc -
tion ô indicators ô to ô alert ô other ô road ô users ô
to
ô
a
ô
vehicle
ô
breakdown,
ô
towing
ô
or
ô
ac
-
cident.
Three flashes of the direction
indicators
F
ô
Press
ô
briefly
ô
upwards
ô
or
ô
down
-
wards,
ô
without
ô
going
ô
beyond
ô
the
ô
point
ô
of
ô
resistance;
ô
the
ô
direction
ô
in
-
dicators
ô
will
ô
flash
ô
3
ô
times.
If
ô
you
ô
forget
ô
to
ô
cancel
ô
the
ô
di
-
rection
ô
indicators
ô
for
ô
more
ô
than
ô
twenty
ô
seconds,
ô
the
ô
volume
ô
of
ô
the
ô
audible
ô
signal
ô
will
ô
increase
ô
if
ô
the
ô
speed
ô
is
ô
above
ô
40
ô
mph
ô
(60
ô
km/h). Audible
ô warning ô system ô to ô alert ô other ô road
ô users ô to ô an ô imminent ô danger.
Use
ô
the
ô
horn
ô
moderately
ô
and
ô
only
ô
in
ô
situations
ô
allowed
ô
by
ô
the
ô
motoring
ô
regulations
ô
in
ô
the
ô
country
ô you ô are ô driving ô in.
F
ô
Press
ô
the
ô
central
ô
part
ô
of
ô
the
ô
multi
-
function
ô steering ô wheel.
SAFETY
Page 125 of 340
88
123ô
C4-2_en_Chap08_securite_ed01-2014
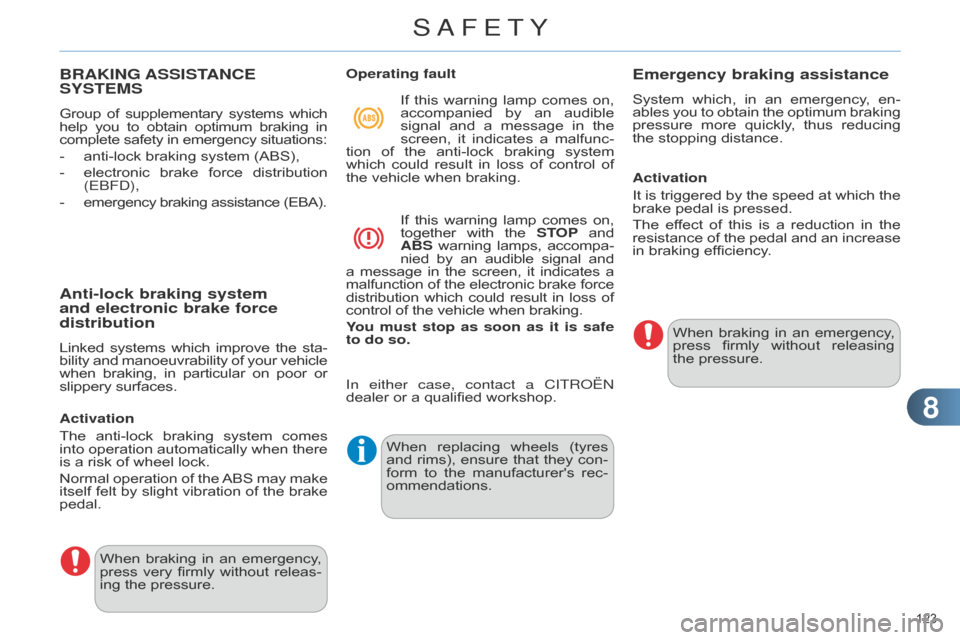
BRAKING ASSISTANCE SYSTEMS
Groupô ofô supplementary ô systems ô whichô help
ô you ô to ô obtain ô optimum ô braking ô inô complete
ô safety ô in ô emergency ô situations:
-
ô
anti-lock
ô braking ô system ô (ABS),
-
ô
electronic
ô
brake
ô
force
ô
distribution
ô
(E
b F d ),
-
ô emergency
ô braking ô assistance ô (EBA).
When
ô
braking
ô
in
ô
an
ô
emergency
, ô
press
ô
very
ô
firmly
ô
without
ô
releas
-
ing
ô the ô pressure. When
ô
replacing
ô
wheels
ô
(tyres
ô
and
ô
rims),
ô
ensure
ô
that
ô
they
ô
con
-
form
ô
to
ô
the
ô
manufacturer's
ô
rec
-
ommendations. When
ô
braking
ô
in
ô
an
ô
emergency
, ô
press
ô
firmly
ô
without
ô
releasing
ô
the
ô pressure.
Anti-lock braking system
and electronic brake force
distribution
Linkedô systemsô which ô improve ô the ô sta -
bility ô and ô manoeuvrability ô of ô your ô vehicleô when
ô
braking,
ô
in
ô
particular
ô
on
ô
poor
ô
orô slippery
ô surfaces.
Activation
The
ô
anti-lock
ô
braking
ô
system
ô
comes
ô
into
ô
operation
ô
automatically
ô
when
ô
there
ô
is
ô a ô risk ô of ô wheel ô lock.
Normal
ô
operation
ô
of
ô
the
ô
ABS
ô
may
ô
make
ô
itself
ô
felt
ô
by
ô
slight
ô
vibration
ô
of
ô
the
ô
brake
ô
pedal. Operating fault
If
ô
this
ô
warning
ô
lamp
ô
comes
ô
on,
ô
accompanied
ô
by
ô
an
ô
audible
ô
signal
ô
and
ô
a
ô
message
ô
in
ô
the
ô
screen,
ô
it
ô
indicates
ô
a
ô
malfunc
-
tion ô
of
ô
the
ô
anti-lock
ô
braking
ô
system
ô
which
ô
could
ô
result
ô
in
ô
loss
ô
of
ô
control
ô
of
ô
the
ô vehicle ô when ô braking.
If ô
this
ô
warning
ô
lamp
ô
comes
ô
on,ô together
ô
with
ô
the
ô
ST
OP ô
andô ABS
ô
warning
ô
lamps,
ô
accompa
-
nied ô
by
ô
an
ô
audible
ô
signal
ô
andô a
ô
message
ô
in
ô
the
ô
screen,
ô
it
ô
indicates
ô
aô malfunction
ô
of
ô
the
ô
electronic
ô
brake
ô
forceô distribution
ô
which
ô
could
ô
result
ô
in
ô
loss
ô
ofô control
ô of ô the ô vehicle ô when ô braking.
You must stop as soon as it is safe
to do so.
Emergency braking assistance
Systemô which, ô in ô an ô emergency , ô en -
ables ô you ô to ô obtain ô the ô optimum ô braking ô
pressure
ô
more
ô
quickly
, ô
thus
ô
reducing
ô
the
ô stopping ô distance.
Activation
It
ô
is
ô
triggered
ô
by
ô
the
ô
speed
ô
at
ô
which
ô
the
ô
brake
ô pedal ô is ô pressed.
The
ô
ef
fect ô
of
ô
this
ô
is
ô
a
ô
reduction
ô
in
ô
the
ô
resistance
ô
of
ô
the
ô
pedal
ô
and
ô
an
ô
increase
ô
in
ô braking ô efficiency.
In either case, contact a CITR
o
û
n
dealer
ô
or
ô
a
ô
qualified
ô
workshop.
SAFETY
Page 126 of 340
88
124ô
C4-2_en_Chap08_securite_ed01-2014
TRAjECTORY CONTROL SYSTEMS
Anti-slip regulation (ASR) and
dynamic stability control (DSC)
Theô anti-slipô regulation ô (also ô known ô as ô traction
ô control) ô optimises ô traction ô to ô
prevent
ô
skidding
ô
of
ô
the
ô
wheels,
ô
by
ô
act
-
ing
ô
on
ô
the
ô
brakes
ô
of
ô
the
ô
driving
ô
wheels
ô
and
ô on ô the ô engine.
The electronic stability control acts on
the
ô
brake
ô
of
ô
one
ô
or
ô
more
ô
wheels
ô
and
ô
on
ô
the
ô
engine
ô
to
ô
keep
ô
the
ô
vehicle
ô
on
ô
the
ô
trajectory
ô
required
ô
by
ô
the
ô
driver
, ô
within
ô
the
ô limits ô of ô the ô laws ô of ô physics.
Activation
These
ô
systems
ô
are
ô
activated
ô
automati
-
cally
ô each ô time ô the ô vehicle ô is ô started.
They
ô
come
ô
into
ô
operation
ô
in
ô
the
ô
event
ô
of
ô a ô grip ô or ô trajectory ô problem.
This
ô
is
ô
indicated
ô
by
ô
flashing
ô
of
ô
this
ô
warning
ô
lamp
ô
in
ô
the
ô
instru
-
ment
ô panel.
Intelligent traction control
system ("Snow motion")Deactivation
Inô
extremely
ô
severe
ô
conditions
ô
(deep
ô
snow
, ô
mud,
ô
...),
ô
if
ô
you
ô
are
ô
unable
ô
to
ô
move
ô
of
f, ô
it
ô
may
ô
be
ô
useful
ô
to
ô
temporar
-
ily
ô
deactivate
ô
these
ô
systems
ô
so
ô
that
ô
the
ô
wheels
ô
can
ô
spin
ô
freely
ô
and
ô
allow
ô
the
ô
vehicle
ô to ô move.
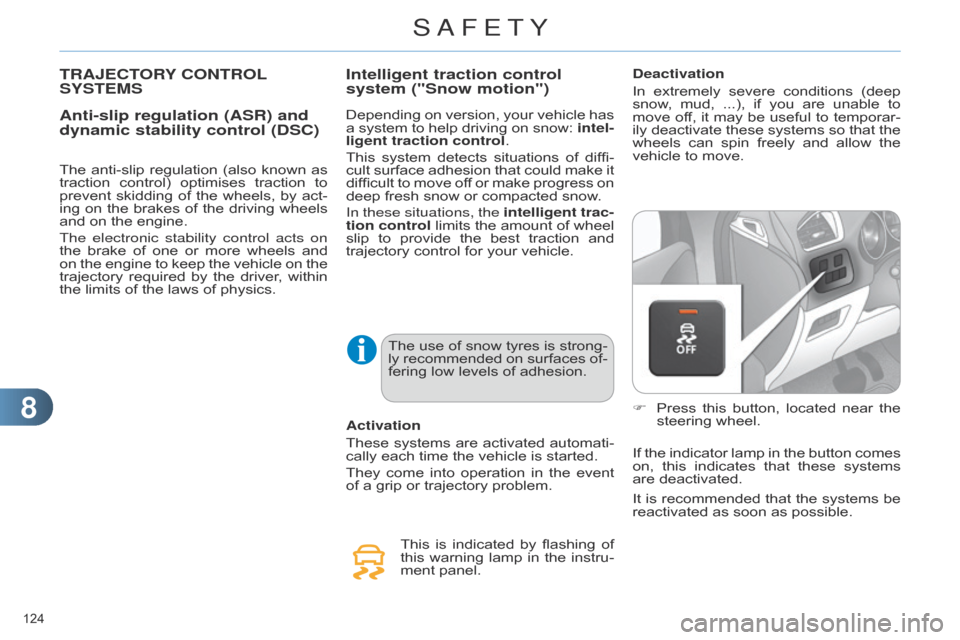
F
ô
Press
ô
this
ô
button,
ô
located
ô
near
ô
the
ô
steering
ô wheel.
If
ô
the
ô
indicator
ô
lamp
ô
in
ô
the
ô
button
ô
comes
ô
on,
ô
this
ô
indicates
ô
that
ô
these
ô
systems
ô
are
ô deactivated.
Depending
ô
on
ô
version,
ô
your
ô
vehicle
ô
has
ô
a
ô
system
ô
to
ô
help
ô
driving
ô
on
ô
snow:
ô
intel
-
ligent traction control.
This
ô
system
ô
detects
ô
situations
ô
of
ô
diffi
-
cult
ô
surface
ô
adhesion
ô
that
ô
could
ô
make
ô
it
ô
difficult
ô
to
ô
move
ô
of
f
ô
or
ô
make
ô
progress
ô
on
ô
deep
ô
fresh
ô
snow
ô
or
ô
compacted
ô
snow.
In these situations, the intelligent trac-
tion control
ô
limits
ô
the
ô
amount
ô
of
ô
wheel
ô
slip
ô
to
ô
provide
ô
the
ô
best
ô
traction
ô
and
ô
trajectory
ô
control
ô
for
ô
your
ô
vehicle.
The
ô
use
ô
of
ô
snow
ô
tyres
ô
is
ô
strong-
ly
ô
recommended
ô
on
ô
surfaces
ô
of
-
fering
ô
low
ô
levels
ô
of
ô
adhesion. It
ô
is
ô
recommended
ô
that
ô
the
ô
systems
ô
be
ô
reactivated
ô as ô soon ô as ô possible.
SAFETY
Page 127 of 340
88
125ô
C4-2_en_Chap08_securite_ed01-2014
Theô trajectoryô control ô systems ô of
fer ô increased ô safety ô in ô normal ô
driving,
ô
but
ô
this
ô
should
ô
not
ô
en
-
courage
ô
the
ô
driver
ô
to
ô
take
ô
extra
ô
risks
ô or ô drive ô at ô high ô speed.
The
ô
correct
ô
functioning
ô
of
ô
these
ô
systems
ô
is
ô
assured
ô
provided
ô
that
ô
manufacturer's
ô
recommen
-
dations
ô are ô observed ô on:
-
ô
wheels
ô (tyres ô and ô rims),
-
ô
braking
ô components,
-
ô
electronic
ô components,
-
ô
assembly
ô
and
ô
repair
ô
proce
-
dures.
After
ô
an
ô
impact,
ô
have
ô
these
ô
sys
-
tems
ô
checked
ô
by
ô
a
ô
CITROûN
ô
dealer
ô or ô a ô qualified ô workshop.
Reactivation
These
ô systems
ô are
ô reactivated
ô automati
-
cally
ô
each
ô
time
ô
the
ô
ignition
ô
is
ô
switchedô back
ô
on
ô
or
ô
from
ô
30
ô
mph
ô
(50
ô
km/h).
F
ô
Press
ô
this
ô
button
ô
again
ô
to
ô
reactivate
ô
them
ô
manually.
The
ô
illu
mination
ô
of
ô
the
ô
indicator
ô
lamps
ô
in
ô
the
ô
instrument
ô
panel
ô
and
ô
in
ô
this
ô
button,
ô
accompa
-
nied
ô
by
ô
an
ô
audible
ô
signal
ô
and
ô
a
ô
message
ô
in
ô
the
ô
screen,
ô
indicates
ô
a
ô
fault
ô
with
ô
these
ô
systems.
Have
ô
it
ô
checked
ô
by
ô
a
ô
CITROûN
ô
dealer
ô
or
ô
a
ô
qualified
ô
workshop.
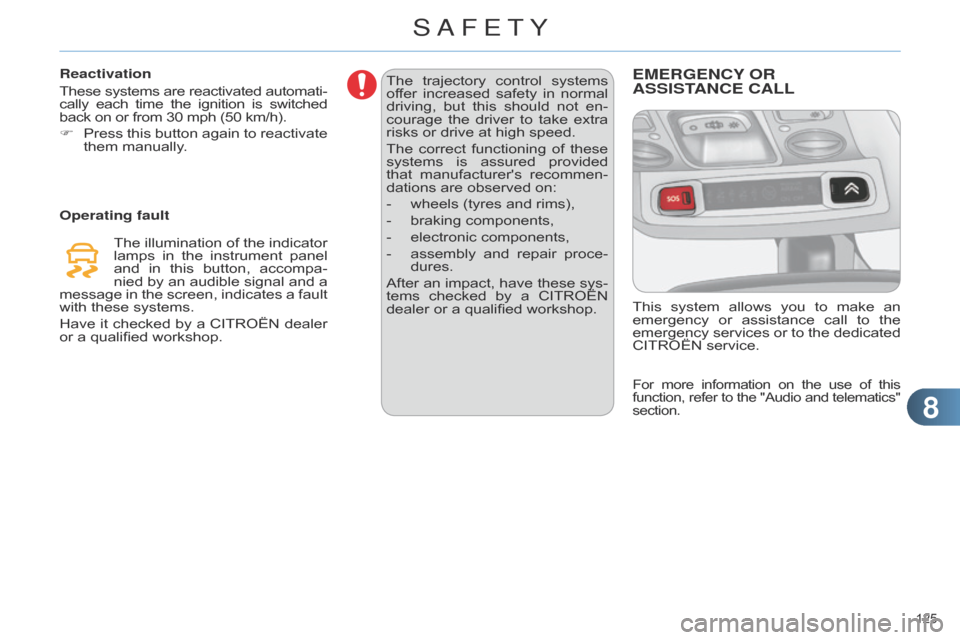
Operating faultEMERGENCY
OR ASSIST
ANCE CALL
Thisô systemô allows ô you ô to ô make ô an ô emergency
ô or ô assistance ô call ô to ô the ô
emergency
ô
services
ô
or
ô
to
ô
the
ô
dedicated
ô
CITROûN
ô service.
Forô moreô information ô on ô the ô use ô of ô thisô function,
ô refer ô to ô the ô "Audio ô and ô telematics"ô section.
SAFETY
Page 128 of 340
88
126ô
C4-2_en_Chap08_securite_ed01-2014
Seat belt not fastened / unfastened
warning lamp in the instrument panelWhen
ô
the
ô
ignition
ô
is
ô
switched
ô
on,ô this
ô
warning
ô
lamp
ô
comes
ô
on
ô
inô the
ô
instrument
ô
panel
ô
if
ô
the
ô
driverô and/or
ô
the
ô
front
ô
passenger
ô
hasô not
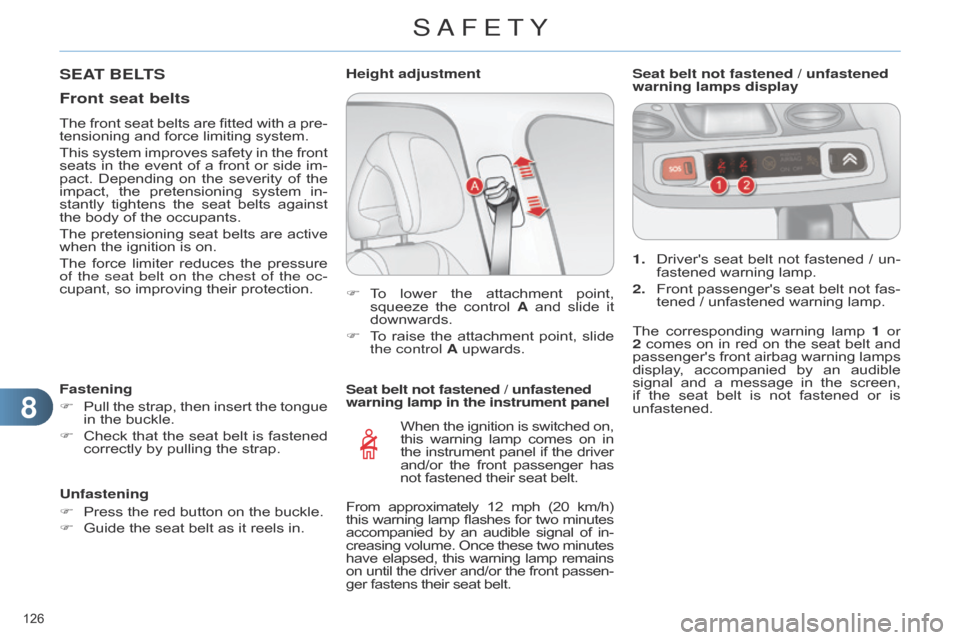
ô fastened ô their ô seat ô belt.1.
ô
Driver's
ô
seat
ô
belt
ô
not
ô
fastened
ô
/
ô
un
-
fastened ô warning ô lamp.
2. ô
Front
ô
passenger's
ô
seat
ô
belt
ô
not
ô
fas
-
tened ô / ô unfastened ô warning ô lamp.
Seat belt not fastened / unfastened
warning lamps display
F ô
T
o ô
lower
ô
the
ô
attachment
ô
point,
ô
squeeze
ô
the
ô
control
ô
A
ô
and
ô
slide
ô
it
ô
downwards.
F
ô
T
o ô
raise
ô
the
ô
attachment
ô
point,
ô
slide
ô
the control
A ô upwards.
Height adjustment
SEAT BELTS
Front seat belts
Theô front
ô seat ô belts ô are ô fitted ô with ô a ô pre -
tensioning ô and ô force ô limiting ô system.
This
ô
system
ô
improves
ô
safety
ô
in
ô
the
ô
front
ô
seats
ô
in
ô
the
ô
event
ô
of
ô
a
ô
front
ô
or
ô
side
ô
im
-
pact.
ô
Depending
ô
on
ô
the
ô
severity
ô
of
ô
the
ô
impact,
ô
the
ô
pretensioning
ô
system
ô
in
-
stantly
ô
tightens
ô
the
ô
seat
ô
belts
ô
against
ô
the
ô body ô of ô the ô occupants.
The
ô
pretensioning
ô
seat
ô
belts
ô
are
ô
active
ô
when
ô the ô ignition ô is ô on.
The
ô
force
ô
limiter
ô
reduces
ô
the
ô
pressure
ô
of
the seat belt on the chest of the oc-
cupant,
ô so ô improving ô their ô protection.
Fastening
F
ô
Pull
ô
the
ô
strap,
ô
then
ô
insert
ô
the
ô
tongue
ô
in
ô the ô buckle.
F
ô
Check
ô
that
ô
the
ô
seat
ô
belt
ô
is
ô
fastened
ô
correctly
ô by ô pulling ô the ô strap.
Unfastening
F
ô
Press
ô the ô red ô button ô on ô the ô buckle.
F
ô
Guide
ô the ô seat ô belt ô as ô it ô reels ô in. The
ô
corresponding
ô
warning
ô
lamp
ô
1
or
2
ô
comes
ô
on
ô
in
ô
red
ô
on
ô
the
ô
seat
ô
belt
ô
and
ô
passenger's
ô
front
ô
airbag
ô
warning
ô
lamps
ô
display
, ô
accompanied
ô
by
ô
an
ô
audible
ô
signal
ô
and
ô
a
ô
message
ô
in
ô
the
ô
screen,
ô
if
ô
the
ô
seat
ô
belt
ô
is
ô
not
ô
fastened
ô
or
ô
is
ô
unfastened.
From
ô
approximately
ô
12
ô
mph
ô
(20ô
km/h)
ô this
ô
warning
ô
lamp
ô
flashes
ô
for
ô
two
ô
minutesô accompanied
ô
by
ô
an
ô
audible
ô
signal
ô
of
ô
in
-
creasing
ô
volume.
ô
Once
ô
these
ô
two
ô
minutesô have
ô
elapsed,
ô
this
ô
warning
ô
lamp
ô
remainsô on
ô
until
ô
the
ô
driver
ô
and/or
ô
the
ô
front
ô
passen
-
ger
ô fastens ô their ô seat ô belt.
SAFETY
Page 129 of 340
88
127ô
C4-2_en_Chap08_securite_ed01-2014
Rear seat belts
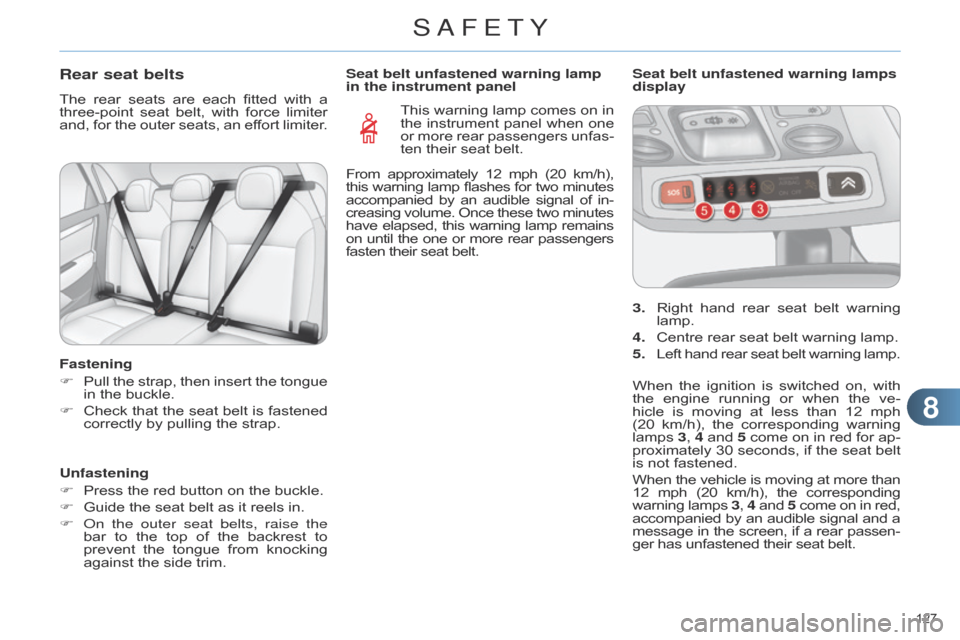
Theô rearô seats ô are ô each ô fitted ô with ô a ô three-point
ô seat ô belt, ô with ô force ô limiter ô
and,
ô
for
ô
the
ô
outer
ô
seats,
ô
an
ô
ef
fort ô
limiter
.
Fastening
F
ô
Pull
ô
the
ô
strap,
ô
then
ô
insert
ô
the
ô
tongue
ô
in
ô the ô buckle.
F
ô
Check
ô
that
ô
the
ô
seat
ô
belt
ô
is
ô
fastened
ô
correctly
ô by ô pulling ô the ô strap.
Unfastening
F
ô
Press
ô the ô red ô button ô on ô the ô buckle.
F
ô
Guide
ô the ô seat ô belt ô as ô it ô reels ô in.
F
o n the outer seat belts, raise the
bar
ô
to
ô
the
ô
top
ô
of
ô
the
ô
backrest
ô
to
ô
prevent
ô
the
ô
tongue
ô
from
ô
knocking
ô
against
ô the ô side ô trim. This
ô warning ô lamp ô comes ô on ô in ô
the
ô
instrument
ô
panel
ô
when
ô
one
ô
or
ô
more
ô
rear
ô
passengers
ô
unfas
-
ten
ô their ô seat ô belt.
Seat belt unfastened warning lamp
in the instrument panel
3. ô
Right
ô
hand
ô
rear
ô
seat
ô
belt
ô
warning
ô
lamp.
4.
ô
Centre
ô rear ô seat ô belt ô warning ô lamp.
5.
ô
Left
ô
hand
ô
rear
ô
seat
ô
belt
ô
warning
ô
lamp.
Seat belt unfastened warning lamps
display
When
ô
the
ô
ignition
ô
is
ô
switched
ô
on,
ô
with
ô
the
ô
engine
ô
running
ô
or
ô
when
ô
the
ô
ve
-
hicle
ô
is
ô
moving
ô
at
ô
less
ô
than
ô
12
ô
mph
ô
(20
ô
km/h),
ô
the
ô
corresponding
ô
warning
ô
lamps
ô
3
, 4
ô
and
ô
5
ô
come
ô
on
ô
in
ô
red
ô
for
ô
ap
-
proximately
ô
30
ô
seconds,
ô
if
ô
the
ô
seat
ô
belt
ô
is
ô not ô fastened.
When
ô
the
ô
vehicle
ô
is
ô
moving
ô
at
ô
more
ô
thanô 12
ô
mph
ô
(20
ô
km/h),
ô
the
ô
correspondingô warning
ô
lamps
ô
3, 4ô and
ô
5ô come
ô
on
ô
in
ô
red,ô accompanied
ô
by
ô
an
ô
audible
ô
signal
ô
and
ô
aô message
ô
in
ô
the
ô
screen,
ô
if
ô
a
ô
rear
ô
passen
-
ger
ô has ô unfastened ô their ô seat ô belt.
From
ô
approximately
ô
12ô
mph ô
(20ô
km/h),
ô this
ô
warning
ô
lamp
ô
flashes
ô
for
ô
two
ô
minutesô accompanied
ô
by
ô
an
ô
audible
ô
signal
ô
of
ô
in
-
creasing
ô
volume.
ô
Once
ô
these
ô
two
ô
minutesô have
ô
elapsed,
ô
this
ô
warning
ô
lamp
ô
remainsô on
ô
until
ô
the
ô
one
ô
or
ô
more
ô
rear
ô
passengersô fasten
ô their ô seat ô belt.
SAFETY
Page 130 of 340
88
128ô
C4-2_en_Chap08_securite_ed01-2014
Theô driverô must ô ensure ô that ô passen -
gers ô use ô the ô seat ô belts ô correctly ô and ô
that
ô
they
ô
are
ô
all
ô
restrained
ô
securely
ô
before
ô setting ô off.
Wherever
ô
you
ô
are
ô
seated
ô
in
ô
the
ô
ve
-
hicle, always fasten your seat belt,
even
ô for ô short ô journeys.
Do
ô
not
ô
interchange
ô
the
ô
seat
ô
belt
ô
buckles
ô
as
ô
they
ô
will
ô
not
ô
fulfil
ô
their
ô
role
ô
fully
.
The
ô
seat
ô
belts
ô
are
ô
fitted
ô
with
ô
an
ô
inertia
ô
reel
ô
permitting
ô
automatic
ô
adjustment
ô
of
ô
the
ô
length
ô
of
ô
the
ô
strap
ô
to
ô
your
ô
size.
ô
The
ô
seat
ô
belt
ô
is
ô
stowed
ô
automatically
ô
when
ô not ô in ô use.
Before
ô
and
ô
after
ô
use,
ô
ensure
ô
that
ô
the
ô
seat
ô belt ô is ô reeled ô in ô correctly.
The
ô
lower
ô
part
ô
of
ô
the
ô
strap
ô
must
ô
be
ô
positioned
ô
as
ô
low
ô
as
ô
possible
ô
on
ô
the
ô
pelvis.
The
ô
upper
ô
part
ô
must
ô
be
ô
positioned
ô
in
ô
the
ô hollow ô of ô the ô shoulder.
The
ô
inertia
ô
reels
ô
are
ô
fitted
ô
with
ô
an
ô
auto
-
matic
ô
locking
ô
device
ô
which
ô
comes
ô
intoô operation in the event of a collision,
emergency
ô
braking
ô
or
ô
if
ô
the
ô
vehicleô rolls
ô
over
. ô
Y
ou ô
can
ô
release
ô
the
ô
deviceô by
ô
pulling
ô
the
ô
strap
ô
firmly
ô
and
ô
then
ô
re
-
leasing
ô it ô so ô that ô it ô reels ô in ô slightly.In
ô order ô to ô be ô ef fective, ô a ô seat ô belt ô must:
-
ô
be
ô
tightened
ô
as
ô
close
ô
to
ô
the
ô
body
ô
as possible,
-
ô
be
ô
pulled
ô
in
ô
front
ô
of
ô
you
ô
with
ô
a
ô
smooth
ô
movement,
ô
checking
ô
that
ô
it
ô does ô not ô twist,
-
ô be
ô
used
ô
to
ô
restrain
ô
only
ô
one
ô
person,
-
ô not
ô
bear
ô
any
ô
trace
ô
of
ô
cuts
ô
or
ô
fraying,
-
ô
not
ô
be
ô
converted
ô
or
ô
modified
ô
to
ô
avoid
ô affecting ô its ô performance.
In
ô
accordance
ô
with
ô
current
ô
safety
ô
regulations,
ô
for
ô
all
ô
repairs
ô
on
ô
your
ô
vehicle's
ô
seat
ô
belts,
ô
go
ô
to
ô
a
ô
qualified
ô
workshop
ô
with
ô
the
ô
skills
ô
and
ô
equip
-
ment
ô
needed,
ô
which
ô
a
ô
CITROûN
ô
dealer
ô is ô able ô to ô provide.
Have
ô
your
ô
seat
ô
belts
ô
checked
ô
regu
-
larly
ô
by
ô
a
ô
CITROûN
ô
dealer
ô
or
ô
a
ô
qualified
ô
workshop,
ô
particularly
ô
if
ô
the
ô
straps
ô show ô signs ô of ô damage.
Clean the seat belt straps with soapy
water
ô
or
ô
a
ô
textile
ô
cleaning
ô
product,
ô
sold
ô by ô CITROûN ô dealers.
After
ô
folding
ô
or
ô
moving
ô
a
ô
seat
ô
or
ô
rear
ô
bench seat, ensure that the seat belt
is
ô positioned ô and ô reeled ô in ô correctly.Recommendations for children
Use
ô
a
ô
suitable
ô
child
ô
seat
ô
if
ô
the
ô
pas
-
senger
ô
is
ô
less
ô
than
ô
12
ô
years
ô
old
ô
or
ô
shorter
ô than ô one ô and ô a ô half ô metres.
Never
ô
use
ô
the
ô
same
ô
seat
ô
belt
ô
to
ô
se
-
cure
ô more ô than ô one ô person.
Never
ô
allow
ô
a
ô
child
ô
to
ô
travel
ô
on
ô
your
ô
lap.
For
ô
more
ô
information,
ô
refer
ô
to
ô
the
ô
"Child
ô seats" ô section.
In the event of an impact
Depending on the nature and se-
riousness of the impact, the pre-
tensioning
ô
device
ô
may
ô
be
ô
deployed
ô
before
ô
and
ô
independently
ô
of
ô
the
ô
airbags.
ô
Deployment
ô
of
ô
the
ô
preten
-
sioners
ô
is
ô
accompanied
ô
by
ô
a
ô
slight
ô
discharge
ô
of
ô
harmless
ô
smoke
ô
and
ô
a
ô
noise,
ô
due
ô
to
ô
the
ô
activation
ô
of
ô
the
ô
pyrotechnic
ô
cartridge
ô
incorporated
ô
in
ô
the
ô system.
In
ô
all
ô
cases,
ô
the
ô
airbag
ô
warning
ô
lamp
ô
comes
ô on.
Following
ô
an
ô
impact,
ô
have
ô
the
ô
seat
ô
belts
ô
system
ô
checked,
ô
and
ô
if
ô
neces
-
sary
ô
replaced,
ô
by
ô
a
ô
CITROûN
ô
dealer
ô
or
ô a ô qualified ô workshop.
SAFETY