display Citroen C4 DAG 2014.5 2.G Owner's Manual
[x] Cancel search | Manufacturer: CITROEN, Model Year: 2014.5, Model line: C4 DAG, Model: Citroen C4 DAG 2014.5 2.GPages: 340, PDF Size: 12.89 MB
Page 312 of 340
05
Saisir code authentification
01
OK Del 23456789
_
310
C4-2_en_Chap13c_RD5_ed01-2014
USING THE TELEPHONE
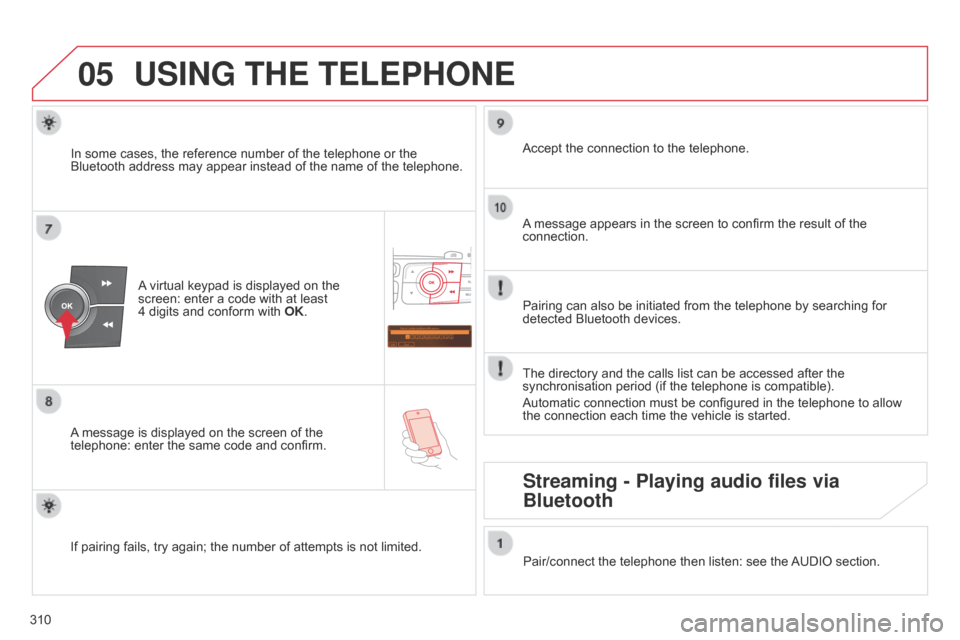
A virtual keypad is displayed on the screen:
enter a code with at least
4 digits
and conform with
OK
.
A
message
is displayed on the screen of the
telephone:
enter the same code and confirm. A
message appears in the screen to confirm the result of the
connection.
Pairing
can also be initiated from the telephone by searching for
detected
Bluetooth devices.
Accept
the connection to the telephone.
If
pairing
fails, try again; the number of attempts is not limited.The
directory and the calls list can be accessed after the
synchronisation
period (if the telephone is compatible).
Automatic
connection must be configured in the telephone to allow
the
connection each time the vehicle is started.
In
some
cases, the reference number of the telephone or the
Bluetooth
address may appear instead of the name of the telephone.
Pair/connect the telephone then listen: see the
AUDIO
section.
Streaming - Playing audio files via
Bluetooth
Page 313 of 340
05
3 11
C4-2_en_Chap13c_RD5_ed01-2014
USING THE TELEPHONE
The telephone connection automatically includes hands free operation and audio streaming.
The
ability of the system to connect to just one profile depends on the
telephone.
Both profiles may connect by default.
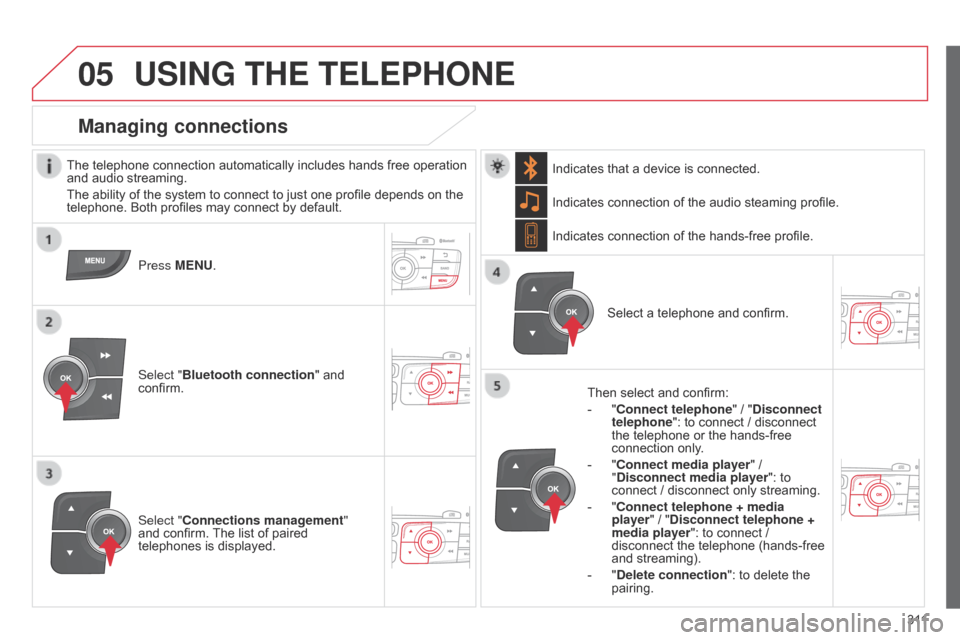
Press MENU.
Select "Bluetooth connection "
and
confirm. Indicates
connection of the audio steaming profile.
Managing connections
Select "Connections management"
and confirm. The list of paired
telephones
is displayed. Select
a telephone and confirm.
Indicates connection of the hands-free profile.
Then select and confirm:
-
"
Connect telephone
" / "
Disconnect
telephone": to connect / disconnect
the
telephone or the hands-free
connection
only.
-
"
Connect media player" /
"
Disconnect media player": to
connect
/ disconnect only streaming.
- " Connect telephone + media
player" / "Disconnect telephone +
media player": to connect /
disconnect
the telephone (hands-free
and
streaming).
-
"
Delete connection": to delete the
pairing.
Indicates
that a device is connected.
Page 314 of 340
05
312
C4-2_en_Chap13c_RD5_ed01-2014
USING THE TELEPHONE
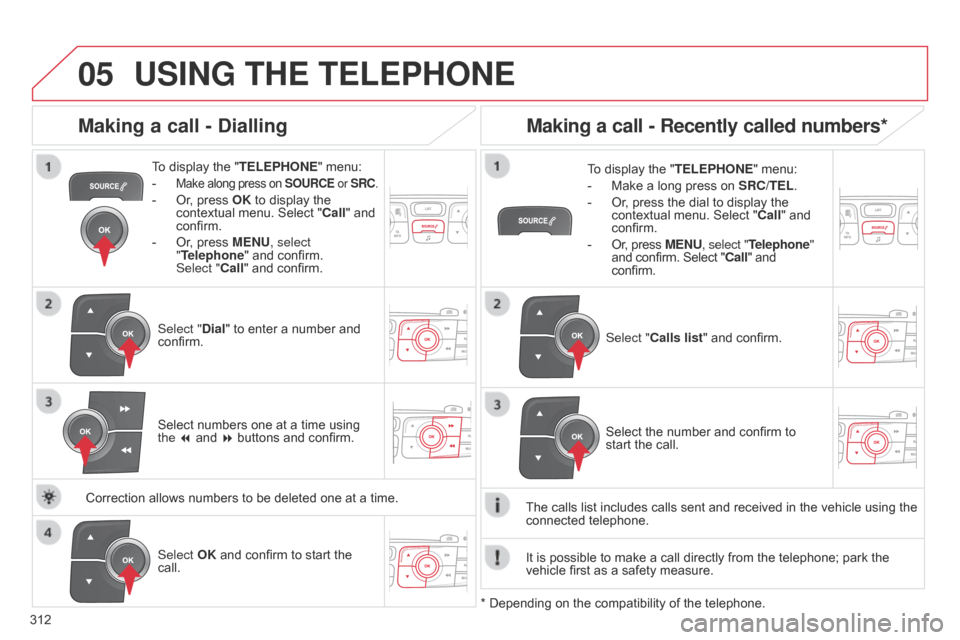
To display the " TELEPHONE " menu:
-
Make along press on SOURCE or SRC.
- Or, press OK to display the contextual
menu. Select "Call"
and
confirm.
-
Or
, press MENU, select
"Telephone"
and confirm.
Select
"Call" and confirm.
Select "Dial"
to enter a number and
confirm. T
o display the "
TELEPHONE" menu:
- Make a long press on SRC/TEL .
- Or , press the dial to display the contextual
menu. Select "Call"
and
confirm.
-
Or
, press MENU, select "Telephone"
and
confirm. Select "Call" and
confirm.
Select
OK and confirm to start the
call. Select "
Calls list" and confirm.
Making a call - Dialling
Select numbers one at a time using the 7 and 8 buttons and confirm.
Making a call - Recently called numbers*
Select the number and confirm to start the call.
The
calls
list
includes calls sent and received in the vehicle using the
connected
telephone.
*
Depending
on
the
compatibility of the telephone.
Correction
allows
numbers
to
be
deleted
one
at
a
time. It
is
possible
to make a call directly from the telephone; park the
vehicle
first
as a safety measure.
Page 315 of 340
05
313
C4-2_en_Chap13c_RD5_ed01-2014
USING THE TELEPHONE
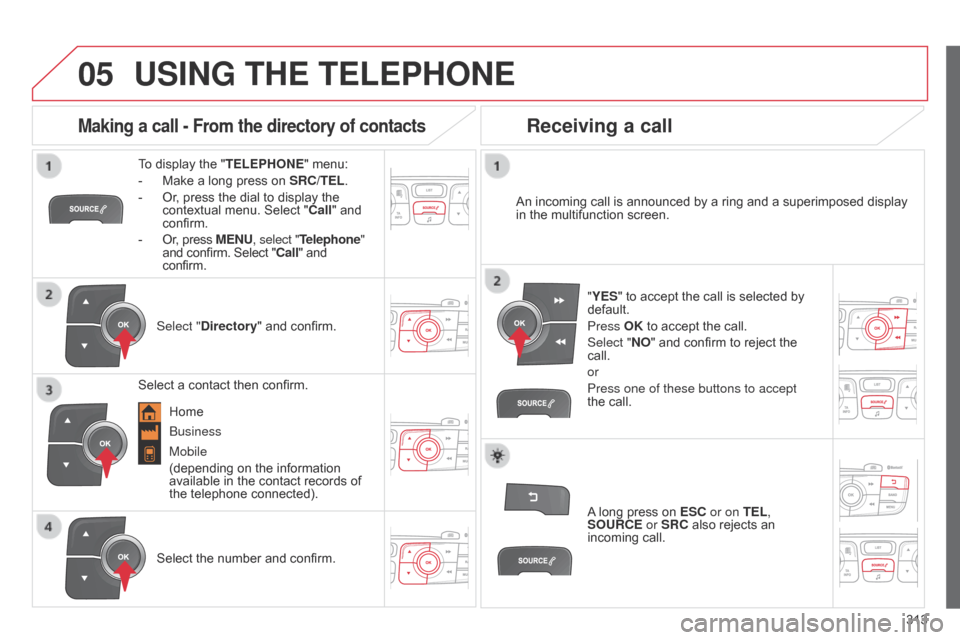
To display the "TELEPHONE " menu:
-
Make
a long press on
SRC/TEL
.
-
Or
, press the dial to display the
contextual
menu. Select "Call"
and
confirm.
-
Or
, press MENU, select "Telephone"
and
confirm. Select "Call" and
confirm.
Select "
Directory"
and confirm. An
incoming call is announced by a ring and a superimposed display
in
the multifunction screen.
Mobile
(depending
on the information
available
in the contact records of
the
telephone connected). "YES"
to accept the call is selected by
default.
Press
OK to accept the call.
Select "NO"
and confirm to reject the
call.
or
Press one of these buttons to accept
the
call.
Making a call - From the directory of contacts
Select a contact then confirm.
Receiving a call
Select the number and confirm.A
long press on
ESC
or on TEL,
SOURCE or SRC also rejects an
incoming
call.
b
usiness
Home
Page 316 of 340
05
314
C4-2_en_Chap13c_RD5_ed01-2014
USING THE TELEPHONE
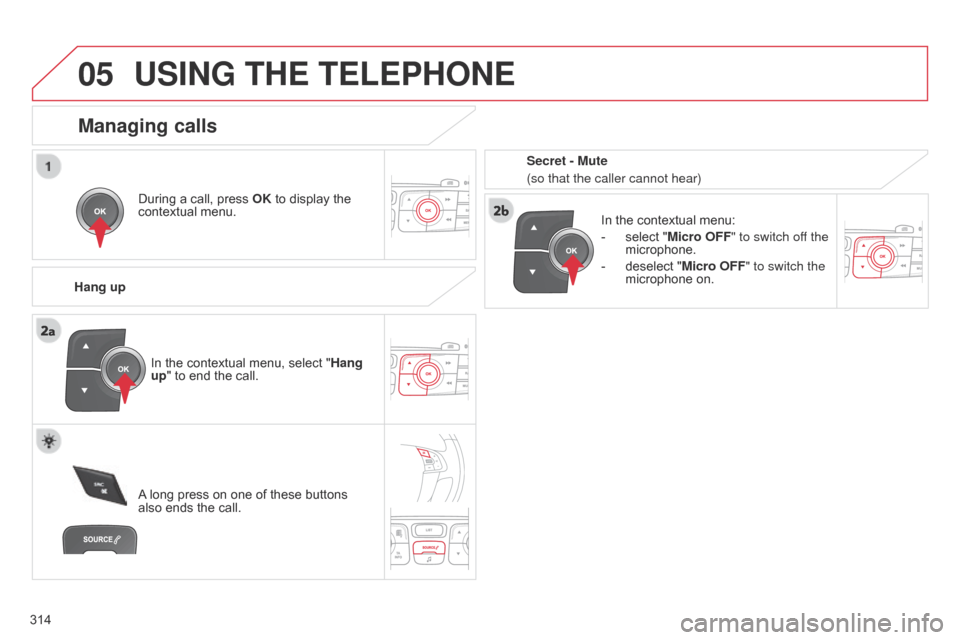
During a call, press OK to display the contextual
menu.
Hang up In
the contextual menu:
-
select
"Micro OFF" to switch off the
microphone.
-
deselect
"Micro OFF" to switch the
microphone
on.
Managing calls
A long press on one of these buttons also
ends the call.
In
the contextual menu, select "Hang
up" to end the call. Secret - Mute
(so that the caller cannot hear)
Page 319 of 340
06
317
C4-2_en_Chap13c_RD5_ed01-2014
AUDIO SETTINGS
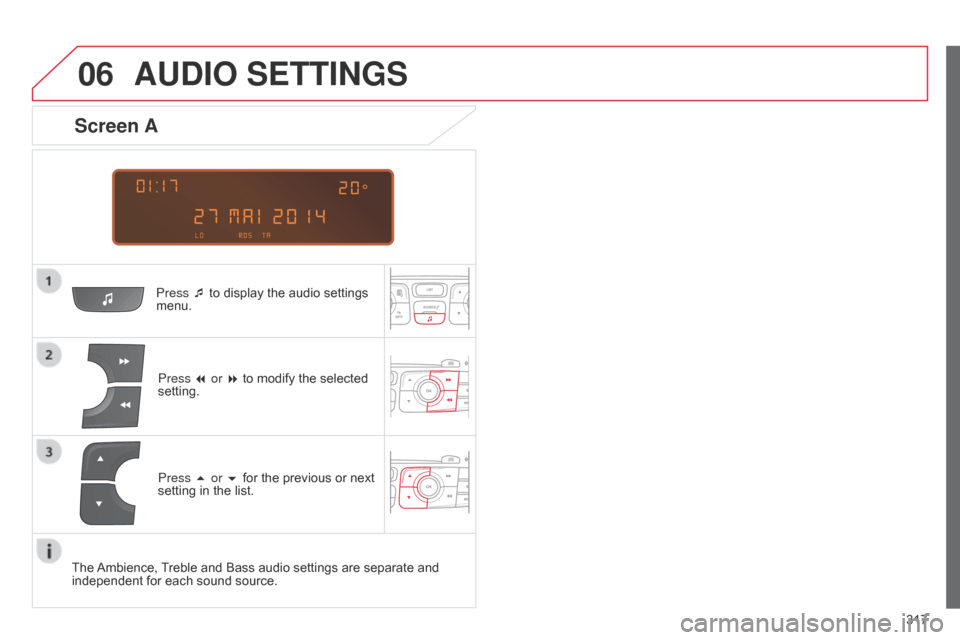
Press ¯ to display the audio settings menu.
Press
7 or 8 to modify the selected
setting.
Screen A
Press 5 or 6 for the previous or next setting in the list.
The
Ambience,
T
reble and Bass audio settings are separate and
independent
for each sound source.
Page 320 of 340
06
318
C4-2_en_Chap13c_RD5_ed01-2014
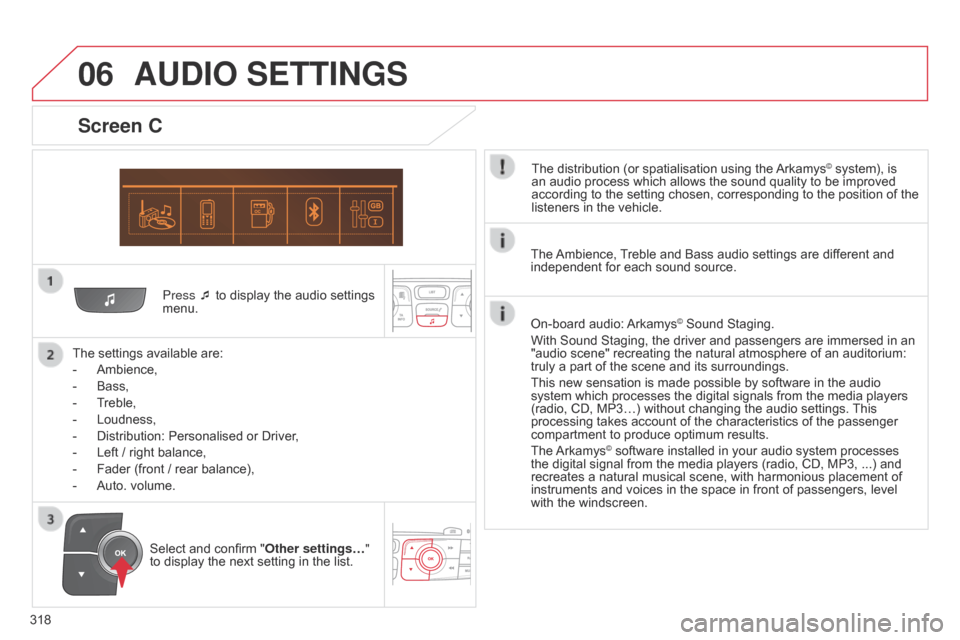
Press ¯ to display the audio settings menu.
The
settings
available are:
-
Ambience,
-
Bass,
-
T
reble,
-
Loudness,
-
Distribution:
Personalised or Driver,
-
Left
/
right
balance,
-
Fader
(front / rear balance),
-
Auto.
volume.
Screen C
The distribution (or spatialisation using the Arkamys© system), is an
audio
process
which
allows
the
sound
quality
to
be improved
according
to
the
setting
chosen,
corresponding
to
the position of the
listeners
in
the
vehicle.
AUDIO SETTINGS
Select and confirm " Other settings… "
to display the next setting in the list. The
Ambience,
T
reble and Bass audio settings are different and
independent
for each sound source.
On-board audio:
Arkamys© Sound Staging.
With
Sound
Staging,
the
driver and passengers are immersed in an
"audio
scene"
recreating
the natural atmosphere of an auditorium:
truly
a
part
of
the
scene
and its surroundings.
This
new
sensation
is
made possible by software in the audio
system
which
processes
the digital signals from the media players
(radio,
CD,
MP3…)
without changing the audio settings.
This
processing
takes
account
of the characteristics of the passenger
compartment
to
produce
optimum results.
The
Arkamys© software installed in your audio system processes the
digital
signal from the media players (radio, CD, MP3, ...) and
recreates
a
natural musical scene, with harmonious placement of
instruments
and voices in the space in front of passengers, level
with
the
windscreen.
Page 323 of 340
07
321
C4-2_en_Chap13c_RD5_ed01-2014
SCREEN MENU MAP(S)
* Depending on vehicle equipment.
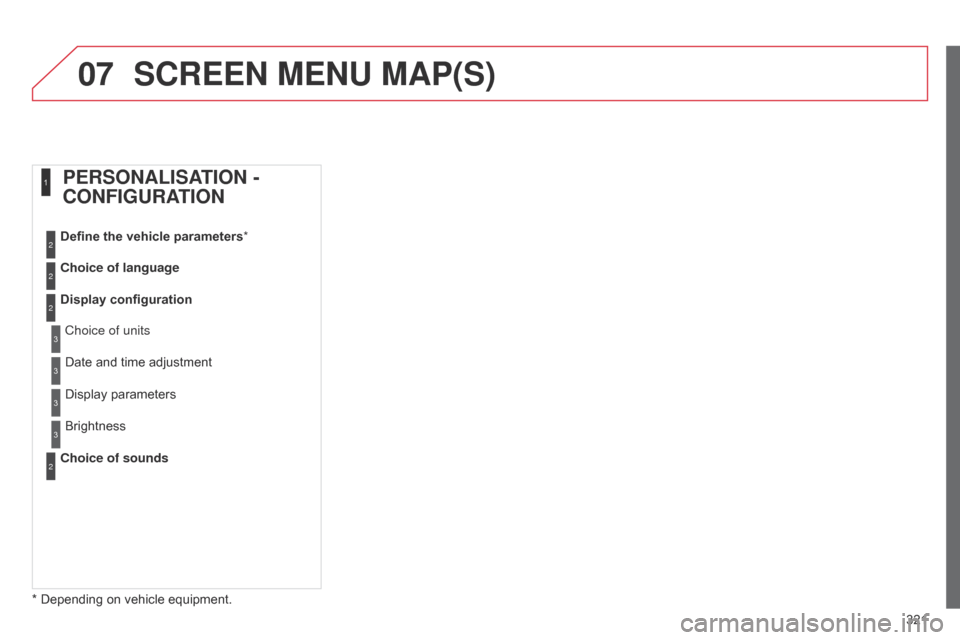
Choice of language Define the vehicle parameters
*
Display configuration
Choice of sounds
PERSONALISATION -
CONFIGURATION
2
2
2
2
1
Choice of units
Display
parameters
Date
and time adjustment
Brightness3
3
3
3
Page 325 of 340
323
C4-2_en_Chap13c_RD5_ed01-2014
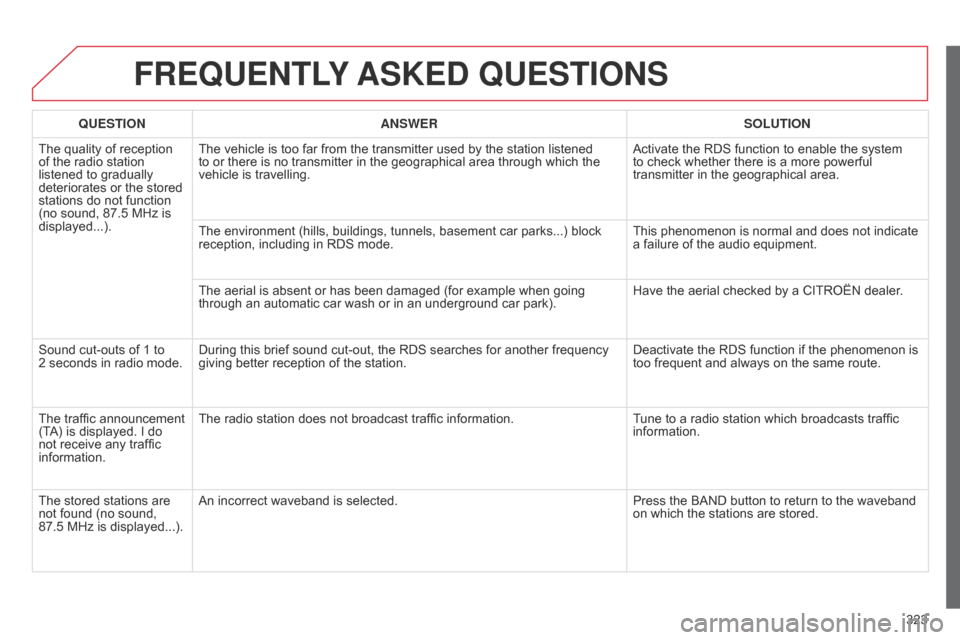
FREqUENTLY ASKED q UESTIONS
qUESTION ANSWER SOLUTION
The
quality of reception
of
the
radio station
listened
to gradually
deteriorates
or the stored
stations
do not function
(no
sound, 87.5 MHz is
displayed...). The
vehicle is too far from the transmitter used by the station listened
to
or there is no transmitter in the geographical area through which the
vehicle
is travelling. Activate
the RDS function to enable the system
to
check whether there is a more powerful
transmitter
in the geographical area.
The
environment (hills, buildings, tunnels, basement car parks...) block
reception,
including in RDS mode.This
phenomenon is normal and does not indicate
a
failure of the audio equipment.
The
aerial is absent or has been damaged (for example when going
through
an automatic car wash or in an underground car park).Have
the aerial checked by a CITROËN dealer.
Sound
cut-outs of 1 to
2 seconds
in radio mode.During
this brief sound cut-out, the RDS searches for another frequency
giving
better reception of the station.Deactivate
the RDS function if the phenomenon is
too
frequent and always on the same route.
The
traffic announcement
(T
A)
is
displayed. I do
not
receive any traffic
information. The
radio station does not broadcast traffic information.Tune
to a radio station which broadcasts traffic
information.
The
stored stations are
not
found (no sound,
87.5 MHz
is displayed...). An
incorrect waveband is selected. Press
the BAND button to return to the waveband
on
which the stations are stored.
Page 327 of 340
325
C4-2_en_Chap13c_RD5_ed01-2014
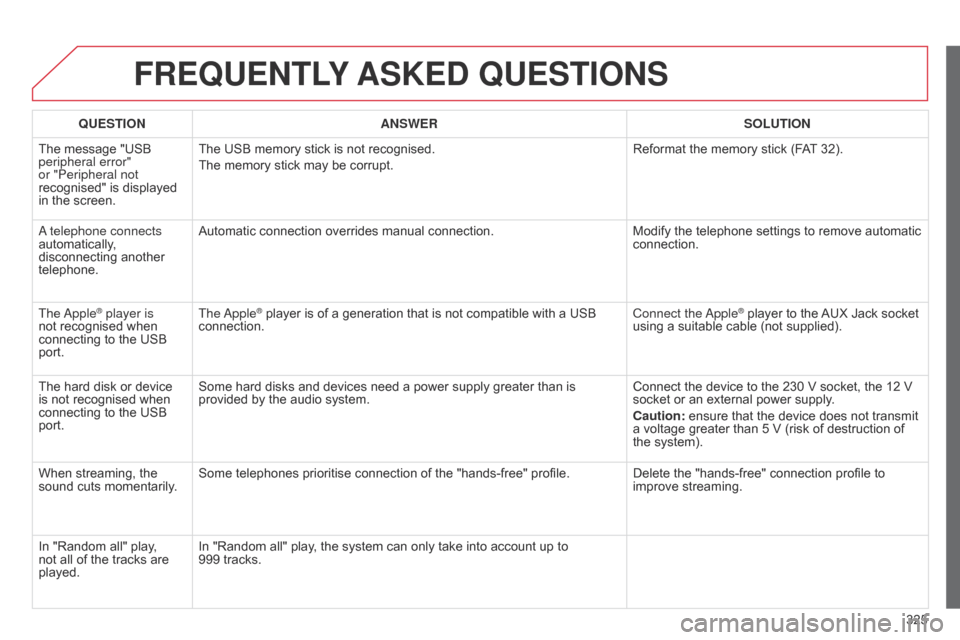
FREqUENTLY ASKED q UESTIONS
qUESTION ANSWER SOLUTION
The
message "USB
peripheral error"
or "Peripheral not
recognised"
is displayed
in
the
screen. The
USB memory stick is not recognised.
The
memory stick may be corrupt. Reformat
the memory stick (FAT
32).
a telephone connects
automatically
,
disconnecting
another
telephone. Automatic
connection overrides manual connection.Modify
the telephone settings to remove automatic
connection.
The
a
pple
® player is
not
recognised when
connecting
to the USB
port. The
a pple® player is of a generation that is not compatible with a USB connection. Connect
the a pple® player to the AUX Jack socket using
a
suitable
cable (not supplied).
The
hard
disk
or
device
is
not
recognised
when
connecting
to
the
USB
port. Some
hard
disks
and
devices
need
a
power
supply
greater
than
is
provided
by
the
audio
system. Connect
the
device
to the 230 V socket, the 12 V
socket
or
an
external power supply.
Caution:
ensure
that the device does not transmit
a
voltage
greater
than 5 V (risk of destruction of
the
system).
When
streaming,
the
sound
cuts
momentarily. Some
telephones
prioritise
connection
of
the
"hands-free"
profile. Delete
the
"hands-free" connection profile to
improve
streaming.
In
"Random
all"
play,
not
all
of
the
tracks
are
played. In
"Random
all"
play,
the
system
can
only
take
into
account
up
to
999 tracks.