display Citroen C4 DAG 2014.5 2.G Owners Manual
[x] Cancel search | Manufacturer: CITROEN, Model Year: 2014.5, Model line: C4 DAG, Model: Citroen C4 DAG 2014.5 2.GPages: 340, PDF Size: 12.89 MB
Page 269 of 340
06
267
C4-2_en_Chap13b_RT6_ed01-2014
USING THE TELEPHONE
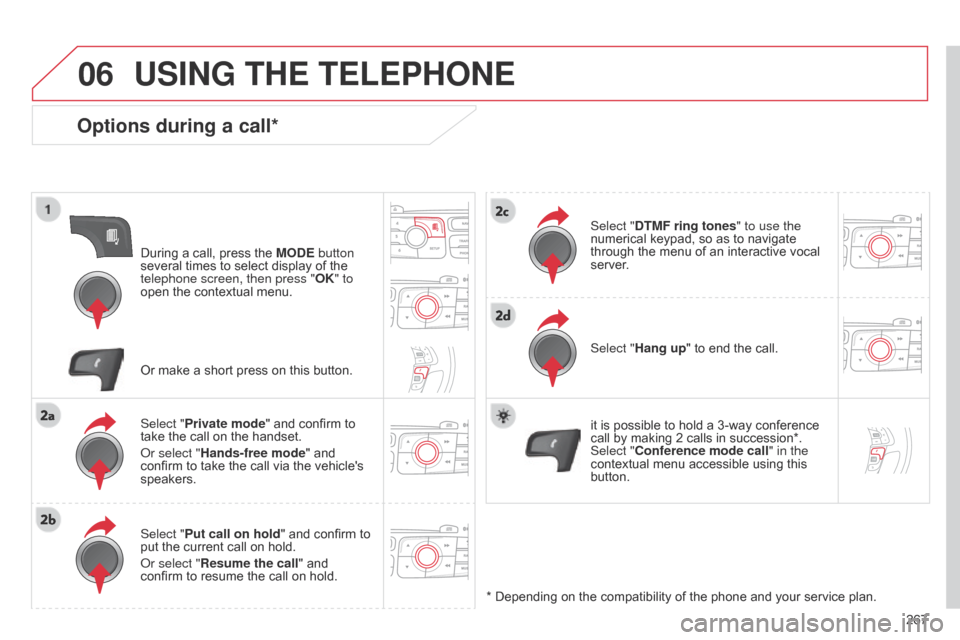
Options during a call*
During a call, press the MODE button
several times to select display of the
telephone screen, then press "OK
" to
open
the contextual menu.
Select "Private mode"
and confirm to
take
the call on the handset.
o
r select "Hands-free mode" and
confirm
to take the call via the vehicle's
speakers.
Select "
Put call on hold "
and confirm to
put
the current call on hold.
o
r select "Resume the call" and
confirm
to resume the call on hold. Select "DTMF ring tones
" to use the
numerical keypad, so as to navigate through
the menu of an interactive vocal server
.
Select "Hang up"
to end the call.
*
Depending on the compatibility of the phone and your service plan.
it
is possible to hold a 3-way conference
call
by making 2 calls in succession*.
Select "
Conference mode call" in the
contextual
menu accessible using this
button.
Or
make a short press on this button.
Page 271 of 340
07
269
C4-2_en_Chap13b_RT6_ed01-2014
RADIO
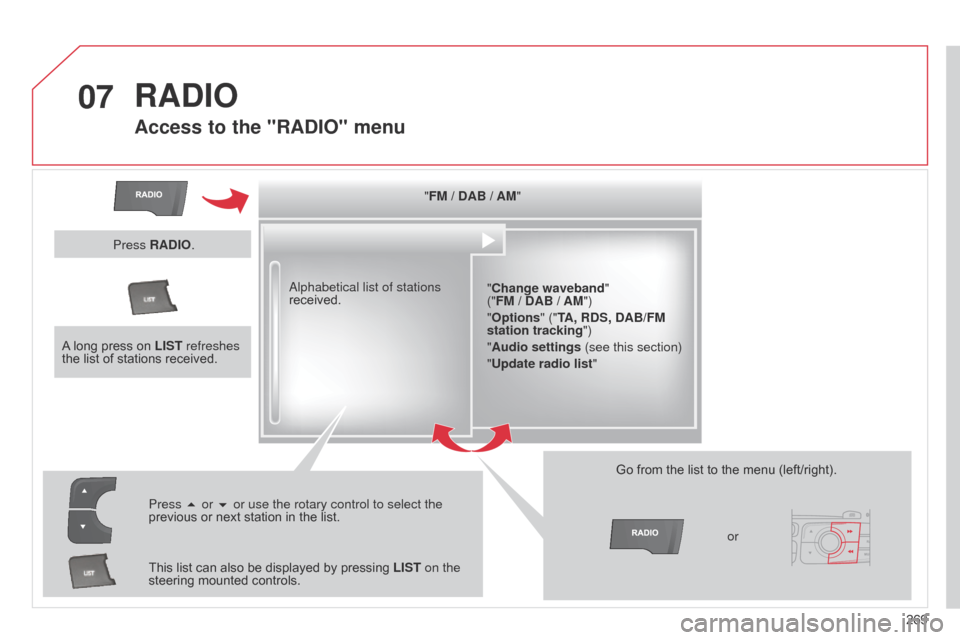
Access to the "RADIO" menu
"FM / DAB / AM""Change waveband"
("FM / DAB / AM")
"Options" ("TA, RDS, DAB/FM
station tracking")
"Audio settings (see this section)
"Update radio list "
a
lphabetical list of stations
received.
Press 5 or 6 or use the rotary control to select the
previous
or
next
station
in
the
list.
This
list
can
also
be
displayed
by
pressing
LIST on the
steering
mounted
controls. Go
from the list to the menu (left/right).
or
A
long
press
on
LIST refreshes
the
list
of
stations
received.
Press RADIO.
Page 272 of 340
07
270
C4-2_en_Chap13b_RT6_ed01-2014
RADIO
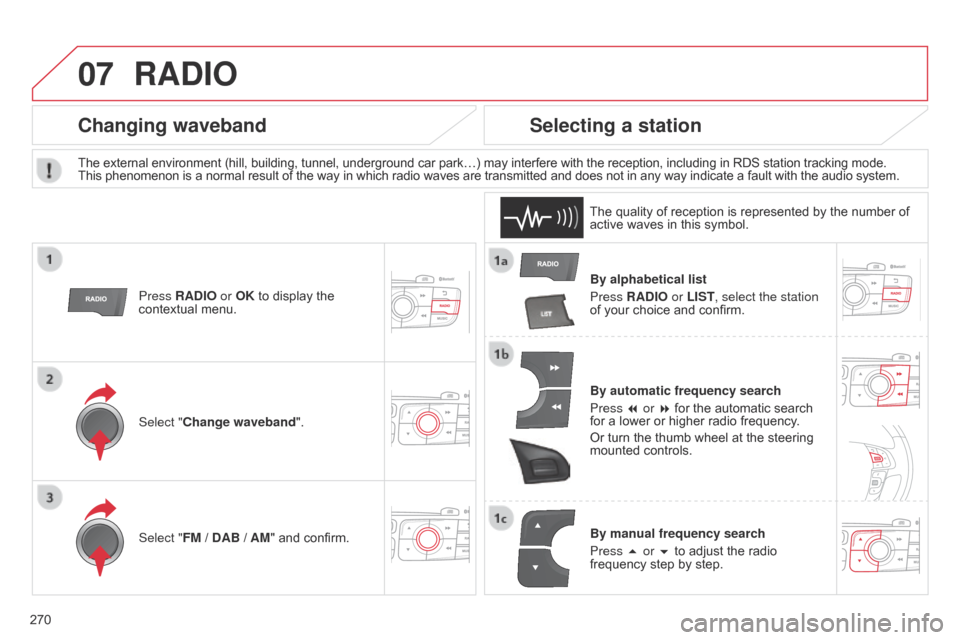
By alphabetical list
Press RADIO or LIST, select the station
of
your choice and confirm.
By automatic frequency search
Press 7 or 8
for the automatic search
for
a lower or higher radio frequency.
Or
turn the thumb wheel at the steering
mounted
controls.
By manual frequency search
Press 5 or 6
to adjust the radio
frequency
step by step.
Selecting a station
The external environment (hill, building, tunnel, underground car park…) may interfere with the reception, including in RDS station tracking mode. This phenomenon is a normal result of the way in which radio waves are transmitted and does not in any way indicate a fault with the audio system.
The
quality of reception is represented by the number of
active
waves in this symbol.
Press RADIO or OK
to display the
contextual
menu.
Changing waveband
Select "Change waveband".
Select "FM / DAB / AM" and confirm.
Page 274 of 340
07
272
C4-2_en_Chap13b_RT6_ed01-2014
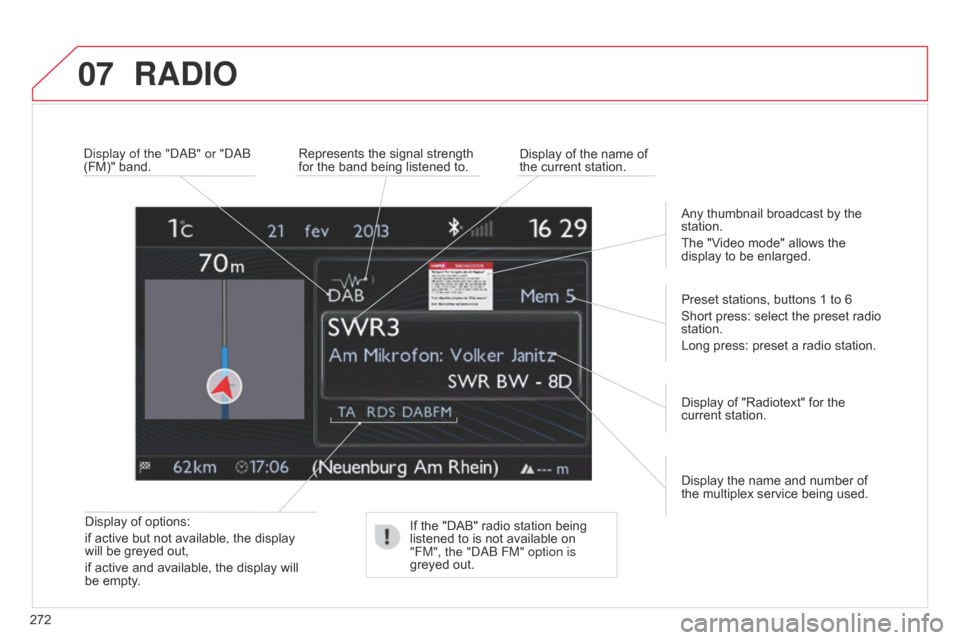
Display of options:
if active but not available, the display
will
be greyed out,
if
active and available, the display will
be
empty. Display
the name and number of
the
multiplex service being used.
Preset stations, buttons 1 to 6
Short press: select the preset radio
station.
Long
press: preset a radio station.
Display of "Radiotext" for the
current
station.
d
isplay of the " dab " or " dab
(FM)" band.
Display of the name of
the
current station.
Represents the signal strength
for
the band being listened to.
If the "DAB" radio station being
listened
to is not available on
"FM", the "
dab FM" option is
greyed
out.Any
thumbnail broadcast by the
station.
The
"Video mode" allows the
display
to be enlarged.
RADIO
Page 275 of 340
07
273
C4-2_en_Chap13b_RT6_ed01-2014
RADIO
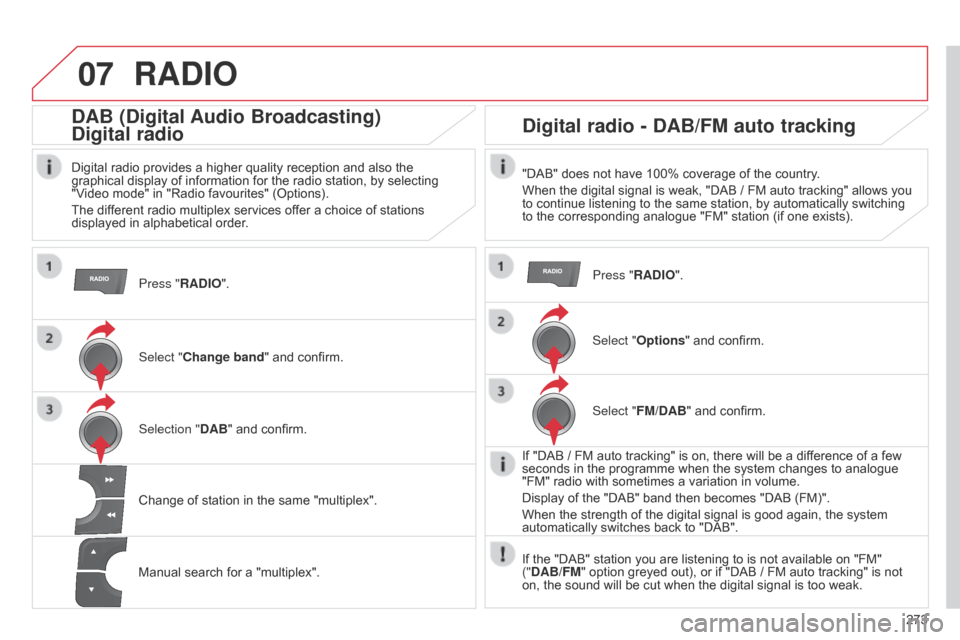
Press "RADIO".
DAB (Digital Audio Broadcasting)
Digital radio
Digital radio provides a higher quality reception and also the graphical display of information for the radio station, by selecting
"V
ideo mode" in "Radio favourites" (Options).
The
different radio multiplex services offer a choice of stations
displayed
in alphabetical order.
Select "Change band"
and confirm.
Selection " DAB"
and confirm.
Digital radio - DAB/FM auto tracking
"DAB" does not have 100% coverage of the country.
When the digital signal is weak, "DAB / FM auto tracking" allows you
to
continue listening to the same station, by automatically switching
to
the corresponding analogue "FM" station (if one exists).
Change
of
station
in
the
same
"multiplex".
Manual
search
for
a
"multiplex". Press "RADIO".
Select "Options
"
and confirm.
Select "FM/DAB"
and confirm.
If
"DAB / FM auto tracking" is on, there will be a difference of a few
seconds
in the programme when the system changes to analogue
"FM"
radio with sometimes a variation in volume.
Display
of the "DAB" band then becomes "DAB (FM)".
When
the strength of the digital signal is good again, the system
automatically
switches back to "DAB".
If
the "DAB" station you are listening to is not available on "FM"
("
DAB/FM" option greyed out), or if "DAB / FM auto tracking" is not
on,
the sound will be cut when the digital signal is too weak.
Page 276 of 340
08
274
C4-2_en_Chap13b_RT6_ed01-2014
MUSIC MEDIA PLAYERS
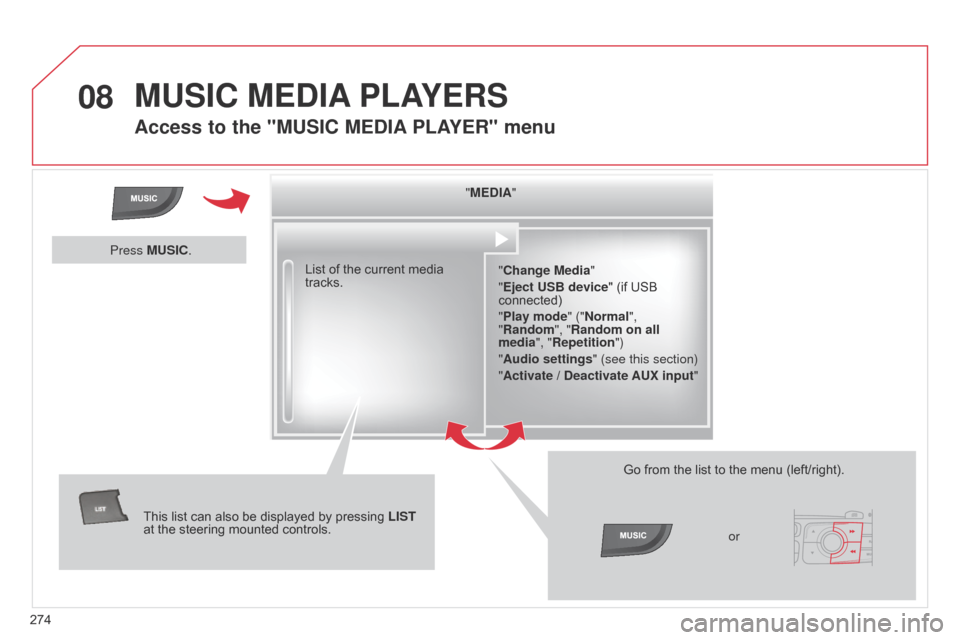
Access to the "MUSIC MEDIA PLAYER" menu
"MEDIA"
"Change Media"
"Eject USB device"
(if USB
connected)
"
Play mode" ("Normal",
"Random", "Random on all
media", "Repetition")
"Audio settings " (see this section)
"Activate / Deactivate AUX input "
List
of
the
current
media
tracks.
This
list
can
also
be
displayed
by
pressing
LIST
at
the
steering
mounted
controls. Go
from the list to the menu (left/right).
or
Press MUSIC.
Page 277 of 340
08
275
C4-2_en_Chap13b_RT6_ed01-2014
MUSIC MEDIA PLAYERS
CD, MP3 CD / USB player
The audio equipment will only play audio files with ".wma, .aac, .flac, .ogg
and .mp3" file extensions and with a bit rate of between 32 Kbps
and
320 Kbps.
It
also supports VBR (Variable Bit Rate) mode.
No
other type of file (.mp4, .m3u...) can be played.
WMA
files must be of the standard wma 9 type.
The
sampling rates supported are greater than 32 KHz.
It
is advisable to restrict file names to 20 characters, without using of
special
characters (e.g.: " " ? ; ù) to avoid any playing and displaying
problems.
In
order to be able to play a recorded CDR or CDRW, when recording
it
is preferable to select the ISO 9660 level 1, 2 or Joliet standard.
If
the disc is recorded in another format (udf, ...), it may not be played
correctly
.
It
is recommended that the same recording standard is always used
for
an individual disc, with as low a speed as possible (4x maximum)
for
optimum sound quality.
In
the particular case of a multi-session CD, the Joliet standard is
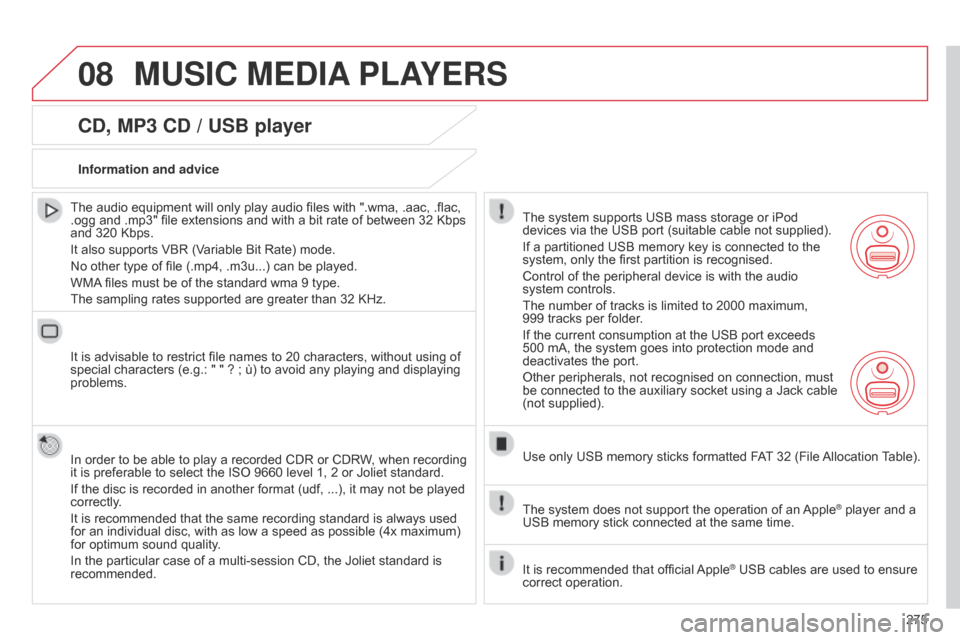
recommended.Information and advice
The
system supports USB mass storage or iPod
devices
via the USB port (suitable cable not supplied).
If
a partitioned USB memory key is connected to the
system,
only the first partition is recognised.
Control
of the peripheral device is with the audio
system
controls.
The
number of tracks is limited to 2000 maximum,
999
tracks per folder.
If
the current consumption at the USB port exceeds
500
mA, the system goes into protection mode and
deactivates
the port.
Other
peripherals, not recognised on connection, must
be
connected to the auxiliary socket using a Jack cable
(not
supplied).
Use
only USB memory sticks formatted FAT
32 (File
Allocation
T
able).
The
system does not support the operation of an
Apple® player and a USB
memory
stick
connected
at
the
same
time.
It
is
recommended
that
official
Apple® USB cables are used to ensure correct
operation.
Page 278 of 340
08
276
C4-2_en_Chap13b_RT6_ed01-2014
MUSIC MEDIA PLAYERS
Sources
Insert the CD in the player, insert the USB memory
stick
in the USB player or connect the USB
peripheral
to the USB port using a suitable cable
(not
supplied).
The
system builds playlists (in temporary memory),
an
operation which can take from a few seconds to
several
minutes at the first connection.
Reduce
the number of non-music files and the
number
of folders to reduce the waiting time.
The
playlists are updated every time the ignition is
switched
off or connection of a USB memory stick.
However
, the system memorises these lists and
if
they are not modified, the loading time will be
shorter
.
Play
starts automatically after a period which
depends
on the capacity of the USB memory stick.Selection of source
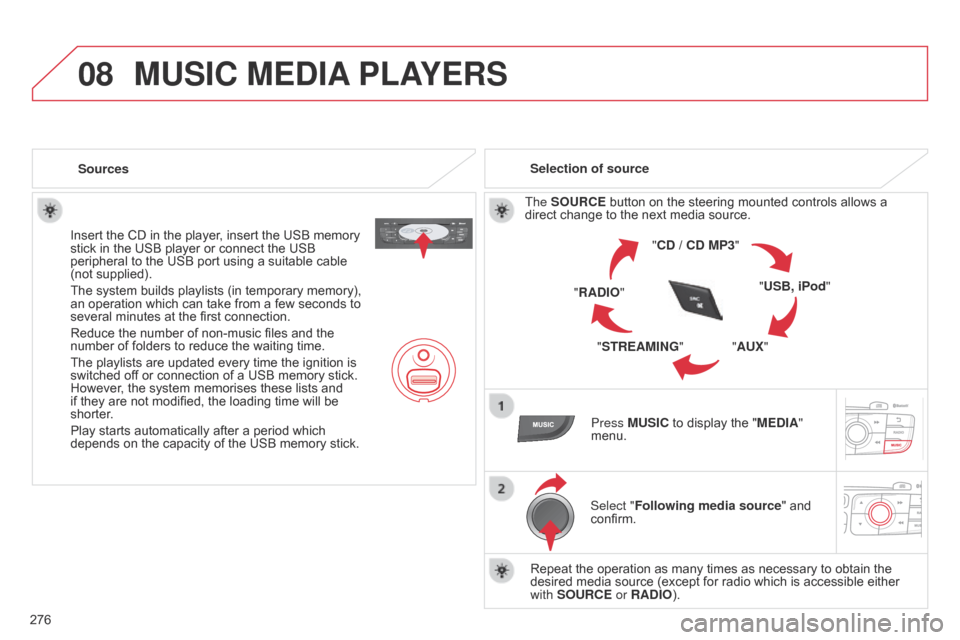
The SOURCE button on the steering mounted controls allows a
direct
change to the next media source.
"CD / CD MP3"
"USB, iPod"
"AUX"
"STREAMING"
"RADIO"
Press MUSIC
to display the "MEDIA"
menu.
Select "Following media source "
and
confirm.
Repeat
the operation as many times as necessary to obtain the
desired
media source (except for radio which is accessible either
with
SOURCE or RADIO).
Page 281 of 340
08
279
C4-2_en_Chap13b_RT6_ed01-2014
MUSIC MEDIA PLAYERS
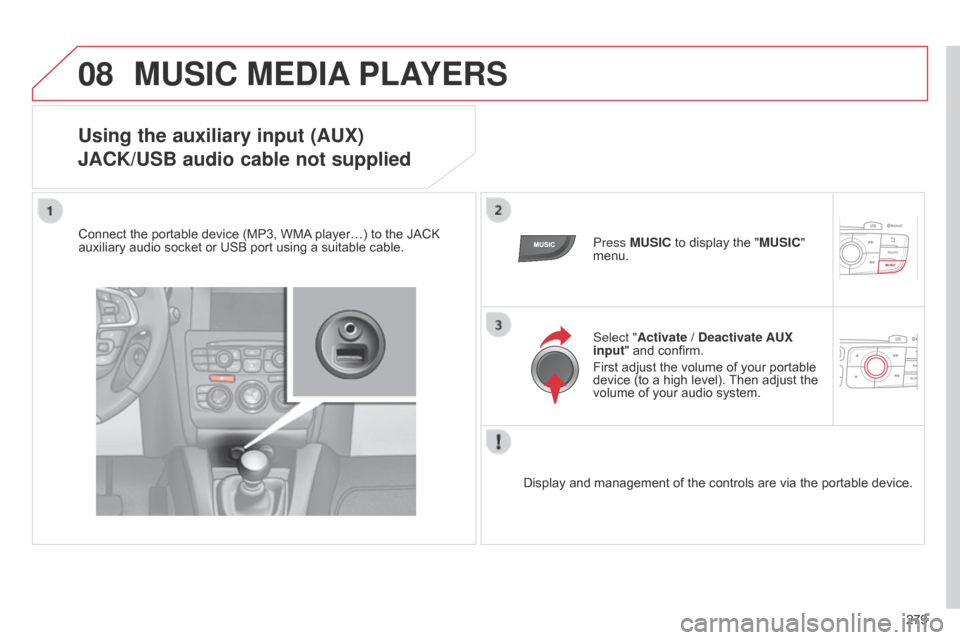
Using the auxiliary input (AUX)
j
ACK/USB audio cable not supplied
Connect the portable device (MP3, WMA player…) to the JACK auxiliary
audio socket or USB port using a suitable cable.Press MUSIC
to display the "MUSIC"
menu.
Select "Activate / Deactivate AUX
input "
and confirm.
First
adjust the volume of your portable
device
(to a high level).
Then
adjust the
volume
of your audio system.
Display
and management of the controls are via the portable device.
Page 283 of 340

10
281
C4-2_en_Chap13b_RT6_ed01-2014
CONFIGURATION
Press SETUP to display the "Configuration "
menu. Select "Choose colour"
and confirm to
select
the screen colour harmony and
the
map presentation mode:
- day mode,
- night mode,
-
automatic
day/night mode,
according
to whether the
headlamps
are on.
Select "Adjust luminosity "
and confirm
to
adjust the screen brightness.
Press "OK"
to save the changes.
The
settings for day and night are
independent.
Select "
Display configuration "
and
confirm.
Display configuration