boot Citroen C4 DAG 2014.5 2.G Owner's Guide
[x] Cancel search | Manufacturer: CITROEN, Model Year: 2014.5, Model line: C4 DAG, Model: Citroen C4 DAG 2014.5 2.GPages: 340, PDF Size: 12.89 MB
Page 185 of 340
1010
183
C4-2_en_Chap10_verification_ed01-2014
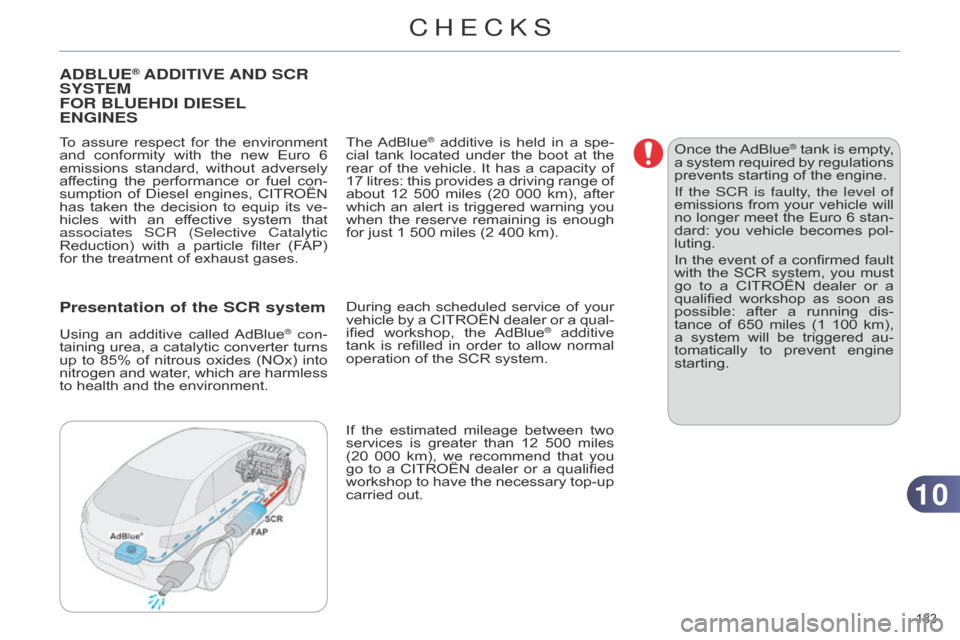
ADBLUE® ADDITIVE AND SCR SYSTEM
FOR
B
LUE HD I D IESEL
ENGINES
To assure respect for the environment and
conformity with the new Euro 6
emissions
standard,
without
adversely
af
fecting
the
performance
or
fuel
con
-
sumption
of
Diesel
engines,
CITROËN
has
taken
the
decision
to
equip
its
ve
-
hicles
with
an
ef
fective
system
that
associates SCR (Selective Catalytic
Reduction)
with
a
particle
filter
(F
AP)
for
the treatment of exhaust gases.
Presentation of the SCR system
Using an additive called AdBlue® con-
taining
urea,
a
catalytic
converter
turns
up
to
85%
of
nitrous
oxides
(NOx)
into
nitrogen
and
water
,
which
are
harmless
to
health
and
the
environment. The
AdBlue® additive
is held in a spe -
cial
tank
located under the boot at the
rear
of
the
vehicle.
It
has
a
capacity
of
17
litres:
this
provides
a
driving
range
of
about
12
500
miles
(20
000
km),
after
which
an
alert
is
triggered
warning
you
when
the
reserve
remaining
is
enough
for
just
1
500 miles (2 400 km).
During
each
scheduled
service
of
your
vehicle
by
a
CITROËN
dealer
or
a
qual
-
ified
workshop,
the
AdBlue® additive tank
is
refilled
in
order
to
allow normal
operation
of
the
SCR
system.
If
the
estimated
mileage
between
two
services
is
greater
than
12
500
miles
(20
000
km),
we
recommend
that
you
go
to
a
CITROËN
dealer
or
a
qualified
workshop
to
have
the
necessary
top-up
carried
out. Once
the
AdBlue® tank is
empty , a
system
required
by regulations
prevents
starting
of the engine.
If the SCR
is faulty, the level of
emissions
from
your
vehicle
will
no
longer
meet
the
Euro
6
stan
-
dard:
you
vehicle
becomes
pol
-
luting.
In
the
event
of
a
confirmed
fault
with
the
SCR
system,
you
must
go
to
a
CITROËN
dealer
or
a
qualified
workshop
as
soon
as
possible:
after
a
running
dis
-
tance
of
650
miles
(1
100
km),
a
system
will
be
triggered
au
-
tomatically
to
prevent
engine
starting.
CHECKS
Page 190 of 340
1010
188
C4-2_en_Chap10_verification_ed01-2014
Recommendations on storage
AdBlue® freezes at about -1 1°C and deteriorates
above 25°C. It is recom -
mended
that
bottles
be
stored
in
a
cool
area
and
protected
from
direct
sunlight.
Under
these
conditions,
the
additive
can
be
kept for at least a year.
If
the
additive
has
frozen,
can
be
used
once
it
has completely thawed out.
Never
store
bottles
of
AdBlue® in
your
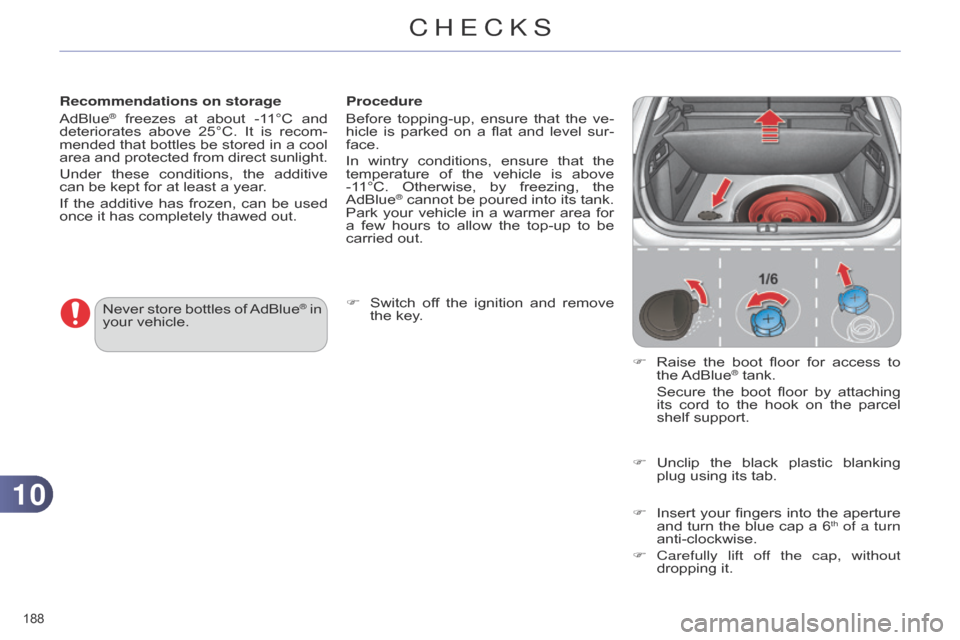
vehicle. Procedure
Before
topping-up,
ensure
that
the
ve
-
hicle
is
parked
on
a
flat
and
level
sur
-
face.
In
wintry
conditions,
ensure
that
the
temperature
of
the
vehicle
is
above
-1
1°C.
Otherwise,
by
freezing,
the
AdBlue® cannot
be poured into its tank. Park
your vehicle in a warmer area for
a
few
hours
to
allow
the
top-up
to
be
carried
out.
F
Switch
of
f
the
ignition
and
remove
the
key. F
Raise
the
boot
floor
for
access
to
the
AdBlue® tank.
Secure
the
boot
floor
by
attaching
its
cord
to
the
hook
on
the
parcel
shelf
support.
F
Unclip
the
black
plastic
blanking
plug
using
its tab.
F
Insert
your
fingers
into
the
aperture
and
turn
the
blue
cap
a
6th of a turn
anti-clockwise.
F
Carefully
lift off the cap, without
dropping
it.
CHECKS
Page 191 of 340
1010
189
C4-2_en_Chap10_verification_ed01-2014
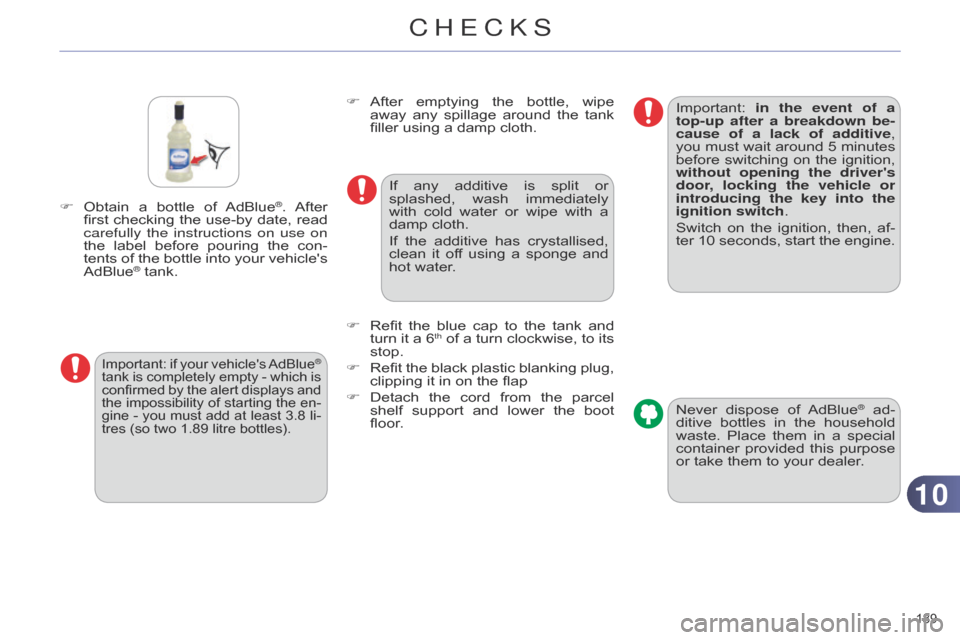
F Obtain a bottle of AdBlue®. After first
checking
the
use-by
date, read
carefully
the instructions on use on
the
label
before
pouring
the
con
-
tents
of
the
bottle
into
your
vehicle's
AdBlue® tank.
Important: if your vehicle's AdBlue®
tank
is
completely
empty
-
which
is
confirmed
by
the
alert
displays
and
the
impossibility
of
starting
the
en
-
gine
-
you
must
add
at
least
3.8
li-
tres
(so
two
1.89
litre
bottles).
F After emptying the bottle, wipe away
any spilla ge around the tank
filler
using a damp cloth.
If
any
additive
is
split
or
splashed,
wash
immediately
with
cold
water
or
wipe
with
a
damp
cloth.
If
the
additive
has
crystallised,
clean
it
of
f
using
a
sponge
and
hot
water.
F
Refit
the
blue
cap
to
the
tank
and
turn
it
a
6th of a turn clockwise, to its stop.
F
Refit
the
black
plastic
blanking
plug,
clipping
it
in on the flap
F
Detach
the
cord
from
the
parcel
shelf
support
and
lower
the
boot
floor
. Never
dispose
of
AdBlue® ad-
ditive
bottles
in
the
household
waste.
Place
them
in
a
special
container
provided
this
purpose
or
take
them
to
your
dealer.
Important:
in the event of a
top-up
after a breakdown be-
cause of a lack of additive,
you
must
wait
around
5
minutes
before
switching
on
the
ignition,
without
opening the driver's
door, locking the vehicle or
introducing the key into the
ignition switch.
Switch
on
the
ignition,
then,
af
-
ter
10
seconds,
start
the
engine.
CHECKS
Page 192 of 340
1111
190
C4-2_en_Chap11_info-pratique_ed01-2014
TEMPORARY PUNCTURE REP
AIR KIT
Access to the kit
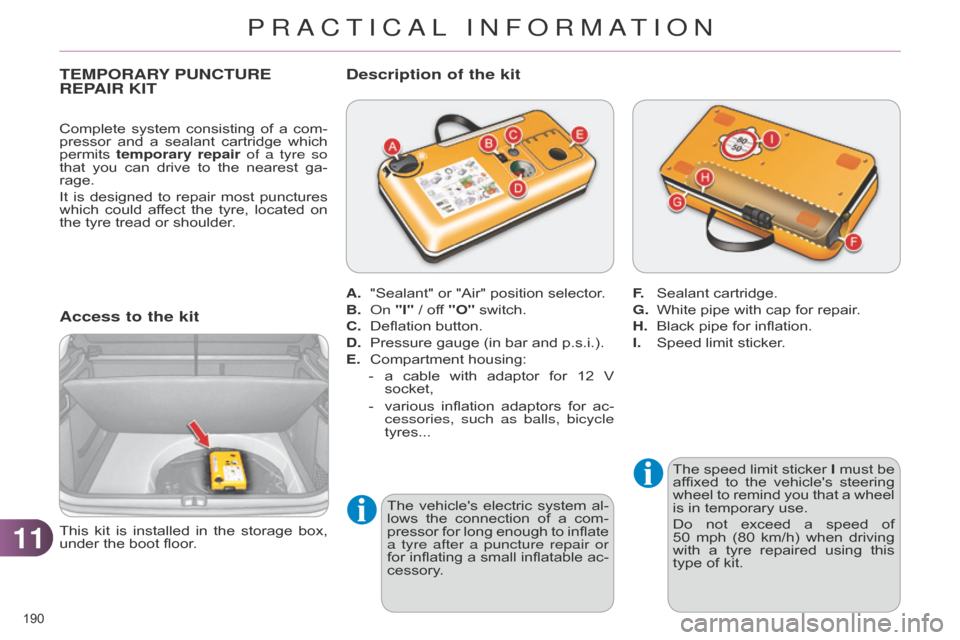
The speed limit sticker I must be affixed
to the vehicle's steering
wheel
to
remind
you
that
a
wheel
is
in temporary use.
Do
not
exceed
a
speed
of
50
mph
(80
km/h)
when
driving
with
a
tyre
repaired
using
this
type
of kit.
This
kit
is
installed
in
the
storage
box,
under
the
boot
floor. A.
"Sealant"
or
"Air"
position
selector.
B.
o
n
"I"
/
off
"O"
switch.
C.
Deflation
button.
D.
Pressure
gauge
(in
bar
and
p.s.i.).
E.
Compartment
housing:
-
a
cable
with
adaptor
for
12
V
socket,
-
various
inflation
adaptors
for
ac
-
cessories, such as balls, bicycle
tyres...
Description of the kit
F. Sealant cartridge.
G.
White
pipe with cap for repair.
H.
Black
pipe for inflation.
I.
Speed
limit sticker.
Complete
system
consisting
of
a
com
-
pressor
and
a
sealant
cartridge
which
permits
temporary repair
of a tyre so
that
you
can
drive
to
the
nearest
ga
-
rage.
It
is
designed
to
repair
most
punctures
which
could
af
fect
the
tyre,
located
on
the
tyre
tread
or
shoulder.
The
vehicle's
electric
system
al
-
lows
the
connection
of
a
com
-
pressor
for
long
enough
to
inflate
a tyre after a puncture repair or
for
inflating
a
small
inflatable
ac
-
cessory.
PRACTICAL INFORMATION
Page 197 of 340
1111
195
C4-2_en_Chap11_info-pratique_ed01-2014
CHANGING A WHEEL
Procedure for changing a faulty wheel for
the spare wheel using the tools pro -
vided
with the vehicle.
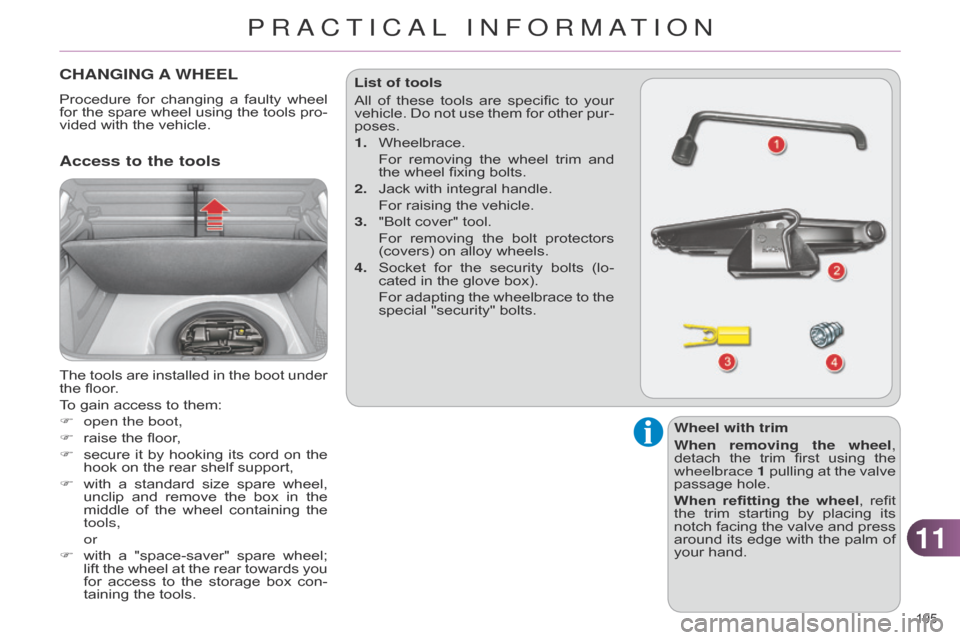
Access to the tools
The tools are installed in the boot under the
floor.
To
gain access to them:
F
open the boot,
F
raise
the floor,
F
secure
it
by
hooking
its
cord
on
the
hook
on the rear shelf support,
F
with
a
standard
size
spare
wheel,
unclip
and
remove
the
box
in
the
middle
of
the
wheel
containing
the
tools,
or
F
with
a
"space-saver"
spare
wheel;
lift
the
wheel
at
the
rear
towards
you
for
access
to
the
storage
box
con
-
taining
the tools. List of tools
All
of
these
tools
are
specific
to
your
vehicle.
Do
not
use
them
for
other
pur
-
poses.
1.
Wheelbrace.
For
removing
the
wheel
trim
and
the
wheel fixing bolts.
2.
Jack
with integral handle.
For
raising the vehicle.
3.
"Bolt
cover" tool.
For
removing
the
bolt
protectors
(covers)
on alloy wheels.
4.
Socket
for
the
security
bolts
(lo
-
cated in the glove box).
For
adapting
the
wheelbrace
to
the
special
"security" bolts.
Wheel with trim
When removing the wheel,
detach
the
trim
first
using
the
wheelbrace 1
pullin
g
at
the
valve
passage
hole.
When refitting the wheel,
refit
the
trim
starting
by
placing
its
notch
facing
the
valve
and
press
around
its
edge
with
the
palm
of
your
hand.
PRACTICAL INFORMATION
Page 198 of 340
1111
196
C4-2_en_Chap11_info-pratique_ed01-2014
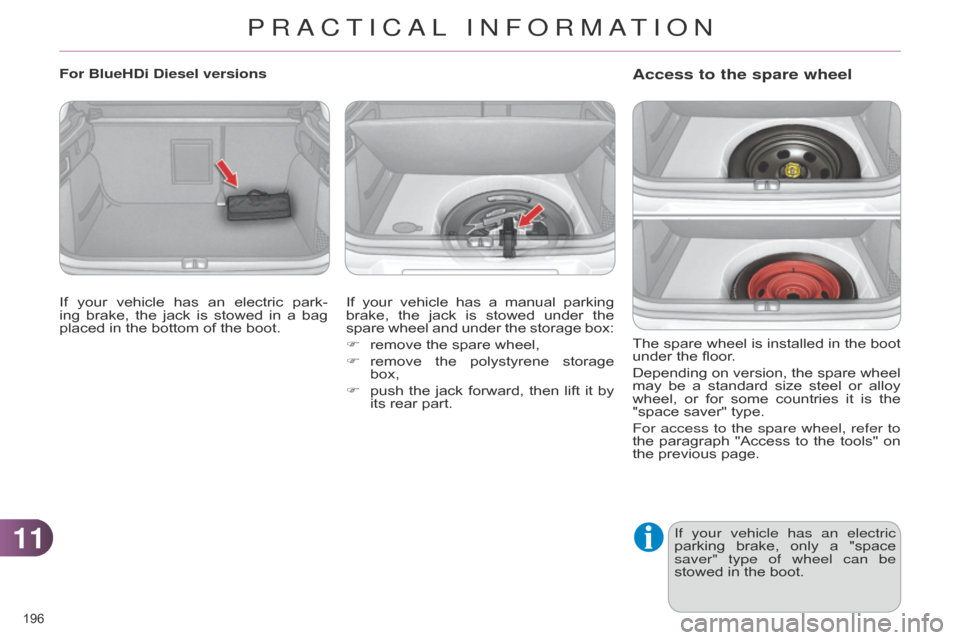
Access to the spare wheel
The spare wheel is installed in the boot under
the floor.
Depending
on
version,
the
spare
wheel
may
be
a
standard
size
steel
or
alloy
wheel,
or
for
some
countries
it
is
the
"space
saver" type.
For access to the spare wheel, refer to
the
paragraph
"Access
to
the
tools"
on
the
previous page.
If your vehicle has an electric
parking
brake,
only
a
"space
saver" type of wheel can be
stowed
in the boot.
For BlueHDi Diesel versions
If
your
vehicle
has
an
electric
park
-
ing
brake,
the
jack
is
stowed
in
a
bag
placed
in
the
bottom
of
the
boot. If
your
vehicle
has
a
manual
parking
brake,
the
jack
is
stowed
under
the
spare
wheel
and
under
the
storage
box:
F
remove
the
spare
wheel,
F
remove
the
polystyrene
storage
box,
F
push
the
jack
forward,
then
lift
it
by
its
rear
part.
PRACTICAL INFORMATION
Page 199 of 340
1111
197
C4-2_en_Chap11_info-pratique_ed01-2014
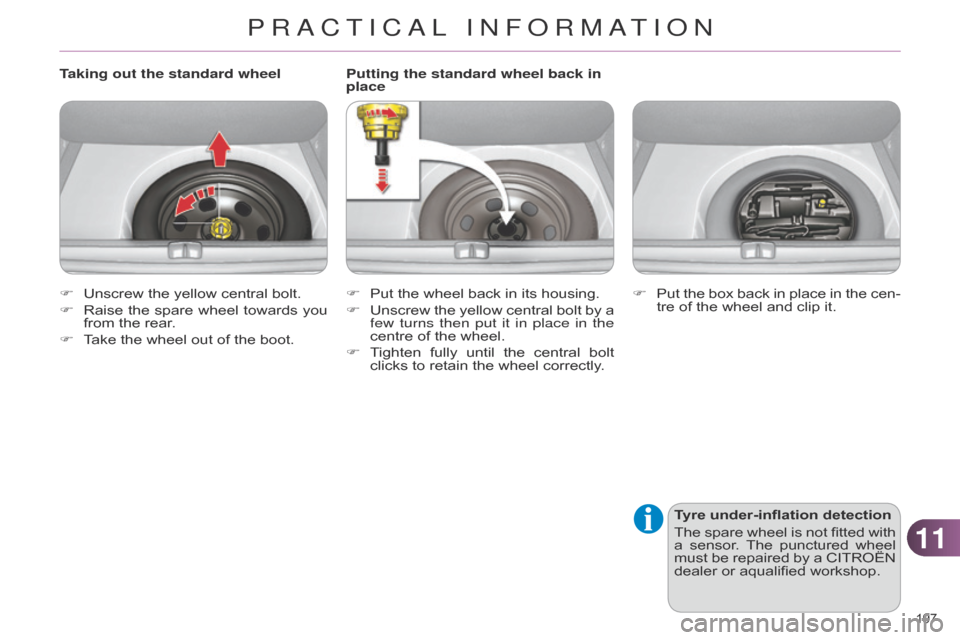
Putting the standard wheel back in
placeTyre under-inflation detection
The
spare
wheel
is
not
fitted
with
a
sensor
.
The
punctured
wheel
must
be
repaired
by
a
CITROËN
dealer
or aqualified workshop.
Taking out the standard wheel
F
Put
the wheel back in its housing.
F
Unscrew
the
yellow
central
bolt
by
a
few turns then put it in place in the
centre
of the wheel.
F
T
ighten
fully
until
the
central
bolt
clicks
to retain the wheel correctly.
F
Unscrew
the
yellow
central
bolt.
F
Raise
the
spare
wheel
towards
you
from
the
rear.
F
T
ake
the
wheel
out
of
the
boot. F
Put
the
box
back
in
place
in
the
cen
-
tre
of the wheel and clip it.
PRACTICAL INFORMATION
Page 202 of 340
1111
200
C4-2_en_Chap11_info-pratique_ed01-2014
After changing a wheel
To
store
the
punctured
wheel
in
the
boot
correctly
,
first
remove
the
central cover.
When
using
the
"space-saver"
type
spare
wheel,
do
not
exceed
50
mph (80 km/h).
Have
the
tightening
of
the
bolts
and
the
pressure
of
the
spare
wheel
checked
by
a
CITROËN
dealer
or
a
qualified
workshop
without
delay.
Have
the
punctured
wheel
re
-
paired
and
replace
it
on
the
ve
-
hicle
as soon as possible.
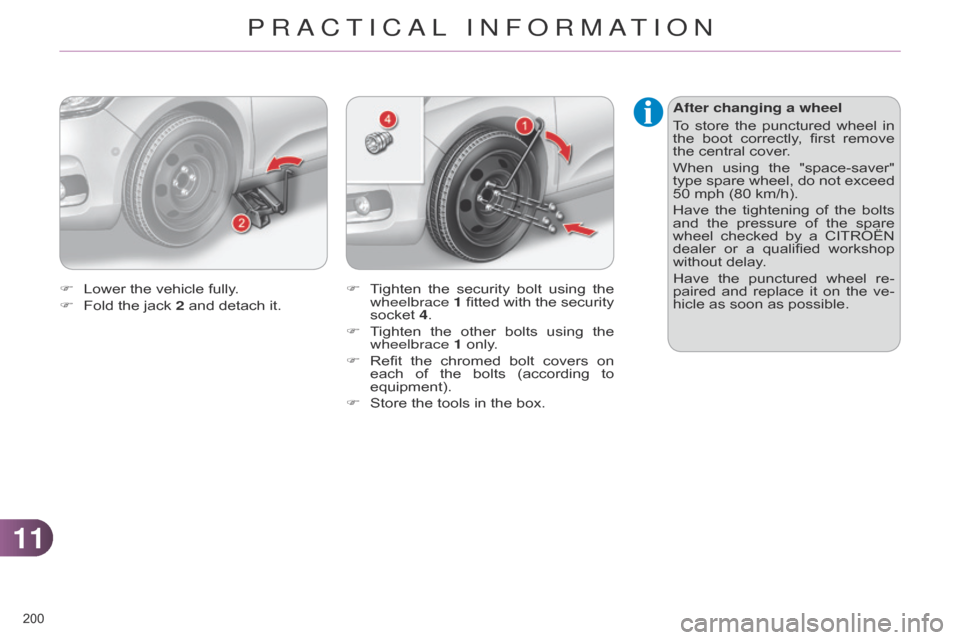
F
T
ighten
the
security
bolt
using
the
wheelbrace 1
fitted
with
the
security
socket
4.
F
T
ighten
the
other
bolts
using
the
wheelbrace
1
only.
F
Refit
the
chromed
bolt
covers
on
each
of
the
bolts
(according
to
equipment).
F
Store
the
tools
in
the
box.
F
Lower
the
vehicle
fully.
F
Fold
the
jack
2
and
detach
it.
PRACTICAL INFORMATION
Page 208 of 340
1111
206
C4-2_en_Chap11_info-pratique_ed01-2014
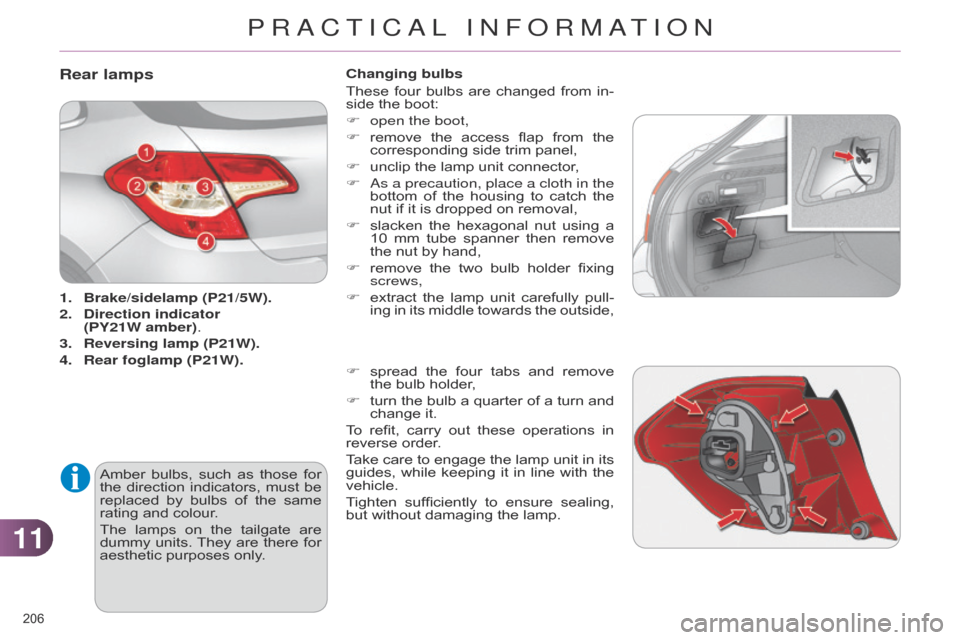
Rear lamps
1. Brake/sidelamp (P21/5W).
2.
Direction
indicator
(PY21W amber).
3.
Reversing lamp (P21W).
4.
Rear
foglamp (P21W).
Amber
bulbs,
such
as
those
for
the
direction
indicators,
must
be
replaced
by
bulbs
of
the
same
rating
and colour.
The
lamps
on
the
tailgate
are
dummy
units.
They
are
there
for
aesthetic
purposes only.Changing bulbs
These
four
bulbs
are
changed
from
in
-
side the boot:
F
open the boot,
F
remove
the
access
flap
from
the
corresponding
side trim panel,
F
unclip
the lamp unit connector,
F a s a precaution, place a cloth in the
bottom
of
the
housing
to
catch
the
nut
if it is dropped on removal,
F
slacken
the
hexagonal
nut
using
a
10
mm
tube
spanner
then
remove
the
nut by hand,
F
remove
the
two
bulb
holder
fixing
screws,
F
extract the lamp unit carefully pull -
ing in its middle towards the outside,
F
spread
the
four
tabs
and
remove
the
bulb holder,
F
turn
the
bulb
a
quarter
of
a
turn
and
change
it.
To
refit,
carry
out
these
operations
in
reverse
order.
Take
care
to
engage
the
lamp
unit
in
its
guides,
while
keeping
it
in
line
with
the
vehicle.
T
ighten
sufficiently
to
ensure
sealing,
but
without damaging the lamp.
PRACTICAL INFORMATION
Page 211 of 340

1111
209
C4-2_en_Chap11_info-pratique_ed01-2014
Dashboard fuses
The fuseboxes are located in the lower dashboard
(left-hand side).
Access to the fuses
F
Refer
to
the
paragraph
"Access
to
the
tools". Fuse tables
Fusebox 1
Fuse N° Rating Functions
F8 3 AAlarm
siren, alarm ECU.
F13 10 A12
V socket.
F14 10 A12
V socket in boot.
F16 3 ALighting
for the large multifunctional storage unit,
rear
map reading lamps, glove box illumination.
F17 3 ASun
visor illumination, front map reading lamps.
F28 15 AAudio
system, radio (after-market).
F30 20 ARear
wiper.
F32 10 AHi-Fi
amplifier.
PRACTICAL INFORMATION