engine Citroen C4 DAG 2014.5 2.G Owner's Guide
[x] Cancel search | Manufacturer: CITROEN, Model Year: 2014.5, Model line: C4 DAG, Model: Citroen C4 DAG 2014.5 2.GPages: 340, PDF Size: 12.89 MB
Page 33 of 340
31
C4-2_en_Chap01_controle-de-marche_ed01-2014
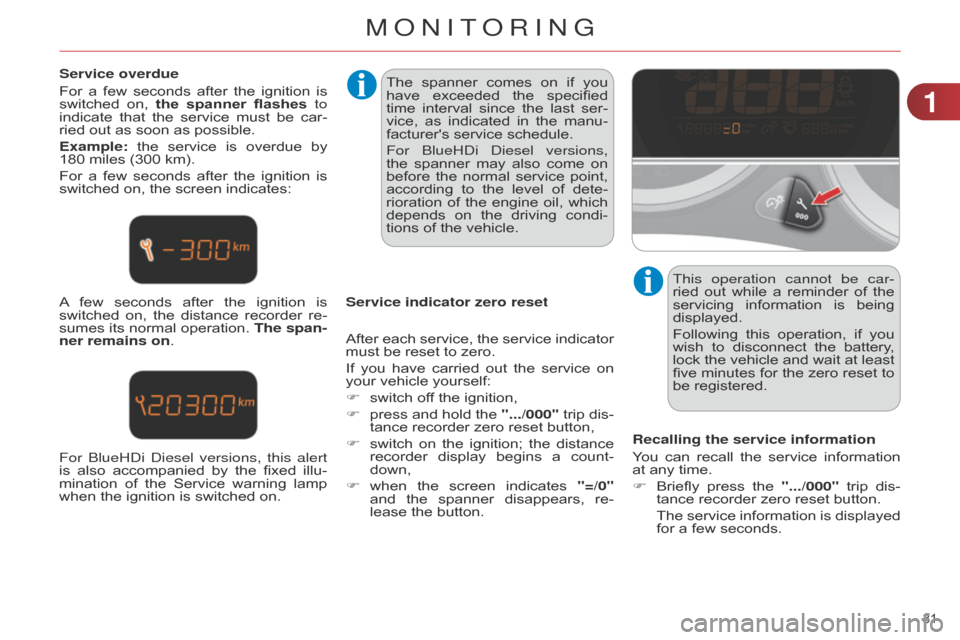
Service overdue
For
a
few
seconds
after
the
ignition
is
switched
on,
the
spanner flashes to
indicate
that
the
service
must
be
car
-
ried
out as soon as possible.
Example:
the
service
is
overdue
by
180
miles (300 km).
For
a
few
seconds
after
the
ignition
is
switched
on, the screen indicates:
A
few
seconds
after
the
ignition
is
switched
on,
the
distance
recorder
re
-
sumes
its
normal
operation.
The span
-
ner remains on. The
spanner comes on if you
have
exceeded
the
specified
time
interval
since
the
last
ser
-
vice,
as
indicated
in
the
manu
-
facturer's
service schedule.
For
b lueH d i d iesel versions,
the
spanner
may
also
come
on
before
the
normal
service
point,
according
to
the
level
of
dete
-
rioration
of
the
engine
oil,
which
depends
on
the
driving
condi
-
tions
of the vehicle.
Service indicator zero reset This operation cannot be car-
ried
out
while
a
reminder
of
the
servicing
information
is
being
displayed.
Following
this
operation,
if
you
wish
to
disconnect
the
battery
,
lock
the
vehicle
and
wait
at
least
five
minutes
for
the
zero
reset
to
be
registered.
Recalling the service information
You
can
recall
the
service
information
at
any time.
F
Briefly
press
the
".../000"
trip
dis
-
tance
recorder zero reset button.
The
service
information
is
displayed
for
a few seconds.
After
each
service,
the
service
indicator
must
be reset to zero.
If
you
have
carried
out
the
service
on
your
vehicle yourself:
F
switch
off the ignition,
F
press
and
hold
the
".../000"
trip
dis
-
tance
recorder zero reset button,
F
switch
on
the
ignition;
the
distance
recorder
display
begins
a
count
-
down,
F
when
the
screen
indicates
"=/0"
and
the
spanner
disappears,
re
-
lease
the button.
For
b lueH d i d iesel versions, this alert
is
also
accompanied
by
the
fixed
illu-
mination
of
the
Service
warning
lamp
when
the ignition is switched on.
1
MONITORING
Page 50 of 340

33
48
C4-2_en_Chap03_confort_ed01-2014
RECOMMENDATIONS FOR VENTILA TION AND AIR CONDITIONING
In order for these systems to be fully ef fective, follow the operation and maintenance
guidelines below:
F
T
o
obtain
an
even
air
distribution,
take
care
not
to
obstruct
the
exterior
air
intake
grille
s
located
at
the
base
of
the
windscreen,
the
nozzles,
the
vents
and
the
air
outlets,
as
well
as
the
air
extractor
located
in
the
boot.
F
Do
not
cover
the
sunshine
sensor
,
located
on
the
dashboard;
this
is
used
for regulation of the air conditioning system.
F
Operate
the
air
conditioning
system
for
at
least
5
to
10
minutes,
once
or
twice
a month to keep it in perfect working order.
F
Ensure
that
the
passenger
compartment
filter
is
in
good
condition
and
have
the filter elements replaced regularly.
W
e
recommend
the
use
of
a
combined
passenger
compartment
filter
.
Thanks
to
its
special
active
additive,
it
contributes
to
the
purification
of
the
air
breathed
by
the
occupants
and
the
cleanliness
of
the
passenger
compartment
(reduction
of
allergic
symptoms,
bad
odours
and
greasy
deposits).
F
T
o
ensure
correct
operation
of
the
air
conditioning
system,
you
are
also
advised
to
have
it
checked
regularly
as
recommended
in
the
mainte
-
nance
and warranty guide.
F
If
the
system
does
not
produce
cold
air
,
switch
it
of
f
and
contact
a
CITROËN
dealer or a qualified workshop.
When
towing
the
maximum
load
on
a
steep
gradient
in
high
temperatures,
switching
of
f
the
air
conditioning
increases
the
available
engine
power
and
so
improves the towing ability. If
after
an
extended
stop
in
sun
-
shine,
the
interior
temperature
is
very
high, first ventilate the pas -
senger compartment for a few moments.
Put
the
air
flow
control
at
a
set
-
ting
high
enough
to
quickly
change
the
air
in
the
passenger
compartment.
The
air
conditioning
system
does
not
contain
chlorine
and
does
not
present
any
danger
to
the
ozone layer.
The
condensation
created
by
the
air
conditioning
results
in
a
discharge
of
water
under
the
ve
-
hicle
which is perfectly normal.
Stop & Start
The
heating
and
air
conditioning
systems
only
work
when
the
engine
is
running.
T
o
maintain
a
comfortable
temperature
in
the
passenger
compart
-
ment,
you
can
temporarily
deactivate
the
Stop
&
Start
system
(see
the
corresponding
section).
COMFORT
Page 52 of 340
33
50
C4-2_en_Chap03_confort_ed01-2014
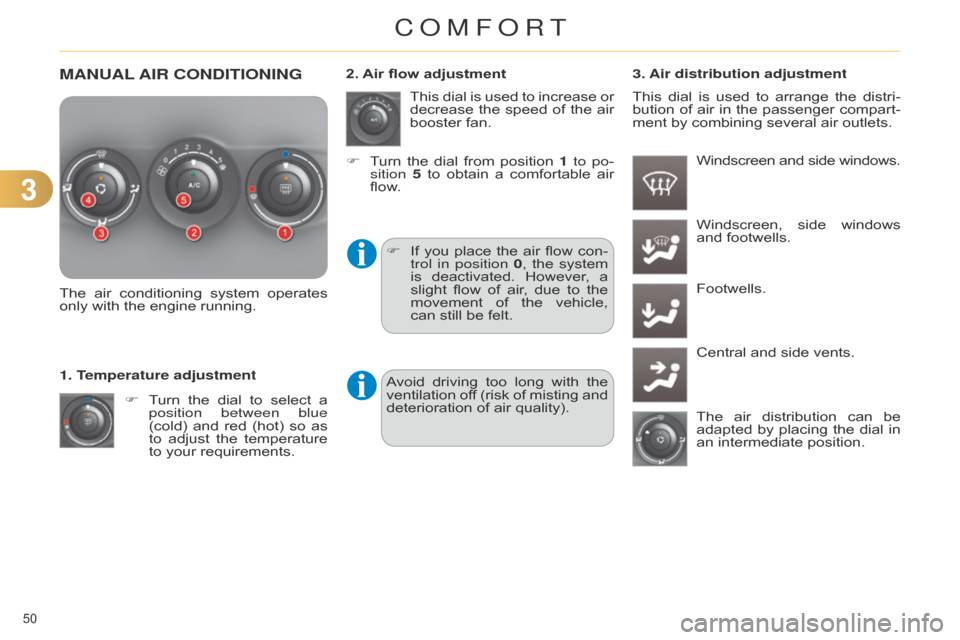
MANUAL AIR CONDITIONING
The air conditioning system operates only
with the engine running.
F
T
urn
the
dial
to
select
a
position between blue
(cold)
and
red
(hot)
so
as
to
adjust
the
temperature
to
your requirements.
1. Temperature adjustment This
dial
is
used
to
increase
or
decrease
the
speed
of
the
air
booster
fan.
2. Air flow adjustment
3. Air distribution adjustment
Windscreen and side windows.
F
If
you
place
the
air
flow
con
-
trol in position 0,
the
system
is
deactivated.
However
,
a
slight
flow of air , due to the movement
of the vehicle,
can
still be felt.Windscreen,
side
windows
and
footwells.
Footwells.
Central
and side vents.
The
air
distribution
can
be
adapted
by
placing
the
dial
in
an
intermediate position.
F
T
urn
the
dial
from
position
1
to po-
sition 5
to
obtain
a
comfortable
air
flow
.
This
dial
is
used
to
arrange
the
distri
-
bution
of
air
in
the
passenger
compart
-
ment by combining several air outlets.
Avoid
driving
too
long
with
the
ventilation
of
f
(risk
of
misting
and
deterioration
of air quality).
COMFORT
Page 54 of 340
33
52
C4-2_en_Chap03_confort_ed01-2014
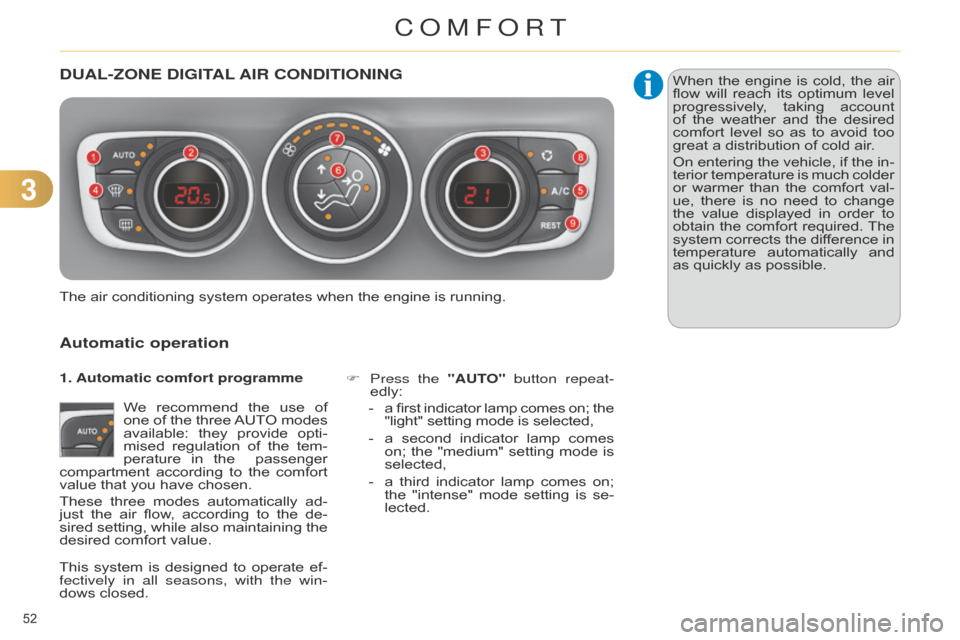
DUAL-ZONE DIGITAL AIR CONDITIONING
Automatic operation
We recommend the use of one
of the three AUT O modes
available:
they
provide
opti
-
mised
regulation
of
the
tem
-
perature
in
the
passenger
compartment
according
to
the
comfort
value
that you have chosen.
These
three
modes
automatically
ad
-
just
the
air
flow
,
according
to
the
de
-
sired
setting,
while
also
maintaining
the
desired
comfort value. F
Press
the "AUTO" button repeat-
edly:
- a first indicator lamp comes on; the "light"
setting mode is selected,
-
a
second
indicator
lamp
comes
on;
the
"medium"
setting
mode
is
selected,
-
a
third
indicator
lamp
comes
on;
the
"intense"
mode
setting
is
se
-
lected.
The
air
conditioning system operates when the engine is running.When
the
engine
is
cold,
the
air
flow
will
reach
its
optimum
level
progressively
,
taking
account
of
the
weather
and
the
desired
comfort
level
so
as
to
avoid
too
great
a distribution of cold air.
On
entering
the
vehicle,
if
the
in
-
terior
temperature
is
much
colder
or
warmer
than
the
comfort
val
-
ue,
there
is
no
need
to
change
the
value
displayed
in
order
to
obtain
the
comfort
required.
The
system
corrects
the
dif
ference
in
temperature
automatically
and
as
quickly as possible.
1. Automatic comfort programme
This
system
is
designed
to
operate
ef
-
fectively in all seasons, with the win-
dows
closed.
COMFORT
Page 56 of 340
33
54
C4-2_en_Chap03_confort_ed01-2014
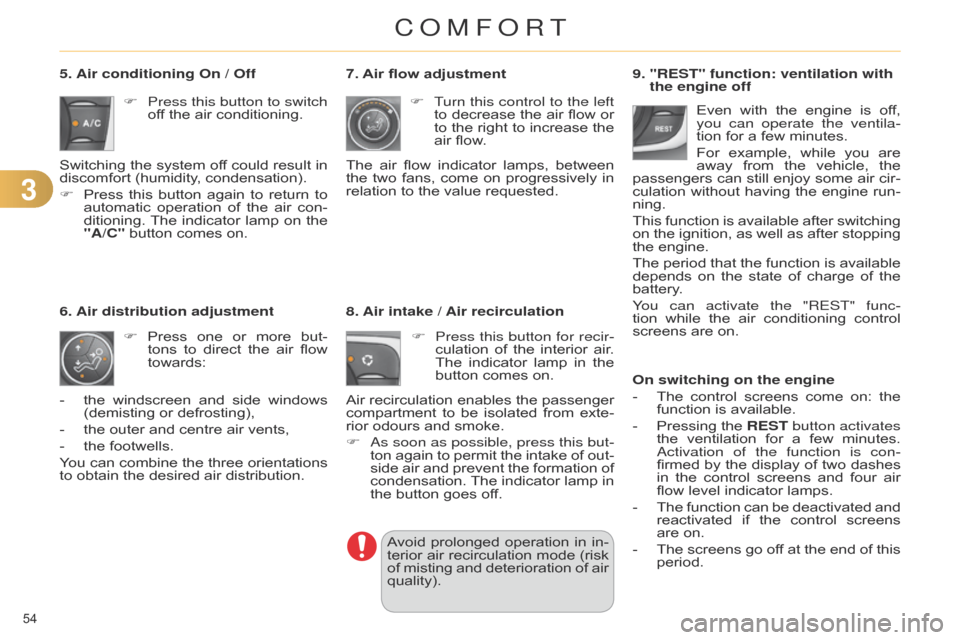
9. "REST" function: ventilation with
the engine off
On switching on the engine
-
The
control
screens
come
on:
the
function
is available.
-
Pressing
the
REST
button activates
the
ventilation
for
a
few
minutes.
a
ctivation of the function is con-
firmed
by
the
display
of
two
dashes
in
the
control
screens
and
four
air
flow
level indicator lamps.
-
The
function
can
be
deactivated
and
reactivated
if
the
control
screens
are
on.
-
The
screens
go
of
f
at
the
end
of
this
period.Even
with
the
engine
is
of
f,
you can operate the ventila
-
tion
for a few minutes.
For
example,
while
you
are
away
from
the
vehicle,
the
passengers
can
still
enjoy
some
air
cir
-
culation
without
having
the
engine
run
-
ning.
This
function
is
available
after
switching
on
the
ignition,
as
well
as
after
stopping
the
engine.
The
period
that
the
function
is
available
depends
on
the
state
of
charge
of
the
battery
.
You can activate the "REST" func-
tion
while
the
air
conditioning
control
screens
are on.
7. Air flow adjustment
F
T
urn this control to the left
to
decrease
the
air
flow
or
to
the
right
to
increase
the
air
flow.
The
air
flow
indicator
lamps,
between
the
two
fans,
come
on
progressively
in
relation
to
the
value
requested.
5. Air conditioning On / Off
F
Press
this button to switch
off
the
air
conditioning.
Switching
the
system
of
f
could
result
in
discomfort
(humidity,
condensation).
F
Press
this
button
again
to
return
to
automatic
operation
of
the
air
con
-
ditioning.
The
indicator
lamp
on
the
"A/C"
button
comes
on.
F
Press
one
or
more
but
-
tons
to
direct
the
air
flow
towards:
6.
Air distribution adjustment
-
the
windscreen
and
side
windows
(demisting
or
defrosting),
-
the
outer
and
centre
air
vents,
-
the
footwells.
You
can
combine
the
three
orientations
to
obtain
the
desired
air
distribution. 8. Air intake / Air recirculation
F
Press this button for recir
-
culation
of
the
interior
air
.
The
indicator
lamp
in
the
button
comes
on.
Air
recirculation
enables
the
passenger
compartment
to
be
isolated
from
exte
-
rior
odours
and
smoke.
F
a
s soon as possible, press this but-
ton
again
to
permit
the
intake
of
out
-
side
air
and
prevent
the
formation
of
condensation.
The
indicator
lamp
in
the
button
goes
off.
Avoid
prolonged
operation
in
in
-
terior
air
recirculation
mode
(risk
of
misting
and
deterioration
of
air
quality).
COMFORT
Page 57 of 340
33
55
C4-2_en_Chap03_confort_ed01-2014
Switching the system off
Avoid prolonged operation in in -
terior air recirculation mode or
driving
for
long
periods
with
the
system
of
f
(risk
of
misting
and
deterioration
of air quality).
On stopping the engine
-
While
the
control
screens
remain
on:
the
function
is
available.
-
Pressing
the
REST
button activates
the
ventilation
for
a
few
minutes.
a
ctivation of the function is con-
firmed
by
the
display
of
two
dashes
in
the
control
screens
and
four
air
flow
level
indicator
lamps.
Locking
the
vehicle
has
no
ef
fect
on
this
function.
-
The
control
screens
go
of
f
at
the
end
of
this
period.
Pressing
again
before
the
end
of
the
period
interrupts
of
f
the
ventila
-
tion
definitively:
the
control
screens
go
of
f
and
the
function
is
no
longer
available. F
T
urn
the
air
flow
control
to
the
left
until
all
of
the
indi
-
cator lamps go off.
This
action
switches
of
f
the
air
condi
-
tioning and the ventilation.
Temperature
related
comfort
is
no
long
-
er
assured
but
a
slight
flow
of
air
,
due
to
the
movement
of
the
vehicle,
can
still
be
felt.
F
Modify
the
settings
(temperature,
air
flow
or
air
distribution)
or
press
the
"AUT
O" button to reactivate the
system
with
the
values
set
before
it
was
switched off.
This
switch
does
not
operate
the
air
conditioning,
only
the
air
fan.
When the "REST" function is ac-
tivated,
you
cannot
modify
the
temperature,
air
flow
and
distri
-
bution
settings:
these
are
con
-
trolled
automatically
according
to
the
ambient
temperature.
This function is not available in
the
STOP
mode
of
Stop
&
Start.
COMFORT
Page 58 of 340
33
56
C4-2_en_Chap03_confort_ed01-2014
FRONT DEMIST - DEFROST
These markings on the control panel
indicate the control po -
sitions
for
rapid
demisting
or
defrosting
of
the
windscreen
and
side windows.
With manual air conditioning
F Put the temperature, air flow and distribution
controls to the dedicated marked
position.
F
Put
the
air
intake
control
to
the
"Exterior
air intake" position
(indicator
lamp on the control off).
F
Switch
on
the
air
conditioning
by pressing
the
"A/C"
button; the warn-
ing
lamp in the button comes on.
REAR SCREEN DEMIST - DEFROST
The control button is located on
the air conditioning system
control
panel.
Switching on
The rear screen demisting/defrosting can
only operate when the engine is
running.
F
Press
this
button
to
demist/defrost
the
rear
screen
and
(depending
on
version)
the
door
mirrors.
The
indi
-
cator
lamp
associated
with
the
but
-
ton
comes on.
Switching off
The demisting/defrosting switches of f automatically
to prevent an excessive
consumption
of current.
F
It
is
possible
to
stop
the
demisting/de
-
frosting
operation
before
it
is
switched of
f
automatically
by
pressing
the
button again.
The
indicator
lamp
associated with
the button goes off.
F
Switch
of
f
the
demisting/de
-
frosting
of
the
rear
screen
and
door
mirrors
as
soon
as
appropriate, as lower current
consumption
results
in
re
-
duced
fuel consumption.
With digital dual-zone air
conditioning
Automatic visibility programme
F
Select
this
programme
to
demist
or
defrost
the
windscreen
and
side
windows
as quickly as possible.
The
system
automatically
manages
the
air
conditioning,
air
flow
and
air
intake,
and
provides
optimum
distribu
-
tion
towards
the
windscreen
and
side
windows.
F
To stop the programme, press either the "visibility" button again or "AUT O",
the warning lamp on the button goes of
f
and
the
warning
lamp
on
the "AUT
O"
button comes on.
The system starts again with the values in
use before it was overridden by the
visibility
programme.
With
Stop
&
Start,
when
dem
-
isting
has
been
activated,
the
ST
OP
mode is not available.
With Stop & Start, when the
demisting,
air
conditioning
and
air
flow
functions
are
activated,
ST
OP
mode
is
not
available.
COMFORT
Page 61 of 340
33
59
C4-2_en_Chap03_confort_ed01-2014
Additional adjustments
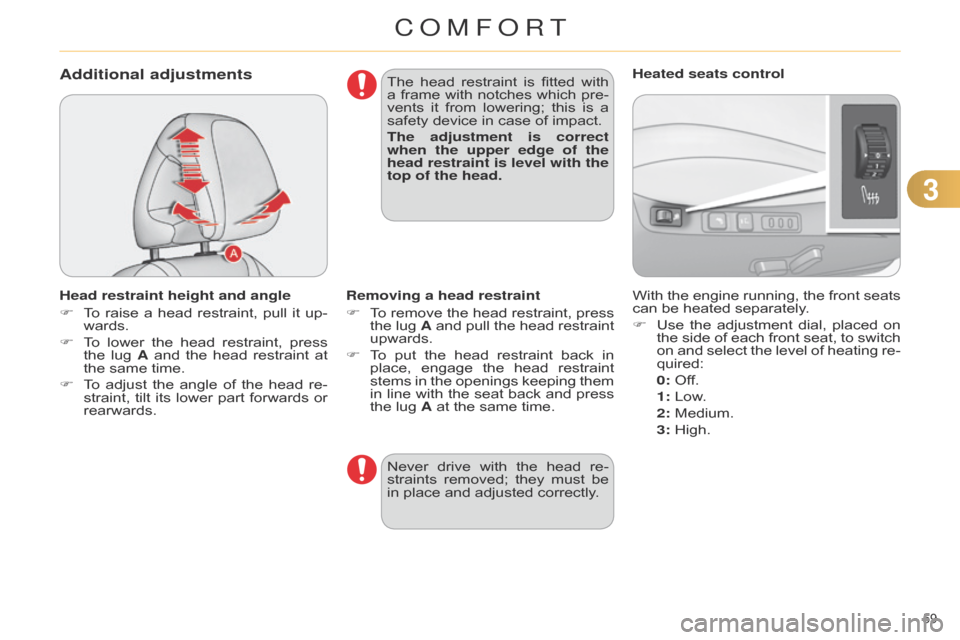
Head restraint height and angle
F
T
o
raise
a
head
restraint,
pull
it
up
-
wards.
F
T
o
lower
the
head
restraint,
press
the
lug
A
and
the
head
restraint
at
the
same time.
F
T
o
adjust
the
angle
of
the
head
re
-
straint,
tilt
its
lower
part
forwards
or
rearwards. The
head
restraint
is
fitted
with
a
frame
with
notches
which
pre
-
vents
it
from
lowering;
this
is
a
safety
device in case of impact.
The adjustment is correct
when the upper edge of the
head restraint is level with the
top of the head.
With the engine running, the front seats can
be heated separately.
F
Use
the
adjustment
dial,
placed
on
the
side
of
each
front
seat,
to
switch
on
and
select
the
level
of
heating
re
-
quired:
0:
Off.
1
: Low.
2
: Medium.
3
: High.
Heated seats control
Removing a head restraint
F
T
o
remove
the
head
restraint,
press
the
lug
A
and
pull
the
head
restraint
upwards.
F
T
o
put
the
head
restraint
back
in
place,
engage
the
head
restraint
stems
in
the
openings
keeping
them
in
line
with
the
seat
back
and
press
the
lug A at the same time.
Never
drive
with
the
head
re
-
straints
removed;
they
must
be
in
place and adjusted correctly.
COMFORT
Page 62 of 340
33
60
C4-2_en_Chap03_confort_ed01-2014
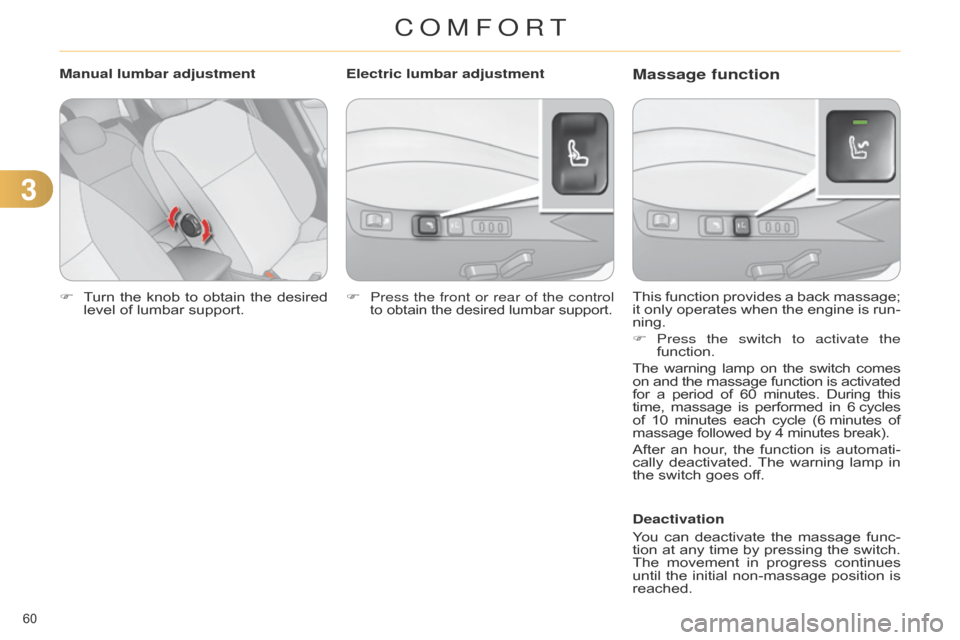
F Turn the knob to obtain the desired level
of lumbar support. This
function provides a back massage; it
only operates when the engine is run -
ning.
F
Press the switch to activate the
function.
The
warning
lamp
on
the
switch
comes on
and
the
massage
function
is
activated for
a
period
of
60
minutes.
During
this time,
massage
is
performed
in
6
cycles
of
10
minutes
each
cycle
(6
minutes
of massage
followed by 4 minutes break).
After
an
hour
,
the
function
is
automati
-
cally
deactivated.
The
warning
lamp
in
the
switch goes off.
Deactivation
You
can
deactivate
the
massage
func
-
tion
at
any
time
by
pressing
the
switch.
The
movement
in
progress
continues
until
the
initial
non-massage
position
is
reached.
Manual lumbar adjustment
Massage functionElectric lumbar adjustment
F
Press the front or rear of the control
to obtain the desired lumbar support.
COMFORT
Page 63 of 340
33
61
C4-2_en_Chap03_confort_ed01-2014
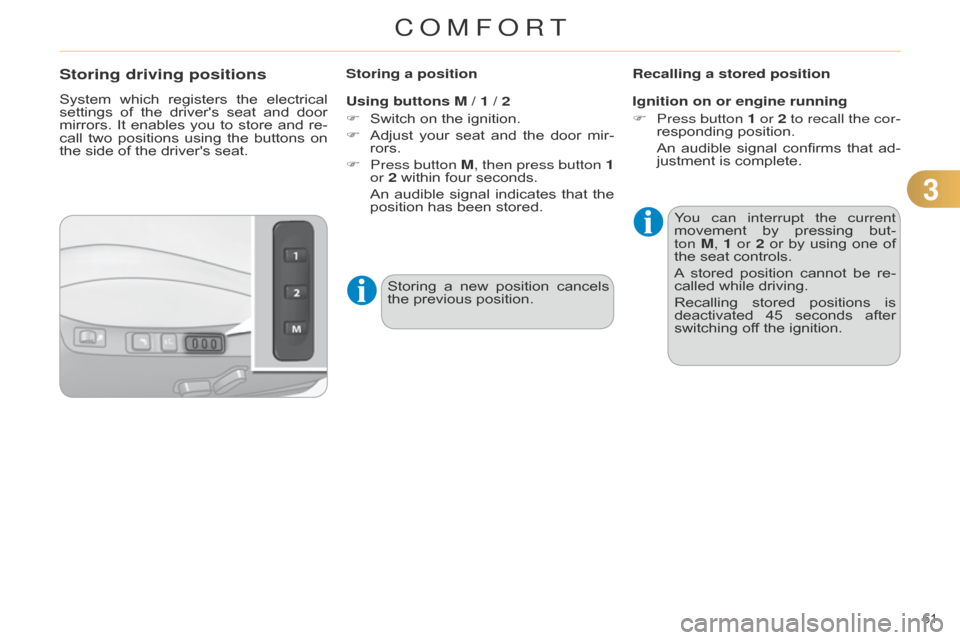
Storing driving positions
System which registers the electrical settings
of the driver's seat and door
mirrors.
It
enables
you
to
store
and
re
-
call
two
positions
using
the
buttons
on
the
side of the driver's seat.Storing a position
Using buttons M / 1 / 2
F
Switch
on the ignition.
F
Adjust
your
seat
and
the
door
mir
-
rors.
F
Press button
M, then press button 1
or 2
within four seconds.
An
audible
signal
indicates
that
the
position
has been stored.Recalling a stored position
Ignition on or engine running
F
Press button
1 or 2 to recall the cor-
responding
position.
An
audible
signal
confirms
that
ad
-
justment
is complete.
You can interrupt the current
movement
by
pressing
but
-
ton
M
, 1 or 2
or
by
using
one
of
the
seat controls.
A
stored
position
cannot
be
re
-
called
while driving.
Recalling
stored
positions
is
deactivated
45
seconds
after
switching
off the ignition.
Storing
a
new
position
cancels
the
previous position.
COMFORT