warning Citroen C4 DAG 2014.5 2.G Manual PDF
[x] Cancel search | Manufacturer: CITROEN, Model Year: 2014.5, Model line: C4 DAG, Model: Citroen C4 DAG 2014.5 2.GPages: 340, PDF Size: 12.89 MB
Page 189 of 340
1010
187ô
C4-2_en_Chap10_verification_ed01-2014
Topping-up the AdBlueôÛ
additive
Fillingô the ô AdBlueôÛô tankô is ô an ô operation ô included
ô in
ô every
ô routine ô service ô on ô
your
ô
vehicle
ô
by
ô
a
ô
CITROûN
ô
dealer
ô
or
ô
a
ô
qualified
ô
workshop.
Nevertheless,
ô
given
ô
the
ô
capacity
ô
of
ô
the
ô
tank,
ô
it
ô
may
ô
be
ô
necessary
ô
to
ô
top-up
ô
the
ô
additive
ô
between
ô
services,
ô
more
ô
partic
-
ularly
ô
if
ô
an
ô
alert
ô
(warning
ô
lamps
ô
and
ô
a
ô
message)
ô
signals
ô
the ô requirement.
You
ô
can
ô
got
ô
to
ô
a
ô
CITROûN
ô
dealer
ô
or
ô
a
ô
qualified
ô
workshop.
If
ô
you
ô
envisage
ô
topping-up
ô
yourself,
ô
please
ô
read
ô
the
ô
following
ô
warnings
ô
carefully
. Precautions in use
The
ô AdBlueôÛô additiveô is ô an ô urea-based ô solution.
ô This ô liquid ô is ô non-flammable, ô
colourless
ô
and
ô
odourless
ô
(kept
ô
in
ô
a
ô
cool
ô
area).
In
ô
the
ô
event
ô
of
ô
contact
ô
with
ô
the
ô
skin,
ô
wash
ô
the
ô
af
fected ô
area
ô
with
ô
soap
ô
and
ô
water
.
ô
In
ô
the
ô
event
ô
of
ô
contact
ô
with
ô
the
ô
eyes,
ô
wash
ô
(irrigate)
ô
the
ô
eyes
ô
with
ô
large
ô
amounts
ô
of
ô
water
ô
or
ô
with
ô
an
ô
eye
ô
wash
ô
solution
ô
for
ô
at
ô
least
ô
15
ô
minutes.
ô
If
ô
a
ô
burning
ô
sensation
ô
or
ô
irritation
ô
persists,
ô
get
ô
medical
ô
attention.
If
ô
swallowed,
ô
immediately
ô
wash
ô
out
ô
the
ô
mouth
ô
with
ô
clean
ô
water
ô
and
ô
then
ô
drink
ô
plenty
ô
of
ô
water.
In
ô
certain
ô
conditions
ô
(high
ô
ambient
ô
tem
-
perature,
ô
for
ô
example),
ô
the
ô
risk
ô
of
ô
re
-
lease
ô
of
ô
ammonia
ô
cannot
ô
be
ô
excluded:
ô
do
ô
not
ô
inhale
ô
the
ô
product.
ô
Ammonia
ô
vapour
ô
has
ô
en
ô
irritant
ô
ef
fect ô
on
ô
mucous
ô
membranes
ô
(eyes, ô nose ô and ô throat).
Keep
ô
AdBlueôÛ out of the reach
of
ô
children,
ô
in
ô
its ô original ô bottle.
Never
ô
transfer
ô
AdBlueôÛ to an-
other
ô container:
ô it
ô would ô loose ô
its
ô
purity. Use
ô
only
ô
AdBlueôÛô additive
ô that ô meets ô the
ô
ISO
ô
22241
ô
standard.
Never
ô
dilute
ô
the
ô
additive
ô
with
ô
water
.
Never
ô
pour
ô
the
ô
additive
ô
into
ô
the
ô
Diesel
ô
fuel
ô
tank.
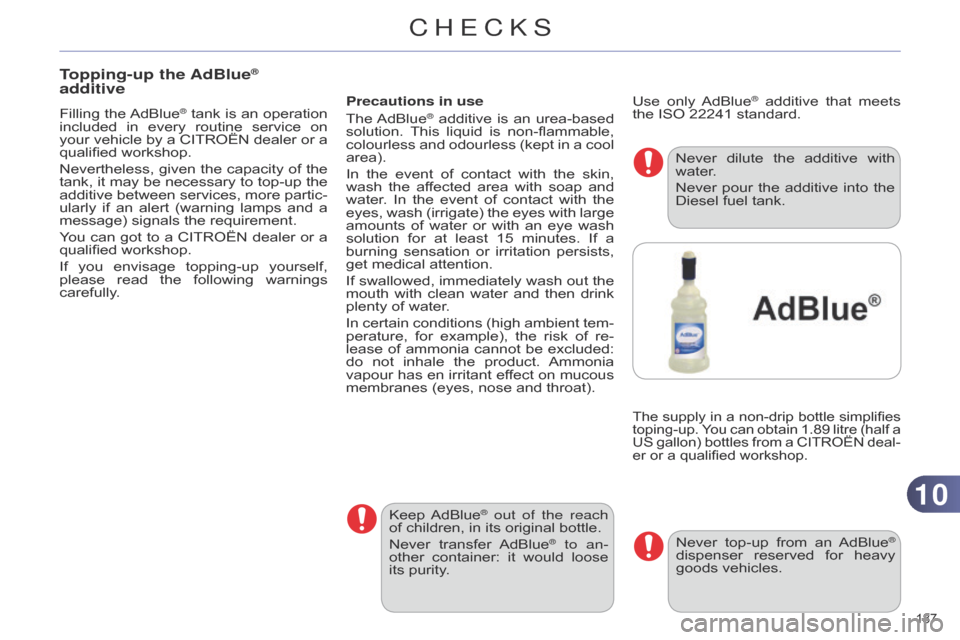
Theô supply ô in ô a ô non-drip ô bottle ô simplifies ô toping-up.
ô Y ou ô can ô obtain ô 1.89 ô litre ô (half ô a ô
US
ô
gallon)
ô
bottles
ô
from
ô
a
ô
CITROûNô
deal-
er
ô or ô a ô qualified ô workshop.
Neverô top-upô from ô an ô AdBlueôÛ
dispenser
ô reserved
ô for
ô heavy
ô
goods
ô
vehicles.
CHECKS
Page 194 of 340
1111
192ô
C4-2_en_Chap11_info-pratique_ed01-2014
Tyre under-inflation detection
Ifô
the
ô
vehicle
ô
is
ô
fitted
ô
with
ô
tyreô under-inflation
ô
detection,
ô
the
ô
un
-
der-inflation
ô
warning
ô
lamp
ô
will
ô
re
-
main
ô
on
ô
after
ô
the
ô
wheel
ô
has
ô
beenô repaired
ô
until
ô
the
ô
system
ô
is
ô
reini
-
tialised
ô
by
ô
a
ô
CITROûN
ô
dealer
ô
orô a
ô qualified ô workshop.
If
ô
after
ô
around
ô
5
ô
to
ô
7
ô
minutes
ô
the
ô
pressure
ô
is
ô
not
ô
attained,
ô
this
ô
in
-
dicates
ô
that
ô
the
ô
tyre
ô
is
ô
not
ô
repair
-
able;
ô
contact
ô
a
ô
CITROûN
ô
dealer
ô
or
ô
a
ô
qualified
ô
workshop
ô
for
ô
as
-
sistance.
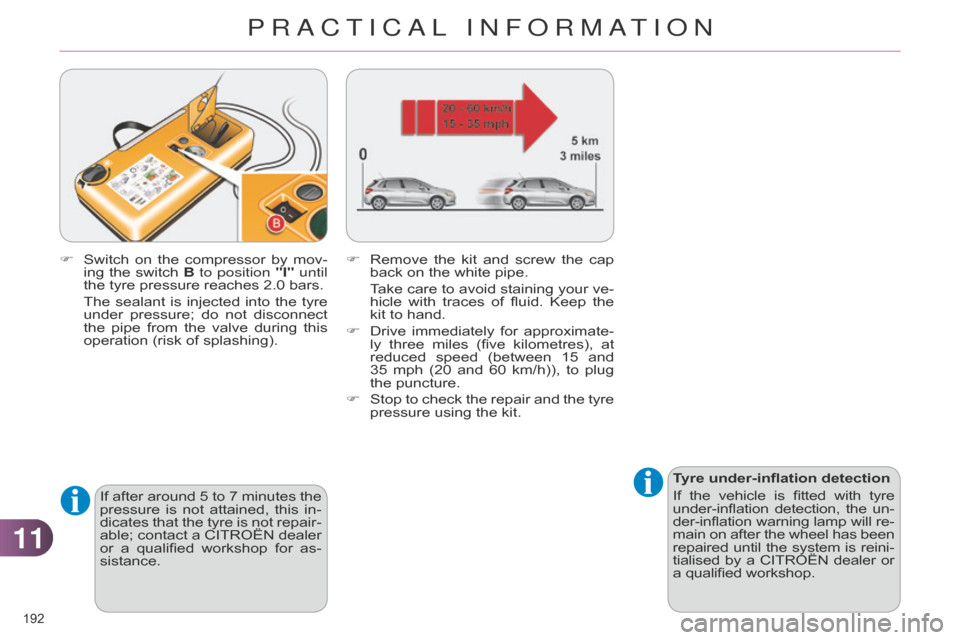
F
ô
Switch
ô
on
ô
the
ô
compressor
ô
by
ô
mov
-
ing
ô
the
ô
switch
ô
B
to position
"I" until
the
ô
tyre
ô
pressure
ô
reaches
ô
2.0
ô
bars.
ô The
ô
sealant
ô
is
ô
injected
ô
into
ô
the
ô
tyre
ô
under
ô
pressure;
ô
do
ô
not
ô
disconnect
ô
the
ô
pipe
ô
from
ô
the
ô
valve
ô
during
ô
this
ô
operation
ô
(risk
ô
of
ô
splashing).
F
ô
Remove
ô
the
ô
kit
ô
and
ô
screw
ô
the
ô
cap
ô
back
ô
on
ô
the
ô
white
ô
pipe.
ô T
ake
ô
care
ô
to
ô
avoid
ô
staining
ô
your
ô
ve
-
hicle
ô
with
ô
traces
ô
of
ô
fluid.
ô
Keep
ô
the
ô
kit
ô
to
ô
hand.
F
ô
Drive
ô
immediately
ô
for
ô
approximate
-
ly
ô
three
ô
miles
ô
(five
ô
kilometres),
ô
at
ô
reduced
ô
speed
ô
(between
ô
15
ô
and
ô
35ô
mph
ô
(20
ô
and
ô
60
ô
km/h)),
ô
to
ô
plug
ô
the
ô
puncture.
F
ô
Stop
ô
to
ô
check
ô
the
ô
repair
ô
and
ô
the
ô
tyre
ô
pressure
ô
using
ô
the
ô
kit.
PRACTICAL INFORMATION
Page 200 of 340
1111
198ô
C4-2_en_Chap11_info-pratique_ed01-2014
Ensureô thatô the ô jack ô is ô stable. ô If ô the
ô ground ô is ô slippery ô or ô loose, ô
the
ô
jack
ô
may
ô
slip
ô
or
ô
drop
ô
-
ô
Risk
ô
of
ô injury!
Removing a wheel
Parking the vehicle
Immobilise ô
the
ô
vehicle
ô
where
ô
it
ô
does
ô
not
ô
block
ô
traffic:
ô
the
ô
ground
ô
must
ô
be
ô
level,
ô
stable
ô
and
ô
non-
slippery
ô ground.
Apply
ô
the
ô
parking
ô
brake
ô
unless
ô
it
ô
has
ô
been
ô
programmed
ô
to
ô
au
-
tomatic
ô
mode,
ô
switch
ô
of
f ô
the
ô
ig
-
nition
ô
and
ô
engage
ô
first
ô
gear*
ô
to
ô
lock
ô the ô wheels.
Check
ô
that
ô
the
ô
braking
ô
warning
ô
lamps
ô
in
ô
the
ô
instrument
ô
panel
ô
are
ô on ô (not ô flashing).
The
ô
occupants
ô
must
ô
get
ô
out
ô
of
ô
the
ô
vehicle
ô
and
ô
wait
ô
where
ô
they
ô
are
ô safe.
If
ô
necessary
, ô
place
ô
a
ô
chock
ô
un
-
der
ô
the
ô
wheel
ô
diagonally
ô
oppo
-
site
ô the ô wheel ô to ô be ô changed.
Never
ô
go
ô
underneath
ô
a
ô
vehicle
ô
raised
ô
using
ô
a
ô
jack;
ô
use
ô
an
ô
axle
ô
stand. *
position R
ô
for
ô
an
ô
electronic
ô
gearbox;
ô
P
for
ô an ô automatic ô gearbox.
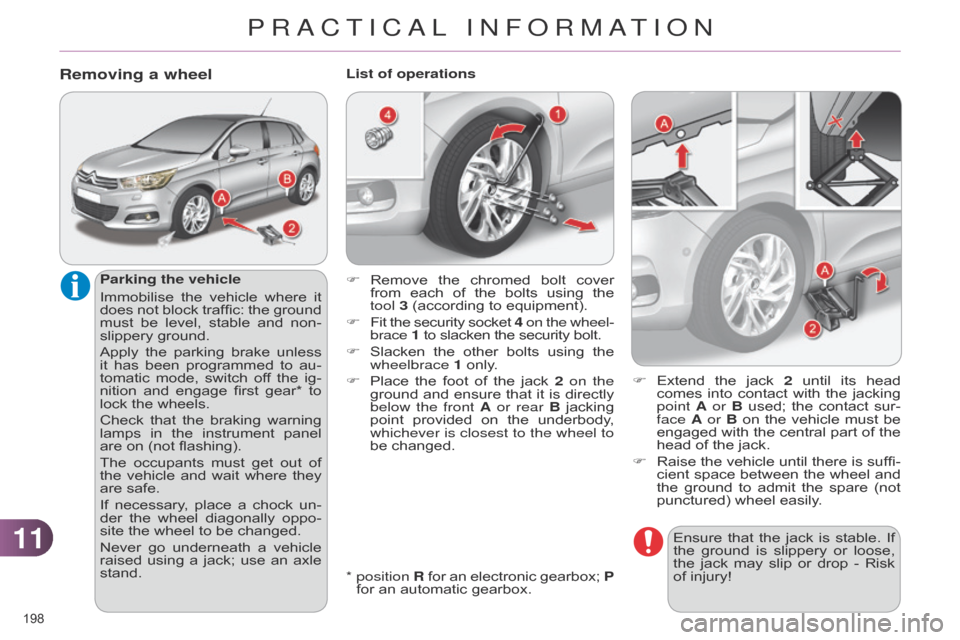
List of operations
F ô
Extend
ô
the
ô
jack
ô
2
ô
until
ô
its
ô
head
ô
comes
ô
into
ô
contact
ô
with
ô
the
ô
jacking
ô
point A
or B ô
used;
ô
the
ô
contact
ô
sur
-
face A or B
ô
on
ô
the
ô
vehicle
ô
must
ô
be
ô
engaged
ô
with
ô
the
ô
central
ô
part
ô
of
ô
the
ô
head
ô of ô the ô jack.
F
ô
Raise
ô
the
ô
vehicle
ô
until
ô
there
ô
is
ô
suffi
-
cient
ô
space
ô
between
ô
the
ô
wheel
ô
and
ô
the
ô
ground
ô
to
ô
admit
ô
the
ô
spare
ô
(not
ô
punctured)
ô wheel ô easily.
F
ô Remove ô the ô chromed ô bolt ô cover ô from
ô each ô of ô the ô bolts ô using ô the ô
tool
3 ô (according ô to ô equipment).
F
ô
Fit
ô
the
ô
security
ô
socket
ô
4 on the wheel
-
brace 1
ô
to ô slacken ô the ô security ô bolt.
F
ô
Slacken
ô
the
ô
other
ô
bolts
ô
using
ô
the
ô
wheelbrace
1 ô only.
F
ô
Place
ô
the
ô
foot
ô
of
ô
the
ô
jack
ô
2
on the
ground
ô
and
ô
ensure
ô
that
ô
it
ô
is
ô
directly
ô
below the front
A or rear B ô
jacking
ô
point
ô
provided
ô
on
ô
the
ô
underbody
, ô
whichever is closest to the wheel to
be
ô changed.
PRACTICAL INFORMATION
Page 205 of 340
1111
203ô
C4-2_en_Chap11_info-pratique_ed01-2014
Amberô colouredô bulbs, ô such ô as ô the
ô direction ô indicators, ô must ô be ô
replaced
ô
with
ô
bulbs
ô
of
ô
identical
ô
specifications
ô and ô colour.
When
ô
refitting,
ô
close
ô
the
ô
protec
-
tive cover carefully to preserve
the
ô sealing ô of ô the ô headlamp.
Changing direction indicator bulbs
Model with halogen headlamps
Rapid
ô
flashing
ô
of
ô
the
ô
direction
ô
indicator
ô
warning
ô
lamp
ô
(right
ô
or
ô
left)
ô
indicates
ô
the
ô
failure
ô
of
ô
a
ô
bulb
ô
on
ô
that
ô
side.
Access to bulbs
F
ô
Remove
ô
the
ô
air
ô
deflector
ô
by
ô
unclip
-
ping
ô
each
ô
of
ô
its
ô
three
ô
attachment
ô
points.
F
ô
Unclip
ô
the
ô
bonnet
ô
release
ô
cable
ô
at
ô
its
ô
two
ô
fixings.
F
ô Move
ô
the
ô
cable
ô
down.
After
ô changing
ô the
ô failed
ô bulb,
ô rememberô to
ô
put
ô
everything
ô
back
ô
in
ô
place
ô
(cable
ô
andô air
ô
deflector).
Depending
ô
on
ô
the
ô
engine
ô
and
ô
only
ô
on
ô
the
ô
left
ô
hand
ô
side,
ô
you
ô
must
ô
first
ô
carry
ô
out
ô
the
ô
following
ô
operations
ô
for
ô
access
ô
to
ô
the
ô
protective
ô
covers
ô
on
ô
the
ô
bulbs.
F
ô
T
urn
ô
the
ô
bulb
ô
holder
ô
a
ô
quarter
ô
of
ô
a
ô
turn
ô
and
ô
extract
ô
it.
F
ô
Pull
ô
out
ô
the
ô
bulb
ô
and
ô
change
ô
it.
To
ô
reassemble,
ô
carry
ô
out
ô
these
ô
opera
-
tions
ô
in
ô
reverse
ô
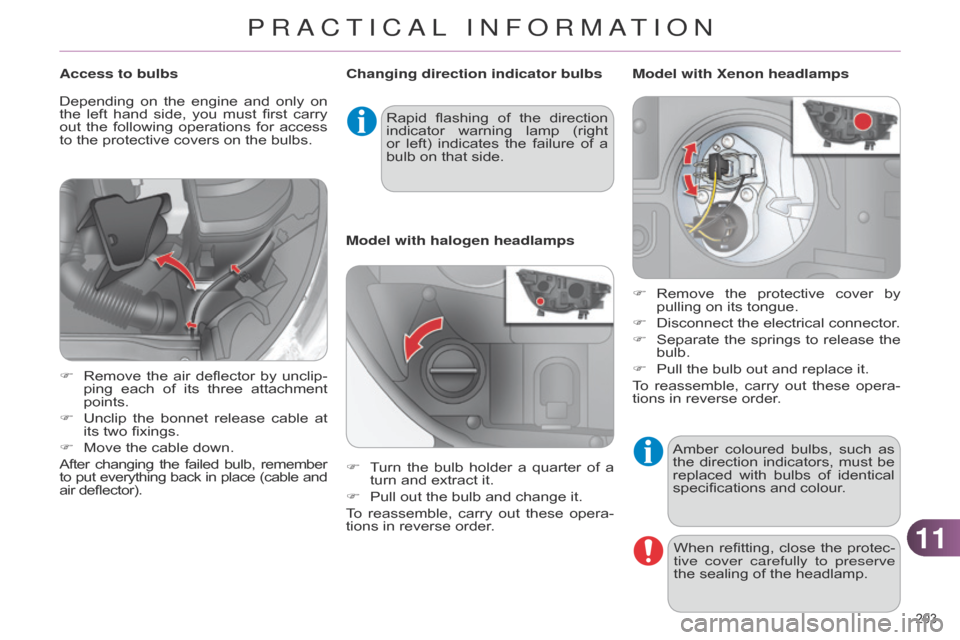
order. Model with Xenon headlamps
F
ô
Remove
ô
the
ô
protective
ô
cover
ô
by
ô
pullin
g ô on ô its ô tongue.
F
ô
Disconnect
ô the ô electrical ô connector.
F
ô
Separate
ô
the
ô
springs
ô
to
ô
release
ô
the
ô
bulb.
F
ô
Pull
ô the ô bulb ô out ô and ô replace ô it.
To
ô
reassemble,
ô
carry
ô
out
ô
these
ô
opera
-
tions
ô
in ô reverse ô order.
PRACTICAL INFORMATION
Page 216 of 340
1111
214ô
C4-2_en_Chap11_info-pratique_ed01-2014
Charging the battery using
a battery chargerItô is ô advisable ô to ô disconnect ô theô battery if the vehicle is to be left
unused
ô for ô more ô than ô one ô month.
The
ô
batteries
ô
contain
ô
harmful
ô
substances
such as sulphuric
acid
ô
and
ô
lead.
ô
They
ô
must
ô
be
ô
disposed
ô
of
ô
in
ô
accordance
ô
with
ô
regulations
ô
and
ô
must
ô
not,
ô
in
ô
any
ô
circumstances,
ô
be
ô
discarded
ô
with
ô
household
ô
waste.
Take
ô
used
ô
remote
ô
control
ô
bat
-
teries
ô
and
ô
vehicle
ô
batteries
ô
to
ô
a
ô
special
ô
collection
ô
point.
F
Disconnectô the ô battery ô from ô the ô vehicle.
F Follow the instructions for use pro -
vided ô by ô the ô manufacturer ô of ô the ô
charger
.
F
ô
Connect
ô
the
ô
battery
ô
starting
ô
with
ô
the
ô
negative
ô terminal ô (-).
F
ô
Check
ô
that
ô
the
ô
terminals
ô
and
ô
con
-
nectors
ô
are
ô
clean.
ô
If
ô
they
ô
are
ô
coveredô with
ô
sulphate
ô
(whitish
ô
or
ô
greenish
ô
deposit),
ô
remove
ô
them
ô
and
ô
clean
ô
them. Protect
ô
your
ô
eyes
ô
and
ô
face
ô
be
-
fore ô handling ô the ô battery.
a
ll operations on the battery
must ô be ô carried ô out ô in ô a ô well ô ventilated
ô area ô and ô away ô from ô naked
ô flames ô and ô sources ô of ô
sparks,
ô
so
ô
as
ô
to
ô
avoid
ô
the
ô
risk
ô
of
ô
explosion
ô or ô fire.
Do
ô
not
ô
try
ô
to
ô
charge
ô
a
ô
frozen
ô
battery;
ô
the
ô
battery
ô
must
ô
first
ô
be
ô
thawed
ô
out
ô
to
ô
avoid
ô
the
ô
risk
ô
of
ô
explosion.
ô
If
ô
the
ô
battery
ô
has
ô
been
ô
frozen,
ô
before
ô
charging
ô
have
ô
it
ô
checked
ô
by
ô
a
ô
CITROûN
ô
dealer
ô
or
ô
a
ô
qualified
ô
workshop
ô
who
ô
will
ô
check
ô
that
ô
the
ô
inter
-
nal
ô
components
ô
have
ô
not
ô
been
ô
damaged
ô
and
ô
the
ô
casing
ô
is
ô
not
ô
cracked,
ô
which
ô
could
ô
cause
ô
a
ô
leak
ô of ô toxic ô and ô corrosive ô acid.
Do
ô
not
ô
reverse
ô
the
ô
polarity
ô
and
ô
use
ô only ô a ô 12 ô V ô charger.
Do
ô
not
ô
disconnect
ô
the
ô
terminals
ô
while
ô the ô engine ô is ô running.
Do
ô
not
ô
charge
ô
the
ô
batteries
ô
with
-
out
ô
disconnecting
ô
the
ô
terminals
ô
first.
W
ash ô your ô hands ô afterwards.
Reinitialisation after
reconnection
after any reconnection of the battery,
switch ô on ô the ô ignition ô and ô wait ô at ô least ô
one
ô
minute
ô
before
ô
starting,
ô
to
ô
allow
ô
time
ô
for
the initialisation of the
electronic
systems.
By
ô
referring
ô
to
ô
the
ô
corresponding
ô
sec
-
tions,
ô
you
ô
should
ô
set
ô
or
ô
initialise
ô
the
ô
fol
-
lowing
ô systems ô yourself:
-
ô
one-touch
ô electric ô windows,
-
ô
time
ô and ô date,
-
ô
audio
ô
and
ô
navigation
ô
system
ô
set
-
tings.
Check
ô
that
ô
no
ô
alert
ô
message
ô
or
ô ô
warning
ô
lamp
ô
comes
ô
on
ô
after
ô
switching
ô
on
ô
the
ô
ignition.
However
, ô
if
ô
minor
ô
problems
ô
persist
ô
ô
after
ô
carrying
ô
out
ô
these
ô
operations,
ô
contact
ô
a
ô
CITROûN
ô
dealer
ô
or
ô
a
ô
quali
-
fied
ô ô
workshop. Some
ô
functions
ô
are
ô
not
ô
available
ô
if
ô
the
ô
battery
ô
is
ô
not
ô
sufficiently
ô
charged.
d
o not push the vehicle to start
the
ô
engine
ô
if
ô
you
ô
have
ô
an
ô
elec
-
tronic
ô or ô automatic ô gearbox.
With Stop & Start, the battery
does
ô
not
ô
have
ô
to
ô
be
ô
disconnect
-
ed
ô for ô charging.
PRACTICAL INFORMATION
Page 220 of 340
1111
218ô
C4-2_en_Chap11_info-pratique_ed01-2014
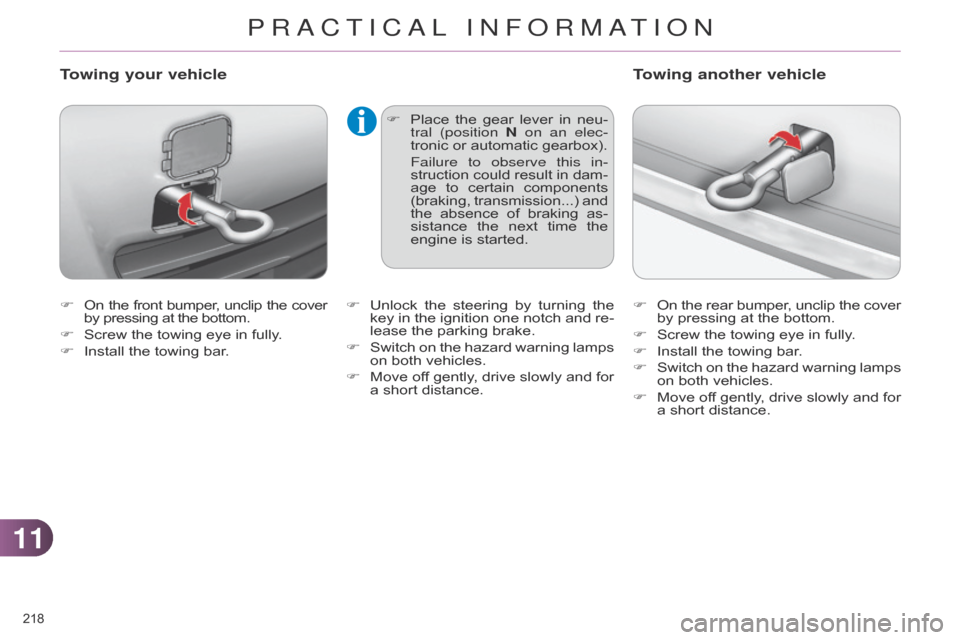
Fô Onô the ô front ô bumper , ô unclip ô the ô coverô by
ô pressing ô at ô the ô bottom.
F
ô
Screw
ô the ô towing ô eye ô in ô fully.
F
ô
Install
ô the ô towing ô bar.
Towing your vehicle
Fô Placeô the ô gear ô lever ô in ô neu -
tral (position N on an elec-
tronic
ô or ô automatic ô gearbox).
Failure to observe this in
-
struction
ô
could
ô
result
ô
in
ô
dam
-
age
ô
to
ô
certain
ô
components
ô
(braking,
ô
transmission...)
ô
and
ô
the
ô
absence
ô
of
ô
braking
ô
as
-
sistance
ô
the
ô
next
ô
time
ô
the
ô
engine
ô is ô started. F
ô
On
ô
the
ô
rear
ô
bumper
, ô
unclip
ô
the
ô
coverô by
ô pressing ô at ô the ô bottom.
F
ô
Screw
ô the ô towing ô eye ô in ô fully.
F
ô
Install
ô the ô towing ô bar.
F
ô
Switch
ô
on
ô
the
ô
hazard
ô
warning
ô
lamps
ô
on
ô both ô vehicles.
F
ô
Move
ô
of
f ô
gently
, ô
drive
ô
slowly
ô
and
ô
for
ô
a
ô short ô distance.
Towing another vehicle
Fô Unlockô the ô steering ô by ô turning ô the ô key
ô in ô the ô ignition ô one ô notch ô and ô re -
lease
ô the ô parking ô brake.
F
ô
Switch
ô
on
ô
the
ô
hazard
ô
warning
ô
lamps
ô
on
ô both ô vehicles.
F
ô
Move
ô
of
f ô
gently
, ô
drive
ô
slowly
ô
and
ô
for
ô
a
ô short ô distance.
PRACTICAL INFORMATION
Page 221 of 340
1111
219ô
C4-2_en_Chap11_info-pratique_ed01-2014
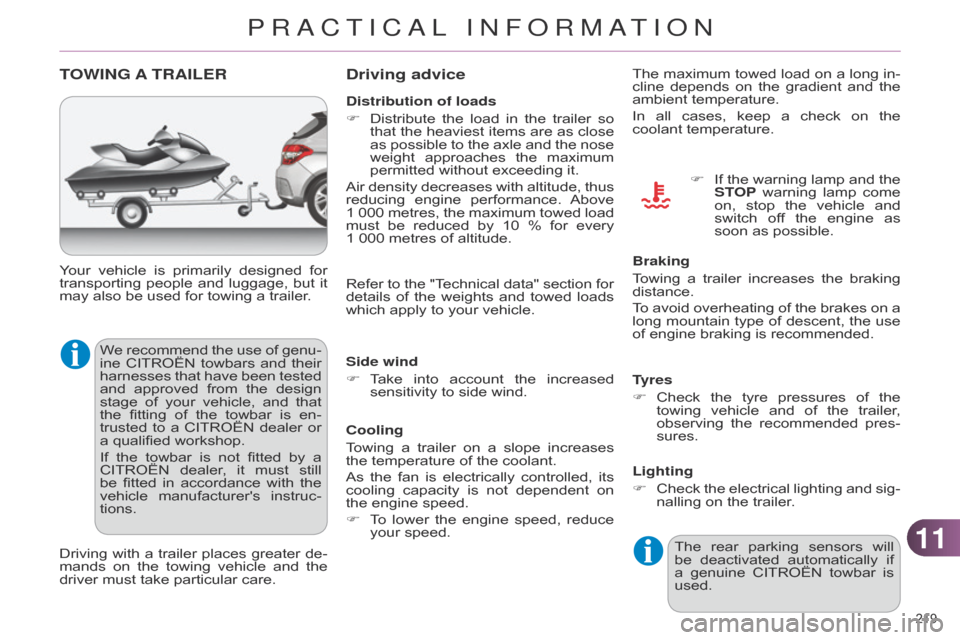
TOWING A TRAILER
Weô recommend ô the ô use ô of ô genu -
ine ô CITROûN ô towbars ô and ô their ô
harnesses
ô
that
ô
have
ô
been
ô
tested
ô
and
ô
approved
ô
from
ô
the
ô
design
ô
stage
ô
of
ô
your
ô
vehicle,
ô
and
ô
that
ô
the
ô
fitting
ô
of
ô
the
ô
towbar
ô
is
ô
en
-
trusted
ô
to
ô
a
ô
CITROûN
ô
dealer
ô
or
ô
a
ô qualified ô workshop.
If
ô
the
ô
towbar
ô
is
ô
not
ô
fitted
ô
by
ô
a
ô
CITROûN
ô
dealer
, ô
it
ô
must
ô
still
ô
be
ô
fitted
ô
in
ô
accordance
ô
with
ô
the
ô
vehicle
ô
manufacturer's
ô
instruc
-
tions.
Your
ô
vehicle
ô
is
ô
primarily
ô
designed
ô
for
ô
transporting
ô
people
ô
and
ô
luggage,
ô
but
ô
it
ô
may
ô
also ô be ô used ô for ô towing ô a ô trailer.
Driving ô
with
ô
a
ô
trailer
ô
places
ô
greater
ô
de
-
mands
ô
on
ô
the
ô
towing
ô
vehicle
ô
and
ô
the
ô
driver
ô must ô take ô particular ô care.
Driving advice
Distribution of loads
Fô
Distribute
ô
the
ô
load
ô
in
ô
the
ô
trailer
ô
so
ô
that
ô
the
ô
heaviest
ô
items
ô
are
ô
as
ô
close
ô
as
ô
possible
ô
to
ô
the
ô
axle
ô
and
ô
the
ô
nose
ô
weight
ô
approaches
ô
the
ô
maximum
ô
permitted
ô without ô exceeding ô it.
Air
ô
density
ô
decreases
ô
with
ô
altitude,
ô
thus
ô
reducing
ô
engine
ô
performance.
ô
Above
ô
1ô
000 ô
metres,
ô
the
ô
maximum
ô
towed
ô
load
ô
must
ô
be
ô
reduced
ô
by
ô
10ô
% ô
for
ô
every
ô
1ô 000
ô metres ô of ô altitude.
Side wind
F
ô
T
ake ô
into
ô
account
ô
the
ô
increased
ô
sensitivity
ô to ô side ô wind.
Cooling
Towing
ô
a
ô
trailer
ô
on
ô
a
ô
slope
ô
increases
ô
the
ô temperature ô of ô the ô coolant.
As
ô
the
ô
fan
ô
is
ô
electrically
ô
controlled,
ô
its
ô
cooling
ô
capacity
ô
is
ô
not
ô
dependent
ô
on
ô
the
ô engine ô speed.
F
ô
T
o ô
lower
ô
the
ô
engine
ô
speed,
ô
reduce
ô
your
ô speed. The
ô
maximum
ô
towed
ô
load
ô
on
ô
a
ô
long
ô
in
-
cline ô depends ô on ô the ô gradient ô and ô the ô ambient
ô temperature.
In ô all ô cases, ô keep ô a ô check ô on ô the ô
ô
coolant
ô temperature.
F
ô
If
ô
the
ô
warning
ô
lamp
ô
and
ô
the
ô
ST
OP ô
warning
ô
lamp
ô
come
ô
on,
ô
stop
ô
the
ô
vehicle
ô
and
ô
switch
ô
of
f ô
the
ô
engine
ô
as
ô
soon
ô as ô possible.
Braking
Towing
ô
a
ô
trailer
ô
increases
ô
the
ô
braking
ô
distance.
T
o ô
avoid
ô
overheating
ô
of
ô
the
ô
brakes
ô
on
ô
a
ô
long
ô
mountain
ô
type
ô
of
ô
descent,
ô
the
ô
use
ô
of
ô engine ô braking ô is ô recommended.
Tyres
F
ô
Check
ô
the
ô
tyre
ô
pressures
ô
of
ô
the
ô
towing
ô
vehicle
ô
and
ô
of
ô
the
ô
trailer
, ô
observing
ô
the
ô
recommended
ô
pres
-
sures.
Lighting
F
ô
Check
ô
the
ô
electrical
ô
lighting
ô
and
ô
sig
-
nalling
ô on ô the ô trailer.
Refer
ô
to
ô
the
ô
"T
echnical ô
data"
ô
section
ô
for
ô
details
ô
of
ô
the
ô
weights
ô
and
ô
towed
ô
loads
ô
which
ô apply ô to ô your ô vehicle.
The
ô
rear
ô
parking
ô
sensors
ô
will
ô
be
ô
deactivated
ô
automatically
ô
if
ô
a
ô
genuine
ô
CITROûN
ô
towbar
ô
is
ô
used.
PRACTICAL INFORMATION
Page 223 of 340
1111
221ô
C4-2_en_Chap11_info-pratique_ed01-2014
ACCESSORIES
Aô wideô range ô of ô accessories ô and ô genu -
ine ô parts ô is ô available ô from ô the ô CITROûN ô
dealer
ô network.
These
ô
accessories
ô
and
ô
parts
ô
are
ô
all
ô
suitable
ô
for
ô
your
ô
vehicle
ô
and
ô
benefit
ô
from
ô
CITROûN's
ô
recommendation
ô
and
ô
warranty
.
Conversion kits
You
ô
can
ô
obtain
ô
an
ô
"Enterprise"
ô
kit
ô
to
ô
convert
ô
a
ô
trade
ô
vehicle
ô
to
ô
a
ô
private
ô
car
ô
and
ô vice-versa.
"Comfort":
door
ô
deflectors,
ô
side
ô
window
ô
blinds,
ô
rear
ô
screen
ô
blind,
ô
insulated
ô
module,
ô
coat
ô
hanger
ô
fixed
ô
to
ô
head
ô
restraint,
ô
reading
ô
lamp,
ô
mirror
ô
for
ô
caravan,
ô
cruise
ô
control,
ô
scented
ô
air
ô
freshener
ô
and
ô
car
-
tridges,
ô parking ô sensors... "Transport systems":
boot carpet, boot liner, boot net, boot
spacers, transverse roof bars, bicycle
carrier,
ô
ski
ô
carrier
, ô
roof
ô
boxes,
ô
towbars,
ô
towbar
ô wiring ô harnesses...
"Styling":
gear
ô
lever
ô
knobs,
ô
aluminium
ô
foot
ô
rest,
ô
alloy
ô
wheels,
ô
wheel
ô
embellishers,
ô
chrome
ô
mirror
ô
shells,
ô
chrome
ô
door
ô
ô
aperture
ô
finishers,
ô
door
ô
sill
ô
finishers,
ô
tailgate
ô lower ô chrome ô finisher...*
ô
T
o ô
avoid
ô
any
ô
risk
ô
of
ô
jamming
ô
the
ô
pedals:-
ô
ensure
ô
that
ô
mats
ô
are
ô
correctly
ô
positioned
ô and ô secured,
-
ô
never
ô
fit
ô
one
ô
mat
ô
on
ô
top
ô
of
ô
ô
another
.
"Security and safety":
anti-intrusion
ô alarm, ô microwave ô sensor , ô anti-tilt
ô sensor , ô stolen ô vehicle ô tracking ô
system,
ô
child
ô
seats
ô
and
ô
booster
ô
cush
-
ions,
ô
breathalyser
, ô
first
ô
aid
ô
kit,
ô
fire
ô
extin
-
guisher,
ô
warning
ô
triangle,
ô
high
ô
visibility
ô
vest,
ô
dog
ô
guard,
ô
pet
ô
seat
ô
belt,
ô
wheel
ô
security
ô
bolts,
ô
snow
ô
chains,
ô
non-slip
ô
covers,
ô front ô foglamp ô kit...
"Protection":
mats*,
ô
seat
ô
covers
ô
compatible
ô
with
ô
ô
lateral
ô
airbags,
ô
door
ô
sill
ô
protectors,
ô
mud
ô
flaps,
ô
door
ô
protective
ô
rubbing
ô
strips,
ô
bumper
ô
protection
ô
strips,
ô
protective
ô
covers
ô for ô pets, ô vehicle ô cover...
If
ô
a
ô
towbar
ô
and
ô
wiring
ô
harness
ô
are
ô
fitted
ô
outside
ô
the
ô
CITROûN
ô
dealer
ô
network,
ô
the
ô
installation
ô
must
ô
be
ô
done
ô
using
ô
the
ô
vehicle's
ô
electrical
ô
pre-equipment
ô
and
ô
in
ô
line
ô
with
ô
the
ô
manufacturer's
ô
rec
-
ommendations.
PRACTICAL INFORMATION
Page 224 of 340
1111
222
C4-2_en_Chap11_info-pratique_ed01-2014
Installation of radio
communication transmitters
Beforeô
installin
g ô
any
ô
after-
market
ô
radio
ô
communication
ô
transmitter
, ô
you
ô
can
ô
contact
ô
a
ô
CITROûN
ô
dealer
ô
for
ô
the
ô
speci
-
fication
ô
of
ô
transmitters
ô
which
ô
can
ô
be
ô
fitted
ô
(frequency
, ô
maxi
-
mum
ô
power
, ô
aerial
ô
position,
ô
specific
ô
installation
ô
require
-
ments),
ô
in
ô
line
ô
with
ô
the
ô
V
ehicle ô
Electromagnetic
ô
Compatibility
ô
Directive ô (2004/104/EC). Depending
ô on ô the ô legislation ô in ô force
in the country, certain safe-
ty
ô
equipment
ô
may
ô
be
ô
compul
-
sory:
ô
high
ô
visibility
ô
safety
ô
vests,
ô
warning
ô
triangles,
ô
breathalyzers,
ô
spare
ô
bulbs,
ô
spare
ô
fuses,
ô
fire
ô
ex
-
tinguisher,
ô
first
ô
aid
ô
kit,
ô
mud
ô
flaps
ô
at
ô the ô rear ô of ô the ô vehicle.
The
ô
fitting
ô
of
ô
electrical
ô
equip
-
ment
ô
or
ô
accessories
ô
which
ô
are
ô
not
ô
recommended
ô
by
ô
CITROûN
ô
may
ô
result
ô
in
ô
a
ô
failure
ô
of
ô
your
ô
ve
-
hicle's
ô
electronic
ô
system
ô
and
ô
ex
-
cessive
ô electrical ô consumption.
Contact
ô
a
ô
CITROûN
ô
dealer
ô
for
ô
information
ô
on
ô
the
ô
range
ô
of
ô
recommended
ô
equipment
ô
and
ô
ô
accessories.
"Multimedia":
audio
ô
systems,
ô
steering
ô
mounted
ô
au
-
dio
ô
controls,
ô
speakers,
ô
Hi-Fi
ô
module,
ô
Bluetooth
ô
hands-free
ô
system,
ô
port
-
able
ô
satellite
ô
navigation
ô
system,
ô
semi-
integral
ô
support
ô
bracket
ô
for
ô
portable
ô
navigation
ô
system,
ô
mapping
ô
update
ô
CD,
ô
driving
ô
assistant,
ô
portable
ô
video
ô
screen,
ô
portable
ô
video
ô
support
ô
bracket,
ô
230ô
V/50 ô
Hz
ô
socket,
ô
230
ô
V/50
ô
Hz
ô
adap
-
tor, iPhone
ôÛô compatible ô mobile ô phone ô charger
,
ô mobile ô phone/smartphone ô
bracket,
ô
Wi-Fi ô on ô board... By
ô
going
ô
to
ô
a
ô
CITROûNô
dealer, ô
you
ô
can
ô
also
ô
obtain
ô
cleaning
ô
and
ô
maintenance
ô
products
ô
(interior
ô
and
ô
exterior)ô
-ô in-
cluding ô
ecological
ô
products
ô
in
ô
the
ô
"TECHNA
TURE" ô
range
ô
-,
ô
products
ô
for
ô
topping
ô
up
ô
(screenwash...),
ô
touch-up
ô
pens
ô
and
ô
paint
ô
aerosols
ô
for
ô
the
ô
exact
ô
colour
ô
of
ô
your
ô
vehicle,
ô
recharges
ô
(car
-
tridge ô
for
ô
the
ô
temporary
ô
puncture
ô
repair
ô
kit...),
ô ...
PRACTICAL INFORMATION
Page 227 of 340

225ô
C4-2_en_Chap12_caracteristique_ed01-2014
*ô Theô kerb ô weight ô is ô equal ô to ô the ô unladen ô weight ô + ô driver ô (75 ô kg).
** ô ô
The
ô
weight
ô
of
ô
the
ô
braked
ô
trailer
ô
can
ô
be
ô
increased,
ô
within
ô
the
ô
GTW
ô
limit,
ô
if
ô
the
ô
GVW
ô
of
ô
the
ô
towing
ô
vehicle
ô
is
ô
reduced
ô
by
ô
an
ô equal ô amount. ô Warning: ô towing ô using ô a ô lightly ô loaded ô towing ô vehicle ô may ô have ô an ô adverse ô effect ô on ô its ô road ô holding.
PETROL WEIGHTS AND TOWED LOADS ( IN KG )
Theô GTWô and ô towed ô load ô values ô indicated ô are ô valid ô up ô to ô a ô maximum ô altitude ô of ô 1 ô 000 ô metres; ô the ô towed ô load ô mentioned ô must
ô be ô reduced ô by ô 10 ô % ô for ô each ô additional ô 1 ô 000 ô metres ô of ô altitude.
When
ô towing, ô the ô maximum ô authorised ô speed ô is ô reduced ô (comply ô with ô the ô legislation ô in ô force ô in ô your ô country).
High
ô
ambient
ô
temperatures
ô
may
ô
result
ô
in
ô
a
ô
reduction
ô
in
ô
the
ô
performance
ô
of
ô
the
ô
vehicle
ô
to
ô
protect
ô
the
ô
engine;
ô
if
ô
the
ô
ambient
ô
temperature
ô is ô above ô 37 ô ô¯C, ô limit ô the ô towed ô load.
Petrol engine
VTi 95 THP 110VTi 120
Gearbox Manual Manual Manual Automatic
Model code:
NC... 8FR0HNZ6
HNZ6/1 -/2 5FS05FS9
5FS9/D
- ô
Unladen
ô weight
1 ô 200
1 ô 200
1 ô 205
1 ô 270
- ô
Kerb
ô weight*
1 ô 275
1 ô 275
1 ô 280
1 ô 345
- ô
Gross
ô vehicle ô weight ô (GVW)
1 ô 720
1 ô 770
1 ô 765
1 ô 755
- ô
Gross
ô train ô weight ô (GTW) ô
ô
on
ô a ô 12 ô % ô gradient
2 ô 920
2 ô 970
3 ô 065
3 ô 055
- ô
Braked
ô trailer ô (within ô the ô GTW ô limit) ô
ô
on
ô a ô 12 ô % ô gradient
1 ô 200
1 ô 200
1 ô 300
1 ô 300
- ô
Braked
ô
trailer**
ô
(with
ô
load
ô
transfer
ô
within
ô
the
ô
GTW
ô limit)
1 ô 450
1 ô 450
1 ô 550
1 ô 550
- ô
Unbraked
ô trailer
635635640670
- ô
Recommended
ô nose ô weight
75757575
12
TECHNICAL DATA