fog light Citroen C4 DAG 2014.5 2.G Owner's Manual
[x] Cancel search | Manufacturer: CITROEN, Model Year: 2014.5, Model line: C4 DAG, Model: Citroen C4 DAG 2014.5 2.GPages: 340, PDF Size: 12.89 MB
Page 6 of 340

4
C4-2_en_Chap00b_vue-ensemble_ed01-2014
4
C4-2_en_Chap00b_vue-ensemble_ed01-2014
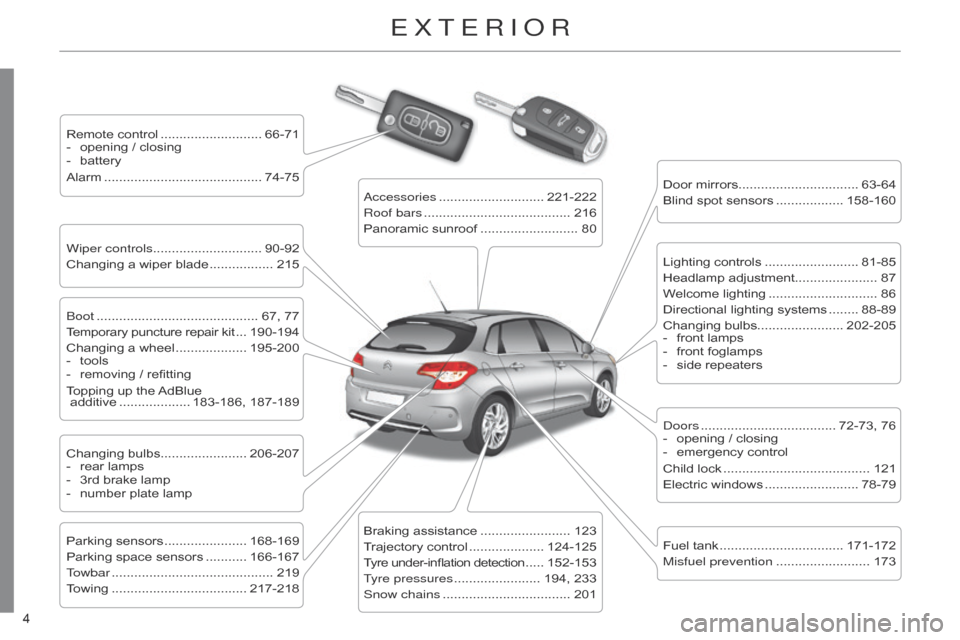
ExTERIoR
Remote control ........................... 66-71
- opening / closing
-
battery
Alarm
.......................................... 74-75
Wiper controls............................. 90-92
Changing
a wiper blade
................. 215 Door
mirrors
................................ 63-64
Blind
spot sensors
.................. 158-160
b
oot
........................................... 67,
77
Temporary
puncture repair kit
... 190-194
Changing
a wheel
................... 195-200
-
tools
-
removing
/ refitting
Topping
up the
AdBlue
additive
................... 183-186,
187-189
Changing
bulbs....................... 206-207
-
rear
lamps
-
3rd
brake lamp
-
number
plate lamp
Parking
sensors
...................... 168-169
Parking
space sensors
........... 166-167
T
owbar
........................................... 219
T
owing
.................................... 217-218
a
ccessories
............................ 221-222
Roof bars
....................................... 216
Panoramic
sunroof
.......................... 80
Braking
assistance
........................ 123
T
rajectory control
.................... 124-125
T
yre under-inflation detection
..... 152-153
T
yre pressures
....................... 194,
233
Snow chains
.................................. 201Lighting
controls
......................... 81-85
Headlamp
adjustment...................... 87
Welcome
lighting
............................. 86
Directional
lighting systems
........ 88-89
Changing
bulbs....................... 202-205
-
front
lamps
-
front
foglamps
-
side
repeaters
d
oors
.................................... 72-73,
76
-
opening
/ closing
-
emergency
control
Child
lock
....................................... 121
Electric
windows
......................... 78-79
Fuel
tank
................................. 171-172
Misfuel prevention
......................... 173
Page 12 of 340

10
Eco-driving is a range of everyday practices that allow the motorist to optimise their fuel consumption and CO2 emissions.
Optimise the use of your gearbox
With a manual gearbox, move of f gently and change up without
waiting. During acceleration change up early.
With
an
automatic
or
electronic
gearbox,
give
preference
to
automatic
mode
and
avoid
pressing
the
accelerator
pedal
heavily
or suddenly.
Drive smoothly
Maintain a safe distance between vehicles, use engine braking
rather than the brake pedal, and press the accel -
erator
progressively
.
These
practices
contribute
towards
a
reduction
in fuel consumption and CO
2 emissions and also helps
reduce
the
background
traffic
noise.
If
your
vehicle
has
cruise
control,
make
use
of
the
system
at speeds
above
25
mph
(40
km/h)
when
the
traffic
is
flowing well.
Control the use of your electrical equipment
Before moving of f, if the passenger compartment is too warm,
ventilate it by opening the windows and air vents
before
using the air conditioning.
Above
30
mph
(50
km/h),
close
the
windows
and
leave
the
air
vents open.
Remember
to
make
use
of
equipment
that
can
help
keep
the
temperature
in
the
passenger
compartment
down
(sun
-
roof
and window blinds...).
Switch
of
f
the
air
conditioning,
unless
it
has
automatic
regu
-
lation,
as soon as the desired temperature is attained.
Switch
of
f
the
demisting
and
defrosting
controls,
if
not
au
-
tomatic.
Switch
off the heated seat as soon as possible.
Switch
of
f
the
headlamps
and
front
foglamps
when
the
level of
light does not require their use.
Avoid
running
the
engine
before
moving
of
f,
particularly
in
winter;
your
vehicle
will
warm
up
much
faster
while
driving.
As
a
passenger
,
if
you
avoid
connecting
your
multimedia
devices
(film,
music,
video
game...),
you
will
contribute
to
-
wards
limiting
the
consumption
of
electrical
energy
,
and
so
of
fuel.
Disconnect
your
portable
devices
before
leaving
the
ve
-
hicle.
ECO-DRIVING
The gear shift indicator invites you engage the most suit -
able gear: as soon as the indication is displayed in the in -
strument
panel, follow it straight away.
For
vehicles
fitted
with
an
electronic
or
automatic
gearbox,
this
indicator appears only in manual mode.
Page 27 of 340

25
C4-2_en_Chap01_controle-de-marche_ed01-2014
Operation indicator lamps
If one of the following indicator lamps comes on, this confirms that the corresponding system has come into operation.
It
may be accompanied by an audible signal and a message in the screen.
Warning/indicator lamp is onCause Action/Observations
Left-hand direction
indicator flashing
with
buzzer
.The
lighting stalk is pushed
down.
Right-hand direction
indicator flashing
with
buzzer
.The
lighting stalk is pushed up.
Hazard warning lamps flashing
with
audible
signal.The
hazard warning lamps
switch,
located on the
dashboard,
has been operated.The
left-hand and right-hand direction
indicators
and their associated indicator
lamps
flash simultaneously.
Sidelamps fixed.The
lighting stalk is in the
"Sidelamps"
position.
Dipped beam headlamps fixed.The
lighting stalk is in the
"Dipped
beam headlamps"
position
or in the "AUTO"
position
in conditions of low
light.
Main beam
headlamps fixed.The
lighting stalk is pulled
towards
you.Pull
the stalk again to return to dipped
beam
headlamps.
Front foglamps fixed.The
front foglamps are
switched
on using the ring on
the
lighting control stalk.Turn
the ring on the lighting control stalk
rearwards
twice to switch off the front
foglamps.
Rear foglamps fixed. The
rear foglamps are on.Turn
the ring on the stalk rearward to turn
of
f the rear foglamps.
1
MONITORING
Page 83 of 340

55
81
C4-2_en_Chap05_visibilite_ed01-2014
LIGHTING CONTROLS
System for selection and control of the various
front and rear lamps providing
the
vehicle's lighting.
Main lighting
The various front and rear lamps of the vehicle
are designed to adapt the driver's visibility
progressively
according
to
the climatic
conditions:
-
sidelamps,
to be seen,
-
dipped
beam
headlamps
to
see
without
dazzling other drivers,
-
main beam headlamps to see clearly when
the road is clear.
Additional lighting
Other lamps are provided to meet the requirements
of particular driving con -
ditions:
-
rear
foglamps,
-
front
foglamps
with
cornering
lighting,
-
directional
headlamps
for
improved
visibility
when cornering,
-
daytime
running
lamps
to
be
more
visible
during the day,
-
guide-me-home
and
welcome
light
-
ing
to
facilitate
access
to
the
vehicle,
-
parking
lamps
as
vehicle
position
markers.
Programming
The setting of some functions can be adjusted:
-
daytime
running lamps,
-
automatic
illumination
of
headlamps,
-
guide-me-home
lighting,
-
welcome
lighting,
-
directional
lighting.
In
some
weather
conditions
(e.g. low
temperature
or
humidity),
the presence
of
misting
on
the
inter
-
nal
surface
of
the
glass
of
the headlamps
and
rear
lamps
is
nor
-
mal;
it
disappears
after
the
lamps have
been
on
for
a
few
minutes.
VISIBILITY
Page 85 of 340

55
83
C4-2_en_Chap05_visibilite_ed01-2014
C. Foglamp selection ring.
The
foglamps
operate
with
the
dipped
and
main beam headlamps.
They
operates
with
the
dipped
beam headlamps
and main beam headlamps.
F
T
o
switch
on
the
rear
foglamps,
turn
the
ring C forwards.
F
T
o
switch
of
f
the
rear
foglamps,
turn
the
ring C rearwards.
When automatic illumination of headlamps is
on (with AUT O model), the dipped beam headlamps
and
sidelamps
remain
on
while the
rear foglamps are on.
Model with rear foglamps only rear foglamps
Rotate
and release the ring C:
F
forwards
a
first
time
to
switch
on
the
front
foglamps,
F
forwards
a
second
time
to
switch
on
the
rear foglamps,
F
rearwards
a
first
time
to
switch
of
f
the
rear foglamps,
F
rearwards
a
second
time
to
switch
of
the front fog lamps.
Model with front and
rear foglamps front
and rear foglampsWhen
the
headlamps
switch
of
f
with automatic
illumination
of
headlamps (AUT
O
model)
or
when
the
dipped
beam headlamps
are
switched
of
f
manually
,
the
foglamps and sidelamps remain on.
F
T
urn
the
ring
rearwards
to
switch
of
f
the
foglamps,
the
sidelamps
will
then
switch off.
In
good
or
rainy
weather
,
by
both
day
and
night,
the
front
foglamps
and
the
rear
foglamps
are
pro
-
hibited.
In
these
situations,
the
power
of their beams may dazzle other
drivers. They should only be
used in fog or falling snow.
In
these
weather
conditions,
you
should
switch
on
the
foglamps
and
dipped
beam
headlamps
manually
,
as
the
sunshine
sen
-
sor
may detect sufficient light.
Do
not
forget
to
switch
of
f
the
front
and
rear
foglamps
when
they
are no longer necessary.
VISIBILITY
Page 87 of 340

55
85
C4-2_en_Chap05_visibilite_ed01-2014
Automatic illumination of
headlamps
The sidelamps and dipped beam head -
lamps are switched on automatically ,
without any action on the part of the
driver
,
when
a
low
level
of
external
light
is
detected
or
in
certain
cases
of
activa
-
tion
of the windscreen wipers.
As
soon
as
the
brightness
returns
to
a
sufficient
level
or
after
the
windscreen
wipers
are
switched
of
f,
the
lamps
are
switched
off automatically.
Activation
F
T
urn
ring
A to the
"AUTO"
position. The
automatic
illumination
of
head
-
lamps
is accompanied by
a
message in
the screen.
Deactivation
F
T
urn
ring
A
to a position other
than
"AUT
O".
Deactivation
is
ac
-
companied
by
a
message
in
the
screen.Coupling with the automatic "Guide-
me-home" lighting
Association
with the automatic illu mi-
nation of headlamps provides "guide-
me-home"
lighting
with
the
following
additional
options:
-
selection
of
the
lighting
duration
to
15,
30
or
60
seconds
in
the
settings
in
the
vehicle
configuration
menu
(except
in
the
case
of
the
mono
-
chrome
screen
A,
for
which
the
duration
is set: 60 seconds),
-
automatic
activation
of
"guide-me-
home"
lighting
when
automatic
illumi
-
nation
of headlamps is in operation.
In the event of a fault with the
sunshine sensor , the lighting come
on,
this
warning
lamp
is displayed
on
the
instrument
panel
and/or
a message
appears
in
the
screen,
accompa
-
nied
by
an
audible signal.
Contact
a
CITROËN
or
a
qualified
work
-
shop
workshop.
Operating fault
In
fog
or
snow
,
the
sunshine
sensor
may
detect
sufficient
light.
Therefore,
the
lighting
will
not
come on automatically.
d
o not cover the sunshine sen-
sor,
coupled
with
the
rain
sensor
and
located
in
the
centre
of
the
windscreen
behind
the
rear
view
mirror;
the
associated
functions
would
no longer be controlled.
VISIBILITY
Page 91 of 340

55
89
C4-2_en_Chap05_visibilite_ed01-2014
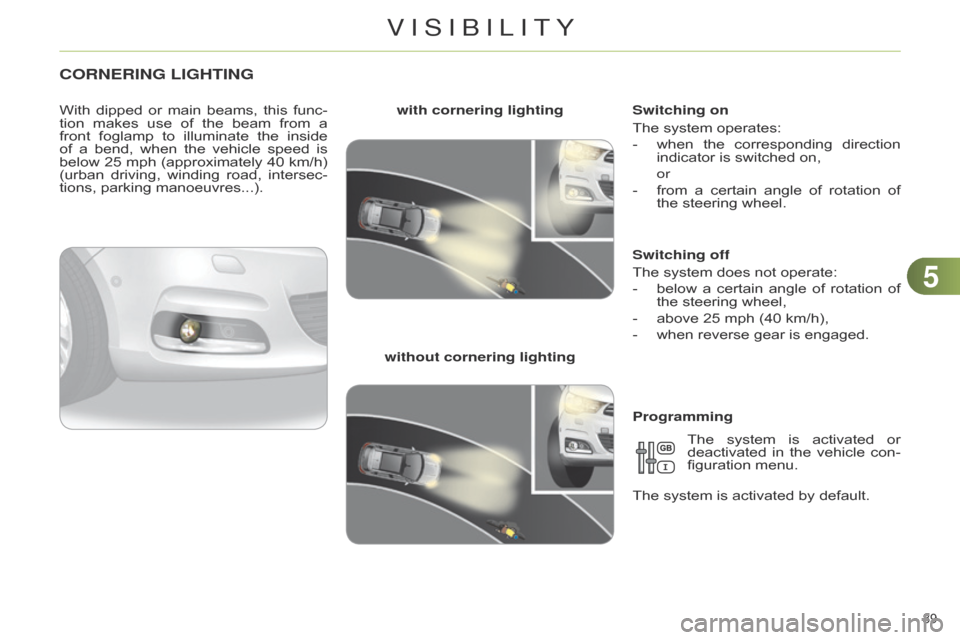
CORNERING LIGHTING
With dipped or main beams, this func -
tion makes use of the beam from a
front
foglamp
to
illu
minate
the
inside
of
a
bend,
when
the
vehicle
speed
is
below
25
mph
(approximately
40
km/h)
(urban
driving,
winding
road,
intersec
-
tions,
parking manoeuvres...). with cornering lighting
without cornering lighting Switching on
The
system operates:
-
when
the
corresponding
direction
indicator
is switched on,
or
-
from
a
certain
angle
of
rotation
of
the
steering wheel.
Switching off
The
system does not operate:
-
below
a
certain
angle
of
rotation
of
the
steering wheel,
-
above
25 mph (40 km/h),
-
when
reverse gear is engaged.
Programming The
system
is
activated
or
deactivated
in
the
vehicle
con
-
figuration
menu.
The
system is activated by default.
VISIBILITY
Page 204 of 340

1111
202
C4-2_en_Chap11_info-pratique_ed01-2014
CHANGING A BULB
The headlamps are fitted with polycarbonate
glass with a pro -
tective
coating:
F
do not clean them using a
dry or abrasive cloth,
nor
with a detergent or solvent
product,
F
use
a
sponge
and
soapy
wa
-
ter
or a pH neutral product,
F
when
using
a
high
pressure
washer
on
persistent
marks,
do
not
keep
the
lance
direct
-
ed
towards
the
lamps
or
their
edges
for
too
long,
so
as
not
to
damage
their
protective
coating
and seals.
Changing
a
bulb
should
only
be
done
after
the
headlamp
has
been
switched
of
f
for
several
minutes
(risk of serious burns).
F
Do
not
touch
the
bulb
directly
with
your
fingers,
use
a
lint-
free
cloth.
It
is
imperative
to
use
only
anti-
ultraviolet
(UV)
type
bulbs
to
avoid
damaging the headlamp.
Always
replace
a
failed
bulb
with
a
new
bulb
with
the
same
type
and
specification. Risk of electrocution
Xenon
bulbs
(D1S-35W)
must
be replaced
by
a
CITROËN
dealer or
a qualified workshop.
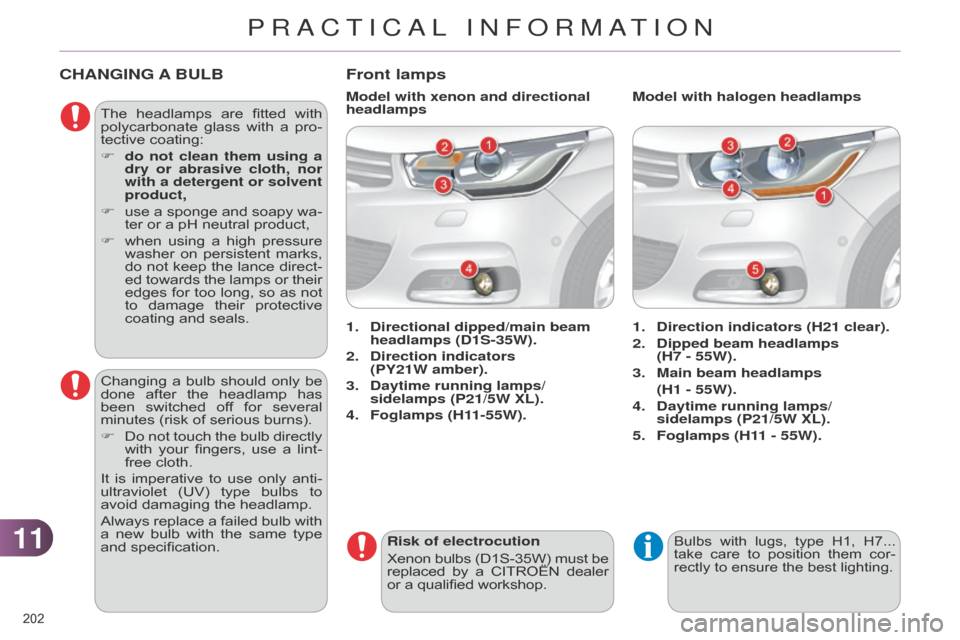
Front lamps
1. Direction indicators (H21 clear).
2.
Dipped beam headlamps
(H7 - 55W).
3.
Main beam headlamps
(H1 - 55W).
4.
Daytime running lamps/
sidelamps (P21/5W XL).
5.
Foglamps (H1
1 - 55W).
1.
Directional dipped/main beam
headlamps (D1S-35W).
2.
Direction indicators
(PY21W
amber).
3.
Daytime running lamps/
sidelamps (P21/5W XL).
4.
Foglamps (H1
1-55W). Model with halogen headlamps
Model with xenon and directional
headlamps
Bulbs with lugs, type H1, H7... take
care to position them cor -
rectly
to ensure the best lighting.
PRACTICAL INFORMATION
Page 330 of 340

328
C4-2_en_Chap14_index-alpha_ed01-2014
Courtesy mirror ............................ 96
Cruise control .................... 161, 164
Cup
holder
................................... 98
DAB
(Digital
Audio
Broadcasting)
................ 272,
273,
300,
301
Date
(setting)
................... 35,
37, 42
Daytime
running
lamps
........................ 82,
202, 204
Deactivating
the passenger
airbag...................................... 129
Defrosting
.................................... 56
Diesel
additive level
................... 180
Diesel
engine pre-heat
warning
lamp
............................ 26
Dimensions
................................ 232
Dipped
beam
............... 81,
202, 204
Dipstick
................................ 29,
178
Directional
lighting
................. 88,
89
Direction
indicators
............. 84,
122,
202,
203, 206
d
oors
........................................... 76
Doors
emergency
control
....................................... 73d
oor trays
.................................... 95
Driving
positions
(memorising)
............................. 61
Dynamic
emergency
braking
.................................... 137
Dynamic
stability control
(
d SC)
...................................... 124 Eco-driving
.................................. 10
Eco-driving (advice) ..................... 10
Economical
driving
..................... 10
Economy
mode.......................... 215
Electric
window controls
.............. 78
Electronic
brake force
distribution
(EBFD)
................. 123
Electronic
engine
immobiliser
....................... 71,
134
Electronic
gearbox
system
...... 10,
144, 154, 182, 214
Emergency
boot release.............. 77
Emergency
braking system
....... 123
Emergency
call
.......... 125,
235, 236
Emergency
warning lamps
........ 122
Emissions
control system,
SCR
.......................................... 24
eMyW
ay
............................... 41,
237
Energy
economy mode.............. 215
Engine
compartment
......... 176,
177
Engine
compartment
fusebox
................................... 208
Engine,
Diesel
.................... 26,
172,
174,
177, 227
Engine
oil
................................... 178
Engine
oil level indicator
...... 29,
178
Engine,
petrol
............ 172,
176, 223
Engines.............................. 223,
227
Environment
.......................... 10,
71
Equipment
settings
.... 35,
37, 41, 42Flashing
indicators.............. 84, 122,
203, 205
Foglamps,
rear
.................... 83,
206
Front
foglamps....... 83, 89, 202, 205
Front seats ....................... 57,
58, 61
Fuel...................................... 10,
172
Fuel
consumption
........................ 10
Fuel
filler flap
..................... 171,
173
Fuel
gauge................................. 171
Fuel
tank
............................ 171,
173
Fusebox,
dashboard
.................. 208
Fuses
......................................... 208
D
Fillin
g with fuel
.................... 171-173
Fitting
a wheel
........................... 198
Fitting
roof bars.......................... 216
Fittings,
boot
...................... 104,
107
Fitting
speakers
......................... 220
F G
Gearbox,
automatic
............ 10,
147,
182,
214
Gearbox,
manual
.............. 10,
143, 154, 182
Gear
efficiency indicator
............ 151
Gear lever
.................................... 10
Gear
lever, automatic
gearbox................................... 147
Gear
lever, manual gearbox
...... 143
Glove
box
.................................... 96
G.P
.S.
........................................ 246
Grab
handles
............................... 95
Guidance
........................... 244,
251
EBA
(Emergency braking
assistance)
............................. 123
E H
Halogen
headlamps................... 202
Hands-free
kit
.................... 260,
309
Hazard
warning lamps
............... 122
Headlamp
adjustment.................. 87
Headlamps,
directional
.....87,
88, 202
Headlamp
wash
........................... 91
aLPHabETICaL IndEx