tow Citroen C4 PICASSO 2011.5 1.G User Guide
[x] Cancel search | Manufacturer: CITROEN, Model Year: 2011.5, Model line: C4 PICASSO, Model: Citroen C4 PICASSO 2011.5 1.GPages: 352, PDF Size: 9.83 MB
Page 94 of 352

IV
92
ACCESS
FUEL TANK
Capacity of the tank: approxi-
mately 60 litres.
Low fuel level
When the low fuel level is
reached, this warning lamp
comes on in the instrument
panel, accompanied by an
audible warning and a message in
the multifunction screen.
When it fi rst comes on, around 7 litres
of fuel remain in the tank.
Until suffi cient fuel has been added,
this warning lamp comes on every
time the ignition is switched on, ac-
companied by an audible signal and
a message. Depending on the ver-
sion, this audible signal and mes-
sage are repeated with increasing
frequency, as the fuel level drops
towards " 0
".
You must refuel as soon as possible
to avoid running out. A label on the inner face of the fuel
fi ller fl ap reminds you of the type of
fuel to be used, according to your
engine type.
Additions of fuel must be of at least
5 litres to be registered by the fuel
gauge.
Refuelling
If you are fi lling your tank to the
top, do not persist after the 3rd
cut-off; this could cause mal-
functions.
With Stop & Start, never refuel with
the system in STOP mode; you
must switch off the ignition with the
key. Opening the fi ller cap may result
in an inrush of air. This vacuum is
entirely normal and results from the
sealing of the fuel system.
�)
Press and hold control A
, situ-
ated on the control panel on the
right hand side of the dashboard
until the fuel fl ap opens automa-
tically.
After switching off the ignition, this
control remains active for a few
minutes. If necessary, switch the
ignition on again to reactivate it.
�)
Take care to select the pump
that delivers the correct type of
fuel for your vehicle.
�)
Introduce the nozzle so as to
push in the metal non-return
valve B.
�)
Make sure that the nozzle is
pushed in as far as possible
before starting to refuel (risk of
blowback).
�)
Maintain this position throughout
the refuelling operation.
�)
Push on the fuel fi ller fl ap to
close it.
Page 96 of 352
V
94
VISIBILITY
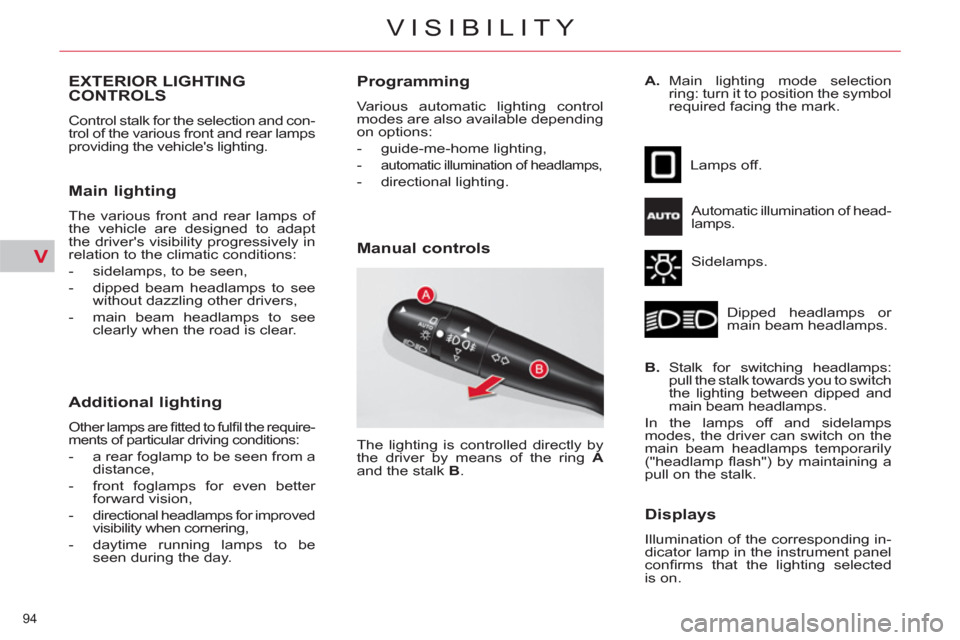
EXTERIOR LIGHTING
CONTROLS
Control stalk for the selection and con-
trol of the various front and rear lamps
providing the vehicle's lighting.
Main lighting
The various front and rear lamps of
the vehicle are designed to adapt
the driver's visibility progressively in
relation to the climatic conditions:
- sidelamps, to be seen,
- dipped beam headlamps to see
without dazzling other drivers,
- main beam headlamps to see
clearly when the road is clear.
Additional lighting
Other lamps are fi tted to fulfi l the require-
ments of particular driving conditions:
- a rear foglamp to be seen from a
distance,
- front foglamps for even better
forward vision,
- directional headlamps for improved
visibility when cornering,
- daytime running lamps to be
seen during the day.
Programming
Various automatic lighting control
modes are also available depending
on options:
- guide-me-home lighting,
-
automatic illumination of headlamps,
- directional lighting.
Manual controls
Lamps off.
Automatic illumination of head-
lamps.
Sidelamps.
Dipped headlamps or
main beam headlamps.
B.
Stalk for switching headlamps:
pull the stalk towards you to switch
the lighting between dipped and
main beam headlamps.
In the lamps off and sidelamps
modes, the driver can switch on the
main beam headlamps temporarily
("headlamp fl ash") by maintaining a
pull on the stalk.
Displays
Illumination of the corresponding in-
dicator lamp in the instrument panel
confi rms that the lighting selected
is on. The lighting is controlled directly by
the driver by means of the ring A
and the stalk B
.
A.
Main lighting mode selection
ring: turn it to position the symbol
required facing the mark.
Page 103 of 352
V
101
VISIBILITY
Reverse gear
When reverse gear is engaged, the
rear wiper will come into operation if
the windscreen wipers are operating.
Programming
The function is activated
or deactivated via the
vehicle confi guration
menu.
This function is activated
by default.
Windscreen and headlamp
wash
�)
Pull the windscreen wiper stalk
towards you. The windscreen
wash then the windscreen wipers
operate for a fi xed period.
The headlamp washers only operate
when the dipped beam headlamps
are on
.
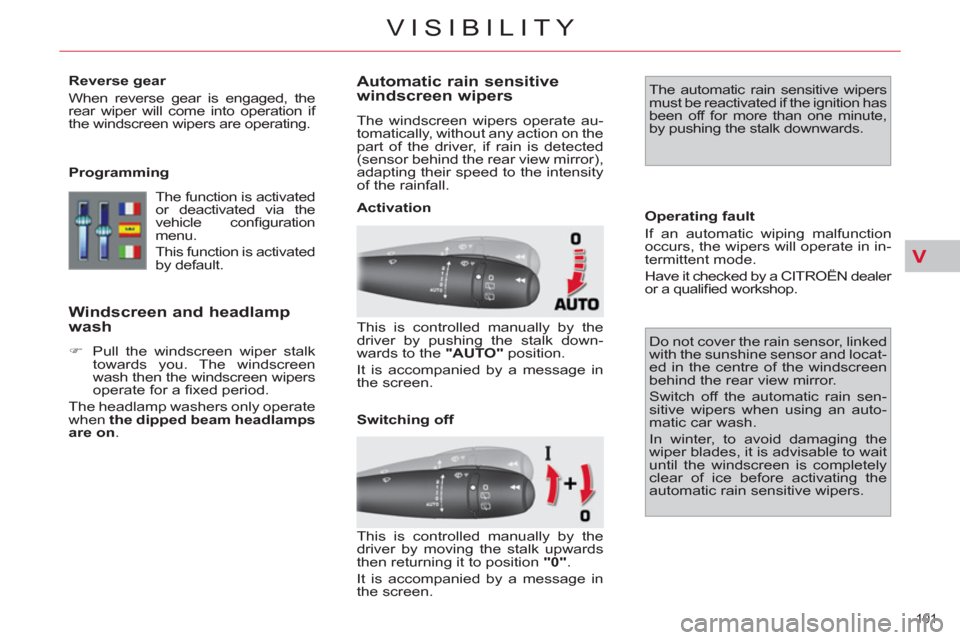
Automatic rain sensitive
windscreen wipers
The windscreen wipers operate au-
tomatically, without any action on the
part of the driver, if rain is detected
(sensor behind the rear view mirror),
adapting their speed to the intensity
of the rainfall.
This is controlled manually by the
driver by pushing the stalk down-
wards to the "AUTO"
position.
It is accompanied by a message in
the screen. The automatic rain sensitive wipers
must be reactivated if the ignition has
been off for more than one minute,
by pushing the stalk downwards.
Operating fault
If an automatic wiping malfunction
occurs, the wipers will operate in in-
termittent mode.
Have it checked by a CITROËN dealer
or a qualifi ed workshop.
Do not cover the rain sensor, linked
with the sunshine sensor and locat-
ed in the centre of the windscreen
behind the rear view mirror.
Switch off the automatic rain sen-
sitive wipers when using an auto-
matic car wash.
In winter, to avoid damaging the
wiper blades, it is advisable to wait
until the windscreen is completely
clear of ice before activating the
automatic rain sensitive wipers.
Activation
Switching off
This is controlled manually by the
driver by moving the stalk upwards
then returning it to position "0"
.
It is accompanied by a message in
the screen.
Page 111 of 352

VI
109
FITTINGS
AIRCRAFT-STYLE REARTABLES
Rear table stowed
Rear table opened
The backrests of the front seats are
fi tted with aircraft-style tables. These
incorporate a cup-holder A
and a
retaining strap B
, for the placing of
objects.
�)
Pull the table downwards to
open.
�)
To stow the table, raise it until
the latch locks.
For safety reasons, these tables col-
lapse downwards if excessive pressure
is exerted on them.
Reading lamps C
may be fi tted in
the front seat backrests, behind the
tables. They illuminate the surface
of the tables without disturbing the
other passengers.
They can be used only while the table
is down.
�)
Press the "on/off" button to turn
the lamp on or off.
SECOND ROW FOOTWELL
Depending on the confi guration, the
vehicle has one or two storage com-
partments under the footwell, located
between the seats of the fi rst and
second rows. They can be accessed
via clipped fl aps with a handle A
.
The compartment on the left-hand
side may contain the temporary
puncture repair kit and the tool kit
may be stored in the compartment
on the right-hand side. In this case
the fl ap is secured by means of a
screw B
. To gain access to the com-
partment, turn the screw a quarter
turn anticlockwise using a coin.
On vehicles fi tted with pneumatic sus-
pension, the left-hand fl ap is locked.
Individual reading lamps
Page 114 of 352
VI
112
FITTINGS
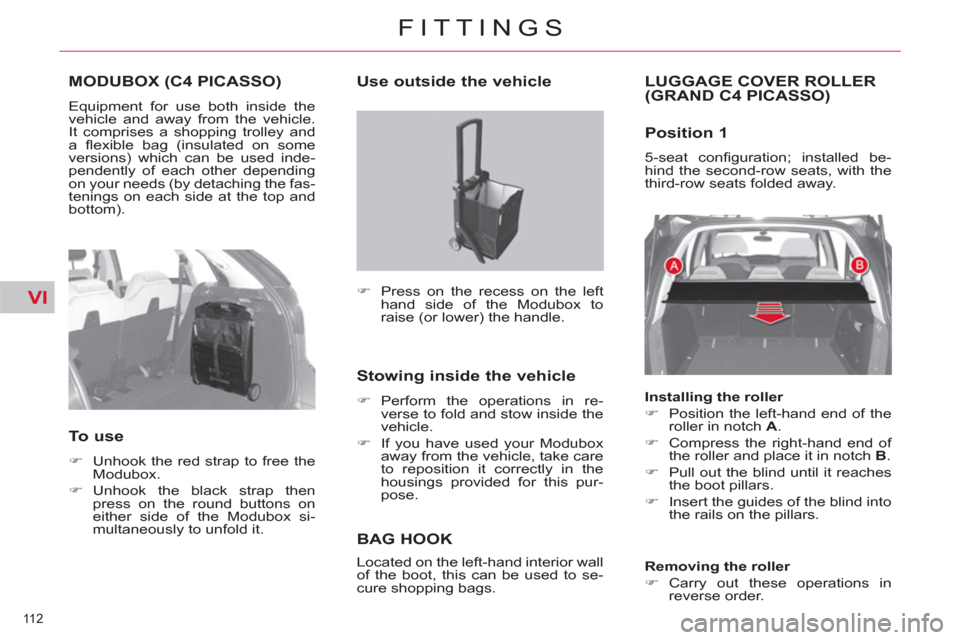
MODUBOX (C4 PICASSO)
Equipment for use both inside the
vehicle and away from the vehicle.
It comprises a shopping trolley and
a fl exible bag (insulated on some
versions) which can be used inde-
pendently of each other depending
on your needs (by detaching the fas-
tenings on each side at the top and
bottom).
To use
�)
Unhook the red strap to free the
Modubox.
�)
Unhook the black strap then
press on the round buttons on
either side of the Modubox si-
multaneously to unfold it.
Use outside the vehicle
Stowing inside the vehicle
�)
Perform the operations in re-
verse to fold and stow inside the
vehicle.
�)
If you have used your Modubox
away from the vehicle, take care
to reposition it correctly in the
housings provided for this pur-
pose.
BAG HOOK
LUGGAGE COVER ROLLER(GRAND C4 PICASSO)
Position 1
5-seat confi guration; installed be-
hind the second-row seats, with the
third-row seats folded away.
�)
Press on the recess on the left
hand side of the Modubox to
raise (or lower) the handle.
Located on the left-hand interior wall
of the boot, this can be used to se-
cure shopping bags.
Installing the roller
�)
Position the left-hand end of the
roller in notch A
.
�)
Compress the right-hand end of
the roller and place it in notch B
.
�)
Pull out the blind until it reaches
the boot pillars.
�)
Insert the guides of the blind into
the rails on the pillars.
Removing the roller
�)
Carry out these operations in
reverse order.
Page 115 of 352

VI
11 3
FITTINGS
The roller has a moving fl ap to
avoid interference with the second-
row passengers when the seats
are in the "reclined" position.
�)
Engage the lug on the left of the
roller in notch C
.
�)
Pass the right-hand end above
the third-row armrest.
�)
Engage the lug in notch D
.
�)
Pull the seat belt(s) so that they
reel out without locking.
�)
Pull out the blind and engage
the guides into the rails on the
pillars.
�)
Lock the seat(s) in position.
Installing the roller
�)
Reel in the blind, then remove
the roller from its initial position.
�)
Position the roller, with the blind
pull bar uppermost, fl ap down-
ward.
�)
Fold the concertina boards.
Removing the roller
�)
Push the fl ap towards the seat
backrest.
�)
Lift the concertina board by tak-
ing it at the side, then position it
vertically.
�)
Release the seat by pulling the
strap E
.
�)
Push the backrest towards the front.
�)
Proceed in reverse order to in-
stalling.
Position 3
7-seat confi guration; stowed behind
the third row seats when these are
folded away.
Installing the roller
�)
Fold the concertina boards.
�)
Position the roller, with the blind
pull bar uppermost, fl ap down-
ward.
�)
Engage the lug on the left of the
roller in notch C
.
�)
Pass the right-hand end above
the third-row armrest.
�)
Engage the lug in notch D
.
Removing the roller
�)
Proceed in reverse order to in-
stalling.
Position 2
7-seat confi guration; installed be-
hind the third-row seats when these
are folded away. This position con-
ceals objects stowed in the boot
from outside view.
The roller can only be stored when
the seats are folded away.
You can position the concertina
board vertically to lodge a bulky ob-
ject in the boot well.
Page 116 of 352

VI
114
FITTINGS
CARGO NET(GRAND C4 PICASSO)
This enables you to maximise the
vehicle’s loadspace.
It retains objects, preventing them
from sliding towards the front of the
passenger compartment.
You insert it under the luggage-
cover roller securing it on the
third-row side mouldings.
Position 1
5-seat confi guration: installed behind
the second row.
Installing the roller
�)
Remove the protective covers
located under the blind roller
notches.
�)
Position the roller under that of
the luggage-cover blind.
�)
Raise the fl ap on the blind, posi-
tioning it on top of the blind.
�)
Deploy the net, passing it be-
tween the rollers and the seats.
�)
Pull the net upwards.
�)
Anchor it to the roof by means of
the fi xing points (after you have
removed their covers).
Removing the roller
�)
Carry out these operations in re-
verse order.
Position 2
2-seat confi guration; installed behind
the fi rst row.
Removing the roller
�)
Carry out these operations in re-
verse order.
Installing the roller
�)
With the second-row seats folded
away, remove the covers of the
Isofi x mounting points located on
the seat backrests.
�)
Secure the roller on the Isofi x
mounting points.
�)
Deploy the net and pull it up-
wards.
�)
Anchor it to the roof by means of
the fi xing points (after you have
removed their covers).
Page 118 of 352
VI
116
FITTINGS
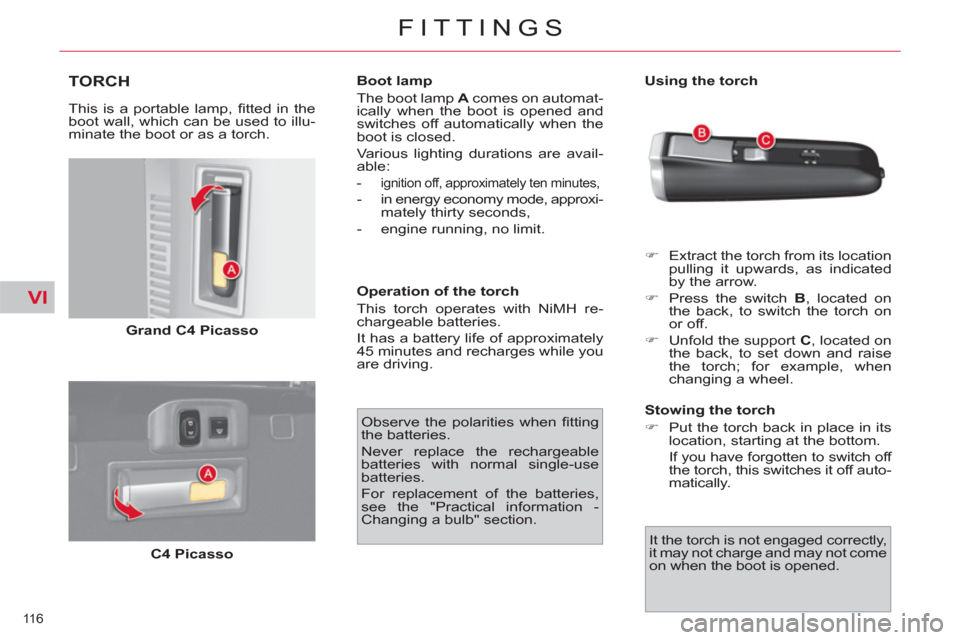
TORCH
This is a portable lamp, fi tted in the
boot wall, which can be used to illu-
minate the boot or as a torch.
Grand C4 Picasso
C4 Picasso
Boot lamp
The boot lamp A
comes on automat-
ically when the boot is opened and
switches off automatically when the
boot is closed.
Various lighting durations are avail-
able:
- ignition off, approximately ten minutes,
- in energy economy mode, approxi-
mately thirty seconds,
- engine running, no limit.
Operation of the torch
This torch operates with NiMH re-
chargeable batteries.
It has a battery life of approximately
45 minutes and recharges while you
are driving.
�)
Extract the torch from its location
pulling it upwards, as indicated
by the arrow.
�)
Press the switch B
, located on
the back, to switch the torch on
or off.
�)
Unfold the support C
, located on
the back, to set down and raise
the torch; for example, when
changing a wheel.
Stowing the torch
�)
Put the torch back in place in its
location, starting at the bottom.
If you have forgotten to switch off
the torch, this switches it off auto-
matically. Observe the polarities when fi tting
the batteries.
Never replace the rechargeable
batteries with normal single-use
batteries.
For replacement of the batteries,
see the "Practical information -
Changing a bulb" section.
It the torch is not engaged correctly,
it may not charge and may not come
on when the boot is opened.
Using the torch
Page 122 of 352

VII
120
CHILD SAFETY
*
Applies only to the CITROËN Grand C4 Picasso.
LOCATIONS FOR CHILD SEATS SECURED WITH THE VEHICLE SEAT BELT
In conformity with European law, this table tells you to what extent each of the seat positions in your vehicle may take a
child seat that is secured with the vehicle seat belt and approved as Universal (a), according to the weight of the child and
the position in the vehicle.
(a) Universal child seat: child seat which can be installed in all vehicles by means of the seat belt.
(b) Group 0: from birth to 10 kg. Shell seats and "car cots" cannot be installed on the front passenger seat.
(c) Consult the legislation in force in your country before installing your child on this seat.
U
: seat position suitable for the installation (in conjunction with the vehicle seat belt) of a universal rearwards-facing and/or
forwards-facing child seat.
For seats in groups 1, 2 and 3, check that the child seat is correctly secured on the backrest of the vehicle seat. If
necessary, remove and stow the head restraint.
To install a voluminous child seat in the 2nd or 3rd row, move the rear seat fully back so as to avoid interference with the
front seat.
Seat position
Weight groups established by legislation
< 10 kg and < 13 kg
(groups 0 (b) and 0+)
9 – 18 kg
(group 1)
15 – 25 kg
(group 2)
22 – 36 kg
(group 3)
1st
row
Front passenger
(c)
U
U
U
U
2nd row
Outer
U
U
U
U
Centre
U
U
U
U
3rd row
*
Outer
U
U
U
U
Page 128 of 352
VIII
126
SAFETY
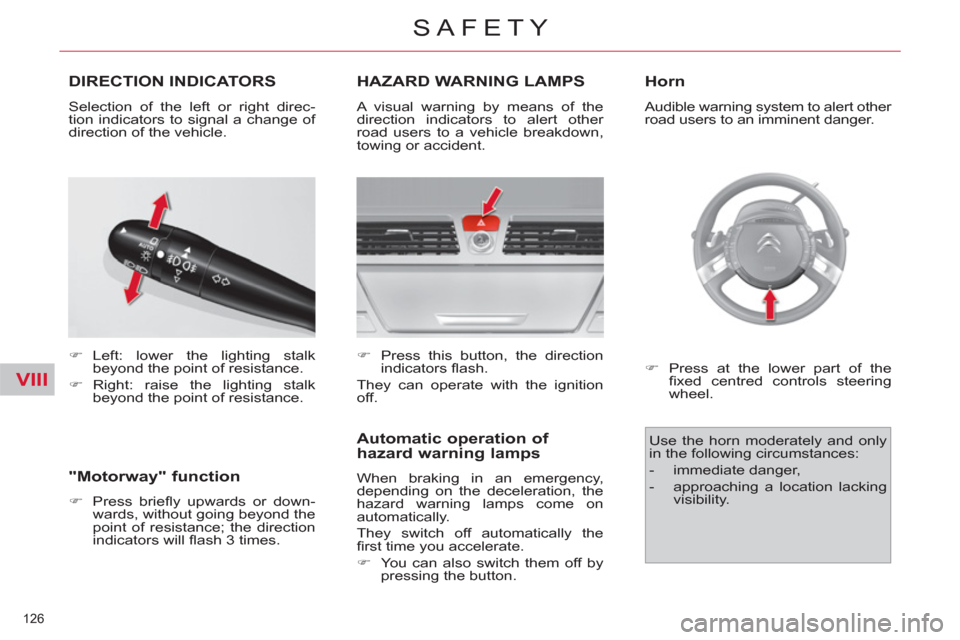
DIRECTION INDICATORS
�)
Left: lower the lighting stalk
beyond the point of resistance.
�)
Right: raise the lighting stalk
beyond the point of resistance.
HAZARD WARNING LAMPS
A visual warning by means of the
direction indicators to alert other
road users to a vehicle breakdown,
towing or accident.
Automatic operation of
hazard warning lamps
When braking in an emergency,
depending on the deceleration, the
hazard warning lamps come on
automatically.
They switch off automatically the
fi rst time you accelerate.
�)
You can also switch them off by
pressing the button.
Horn
Audible warning system to alert other
road users to an imminent danger. Selection of the left or right direc-
tion indicators to signal a change of
direction of the vehicle.
�)
Press this button, the direction
indicators fl ash.
They can operate with the ignition
off.
�)
Press at the lower part of the
fi xed centred controls steering
wheel.
Use the horn moderately and only
in the following circumstances:
- immediate danger,
- approaching a location lacking
visibility.
"Motorway" function
�)
Press briefl y upwards or down-
wards, without going beyond the
point of resistance; the direction
indicators will fl ash 3 times.