Citroen C4 PICASSO 2016 2.G Owner's Manual
Manufacturer: CITROEN, Model Year: 2016, Model line: C4 PICASSO, Model: Citroen C4 PICASSO 2016 2.GPages: 527, PDF Size: 13.72 MB
Page 291 of 527
289
C4-Picasso-II_en_Chap08_en-cas-panne_ed01-2016
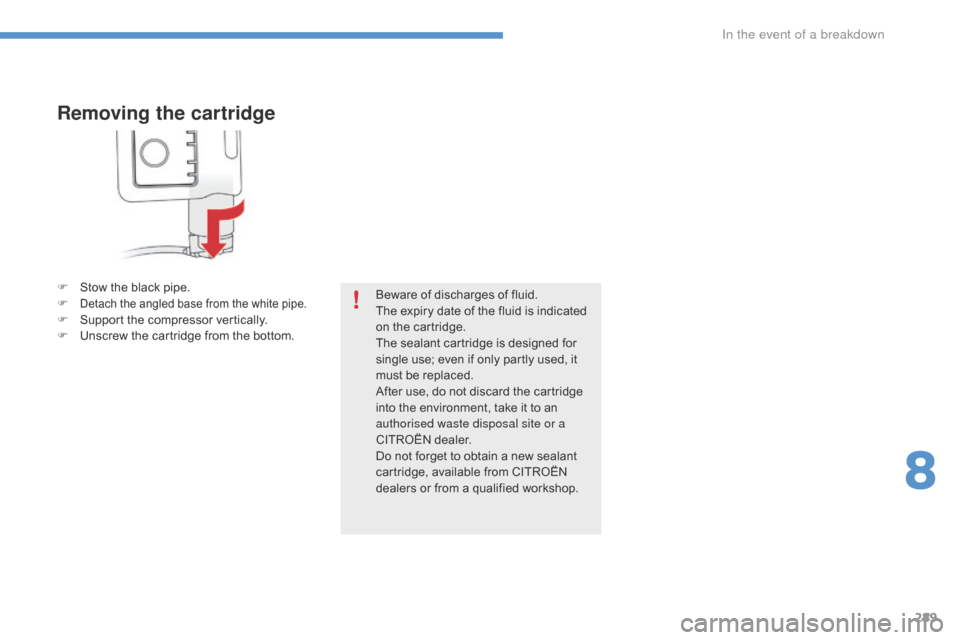
Removing the cartridge
F Stow the black pipe.
F Detach the angled base from the white pipe.F Support the compressor vertically.
F U nscrew the cartridge from the bottom.Beware
of discharges of fluid.
The expiry date of the fluid is indicated o
n the cartridge.
The
sealant cartridge is designed for
s
ingle use; even if only partly used, it
m
ust be replaced.
After
use, do not discard the cartridge
i
nto the environment, take it to an
a
uthorised waste disposal site or a
CITROËN
dealer.
Do
not forget to obtain a new sealant
c
artridge, available from CITROËN
d
ealers or from a qualified workshop.
8
In the event of a breakdown
Page 292 of 527
290
C4-Picasso-II_en_Chap08_en-cas-panne_ed01-2016
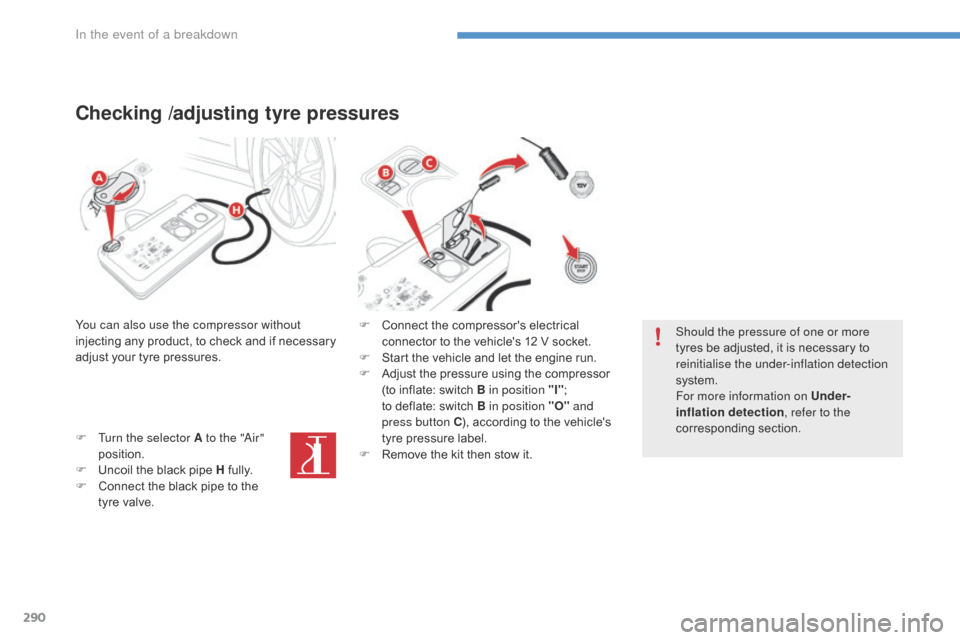
Checking /adjusting tyre pressures
You can also use the compressor without
injecting any product, to check and if necessary
a
djust your tyre pressures.
F
T
urn the selector A to the "Air"
position.
F
U
ncoil the black pipe H
f
ully.
F
C
onnect the black pipe to the
t
yre valve. F
C onnect the compressor's electrical
c
onnector to the vehicle's 12 V socket.
F
S
tart the vehicle and let the engine run.
F
A
djust the pressure using the compressor
(
to inflate: switch B in position "I";
t
o deflate: switch B in position "O" and
press button C ),
according to the vehicle's
t
yre pressure label.
F
R
emove the kit then stow it.Should the pressure of one or more
tyres
be adjusted, it is necessary to
r
einitialise the under-inflation detection
system.
For more information on Under-
inflation detection , refer to the
corresponding
s
ection.
In the event of a breakdown
Page 293 of 527
291
C4-Picasso-II_en_Chap08_en-cas-panne_ed01-2016
Spare wheel
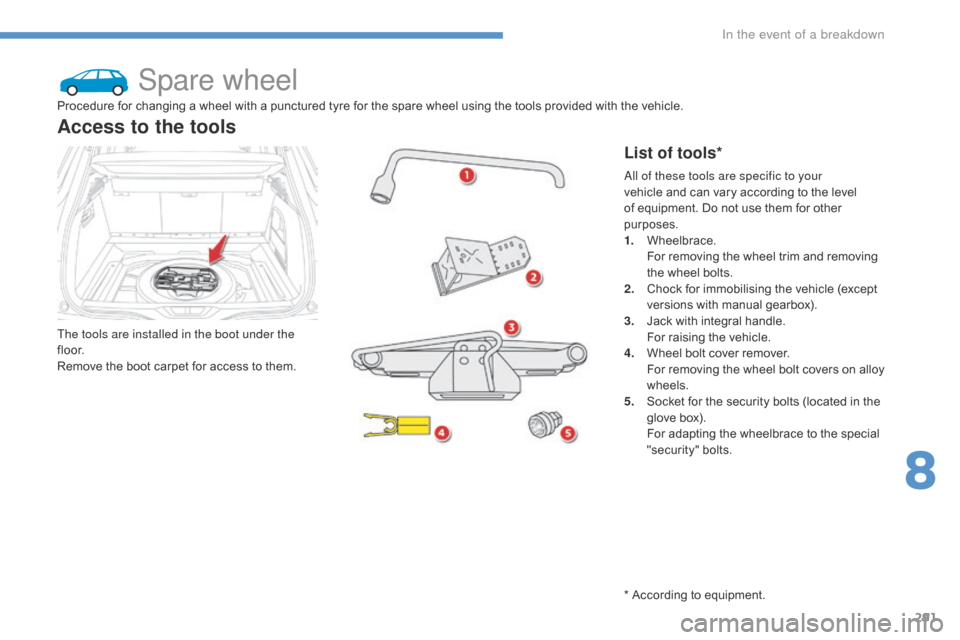
The tools are installed in the boot under the
f l o o r.
Remove the boot carpet for access to them.
Access to the tools
List of tools*
Procedure for changing a wheel with a punctured tyre for the spare wheel using the tools provided with the vehicle.
A ll of these tools are specific to your
vehicle
and can vary according to the level
o
f equipment. Do not use them for other
p
urposes.
1.
W
heelbrace.
F
or removing the wheel trim and removing
t
he wheel bolts.
2.
C
hock for immobilising the vehicle (except
v
ersions with manual gearbox).
3.
J
ack with integral handle.
F
or raising the vehicle.
4.
W
heel bolt cover remover.
F
or removing the wheel bolt covers on alloy
w
heels.
5.
S
ocket for the security bolts (located in the
g
love box).
F
or adapting the wheelbrace to the special
"s
ecurity"
b
olts.
*
According to equipment.
8
In the event of a breakdown
Page 294 of 527
292
C4-Picasso-II_en_Chap08_en-cas-panne_ed01-2016
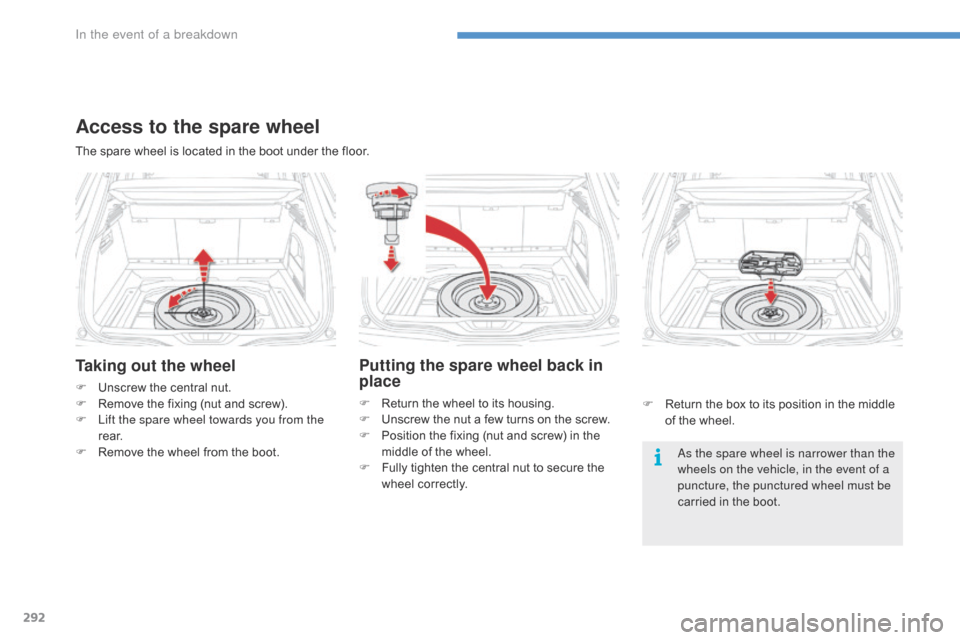
Taking out the wheel
F Unscrew the central nut.
F R emove the fixing (nut and screw).
F
L
ift the spare wheel towards you from the
r e a r.
F
R
emove the wheel from the boot. As the spare wheel is narrower than the
wheels on the vehicle, in the event of a
puncture, the punctured wheel must be
carried
in the boot.
The
spare wheel is located in the boot under the floor.
Access to the spare wheel
Putting the spare wheel back in
place
F Return
the wheel to its housing.
F U nscrew the nut a few turns on the screw.
F
P
osition the fixing (nut and screw) in the
m
iddle of the wheel.
F
F
ully tighten the central nut to secure the
w
heel correctly. F
R eturn the box to its position in the middle
o
f the wheel.
In the event of a breakdown
Page 295 of 527
293
C4-Picasso-II_en_Chap08_en-cas-panne_ed01-2016
Spare wheelProcedure for changing a wheel with a punctured tyre for the spare wheel using the tools provided with the vehicle.
S
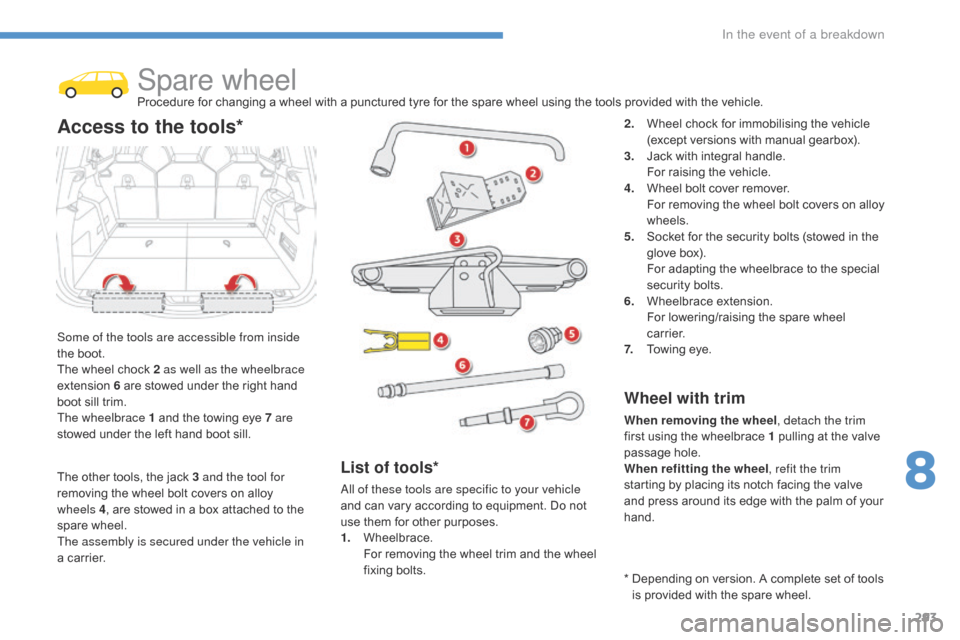
ome of the tools are accessible from inside
the
boot.
The
wheel
chock 2 as well as the wheelbrace
extension
6
are stowed under the right hand
b
oot
sill
trim.
The wheelbrace 1
and the towing eye 7 are
stowed
under
the left hand boot sill.
Access to the tools*2. Wheel chock for immobilising the vehicle (
except versions with manual gearbox).
3.
J
ack with integral handle.
F
or raising the vehicle.
4.
W
heel bolt cover remover.
F
or removing the wheel bolt covers on alloy
w
heels.
5.
S
ocket for the security bolts (stowed in the
g
love box).
F
or adapting the wheelbrace to the special
s
ecurity bolts.
6.
W
heelbrace
e
xtension.
F
or lowering/raising the spare wheel
c
a r r i e r.
7.
T
owing eye.
Wheel with trim
When removing the wheel , detach the trim
first using the wheelbrace 1 pulling at the valve
p
assage hole.
When refitting the wheel , refit the trim
starting
by placing its notch facing the valve
a
nd press around its edge with the palm of your
han
d.
List of tools*
All of these tools are specific to your vehicle
and can vary according to equipment. Do not
u
se them for other purposes.
1.
W
heelbrace.
F
or removing the wheel trim and the wheel
f
ixing
bol
ts. *
D
epending on version. A complete set of tools
i
s provided with the spare wheel.
The
other
tools,
the
jack
3 and the tool for
removing
the
wheel
bolt
covers
on
alloy
w
heels
4 ,
are
stowed
in
a
box
attached
to
the
spar
e
w
heel.
The assembly is secured under the vehicle in
a
carrier.
8
In the event of a breakdown
Page 296 of 527
294
C4-Picasso-II_en_Chap08_en-cas-panne_ed01-2016
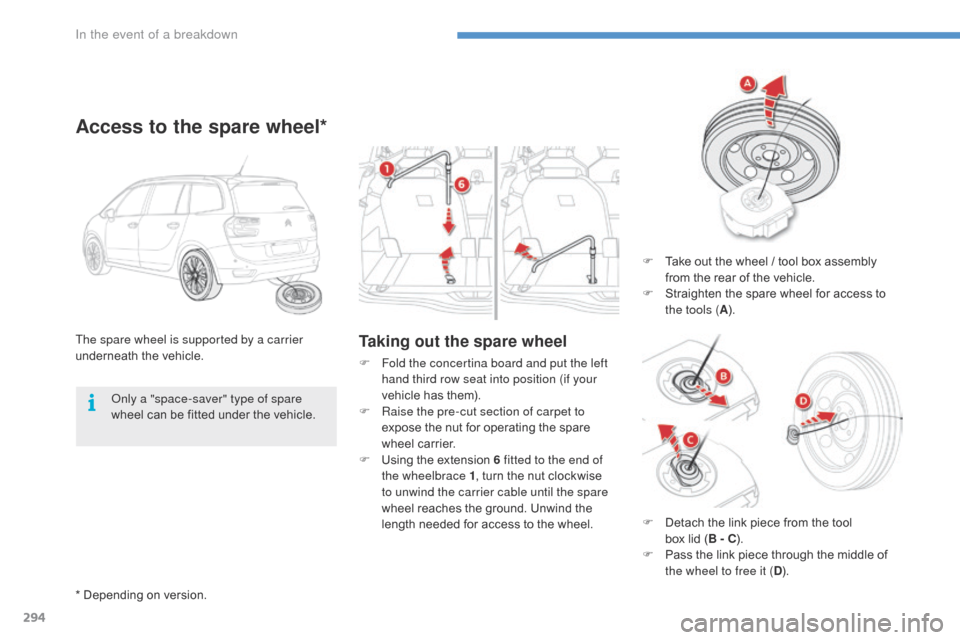
Taking out the spare wheelThe spare wheel is supported by a carrier
underneath the v ehicle.
Access to the spare wheel*
F Take out the wheel / tool box assembly f
rom the rear of the vehicle.
F
S
traighten the spare wheel for access to
t
he tools ( A).
F
F
old the concertina board and put the left
hand third row seat into position (if your
vehicle
has
them).
F
R
aise the pre-cut section of carpet to
expose
the
nut
for
operating
the
spare
w
heel
carrier.
F
U
sing
the
extension
6 fitted to the end of
the wheelbrace 1 ,
turn
the
nut
clockwise
t
o unwind the carrier cable until the spare
wheel
reaches
the
ground.
Unwind
the
l
ength
needed
for
access
to
the
wheel.
Only a "space-saver" type of spare
wheel
can
be
fitted
under
the
vehicle.
*
Depending
on
version. F
D
etach the link piece from the tool
b
ox lid ( B - C).
F
P
ass the link piece through the middle of
t
he wheel to free it ( D).
In the event of a breakdown
Page 297 of 527
295
C4-Picasso-II_en_Chap08_en-cas-panne_ed01-2016
A punctured wheel from the vehicle
cannot be fitted under the vehicle. It
m
ust
b
e
c
arried
i
n
t
he
b
oot.
U
se
a
c
over
t
o protect the boot.
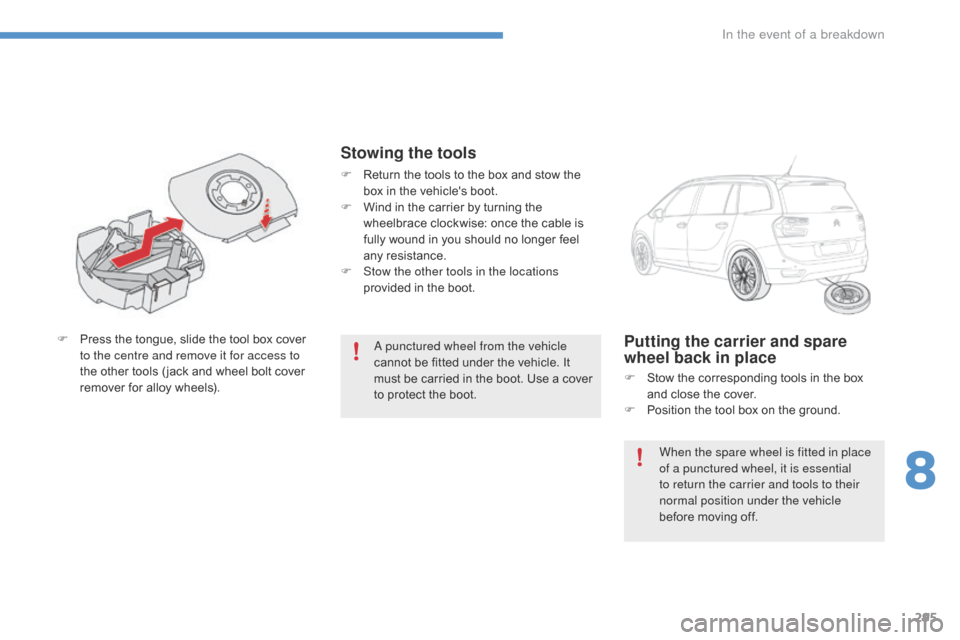
F
P
ress
the
tongue,
slide
the
tool
box
cover
t
o the centre and remove it for access to
the
other
tools
( jack
and
wheel
bolt
cover
r
emover
for
alloy
wheels).Putting the carrier and spare
wheel back in place
F Stow the corresponding tools in the box a
nd close the cover.
F
P
osition the tool box on the ground.
Stowing the tools
F Return the tools to the box and stow the b
ox in the vehicle's boot.
F
W
ind in the carrier by turning the
w
heelbrace clockwise: once the cable is
f
ully wound in you should no longer feel
an
y
r
esistance.
F
S
tow the other tools in the locations
provided
in the boot.
When the spare wheel is fitted in place
of a punctured wheel, it is essential
to return the carrier and tools to their
normal position under the vehicle
before
moving off.
8
In the event of a breakdown
Page 298 of 527
296
C4-Picasso-II_en_Chap08_en-cas-panne_ed01-2016
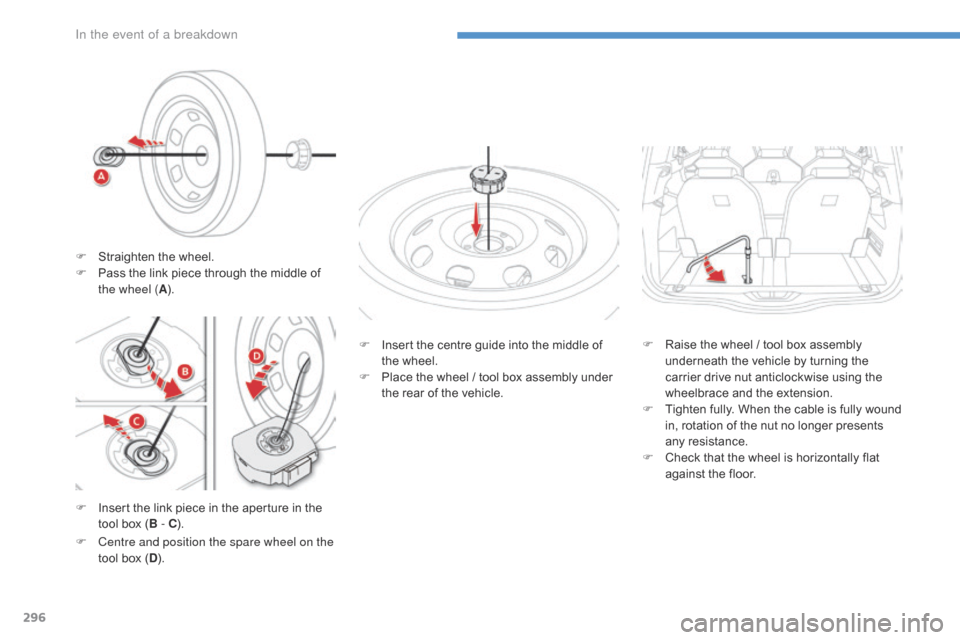
F Insert the link piece in the aperture in the t
ool box (B - C ). F
I
nsert the centre guide into the middle of
t
he wheel.
F
P
lace the wheel / tool box assembly under
t
he rear of the vehicle.
F
C
entre and position the spare wheel on the
tool
box (D ). F
R
aise the wheel / tool box assembly
u
nderneath the vehicle by turning the
c
arrier drive nut anticlockwise using the
w
heelbrace and the extension.
F
T
ighten fully. When the cable is fully wound
i
n, rotation of the nut no longer presents
an
y
r
esistance.
F
C
heck that the wheel is horizontally flat
a
gainst the floor.
F
S
traighten the wheel.
F
P
ass the link piece through the middle of
t
he wheel (
A).
In the event of a breakdown
Page 299 of 527
297
C4-Picasso-II_en_Chap08_en-cas-panne_ed01-2016
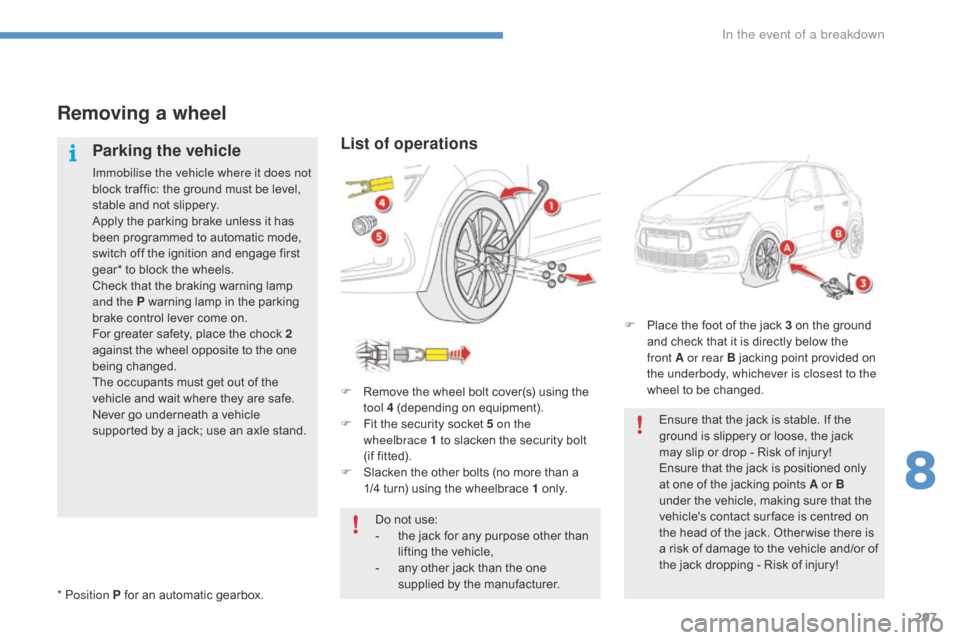
Removing a wheel
Parking the vehicle
Immobilise the vehicle where it does not
block traffic: the ground must be level,
s
table and not slippery.
Apply
the parking brake unless it has
b
een programmed to automatic mode,
s
witch off the ignition and engage first
g
ear* to block the wheels.
Check
that the braking warning lamp
a
nd the P warning lamp in the parking
b
rake control lever come on.
For
greater safety, place the chock 2
against
the wheel opposite to the one
b
eing
c
hanged.
The
occupants must get out of the
v
ehicle and wait where they are safe.
Never
go underneath a vehicle
s
upported by a jack; use an axle stand.
List of operations
F Remove the wheel bolt cover(s) using the t
ool 4 (depending on equipment).
F
F
it the security socket 5 on the
wheelbrace
1 to slacken the security bolt
(
if fitted).
F
S
lacken the other bolts (no more than a
1
/4 turn) using the wheelbrace 1
o
n l y.
* Position P
for
an
automatic
gearbox. Do
not use:
-
t
he jack for any purpose other than
l
ifting the vehicle,
-
a
ny other jack than the one
s
upplied by the manufacturer.F
P
lace the foot of the jack 3 on the ground
a
nd check that it is directly below the
f
ront A or rear B jacking point provided on
t
he underbody, whichever is closest to the
wheel to be changed.
Ensure that the jack is stable. If the
g
round is slippery or loose, the jack
m
ay slip or drop - Risk of injury!
Ensure
that the jack is positioned only
a
t one of the jacking points A or B
under
the vehicle, making sure that the
v
ehicle's contact sur face is centred on
t
he head of the jack. Other wise there is
a
risk of damage to the vehicle and/or of
t
he jack dropping - Risk of injury!
8
In the event of a breakdown
Page 300 of 527

298
C4-Picasso-II_en_Chap08_en-cas-panne_ed01-2016
F Extend the jack 3 until its head comes into contact with the jacking point A or B used; the v
ehicle's contact sur face A or B must engage with the central part of the head of the jack
F
R
aise the vehicle until there is sufficient space between the wheel and the ground to admit the
s
pare (not punctured) wheel easily. F
R emove the bolts and store them in a clean
place.
F
R
emove the wheel.
In the event of a breakdown