ECU CITROEN C4 PICASSO 2022 User Guide
[x] Cancel search | Manufacturer: CITROEN, Model Year: 2022, Model line: C4 PICASSO, Model: CITROEN C4 PICASSO 2022Pages: 316, PDF Size: 10.36 MB
Page 120 of 316

118
Installing a child seat attached with the seat belt
In accordance with European regulations, this table indicates the options for installing child seats secured using the seat belt and universally approved
(a ) in relation to the weight of the child and the seat in the vehicle.
Weight of the child/indicative age
Seat position Groups 0 (b) and 0+)
Bir th to 13
kgGroup 1
9 -18
kgGroup 2
15 -25
kgGroup 3
22-36
kg
1
st row Front passenger seat (
c)
- fixed UUUU
-
h
eight adjustable U(R)U(R)U(R)U(R)
2
nd row Fixed outer rear seats and
centre rear seat ( d)
Longitudinally-adjustable outer rear seats ( d) ( e) U
UUU
3
rd row Outer rear seats UUUU
(a) Universal child seat: child seat that can
be installed in all vehicles using the
seat belt. (b)
Group 0: from birth to 10
kg. Infant
car seats and "car cots" cannot be
installed on the front passenger seat or
in the 3
rd row. When installed in the 2nd
row, they may prevent the use of the
other seats. (c)
Refer to the current legislation in your
country before installing your child on
this seat.
Safety
Page 121 of 316
119
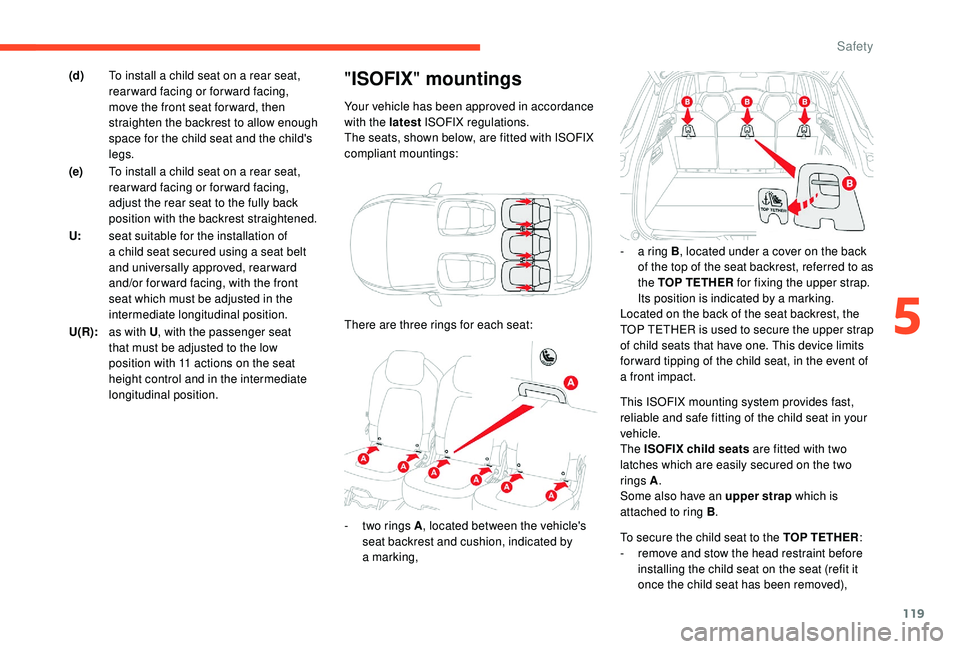
This ISOFIX mounting system provides fast,
reliable and safe fitting of the child seat in your
vehicle.
The ISOFIX child seats are fitted with two
latches which are easily secured on the two
rings A.
Some also have an upper strap which is
attached to ring B .
"ISOFIX " mountings
Your vehicle has been approved in accordance
with the latest ISOFIX regulations.
The seats, shown below, are fitted with ISOFIX
compliant mountings:
(d)
To install a
child seat on a
rear seat,
rearward facing or forward facing,
move the front seat for ward, then
straighten the backrest to allow enough
space for the child seat and the child's
legs.
(e) To install a
child seat on a
rear seat,
rearward facing or forward facing,
adjust the rear seat to the fully back
position with the backrest straightened.
U: seat suitable for the installation of
a
child seat secured using a
seat belt
and universally approved, rearward
and/or for ward facing, with the front
seat which must be adjusted in the
intermediate longitudinal position.
U(R): as with U , with the passenger seat
that must be adjusted to the low
position with 11
actions on the seat
height control and in the intermediate
longitudinal position. There are three rings for each seat:
-
t
wo rings A , located between the vehicle's
seat backrest and cushion, indicated by
a
marking, -
a r
ing B, located under a
cover on the back
of the top of the seat backrest, referred to as
the TOP TETHER for fixing the upper strap.
Its position is indicated by a
marking.
Located on the back of the seat backrest, the
TOP TETHER is used to secure the upper strap
of child seats that have one. This device limits
for ward tipping of the child seat, in the event of
a
front impact.
To secure the child seat to the TOP TETHER :
-
r
emove and stow the head restraint before
installing the child seat on the seat (refit it
once the child seat has been removed),
5
Safety
Page 122 of 316
120
- detach the TOP TETHER cover by pulling its cut-out,
-
p
ass the upper strap of the child seat over
the seat backrest, centring it between the
openings for the head restraint rods,
-
f
ix the hook of the upper strap to ring B ,
-
t
ighten the upper strap.The incorrect installation of a
child seat in
a
vehicle compromises the protection of
the child in the event of an accident.
Strictly obser ve the fitting instructions
provided with the child seat.
For information on the possibilities for
installing ISOFIX child seats in your
vehicle, refer to the summary table.
Recommended ISOFIX child
seats
Also consult the user guide from the child
seat's manufacturer to find out how to
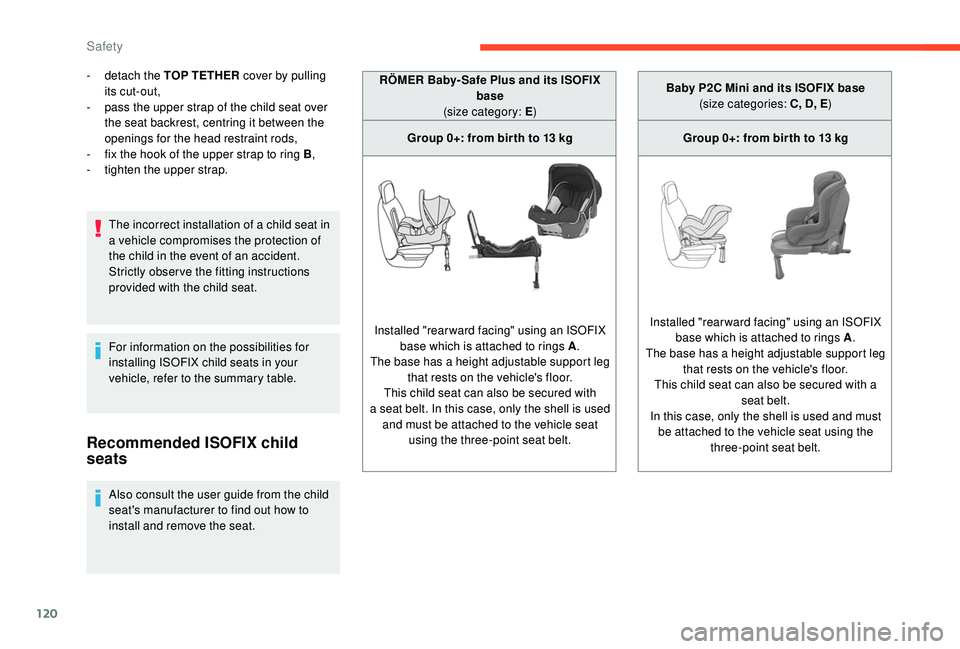
install and remove the seat. RÖMER Baby- Safe Plus and its ISOFIX
base
(size category: E )
Group 0+: from bir th to 13 kg
Installed "rearward facing" using an ISOFIX base which is attached to rings A .
The base has a height adjustable support leg
that rests on the vehicle's floor.
This child seat can also be secured with
a seat belt. In this case, only the shell is used
and must be attached to the vehicle seat using the three-point seat belt. Baby P2C Mini and its ISOFIX base
(size categories: C, D, E )
Group 0+: from bir th to 13 kg
Installed "rearward facing" using an ISOFIX base which is attached to rings A .
The base has a height adjustable support leg that rests on the vehicle's floor.
This child seat can also be secured with a seat belt.
In this case, only the shell is used and must be attached to the vehicle seat using the three-point seat belt.
Safety
Page 123 of 316
121
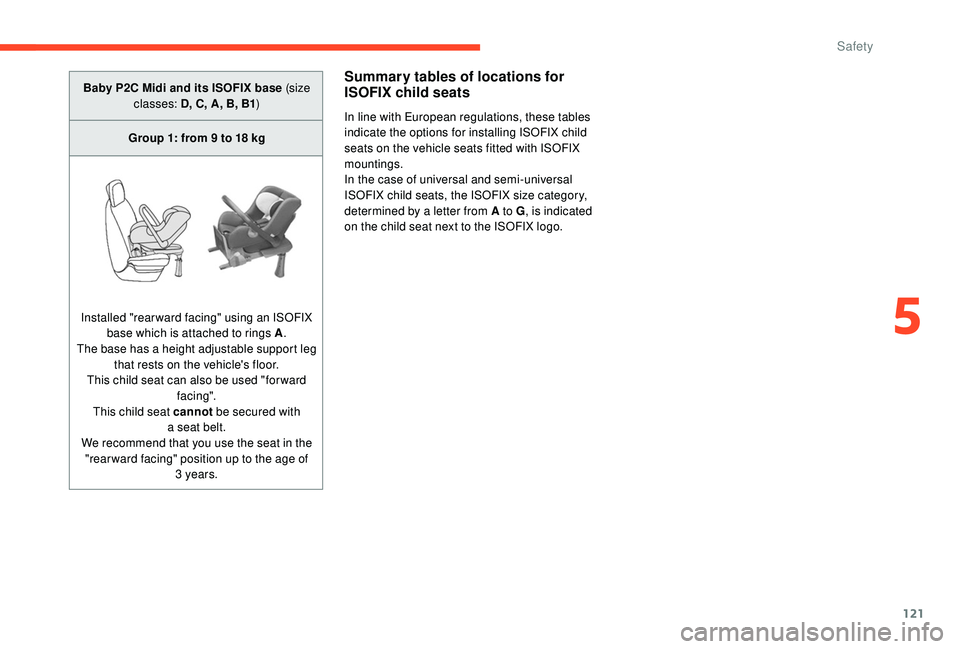
Baby P2C Midi and its ISOFIX base (size classes: D, C, A, B, B1 )
Group 1: from 9
to 18 kg
Installed "rearward facing" using an ISOFIX base which is attached to rings A .
The base has a height adjustable support leg that rests on the vehicle's floor.
This child seat can also be used "for ward fac ing".
This child seat cannot be secured with
a
seat belt.
We recommend that you use the seat in the "rear ward facing" position up to the age of 3
years.Summary tables of locations for
ISOFIX child seats
In line with European regulations, these tables
indicate the options for installing ISOFIX child
seats on the vehicle seats fitted with ISOFIX
mountings.
In the case of universal and semi-universal
ISOFIX child seats, the ISOFIX size category,
determined by a letter from A to G , is indicated
on the child seat next to the ISOFIX logo.
5
Safety
Page 124 of 316
122
Weight of the child/indicative age
Under 10
kg
(group 0)
Up to about 6
months Under 10
kg
(group 0)
Under 13
kg
(group 0+)
Up to about 1
year 9-18
kg (group 1)
From about 1
to 3 years old
Type of ISOFIX child seat Infant car seat * rearward facing rearward facing forward facing
ISOFIX size categor y F G C D E C D ABB1
Front passenger seat Not ISOFIX
Fixed rear outer seats IL- SU** IL- SU IL- SUXI U F, I L - S U
Longitudinally-adjustable rear outer seats IL- SU
** IL- SU IL- SUI U F/ I L- SU (1) IUF/IL- SU
Centre rear seat XIL- SU IL- SUIUF/IL- SU IUF/IL- SU
*
I
nfant car seats and "car cots" cannot be
installed on the front passenger seat.
**
T
he ISOFIX infant car seat, secured to the
lower rings of an ISOFIX seat, occupies all
of the space on the rear bench seat. I UF:
seat suitable for the installation of
an ISOFIX U niversal seat, " For ward
facing" secured using the upper strap
on the upper ring of ISOFIX seating
positions.
IL- SU: seat suitable for the installation of
an Isofix S emi-Universal seat which
can be:
-
"
rear ward facing" fitted with an
upper strap or a
support leg,
-
"
for ward facing" fitted with
a
support leg, or
-
a
n infant car seat fitted with an
upper strap or a
support leg. X:
seat not suitable for the installation of
a
child seat or infant car seat for the
weight group indicated.
(1): the outer row 2
seat must be adjusted
to the maximum forward position minus
3
notches.
For more information on the ISOFIX
mountings and in particular the upper strap,
refer to the corresponding section.
Safety
Page 125 of 316
123
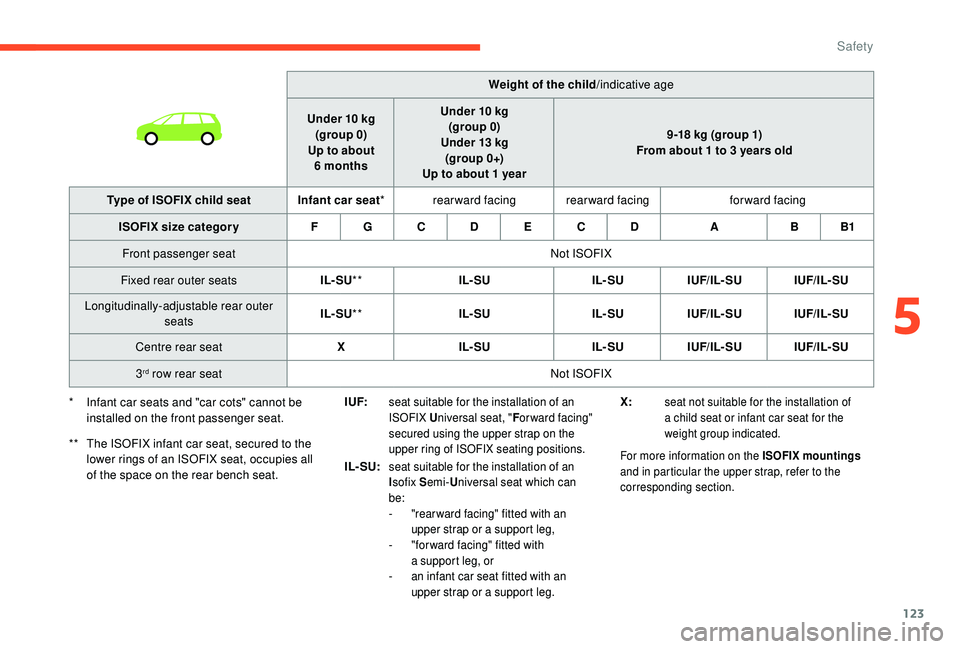
I UF:seat suitable for the installation of an
ISOFIX Universal seat, " For ward facing"
secured using the upper strap on the
upper ring of ISOFIX seating positions.
IL- SU:seat suitable for the installation of an
I sofix S emi-Universal seat which can
be:
-
"
rear ward facing" fitted with an
upper strap or a
support leg,
-
"
for ward facing" fitted with
a
support leg, or
-
a
n infant car seat fitted with an
upper strap or a
support leg.For more information on the ISOFIX mountings
and in particular the upper strap, refer to the
corresponding section.
Weight of the child /indicative age
Under 10
kg
(group 0)
Up to about 6
months Under 10
kg
(group 0)
Under 13
kg
(group 0+)
Up to about 1
year 9-18
kg (group 1)
From about 1
to 3 years old
Type of ISOFIX child seat Infant car seat * rearward facing rearward facing forward facing
ISOFIX size categor y F G C D E C D ABB1
Front passenger seat Not ISOFIX
Fixed rear outer seats IL- SU** IL- SU IL- SUIUF/IL- SU IUF/IL- SU
Longitudinally-adjustable rear outer seats IL- SU
** IL- SU IL- SUIUF/IL- SU IUF/IL- SU
Centre rear seat XIL- SU IL- SUIUF/IL- SU IUF/IL- SU
3
rd row rear seat Not ISOFIX
*
I
nfant car seats and "car cots" cannot be
installed on the front passenger seat.
**
T
he ISOFIX infant car seat, secured to the
lower rings of an ISOFIX seat, occupies all
of the space on the rear bench seat. X:
seat not suitable for the installation of
a
child seat or infant car seat for the
weight group indicated.
5
Safety
Page 126 of 316
124
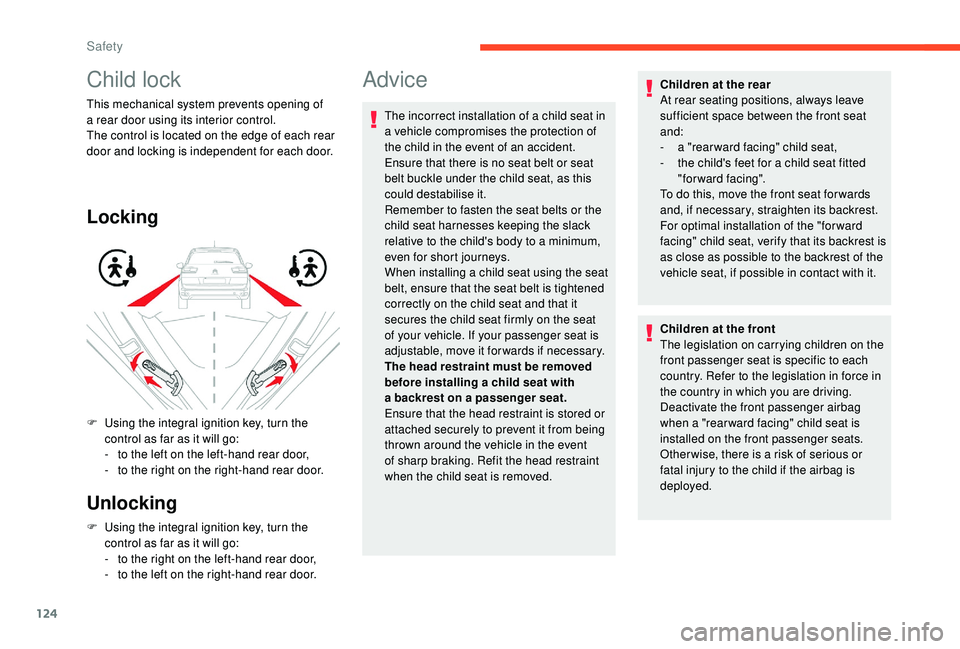
Child lock
This mechanical system prevents opening of
a rear door using its interior control.
The control is located on the edge of each rear
door and locking is independent for each door.
Locking
Unlocking
F Using the integral ignition key, turn the control as far as it will go:
-
t
o the right on the left-hand rear door,
-
t
o the left on the right-hand rear door.
F
U
sing the integral ignition key, turn the
control as far as it will go:
-
t
o the left on the left-hand rear door,
-
t
o the right on the right-hand rear door.
Advice
The incorrect installation of a child seat in
a vehicle compromises the protection of
the child in the event of an accident.
Ensure that there is no seat belt or seat
belt buckle under the child seat, as this
could destabilise it.
Remember to fasten the seat belts or the
child seat harnesses keeping the slack
relative to the child's body to a
minimum,
even for short journeys.
When installing a
child seat using the seat
belt, ensure that the seat belt is tightened
correctly on the child seat and that it
secures the child seat firmly on the seat
of your vehicle. If your passenger seat is
adjustable, move it forwards if necessary.
The head restraint must be removed
before installing a
child seat with
a
backrest on a passenger seat.
Ensure that the head restraint is stored or
attached securely to prevent it from being
thrown around the vehicle in the event
of sharp braking. Refit the head restraint
when the child seat is removed. Children at the rear
At rear seating positions, always leave
sufficient space between the front seat
and:
-
a "
rear ward facing" child seat,
-
t
he child's feet for a child seat fitted
"forward facing".
To do this, move the front seat for wards
and, if necessary, straighten its backrest.
For optimal installation of the "forward
facing" child seat, verify that its backrest is
as close as possible to the backrest of the
vehicle seat, if possible in contact with it.
Children at the front
The legislation on carrying children on the
front passenger seat is specific to each
country. Refer to the legislation in force in
the country in which you are driving.
Deactivate the front passenger airbag
when a "rear ward facing" child seat is
installed on the front passenger seats.
Other wise, there is a
risk of serious or
fatal injury to the child if the airbag is
deployed.
Safety
Page 133 of 316

131
Switching the ignition on
(without starting)
With the electronic key in the reader or the
Keyless Entry and Starting key inside the
vehicle, pressing the "START/STOP" button,
with no action on the pedals, allows the
ignition to be switched on.
F
P
ress the "START/STOP" button, the
instrument panel comes on but the engine
does not start.
F
P
ress the button again to switch off the
ignition and allow the vehicle to be locked.
With the ignition on, the system
automatically changes to energy economy
mode when required to maintain an
adequate state of charge of the battery.
On certain versions with the automatic gearbox
(EAT6/EAT8), the steering column does not
lock.
Electric parking brake
The technology adopted for the electric
parking brake does not allow the fitment of
15-inch wheels.
Indicator lamp
This indicator lamp comes on in the
instrument panel and in the control
lever to confirm the application of
the parking brake. It goes off to confirm the release of the parking
brake.
The indicator lamp in the control lever flashes
during manual application or release.
After applying the parking brake, the
simultaneous flashing of the indicator lamps
in the instrument panel and in the control lever
warns you to secure the immobilisation of the
vehicle by engaging a
gear (with a manual
gearbox or by placing the selector at position
P with an automatic gearbox or by placing
a chock against one of the wheels (e.g. parking
on a very steep slope or a steep slope with
a weak battery).
In the event of a battery failure, the
electric parking brake no longer works.
As a safety measure, if the parking brake
is not applied, immobilise the vehicle by
engaging a
gear (with a
manual gearbox)
or placing a chock against one of the
wheels.
Call a CITROËN dealer or a qualified
workshop.
The system provides, in automatic operation,
the application of the parking brake on
switching off the engine and release as the
vehicle moves off.
The driver can take over at any time to apply
or release the parking brake, by operating the
control lever:
-
b
y briefly pulling
the control lever to apply
the brake,
-
b
y briefly pushing
the control lever, while
pressing the brake pedal, to release it.
Automatic mode is activated by default.
6
Driving
Page 147 of 316

145
The speed limit units (mph or km/h)
depend on the country you are driving in.
This should be taken into account in order
to obser ve the speed limit.
For the system to operate correctly when
you change country, the units for speed in
the instrument panel must be those for the
country you are driving in.
The automatic reading of road signs is
a driving assistance system and does not
always display speed limits correctly.
The speed limit signs present on the road
always take priority over the display by the
system.
The system cannot in any circumstances
replace the need for vigilance on the part
of the driver.
The driver must observe the driving
regulations and must adapt the speed of
the vehicle to suit the weather and traffic.
The system may not display the speed
limit if it does not detect a
speed limit sign
within a
preset period.
The system is designed to detect signs
that conform to the Vienna Convention on
road signs. To maintain correct operation of the
system: regularly clean the area in front of
the camera.
The internal sur face of the windscreen can
also become misted around the camera.
In humid and cold weather, demist the
windscreen regularly.
Activation/Deactivation
Activation and deactivation of the system is
done in the touch screen's Driving
menu.
Select the " Vehicle settings " tab, then
" Security "/ "Safety " and "Recommended
speed display ".
Displays in the instrument panel
1.Detected speed limit indication.
or
2. Indication of the end of the speed limit. The system is active but is not detecting speed
limit information.
On detection of speed limit information, the
system displays the value.
Operating limits
The legislation on speed limits is specific to
each country.
The system does not take account of reduced
speed limits in the following cases:
-
p
oor weather (rain, snow),
-
a
tmospheric pollution,
-
w
hen towing,
-
d
riving with a space-saver type spare wheel
or snow chains fitted,
-
p
uncture repair using the temporary repair
kit,
-
y
oung drivers, etc.
The following situations may interfere with
the operation of the system or prevent it from
working:
-
p
oor visibility (inadequate street lighting,
falling snow, rain, fog),
6
Driving
Page 153 of 316

151
When the cruise control is switched on, be
careful if you maintain the pressure on one
of the programmed speed modification
buttons: this may result in a very rapid
change in the speed of your vehicle.
Do not use the cruise control on slippery
roads or in heavy traffic.
When descending a
steep hill, the cruise
control system cannot prevent the vehicle
from exceeding the programmed speed.
On steep climbs or when towing, the
programmed speed may not be reached
or maintained.
The use of mats not approved by
CITROËN may inter fere with the operation
of the cruise control.
To avoid any risk of jamming of the pedals:
-
e
nsure that mats are secured correctly,
-
n
ever fit one mat on top of another.Adaptive cruise control
The system allows the speed of
your vehicle to be maintained at the
setting you have made, and also to
respect the inter-vehicle time that
you have selected between your
vehicle and the one in front, when
the situation permits it.
Switching between the
types of cruise control
The choice between "adaptive" and "standard"
cruise control is made in the Driving menu.
F
T
urn the cruise control wheel to
the "CRUISE" position.
F
I
n the Driving menu, select the Driving
functions tab and then Active cruise
control to activate or deactivate adaptive
cruise control.
For more information on the Cruise
control , refer to the corresponding
section.
Principles of operation
Using radar with a range of about 100 metres,
l ocated at the front of the vehicle, this system
detects a
vehicle travelling in front of your
vehicle.
It automatically adapts the speed of your
vehicle to that of the vehicle in front.
If the vehicle in front is travelling more slowly,
the system progressively reduces the speed of
your vehicle using just engine braking (as if the
driver had pressed the " -" b u t to n).
If your vehicle is too close to the vehicle in
front or is approaching it too quickly, adaptive
cruise control is automatically deactivated.
The driver is then alerted by an audible signal
accompanied by a
message.
If the vehicle in front accelerates or changes
lane, the adaptive cruise control gradually
accelerates your vehicle to return to the
programmed speed.
If the driver operates the direction indicator to
the left (left-hand drive) or to the right (right-
hand drive), to overtake a
slower vehicle, the
adaptive cruise control allows your vehicle to
temporarily approach the vehicle in front to
assist the overtaking manoeuvre, though never
exceeding the programmed speed.
The adaptive cruise control operates
by day and at night, in fog or moderate
rainfall.
6
Driving