seat adjustment Citroen C4 RHD 2015 2.G Owner's Manual
[x] Cancel search | Manufacturer: CITROEN, Model Year: 2015, Model line: C4 RHD, Model: Citroen C4 RHD 2015 2.GPages: 328, PDF Size: 12.72 MB
Page 4 of 328
2
Monochromeô screenô Aô 35
Monochrome ô screen ô C ô 37
Colour
ô screen ô
41
T
rip ô computer ô
43
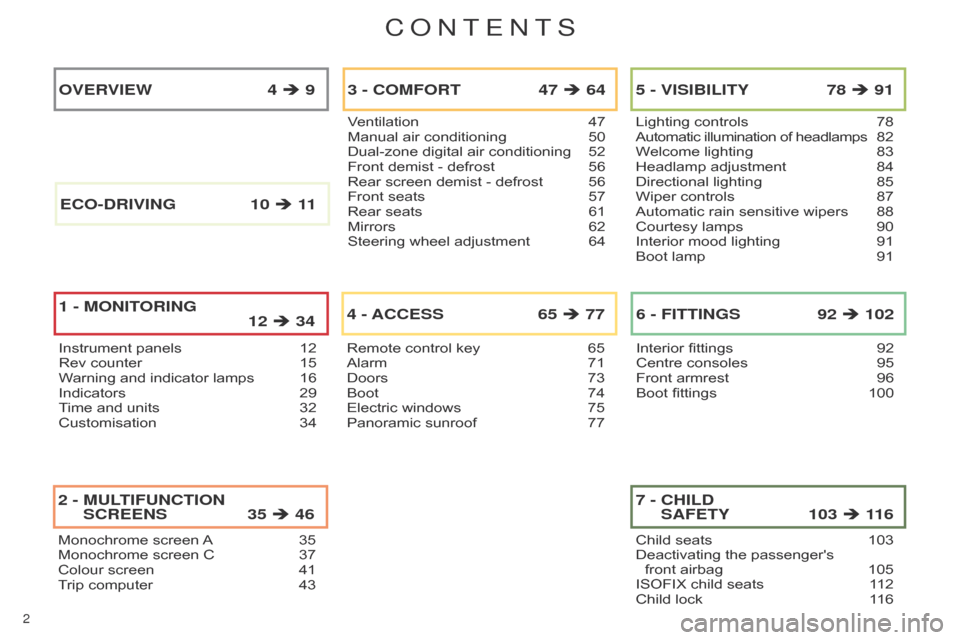
2 - MULTIFUNCTION SCREENS 35 ÿ´
46
Ventilationô 47
Manual ô air ô conditioning ô 50
Dual-zone
ô digital ô air ô conditioning ô
52
Front
ô demist ô - ô defrost ô
56
Rear
ô screen ô demist ô - ô defrost ô
56
Front
ô seats ô
57
Rear
ô seats ô
61
Mirrors
ô
62
Steering
ô wheel ô adjustment ô
64
3 - COMFORT 47 ÿ´ 64
Remoteô controlô keyô 65
Alarm ô 71
Doors
ô
73
Boot
ô
74
Electric
ô windows ô
75
Panoramic
ô sunroof ô
77
4 - ACCESS 65 ÿ´ 77
Lightingô controlsô 78
Automatic ô illumination ô of ô headlamps ô 8 2
Welcome
ô lighting ô
83
Headlamp
ô adjustment ô
84
Directional
ô lighting ô
85
Wiper
ô controls ô
87
Automatic
ô rain ô sensitive ô wipers ô
88
Courtesy
ô lamps ô
90
Interior
ô mood ô lighting ô
91
Boot
ô lamp ô
91
5 - VISIBILITY 78 ÿ´ 91
Interiorô fittingsô 92
Centre ô consoles ô 95
Front
ô armrest ô
96
Boot
ô fittings ô
100
6 - FITTINGS 92 ÿ´ 102
Instrumentô panelsô 12
Rev ô counter ô 15
W
arning ô and ô indicator ô lamps ô
16
Indicators
ô
29
T
ime ô and ô units ô
32
Customisation
ô
34
OVERVIEW 4 ÿ´ 9
1 -
MONITORING 12 ÿ´ 34
Childô seatsô 103
Deactivating ô the ô passenger's ô
front
ô airbag ô
105
ISOFIX
ô child ô seats ô
1
12
Child
ô lock ô
1
16
7 - CHILD SAFETY 103 ÿ´
11 6
E
CO
-
DRIVING
10
ÿ´ 11
ConTEnTS
Page 29 of 328

27ô
Passenger's
airbag system fixed
ô in ô the ô seat
ô belt ô and ô passenger's
ô front ô
airbag
ô warning ô
lamps
ô display.The
ô control ô switch, ô located ô
in
ô the ô glove ô box, ô has ô been ô placed
ô in ô the ô "ON" ô position.
The ô passenger's ô front ô airbag ô
is
ô activated.
In
ô this ô case, ô do ô not ô install ô a ô
"rearward
ô facing" ô child ô seat.Move the control switch to the "OFF"
position
ô to ô deactivate ô the ô passenger's ô front
ô airbag.
In
ô this ô case, ô you ô can ô install ô a ô "rearward ô
facing"
ô child ô seat.
Warning/indicator lamp
is onCause Action/Observations
Stop & Start fixed.
When
ô the ô vehicle ô stops ô (red ô
lights,
ô traffic ô jams, ô ...) ô the ô
Stop
ô & ô Start ô system ô has ô put ô
the
ô engine ô into ô STOP
ô
mode.The
ô warning ô lamp ô goes ô off ô and ô the ô
engine
ô restarts ô automatically ô in ô START
ô mode,
ô as ô soon ô as ô you ô want ô to ô move ô off.
flashes
ô for ô a ô few ô
seconds,
ô then ô
goes
ô off.STOP
ô
mode ô is ô temporarily ô
unavailable.
or
ST
ART
ô
mode ô is ô invoked ô
automatically
.For
ô more ô information ô on ô special ô cases ô
with
ô STOP
ô
mode ô and ô START
ô
mode, ô refer ô
to
ô the ô "Stop ô & ô Start" ô section.
Parking space
sensors fixed.
The
ô parking ô space ô sensors ô
function
ô is ô selected.To
ô start ô measurement, ô operate ô the ô direction
ô indicator
ô on ô the ô side ô of ô the ô space ô to ô be
ô measured,
ô and ô do ô not ô exceed ô 12 ô mph
ô
(20
ô km/h). ô
Aô
message ô is ô displayed ô once ô the
ô measurement
ô has ô been ô completed.
Automatic
wiping fixed.The ô wiper ô control ô is ô pushed ô
downwards.
Automatic
ô front ô wiping ô is ô activated.
To ô deactivate ô automatic ô wiping, ô operate ô
the
ô control ô stalk ô downwards ô or ô put ô the ô
stalk
ô into ô another ô position.
Lighting dimmer fixed.The ô lighting ô dimmer ô is ô making ô
an
ô adjustment.
You ô can ô adjust ô the ô level ô of ô illumination ô of ô
the
ô instruments ô between ô 1 ô and ô 16.
1
MONITORING
Page 59 of 328
33
57ô
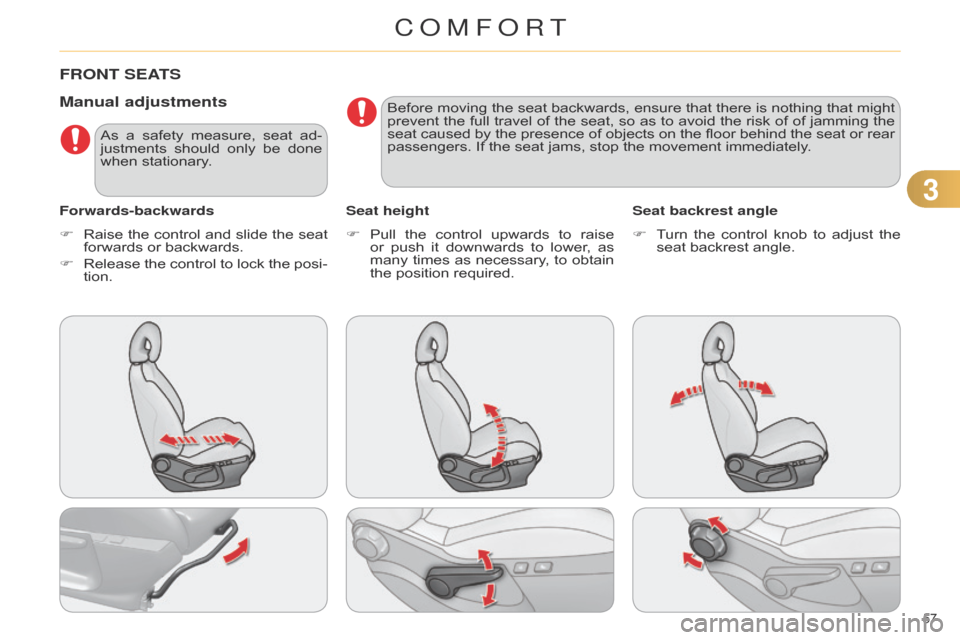
FRONT SEATS
Manual adjustments
Forwards-backwardsSeat heightSeat backrest angle
F ô
Raise
ô
the
ô
control
ô
and
ô
slide
ô
the
ô
seat
ô
forwards
ô or ô backwards.
F
ô
Release
ô
the
ô
control
ô
to
ô
lock
ô
the
ô
posi
-
tion. F
ô
Pull
ô
the
ô
control
ô
upwards
ô
to
ô
raise
ô
or
ô
push
ô
it
ô
downwards
ô
to
ô
lower
, ô
as
ô
many
ô
times
ô
as
ô
necessary
, ô
to
ô
obtain
ô
the
ô position ô required.F
ô
T
urn ô
the
ô
control
ô
knob
ô
to
ô
adjust
ô
the
ô
seat
ô backrest ô angle.
As
ô
a
ô
safety
ô
measure,
ô
seat
ô
ad
-
justments ô
should
ô
only
ô
be
ô
done
ô
when
ô stationary. Before ô
moving
ô
the
ô
seat
ô
backwards,
ô
ensure
ô
that
ô
there
ô
is
ô
nothing
ô
that
ô
might
ô
prevent
ô
the
ô
full
ô
travel
ô
of
ô
the
ô
seat,
ô
so
ô
as
ô
to
ô
avoid
ô
the
ô
risk
ô
of
ô
of
ô
jamming
ô
the
ô
seat
ô
caused
ô
by
ô
the
ô
presence
ô
of
ô
objects
ô
on
ô
the
ô
floor
ô
behind
ô
the
ô
seat
ô
or
ô
rear
ô
passengers.
ô If ô the ô seat ô jams, ô stop ô the ô movement ô immediately.
COMFORT
Page 60 of 328
33
58ô
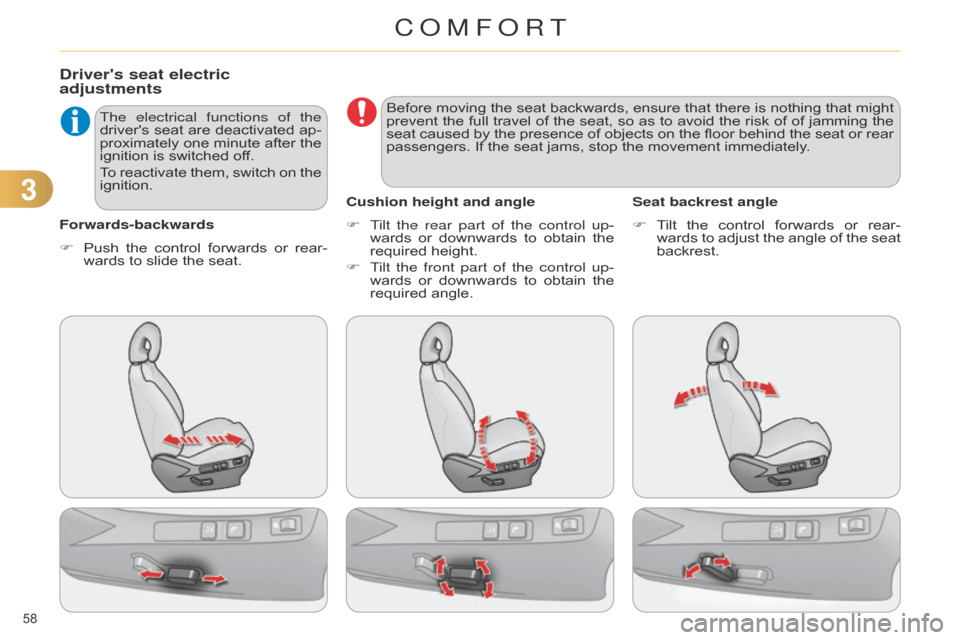
Driver's seat electric
adjustments
Forwards-backwardsThe electrical functions of the
driver's
ô
seat
ô
are
ô
deactivated
ô
ap
-
proximately ô
one
ô
minute
ô
after
ô
the
ô
ignition
ô is ô switched ô off.
To ô
reactivate
ô
them,
ô
switch
ô
on
ô
the
ô
ignition.
F
T ilt the rear part of the control up-
wards
ô or ô downwards ô to ô obtain ô the ô
required
ô height.
F
T
ilt the front part of the control up-
wards
ô
or
ô
downwards
ô
to
ô
obtain
ô
the
ô
required
ô angle.
Cushion height and angle
F ô T ilt ô the ô control ô forwards ô or ô rear -
wards
ô to ô adjust ô the ô angle ô of ô the ô seat ô
backrest.
Seat backrest angle
F
ô
Push
ô
the
ô
control
ô
forwards
ô
or
ô
rear
-
wards
ô to ô slide ô the ô seat. Before
ô
moving
ô
the
ô
seat
ô
backwards,
ô
ensure
ô
that
ô
there
ô
is
ô
nothing
ô
that
ô
might
ô
prevent
ô
the
ô
full
ô
travel
ô
of
ô
the
ô
seat,
ô
so
ô
as
ô
to
ô
avoid
ô
the
ô
risk
ô
of
ô
of
ô
jamming
ô
the
ô
seat
ô
caused
ô
by
ô
the
ô
presence
ô
of
ô
objects
ô
on
ô
the
ô
floor
ô
behind
ô
the
ô
seat
ô
or
ô
rear
ô
passengers.
ô If ô the ô seat ô jams, ô stop ô the ô movement ô immediately.
COMFORT
Page 61 of 328
33
59ô
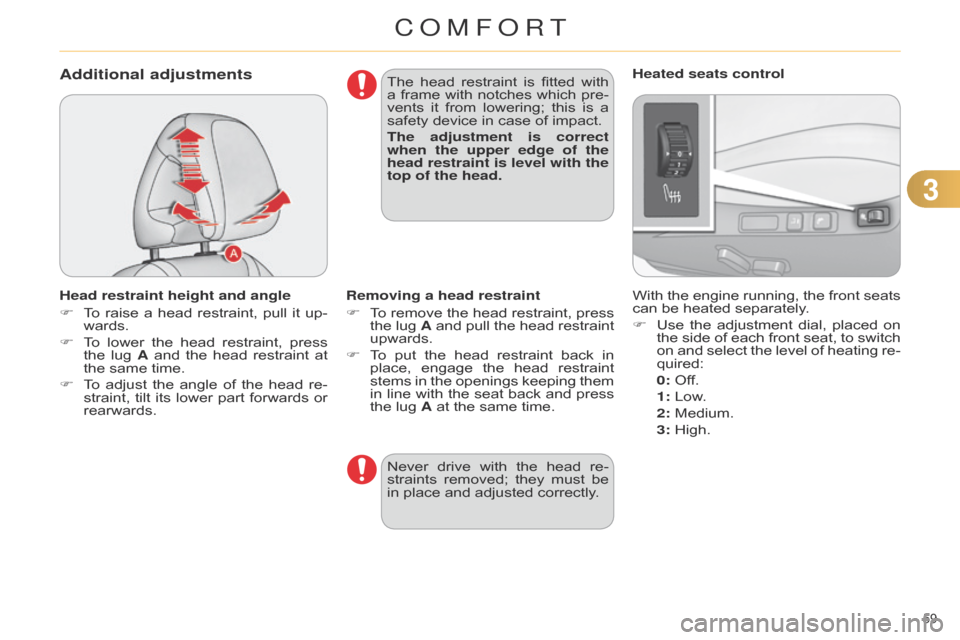
Additional adjustments
Head restraint height and angle
Fô
T
o ô
raise
ô
a
ô
head
ô
restraint,
ô
pull
ô
it
ô
up
-
wards.
F
ô
T
o ô
lower
ô
the
ô
head
ô
restraint,
ô
press
ô
the
ô
lug
ô
A
ô
and
ô
the
ô
head
ô
restraint
ô
at
ô
the
ô same ô time.
F
ô
T
o ô
adjust
ô
the
ô
angle
ô
of
ô
the
ô
head
ô
re
-
straint,
ô
tilt
ô
its
ô
lower
ô
part
ô
forwards
ô
or
ô
rearwards. The
ô
head
ô
restraint
ô
is
ô
fitted
ô
with
ô
a
ô
frame
ô
with
ô
notches
ô
which
ô
pre
-
vents ô
it
ô
from
ô
lowering;
ô
this
ô
is
ô
a
ô
safety
ô device ô in ô case ô of ô impact.
The adjustment is correct
when the upper edge of the
head restraint is level with the
top of the head.
With ô the ô engine ô running, ô the ô front ô seats ô can
ô be ô heated ô separately.
F
ô
Use
ô
the
ô
adjustment
ô
dial,
ô
placed
ô
on
ô
the
ô
side
ô
of
ô
each
ô
front
ô
seat,
ô
to
ô
switch
ô
on
ô
and
ô
select
ô
the
ô
level
ô
of
ô
heating
ô
re
-
quired:
0:
ô Off.
1
: ô Low.
2
: ô Medium.
3
: ô High.
Heated seats control
Removing a head restraint
F ô
T
o ô
remove
ô
the
ô
head
ô
restraint,
ô
press
ô
the
ô
lug
ô
A
ô
and
ô
pull
ô
the
ô
head
ô
restraint
ô
upwards.
F
ô
T
o ô
put
ô
the
ô
head
ô
restraint
ô
back
ô
in
ô
place,
ô
engage
ô
the
ô
head
ô
restraint
ô
stems
ô
in
ô
the
ô
openings
ô
keeping
ô
them
ô
in
ô
line
ô
with
ô
the
ô
seat
ô
back
ô
and
ô
press
ô
the
ô lug ô A ô at ô the ô same ô time.
Never
ô
drive
ô
with
ô
the
ô
head
ô
re
-
straints
ô
removed;
ô
they
ô
must
ô
be
ô
in
ô place ô and ô adjusted ô correctly.
COMFORT
Page 86 of 328
55
84ô
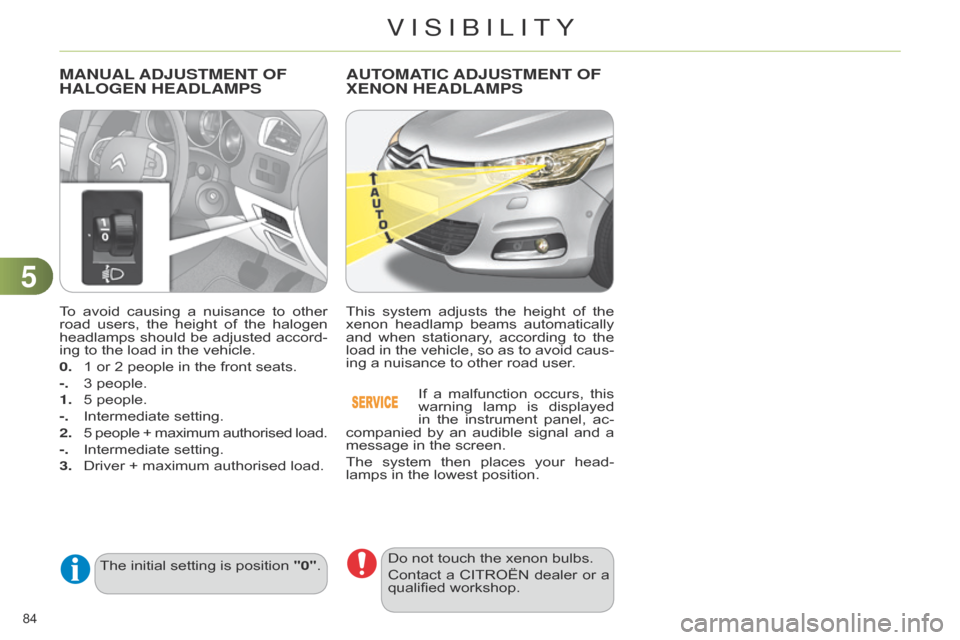
Toô avoidô causing ô a ô nuisance ô to ô other ô road
ô users, ô the ô height ô of ô the ô halogen ô
headlamps
ô
should
ô
be
ô
adjusted
ô
accord
-
ing
ô to ô the ô load ô in ô the ô vehicle.
0.
ô
1
ô or ô 2 ô people ô in ô the ô front ô seats.
-.
ô
3
ô people.
1.
ô
5
ô people.
-.
ô
Intermediate
ô setting.
2.
ô
5
ô
people
ô
+
ô
maximum
ô
authorised
ô
load.
-.
ô
Intermediate
ô setting.
3.
ô
Driver
ô + ô maximum ô authorised ô load.
MANUAL AD j USTMENT OF HALOGEN
HEADLAMPS
Theô initialô settingô isô positionô "0".
AUTOMATIC ADjUSTMENT OF XENON
HEADLAMPS
Thisô system ô adjusts ô the ô height ô of ô the ô xenon
ô headlamp ô beams ô automatically ô
and
ô
when
ô
stationary
, ô
according
ô
to
ô
the
ô
load
ô
in
ô
the
ô
vehicle,
ô
so
ô
as
ô
to
ô
avoid
ô
caus
-
ing
ô a ô nuisance ô to ô other ô road ô user.
If
ô
a
ô
malfunction
ô
occurs,
ô
this
ô
warning
ô
lamp
ô
is
ô
displayed
ô
in
ô
the
ô
instrument
ô
panel,
ô
ac
-
companied
ô
by
ô
an
ô
audible
ô
signal
ô
and
ô
a
ô
message
ô in ô the ô screen.
The
ô
system
ô
then
ô
places
ô
your
ô
head
-
lamps
ô in ô the ô lowest ô position.
Do
ô not ô touch ô the ô xenon ô bulbs.
Contact
ô
a
ô
CITROûN
ô
dealer
ô
or
ô
a
ô
qualified
ô workshop.
VISIBILITY
Page 123 of 328
88
121ô
Seat belt not fastened / unfastened
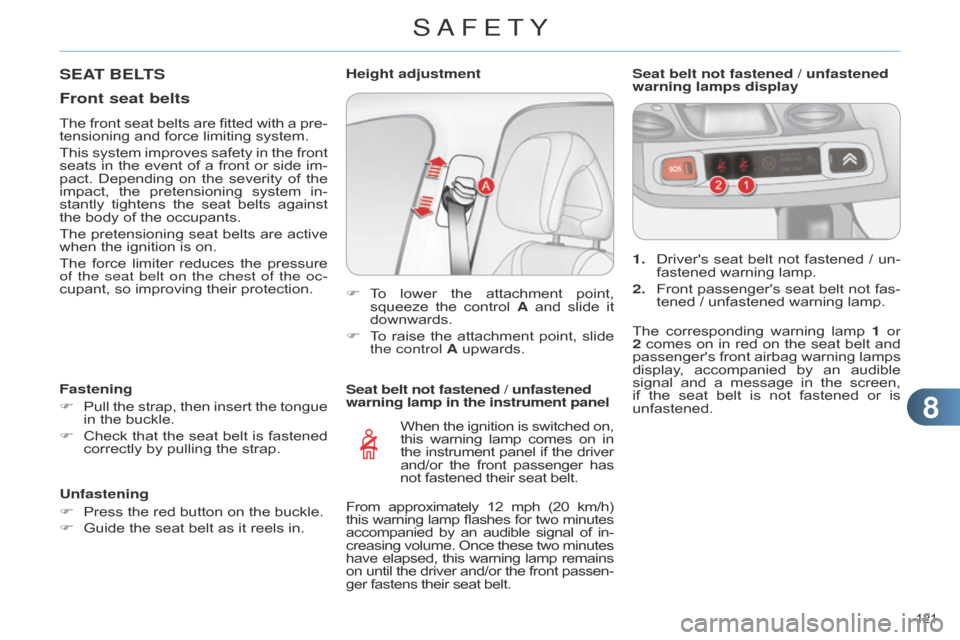
warning lamp in the instrument panelWhen
ô
the
ô
ignition
ô
is
ô
switched
ô
on,ô this
ô
warning
ô
lamp
ô
comes
ô
on
ô
inô the
ô
instrument
ô
panel
ô
if
ô
the
ô
driverô and/or
ô
the
ô
front
ô
passenger
ô
hasô not
ô fastened ô their ô seat ô belt.1.
ô
Driver's
ô
seat
ô
belt
ô
not
ô
fastened
ô
/
ô
un
-
fastened ô warning ô lamp.
2. ô
Front
ô
passenger's
ô
seat
ô
belt
ô
not
ô
fas
-
tened ô / ô unfastened ô warning ô lamp.
Seat belt not fastened / unfastened
warning lamps display
F ô
T
o ô
lower
ô
the
ô
attachment
ô
point,
ô
squeeze
ô
the
ô
control
ô
A
ô
and
ô
slide
ô
it
ô
downwards.
F
ô
T
o ô
raise
ô
the
ô
attachment
ô
point,
ô
slide
ô
the control
A ô upwards.
Height adjustment
SEAT BELTS
Front seat belts
Theô front
ô seat ô belts ô are ô fitted ô with ô a ô pre -
tensioning ô and ô force ô limiting ô system.
This
ô
system
ô
improves
ô
safety
ô
in
ô
the
ô
front
ô
seats
ô
in
ô
the
ô
event
ô
of
ô
a
ô
front
ô
or
ô
side
ô
im
-
pact.
ô
Depending
ô
on
ô
the
ô
severity
ô
of
ô
the
ô
impact,
ô
the
ô
pretensioning
ô
system
ô
in
-
stantly
ô
tightens
ô
the
ô
seat
ô
belts
ô
against
ô
the
ô body ô of ô the ô occupants.
The
ô
pretensioning
ô
seat
ô
belts
ô
are
ô
active
ô
when
ô the ô ignition ô is ô on.
The
ô
force
ô
limiter
ô
reduces
ô
the
ô
pressure
ô
of
the seat belt on the chest of the oc-
cupant,
ô so ô improving ô their ô protection.
Fastening
F
ô
Pull
ô
the
ô
strap,
ô
then
ô
insert
ô
the
ô
tongue
ô
in
ô the ô buckle.
F
ô
Check
ô
that
ô
the
ô
seat
ô
belt
ô
is
ô
fastened
ô
correctly
ô by ô pulling ô the ô strap.
Unfastening
F
ô
Press
ô the ô red ô button ô on ô the ô buckle.
F
ô
Guide
ô the ô seat ô belt ô as ô it ô reels ô in. The
ô
corresponding
ô
warning
ô
lamp
ô
1
or
2
ô
comes
ô
on
ô
in
ô
red
ô
on
ô
the
ô
seat
ô
belt
ô
and
ô
passenger's
ô
front
ô
airbag
ô
warning
ô
lamps
ô
display
, ô
accompanied
ô
by
ô
an
ô
audible
ô
signal
ô
and
ô
a
ô
message
ô
in
ô
the
ô
screen,
ô
if
ô
the
ô
seat
ô
belt
ô
is
ô
not
ô
fastened
ô
or
ô
is
ô
unfastened.
From
ô
approximately
ô
12
ô
mph
ô
(20ô
km/h)
ô this
ô
warning
ô
lamp
ô
flashes
ô
for
ô
two
ô
minutesô accompanied
ô
by
ô
an
ô
audible
ô
signal
ô
of
ô
in
-
creasing
ô
volume.
ô
Once
ô
these
ô
two
ô
minutesô have
ô
elapsed,
ô
this
ô
warning
ô
lamp
ô
remainsô on
ô
until
ô
the
ô
driver
ô
and/or
ô
the
ô
front
ô
passen
-
ger
ô fastens ô their ô seat ô belt.
SAFETY
Page 125 of 328
88
123ô
Theô driverô must ô ensure ô that ô passen -
gers ô use ô the ô seat ô belts ô correctly ô and ô
that
ô
they
ô
are
ô
all
ô
restrained
ô
securely
ô
before
ô setting ô off.
Wherever
ô
you
ô
are
ô
seated
ô
in
ô
the
ô
ve
-
hicle, always fasten your seat belt,
even
ô for ô short ô journeys.
Do
ô
not
ô
interchange
ô
the
ô
seat
ô
belt
ô
buckles
ô
as
ô
they
ô
will
ô
not
ô
fulfil
ô
their
ô
role
ô
fully
.
The
ô
seat
ô
belts
ô
are
ô
fitted
ô
with
ô
an
ô
inertia
ô
reel
ô
permitting
ô
automatic
ô
adjustment
ô
of
ô
the
ô
length
ô
of
ô
the
ô
strap
ô
to
ô
your
ô
size.
ô
The
ô
seat
ô
belt
ô
is
ô
stowed
ô
automatically
ô
when
ô not ô in ô use.
Before
ô
and
ô
after
ô
use,
ô
ensure
ô
that
ô
the
ô
seat
ô belt ô is ô reeled ô in ô correctly.
The
ô
lower
ô
part
ô
of
ô
the
ô
strap
ô
must
ô
be
ô
positioned
ô
as
ô
low
ô
as
ô
possible
ô
on
ô
the
ô
pelvis.
The
ô
upper
ô
part
ô
must
ô
be
ô
positioned
ô
in
ô
the
ô hollow ô of ô the ô shoulder.
The
ô
inertia
ô
reels
ô
are
ô
fitted
ô
with
ô
an
ô
auto
-
matic
ô
locking
ô
device
ô
which
ô
comes
ô
intoô operation in the event of a collision,
emergency
ô
braking
ô
or
ô
if
ô
the
ô
vehicleô rolls
ô
over
. ô
Y
ou ô
can
ô
release
ô
the
ô
deviceô by
ô
pulling
ô
the
ô
strap
ô
firmly
ô
and
ô
then
ô
re
-
leasing
ô it ô so ô that ô it ô reels ô in ô slightly.In
ô order ô to ô be ô ef fective, ô a ô seat ô belt ô must:
-
ô
be
ô
tightened
ô
as
ô
close
ô
to
ô
the
ô
body
ô
as possible,
-
ô
be
ô
pulled
ô
in
ô
front
ô
of
ô
you
ô
with
ô
a
ô
smooth
ô
movement,
ô
checking
ô
that
ô
it
ô does ô not ô twist,
-
ô be
ô
used
ô
to
ô
restrain
ô
only
ô
one
ô
person,
-
ô not
ô
bear
ô
any
ô
trace
ô
of
ô
cuts
ô
or
ô
fraying,
-
ô
not
ô
be
ô
converted
ô
or
ô
modified
ô
to
ô
avoid
ô affecting ô its ô performance.
In
ô
accordance
ô
with
ô
current
ô
safety
ô
regulations,
ô
for
ô
all
ô
repairs
ô
on
ô
your
ô
vehicle's
ô
seat
ô
belts,
ô
go
ô
to
ô
a
ô
qualified
ô
workshop
ô
with
ô
the
ô
skills
ô
and
ô
equip
-
ment
ô
needed,
ô
which
ô
a
ô
CITROûN
ô
dealer
ô is ô able ô to ô provide.
Have
ô
your
ô
seat
ô
belts
ô
checked
ô
regu
-
larly
ô
by
ô
a
ô
CITROûN
ô
dealer
ô
or
ô
a
ô
qualified
ô
workshop,
ô
particularly
ô
if
ô
the
ô
straps
ô show ô signs ô of ô damage.
Clean the seat belt straps with soapy
water
ô
or
ô
a
ô
textile
ô
cleaning
ô
product,
ô
sold
ô by ô CITROûN ô dealers.
After
ô
folding
ô
or
ô
moving
ô
a
ô
seat
ô
or
ô
rear
ô
bench seat, ensure that the seat belt
is
ô positioned ô and ô reeled ô in ô correctly.Recommendations for children
Use
ô
a
ô
suitable
ô
child
ô
seat
ô
if
ô
the
ô
pas
-
senger
ô
is
ô
less
ô
than
ô
12
ô
years
ô
old
ô
or
ô
shorter
ô than ô one ô and ô a ô half ô metres.
Never
ô
use
ô
the
ô
same
ô
seat
ô
belt
ô
to
ô
se
-
cure
ô more ô than ô one ô person.
Never
ô
allow
ô
a
ô
child
ô
to
ô
travel
ô
on
ô
your
ô
lap.
For
ô
more
ô
information,
ô
refer
ô
to
ô
the
ô
"Child
ô seats" ô section.
In the event of an impact
Depending on the nature and se-
riousness of the impact, the pre-
tensioning
ô
device
ô
may
ô
be
ô
deployed
ô
before
ô
and
ô
independently
ô
of
ô
the
ô
airbags.
ô
Deployment
ô
of
ô
the
ô
preten
-
sioners
ô
is
ô
accompanied
ô
by
ô
a
ô
slight
ô
discharge
ô
of
ô
harmless
ô
smoke
ô
and
ô
a
ô
noise,
ô
due
ô
to
ô
the
ô
activation
ô
of
ô
the
ô
pyrotechnic
ô
cartridge
ô
incorporated
ô
in
ô
the
ô system.
In
ô
all
ô
cases,
ô
the
ô
airbag
ô
warning
ô
lamp
ô
comes
ô on.
Following
ô
an
ô
impact,
ô
have
ô
the
ô
seat
ô
belts
ô
system
ô
checked,
ô
and
ô
if
ô
neces
-
sary
ô
replaced,
ô
by
ô
a
ô
CITROûN
ô
dealer
ô
or
ô a ô qualified ô workshop.
SAFETY
Page 322 of 328

320ô
Deactivatingô theô passengerô
airbag...................................... 124
Deadlocking
ô
................................. 66
Defrosting
ô
.................................... 56
Diesel
ô additive ô level ô
................... 174
Diesel
ô engine ô pre-heat ô warning ô
lamp
ô
.......................................... 26
Dimensions
ô
................................ 225
Dipped
ô beam ô
............... 78,
ô 196, ô 198
Dipstick
ô
................................ 29,
ô 172
Directional
ô lighting ô
................. 85,
ô 86
d
irection indicators
ô
...81,
ô 117, ô 196, ô 197, ô 200
d
oors ô
........................................... 73
Doors
ô emergency ô control ô
............ 70d
oors, rear.................................. 11 6
d
oor trays ô
.................................... 92
Dynamic
ô emergency ô braking ô
..... 132
Dynamic
ô stability ô
control (
d SC) ô
........................... 11
9
EBA
ô
(Emergency ô braking ô
assistance)
ô
.............................. 11
8
Eco-driving
ô
.................................. 10
Eco-driving
ô (advice) ô
..................... 10
Economical
ô driving ô ô
..................... 10
Economy
ô mode.......................... 209
Electric
ô window ô controls ô
.............. 75
Electronic
ô brake ô force ô distribution ô
(E
b F d ) ô
..................................... 11
8
Electronic
ô engine ô
immobiliser
ô
....................... 68,
ô 129
Electronic
ô gearbox ô
system
ô
...... 10,
ô 139, ô 149, ô 176, ô 208
Emergency
ô boot ô release.............. 74
Emergency
ô braking ô
system
ô
..................................... 11
8Emergency
ô call ô .......... 120, ô 227, ô 228
Emergency ô warning ô
lamps
ô
.......................................11
7
Emissions
ô control ô
system,
ô SCR ô
............................. 24
eMyW
ay ô
............................... 41,
ô 229
Energy
ô economy ô
mode....................................... 209
Engine
ô compartment ô
......... 170,
ô 171
Engine
ô compartment ô
fusebox
ô
................................... 202
Engine,
ô
d
iesel........ 26, ô 166, ô 168, ô 171, ô 221
Engine
ô oil ô
................................... 172
Engine
ô oil ô level ô indicator ô
...... 29,
ô 172
Engine,
ô petrol ô
............ 166,
ô 170, ô 217
Engines.............................. 217,
ô 221
Environment
ô
.......................... 10,
ô 68
Equipment
ô settings ô
.... 35,
ô 37, ô 41, ô 42Gearbox,
ô
automatic ô .......... 10, ô 142, ô 176, ô 208
Gearbox,
ô
manual
ô
.............. 10,
ô 138, ô 149, ô 176
Gear
ô efficiency ô indicator ô
............ 146
Gear lever
ô
.................................... 10
Gear
ô lever, ô automatic ô
gearbox................................... 142
Gear
ô lever, ô manual ô gearbox ô
...... 138
Glove
ô box ô
.................................... 93
G.P
.S. ô
........................................ 238
Grab
ô handles ô
............................... 92
Guidance
ô
........................... 236,
ô 243
E Filling
ô with ô fuel ô
.................... 165-167
Fitting
ô a ô wheel ô
........................... 192
Fitting
ô roof ô bars.......................... 210
Fittings,
ô boot ô
.............................. 100
Fitting
ô speakers ô
......................... 214
Flashing
ô
indicators
ô
...........81,
ô 117, ô 197, ô 199
Foglamps,
ô rear ô
.................... 80,
ô 200
Front
ô foglamps....... 80, ô 86, ô 196, ô 199
Front seats ............................. 57,
ô 58
Fuel...................................... 10,
ô 166
Fuel
ô consumption ô
........................ 10
Fuel
ô filler ô flap ô
..................... 165,
ô 167
Fuel
ô gauge................................. 165
Fuel
ô tank ô
............................ 165,
ô 167
Fusebox,
ô dashboard ô
.................. 202
Fuses
ô
......................................... 202
F
H
Halogen
ô headlamps................... 196
Hands-free
ô kit ô
.................... 252,
ô 301
Hazard
ô warning ô lamps ô
................11
7
Headlamp
ô adjustment.................. 84
Headlamps,
ô
directional
ô
................... 84,
ô 85, ô 196
Headlamp
ô wash ô
........................... 88
Head
ô restraints, ô front ô
................... 59
Head
ô restraints, ô rear ô
.................... 61
Heated
ô seats ô
............................... 59
Heating
ô
............................ 10,
ô 49, ô 50
Height
ô and ô reach ô adjustment, ô
steering
ô wheel ô
.......................... 64
Hill start assist
ô
........................... 145
Hooks
ô
........................................ 101
Ignition
ô
....................................... 131
Indicators,
ô direction ô
............1
17, ô 197
Indicator
ô lamps, ô status................. 26
Inflating
ô accessories ô
(using
ô the ô kit) ô
.......................... 184
Inflating
ô tyres ô
............................... 10
I G
aLPHabETICaL IndEx
Page 324 of 328

322ô
Regenerationô ofô theô particleô emissionsô filter ô ........................ 175
Reinitialising
ô the ô electric ô
windows
ô
.................................... 75
Reinitialising
ô the ô remote ô
control
ô
....................................... 67
Remote
ô control ô
................ 65,
ô 66, ô 68
Removable
ô screen ô
(snow
ô shield) ô
.......................... 210
Removing
ô a ô wheel ô
..................... 192
Removing
ô the ô mat ô
....................... 98
Repair
ô kit, ô puncture ô
................... 184
Replacing
ô bulbs ô
................. 196,
ô 200
Replacing
ô fuses ô
......................... 202
Replacing
ô the ô air ô filter ô
................ 175
Replacing
ô the ô oil ô filter ô
................ 175
Replacing
ô the ô passenger ô
compartment
ô filter ô
................... 175
Replacing
ô wiper ô blades ô
....... 89,
ô 209
Resetting
ô the ô service ô indicator ô
.... 31
Resetting
ô the ô trip ô recorder ô
........... 32
Rev counter
ô
............................ 12-15
Reversing
ô lamps ô
........................ 200
Risk
ô areas ô (update) ô
................... 240
Roof bars
ô
................................... 210
Roof
ô blind ô
.................................... 77
Routine
ô checks ô
.................. 175,
ô 176
Running
ô out ô of ô fuel ô (Diesel) ô
....... 168Screenwash, front
........................ 88
SCR (Selective Catalytic
Reduction)
ô
.............................. 177
SCR
ô system ô
............................... 177
Seat
ô adjustment..................... 57, ô 58
Seat belts .................... 109,
ô 121-123
Seat, rear bench
ô
.......................... 61
Seats, electric
ô
.............................. 58
Seats, rear
ô
................................... 61
Selector lever
, electronic
gearbox
ô system ô
.............. 139,
ô 176
Serial
ô number, ô vehicle ô
............... 226
Service
ô indicator ô
.......................... 30
Service
ô warning ô light ô
................... 19
Servicing
ô
...................................... 10
Setting
ô the ô clock ô
........ 32,
ô 35, ô 37, ô 42
Short-cut
ô menus ô
........................ 234
Sidelamps
ô
...... 78,
ô 81, ô 196, ô 198, ô 200
Side
ô repeater ô
............................. 199
Ski
ô flap ô
......................................... 99
Snow chains
ô
.............................. 195
Spare wheel ............................... 189
Speakers
ô (fitting) ô
....................... 214
Speed
ô limiter...................... 155, ô 156
Speedometer
ô
.......................... 12-14
Spotlamps,
ô side ô
................... 83,
ô 199
Start
ô
........................................... 206
Starting
ô the ô engine ô
.................... 129
Starting
ô the ô vehicle ô
.... 129,
ô 139, ô 142
Steering
ô mounted ô controls ô
....232,
ô 287
Stopping
ô the ô
vehicle
ô
.................... 129,
ô 139, ô 142
Stop & Start
ô
............ 46,
ô 53, ô 56, ô 149,
165,
ô 169, ô 175, ô 206
Storage
ô
............... 92,
ô 93, ô 95-97, ô 100
Storage
ô compartments ô
.......... 92,
ô 95
Storage
ô drawer ô
............................ 98
Storage
ô net ô
................................ 100Stowing
ô rings ô ............................. 100
Sun visor ...................................... 93
Switching
ô off ô the ô engine ô
............ 129
Synchronising
ô the ô remote ô
control
ô
....................................... 67
Synthesiser
, voice...................... 246
System,
ô navigation ô
.................... 236
T T
able ô of ô weights ô
................. 217,
ô 221
Tables
ô of ô engines............... 217, ô 221
Tables of fuses ........................... 202
Tank,
ô
AdBlueôÛô additiveô ....... 177,ô 181
Tank,
ô
fuel
ô ................................... 167
T
echnical
ô
data.................... 217, ô 221
Telephone
ô
.......................... 252,
ô 256
Temperature
ô
control ô
for
ô
heated
ô
seats ô
........................ 59
T
emporary
ô
tyre ô repair ô kit ô
............ 184
T
icket
ô
holder
ô
................................ 92
TMC
ô
(Traffic
ô
info) ô
....................... 249
T
ools
ô
.......................................... 189
T
orch
ô
.......................................... 102
T
otal
ô
distance
ô recorder ô
................ 32
T
owbar
ô
....................................... 213
T
owed
ô
loads....................... 217, ô 221
Towing
ô
another ô vehicle ô
............... 2
11
Traction control (
a SR) ô
................ 11
9
Traffic
ô
information ô
(T
a
)
ô
......................... 250,
ô 263, ô 290
Traffic
ô
information ô (TMC) ô
... 249,
ô 250
Trailer
ô
........................................ 213
T
rajectory
ô
control ô
systems
ô
................................... 11
9
Trip
ô
computer
ô
......................... 43-46
T
rip
ô
distance
ô
recorder ô
.................. 32
T
yre pressures ô
........................... 226
Safety
ô
for
ô
children.................75,
ô
116
Satellite
ô
navigation
ô
system
ô
.......... 41
Screen,
ô
colour
ô
and
ô
mapping
ô
.............. 42,
ô
45,
ô
233,
ô
274
Screen
ô
menu
ô
map
ô
.......274,
ô
311-313
Screen,
ô
monochrome
ô
.....35,
ô
37,
ô
311
Screen,
ô
multifunction
ô
(with
ô
audio
ô
equipment)............ 35,
ô
37,
ô
41,
ô
288
S
aLPHabETICaL IndEx