seats Citroen C4 RHD 2015 2.G Owner's Manual
[x] Cancel search | Manufacturer: CITROEN, Model Year: 2015, Model line: C4 RHD, Model: Citroen C4 RHD 2015 2.GPages: 328, PDF Size: 12.72 MB
Page 4 of 328
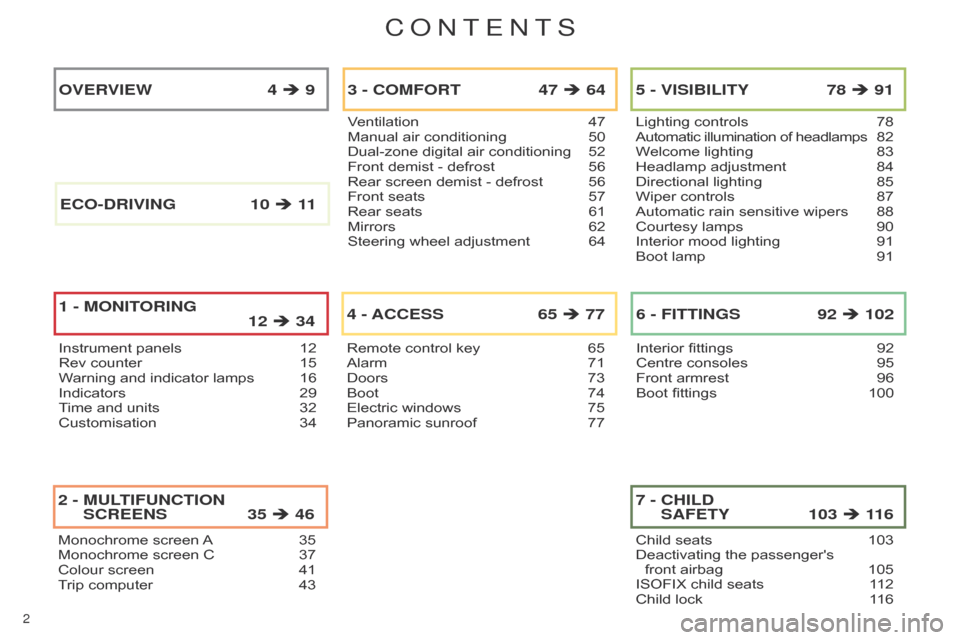
2
Monochromeô screenô Aô 35
Monochrome ô screen ô C ô 37
Colour
ô screen ô
41
T
rip ô computer ô
43
2 - MULTIFUNCTION SCREENS 35 ÿ´
46
Ventilationô 47
Manual ô air ô conditioning ô 50
Dual-zone
ô digital ô air ô conditioning ô
52
Front
ô demist ô - ô defrost ô
56
Rear
ô screen ô demist ô - ô defrost ô
56
Front
ô seats ô
57
Rear
ô seats ô
61
Mirrors
ô
62
Steering
ô wheel ô adjustment ô
64
3 - COMFORT 47 ÿ´ 64
Remoteô controlô keyô 65
Alarm ô 71
Doors
ô
73
Boot
ô
74
Electric
ô windows ô
75
Panoramic
ô sunroof ô
77
4 - ACCESS 65 ÿ´ 77
Lightingô controlsô 78
Automatic ô illumination ô of ô headlamps ô 8 2
Welcome
ô lighting ô
83
Headlamp
ô adjustment ô
84
Directional
ô lighting ô
85
Wiper
ô controls ô
87
Automatic
ô rain ô sensitive ô wipers ô
88
Courtesy
ô lamps ô
90
Interior
ô mood ô lighting ô
91
Boot
ô lamp ô
91
5 - VISIBILITY 78 ÿ´ 91
Interiorô fittingsô 92
Centre ô consoles ô 95
Front
ô armrest ô
96
Boot
ô fittings ô
100
6 - FITTINGS 92 ÿ´ 102
Instrumentô panelsô 12
Rev ô counter ô 15
W
arning ô and ô indicator ô lamps ô
16
Indicators
ô
29
T
ime ô and ô units ô
32
Customisation
ô
34
OVERVIEW 4 ÿ´ 9
1 -
MONITORING 12 ÿ´ 34
Childô seatsô 103
Deactivating ô the ô passenger's ô
front
ô airbag ô
105
ISOFIX
ô child ô seats ô
1
12
Child
ô lock ô
1
16
7 - CHILD SAFETY 103 ÿ´
11 6
E
CO
-
DRIVING
10
ÿ´ 11
ConTEnTS
Page 7 of 328
5ô 5ô
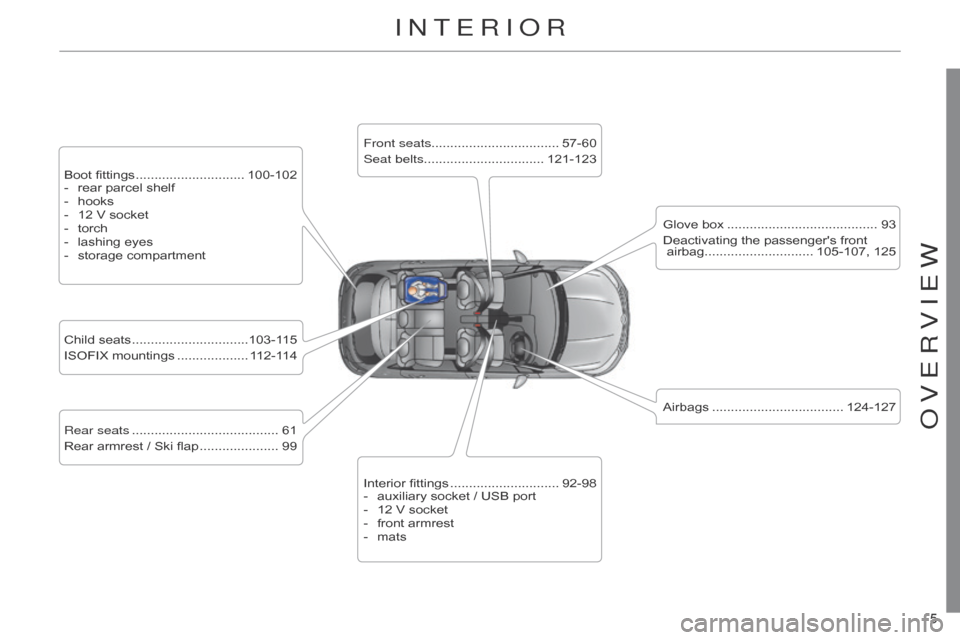
InTERIoR
Bootô fittingsô ............................. 100-102
- ô rear ô parcel ô shelf
-
ô
hooks
-
ô
12
ô V ô socket
-
ô
torch
-
ô
lashing
ô eyes
-
ô
storage
ô compartment
Rear seats
ô
....................................... 61
Rear
ô armrest ô / ô Ski ô flap ô
..................... 99
Child
ô seats ô
...............................103-1
15
ISOFIX
ô mountings ô
................... 1
12-114Front seats
.................................. 57-60
Seat belts ................................ 121-123
Airbags ô
................................... 124-127
Interior
ô fittings ô
............................. 92-98
-
ô
auxiliary
ô socket ô / ô USB ô port
-
ô
12
ô V ô socket
-
ô
front
ô armrest
-
ô
matsGlove
ô box ô
........................................ 93
Deactivating
ô the ô passenger's ô front ô
ô
airbag............................. 105-107, ô 125
oVERVIEW
Page 13 of 328

11ô
ECO-DRIVING
Limit the causes of excess consumption
Spreadô loadsô throughout ô the ô vehicle; ô place ô the ô heaviest ô items
ô in ô the ô bottom ô of ô the ô boot, ô as ô close ô as ô possible ô to ô the ô
rear
ô seats.
Limit
ô
the
ô
loads
ô
carried
ô
in
ô
the
ô
vehicle
ô
and
ô
reduce
ô
wind
ô
resis
-
tance
ô
(roof
ô
bars,
ô
roof
ô
rack,
ô
bicycle
ô
carrier
, ô
trailer
...). ô
Use
ô
a
ô
roof
ô box ô in ô preference.
Remove
ô roof ô bars ô and ô roof ô racks ô after ô use.
At
ô
the
ô
end
ô
of
ô
winter
, ô
remove
ô
snow
ô
tyres
ô
and
ô
refit
ô
your
ô
sum
-
mer
ô tyres.
Observe the recommendations on maintenance
Checkô the ô tyre ô pressures ô regularly , ô when ô cold, ô referring ô to ô the
ô label ô in ô the ô door ô aperture, ô driver's ô side.
Carry
ô out ô this ô check ô in ô particular:
-
ô
before
ô a ô long ô journey,
-
ô
at
ô each ô change ô of ô season,
-
ô
after
ô a ô long ô period ô out ô of ô use.
Don't
ô
forget
ô
the
ô
spare
ô
wheel
ô
and
ô
the
ô
tyres
ô
on
ô
any
ô
trailer
ô
or
ô
caravan.
Have
ô
your
ô
vehicle
ô
serviced
ô
regularly
ô
(engine
ô
oil,
ô
oil
ô
filter
,
ô air
ô
filter
, ô
passenger
ô
compartment
ô
filter
...) ô
and
ô
observe
ô
theô schedule
ô
of
ô
operations
ô
recommended
ô
in
ô
the
ô
manufacturer'sô service
ô schedule.
With
ô
a
ô
BlueHDi
ô
Diesel
ô
engine,
ô
if
ô
the
ô
SCR
ô
system
ô
is
ô
faulty
ô
your
ô
vehicle
ô
becomes
ô
polluting;
ô
go
ô
to
ô
a
ô
CITROûN
ô
dealer
ô
or
ô
a
ô
qualified
ô
workshop
ô
without
ô
delay
ô
to
ô
have
ô
the
ô
emissions
ô
of
ô
nitrous
ô oxides ô brought ô back ô to ô the ô legal ô level.
When
ô
refuellin
g, ô
do
ô
not
ô
continue
ô
after
ô
the
ô
third
ô
cut-of
f ô
of
ô
the
ô
nozzle
ô to ô avoid ô any ô overflow.
At
ô
the
ô
wheel
ô
of
ô
your
ô
new
ô
vehicle,
ô
it
ô
is
ô
only
ô
after
ô
the
ô
first
ô
1ô
800 ô
miles
ô
(3
ô
000
ô
kilometres)
ô
that
ô
you
ô
will
ô
see
ô
the
ô
fuel
ô
consumption
ô settle ô down ô to ô a ô consistent ô average.
Page 59 of 328
33
57ô
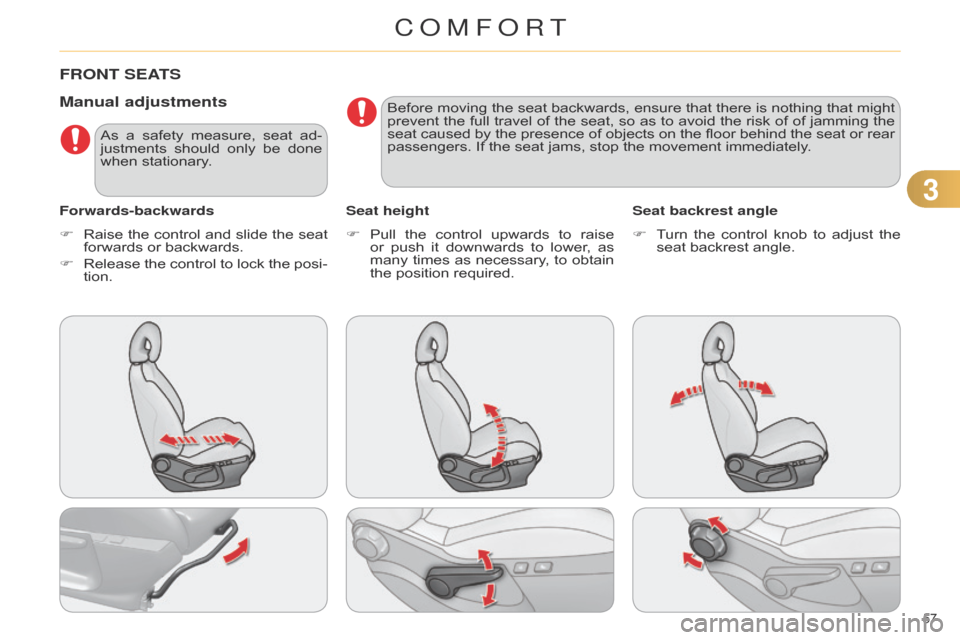
FRONT SEATS
Manual adjustments
Forwards-backwardsSeat heightSeat backrest angle
F ô
Raise
ô
the
ô
control
ô
and
ô
slide
ô
the
ô
seat
ô
forwards
ô or ô backwards.
F
ô
Release
ô
the
ô
control
ô
to
ô
lock
ô
the
ô
posi
-
tion. F
ô
Pull
ô
the
ô
control
ô
upwards
ô
to
ô
raise
ô
or
ô
push
ô
it
ô
downwards
ô
to
ô
lower
, ô
as
ô
many
ô
times
ô
as
ô
necessary
, ô
to
ô
obtain
ô
the
ô position ô required.F
ô
T
urn ô
the
ô
control
ô
knob
ô
to
ô
adjust
ô
the
ô
seat
ô backrest ô angle.
As
ô
a
ô
safety
ô
measure,
ô
seat
ô
ad
-
justments ô
should
ô
only
ô
be
ô
done
ô
when
ô stationary. Before ô
moving
ô
the
ô
seat
ô
backwards,
ô
ensure
ô
that
ô
there
ô
is
ô
nothing
ô
that
ô
might
ô
prevent
ô
the
ô
full
ô
travel
ô
of
ô
the
ô
seat,
ô
so
ô
as
ô
to
ô
avoid
ô
the
ô
risk
ô
of
ô
of
ô
jamming
ô
the
ô
seat
ô
caused
ô
by
ô
the
ô
presence
ô
of
ô
objects
ô
on
ô
the
ô
floor
ô
behind
ô
the
ô
seat
ô
or
ô
rear
ô
passengers.
ô If ô the ô seat ô jams, ô stop ô the ô movement ô immediately.
COMFORT
Page 61 of 328
33
59ô
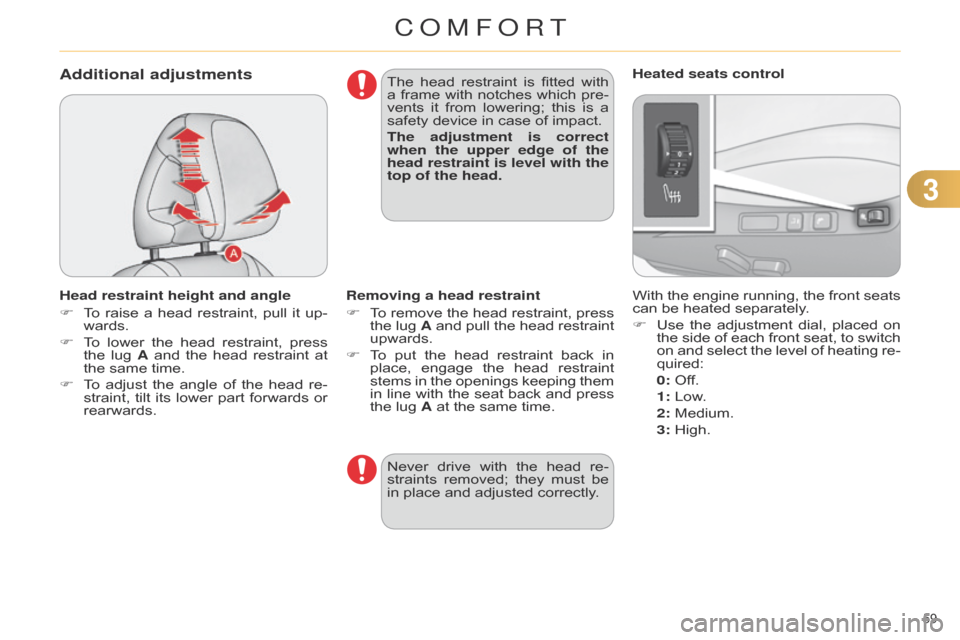
Additional adjustments
Head restraint height and angle
Fô
T
o ô
raise
ô
a
ô
head
ô
restraint,
ô
pull
ô
it
ô
up
-
wards.
F
ô
T
o ô
lower
ô
the
ô
head
ô
restraint,
ô
press
ô
the
ô
lug
ô
A
ô
and
ô
the
ô
head
ô
restraint
ô
at
ô
the
ô same ô time.
F
ô
T
o ô
adjust
ô
the
ô
angle
ô
of
ô
the
ô
head
ô
re
-
straint,
ô
tilt
ô
its
ô
lower
ô
part
ô
forwards
ô
or
ô
rearwards. The
ô
head
ô
restraint
ô
is
ô
fitted
ô
with
ô
a
ô
frame
ô
with
ô
notches
ô
which
ô
pre
-
vents ô
it
ô
from
ô
lowering;
ô
this
ô
is
ô
a
ô
safety
ô device ô in ô case ô of ô impact.
The adjustment is correct
when the upper edge of the
head restraint is level with the
top of the head.
With ô the ô engine ô running, ô the ô front ô seats ô can
ô be ô heated ô separately.
F
ô
Use
ô
the
ô
adjustment
ô
dial,
ô
placed
ô
on
ô
the
ô
side
ô
of
ô
each
ô
front
ô
seat,
ô
to
ô
switch
ô
on
ô
and
ô
select
ô
the
ô
level
ô
of
ô
heating
ô
re
-
quired:
0:
ô Off.
1
: ô Low.
2
: ô Medium.
3
: ô High.
Heated seats control
Removing a head restraint
F ô
T
o ô
remove
ô
the
ô
head
ô
restraint,
ô
press
ô
the
ô
lug
ô
A
ô
and
ô
pull
ô
the
ô
head
ô
restraint
ô
upwards.
F
ô
T
o ô
put
ô
the
ô
head
ô
restraint
ô
back
ô
in
ô
place,
ô
engage
ô
the
ô
head
ô
restraint
ô
stems
ô
in
ô
the
ô
openings
ô
keeping
ô
them
ô
in
ô
line
ô
with
ô
the
ô
seat
ô
back
ô
and
ô
press
ô
the
ô lug ô A ô at ô the ô same ô time.
Never
ô
drive
ô
with
ô
the
ô
head
ô
re
-
straints
ô
removed;
ô
they
ô
must
ô
be
ô
in
ô place ô and ô adjusted ô correctly.
COMFORT
Page 63 of 328
33
61ô
REAR SEATS
Benchô seatô with ô fixed ô one-piece ô cush -
ion ô and ô split ô backrest ô (left ô hand ô 2/3, ô rightô hand
ô 1/3) ô
which
ô
can
ô
be
ô
folded
ô
individuallyô to
ô adapt ô the ô load ô space ô in ô the ô boot.
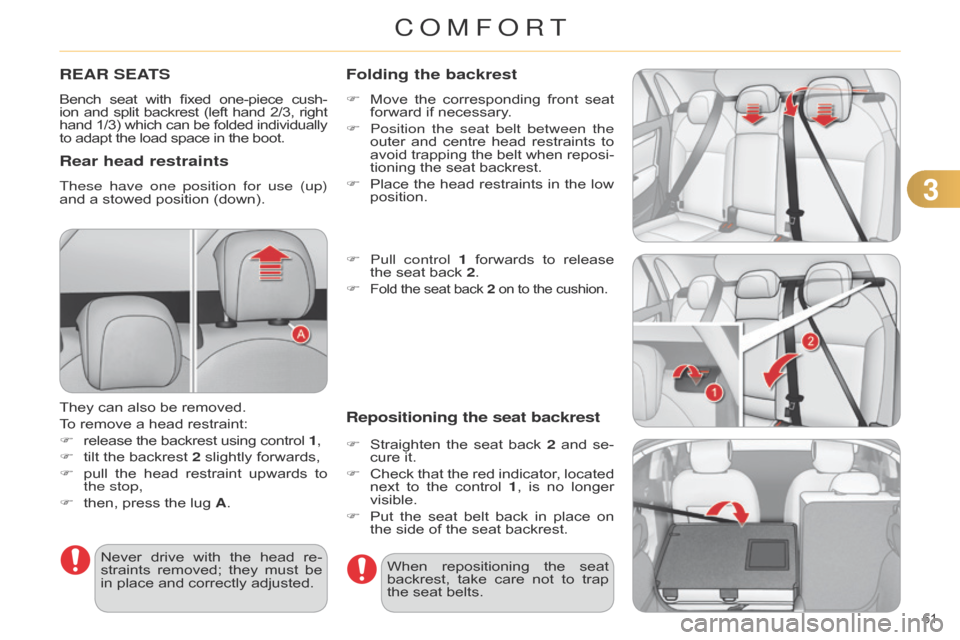
Rear head restraints
These have one position for use (up)
andô a ô stowed ô position ô (down).
They
ô can ô also ô be ô removed.
To
ô remove ô a ô head ô restraint:
F
ô
release
ô the ô backrest ô using ô control ô 1,
F
ô
tilt
ô the ô backrest ô 2 ô slightly ô forwards,
F
ô
pull
ô
the
ô
head
ô
restraint
ô
upwards
ô
to
ô
the stop,
F
ô
then,
ô press ô the ô lug ô A.
Never
ô
drive
ô
with
ô
the
ô
head
ô
re
-
straints
ô
removed;
ô
they
ô
must
ô
be
ô
in
ô place ô and ô correctly ô adjusted.When
ô
repositioning
ô
the
ô
seat
ô
backrest,
ô
take
ô
care
ô
not
ô
to
ô
trap
ô
the
ô seat ô belts.
Folding the backrest
Fô Moveô the ô corresponding ô front ô seat ô forward
ô if ô necessary.
F
Position the seat belt between the
outer
ô
and
ô
centre
ô
head
ô
restraints
ô
to
ô
avoid
ô
trapping
ô
the
ô
belt
ô
when
ô
reposi
-
tioning
ô the ô seat ô backrest.
F
ô
Place
ô
the
ô
head
ô
restraints
ô
in
ô
the
ô
low
ô
position.
F
Pull control 1
ô
forwards
ô
to
ô
release
ô
the
ô seat ô back ô 2.
F
Foldô theô seatô backô 2ô on ô to ô the ô cushion.
Repositioning the seat backrest
Fô Straightenô the ô seat ô back ô 2 ô and ô se -
cure ô it.
F
ô
Check
ô
that
ô
the
ô
red
ô
indicator
, ô
located
ô
next
ô
to
ô
the
ô
control
ô
1
, ô
is
ô
no
ô
longer
ô
visible.
F
ô
Put
ô
the
ô
seat
ô
belt
ô
back
ô
in
ô
place
ô
on
ô
the
ô side ô of ô the ô seat ô backrest.
COMFORT
Page 76 of 328
74ô
BOOT
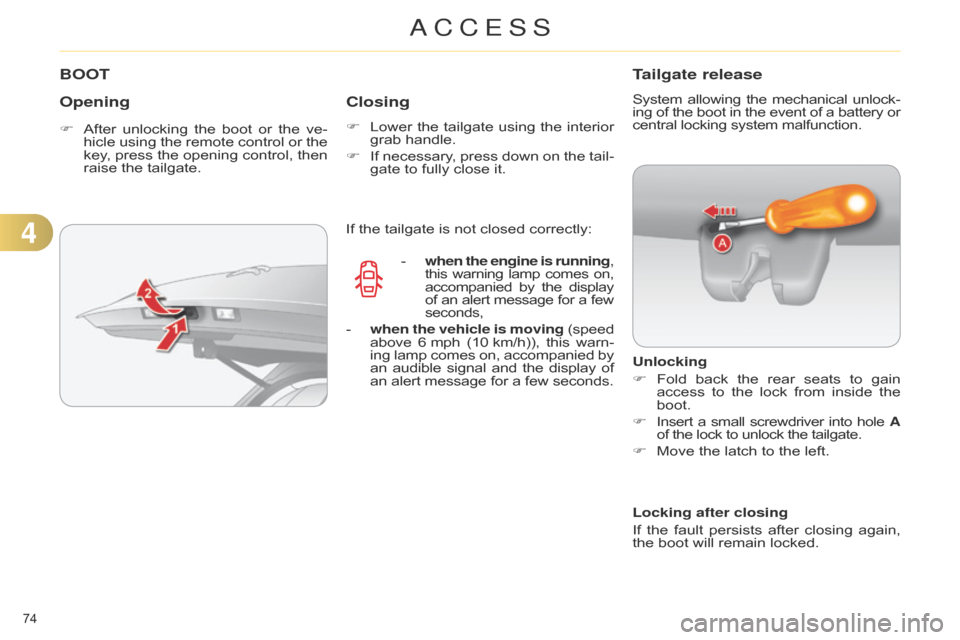
Opening
Fô Afterô unlocking ô the ô boot ô or ô the ô ve -
hicle ô using ô the ô remote ô control ô or ô the ô
key
, ô
press
ô
the
ô
opening
ô
control,
ô
then
ô
raise
ô the ô tailgate.
Closing
Fô Lowerô the ô tailgate ô using ô the ô interior ô grab
ô handle.
F
ô
If
ô
necessary
, ô
press
ô
down
ô
on
ô
the
ô
tail
-
gate
ô to ô fully ô close ô it.
Tailgate release
Systemô allowingô the ô mechanical ô unlock -
ing ô of ô the ô boot ô in ô the ô event ô of ô a ô battery ô orô central
ô locking ô system ô malfunction.
Unlocking
F
ô
Fold
ô
back
ô
the
ô
rear
ô
seats
ô
to
ô
gain
ô
access
ô
to
ô
the
ô
lock
ô
from
ô
inside
ô
the
ô
boot.
F
ô
Insert
ô
a
ô
small
ô
screwdriver
ô
into
ô
hole
ô
A
of
ô the ô lock ô to ô unlock ô the ô tailgate.
F
ô
Move
ô the ô latch ô to ô the ô left.
If
ô
the
ô
tailgate
ô
is
ô
not
ô
closed
ô
correctly:
-
ô
when
the engine is running,
this
ô
warning
ô
lamp
ô
comes
ô
on,ô accompanied
ô
by
ô
the
ô
displayô of
ô
an
ô
alert
ô
message
ô
for
ô
a
ô
fewô seconds,
-
ô
when the vehicle is moving
ô
(speedô above
ô
6
ô
mph
ô
(10
ô
km/h)),
ô
this
ô
warn
-
ing
ô
lamp
ô
comes
ô
on,
ô
accompanied
ô
byô an
ô
audible
ô
signal
ô
and
ô
the
ô
display
ô
ofô an
ô
alert
ô
message
ô
for
ô
a
ô
few
ô
seconds. Locking after closing
If
ô
the
ô
fault
ô
persists
ô
after
ô
closing
ô
again,
ô
the
ô boot ô will ô remain ô locked.
4
ACCESS
Page 86 of 328
55
84ô
Toô avoidô causing ô a ô nuisance ô to ô other ô road
ô users, ô the ô height ô of ô the ô halogen ô
headlamps
ô
should
ô
be
ô
adjusted
ô
accord
-
ing
ô to ô the ô load ô in ô the ô vehicle.
0.
ô
1
ô or ô 2 ô people ô in ô the ô front ô seats.
-.
ô
3
ô people.
1.
ô
5
ô people.
-.
ô
Intermediate
ô setting.
2.
ô
5
ô
people
ô
+
ô
maximum
ô
authorised
ô
load.
-.
ô
Intermediate
ô setting.
3.
ô
Driver
ô + ô maximum ô authorised ô load.
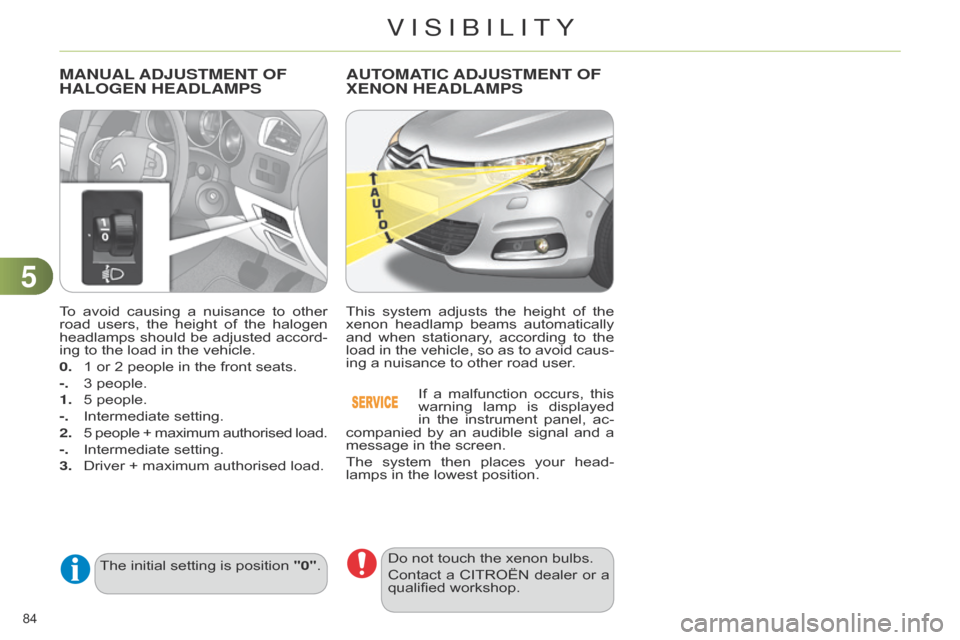
MANUAL AD j USTMENT OF HALOGEN
HEADLAMPS
Theô initialô settingô isô positionô "0".
AUTOMATIC ADjUSTMENT OF XENON
HEADLAMPS
Thisô system ô adjusts ô the ô height ô of ô the ô xenon
ô headlamp ô beams ô automatically ô
and
ô
when
ô
stationary
, ô
according
ô
to
ô
the
ô
load
ô
in
ô
the
ô
vehicle,
ô
so
ô
as
ô
to
ô
avoid
ô
caus
-
ing
ô a ô nuisance ô to ô other ô road ô user.
If
ô
a
ô
malfunction
ô
occurs,
ô
this
ô
warning
ô
lamp
ô
is
ô
displayed
ô
in
ô
the
ô
instrument
ô
panel,
ô
ac
-
companied
ô
by
ô
an
ô
audible
ô
signal
ô
and
ô
a
ô
message
ô in ô the ô screen.
The
ô
system
ô
then
ô
places
ô
your
ô
head
-
lamps
ô in ô the ô lowest ô position.
Do
ô not ô touch ô the ô xenon ô bulbs.
Contact
ô
a
ô
CITROûN
ô
dealer
ô
or
ô
a
ô
qualified
ô workshop.
VISIBILITY
Page 103 of 328
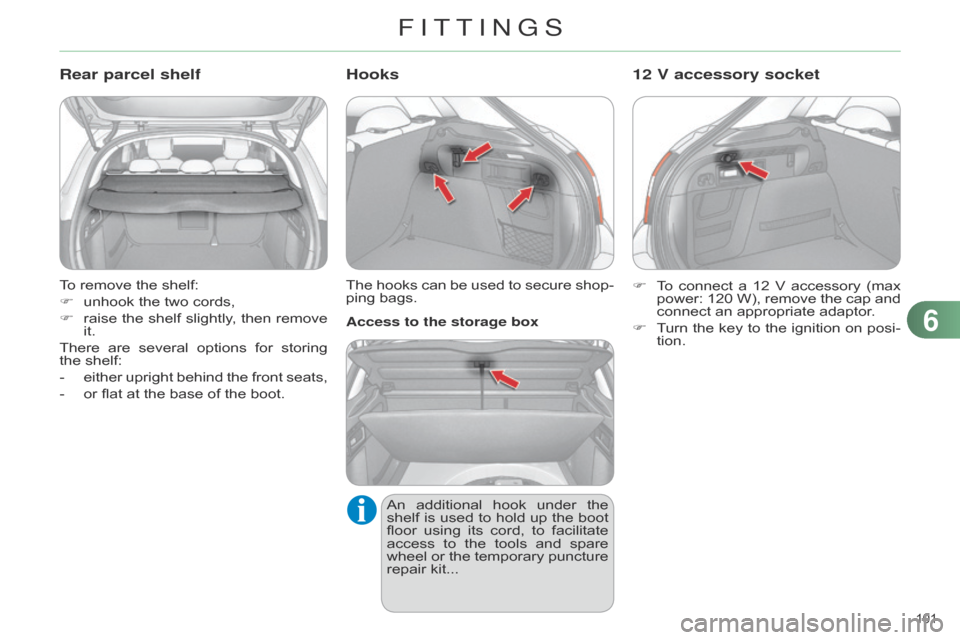
101ô
Toô removeô theô shelf:
F ô
unhook
ô the ô two ô cords,
F
ô
raise
ô
the
ô
shelf
ô
slightly
, ô
then
ô
remove
ô
it.
There
ô
are
ô
several
ô
options
ô
for
ô
storing
ô
the
ô shelf:
-
ô
either
ô
upright
ô
behind
ô
the
ô
front
ô
seats,
-
ô
or
ô flat ô at ô the ô base ô of ô the ô boot.
Rear parcel shelf
Theô hooksô can ô be ô used ô to ô secure ô shop -
ping ô bags.
Hooks
Anô additional ô hook ô under ô the ô shelf
ô is ô used ô to ô hold ô up ô the ô boot ô
floor
ô
using
ô
its
ô
cord,
ô
to
ô
facilitate
ô
access
ô
to
ô
the
ô
tools
ô
and
ô
spare
ô
wheel
ô
or
ô
the
ô
temporary
ô
puncture
ô
repair
ô kit...
Access to the storage box
Fô
T
o ô
connect
ô
a
ô
12
ô
V
ô
accessory
ô
(max
ô
power:
ô
120
ô
W),
ô
remove
ô
the
ô
cap
ô
and
ô
connect
ô an ô appropriate ô adaptor.
F ô
T
urn ô
the
ô
key
ô
to
ô
the
ô
ignition
ô
on
ô
posi
-
tion.
12 V accessory socket
6
FITTINGS
Page 105 of 328

77
103ô
GENERAL POINTS RELATING TO CHILD SEATS
CITROûN recommends that
children
ô should ô travel ô on ô the ô
rear seats
ô of ô your ô vehicle:
-
ô
rearward
facing up to the
age
ô of ô 3,
-
ô
forward
facing
ô
over
ô
the
ô
age
ô
of
ô 3.
Although
ô
one
ô
of
ô
CITROûN
ô
main
ô
criteria
ô
when
ô
designing
ô
your
ô
vehicle,
ô
the
ô
safety
ô
of
ô
your
ô
children
ô
also
ô
depends
ô
on
ô
you.
*ô ô
The
ô
regulations
ô
on
ô
carrying
ô
children
ô
are
ô
specific
ô
to
ô
each
ô
country
. ô
Refer
ô
to
ô
the
ô
legislation
ô
in
ô
force
ô
in
ô
your
ô
country
.
For
ô maximum
ô safety
,
ô please
ô observe
ô the
ô
following
ô
recommendations:
-
ô
in
ô
accordance
ô
with
ô
European
ô
regu
-
lations, all children under the age
of 12 or less than one and a half
metres tall must travel in ap-
proved child seats suited to their
weight,
ô
on
ô
seats
ô
fitted
ô
with
ô
a
ô
seat
ô
belt
ô
or
ô
ISOFIX
ô
mountings*,
-
ô
statistically
, the safest seats in
your vehicle for carrying children
are the rear seats,
-
ô
a child weighing
less than 9 kg
must travel in the rearward fac-
ing position both in the front and
in the rear.
CHILD SAFETY