ground clearance Citroen C5 2007.5 (DC/DE) / 1.G Owner's Manual
[x] Cancel search | Manufacturer: CITROEN, Model Year: 2007.5, Model line: C5, Model: Citroen C5 2007.5 (DC/DE) / 1.GPages: 231, PDF Size: 7.63 MB
Page 6 of 231

II
99
24
33
38
39
3736
35
22
23
30
28
25
27
2629
31
32
34
41
40
IN BRIEF
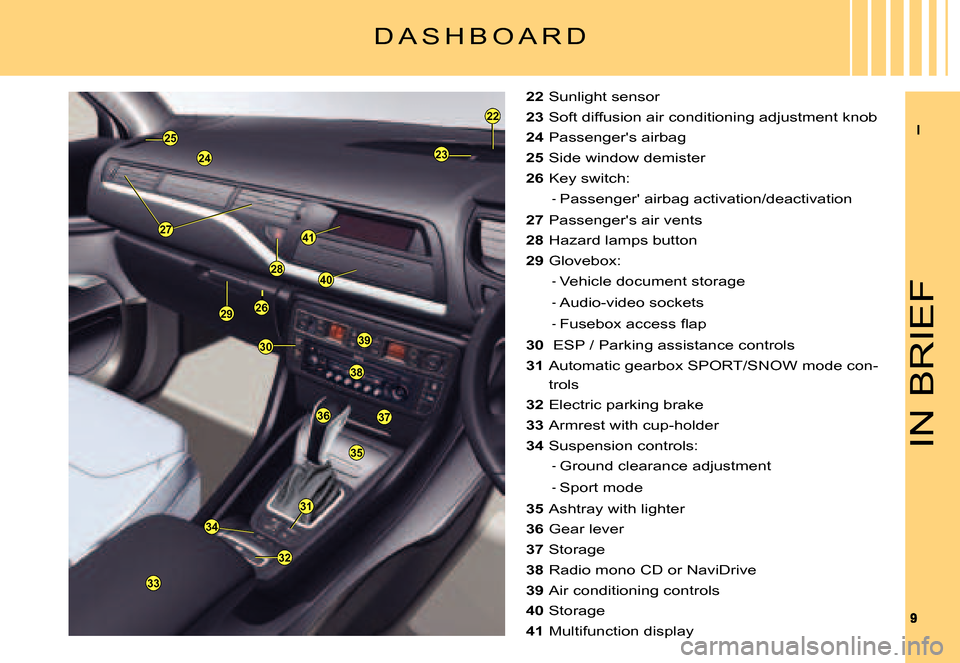
D A S H B O A R D
22 Sunlight sensor
23 Soft diffusion air conditioning adjustment knob
24 Passenger's airbag
25 Side window demister
26 Key switch:
Passenger' airbag activation/deactivation
27 Passenger's air vents
28 Hazard lamps button
29 Glovebox:
Vehicle document storage
Audio-video sockets
�F�u�s�e�b�o�x� �a�c�c�e�s�s� �fl� �a�p
30 ESP / Parking assistance controls
31 Automatic gearbox SPORT/SNOW mode con-
trols
32 Electric parking brake
33 Armrest with cup-holder
34 Suspension controls:
Ground clearance adjustment
Sport mode
35 Ashtray with lighter
36 Gear lever
37 Storage
38 Radio mono CD or NaviDrive
39 Air conditioning controls
40 Storage
41 Multifunction display
-
-
-
-
-
-
Page 83 of 231

87
II
A
“ H Y D R A C T I V E I I I + ” S U S P E N S I O N
Normal mode, for maximum comfort
A message is displayed on the instrument panel.
“Hydractive III +” suspension auto-matically adjusts to road surface conditions and driving style.
It allows you to alternate between �s�o�f�t� �a�n�d� �fi� �r�m� �s�u�s�p�e�n�s�i�o�n� �s�e�t�t�i�n�g�s�,� maximising comfort at the same time as permanently guaranteeing the highest level of safety. It also automatically corrects road hold-ing, according to the vehicle load and driving conditions.
Also, the “Hydractive III +” suspen-sion gives you the possibility of choosing between two modes of suspension.
A change of suspension mode can be made either when the vehicle is moving or when stationary, by pressing on button A.
Signalling
Sport mode, more suited for a sporty style of driving
A message is displayed on the instrument panel and the warning lamp on button A comes on.
Note: Sport mode is retained when you switch off the engine.
Note: If the speed authorised for a particular position is exceeded, the vehi-cle reverts automatically to the normal road position.
Note: Automatic variation of ground clearanceIf your speed exceeds 110 km/h (approx. 70 mph), on a good road surface, ground clearance is lowered. The vehicle returns to its normal position if the road sur-face deteriorates or if your speed is lower than 90 km/h (approx. 55 mph).
At low or medium speed, if the road surface is deteriorated, ground clearance is increased. The vehi-cle returns to its normal position once one of these two conditions is no longer observed.
Page 84 of 231

88
II
“ H Y D R A C T I V E I I I + ” S U S P E N S I O N
Position changes may only be made when the engine is run-ning.
Adjustable ground clearance responds to all types of situation. �A�p�a�r�t� �f�r�o�m� �a� �f�e�w� �s�p�e�c�i�fi� �c� �s�i�t�u�a�-tions, driving in the normal road position is imperative.
To change the position
Press once on one of the adjust-ment controls. The change in posi-tion is indicated by a message on the instrument panel screen:
Maximum height
Changing a wheel (Not possible if speed > 10 km/h).
Intermediate position
For an increased ground clearance (Not possible if speed > 40 km/h).
�F�o�r� �u�s�e� �o�n� �d�i�f�fi� �c�u�l�t� �r�o�a�d�s� �w�h�e�n� �t�r�a�v�e�l�l�i�n�g� at reduced speed, as well as on carpark ramps.
Normal road position
Note: If the speed authorised for a par-ticular position is exceeded, the vehicle reverts automatically to the normal road position.
Minimum height
To facilitate loading or unloading the vehicle.
For workshop inspections.
Not to be used in normal driving (Not possible if speed > 10 km/h).
For your safety if you are operating underneath the vehicle, it is obligatory to support the vehicle with axle stands.
Viewing of the position of the vehicle
Once the adjustment has been made, a message is displayed on t he instru-ment panel screen.
Page 168 of 231

172
VI
3
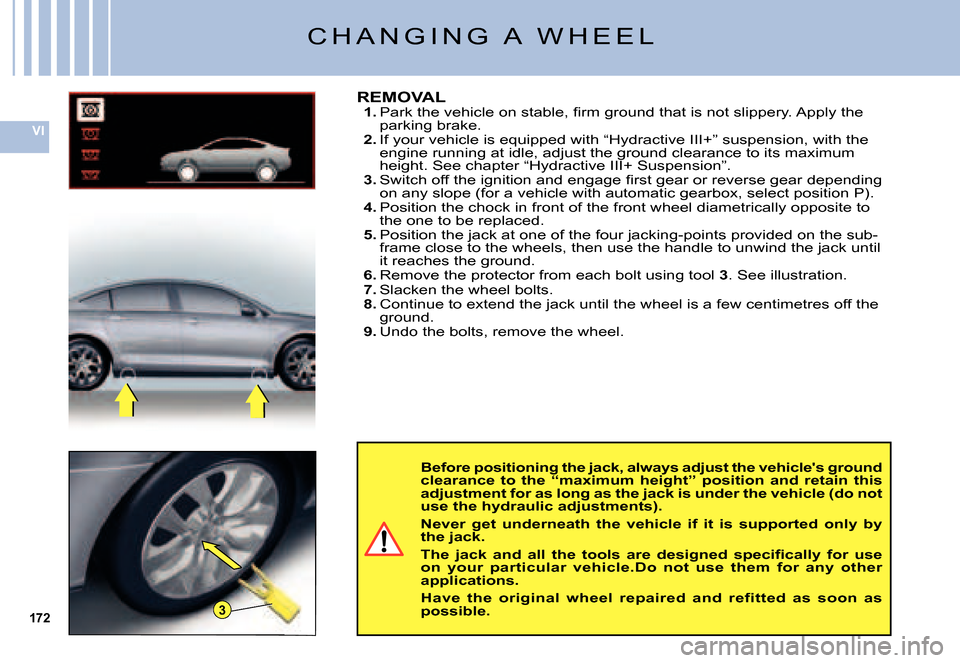
Before positioning the jack, always adjust the vehicle's ground clearance to the “maximum height” position and retain this adjustment for as long as the jack is under the veh icle (do not use the hydraulic adjustments).
Never get underneath the vehicle if it is supported only by the jack.
�T�h�e� �j�a�c�k� �a�n�d� �a�l�l� �t�h�e� �t�o�o�l�s� �a�r�e� �d�e�s�i�g�n�e�d� �s�p�e�c�i�fi� �c�a�l�l�y� �f�o�r� �u�s�e� on your particular vehicle.Do not use them for any other applications.
Have the original wheel repaired and refitted as soon as possible.
REMOVAL1. �P�a�r�k� �t�h�e� �v�e�h�i�c�l�e� �o�n� �s�t�a�b�l�e�,� �fi� �r�m� �g�r�o�u�n�d� �t�h�a�t� �i�s� �n�o�t� �s�l�i�p�p�e�r�y�.� �A�p �p�l�y� �t�h�e� parking brake.2. If your vehicle is equipped with “Hydractive III+” suspension, wit h the engine running at idle, adjust the ground clearance to its maximum height. See chapter “Hydractive III+ Suspension”.3. �S�w�i�t�c�h� �o�f�f� �t�h�e� �i�g�n�i�t�i�o�n� �a�n�d� �e�n�g�a�g�e� �fi� �r�s�t� �g�e�a�r� �o�r� �r�e�v�e�r�s�e� �g�e�a�r� �d�e�p�e�n�d�i�n�g� on any slope (for a vehicle with automatic gearbox, select posit ion P).4. Position the chock in front of the front wheel diametrically opposite to the one to be replaced.5. Position the jack at one of the four jacking-points provided o n the sub-frame close to the wheels, then use the handle to unwind the jack until it reaches the ground.6. Remove the protector from each bolt using tool 3. See illustration.7. Slacken the wheel bolts.8. Continue to extend the jack until the wheel is a few centimetres off the ground.9. Undo the bolts, remove the wheel.
C H A N G I N G A W H E E L
Page 169 of 231

173
VI
�I�f� �y�o�u�r� �v�e�h�i�c�l�e� �i�s� �fi� �t�t�e�d� �w�i�t�h� �a� �s�p�a�r�e� �w�h�e�e�l� �o�f� �a� �d�i�f�f�e�r�e�n�t� �s�i�z�e� �t�o� those on the vehicle, you must not exceed 80 km/h (50 mp h) whilst using the spare wheel.
�T�h�e� �w�h�e�e�l� �b�o�l�t�s� �a�r�e� �s�p�e�c�i�fi� �c� �t�o� �t�h�e� �t�y�p�e� �o�f� �w�h�e�e�l�.
If the type of wheel is changed, check with your CITROËN dealer that the wheel bolts are compatible with the new wheels.
Note: take care to note down the code number engrav ed on the head of the anti-theft bolt socket. This will enable you to obtain replacement anti-theft bolt sockets from a dealership.
Spare wheel
�Y�o�u�r� �v�e�h�i�c�l�e� �m�a�y� �b�e� �fi� �t�t�e�d� �w�i�t�h� �a� different spare wheel to those on �t�h�e� �v�e�h�i�c�l�e�.� �W�h�e�n� �fi� �t�t�i�n�g� �t�h�e� �s�p�a�r�e� wheel, it is normal to notice that the wheel bolt washers do not come into contact with the wheel rim.
The spare wheel is secured by the conical tapering of the wheel bolt’s shaft. See illustration.
�W�h�e�n� �r�e�fi� �t�t�i�n�g� �t�h�e� �o�r�i�g�i�n�a�l� �w�h�e�e�l�,� ensure that the wheel bolt contact surfaces are clean and in good condition.
�R�e�fi� �t�t�i�n�g� �a� �w�h�e�e�l1. Fit the wheel on the hub, using the centring guide. Make sure that the contact surface between the hub and the wheel is clean.2. Screw in the bolts but do not fully tighten them.3. Lower the jack and remove it.4. Tighten the wheel bolts, using the wheelbrace.5. �R�e�fi� �t� �t�h�e� �p�r�o�t�e�c�t�o�r�s� �o�n� �t�h�e� bolts.6. Return the ground clearance to the normal position. See chap-ter “Hydractive III+ Suspen-sion”.7. Ensure the tyre pressure is �c�o�r�r�e�c�t� �(�s�e�e� �“�V�e�h�i�c�l�e� �i�d�e�n�t�i�fi� �c�a�-tion”) and have the balancing checked.
�W�h�e�e�l� �e�q�u�i�p�p�e�d� �w�i�t�h� �d�e�fl� �a�-tion detection sensor
Such wheels have tyre pressure sensors. It is essential to have repairs carried out by a CITROËN dealer.
Anti-theft bolts
Each wheel is equipped with one anti-theft bolt.
To remove it1. Remove the protector using tool 3.2. Use the anti-theft socket with the handle.
C H A N G I N G A W H E E L