check engine CITROEN C5 2013 Owner's Manual
[x] Cancel search | Manufacturer: CITROEN, Model Year: 2013, Model line: C5, Model: CITROEN C5 2013Pages: 348, PDF Size: 10.72 MB
Page 189 of 348
187
C5_en_Chap07_info-pratiques_ed01-2016
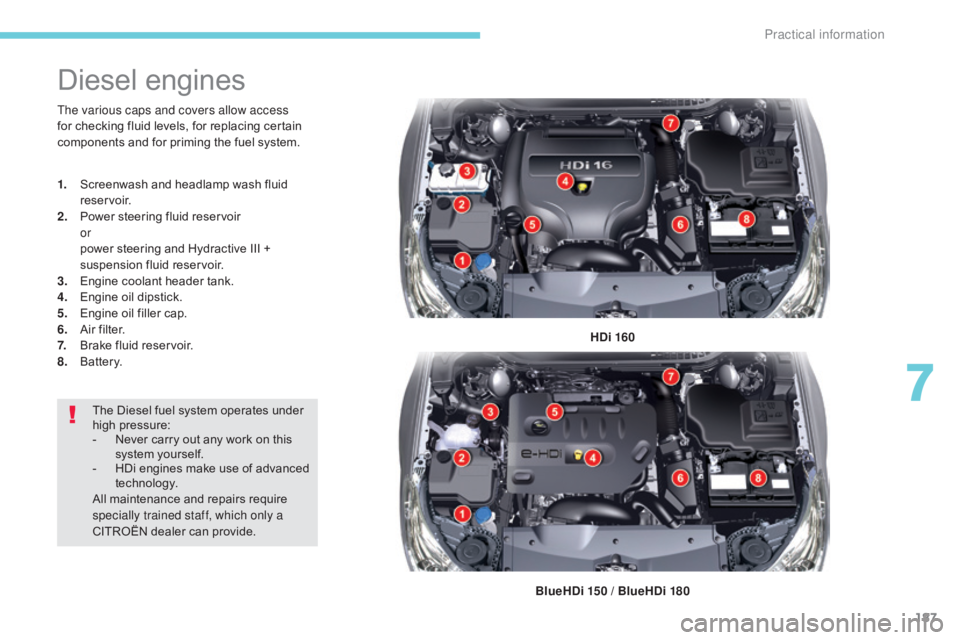
Diesel engines
HDi 160
BlueHDi 150 / BlueHDi 180
The various caps and covers allow access
for checking fluid levels, for replacing certain
components and for priming the fuel system.
1.
S
creenwash and headlamp wash fluid
reservoir.
2.
P
ower steering fluid reservoir
or
p
ower steering and Hydractive III +
suspension fluid reservoir.
3.
E
ngine coolant header tank.
4.
E
ngine oil dipstick.
5.
E
ngine oil filler cap.
6. A
ir filter.
7. B
rake fluid reservoir.
8.
B
attery.
The Diesel fuel system operates under
high pressure:
-
N
ever carry out any work on this
system yourself.
-
H
Di engines make use of advanced
technology.
All maintenance and repairs require
specially trained staff, which only a
CITROËN dealer can provide.
7
Practical information
Page 190 of 348
188
C5_en_Chap07_info-pratiques_ed01-2016
Checking levels
Engine oil level
The check is carried out either when
the ignition is switched on using the
oil level indicator in the instrument
panel for vehicles so equipped, or
using the dipstick.
Check all of these levels regularly, in line with the manufacturer's service schedule. Top them up if necessary, unless other wise indicated.
If a level drops significantly, have the corresponding system checked by a CITROËN dealer or a qualified workshop.
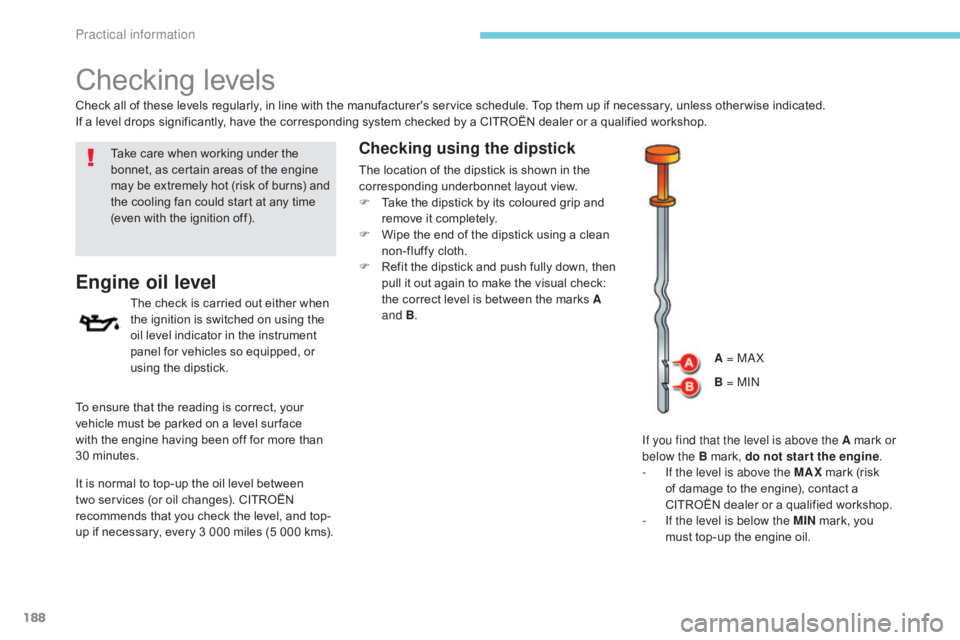
If you find that the level is above the A mark or
below the B mark, do not star t the engine.
-
I
f the level is above the MAX mark (risk
of damage to the engine), contact a
CITROËN dealer or a qualified workshop.
-
I
f the level is below the MIN mark, you
must top-up the engine oil.
Take care when working under the
bonnet, as certain areas of the engine
may be extremely hot (risk of burns) and
the cooling fan could start at any time
(even with the ignition off).
To ensure that the reading is correct, your
vehicle must be parked on a level sur face
with the engine having been off for more than
30
m
inutes.
It is normal to top-up the oil level between
two services (or oil changes). CITROËN
recommends that you check the level, and top-
up if necessary, every 3 000 miles (5 000 kms).
Checking using the dipstick
The location of the dipstick is shown in the
corresponding underbonnet layout view.
F
T
ake the dipstick by its coloured grip and
remove it completely.
F
W
ipe the end of the dipstick using a clean
non-fluffy cloth.
F
R
efit the dipstick and push fully down, then
pull it out again to make the visual check:
the correct level is between the marks A
and B .
A = MA X
B = MIN
Practical information
Page 191 of 348
189
C5_en_Chap07_info-pratiques_ed01-2016
Oil grade
Before topping-up the oil or changing the oil,
check that the oil is the correct grade for your
engine and conforms to the manufacturer's
recommendations.
Topping-up the engine oil level
The location of the oil filler cap is shown in the
corresponding underbonnet layout view.
F
U
nscrew the oil filler cap to reveal the filler
aperture.
F
A
dd oil in small quantities, avoiding any
spills on engine components (risk of fire).
F
W
ait a few minutes before checking the
level again using the dipstick.
F
A
dd more oil if necessary.
F
A
fter checking the level, carefully refit the
oil filler cap and the dipstick in its tube.
After topping-up the oil, the check when
switching on the ignition with the oil
level indicator in the instrument panel
is not valid during the 30 minutes after
topping-up.
Engine oil change
Refer to the manufacturer's service schedule
for details of the interval for this operation.
In order to maintain the reliability of the engine
and emission control system, never use
additives in the engine oil.
7
Practical information
Page 192 of 348
190
C5_en_Chap07_info-pratiques_ed01-2016
Brake fluid level
The brake fluid level should be close
to the "MA X" mark. If it is not, check
the brake pad wear.
Changing the fluid
Refer to the manufacturer's service schedule
for details of the interval for this operation.
Fluid specification
The brake fluid must conform to the
manufacturer's recommendations.
Power steering or power
steering and suspension
fluid level
For topping up, it is necessary to go
to a CITROËN dealer or a qualified
workshop.
Coolant level
The coolant level should be close
to the "MA X" mark but should never
exceed it.
Fluid specification
The coolant must conform to the
manufacturer's recommendations. The cooling fan may star t after switching
off the engine: take care with ar ticles and
clothing that might be caught by the fan
blades.
In addition, as the cooling system is
pressurised, wait at least one hour after
switching off the engine before carrying out any
work.
To avoid any risk of scalding, unscrew the cap
by two turns to allow the pressure to drop.
When the pressure has dropped, remove the
cap and top-up the level. When the engine is warm, the temperature of
the coolant is regulated by the fan.
Practical information
Page 194 of 348
192
C5_en_Chap07_info-pratiques_ed01-2016
Checks
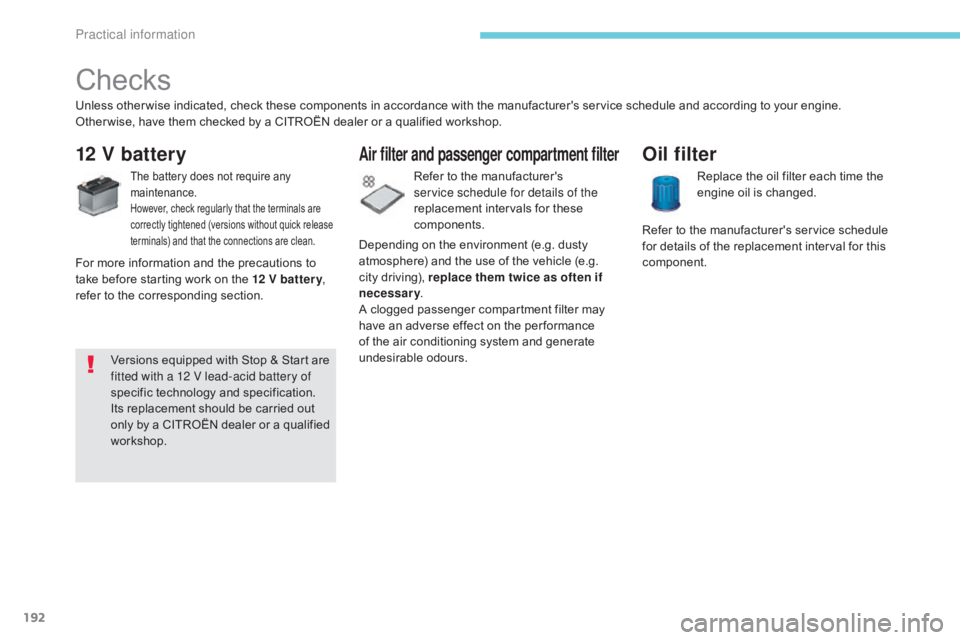
12 V battery
The battery does not require any
maintenance.
However, check regularly that the terminals are
correctly tightened (versions without quick release
terminals) and that the connections are clean.
Unless other wise indicated, check these components in accordance with the manufacturer's service schedule and according to your engine.
Other wise, have them checked by a CITROËN dealer or a qualified workshop.
Air filter and passenger compartment filter
Depending on the environment (e.g. dusty
atmosphere) and the use of the vehicle (e.g.
city driving), replace them twice as often if
necessary.
A clogged passenger compartment filter may
have an adverse effect on the per formance
of the air conditioning system and generate
undesirable odours. Replace the oil filter each time the
engine oil is changed.
Oil filter
Refer to the manufacturer's service schedule
for details of the replacement interval for this
component.
Refer to the manufacturer's
service schedule for details of the
replacement intervals for these
components.
For more information and the precautions to
take before starting work on the 12 V batter y ,
refer to the corresponding section.
Versions equipped with Stop & Start are
fitted with a 12 V lead-acid battery of
specific technology and specification.
Its replacement should be carried out
only by a CITROËN dealer or a qualified
workshop.
Practical information
Page 200 of 348
198
C5_en_Chap07_info-pratiques_ed01-2016
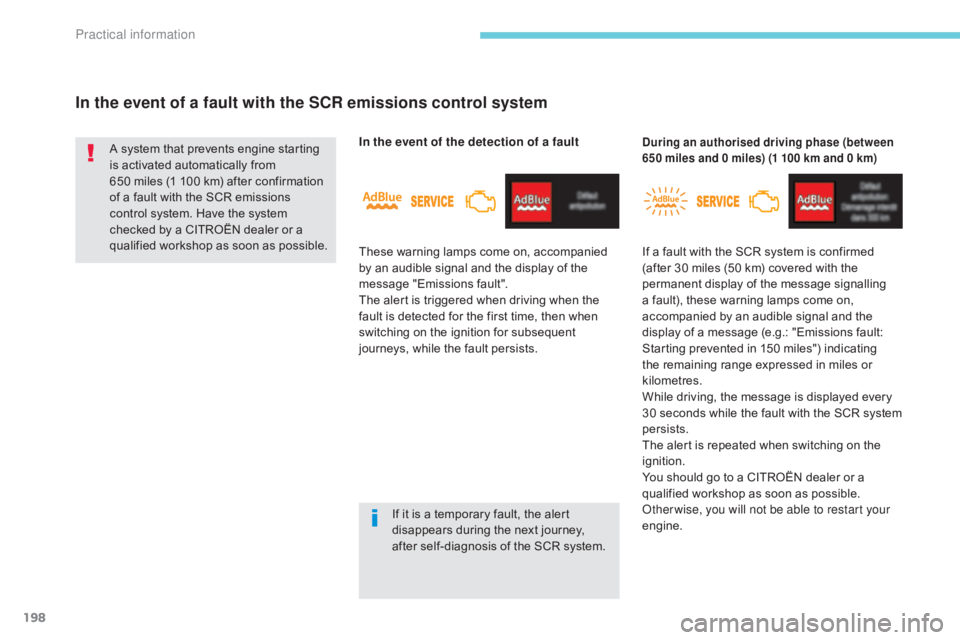
In the event of a fault with the SCR emissions control system
These warning lamps come on, accompanied
by an audible signal and the display of the
message "Emissions fault".
The alert is triggered when driving when the
fault is detected for the first time, then when
switching on the ignition for subsequent
journeys, while the fault persists.If it is a temporary fault, the alert
disappears during the next journey,
after self-diagnosis of the SCR system.
During an authorised driving phase (between
650 miles and 0 miles) (1 100 km and 0 km)A system that prevents engine starting
is activated automatically from
650 miles (1 100 km) after confirmation
of a fault with the SCR emissions
control system. Have the system
checked by a CITROËN dealer or a
qualified workshop as soon as possible. In the event of the detection of a fault
If a fault with the SCR system is confirmed
(after 30 miles (50 km) covered with the
permanent display of the message signalling
a fault), these warning lamps come on,
accompanied by an audible signal and the
display of a message (e.g.: "Emissions fault:
Starting prevented in 150 miles") indicating
the remaining range expressed in miles or
kilometres.
While driving, the message is displayed every
30 seconds while the fault with the SCR system
persists.
The alert is repeated when switching on the
ignition.
You should go to a CITROËN dealer or a
qualified workshop as soon as possible.
Other wise, you will not be able to restart your
engine.
Practical information
Page 212 of 348
210
C5_en_Chap08_en-cas-de-panne_ed01-2016
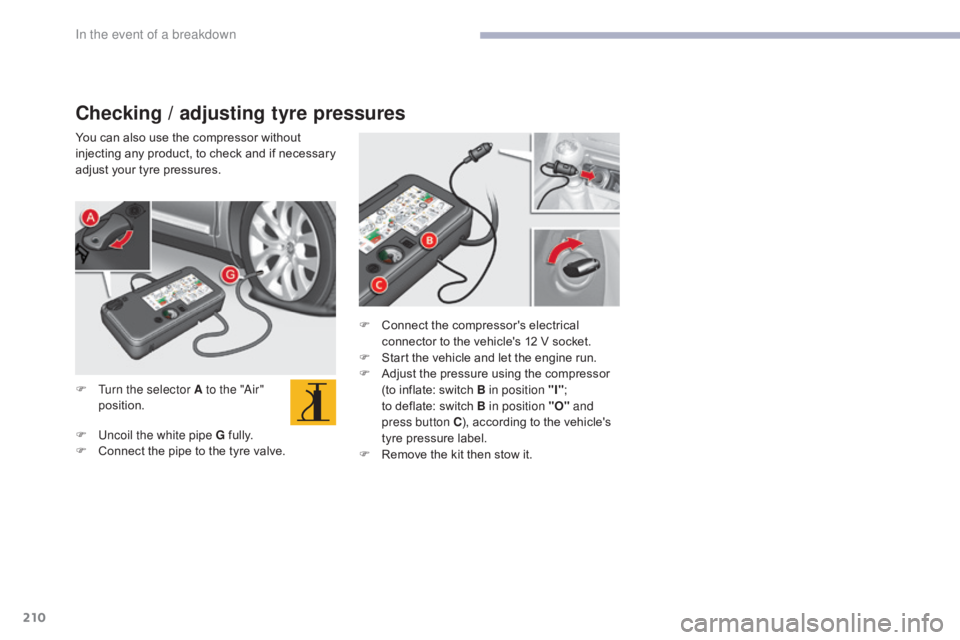
Checking / adjusting tyre pressures
You can also use the compressor without
injecting any product, to check and if necessary
adjust your tyre pressures.
F
T
urn the selector A to the "Air"
position.
F
U
ncoil the white pipe G fully.
F
C
onnect the pipe to the tyre valve. F
C
onnect the compressor's electrical
connector to the vehicle's 12 V socket.
F
S
tart the vehicle and let the engine run.
F
A
djust the pressure using the compressor
(to inflate: switch B in position "I" ;
to
deflate: switch B in position "O" and
press button C ), according to the vehicle's
tyre pressure label.
F
R
emove the kit then stow it.
In the event of a breakdown
Page 238 of 348
236
C5_en_Chap08_en-cas-de-panne_ed01-2016
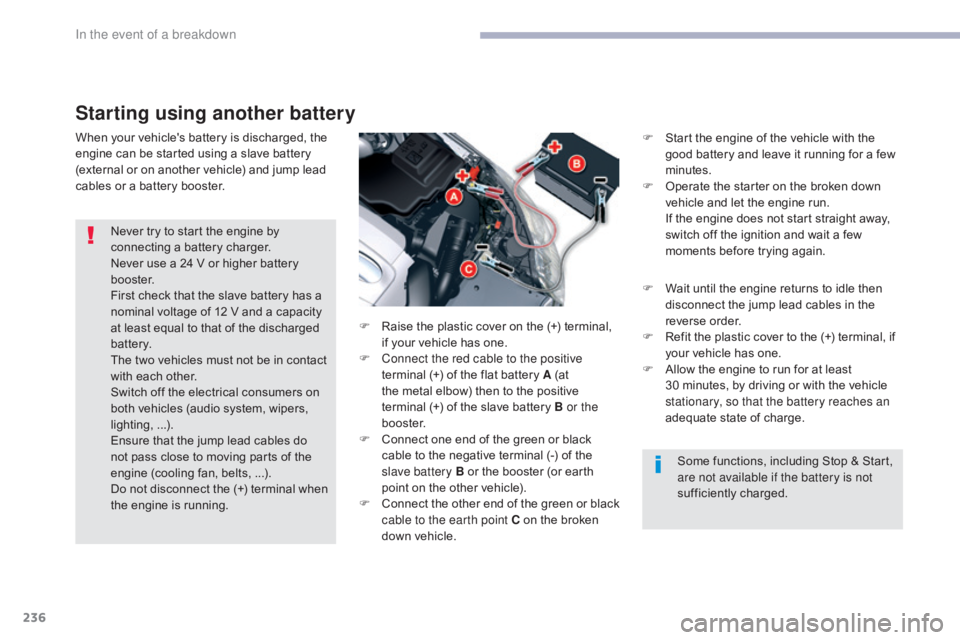
Starting using another battery
When your vehicle's battery is discharged, the
engine can be started using a slave battery
(external or on another vehicle) and jump lead
cables or a battery booster.F
S tart the engine of the vehicle with the
good battery and leave it running for a few
minutes.
F
O
perate the starter on the broken down
vehicle and let the engine run.
I
f the engine does not start straight away,
switch off the ignition and wait a few
moments before trying again.
Never try to start the engine by
connecting a battery charger.
Never use a 24 V or higher battery
b o o s t e r.
First check that the slave battery has a
nominal voltage of 12 V and a capacity
at least equal to that of the discharged
battery.
The two vehicles must not be in contact
with each other.
Switch off the electrical consumers on
both vehicles (audio system, wipers,
lighting, ...).
Ensure that the jump lead cables do
not pass close to moving parts of the
engine (cooling fan, belts, ...).
Do not disconnect the (+) terminal when
the engine is running. Some functions, including Stop & Start,
are not available if the battery is not
sufficiently charged.
F
R
aise the plastic cover on the (+) terminal,
if your vehicle has one.
F
C
onnect the red cable to the positive
terminal (+) of the flat battery A (at
the metal elbow) then to the positive
terminal
(+) of the slave battery B or the
b o o s t e r.
F
C
onnect one end of the green or black
cable to the negative terminal (-) of the
slave battery B or the booster (or earth
point on the other vehicle).
F
C
onnect the other end of the green or black
cable to the earth point C on the broken
down vehicle. F
W
ait until the engine returns to idle then
disconnect the jump lead cables in the
reverse order.
F
R
efit the plastic cover to the (+) terminal, if
your vehicle has one.
F
A
llow the engine to run for at least
30
minutes, by driving or with the vehicle
stationary, so that the battery reaches an
adequate state of charge.
In the event of a breakdown
Page 313 of 348
311
C5_en_Chap10b_SMEGplus_ed01-2016
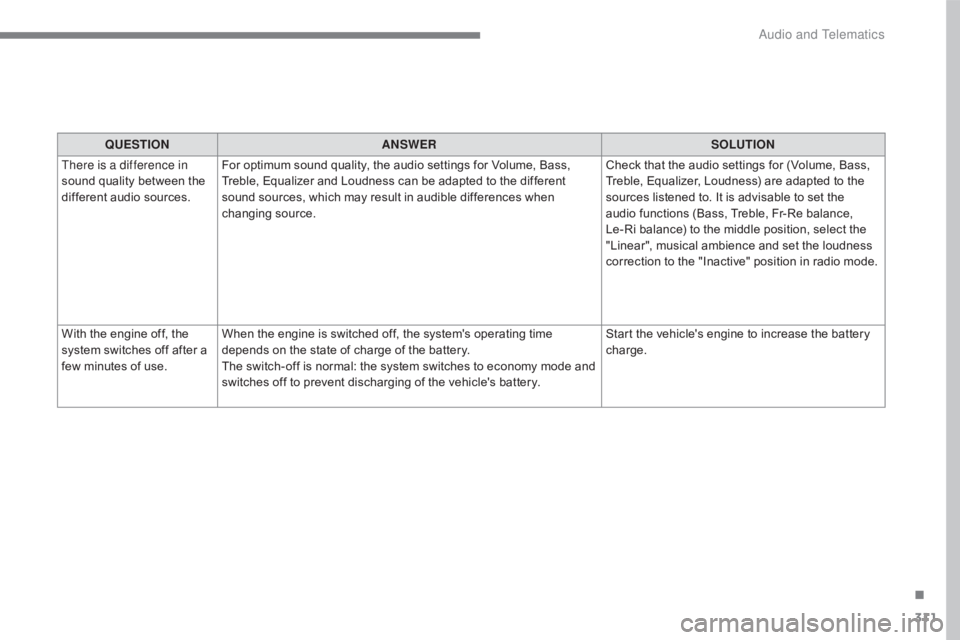
QUESTIONANSWER SOLUTION
There is a difference in
sound quality between the
different audio sources. For optimum sound quality, the audio settings for Volume, Bass,
Treble, Equalizer and Loudness can be adapted to the different
sound sources, which may result in audible differences when
changing source. Check that the audio settings for (Volume, Bass,
Treble, Equalizer, Loudness) are adapted to the
sources listened to. It is advisable to set the
audio functions (Bass, Treble, Fr-Re balance,
Le-Ri balance) to the middle position, select the
"Linear", musical ambience and set the loudness
correction to the "Inactive" position in radio mode.
With the engine off, the
system switches off after a
few minutes of use. When the engine is switched off, the system's operating time
depends on the state of charge of the battery.
The switch-off is normal: the system switches to economy mode and
switches off to prevent discharging of the vehicle's battery. Start the vehicle's engine to increase the battery
charge.
.
Audio and Telematics
Page 331 of 348
329
C5_en_Chap10c_RD45_ed01-2016
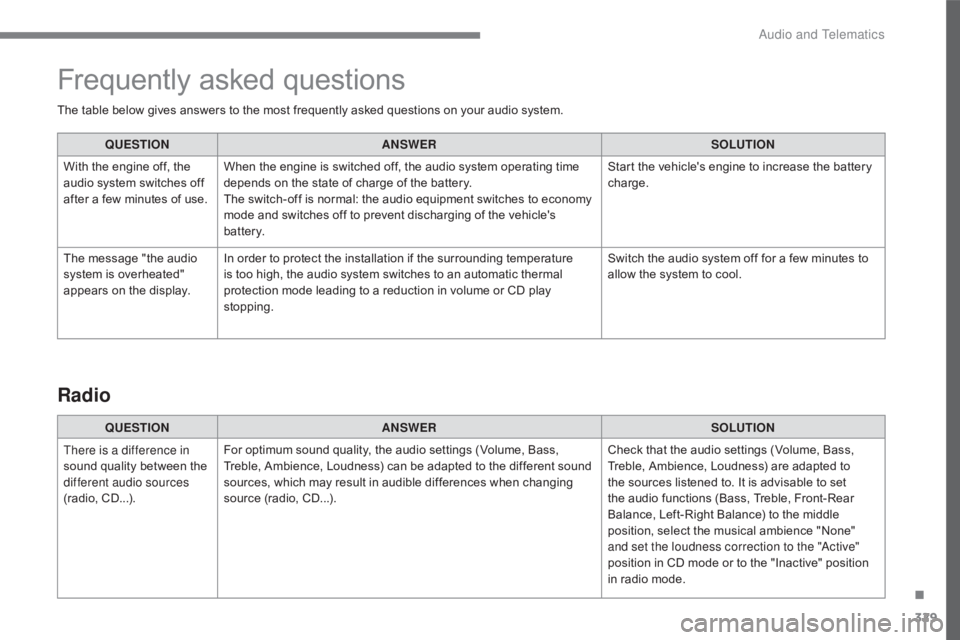
The table below gives answers to the most frequently asked questions on your audio system.QUESTION ANSWER SOLUTION
With the engine off, the
audio system switches off
after a few minutes of use. When the engine is switched off, the audio system operating time
depends on the state of charge of the battery.
The switch-off is normal: the audio equipment switches to economy
mode and switches off to prevent discharging of the vehicle's
battery. Start the vehicle's engine to increase the battery
charge.
The message "the audio
system is overheated"
appears on the display. In order to protect the installation if the surrounding temperature
is too high, the audio system switches to an automatic thermal
protection mode leading to a reduction in volume or CD play
stopping. Switch the audio system off for a few minutes to
allow the system to cool.
Frequently asked questions
QUESTION
ANSWER SOLUTION
There is a difference in
sound quality between the
different audio sources
(radio, CD...). For optimum sound quality, the audio settings (Volume, Bass,
Treble, Ambience, Loudness) can be adapted to the different sound
sources, which may result in audible differences when changing
source (radio, CD...). Check that the audio settings (Volume, Bass,
Treble, Ambience, Loudness) are adapted to
the sources listened to. It is advisable to set
the audio functions (Bass, Treble, Front-Rear
Balance, Left-Right Balance) to the middle
position, select the musical ambience "None"
and set the loudness correction to the "Active"
position in CD mode or to the "Inactive" position
in radio mode.
Radio
.
Audio and Telematics