keyless CITROEN C5 AIRCROSS 2020 Handbook (in English)
[x] Cancel search | Manufacturer: CITROEN, Model Year: 2020, Model line: C5 AIRCROSS, Model: CITROEN C5 AIRCROSS 2020Pages: 292, PDF Size: 8.59 MB
Page 47 of 292
45
For more information on the Remote control
or on the Keyless Entr y and Star ting , refer to
the corresponding section.
If there is a
fault or if it is difficult to move
the tailgate when opening or closing
it, have it checked as soon as possible
by a
CITROËN dealer or a qualified
workshop to prevent the problem
becoming worse, and potentially causing
the tailgate to drop and thereby inflicting
serious injuries.
The tailgate is not designed to support
a
bicycle carrier.
Closing
F Lower the tailgate using the interior grab handle.
If the tailgate is not fully closed:
-
w
ith the engine running or the vehicle
moving (speed below 6
mph (10 km/h)), a
message appears in the screen.
-
w
ith the vehicle moving (speed above
6
mph (10 km/h)), a message appears in
the screen, accompanied by an audible
signal.
Back-up release
To manually unlock the boot in the event of
a battery or central locking failure.
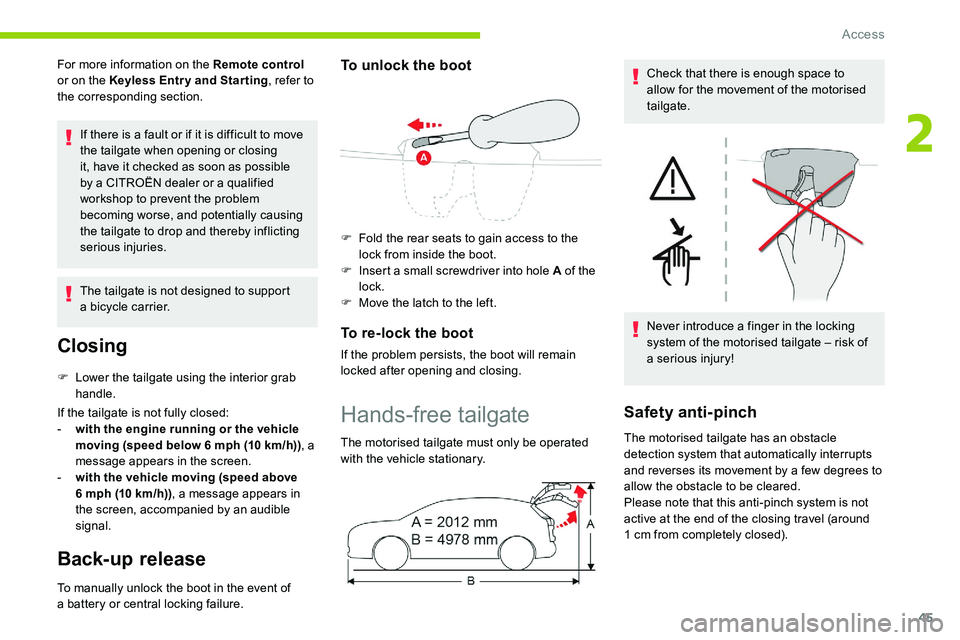
To unlock the boot
F Fold the rear seats to gain access to the lock from inside the boot.
F
I
nsert a small screwdriver into hole A of the
lock.
F
M
ove the latch to the left.
To re-lock the boot
If the problem persists, the boot will remain
locked after opening and closing.
Hands-free tailgate
The motorised tailgate must only be operated
with the vehicle stationary. Check that there is enough space to
allow for the movement of the motorised
tailgate.
Never introduce a
finger in the locking
system of the motorised tailgate – risk of
a
serious injury!
Safety anti-pinch
The motorised tailgate has an obstacle
detection system that automatically interrupts
and reverses its movement by a
few degrees to
allow the obstacle to be cleared.
Please note that this anti-pinch system is not
active at the end of the closing travel (around
1
cm from completely closed).
2
Access
Page 48 of 292
46
To avoid the risk of injury through pinching
or trapping, before and during operation of
the motorised tailgate:
-
e
nsure that there is no-one close to the
rear of the vehicle,
-
m
onitor the activity of your passengers,
particularly any children.
Bicycle carrier/Towing device
The motorised tailgate is not designed to
support a bicycle carrier.
When installing a
bicycle carrier on a towing
device with connection of a
cable to the towing
socket, the motorised operation of the tailgate
will be automatically deactivated.
If using a
towing device or bicycle carrier not
recommended by CITROËN, it is essential
to deactivate the motorised operation of the
tailgate.
Motorised operation
Activation/deactivation of the
motorised operation of the tailgate is
done in the Driving/Vehicle menu of
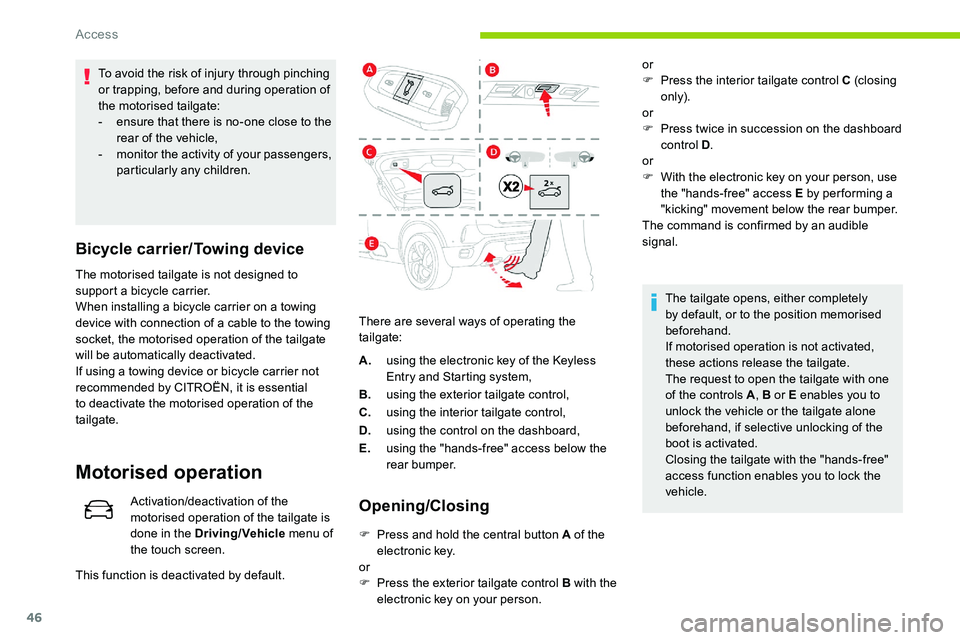
the touch screen. There are several ways of operating the
tailgate:Opening/Closing
F Press and hold the central button A of the
electronic key.
or
F
P
ress the exterior tailgate control B with the
electronic key on your person. The tailgate opens, either completely
by default, or to the position memorised
beforehand.
If motorised operation is not activated,
these actions release the tailgate.
The request to open the tailgate with one
of the controls A
, B or E enables you to
unlock the vehicle or the tailgate alone
beforehand, if selective unlocking of the
boot is activated.
Closing the tailgate with the "hands-free"
access function enables you to lock the
vehicle.
This function is deactivated by default. A.
using the electronic key of the Keyless
Entry and Starting system,
B. using the exterior tailgate control,
C. using the interior tailgate control,
D. using the control on the dashboard,
E. using the "hands-free" access below the
rear bumper. or
F
P
ress the interior tailgate control C (closing
only).
or
F
P
ress twice in succession on the dashboard
control D .
or
F
W
ith the electronic key on your person, use
the "hands-free" access E by per forming a
"kicking" movement below the rear bumper.
The command is confirmed by an audible
signal.
Access
Page 51 of 292
49
Unlocking
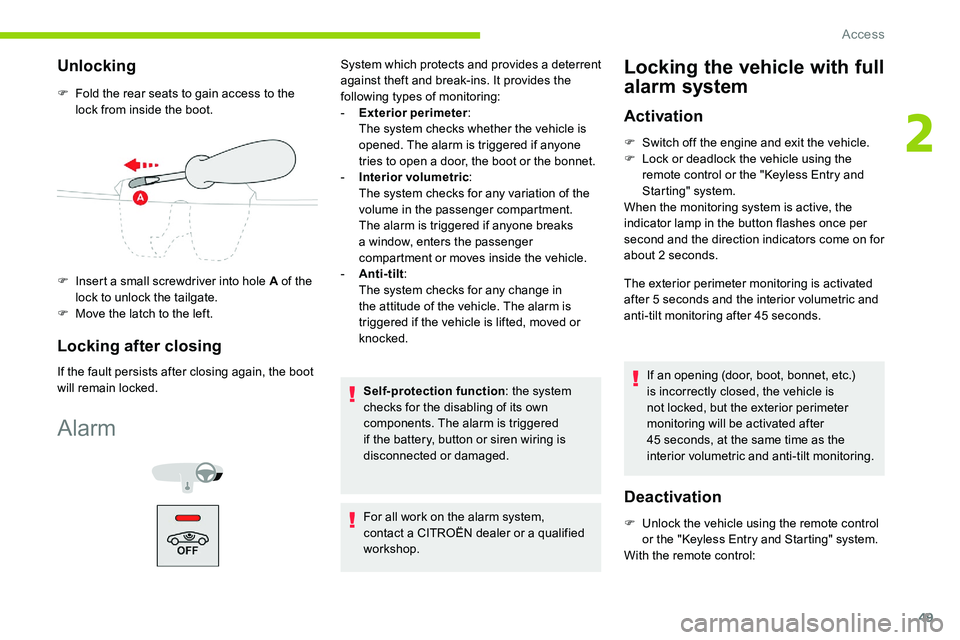
F Fold the rear seats to gain access to the lock from inside the boot.
F
I
nsert a small screwdriver into hole A of the
lock to unlock the tailgate.
F
M
ove the latch to the left.
Locking after closing
If the fault persists after closing again, the boot
will remain locked.
Alarm
System which protects and provides a deterrent
a gainst theft and break-ins. It provides the
following types of monitoring:
-
E
xterior perimeter :
The system checks whether the vehicle is
opened. The alarm is triggered if anyone
tries to open a
door, the boot or the bonnet.
-
I
nterior volumetric :
The system checks for any variation of the
volume in the passenger compartment.
The alarm is triggered if anyone breaks
a
window, enters the passenger
compartment or moves inside the vehicle.
-
A
nti-tilt :
The system checks for any change in
the attitude of the vehicle. The alarm is
triggered if the vehicle is lifted, moved or
knocked.
Self-protection function : the system
checks for the disabling of its own
components. The alarm is triggered
if the battery, button or siren wiring is
disconnected or damaged.
For all work on the alarm system,
contact a
CITROËN dealer or a qualified
workshop.Locking the vehicle with full
alarm system
Activation
F Switch off the engine and exit the vehicle.
F L ock or deadlock the vehicle using the
remote control or the "Keyless Entry and
Starting" system.
When the monitoring system is active, the
indicator lamp in the button flashes once per
second and the direction indicators come on for
about 2
seconds.
The exterior perimeter monitoring is activated
after 5
seconds and the interior volumetric and
anti-tilt monitoring after 45
seconds.
If an opening (door, boot, bonnet, etc.)
is incorrectly closed, the vehicle is
not locked, but the exterior perimeter
monitoring will be activated after
45
seconds, at the same time as the
interior volumetric and anti-tilt monitoring.
Deactivation
F Unlock the vehicle using the remote control or the "Keyless Entry and Starting" system.
With the remote control:
2
Access
Page 52 of 292
50
The monitoring system is deactivated: the
indicator lamp in the button goes off and the
direction indicators flash for about 2 seconds.
If the vehicle automatically locks itself
again (as happens if a
door or the boot
is not opened within 30
seconds of
unlocking), the monitoring system is
automatically reactivated.
Triggering of the alarm
This is indicated by sounding of the siren and
flashing of the direction indicators for thirty
seconds.
The volumetric and anti-tilt monitoring functions
remain active until the tenth successive time
the alarm is triggered.
When the vehicle is unlocked using the remote
control or the "Keyless Entry and Starting"
system, rapid flashing of the indicator lamp
in the button informs you that the alarm was
triggered during your absence. When the
ignition is switched on, this flashing stops
immediately.
Locking the vehicle
with exterior perimeter
monitoring onlyshort press
long press
Deactivate the interior volumetric monitoring
to avoid unwanted triggering of the alarm in
certain cases such as:
-
l
eaving a pet in the vehicle,
-
l
eaving a
window partially open,
-
w
ashing your vehicle,
-
c
hanging a
wheel,
-
h
aving your vehicle towed,
-
t
ransport by ship.
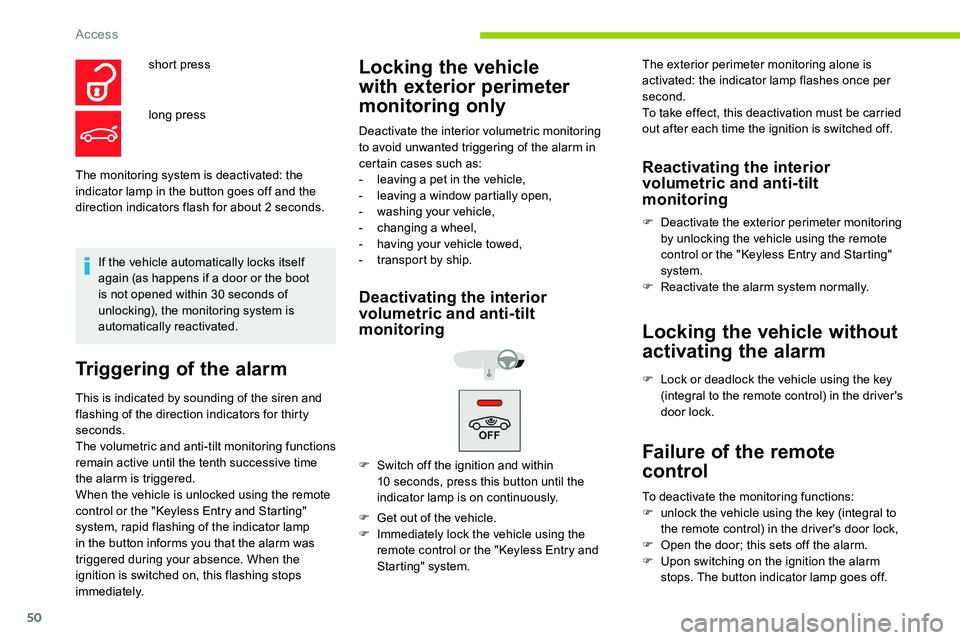
Deactivating the interior
volumetric and anti-tilt
monitoring
F Get out of the vehicle.
F I mmediately lock the vehicle using the
remote control or the "Keyless Entry and
Starting" system.
Reactivating the interior
volumetric and anti-tilt
monitoring
F Deactivate the exterior perimeter monitoring by unlocking the vehicle using the remote
control or the "Keyless Entry and Starting"
system.
F
R
eactivate the alarm system normally.
Locking the vehicle without
activating the alarm
F Lock or deadlock the vehicle using the key (integral to the remote control) in the driver's
door lock.
Failure of the remote
control
To deactivate the monitoring functions:
F u nlock the vehicle using the key (integral to
the remote control) in the driver's door lock,
F
O
pen the door; this sets off the alarm.
F
U
pon switching on the ignition the alarm
stops. The button indicator lamp goes off.
F
S
witch off the ignition and within
10
seconds, press this button until the
indicator lamp is on continuously. The exterior perimeter monitoring alone is
activated: the indicator lamp flashes once per
second.
To take effect, this deactivation must be carried
out after each time the ignition is switched off.
Access
Page 54 of 292
52
Panoramic opening
sunroof
The panoramic sunroof consists of a movable
g lass panel that slides over the roof and a blind
that can be opened independently. Opening the
sunroof automatically opens the blind.
F
T
o operate the panoramic opening sunroof
or the blind, use the buttons in the roof
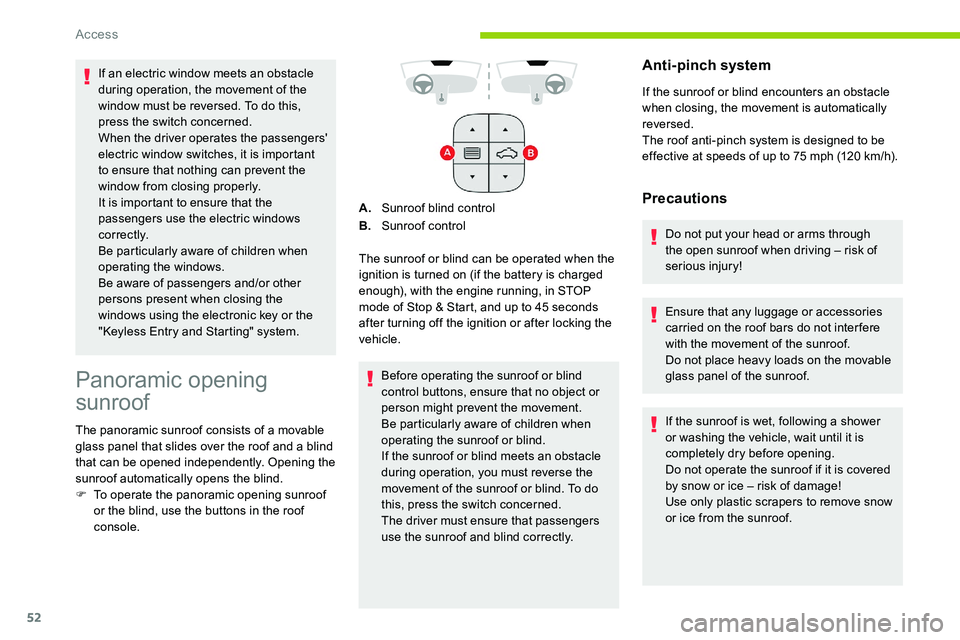
console. A.
Sunroof blind control
B. Sunroof control
The sunroof or blind can be operated when the
ignition is turned on (if the battery is charged
enough), with the engine running, in STOP
mode of Stop & Start, and up to 45 seconds
after turning off the ignition or after locking the
vehicle.
Before operating the sunroof or blind
control buttons, ensure that no object or
person might prevent the movement.
Be particularly aware of children when
operating the sunroof or blind.
If the sunroof or blind meets an obstacle
during operation, you must reverse the
movement of the sunroof or blind. To do
this, press the switch concerned.
The driver must ensure that passengers
use the sunroof and blind correctly.
Anti-pinch system
If the sunroof or blind encounters an obstacle
when closing, the movement is automatically
reversed.
The roof anti-pinch system is designed to be
effective at speeds of up to 75
mph (120 km/h).
Precautions
Do not put your head or arms through
the open sunroof when driving – risk of
serious injury!
Ensure that any luggage or accessories
carried on the roof bars do not inter fere
with the movement of the sunroof.
Do not place heavy loads on the movable
glass panel of the sunroof.
If the sunroof is wet, following a
shower
or washing the vehicle, wait until it is
completely dry before opening.
Do not operate the sunroof if it is covered
by snow or ice – risk of damage!
Use only plastic scrapers to remove snow
or ice from the sunroof.
If an electric window meets an obstacle
during operation, the movement of the
window must be reversed. To do this,
press the switch concerned.
When the driver operates the passengers'
electric window switches, it is important
to ensure that nothing can prevent the
window from closing properly.
It is important to ensure that the
passengers use the electric windows
c o r r e c t l y.
Be particularly aware of children when
operating the windows.
Be aware of passengers and/or other
persons present when closing the
windows using the electronic key or the
"Keyless Entry and Starting" system.
Access
Page 75 of 292

73
Operation
The charger works with the engine running and
in STOP mode of Stop & Start.
Charging is managed by the smartphone.
For versions with Keyless Entry and Starting,
operation of the charger may be interrupted
when opening a door or switching off the
ignition.
Charging
F With the charging area clear, place a device
at its centre.
The system only supports charging one
portable device at a
time.
Once the portable device is detected, the
charge indicator lamp comes on in green. It
stays lit for the whole time that the battery is
being charged. Do not leave any metal objects (coins,
keys, vehicle remote control, etc.) in
the charging area while a
device is
being charged – risk of overheating or
interrupting the charging process!Checking operation
The status of the indicator lamp allows the
operation of the charger to be monitored.
Status of the
indicator lamp Meaning
Off Engine switched off.
No compatible portable
device detected.
Charging finished.
Fixed, green Compatible portable
device detected.
Charging.
Flashing, orange Foreign object detected
in the charging zone.
Portable device not
correctly centred in the
charging zone. Fixed, orange
Fault with the portable
device's battery meter.
Temperature of the
portable device's battery
too high.
Charger fault.
Front armrest
It includes a refrigerated storage space
( depending on version) and is illuminated when
the cover is opened. If the indicator lamp is lit orange:
-
r
emove the portable device, then reposition
it in the middle of the charging zone.
or
-
r
emove the portable device and try again in
a quarter of an hour.
If the problem persists, have the system
checked by a CITROËN dealer or a qualified
workshop.
3
Ease of use and comfort
Page 122 of 292

120
Starting/Switching off the
engine with Keyless Entry
and Starting
The electronic key must be present in the
passenger compartment.
If it is not detected, a message is
displayed.
Move the electronic key so that the engine
can be started or stopped.
If there is still a problem, refer to the "Key
not detected – Back-up starting or Back-
up switch-off " section.
Starting the engine
F Press the " START/STOP" button while
maintaining pressure on the pedal until the
engine starts.
For Diesel engines , when the temperature is
below zero and/or the engine is cold, starting
will only occur once the preheater warning
lamp is off.
F
Y
ou should keep the pedal fully depressed
and not press the " START/STOP" button
again until the engine is running.
If one of the starting conditions is not met, a
message is displayed.
In some circumstances, you are alerted by
a
message that it is necessary to turn the
steering wheel while pressing the " S TA R T/
STOP " button, to help unlock the steering
column.
With petrol engines , after a
cold start,
preheating the catalytic converter can
cause noticeable engine vibrations for
anything up to 2
minutes while stationary
with the engine running (accelerated idle
speed).Switching off the engine
F Immobilise the vehicle, engine at idle.
F W ith a manual gearbox , ideally put the
gear lever into neutral.
F
W
ith an automatic gearbox , ideally select
mode P or N .
F
P
ress the " START/STOP " button.
In some circumstances, it is necessary to turn
the steering wheel to lock the steering column.
On certain versions with the EAT8
automatic
gearbox, the steering column does not lock, but
the gearbox locks in mode P .
If the vehicle is not immobilised, the
engine will not stop.
Never leave your vehicle with the
electronic key still inside.
Switching off the engine leads to a
loss of
braking assistance.
F
W
ith a
manual gearbox , place the gear
lever in neutral and depress the clutch pedal
fully.
or
F
W
ith an automatic gearbox , select mode P
or N and press the brake pedal. If this warning lamp comes on after
pressing the "
START/STOP " button:
Driving
Page 198 of 292
196
Access to the AdBlue® tank
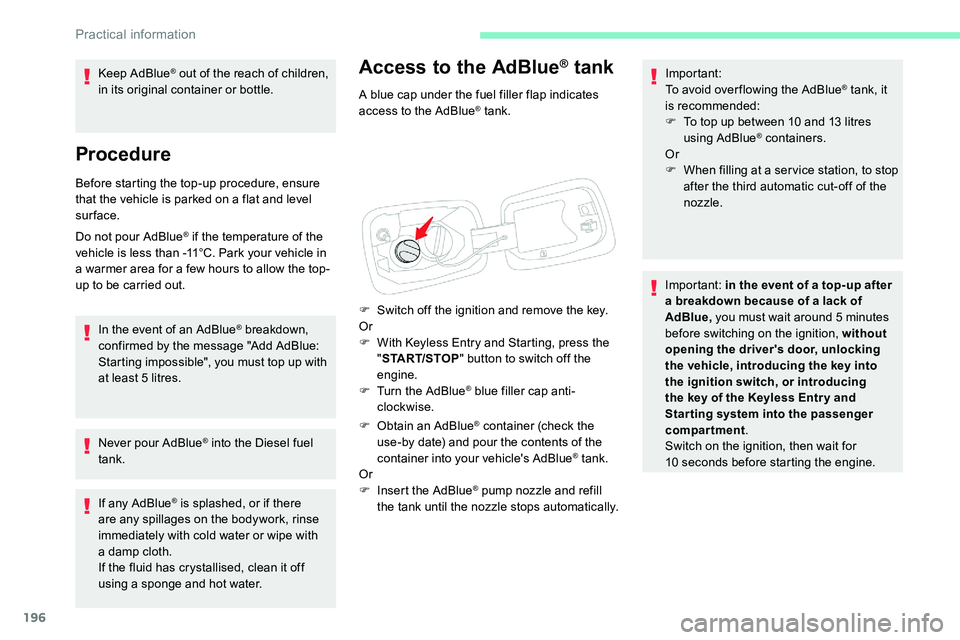
A blue cap under the fuel filler flap indicates
access to the AdBlue® tank.
F
S
witch off the ignition and remove the key.
Or
F
W
ith Keyless Entry and Starting, press the
" START/STOP " button to switch off the
engine.
F
T
urn the AdBlue
® blue filler cap anti-
clockwise.
F
O
btain an AdBlue
® container (check the
use-by date) and pour the contents of the
container into your vehicle's AdBlue
® tank.
Or
F
I
nsert the AdBlue
® pump nozzle and refill
the tank until the nozzle stops automatically. Important:
To avoid over flowing the AdBlue
® tank, it
is recommended:
F
T
o top up between 10
and 13
litres
using AdBlue
® containers.
Or
F
W
hen filling at a ser vice station, to stop
after the third automatic cut-off of the
nozzle.
Important: in the event of a
top-up after
a
breakdown because of a lack of
AdBlue, you must wait around 5
minutes
before switching on the ignition, without
opening the driver's door, unlocking
the vehicle, introducing the key into
the ignition switch, or introducing
the key of the Keyless Entr y and
Star ting system into the passenger
compartment .
Switch on the ignition, then wait for
10
seconds before starting the engine.
Keep AdBlue
® out of the reach of children,
in its original container or bottle.
Procedure
Before starting the top-up procedure, ensure
that the vehicle is parked on a flat and level
sur face.
Do not pour AdBlue
® if the temperature of the
vehicle is less than -11°C. Park your vehicle in
a
warmer area for a
few hours to allow the top-
up to be carried out.
In the event of an AdBlue
® breakdown,
confirmed by the message "Add AdBlue:
Starting impossible", you must top up with
at least 5
litres.
Never pour AdBlue
® into the Diesel fuel
tank.
If any AdBlue
® is splashed, or if there
are any spillages on the bodywork, rinse
immediately with cold water or wipe with
a
damp cloth.
If the fluid has crystallised, clean it off
using a
sponge and hot water.
Practical information
Page 285 of 292
227
Jack .........................................198 -19 9, 203, 23
Jump starting ................................................ 216J
KKey ...................................................... 35, 40 - 42
Keyless Entry and Starting ................3
7- 41, 120
Key not recognised
....................................... 12
1
Key with remote control
....................3
5 - 3 6 , 11 8
Key, electronic
............................................37- 3 9
Kit, hands-free
.................................... 12
, 24 -25
Kit, temporary puncture repair
...... 1
98-200, 202Load reduction mode
....................................
18 6
Load space cover ............................................
76
Locating your vehicle
......................................
37
Locking
...............................
.......................
3 9 - 41
Locking from the inside ...................................
41
Locking the doors ........................................... 41
L ow fuel level ................................................18
0
Lumbar
............................................................55
LLabels, identification ..................................... 221
Lamps, front .................................................. 19 4
Lamps, parking
............................................... 81
Lamps, rear
........................................... 19 4, 210
Lamp, boot
.............................................. 78, 212
Lane departure warning system, active ...17, 1 6 1Lane Keeping Assist, Active ... 147, 151-15 3, 15 6
Leather (care)
................................................ 19 4
LEDs – Light-emitting diodes ...81, 207, 209 -211
Levels and checks
.............................. ...18 9 -191
Level, AdBlue
® .............................................. 19 2
Level, brake fluid ........................................... 191
Level, Diesel additive
............................. 191-192
Level, engine coolant
.............................. 2 7, 1 9 1
Level, engine oil
...................................... 2 7, 1 9 0
Level, screenwash fluid
.......................... 87
, 191
Light-emitting diodes – LEDs ...81, 207, 209 -211
Lighting dimmer
.............................................. 30
Lighting, cornering
.......................................... 85
Lighting, directional
......................................... 85
Lighting, guide-me home
.......................... 3 7, 8 2
Lighting, interior
...............................
............... 75
Lighting, ambience
.......................................... 75
Lighting, welcome
........................................... 82
Loading
................................................... 77, 187
MMaintenance (advice) ....................................19 4
Maintenance, routine ............................1 3 7, 1 9 2
Manoeuvring aids (recommendations)
.........13 5
Map reading lamps
......................................... 75
M
arkings, identification
.................................221
Massage function
..................................... 57- 5 8
Massage, multi-point
................................57- 5 8
Mat
.......................................................... 74 , 13 7
Memorising a
speed
..................................... 14
6
Menu
............................................................... 11
Menu short cuts
.............................................. 33
M
enus (audio)
........................................3-4, 3-4
Menu, main
..................................................... 33
M
essages
........................................................ 27
Messages, quick
............................................. 2
7
Mirrors, door ......................... 58 - 59, 68, 16 4 -166
Mirror, rear view
........................................ 59-60
Mirror, vanity
................................................... 71
Misfuel prevention
......................................... 18 0
Motorised tailgate
..................................... 4
5 - 47
Mountings, ISOFIX
....................................... 111
NNet, high load retaining ...................................77
Number plate lamps ...................................... 2 11
OObstacle detection ........................................ 167
Oil change ..................................................... 19
0
Oil consumption
............................................ 19 0
Oil, engine
..................................................... 19 0
On-board tools
................................ 78, 198 -19 9
Opening the bonnet
...................................... 188
Opening the boot
................................ 38, 44- 45
Opening the doors
.................................... 38, 44
Opening the fuel filler flap
.............................18 0
Opening the windows
..................................... 36
PPads, brake ................................................... 193
Paint .............................................................. 221
Paint colour code
.......................................... 221
Park Assist
...............................
......173 -174, 176
Parking brake, electric
.................. 1
3, 18, 21-22,
121-124, 193
Parking sensors, audible and visual
.............167
Parking sensors, front
...................................167
Parking sensors, rear .................................... 167
Personalisation
............................................ 9 -10
Plates, identification ...................................... 221
Player, Apple
® ............................................. 9 , 23
Player, MP3
CD ............................... ................23
Player, USB
................................................. 8, 22
Power steering
...............................
.................23
Pre-heater, Diesel
........................................... 19
Pressures, tyres
.................................... 193, 202
Pre-tensioning seat belts
.............................. 10 0
Priming the fuel system
......................... 197-198
Profiles
...................................................... 14, 28
Programmable cruise control
.......................14 4
Programmable speed limiter .........................142
Protecting children
...101-102, 104 -107, 110 -114
Puncture
................................. 199-200, 202-203
.
Alphabetical index